DIY: Installing a new Changeover/Heater Control Valve

 06-30-2008, 12:10 AM
#1
MBWorld Fanatic!
Thread Starter
Join Date: Feb 2004
Location: San Diego
Posts: 1,783
Likes: 0
Received 17 Likes
on
3 Posts
2004 E320
Okay, last weekend was frickin hot in So-Cali reaching 90+ and that’s when I first started to experience extremely hot air blowing out from the rear vents (B-pillar and from center console). My front a/c vents were working fine, but the hot air being blown to the rear passenger area was unbearable. I remember seeing several threads of people experiencing the same problem and since my car is no longer under warranty, I decided to tackle the job myself. Thanks to Konigstiger, found the culprit to be with the changeover valve. https://mbworld.org/forums/showpost....49&postcount=2
So here I go, on with another DIY.
Tools required:
Flatnose screwdriver
Needle nose pliers
An extended angle needle nose pliers
Ratchet
13MM socket
T25 Torx wrench or screwdriver
Wire coat hanger
Parts needed:
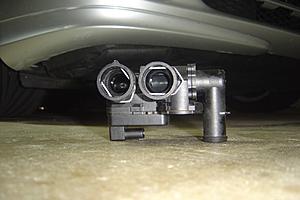
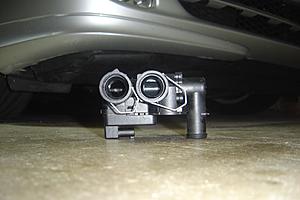
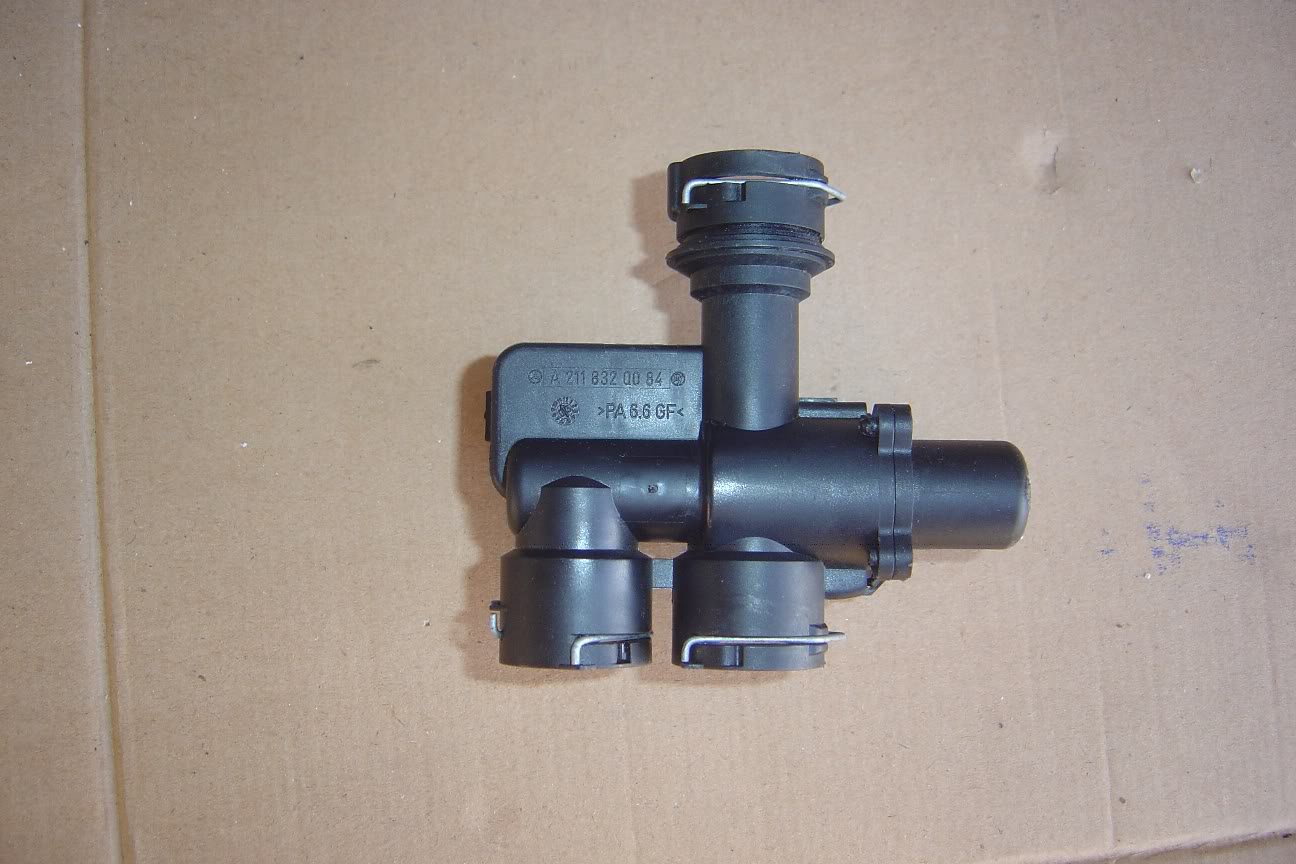
New changeover valve (part #A211 832 05 84). This is probably a revised valve w/ a new design since my faulty valve has the part #A211 832 00 84.
Here is what the changeover valve looks like. (old valve unit)


1st, remove the outer weather-stripping
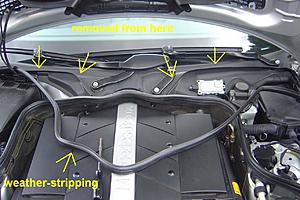
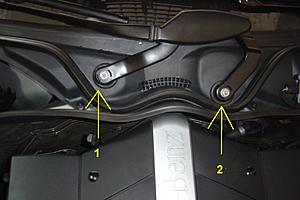
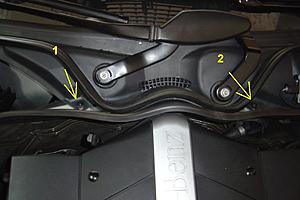
2nd, you’ll need to remove both wiper arm assembly with a ratchet and a 13mm socket. Here are the 3 nuts you’ll need to remove.

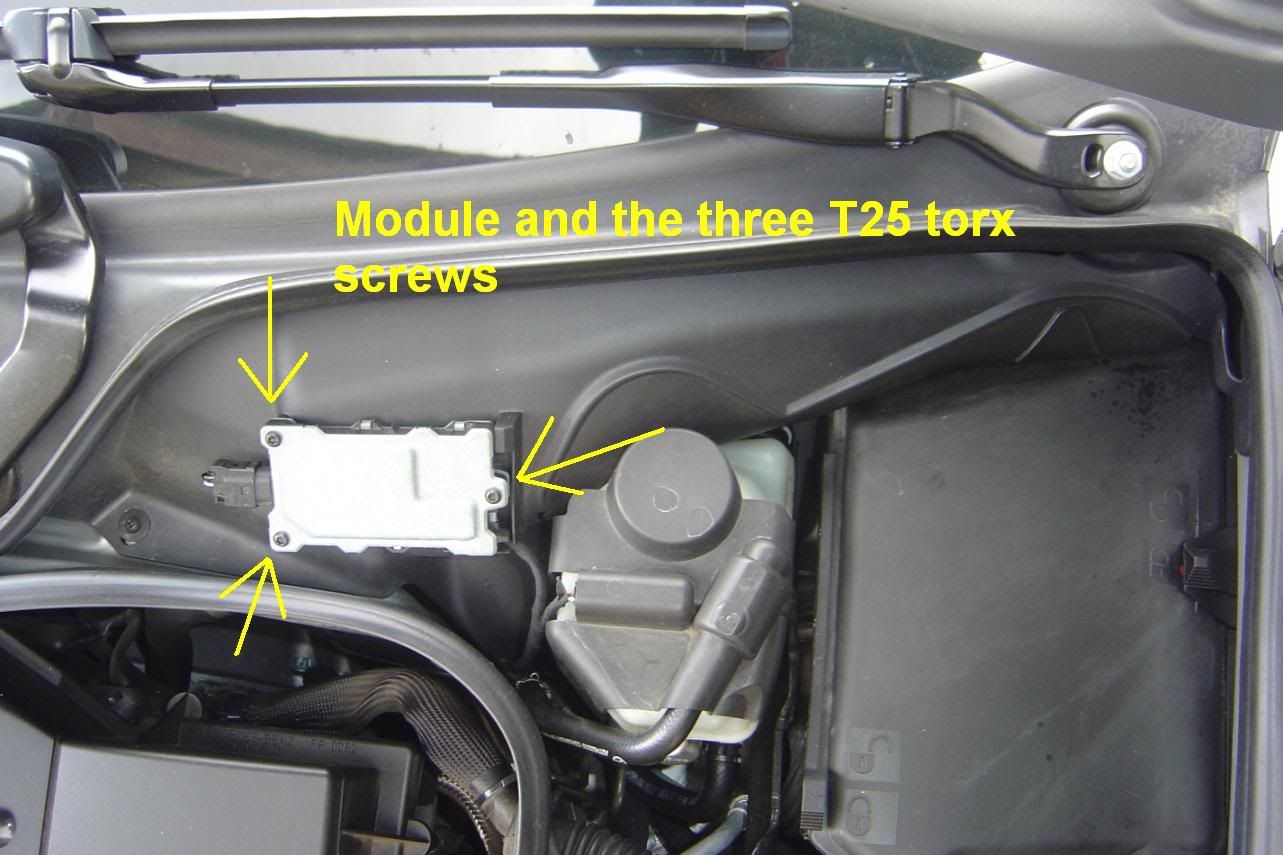
Next remove this module on the driver’s side. I’m not sure what it exactly does, but you’ll need to unscrew it from the plastic trim panel. Using the T25 Torx screwdriver or wrench, remove the 3 screws and set the module aside. You don’t even need to disconnect it.
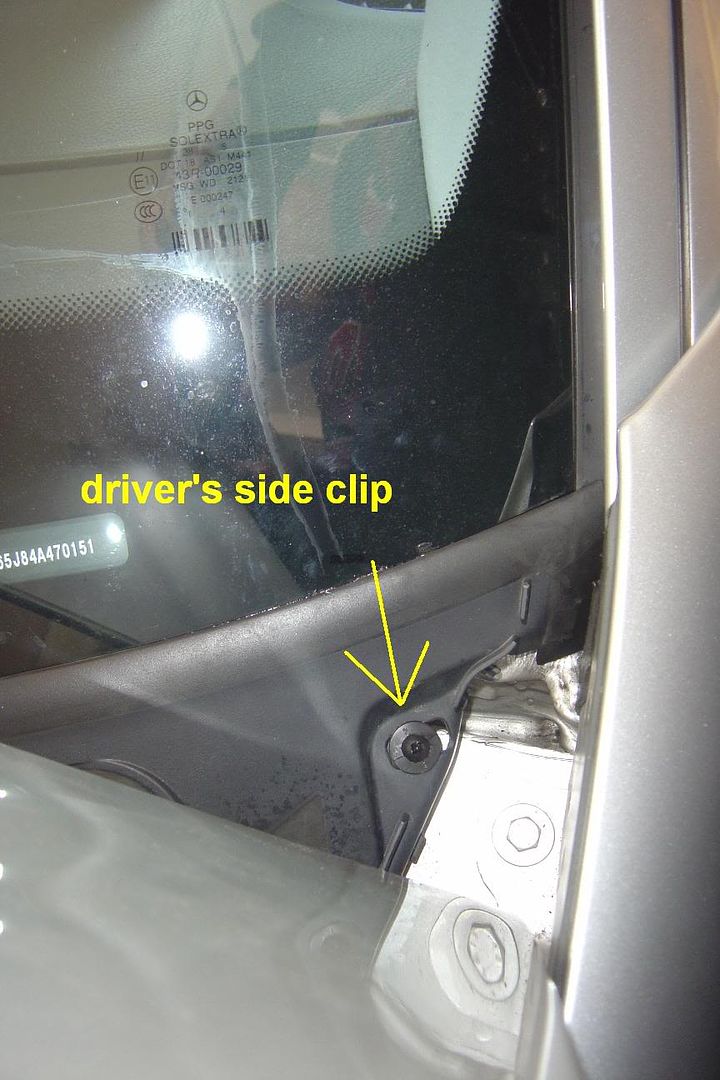
Now you’ll need to remove plastic trim panel that sits at the bottom of the windshield. It is secured down with 4 plastic clips. (they look like philip plastic screws). To remove these clips you gently slide a thin flathead screwdriver under the head of the clip and pry it up high enough so that you could use the needle nose pliers to pull on the shaft. Do not remove the shaft, just pull it out Ľ of an inch or less then remove the clip.
Location of plastic clips

Prying the shaft
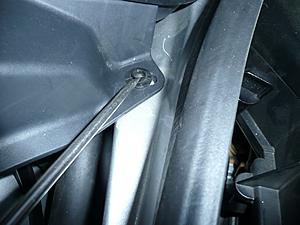
Shaft extended out

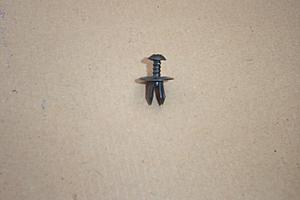
Clip finally removed
At the bottom of the plastic trim panel is a big rubber hose that you’ll need to disconnect. On the passenger side, you’ll need to unhook the 2 electrical wires from the hanger. Now you could remove the plastic trim panel.
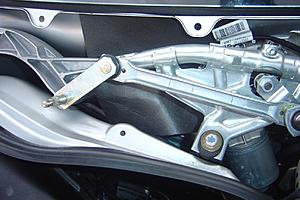
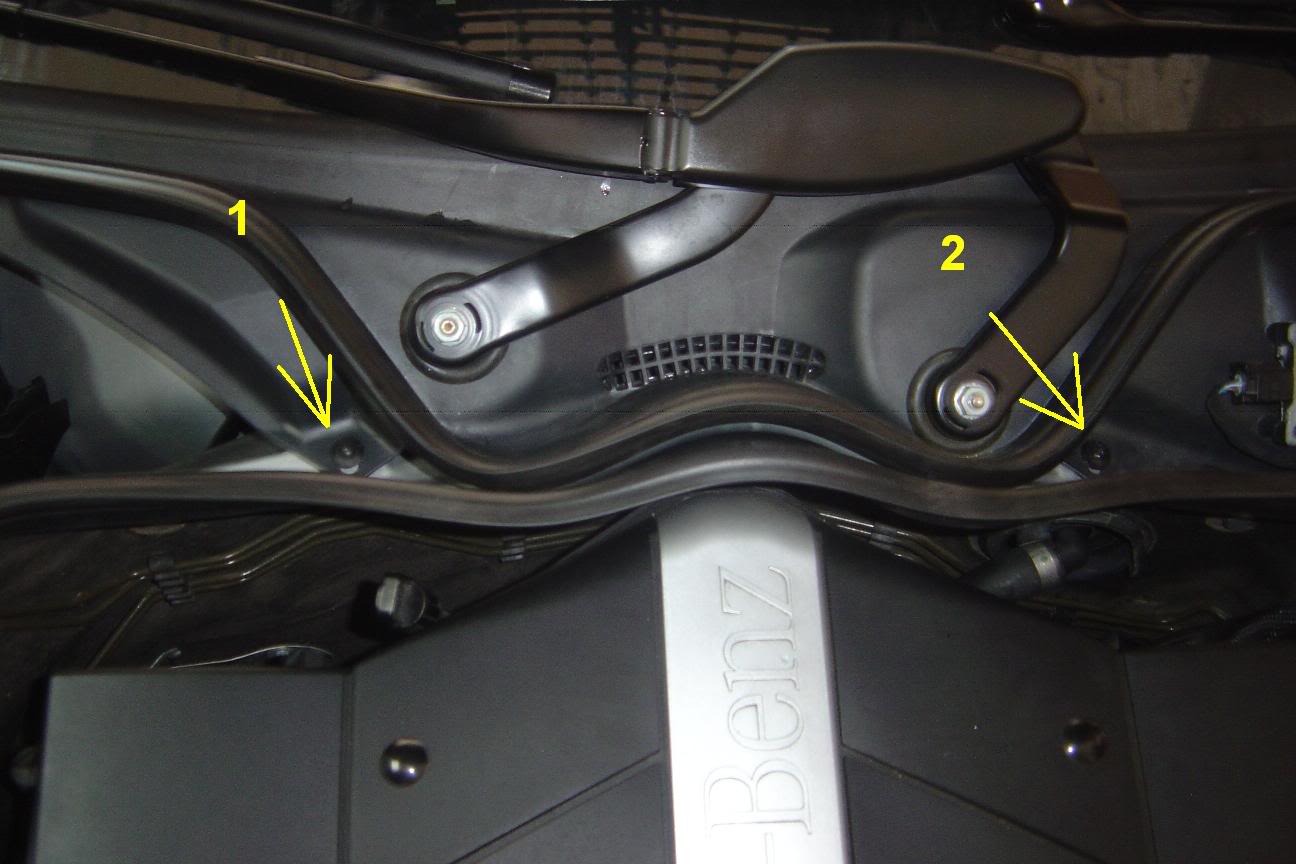
When you remove the plastic trim, you’ll see more wiper arm linkages as seen in the pic.
The changeover valve is covered with this thin foam padding. Just unfold it and tuck it under the wiper linkages. Next, you’ll need to reposition the linkages so you that you could access the valve. Gently push on the linkages until you have enough room. Now you’ll see the changover valve nested on the driver’s side firewall. If you have big hands like myself, you’ll be in a world of hate because it’s a tight squeeze!!
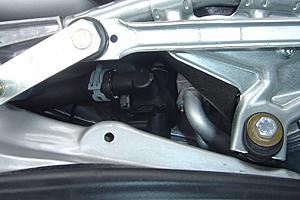
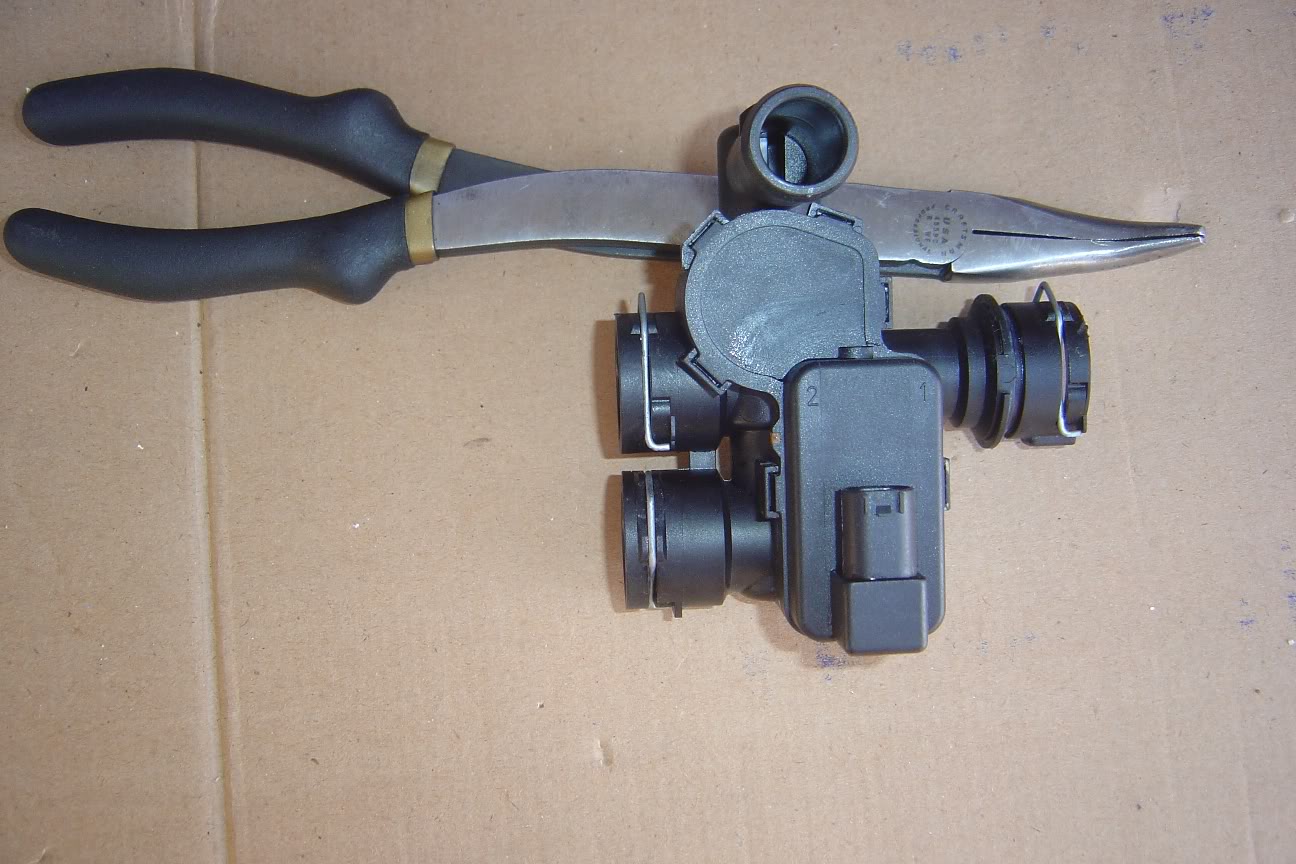
The valve has a total of 4 openings, 3 of which have a built in clip/lock and there is one socket for an electrical connector. In order to install or remove the tube/hose, you’ll need to unlock these locks by pulling on the clip outward.
Clips in locked position
Clips in unlocked position
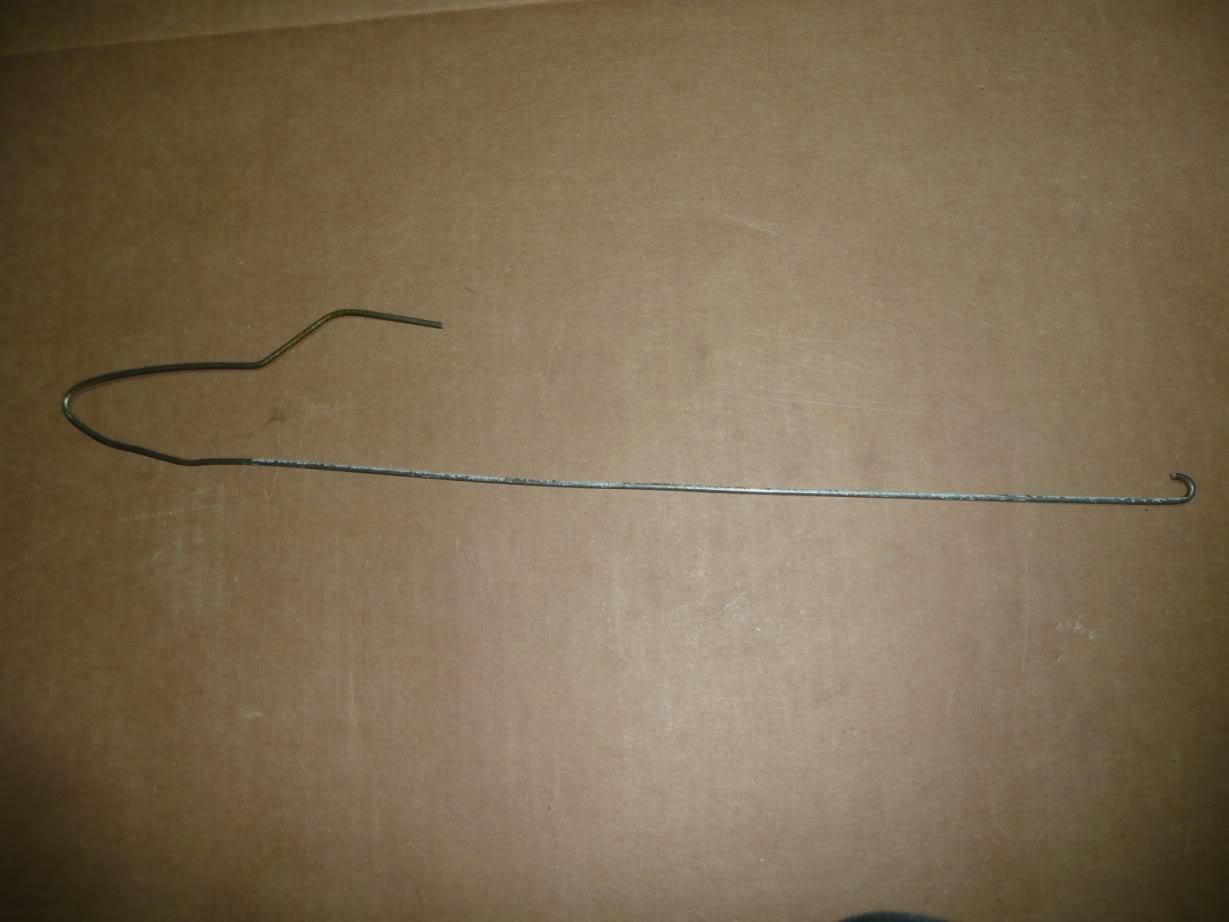
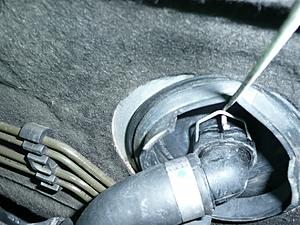
Since the valve is located in an extremely tight area, this is where a wire coat hanger will come in handy. Cut up a hanger then at the end, make a small hook. You’ll use this to unlock the clips. One of the locking clips is accessible between the engine and partition.
Coat hanger
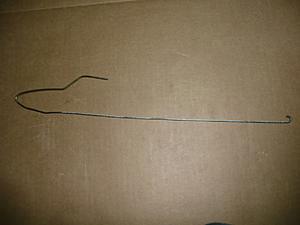
Unlock clip with coat hanger

Hose removed: (small amount of coolant will leak out)
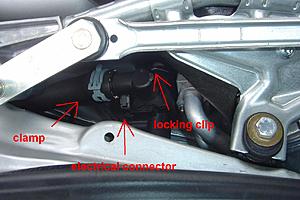
The 4th opening is connected to a hose that has a clamp. Use your angled needle nose pliers to remove this clamp and hose, then disconnect the electrical connector. The 2 locking clips are up against the firewall. From the driver’s side, use your coat hanger again to unlock the top clip. Now from the passenger’s side, use your coat hanger to unlock the bottom clip.
Now with everything disconnected, remove the valve body unit and install the new one in reverse order. Make sure you lock them clips! Reposition the wiper linkages back to their normal state and flip the foam padding back over the valve. Reinstall plastic trim, electronic module, weather-stripping and wiper arms. Now enjoy your a/c!
So here I go, on with another DIY.
Tools required:
Flatnose screwdriver
Needle nose pliers
An extended angle needle nose pliers
Ratchet
13MM socket
T25 Torx wrench or screwdriver
Wire coat hanger
Parts needed:
New changeover valve (part #A211 832 05 84). This is probably a revised valve w/ a new design since my faulty valve has the part #A211 832 00 84.
Here is what the changeover valve looks like. (old valve unit)
1st, remove the outer weather-stripping
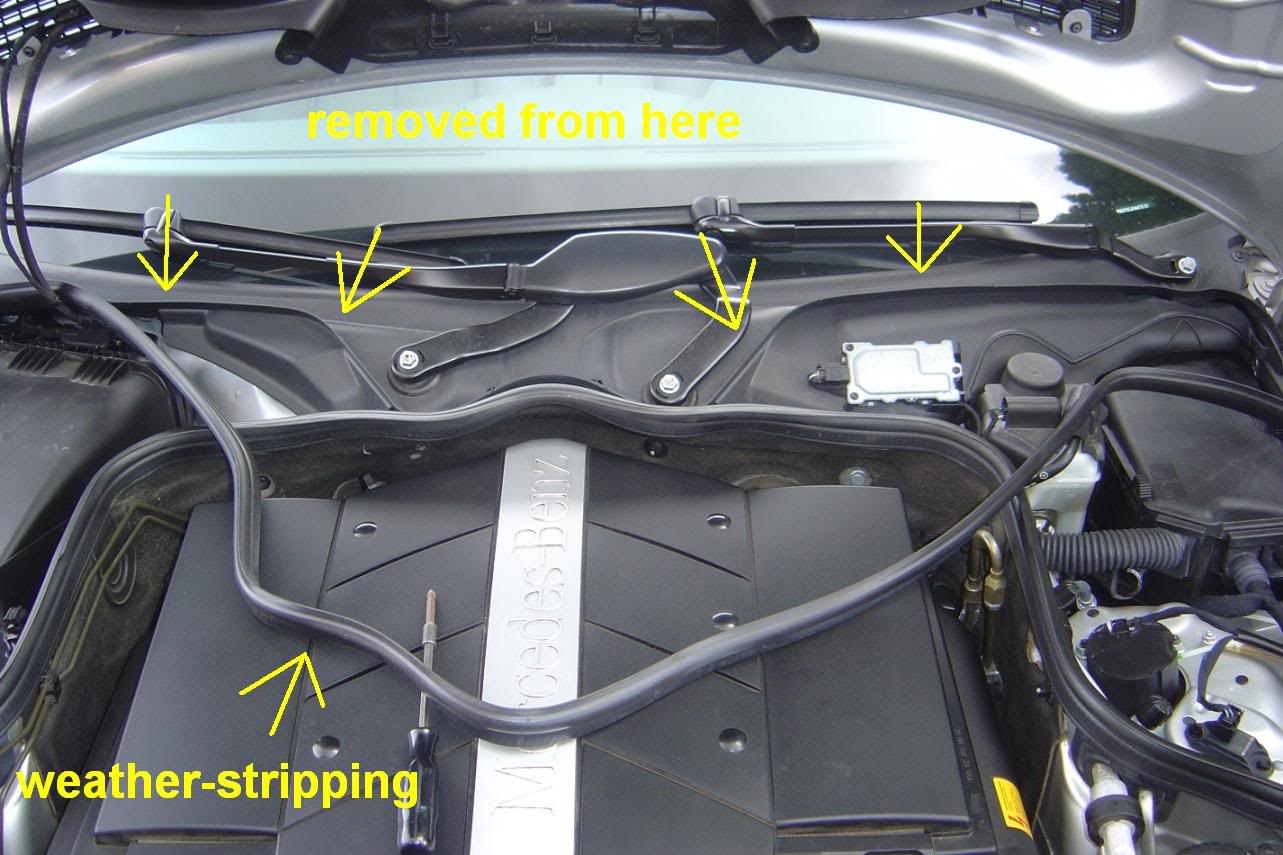
2nd, you’ll need to remove both wiper arm assembly with a ratchet and a 13mm socket. Here are the 3 nuts you’ll need to remove.

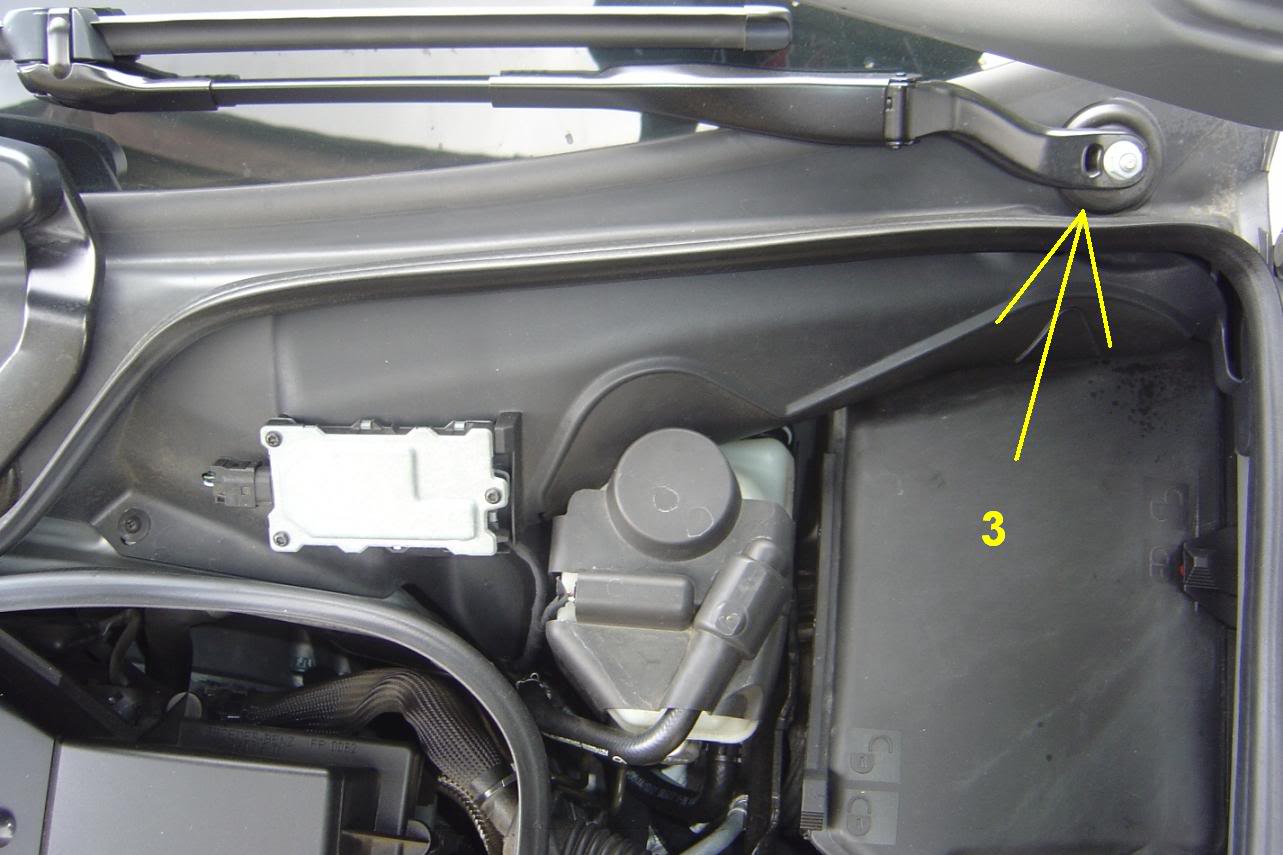
Next remove this module on the driver’s side. I’m not sure what it exactly does, but you’ll need to unscrew it from the plastic trim panel. Using the T25 Torx screwdriver or wrench, remove the 3 screws and set the module aside. You don’t even need to disconnect it.
Now you’ll need to remove plastic trim panel that sits at the bottom of the windshield. It is secured down with 4 plastic clips. (they look like philip plastic screws). To remove these clips you gently slide a thin flathead screwdriver under the head of the clip and pry it up high enough so that you could use the needle nose pliers to pull on the shaft. Do not remove the shaft, just pull it out Ľ of an inch or less then remove the clip.
Location of plastic clips
Prying the shaft

Shaft extended out
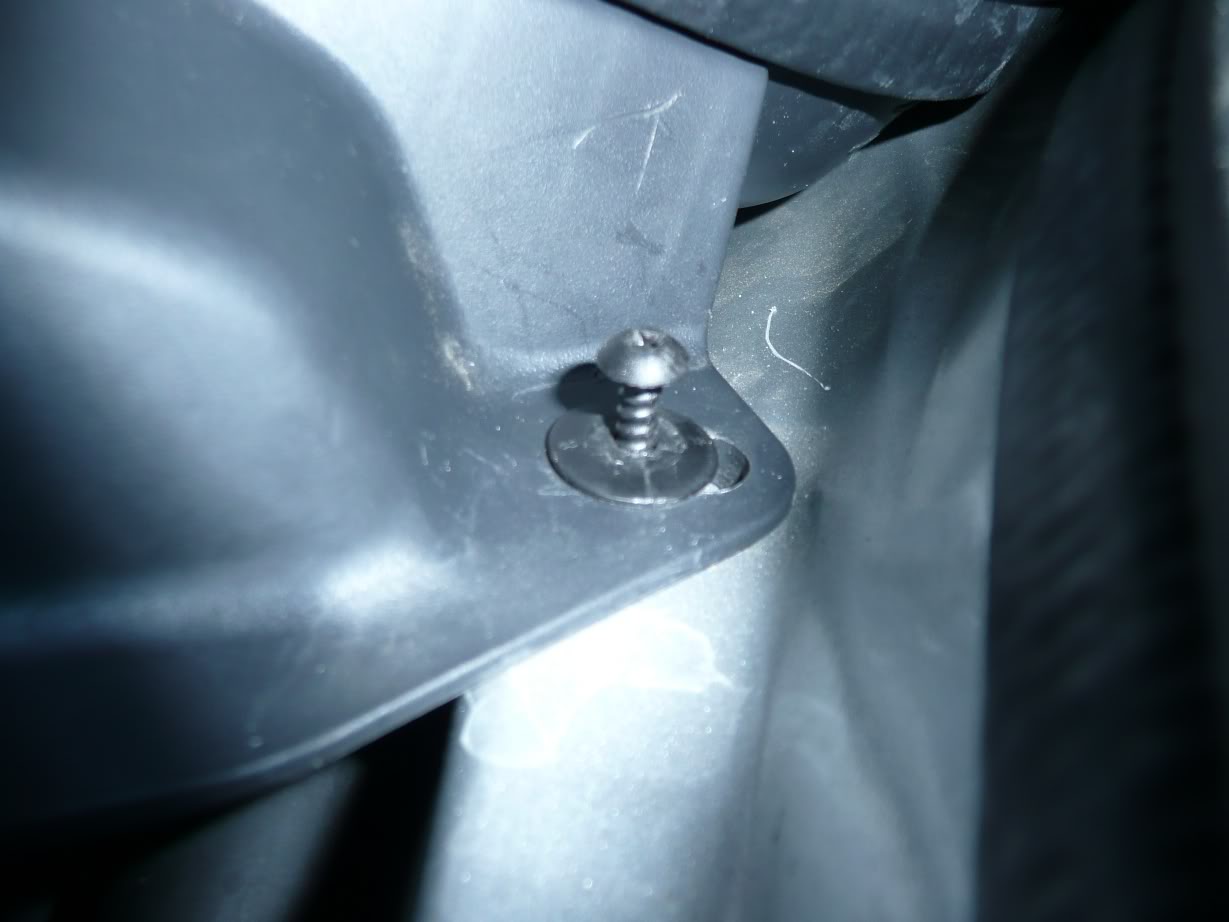
Clip finally removed

At the bottom of the plastic trim panel is a big rubber hose that you’ll need to disconnect. On the passenger side, you’ll need to unhook the 2 electrical wires from the hanger. Now you could remove the plastic trim panel.
When you remove the plastic trim, you’ll see more wiper arm linkages as seen in the pic.
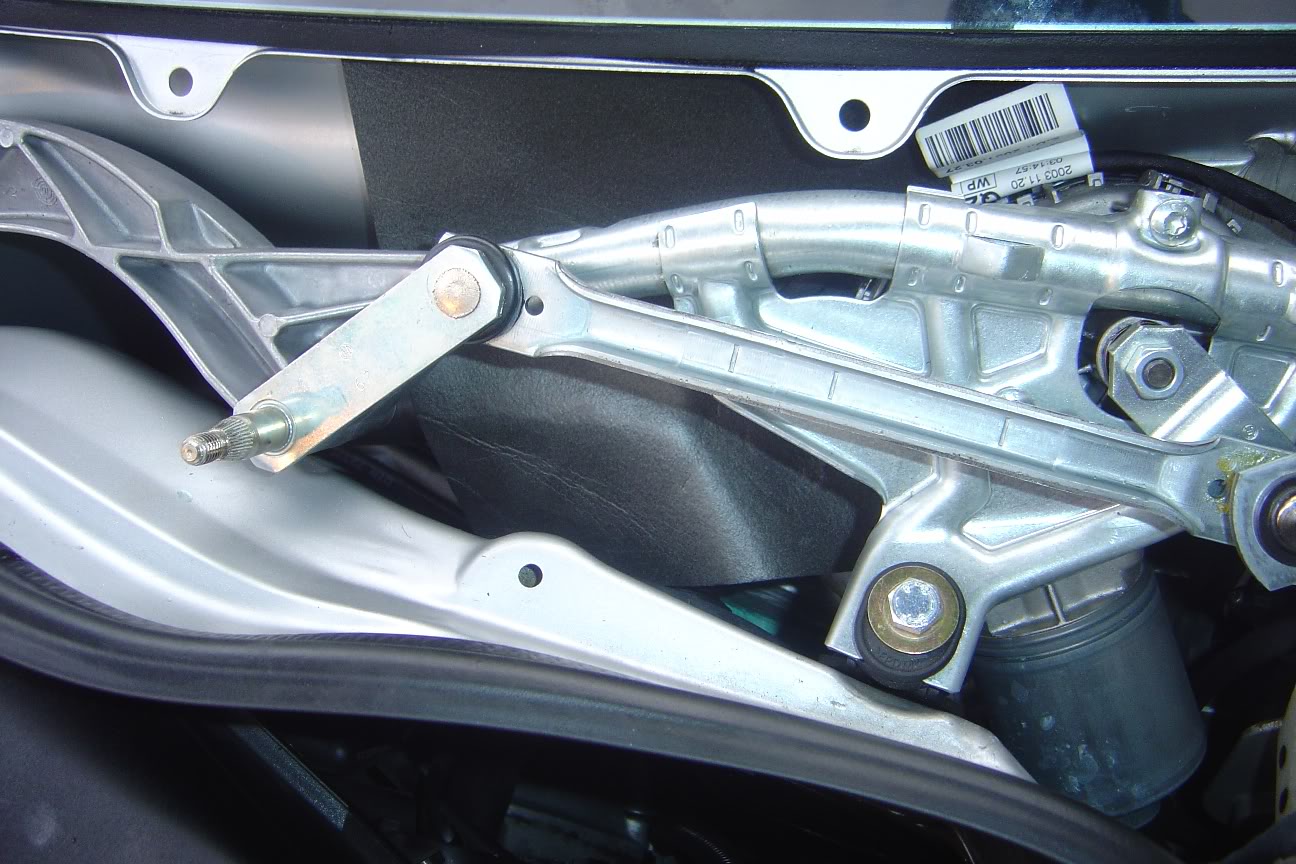
The changeover valve is covered with this thin foam padding. Just unfold it and tuck it under the wiper linkages. Next, you’ll need to reposition the linkages so you that you could access the valve. Gently push on the linkages until you have enough room. Now you’ll see the changover valve nested on the driver’s side firewall. If you have big hands like myself, you’ll be in a world of hate because it’s a tight squeeze!!
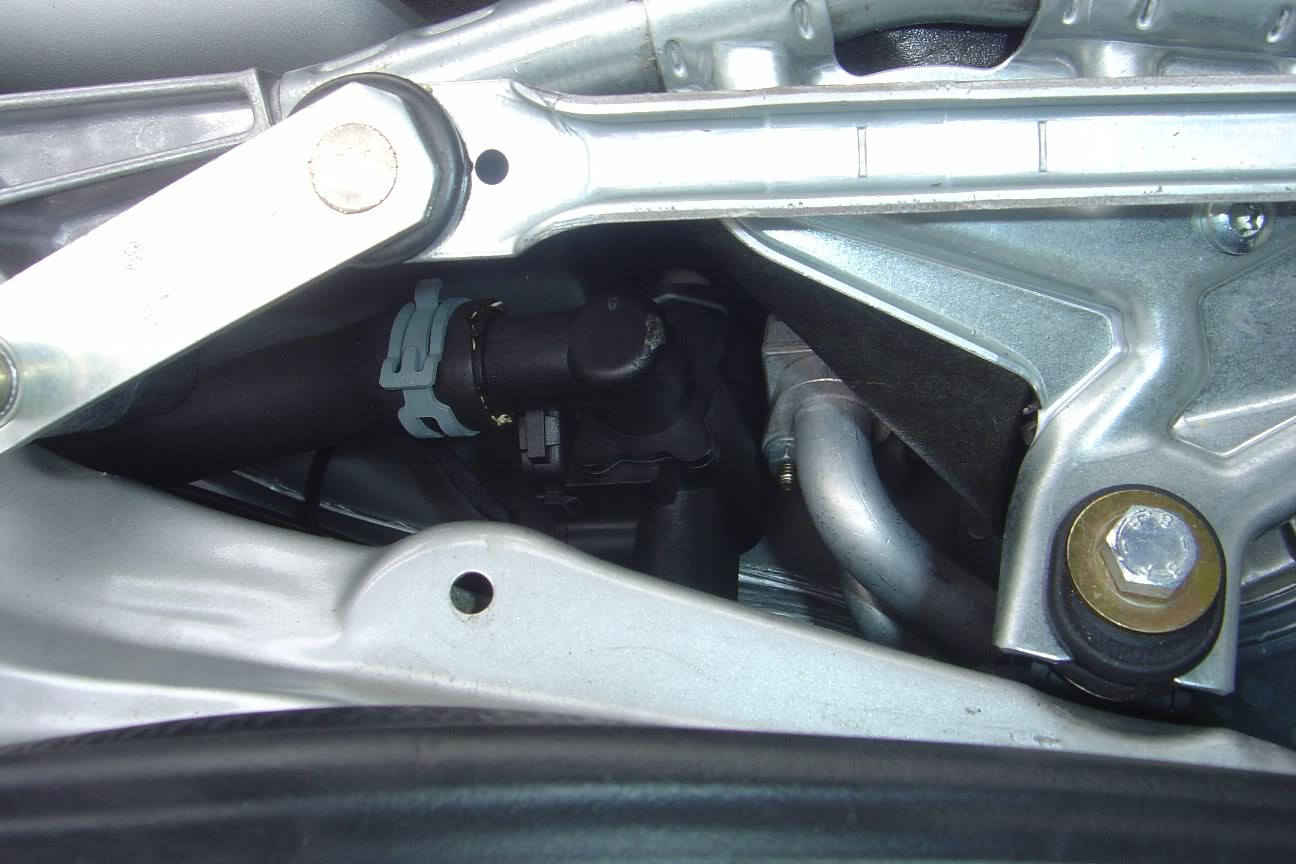
The valve has a total of 4 openings, 3 of which have a built in clip/lock and there is one socket for an electrical connector. In order to install or remove the tube/hose, you’ll need to unlock these locks by pulling on the clip outward.
Clips in locked position

Clips in unlocked position

Since the valve is located in an extremely tight area, this is where a wire coat hanger will come in handy. Cut up a hanger then at the end, make a small hook. You’ll use this to unlock the clips. One of the locking clips is accessible between the engine and partition.
Coat hanger
Unlock clip with coat hanger
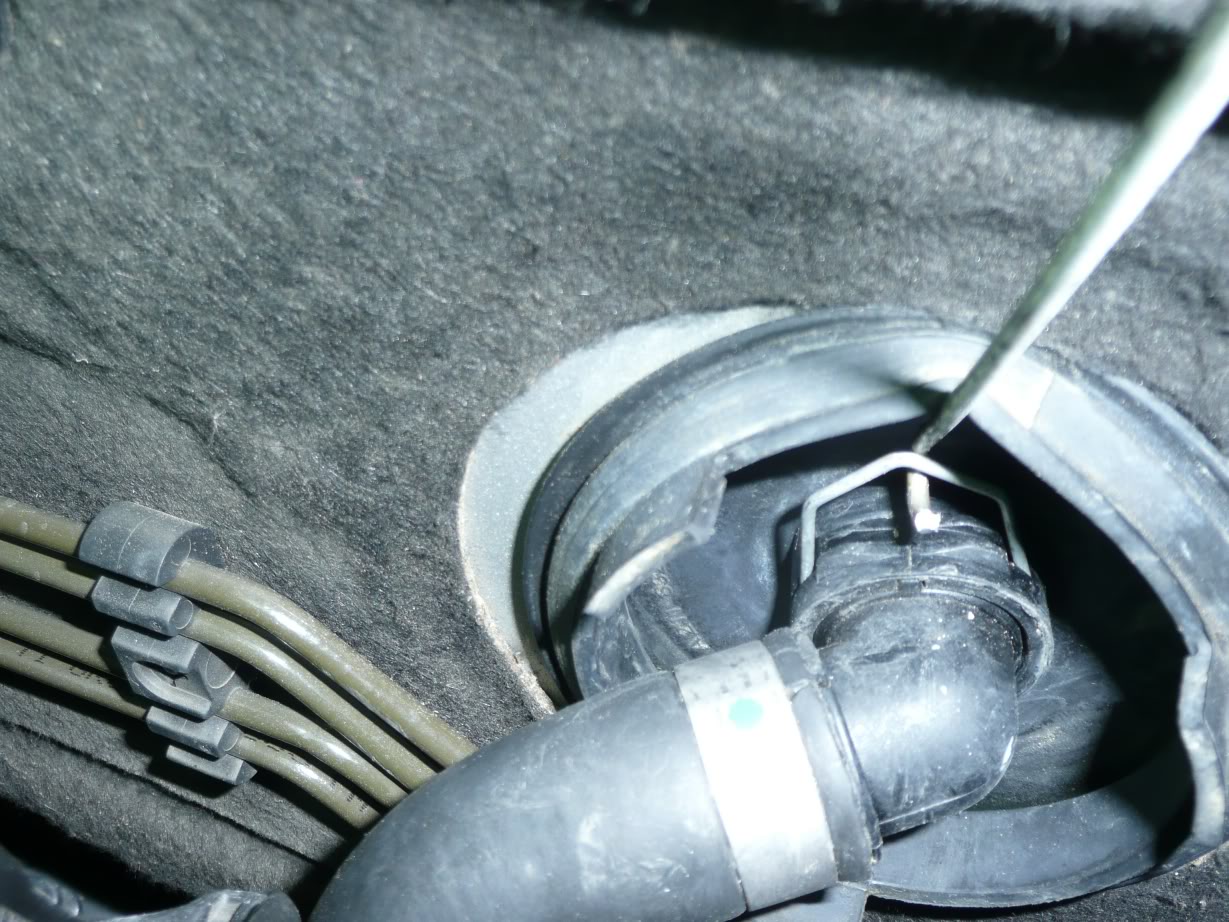
Hose removed: (small amount of coolant will leak out)

The 4th opening is connected to a hose that has a clamp. Use your angled needle nose pliers to remove this clamp and hose, then disconnect the electrical connector. The 2 locking clips are up against the firewall. From the driver’s side, use your coat hanger again to unlock the top clip. Now from the passenger’s side, use your coat hanger to unlock the bottom clip.

Now with everything disconnected, remove the valve body unit and install the new one in reverse order. Make sure you lock them clips! Reposition the wiper linkages back to their normal state and flip the foam padding back over the valve. Reinstall plastic trim, electronic module, weather-stripping and wiper arms. Now enjoy your a/c!
Last edited by W211 Ryda; 06-30-2008 at 12:25 AM.

The following 14 users liked this post by W211 Ryda:
Ahmet Jumayev (12-24-2017),
blueleo619 (08-17-2022),
CaliBenzDriver (04-06-2022),
chuang (12-15-2022),
donnymize (09-10-2017),
and 9 others liked this post.
06-30-2008, 12:31 AM
#2
Super Member
Join Date: May 2006
Location: San Diego, CA
Posts: 511
Likes: 0
Received 1 Like
on
1 Post
2007 A8L 4.2
Excellent writeup, when I did mine the hanger idea took me a while to come up with, but that is basically the only way to remove the old valve.
One thing though, I did not unlock the NEW valve's clips, I left them in the locked position, and when you install the hoses, they just snap right into place.
Cheers.
One thing though, I did not unlock the NEW valve's clips, I left them in the locked position, and when you install the hoses, they just snap right into place.
Cheers.
09-10-2008, 01:03 PM
#3
Super Member
Join Date: Nov 2007
Location: NY
Posts: 612
Likes: 0
Received 2 Likes
on
2 Posts
'12 Mustang 5.0, '89 Supra Turbo, C55,
Excellent write-up. Thanks! It would be great to see more of these DIY projects with such pics and detail. (I plan on it myself when its time). Thank you again.
The following users liked this post:
chuang (12-15-2022)
 09-11-2008, 11:17 AM
#6

I am impressed. Not only that you took on the job but also you were kind enough to document the whole procedure with really helpful pictures and tips. I have so little patience that my DIY projects have been much less organized and somewhat amateurish. That bit of information that you have archived is probably worth four or five hundred dollars at the dealer. I could not imagine taking that on without some guidance. The part is buried pretty deep. Once again, let me offer my thanks. This kind of information is much more valuable to me than chatter about wheels and exhaust finishers, and I don't even own a vehicle that has that type of control.
The following users liked this post:
TJ Bell (01-11-2021)
09-27-2008, 05:26 PM
#7
Newbie

Join Date: Feb 2003
Location: Northern Virginia
Posts: 20
Likes: 0
Received 6 Likes
on
2 Posts
2004 E500 4matic Wagon
I just did this job - detailed comments...
The part was $42 with MB club discount. The dealer wanted $450 to do this job, so it's well worth the DIY.
Allow about 2-3 hours for this job. In another thread someone claims it only took 35 minutes, but I don't know how that's possible, even for a pro.
I have very small hands and it was very hard to reach things - if you have very large hands you may not be able to get this done by yourself.
--Open the hood to the fully open service position (push in the tab on the interior side of the hinge, one on each side of the car)
I had a very hard time prying the 4 black plastic rivets out, I ended up destroying them so I need to buy new ones (you can live without them for a few days).
The metal clips: pulling them with the coat hanger worked easily for one of them, but the other two I had to pry the end free with my finger to get it started which raised up one side a bit, them pull with the hanger.
The one facing towards the passenger side was not visible until I climbed up onto the car and stuck my face right down in the area.
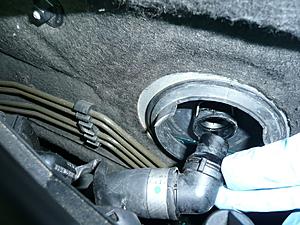
After removing the first hose from the engine bay, fully remove the circle rubber grommet between the engine bay and the firewall area - this lets you reach in through the hole to maneuver the part.
The hose clamp is the hardest part - it takes a lot of force to fully open it, so needle nose pliers didn't work very well. Use a small locking pliers and grab it vertically from straight down. Do this after unclipping the 3 metal clips to the other hoses, as you can them move the part around to get it in position.
I moved the hose clamp back a few inches then removed the pliers - you need the space to reach in to pull the hose off. One technique is to hold the part in place by reaching through the circle hole.
I undid the electrical connector last as it was hard to get to otherwise.
When installing the new valve:
-electrical plug first
-large hose with hose clamp next (you need to be able to brace it against the driver's side of the car, against a tool handle etc).
-the two outlets towards the rear of the car next (leave the clips closed and just push them as mentioned about - it did take a lot of force to get them to click into place)
-reinstall rubber circular grommet
-engine bay hose
Allow about 2-3 hours for this job. In another thread someone claims it only took 35 minutes, but I don't know how that's possible, even for a pro.
I have very small hands and it was very hard to reach things - if you have very large hands you may not be able to get this done by yourself.
--Open the hood to the fully open service position (push in the tab on the interior side of the hinge, one on each side of the car)
I had a very hard time prying the 4 black plastic rivets out, I ended up destroying them so I need to buy new ones (you can live without them for a few days).
The metal clips: pulling them with the coat hanger worked easily for one of them, but the other two I had to pry the end free with my finger to get it started which raised up one side a bit, them pull with the hanger.
The one facing towards the passenger side was not visible until I climbed up onto the car and stuck my face right down in the area.
After removing the first hose from the engine bay, fully remove the circle rubber grommet between the engine bay and the firewall area - this lets you reach in through the hole to maneuver the part.
The hose clamp is the hardest part - it takes a lot of force to fully open it, so needle nose pliers didn't work very well. Use a small locking pliers and grab it vertically from straight down. Do this after unclipping the 3 metal clips to the other hoses, as you can them move the part around to get it in position.
I moved the hose clamp back a few inches then removed the pliers - you need the space to reach in to pull the hose off. One technique is to hold the part in place by reaching through the circle hole.
I undid the electrical connector last as it was hard to get to otherwise.
When installing the new valve:
-electrical plug first
-large hose with hose clamp next (you need to be able to brace it against the driver's side of the car, against a tool handle etc).
-the two outlets towards the rear of the car next (leave the clips closed and just push them as mentioned about - it did take a lot of force to get them to click into place)
-reinstall rubber circular grommet
-engine bay hose
The following users liked this post:
Carlos reis (08-07-2023)
Trending Topics
 11-12-2008, 06:50 PM
#12

First off all thank you very much Ryda for such detail instruction .
I follow each step on my E-320 2003. Except i follow little bit further and remove whole wiper assemble. It took 30 seconds,you unscrew 3 bolts and disconnect wire from motor, take away whole part and you have plenty of room to work on the valve.It is clearly visible and easy accessible.
Thank you also for coat hanger tool it just so simple to use on those clips.
All work took me 45 minutes to complete.
I check for leakage before i install everything back.
This is my first time on the forum and it very helpfull
The following users liked this post:
TJ Bell (04-26-2023)
04-01-2009, 11:46 PM
#13
Super Member

would this be the reason why if I turned on the fan only with the A/C off I get hot air coming out off my vents?
04-06-2009, 07:16 AM
#14
Yes!that is your problem.If you handy with tools you can fix this in 45 minutes.part in the dealer around 60$.
Ryda gave very good step by step instruction so follow it,but do one more step take of windshield viper assemble it only tree nuts to unscrew.By doing this you will have unobstructed access to the valve which make job 100% easier and quicker.
Good luck.
Ryda gave very good step by step instruction so follow it,but do one more step take of windshield viper assemble it only tree nuts to unscrew.By doing this you will have unobstructed access to the valve which make job 100% easier and quicker.
Good luck.
The following users liked this post:
Furious550 (03-13-2022)
04-10-2009, 06:06 PM
#15
Super Member
I just did this in less than an hour, removing the entire wiper motor assembly makes the job easier and faster.
Didn't realised that I was gonna get water pouring out of this unit once disconnected. Freaked me out.
Didn't realised that I was gonna get water pouring out of this unit once disconnected. Freaked me out.
06-12-2009, 08:16 PM
#16
Senior Member

I got the same fault. 2003 E320, on the way home rear fans started blowing 1000F heat! It happened to be a 98F day, and was hot as an oven in my car, even with the rear set to 'LO' the front fans could not keep cabin cool.
Took me about 90 mins to change it out, ~$60 parts from stealer. I went ahead and got a few extra plastic clips, as previous posts stated, they break easy. Hardest part if definitely the top hose with the clamp. Once you get that your home free. Hanger trick was right on the money.
Also, you might want to wait a while so your engine can cool, once you pull the front clamp off, the coolant is very hot, and will go everywhere. im glad i was wearing gloves. I was fighting the remaining daylight.
Thanks again to this forum, once again it saved my $$$$ again!
JM
Took me about 90 mins to change it out, ~$60 parts from stealer. I went ahead and got a few extra plastic clips, as previous posts stated, they break easy. Hardest part if definitely the top hose with the clamp. Once you get that your home free. Hanger trick was right on the money.
Also, you might want to wait a while so your engine can cool, once you pull the front clamp off, the coolant is very hot, and will go everywhere. im glad i was wearing gloves.
I was fighting the remaining daylight.Thanks again to this forum, once again it saved my $$$$ again!
JM
06-19-2009, 03:50 AM
#17
Newbie

I would like to get the most expensive X model when it ships in July but I am wondering if it will fit in my 2004 E320 wagon (W211)? My wagon currently does not have a phone or Nav system and I am constantly reminded of that on my dash board every time I start my car! I am wondering if I will get that warning once I install the Pioneer unit if it will fit?
07-15-2009, 06:04 PM
#18
MBWorld Fanatic!
Thanks for the write up. So my issues on my car is that when the AC is set to say 66 in the front. The passenger will blow correct, but the drivers side just blows air and never gets cold just feels like the same temp as outside - most noticeable when it is hot outside. Will this valvle fix my problem?
07-15-2009, 07:10 PM
#19
Out Of Control!!
Join Date: Jul 2003
Location: North Scottsdale, AZ
Posts: 15,903
Received 4,411 Likes
on
3,144 Posts
'71 Pinto
Thanks for the write up. So my issues on my car is that when the AC is set to say 66 in the front. The passenger will blow correct, but the drivers side just blows air and never gets cold just feels like the same temp as outside - most noticeable when it is hot outside. Will this valvle fix my problem?
Front side-to-side temperature variance = refrigerant
Front to rear = heat exchanger shut off valve
https://mbworld.org/forums/e-class-w...ng-issues.html
Last edited by konigstiger; 07-17-2009 at 12:30 PM.
07-28-2009, 02:05 PM
#20
Junior Member

Join Date: Jun 2007
Location: Vancouver Canada
Posts: 41
Likes: 0
Received 0 Likes
on
0 Posts
1991 190E:1998 E320 4Matic wagon : 2000 E320 4Matic
heat exchanger shut off valve
Great post ..thank you very much. Just finished the job last night so here is an few gems to help do the job.
1. When removing the plastic screws we destroyed all of them so get four new ones in advance.
2. the valve cost $55 in Vancouver Canada and was in stock and I assume the upgraded version.
3. when removing the plastic cover you will need to pull it away from the adhesive on the bottom part of the window...no big deal.
4. the plastic cover is held in by the four plastic screws and four or so positioning pins that you need to pull up on.
5. the large hose that is mentioned on the passanger side is simply a drain hose wit no connector attached to it. It simply pulls off its mount on the plastic cover.
6.Remove not only the winshield wipers but the whole wiper assembly as previously mentioned . It is only an additional 3 bolts ...simple ..no alignment issues on replacing ,very straight forward. I can't imagine doing this job without removing all.
7.I used two sets of needle nose plies to remove the retaining clips instead of hangar.
8.the hose with the clamp on it was easily removed with channel lock pliers.
9. The front connection (in front of the grommet) ws difficult to get off, I needed to wiggle it a few times and pull very hard. Replacing that connection was the most difficult part for us. You will notice that there are two notches on it for alignment. The o-ring inside was askew and it wasn't until we corrected that that we got it on.
10.I used clamps on the hoses to prevent coolant from escaping but it wasn't necessary.
11.All other 3 hoses went on easily.
12. Before putting everything bak together run the engine to check for any leaks.
13.Started at 7pm and finished at 930. Could do it now in less than one hour. Alldata quotes 1.3 hours plus diagnostics.
14. Replacing wiper linkage , motor . and wiper blades ..fast and easy(minutes)
15. When replacing plastic panel look for the positioning pins and guide tabs located on the plastic panel.
16. Good luck a fairly easy diy job thanks to this terrific post and great pics.
08-05-2009, 05:02 AM
#21
Newbie

Join Date: Aug 2009
Posts: 2
Likes: 0
Received 0 Likes
on
0 Posts
2004 CL55 AMG, 2003 E500, 2001 CLK 430
Absolutely stellar report by W211RYDA!!
People like you make it sooo much easier for people like me.
Hope I can help you sometime.
Thanks again!!
W211RYDA, Pinoy? My wife is Pinay.
People like you make it sooo much easier for people like me.
Hope I can help you sometime.
Thanks again!!
W211RYDA, Pinoy? My wife is Pinay.
08-19-2009, 01:24 AM
#22
Member

Join Date: Dec 2007
Location: Orange County, CA
Posts: 125
Likes: 0
Received 1 Like
on
1 Post
2004 MB E-500 & 2000 Honda Accord Coupe
My AC unit is also acting up and need to do this. Quick question though, why do you need to remove this? Is it even connected to the changeover valve?
Nevermind I figured it out once I took out the plastic panel. Those 4clips and plastic panel are a pain in the a** to remove. The plastic panels has 6pins.

Nevermind I figured it out once I took out the plastic panel. Those 4clips and plastic panel are a pain in the a** to remove. The plastic panels has 6pins.
Last edited by Roehl; 08-20-2009 at 01:23 PM.
08-22-2009, 02:58 PM
#23
Member
Join Date: Dec 2007
Location: Orange County, CA
Posts: 125
Likes: 0
Received 1 Like
on
1 Post
2004 MB E-500 & 2000 Honda Accord Coupe
Here's what I found out from the old changeover valve that I replaced. I decided to open up that thing to see what made it failed. The motor that closes and opens the valve from the coolant burned up. Once I opened it I noticed the motor chamber is flooded with coolant, and that shorted out the motor and the valve is stuck open on one side.
The following users liked this post:
adler (10-10-2022)
09-06-2009, 06:40 PM
#24
Newbie

Join Date: Sep 2009
Posts: 10
Likes: 0
Received 0 Likes
on
0 Posts
2003 E500
just making sure
i am having the same problems of hot air blowing out of the rear vents. but it is intermittent. it goes back and forth, i just wanted to make sure the changeover valve is what is bad with my car. I noticed that everyone's concerns on this topic was dealing with e320's , just wanted to make sure this is the same cause with the e500's before i opened it up
Last edited by cupcrazy; 09-06-2009 at 06:43 PM.
10-04-2009, 06:12 PM
#25
Newbie
Join Date: Aug 2007
Location: South Carolina
Posts: 4
Likes: 0
Received 0 Likes
on
0 Posts
04 E320
great post and instructions, the only thing i did different,, was i replaced the stock clamp, the one on the top hose with a regular screw clamp, so just in case I ever have to go back in to replace this valve, I wont have to fight that factory clamp.


