Installed HID on my C350 Coupe
 01-11-2012, 10:00 AM
#1
Junior Member
Thread Starter

Join Date: Nov 2011
Posts: 16
Likes: 0
Received 0 Likes
on
0 Posts
C350 Coupe 2012
Installed HID on my C350 Coupe
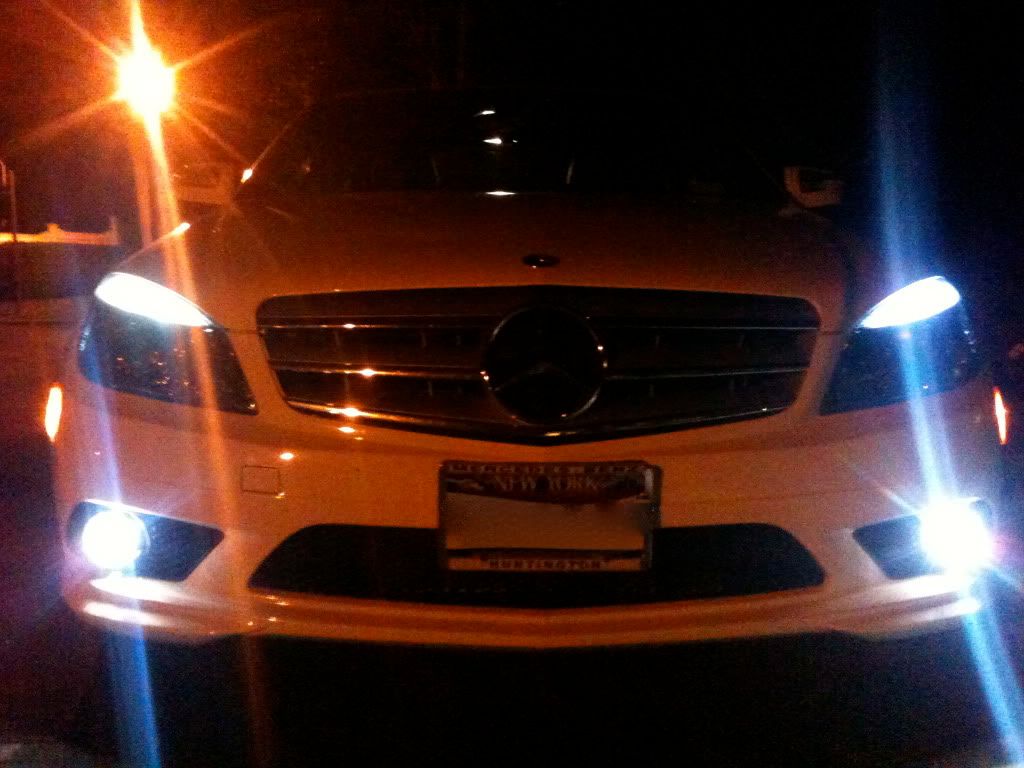
OK I just got my C350 and I installed the HID and tints. The HIDs I got from R2racing in Miami. They look great and I got a very good pricing. They are made in Japan and I got them for $85 Plus Shipping. WWW.HIDSTORE.NET (305)200-7115
These are the pictures I took with my Iphone:
These are the pictures I took with my Iphone:
 01-11-2012, 12:05 PM
#4
01-11-2012, 12:11 PM
#5
Junior Member
Thread Starter
Join Date: Nov 2011
Posts: 16
Likes: 0
Received 0 Likes
on
0 Posts
C350 Coupe 2012
It would take me a while since I would have to take them out to show pictures on how to do it. On the other hand, the guy at HIDSTORE.net gave me step by spep instructions over the phone.
Thanks,
Roman Rodriguez
Thanks,
Roman Rodriguez
Trending Topics
01-11-2012, 07:02 PM
#8
Member

Join Date: Sep 2008
Location: Ohio
Posts: 131
Likes: 0
Received 0 Likes
on
0 Posts
2009 C300, 2012 GLK350, 2012 C350C
I am curious as to how they look with the reflectors?
how is the light pattern?
how does oncoming traffic perceive the new lights?
any more pictures?
how is the light pattern?
how does oncoming traffic perceive the new lights?
any more pictures?
01-11-2012, 07:58 PM
#9
MBWorld Fanatic!
Join Date: Sep 2009
Location: Dix Hills, New York
Posts: 2,108
Likes: 0
Received 7 Likes
on
7 Posts
2012 C250 Coupe
HID kit installation can seem a bit "daunting" at first - especially if you don't know a whole lot, but I assure you that it is a VERY easy install. I will try to "mock-up" a DIY for it - even though I won't be physically installing it with my old HID kit from DDM.
Essentially it goes like this:
1) Remove dust cap cover for low beams (outer most dust cap covers) via turning them left.
2) Remove halogen bulb by first unplugging the cable from the bulb (no clips, just force - if you can't do it while the bracket is on ie: don't have enough leverage, you can't remove it after the bracket - it is just easier to get it out of the way first). Then remove the silver securing bracket. It would help to do the passenger side first as there is AMPLE amounts of room compared to the driver side, and you an see what you are looking at and understand it.
The silver mounting bracket has two "pegs" on one side, and a connected part on the other (Imagine it like a wheel barrel where the handles are separate connecting pegs, and the "u-part" at the other end is connected). On the connected "u-part" simply push downwards on the silver bracket to remove from its holders (very similar to how you secure a pin for a shirt). Then remove the bulb and connect cable if you haven't already done so.
3)Now would be the time where you have to do minor "surgery". You need to cut a hole in the dust cap covers to pass through the wires for the HID kit into the headlight housing. It doesn't need to be LARGE, it depends on the size of your particular grommet supplied with the HID kit you purchased. I would say usually the size of a nickel is the average, but sometimes can need the size of a quarter.
4) After the dust cap covers drilled out to about the size of a nickel, secure your new HID bulb in the reverse order (secure the bulb with the silver mounting bracket). Now this is where the "tricky" wiring comes into play. You DON'T connect the stock wiring cable back to the bulb. In fact, it probably isn't physically possible, as most HID kits already have cable that are "pre-wired" into the HID bulb, with the cable running through a rubber grommet (to seal the hole you just drilled) along with the cable that you will need to connect to the stock wiring plug to power the HID kit. You take that extra cable (the one not connected to the bulb) and plug it into the stock wiring connector. This is positive/negative sensitive. I am not sure if there is a way to tell which is positive and which is negative. But after the install is finished, you can always flop them around if the bulb doesn't turn on.
5) After all the necessary cables are connected, (bulb and power cabling for ballast) and the cable is secured with the silver bracket, push the rubber grommet through the hole that you drilled out on the dust cap covers. The hole should be just big enough so that the cables can fit through, but small enough so that the supplied rubber grommet with fully cover the hole you drilled, sealing the headlight housing from condensation or moisture.
6) After that is done, screw on the dust cap cover (righty tighty, lefty loosey) and then connect those cables to the ballast (the square thingy). It is mostly "idiot proof" process of connecting to the ballast, as they mainly have specific plugs that won't fit into other sockets on the ballast. After the cables are connected, then find a place to mount and conceal your HID kit. I simply use some really strong, hefty 3M double sided tape and hide it somewhere on the plastic lining of the wheel well. Some people go a little ape-**** and try to completely hide it, or start connecting a bunch of zip ties to the ballast and cables, but I don't find this necessary. Just make sure to get the good 3M double sided tape, not the crappy one (you want the exterior - weather resistant tape (sometimes referred to as automotive, but not always). The color is red with grey lining. Here is a link to one site for reference, not sure if it is the "best buy" though, just linked whatever I saw first:
http://www.google.com/products/catal...MAM#ps-sellers
7) Now you are finished with one side - do the same for the other side and you have HID's!
*Note* Not all HID kits are the same, some require external error cancelers which may change the wiring setup, this is just a general guideline that should help anyone figure out how to do it.
I do know that AZNOptics HID kits use digital slim ballast (which are better than the bulky ones, as they don't require a crapload of power on startup, and don't flicker or pop like the old bulky analog ones do when firing up. The AZNOptics kit also has the error cancelers INTEGRATED into the ballast, greatly simplifying the install process.
If you have any questions, feel free to post them. Since this was a lot more detailed than I originally intended, I might as well upload some pictures and make it into a whole DIY write-up. Enjoy!
01-11-2012, 08:42 PM
#10
MBWorld Fanatic!

Here in Australia, if you install HIDs on non projector lensed headlights they are deemed illegal, most obvious reason being they cause blinding/dazzling to oncoming traffic, light pattern is also distorted compared to halogen globes which usually shows up as blanked out lines along the pavement surface, you can usually get away with the blinding/dazzling part of it if you have projector lenses in the head lights, however the distortion still shows up on projector lenses which were not designed for HID globes.
Not trying to be negative as many people all over do this mod, but just a heads up against possibly recieving a hefty fine and/or vehicle defect notice.
01-11-2012, 08:54 PM
#11
SPONSOR/MBworld Guru

Interesting questions
Here in Australia, if you install HIDs on non projector lensed headlights they are deemed illegal, most obvious reason being they cause blinding/dazzling to oncoming traffic, light pattern is also distorted compared to halogen globes which usually shows up as blanked out lines along the pavement surface, you can usually get away with the blinding/dazzling part of it if you have projector lenses in the head lights, however the distortion still shows up on projector lenses which were not designed for HID globes.
Not trying to be negative as many people all over do this mod, but just a heads up against possibly recieving a hefty fine and/or vehicle defect notice.
Here's a step by step instruction video one of our customers made on the HID installation on his pre-facelifted w204. Should be pretty much the same process:
http://www.youtube.com/watch?v=fVw1XsDFDUw
Last edited by AZN Optics; 01-11-2012 at 08:57 PM.
01-12-2012, 04:24 AM
#12
MBWorld Fanatic!
Join Date: Sep 2009
Location: Dix Hills, New York
Posts: 2,108
Likes: 0
Received 7 Likes
on
7 Posts
2012 C250 Coupe
^ Speak of the Devil! lol.
Mike, turns out I won't be needing that 55w HID kit anymore... Upgraded myself to a new c250 coupe with the lighting package! BTW the interior lights on the coupes are ALL w5w (194 LED type). But unfortunately, the coupes don't have the footwell lights, only the sedan.
The front dome is a bit revised - and as such your LED don't really fit. I can't get the holder to fully tighten, it only screws in half of the way - I think they have made it shallower. Any hopes on getting a revised - smaller LED? The LED will still light though halfway turned, but blinks over bumps - not ideal.
Also, the rear dome light no longer uses a festoon bulb, just one single w5w (194 LED) that has no problems fitting and is mounted horizontally, but thats about it - no map lights. Still has the same-ole vanity lights and two trunk lights. Also, the license plate lights come stock LED now.
The reverse light is still the same bulb type, and I used my old white LED I got from you (Correct me if I'm wrong, but it is 1156 bulb type right?) - looks great. No need for the turn signal bulb anymore since it comes LED standard.
Also, the brake lights use bayonet bulbs too (two per tail light) They appear to be the same type as the reverse light, but I could be wrong; definitely bayonets though. And there are no more 194 bulbs for the rear fog, I guess there are led integrated into the tail light for that.
For those of you looking for pure white LED reverse lights, you can find them here:
http://aznoptics.com/index.php?main_...products_id=19
And also, for those wondering what AZNOptics LED colors look like 5000k vs 8000k, here is a pic from my pre-facelift w204 before I started modding it:
The left eyelid is 5000k, the right eyelid is 8000k, and the foglight is a 6000k 35w DDM HID kit I had at the time.
Last edited by jctevere; 01-12-2012 at 04:28 AM.
01-12-2012, 11:47 AM
#13
SPONSOR/MBworld Guru
I've actually been working on a shorter design 194 Wedge which I'll be bringing to market next month 
01-12-2012, 07:48 PM
#14
MBWorld Fanatic!

AZNOptics, I have an E class without HID's and want to install your 5000K kit on them. Would it work even though my car is an E class? I don't have the removable metal retaining clip that holds the bulb in the place. Instead, the E class has a screw in design where the metal bulb holder screws into the projector (the sides of the metal bulb holder have two tabs that lock into two tab catches on the projector). Also, if your kit will work, when will you have more 5K HID kits in stock?
01-12-2012, 09:20 PM
#15
SPONSOR/MBworld Guru
My HID kits are currently out of stock and my shipment is stuck in customs as it was tagged by Department of Transportation for random compliance inspection which they told me could take weeks to a month.
01-18-2012, 11:58 PM
#17
MBWorld Fanatic!
Join Date: Sep 2009
Location: Dix Hills, New York
Posts: 2,108
Likes: 0
Received 7 Likes
on
7 Posts
2012 C250 Coupe
It is always recommended to use error cancelors. Most HID kits are 35w and our vehicles will throw an error for anything not using 55w (which the stock halogens are). Even though I got a 55w HID kit, it would still sometimes throw errors and fail to ignite since HID kits don't always consume consistent power like halogen bulbs, and generally use more amperage at startup and then settle down to its estimated wattage rating (35w or 55w) but since they use a ballast, this number can fluctuate at times, sometimes causing an error and forcing the car's electroncis to cut power to the bulb and not allow it to light up.
So bottom line is this: If the HID kit doesn't come with error cancelors or have error cancelors built in (I know AZNOptics HID kits have error cancelors built in) then get them.
So bottom line is this: If the HID kit doesn't come with error cancelors or have error cancelors built in (I know AZNOptics HID kits have error cancelors built in) then get them.
01-19-2012, 08:41 AM
#18
Member

It is always recommended to use error cancelors. Most HID kits are 35w and our vehicles will throw an error for anything not using 55w (which the stock halogens are). Even though I got a 55w HID kit, it would still sometimes throw errors and fail to ignite since HID kits don't always consume consistent power like halogen bulbs, and generally use more amperage at startup and then settle down to its estimated wattage rating (35w or 55w) but since they use a ballast, this number can fluctuate at times, sometimes causing an error and forcing the car's electroncis to cut power to the bulb and not allow it to light up.
So bottom line is this: If the HID kit doesn't come with error cancelors or have error cancelors built in (I know AZNOptics HID kits have error cancelors built in) then get them.
So bottom line is this: If the HID kit doesn't come with error cancelors or have error cancelors built in (I know AZNOptics HID kits have error cancelors built in) then get them.
 I went ahead and ordered some for my 35w kit. Reason I got 35w (even though our factory lights are 55w) is because I heard a lot of people saying 55w are too bright for lamps and will scatter a lot of the light. Anyone who has experience with this please jump in. I do have to admit I was a bit p.o.'ed that a 74k car (I got a 2012 c63 coupe) didn't come factory with HIDs and projectors
Last edited by padroncubans; 01-19-2012 at 08:42 AM. Reason: spelling
01-28-2012, 02:25 AM
#19

OK I just got my C350 and I installed the HID and tints. The HIDs I got from R2racing in Miami. They look great and I got a very good pricing. They are made in Japan and I got them for $85 Plus Shipping. WWW.HIDSTORE.NET (305)200-7115
These are the pictures I took with my Iphone:
These are the pictures I took with my Iphone:


