
DIY Coilovers (tein).

 06-06-2007, 07:41 PM
#1
Moderator Alumni
Thread Starter
DIY Coilovers (Tein) w/ Pix
First:
I'd like to mention that I am no professional and that the information provided here is by no means the "official" way to do things and that I am not liable for anyone who tries these procedures.
Required tools:
Sockets and wrenches: (going off memory here)
22mm, 24mm(used for the sping compressors), 12mm, 14mm, 7mm, 19mm.. Just lots of them.. most people have most sizes except for the 20mm+ sizes.
I know I used a 7/8ths, a 13/16th, and maybe even a 15/16s.... I dont remember especially well.
Scissor jack in the trunk (stock)
Floor jack - preferably a small one - you can use a small block of wood to help position it w/o damaging things
Jack stands to safely secure the car when raised.
Vice grips.
A couple flat screwdrivers - useful for prying those pesky push pins!
Some Stuff to secure wheels when you jack up the car - i used big wooden blocks
Useful tools:
Extra person to make sure you dont hurt yourself or to step on the brakes.
Another extra person to take pictures :P and general advice
Hat removal tool thingie.
Maybe stuff:
Brake fluid
Tie wraps
Lets get started:
Front (one side at a time):
Park the car on level ground that is preferably sheltered.
Use the scissor jack to lift the front side of the car up using the side jack points and remove the front wheel.
You should be able to see or feel:
Three big bolts (i think one 22 mm, and two 19mm) that hold the bottom of the strut to the suspension.
Also open up the hood and you see that one nut holds the strut mount in place with a black bracket and washer under it.
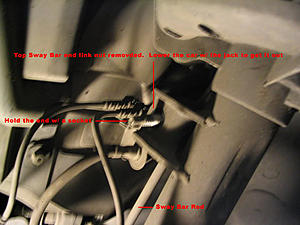
One ball bearing w/ a nut at the end that is attached to a rod that is attached to the sway bar (did that make sense?)
Place a jack at the base of all of the suspension right behind the brake shield, but make sure not to bend your brake shield.
(The shield can always be rebent into posiiton, whatevers)
Lift the jack under the suspension such that it carries a little of the weight and compresses the spring a little bit.
If you try to remove the nut that is attached to the sway bar rod thingie... the sway bar will be pulling down and it will be nearly impossible.
This is where you lower the scissor jack on the side of the car - as you do this the sway bar rod will move upward and the nut can be easily removed because of the jack under the suspension.
Using a socket (7mm i think?) and a wrench (14mm or 12mm?) you can hold the end w/ the socket and use a wrench to losen the nut.
Once this nut is removed, lift the car back up to its original height using the scissor jack.
Remove the three big bolts and the nut that holds the strut mount in place.
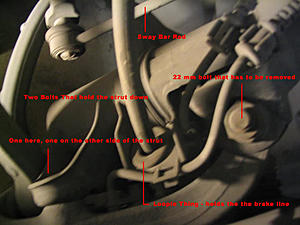
Now the strut is basically free except for the fact that the brake line is running through a little loopie thing attached to the strut.
I swear, you can just cut the tie wrap that holds the lilttle loopie thing - if you can just losen the loopy thing, you can skip this:
**Unplug the brake line (ahhh) and brake sensor mount along with the brake sensor from the caliper**
**All of the brake fluid will leak out, unless you plug the end**
The entire assembly should be free at this point, but might need to be yanked a little bit to be free of the strut mount - I called this the "hat".
Once out, look carefully at the Hat - there are two larger "nubs" that determine how it fits into the mount on the car.
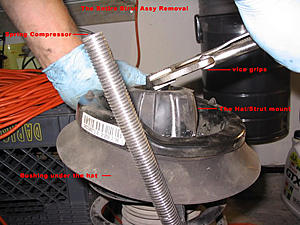
We need the hat and the bushing that is under it, so safely compress the spring and remove the hat.
To remove the hat: have one person hold the bottom of the strut assy, and one person use vice grips to slowly/gently rotate the hat off.
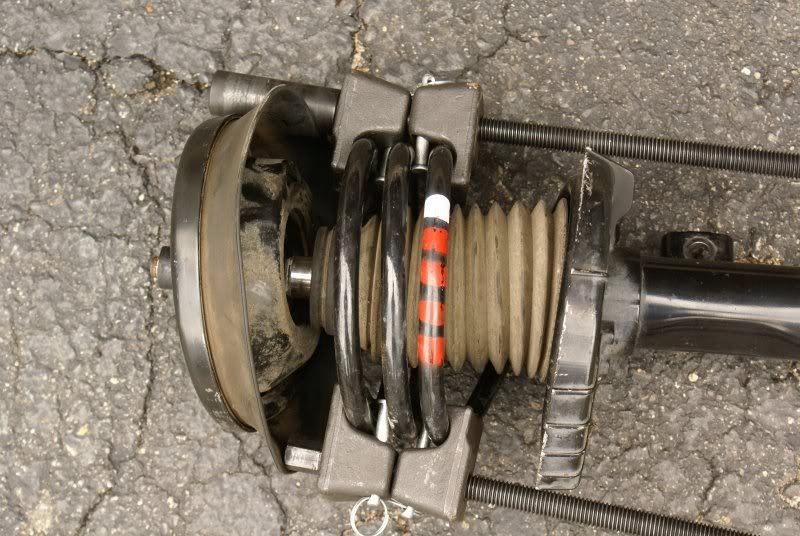
**Be sure that the spring is compressed! This could potentially be dangerous!**

(biff powel's image of what a extremely safe spring looks like fully compressed)
Be sure not to lose the little washer that is between the hat and the threads ontop of the strut assy.
It locks everything in place, I believe.
Reassemble everything with your new coilovers in place.
Just be sure that when you place the strut back into the strut mount, make sure that it fits properly. I have read that the suspension will make funny noises other wise.
**If you didnt cut the tie wrap that has the loopie thingie, be sure to tie wrap your brake line and other wires back to the strut.**
Additionally, When you are putting the nut back on the sway bar, ball bearing thingie... use a WASHER! (no washer was included )
)
I found that after installing the coilvers, as my car swayed on uneven bumps, it made funny noises - this washer prevents this noise!
Do the same thing to both fronts.
Things that are apparently "normal":
There can be a gap between the little black bracket onto of the strut mount (inside the engine bay) and the strut mount itself.
**Now, if you had to unplug the brake line....
You have to get brake fluid back into the brake system but need to make sure there is no air in there.
You need two people:
One person get in the car, dont start it.
One person is by an exposed front brake caliper. (wheel off, duh)
Your brake line and sensors should be returned to the proper functioning positions.
Place a small rubber tube from the brake bleeding nipple and make sure it is aimed downwards - makes sure no air gets in.!
Person in the car steps on the brakes - should be very hard to depress.
As the brakes are being pressed, the person next to the brake caliper, opens the bleeder - a mixture of brake fluid and air will come out
We dont want there to be anything but brake fluid coming out.
The brakes will capable of moving (not so hard to press down anymore..)
As the person in the car is stepping on the brakes and is approaching the maximum brake travel, he tells the person outside of the car near the caliper to close the bleeder.
Do this over and over until nothing but brake fluid comes out.
Do this with both fronts.
Rears (one side at a time):
Safely jack up the rear of the car.
Remove the funny cover on the rear suspension that hides the bottom of the damper's "attach points" to the suspension
Its held on by clever design and two screws.
Remove the side lining in your trunt/rear seat area to expose the rear damper's mount.
At this point you should be abel to see, a long bolt that holds the bottom of the damper to the suspesion and the nut that holds the top of the damper in the trunk area.
Remove all three of these nuts. The damper should barely be sitting in there....
When removing the nut that holds the damper, be sure to use a small wrench to hold the threads in place. Dont use a vice grip because you can easily strip the threads (BAD).
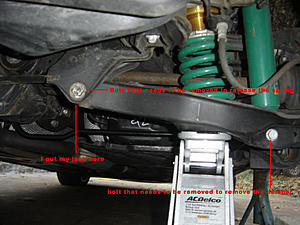
Towards the middle of the car, there is a long bolt that is the point of rotation for the rear suspension. Place a jack under this point and remove this bolt.
Once this bolt is out, slowly lower the jack under where this bolt use to be. This will slowly allow the spring to reach its full extended length then fall free!
(Rlee's Image)
At this point, you can easily remove the damper, the spring, and find the pesky spring perch.
Reassemble everything without the perch - without it, you can be sure that the springs will sit evenly.
You might have to use the stock bushings so dont forget to read your the paper work that comes w/ your coil overs
Oh yea: don't forget to adjust your cool new adjustable gear such that its even on all four corners.
PS:
Thanks to:
waveykat for answering my persistent questions
1via - the true suspension guru
Rlee - for pix and reading over my rough drafts :P
Biff - for the great spring compression
I'd like to mention that I am no professional and that the information provided here is by no means the "official" way to do things and that I am not liable for anyone who tries these procedures.
Required tools:
Sockets and wrenches: (going off memory here)
22mm, 24mm(used for the sping compressors), 12mm, 14mm, 7mm, 19mm.. Just lots of them.. most people have most sizes except for the 20mm+ sizes.
I know I used a 7/8ths, a 13/16th, and maybe even a 15/16s.... I dont remember especially well.
Scissor jack in the trunk (stock)
Floor jack - preferably a small one - you can use a small block of wood to help position it w/o damaging things
Jack stands to safely secure the car when raised.
Vice grips.
A couple flat screwdrivers - useful for prying those pesky push pins!
Some Stuff to secure wheels when you jack up the car - i used big wooden blocks
Useful tools:
Extra person to make sure you dont hurt yourself or to step on the brakes.
Another extra person to take pictures :P and general advice
Hat removal tool thingie.
Maybe stuff:
Brake fluid
Tie wraps
Lets get started:
Front (one side at a time):
Park the car on level ground that is preferably sheltered.
Use the scissor jack to lift the front side of the car up using the side jack points and remove the front wheel.
You should be able to see or feel:
Three big bolts (i think one 22 mm, and two 19mm) that hold the bottom of the strut to the suspension.
Also open up the hood and you see that one nut holds the strut mount in place with a black bracket and washer under it.
One ball bearing w/ a nut at the end that is attached to a rod that is attached to the sway bar (did that make sense?)
Place a jack at the base of all of the suspension right behind the brake shield, but make sure not to bend your brake shield.
(The shield can always be rebent into posiiton, whatevers)
Lift the jack under the suspension such that it carries a little of the weight and compresses the spring a little bit.
If you try to remove the nut that is attached to the sway bar rod thingie... the sway bar will be pulling down and it will be nearly impossible.
This is where you lower the scissor jack on the side of the car - as you do this the sway bar rod will move upward and the nut can be easily removed because of the jack under the suspension.
Using a socket (7mm i think?) and a wrench (14mm or 12mm?) you can hold the end w/ the socket and use a wrench to losen the nut.
Once this nut is removed, lift the car back up to its original height using the scissor jack.

Remove the three big bolts and the nut that holds the strut mount in place.

Now the strut is basically free except for the fact that the brake line is running through a little loopie thing attached to the strut.
I swear, you can just cut the tie wrap that holds the lilttle loopie thing - if you can just losen the loopy thing, you can skip this:
**Unplug the brake line (ahhh) and brake sensor mount along with the brake sensor from the caliper**
**All of the brake fluid will leak out, unless you plug the end**
The entire assembly should be free at this point, but might need to be yanked a little bit to be free of the strut mount - I called this the "hat".
Once out, look carefully at the Hat - there are two larger "nubs" that determine how it fits into the mount on the car.
We need the hat and the bushing that is under it, so safely compress the spring and remove the hat.
To remove the hat: have one person hold the bottom of the strut assy, and one person use vice grips to slowly/gently rotate the hat off.
**Be sure that the spring is compressed! This could potentially be dangerous!**

(biff powel's image of what a extremely safe spring looks like fully compressed)
Be sure not to lose the little washer that is between the hat and the threads ontop of the strut assy.
It locks everything in place, I believe.

Reassemble everything with your new coilovers in place.
Just be sure that when you place the strut back into the strut mount, make sure that it fits properly. I have read that the suspension will make funny noises other wise.
**If you didnt cut the tie wrap that has the loopie thingie, be sure to tie wrap your brake line and other wires back to the strut.**
Additionally, When you are putting the nut back on the sway bar, ball bearing thingie... use a WASHER! (no washer was included
)I found that after installing the coilvers, as my car swayed on uneven bumps, it made funny noises - this washer prevents this noise!
Do the same thing to both fronts.
Things that are apparently "normal":
There can be a gap between the little black bracket onto of the strut mount (inside the engine bay) and the strut mount itself.
**Now, if you had to unplug the brake line....
You have to get brake fluid back into the brake system but need to make sure there is no air in there.
You need two people:
One person get in the car, dont start it.
One person is by an exposed front brake caliper. (wheel off, duh)
Your brake line and sensors should be returned to the proper functioning positions.
Place a small rubber tube from the brake bleeding nipple and make sure it is aimed downwards - makes sure no air gets in.!
Person in the car steps on the brakes - should be very hard to depress.
As the brakes are being pressed, the person next to the brake caliper, opens the bleeder - a mixture of brake fluid and air will come out
We dont want there to be anything but brake fluid coming out.
The brakes will capable of moving (not so hard to press down anymore..)
As the person in the car is stepping on the brakes and is approaching the maximum brake travel, he tells the person outside of the car near the caliper to close the bleeder.
Do this over and over until nothing but brake fluid comes out.
Do this with both fronts.
Rears (one side at a time):
Safely jack up the rear of the car.
Remove the funny cover on the rear suspension that hides the bottom of the damper's "attach points" to the suspension
Its held on by clever design and two screws.
Remove the side lining in your trunt/rear seat area to expose the rear damper's mount.
At this point you should be abel to see, a long bolt that holds the bottom of the damper to the suspesion and the nut that holds the top of the damper in the trunk area.
Remove all three of these nuts. The damper should barely be sitting in there....
When removing the nut that holds the damper, be sure to use a small wrench to hold the threads in place. Dont use a vice grip because you can easily strip the threads (BAD).
Towards the middle of the car, there is a long bolt that is the point of rotation for the rear suspension. Place a jack under this point and remove this bolt.
Once this bolt is out, slowly lower the jack under where this bolt use to be. This will slowly allow the spring to reach its full extended length then fall free!

(Rlee's Image)
At this point, you can easily remove the damper, the spring, and find the pesky spring perch.
Reassemble everything without the perch - without it, you can be sure that the springs will sit evenly.
You might have to use the stock bushings so dont forget to read your the paper work that comes w/ your coil overs
Oh yea: don't forget to adjust your cool new adjustable gear such that its even on all four corners.
PS:
Thanks to:
waveykat for answering my persistent questions
1via - the true suspension guru
Rlee - for pix and reading over my rough drafts :P
Biff - for the great spring compression
Last edited by TruTaing; 06-07-2007 at 05:40 PM.
 06-06-2007, 08:07 PM
#2
Super Moderator Alumni
Join Date: Mar 2004
Location: West Los Angeles
Posts: 7,684
Likes: 0
Received 10 Likes
on
5 Posts
Midnight Blue 2004.5 C230 Kompressor Sport Sedan. 2002 w210 E320, 2009 w211 E350 Sport
You get brownie points and an addition to the AFTERMARKET/DIY thread.

 06-06-2007, 11:13 PM
#6
Super Moderator
TruTaing, waveycat, 1via and rlee �
Great job gentlemen! Your W203 brothers are most appreciative. An excellent narrative.
When I have removed OE and various aftermarket dampers, the brake hoses are retained at the strut by an undulated �C� clip. Therefore, disconnecting and opening the brakes� hydraulic system is not required. Do the Teins not facilitate the same R&R procedure? Not having done the Teins personally, I will most certainly accede to your expertise.
One caveat though. Please be aware that some may encounter potential problems with properly bleeding the brake system of all its residual air upon reassembly, because of our anti-lock systems. The ABS motor must be energized and cycled to activate its valves and flush fluid through the passages. Regardless of how this is achieved, it is absolutely imperative that the bleeding task be done correctly. Otherwise, the brakes will not function as designed during all dynamic situations. None of us wants to fathom that scenario.
Regular brake fluid replenishment is specified by Mercedes-Benz. Not because the fluid wears out, but because it is hygroscopic and attracts disruptive elements from the mechanical bits in the brake system itself. Since the fluid itself absorbs moisture, its boiling point is dramatically reduced merely by the passage of time. Brakes perform their function by creating friction, which obviously generates heat. Boiling fluid, which can be induced during mountain driving, or sporting operation, must be avoided to ensure proper brake function. Anyone who has encountered brake fade from air in the system can attest to this fact. Don�t ask me how I know! The corrosive chemicals transferred to the fluid from the tubes and calipers must also be removed from the system periodically. It always prudent for one to invest in fresh fluid, rather than have to pay for new calipers, or suffer from degraded performance.
Again, thank you for your outstanding post. There is nothing quite like groveling around on the garage floor to help make me feel like I have accomplished something worthwhile. Well, except for driving her afterwards!
Great job gentlemen!
Your W203 brothers are most appreciative. An excellent narrative.When I have removed OE and various aftermarket dampers, the brake hoses are retained at the strut by an undulated �C� clip. Therefore, disconnecting and opening the brakes� hydraulic system is not required. Do the Teins not facilitate the same R&R procedure? Not having done the Teins personally, I will most certainly accede to your expertise.
One caveat though. Please be aware that some may encounter potential problems with properly bleeding the brake system of all its residual air upon reassembly, because of our anti-lock systems. The ABS motor must be energized and cycled to activate its valves and flush fluid through the passages. Regardless of how this is achieved, it is absolutely imperative that the bleeding task be done correctly. Otherwise, the brakes will not function as designed during all dynamic situations. None of us wants to fathom that scenario.
Regular brake fluid replenishment is specified by Mercedes-Benz. Not because the fluid wears out, but because it is hygroscopic and attracts disruptive elements from the mechanical bits in the brake system itself. Since the fluid itself absorbs moisture, its boiling point is dramatically reduced merely by the passage of time. Brakes perform their function by creating friction, which obviously generates heat. Boiling fluid, which can be induced during mountain driving, or sporting operation, must be avoided to ensure proper brake function. Anyone who has encountered brake fade from air in the system can attest to this fact. Don�t ask me how I know! The corrosive chemicals transferred to the fluid from the tubes and calipers must also be removed from the system periodically. It always prudent for one to invest in fresh fluid, rather than have to pay for new calipers, or suffer from degraded performance.
Again, thank you for your outstanding post. There is nothing quite like groveling around on the garage floor to help make me feel like I have accomplished something worthwhile. Well, except for driving her afterwards!
06-07-2007, 02:43 AM
#7
Almost a Member!

Join Date: Sep 2006
Location: Seattle/Olympia, WA
Posts: 40
Likes: 0
Received 0 Likes
on
0 Posts
1996 Volvo 850 Turbo Wagon, 1991 Nissan 240sx track car
Glad you all like it. John(TruTaing) doesn't give himself enough credit. For someone who has done very little work on this car before, he did a great job in finishing this project and sorting out all of the difficulties that arose.
As for the install, I was only there for the front coilovers. This is an aggravating car to work on. Between supporting the car properly, pulling the strut/spring assembly, and disassembly of the unit there were lots of little setbacks that made for a long process that had us half delusional at the end of the night.
I think MB could make this whole process a hell of a lot more simple. Hell, my s13 240sx takes me all of 10 minutes to pull the coilovers per end. But, I am getting off track...
Anyhow, this is definitely doable for anyone with basic hand tools as listed. Only, be sure you allot yourself more time than you think you'll need by a few hours. lol I hope this write up helps people install their coilovers and, more importantly, encourages more people to do their own work on their car.
I also would like to echo the concerns about bleeding of ABS equipped cars. None abs assisted cars are very straightforward to bleed, but many modern abs systems are complicated and require the proper systematic bleeding routine. So, if you dont feel like dealing with this, dont break the brake lines open.
Regards,
Rory
As for the install, I was only there for the front coilovers. This is an aggravating car to work on.
Between supporting the car properly, pulling the strut/spring assembly, and disassembly of the unit there were lots of little setbacks that made for a long process that had us half delusional at the end of the night.I think MB could make this whole process a hell of a lot more simple. Hell, my s13 240sx takes me all of 10 minutes to pull the coilovers per end. But, I am getting off track...
Anyhow, this is definitely doable for anyone with basic hand tools as listed. Only, be sure you allot yourself more time than you think you'll need by a few hours.
lol I hope this write up helps people install their coilovers and, more importantly, encourages more people to do their own work on their car. I also would like to echo the concerns about bleeding of ABS equipped cars. None abs assisted cars are very straightforward to bleed, but many modern abs systems are complicated and require the proper systematic bleeding routine. So, if you dont feel like dealing with this, dont break the brake lines open.
Regards,
Rory
Last edited by 1via; 06-07-2007 at 02:56 AM.
Trending Topics
06-07-2007, 05:54 PM
#8
Newbie

Join Date: May 2007
Location: Bellevue, WA
Posts: 1
Likes: 0
Received 0 Likes
on
0 Posts
1998 MK3 Golf 2.slow
Nice write up j0hn, I was only there for about 2 hours, but just looking at all the wires you had up in there was terrifying.
Not to mention that Rory amount got his arm cut off by using only one spring compressor.
Not to mention that Rory amount got his arm cut off by using only one spring compressor.
 02-09-2009, 12:06 PM
#14
Member
Join Date: Feb 2009
Location: Ireland, co. louth
Posts: 102
Likes: 0
Received 0 Likes
on
0 Posts
c200k
Well new to the forum so hope I post this in the right section. I have a w203 and just after gettin 18" rims, just want advice on lowering it, I don't wanna put coilovers in it cos i only wanna drop it bout 20mm what you's think
 04-01-2010, 04:04 AM
#16
Senior Member
Join Date: Apr 2009
Location: Hong Kong
Posts: 319
Likes: 0
Received 1 Like
on
1 Post
W211 E63, W205 C300
i used one of these compressors. it was a pain in the *** too hook on and remove cuz of the really big hat the bottom part where the spring sits. ended up scratching up the edge on the lower plate.the compressor was surprisingly safe tho, no bending of the shaft whatsoever. uncompressing it was as easy as hooking it on. i suggest using one of those klann spring compressors if possible.

 08-30-2010, 07:59 PM
#23
MBWorld Fanatic!
08-31-2010, 12:06 PM
#24
Newbie

Join Date: May 2008
Posts: 1
Likes: 0
Received 0 Likes
on
0 Posts
2003 C230 Sport Coupe
I have done spring swaps on 5 other cars and this was by FAR the hardest one. Mainly because of how far you have to compress the spring, how large the diameter of the upper mount and the spring seat on the strut are and them getting in the way of the compressor, that pesky little threaded washer on top of the strut mount and how short the piston shaft sticks out.
However once I installed the springs (Tein S-tech in this case) my wife's Coupe looked GREAT!!
The rears are almost too easy so it kinda makes up for it.
However once I installed the springs (Tein S-tech in this case) my wife's Coupe looked GREAT!!
The rears are almost too easy so it kinda makes up for it.
01-29-2011, 02:23 PM
#25
Super Member

Join Date: Jul 2004
Posts: 842
Likes: 0
Received 2 Likes
on
2 Posts
2001 c320 - 2002 ml55 - 2011 c300 - 2014 slk350 - 2015 cla45
Tein CO, washer - noise
""""Additionally, When you are putting the nut back on the sway bar, ball bearing thingie... use a WASHER! (no washer was included )
I found that after installing the coilvers, as my car swayed on uneven bumps, it made funny noises - this washer prevents this noise!"""""
Is this where the washer needs to be installed?
Placement of this washer corrected your "noise" issue?
Thanks in advance!
-Charles
I found that after installing the coilvers, as my car swayed on uneven bumps, it made funny noises - this washer prevents this noise!"""""
Is this where the washer needs to be installed?
Placement of this washer corrected your "noise" issue?
Thanks in advance!
-Charles
Last edited by ML55CLA45; 03-19-2019 at 05:54 AM.


