DIY:W203 radiator R&R


 06-16-2009, 04:31 PM
#77
Super Moderator
ok so this is looking down to the right of the ps reservoir. get a flash light and you will see the label very easily. sorry it took so long good luck. 


[img=http://img132.imageshack.us/img132/6197/dsc028381024x768.th.jpg]
[img=http://img38.imageshack.us/img38/4297/dsc028371024x768.th.jpg]


[img=http://img132.imageshack.us/img132/6197/dsc028381024x768.th.jpg]
[img=http://img38.imageshack.us/img38/4297/dsc028371024x768.th.jpg]
07-19-2009, 11:36 AM
#80
Member

Join Date: Feb 2007
Location: Toronto, Canada
Posts: 200
Likes: 0
Received 1 Like
on
1 Post
2003 C32
*specific to automatic transmission W203s*
Parts required:
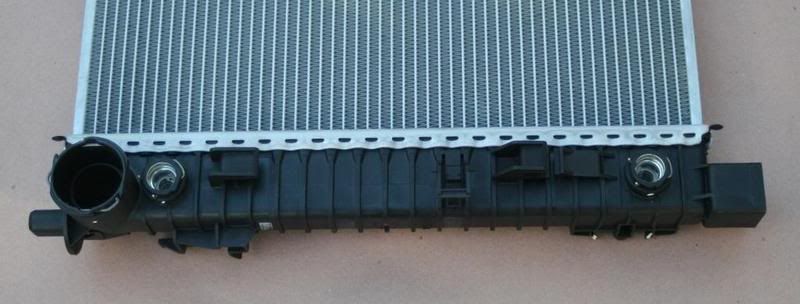
(1) 203 500 05 03 radiator
(2) 028 997 62 48 ATF tube seal
(2) 003 997 17 89 coolant hose seal
(1) 140 991 00 55 ATF cap lock pin
Consumables:
Q 1 03 0002 antifreeze
A 001 989 21 03 19 ATF
Distilled water
Specialty tools:
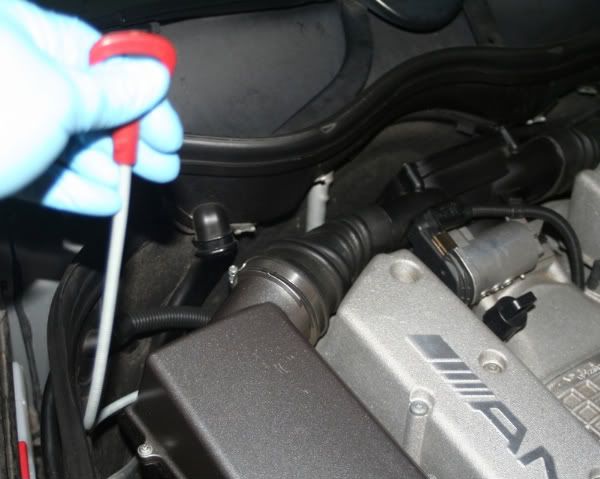
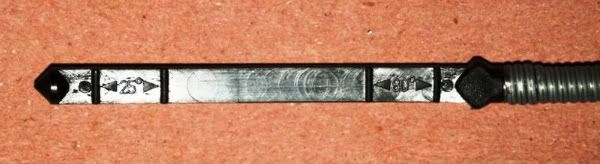
140 589 15 21 00 ATF dipstick
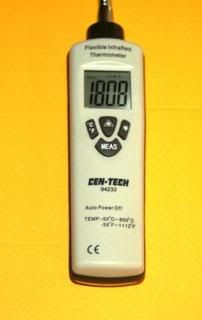
Infrared thermometer
Raise and safely secure the car. Remove the undertray. Drain the radiator via the red petcock.
Remove the upper radiator support.
The horn mount is attached the rear of the bumper reinforcement. It will need to be unbolted in order to pull the support clear.
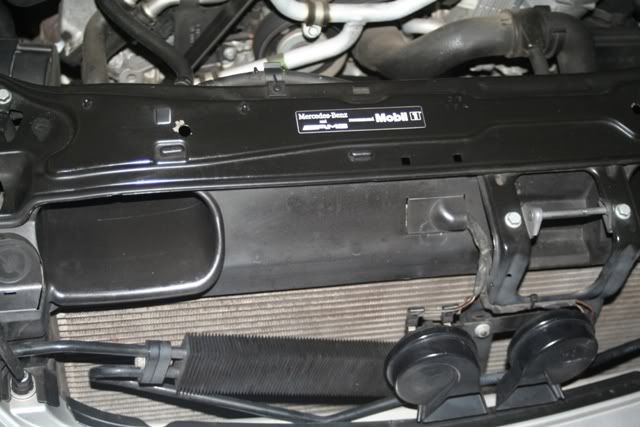
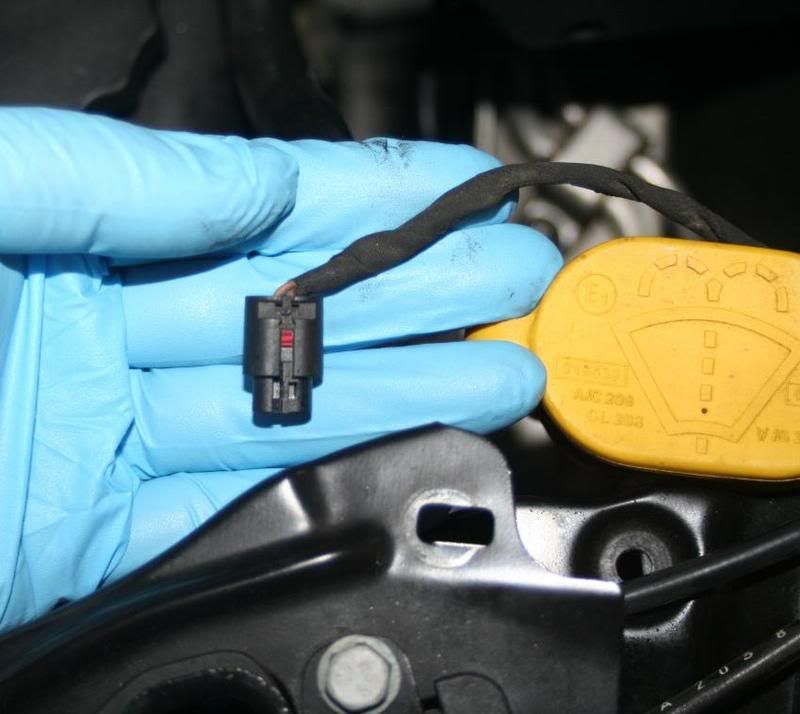
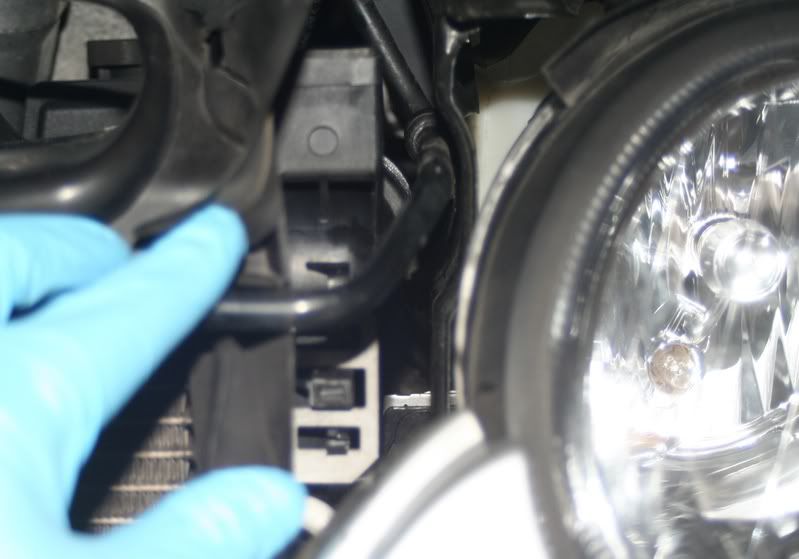
Disconnect the �hood open� sensor wiring.
There is no need to disconnect the hood latch cables.
Lay the radiator support assembly aside.
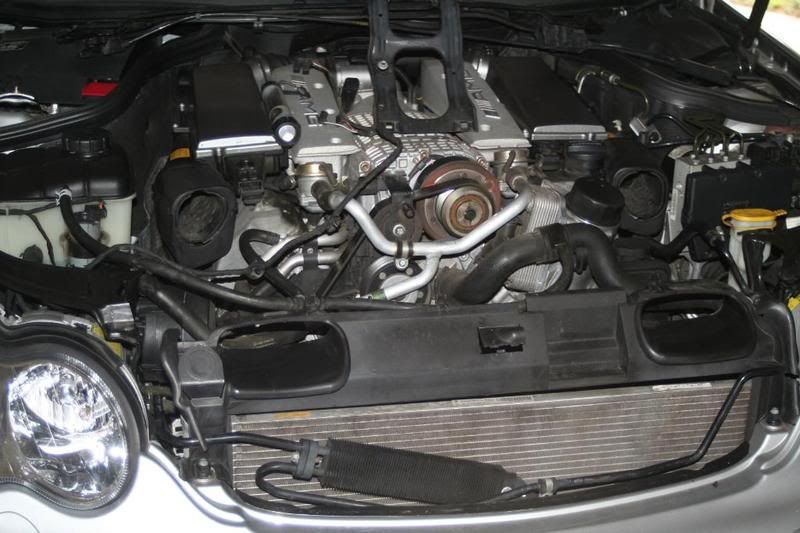
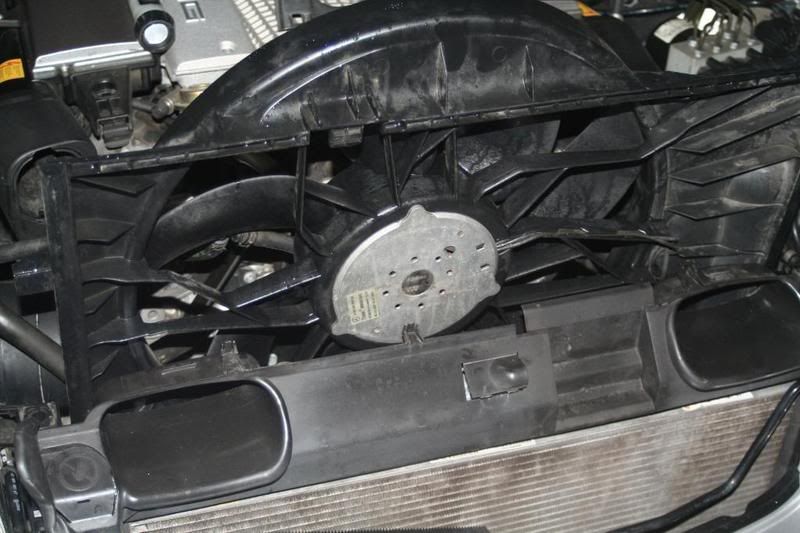
Disconnect the fan wiring. Pull the C clip retainers from the upper/lower coolant hoses and ATF tubes. Be prepared for additional fluid discharge.
Gently twist and pull the lines free from their attaching junctions.
Squeeze, and then push the A/C condenser mounting T barb clips from the radiator.
Pull the radiator/cooling fan assembly up and out. Remove the fan while it�s on the workbench. There are two sprung plastic tabs that secure it to the radiator, in addition to the alignment sleeves.
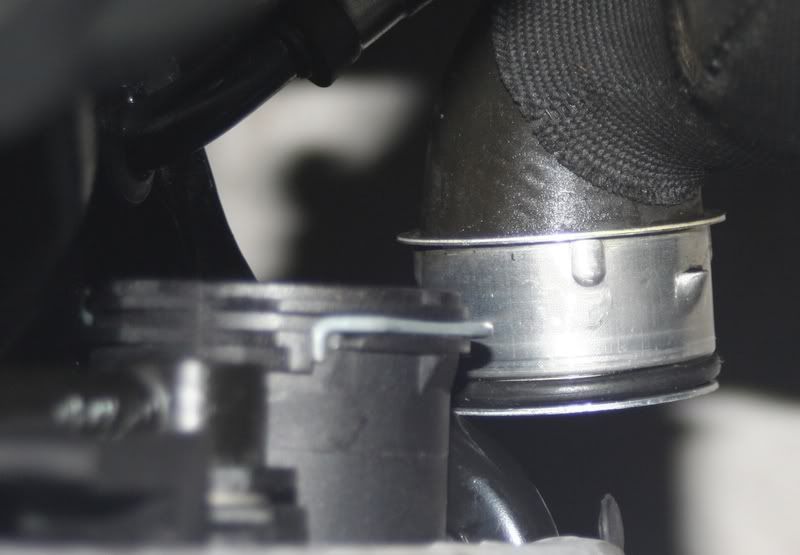
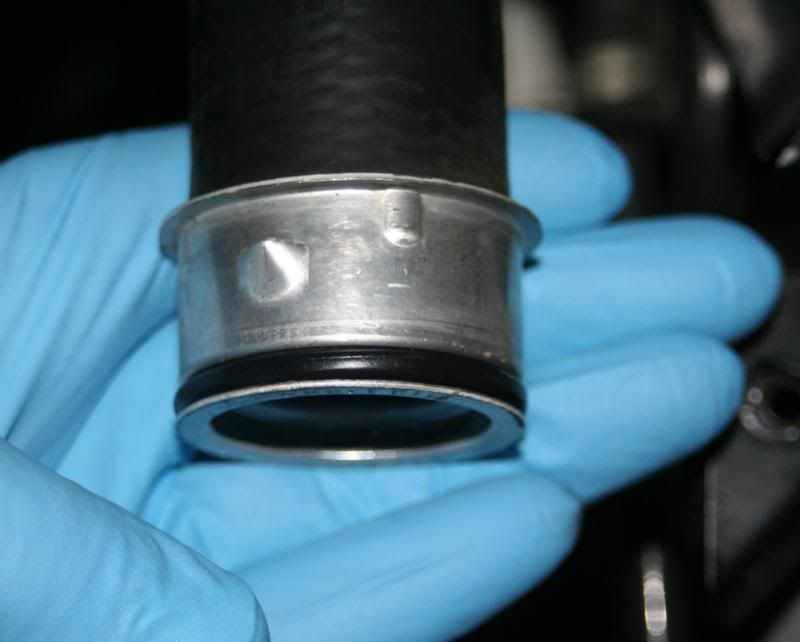
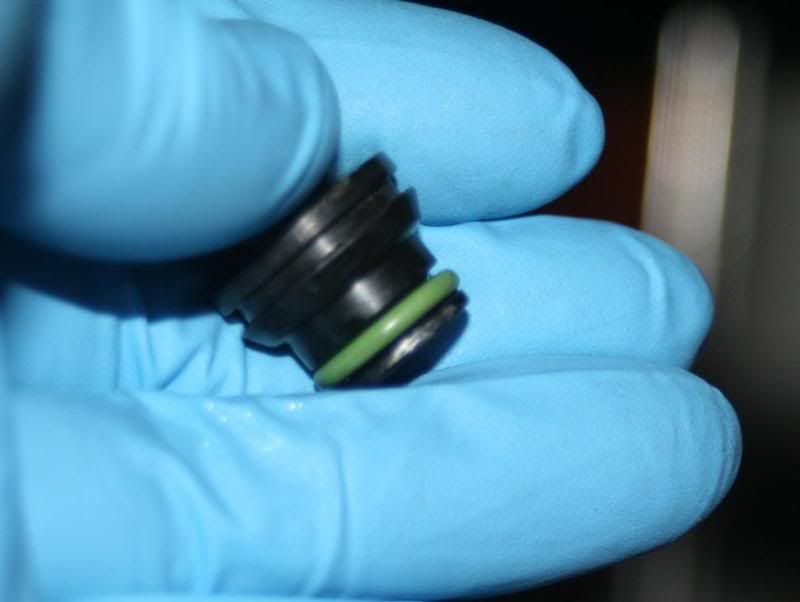
Clean the sealing grooves and fit the new seals to the coolant hoses and ATF tubes.
&
Transfer the existing upper and lower rubber mounts to the new radiator. Lower it in place. Attach the hoses/tubes. Ensure that they are fully seated before snapping the C clips home.
Install the fan and reconnect its wiring.
Refill the reservoir with a 50/50 mixture of MB antifreeze and distilled water.
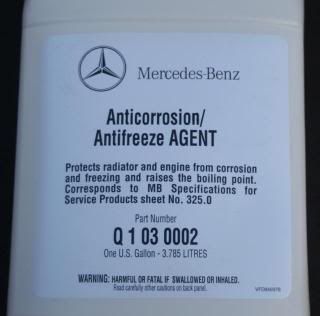
Check for leaks. Reinstall the upper support, its paraphernalia, and the undertray. Lower the car. Start the engine. Continue to add a 50/50 mix until the thermostat has opened. When the reservoir has been thoroughly purged of its residual air, install the cap.
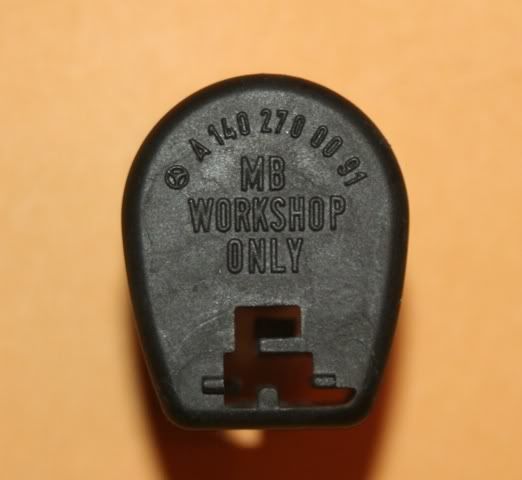
Because our 722.6xx transmission is persnickety about its fluid level, that which was lost during the installation must be replenished. Remove the lock pin from the fill tube cap, and then the cap itself.
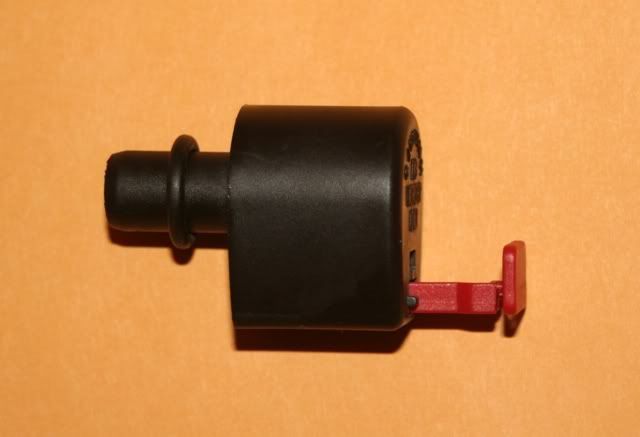
Disregard the 'workshop' admonition.
With the engine running and the transmission in Park, insert the ATF dipstick until it bottoms against the pan. The tool is unlike a conventional dipstick in that when it is measuring, the handle is not flush with the top of its tube.
If the fluid level is too low, estimate the amount that was sacrificed, and then replenish a like quantity. If it reads to at least the minimum mark, it�s time for a lengthy test drive to get everything up to proper temperature. Reinstall the cap. Get it to WOT several times to replicate real-world conditions.
The correct ATF level can only be properly established when the fluid is stabilized at 80 degrees Celsius. MB�s procedure nessecitates STAR DAS. Since I don�t have the scratch for that wonderful ~$15,000 machine, an infrared reading from the exterior of the transmission pan had to suffice.
Add ATF as required to achieve the proper level.
Verify the antifreeze level after several heating/cooling cycles to ensure all is as it should be.
I've been trying a few ways to get the tabs clear for 30 minutes and at a lose on how to separate the bottom end.
I'm obviously missing something, probably simple.
https://mbworld.org/forums/images/sm...smashfreak.gif
TIA for enlightening me.
10-21-2009, 06:39 PM
#81
MBWorld Fanatic!
Join Date: Feb 2005
Location: Bay Area SF
Posts: 1,193
Likes: 0
Received 0 Likes
on
0 Posts
Silver 2002 C32, Silver 2006 CLK 350
Just ordered all the parts I need at one site Good prices
http://www.rmeuropean.com/
cant wait to get all of it and start on it
http://www.rmeuropean.com/
cant wait to get all of it and start on it
10-21-2009, 09:42 PM
#82
Member

Join Date: Jun 2009
Posts: 204
Likes: 0
Received 0 Likes
on
0 Posts
2007 ML350
Just ordered all the parts I need at one site Good prices
http://www.rmeuropean.com/
cant wait to get all of it and start on it
http://www.rmeuropean.com/
cant wait to get all of it and start on it
Can you take pictures of the bolts removed and make more call-outs? I attempted to start this and had problems identifying what I needed to remove (was having a bad day to boot). So kind of like a retard proof one/pictures.
p3
10-24-2009, 07:24 PM
#84
MBWorld Fanatic!
Join Date: Feb 2005
Location: Bay Area SF
Posts: 1,193
Likes: 0
Received 0 Likes
on
0 Posts
Silver 2002 C32, Silver 2006 CLK 350
I got the radiator out and got the new one in.... What a pain to take out
I didnt see there where 2 tabs that you have to push in so the heat exchange and the radiator can be seperated. and its a pain to line it up when you install the new radiator.
Im not done yet im draining the tranny and installing new fluids so I will post more if I find some other problems
tranny fluid is really dark I dont know how MB can say you dont need to change it!
10-25-2009, 08:31 PM
#86
MBWorld Fanatic!
Join Date: Feb 2005
Location: Bay Area SF
Posts: 1,193
Likes: 0
Received 0 Likes
on
0 Posts
Silver 2002 C32, Silver 2006 CLK 350
ok done! the car shift so well, There are not much bolts you have to pull out if you have a c32 like me the heat exchanger clips were a pain to put back. I will upload the pics later
11-20-2009, 02:11 PM
#87
Super Member
I've followed Splinters excellent instructions for the DIY rad replacement. I'm at the very end to lift rad out. Problem I have is getting the tabs that go into the bottom of the end tanks clear so the rad can slip out. The top tabs to the ac condenser are removed.
I've been trying a few ways to get the tabs clear for 30 minutes and at a lose on how to separate the bottom end.
I'm obviously missing something, probably simple.
https://mbworld.org/forums/images/sm...smashfreak.gif
TIA for enlightening me.
I've been trying a few ways to get the tabs clear for 30 minutes and at a lose on how to separate the bottom end.
I'm obviously missing something, probably simple.
https://mbworld.org/forums/images/sm...smashfreak.gif
TIA for enlightening me.
 I'm at this part too, there's something holding the stupid radiator at the bottom! How did you get it out?!
11-21-2009, 12:03 PM
I'm at this part too, there's something holding the stupid radiator at the bottom! How did you get it out?!
11-21-2009, 12:03 PM
#90
Junior Member

Join Date: Nov 2007
Location: Saskatchewan
Posts: 18
Likes: 0
Received 0 Likes
on
0 Posts
99.5 golf TDI,03 C240 Elegance,08 ML350
Last week I just read about the Coolant to transmisson oil problem. I have a 2003 coupe, and I didnt notice anything wrong. But just to be safe I decided re route my trans oil from radiator to an external trans cooler made by B&M. Here are some pics and I recommend anyone to do this. Increases life of trnas and reduces temps about 20* degress. Mounted trans cooler behind rt sde of bumper, in front of fender liner.. Also I added a little scoop to help air flow to cooler . Thanks for the info about problem . Cheers
Thanks
12-05-2009, 04:10 PM
#91
Junior Member
Join Date: Nov 2007
Location: Saskatchewan
Posts: 18
Likes: 0
Received 0 Likes
on
0 Posts
99.5 golf TDI,03 C240 Elegance,08 ML350
New to the forum and the w203 world but i would agree with TEAMREDLINE; i used to work at a tranny shop and many radiators with built in transcoolers (especially those with plastic end tanks) can become contaminated and/or leak.
The cheapest and easiest solution is to eliminate the problem entirely by installing an external tranny cooler and not using the one in the radiator. Good DIY though, impressive pictures and write up i'm sure it took some time to do.
The cheapest and easiest solution is to eliminate the problem entirely by installing an external tranny cooler and not using the one in the radiator. Good DIY though, impressive pictures and write up i'm sure it took some time to do.
02-26-2010, 02:31 PM
#92
Junior Member

Join Date: Aug 2009
Location: Bay Area
Posts: 30
Likes: 0
Received 0 Likes
on
0 Posts
2005 C230 Kompressor Sedan
Does anyone know where the line that carries ATF fluid going into the radiator is? Is it the top or bottom whole.... or in the picture left or right holes? Thanks!
 http://www.flickr.com/photos/23770107@N08/4389812729/
http://www.flickr.com/photos/23770107@N08/4389812729/Last edited by aznstud510x; 02-26-2010 at 02:34 PM.
03-02-2010, 03:54 AM
#93
Junior Member
Join Date: Aug 2009
Location: Bay Area
Posts: 30
Likes: 0
Received 0 Likes
on
0 Posts
2005 C230 Kompressor Sedan
 04-08-2010, 08:42 PM
#95
Junior Member

Join Date: Dec 2008
Location: Rochester, New York
Posts: 35
Likes: 0
Received 0 Likes
on
0 Posts
2014 E350 4Matic
I want to say a big thank you to Splinter.I replaced my trans fluid 3weeks ago and had to do it again today after replacing my valeo radiator with the Behr today also.Took me 3hrs for both due to rain off and on.Bought Behr radiator from ebay for $150 and other parts from MB dealership.Dealer price for radiator is $275 and labor i was told $412.Saved over $500 on DIY.
04-08-2010, 09:18 PM
#96
MBWorld Fanatic!

I want to say a big thank you to Splinter.I replaced my trans fluid 3weeks ago and had to do it again today after replacing my valeo radiator with the Behr today also.Took me 3hrs for both due to rain off and on.Bought Behr radiator from ebay for $150 and other parts from MB dealership.Dealer price for radiator is $275 and labor i was told $412.Saved over $500 on DIY.
 04-09-2010, 01:00 AM
#97
Super Moderator
Does anyone know where the line that carries ATF fluid going into the radiator is? Is it the top or bottom..
You�re most welcome.
It�ll be a sad day when my garage and its toolboxes are used only for storage.
04-10-2010, 03:56 PM
#98
Junior Member
Join Date: Dec 2008
Location: Rochester, New York
Posts: 35
Likes: 0
Received 0 Likes
on
0 Posts
2014 E350 4Matic
05-08-2010, 08:55 PM
#99
Junior Member
Join Date: Dec 2008
Location: Rochester, New York
Posts: 35
Likes: 0
Received 0 Likes
on
0 Posts
2014 E350 4Matic
Hey guys,I noticed my transmission fluid leaking from the area where the bolt holds the heat shield.I flushed the tranny again changing filter and gasket.The tread holding one bolt stripped out.How do i re-tread as my new fluid i put in will leak if i don't tighten an can i also use a longer bolt with same tread?
05-09-2010, 01:11 AM
#100
MBWorld Fanatic!
Hey guys,I noticed my transmission fluid leaking from the area where the bolt holds the heat shield.I flushed the tranny again changing filter and gasket.The tread holding one bolt stripped out.How do i re-tread as my new fluid i put in will leak if i don't tighten an can i also use a longer bolt with same tread?


