When you click on links to various merchants on this site and make a purchase, this can result in this site earning a commission. Affiliate programs and affiliations include, but are not limited to, the eBay Partner Network.
Ok, I had mine done today. Seems that @ 119kmi the mounts were still original, and they did not look _that_ bad.
He did the driver's side first - everything from under the car. Unfastened some hose from firewall area on driver's side which apparently was in the way. Lifted the engine using a jack and a wooden block. For the upper bolt he used what appeared to be a ratcheting box wrench. For the lower bolt - impact gun or smth.
went to the dealership for alignment. The tech diagnosed my engine vibrations to the two engine and one tranny mount. If one goes, you should do them all at the same time. the crappy thing is that I changed them 1 year/25000 miles ago and I get the vibrations again. Make sure that you replace them with OEM parts. The hardest part was dismantling the exhaust/headers to get the motor mounts. I used a floor jack with a piece of wood to suspend the engine. the two motor mounts took like 20 minutes to replace and the tranny mount like 5 minutes. I spent the rest of the time to just putting the headers/exhaust. Not hard, but tedious.
My 2010 C180 has done 50000 KM and has started giving me trouble. I have changed the engine mounts and brake disks. The question I am looking for an answer is 1. how long does a mount last or KM wise? 2 Similarly, the disk brake wears down after how many KM? Also, the controller unit has been giving problems with eps and abs warnings lighting up. Please advise.
Last edited by MBc180_2009; 04-01-2014 at 04:09 AM.
From what I've heard, the mounts are supposed to last around 60k miles. Depends on the roads you drive apparently.
If you used non-OEM mounts, they may fail sooner.
The brakes' wear depends on how aggressively you brake etc. Could be anything from 30k km to 50-60k km. I am at 45k km on front pads, and still got plenty of pad material left.
The EPS warning may be that you need to relearn the steering angles? - turn the steering wheel lock-to-lock several times and see if it helps.
Lastly, you should post in the W204 forum. C-classes after 2007 are W204 chassis.
The brakes' wear depends on how aggressively you brake etc. Could be anything from 30k km to 50-60k km. I am at 45k km on front pads, and still got plenty of pad material left.
[/QUOTE]
Thanks for your response. The silver brakes disks
how long do those solid rims last. You advise that at 110KM yours still looks good?
Last edited by MBc180_2009; 04-01-2014 at 08:11 PM.
As a rule of thumb, on W203, the front rotors should last for two sets of brake pads.
So yes, that would mean 60-120k km they will probably need replaced.
But to be sure you would need to measure the thickness of rotors.
As a rule of thumb, on W203, the front rotors should last for two sets of brake pads.
So yes, that would mean 60-120k km they will probably need replaced.
But to be sure you would need to measure the thickness of rotors.
Thanks for the answers. It has helped clarify my doubts. Cheers!
Looking around online for the motor mounts, I finding some places have the left and right mounts listed as the same party number. Can anyone confirm if this is the case or are some aftermarket mounts just mad to be universal maybe?
Last edited by onehighfocus; 08-10-2014 at 02:53 PM.
The left and right are the same mounts. They have the same serial number. By the way....even though they sell these motor mounts online for cheap.....do not buy them! Regarding these particular mounts....you get what you pay for. Do your research on the brands. I paid approximately $170 for mine
..including the transmission mount. Also, I just replaced mine myself. Drivers side is very tricky. I used a short 4" wrench for the top bolt. It doesn't remove. The mount drops down from the bolt. I only had to raise the engine and lower the steering rack...to create a pathway of removing/installing the mount. But the difference is unbelievable. Worth every cuss word that I uttered during the process.....
Oh I'm not going after the cheapest parts. I actually had already put in my order for the full set of Corteco ones from pelicanparts.com, who incidentally has left and right listed at seperate part numbers and different prices...
I received my order from Pelican Parts for my Corteco motor mounts but I think one of the covers is missing.
Looks like its part number 203-240-20-17 (Right) that came with a cover and 203-240-19-17 (Left) that didn't. And yes, the actually do look identical. cant tell them apart once out of the box.
Did you guys that installed these use the covers or just put in the bare mounts?
Last edited by onehighfocus; 08-14-2014 at 03:26 PM.
I used the rubber boot cover. The original mounts had them installed. It's purpose is to keep excessive dust and dirt from the rubber seals. If you still have the old ones....Clean and reuse one of them, since the new mounts only came with one.
The motormounts are the same and oriented differently. I would recommend buying the OE parts. I had to replace them TWICE! the OE were of better quality. more rubber to handle the torque and vibrations. When I did it I had to drop the exhaust (not the manifold)to get to the motor mount bolts using a box rachet that I bought specifically from sears. Buy OE parts for this job!
Welp finally decided to get out there and take this on... 2004 C230
I wanted to take on the drivers side first in case I was unable to complete it. Didn't want to have a new passengers side mount and trans mount but be stuck with the collapsed drivers side...
After raising and properly securing the vehicle on jack stands (of course...) I free'd the A/C line support bracket (2 bolts) to allow access to the driver side mount. FYI, my drivers side mount did not have that cover boot on it, so I didn't install one.
After about an hour and a half laying on my back, staring at the bottom of the super charger, I decided the only way to turn that top bolt was to cut my standard length, ratcheting box end wrench in half (thanks Dremel). Now how to turn that short lil thing? I came up with the attached contraption (U-joint missing from the 19mm deep socket.. more on that later) I slipped the extensions up thought the lower control arm mounting area and after what seemed like another hour of figuring out how to keep the wrench on the bolt and the contraption on the wrench while applying torque...
SUCCESS!!!!
Undid the bottom bolt
Jacked up the motor quite a bit
Finagled the mount out passed the A/C lines... phewww..
Now to replace.
I slipped the new mount in passed the A/C line, which, for some reason was easier than taking out the collapsed one.
Lined it up (there is a bump on the seat that aligns the mount. It is very slight, don't tighten the bottom bolt up just yet. Lowered the motor slowly making sure the tab on the top side of the mount slips into the slot on the receiving bracket. the weight of the motor will make the final adjustments.
Once everything is sitting aligned and pretty, tighten up that bottom bolt.
Now, I was pretty sure I wasn't going to be able to torque down that top bolt all that well so I threw some Blue loctight on the bolt and snugged it down best I could with the contraption and DONE!
The passenger side was indeed a breeze.
Removed the lower bolt.
Remove the upper bolt (using a U-joint on a 5/8" socket)
Jacked up the motor and free'd up all the pieces.
I removed upper aluminum heat shield , which is now just in the way
Finagled the mount up out through the top, passed the cat and upper mount arm.
to my surprise... the bottom of the mount was shattered
This leads me the believe the car may have been salvaged due to more than just vandalism as disclosed. oh welllls...
This mount did have the rubber boot over it (perhaps a heat thing?) so back in the new one will go with the provided boot.
The new mount went in from the top the same way the old one came out.
Replaces the aluminum heat shield.
Tighten the lower bolt
Tighten the upper bolt... Ooops! too many Torque! snapped my U-joint in half
No, I don't have a torque wrench, nor did I look up the proper specs. I have been wrenching on cars long enough to have a well enough calibrated arm. guess my U-joint just couldn't hang
After all that, swapped out the trans mount (too easy to type up)
Man, indeed, new mounts are all the difference in the world. I thought maybe i have a vacuum leak or miss due the the horrid vibrations, but nope, just busted old mounts
Last edited by onehighfocus; 09-01-2014 at 03:21 AM.
Welp finally decided to get out there and take this on... 2004 C230
I wanted to take on the drivers side first in case I was unable to complete it. Didn't want to have a new passengers side mount and trans mount but be stuck with the collapsed drivers side...
After raising and properly securing the vehicle on jack stands (of course...) I free'd the A/C line support bracket (2 bolts) to allow access to the driver side mount. FYI, my drivers side mount did not have that cover boot on it, so I didn't install one.
After about an hour and a half laying on my back, staring at the bottom of the super charger, I decided the only way to turn that top bolt was to cut my standard length, ratcheting box end wrench in half (thanks Dremel). Now how to turn that short lil thing? I came up with the attached contraption (U-joint missing from the 19mm deep socket.. more on that later) I slipped the extensions up thought the lower control arm mounting area and after what seemed like another hour of figuring out how to keep the wrench on the bolt and the contraption on the wrench while applying torque...
SUCCESS!!!!
Undid the bottom bolt
Jacked up the motor quite a bit
Finagled the mount out passed the A/C lines... phewww..
Now to replace.
I slipped the new mount in passed the A/C line, which, for some reason was easier than taking out the collapsed one.
Lined it up (there is a bump on the seat that aligns the mount. It is very slight, don't tighten the bottom bolt up just yet. Lowered the motor slowly making sure the tab on the top side of the mount slips into the slot on the receiving bracket. the weight of the motor will make the final adjustments.
Once everything is sitting aligned and pretty, tighten up that bottom bolt.
Now, I was pretty sure I wasn't going to be able to torque down that top bolt all that well so I threw some Blue loctight on the bolt and snugged it down best I could with the contraption and DONE!
The passenger side was indeed a breeze.
Removed the lower bolt.
Remove the upper bolt (using a U-joint on a 5/8" socket)
Jacked up the motor and free'd up all the pieces.
I removed upper aluminum heat shield , which is now just in the way
Finagled the mount up out through the top, passed the cat and upper mount arm.
to my surprise... the bottom of the mount was shattered
This leads me the believe the car may have been salvaged due to more than just vandalism as disclosed. oh welllls...
This mount did have the rubber boot over it (perhaps a heat thing?) so back in the new one will go with the provided boot.
The new mount went in from the top the same way the old one came out.
Replaces the aluminum heat shield.
Tighten the lower bolt
Tighten the upper bolt... Ooops! too many Torque! snapped my U-joint in half
No, I don't have a torque wrench, nor did I look up the proper specs. I have been wrenching on cars long enough to have a well enough calibrated arm. guess my U-joint just couldn't hang
After all that, swapped out the trans mount (too easy to type up)
Man, indeed, new mounts are all the difference in the world. I thought maybe i have a vacuum leak or miss due the the horrid vibrations, but nope, just busted old mounts
Good job! This is the same exact procedure I did. For the top drivers mount nut I just came up with a wrench that would fit. Then with some elbow grease and patience it can be removed.
My observation as well, the new mount went in much easier than the old mount came off.
My driver mount did not have the cover either. I believe only the passenger one should have it as it is there because of the heat of the exhaust manifold.
Same effect on my car, completely transformed the way the car feels. Even the transmission behavior has changed once I replaced the mounts.
Also no need to buy the Mercedes-Benz mounts. Some cars came with Corteco and some with Loemforder. These are the same ones that you over pay at the dealer. Anything below that I would not encourage.
After reading this forum I got inspired and pulled the trigger on the passenger side mount.
I have the 1.8L 4 cyl Kompressor. US, left-hand drive.
My symptoms were "rumble" start when I first start the engine, something similar when turning off the engine, a bit of clunk here and there when downshifting. I did the wiggle test on the engine and found the drivers side mount able to move a bit, but the passenger side mount wouldn't budge. So I assume it had collapsed.
Bought Corteco 203-240-20-17 from RME, arrived in two days with free shipping! Decided to do the replacement this morning before I go to work
Replacing the right side mount is pretty easy since it is completely exposed. Some things I didn't know and learned as this is my first time around:
* You don't have quite a straight shot at the top bolt, I used a wobble extension and it worked fine. However the bolt isn't on very tight so you can probably just go with a straight extension. 16mm top, 14mm bottom.
* I was overly cautious on jacking up under the oil pan. Due to the steering rack stiffener plate the oil pan shape has angled front corners, so I found I had to cut a piece of wood to match the contour a bit so I would be lifting on the edges of the pan as much as in the middle. I also didn't know how well the engine would lift off the mount ... turns out it was pretty effortless with the floor jack. The mount stuck to the underside of the engine bracket due to the plastic dust cover -- took a bit of effort to "rip" it off.
* There is blue loc-tite on the bottom bolt. I put some fresh loc-tite on both bolts and torqued them to ~25 ft-lbs.
Comparing my old to new mount, in a relaxed state the new mount was ~3/8" higher than the old one. If I pressed on the top of the old mount, the top would rock from side to side but would not go down. It was bottomed out.
After a quick up and down the street test drive, I'd say about 80% of my problem is gone now. As I've said in other threads/forums I am a firm believer in replacing rubber every several years. I'm going to replace the drivers side mount next.
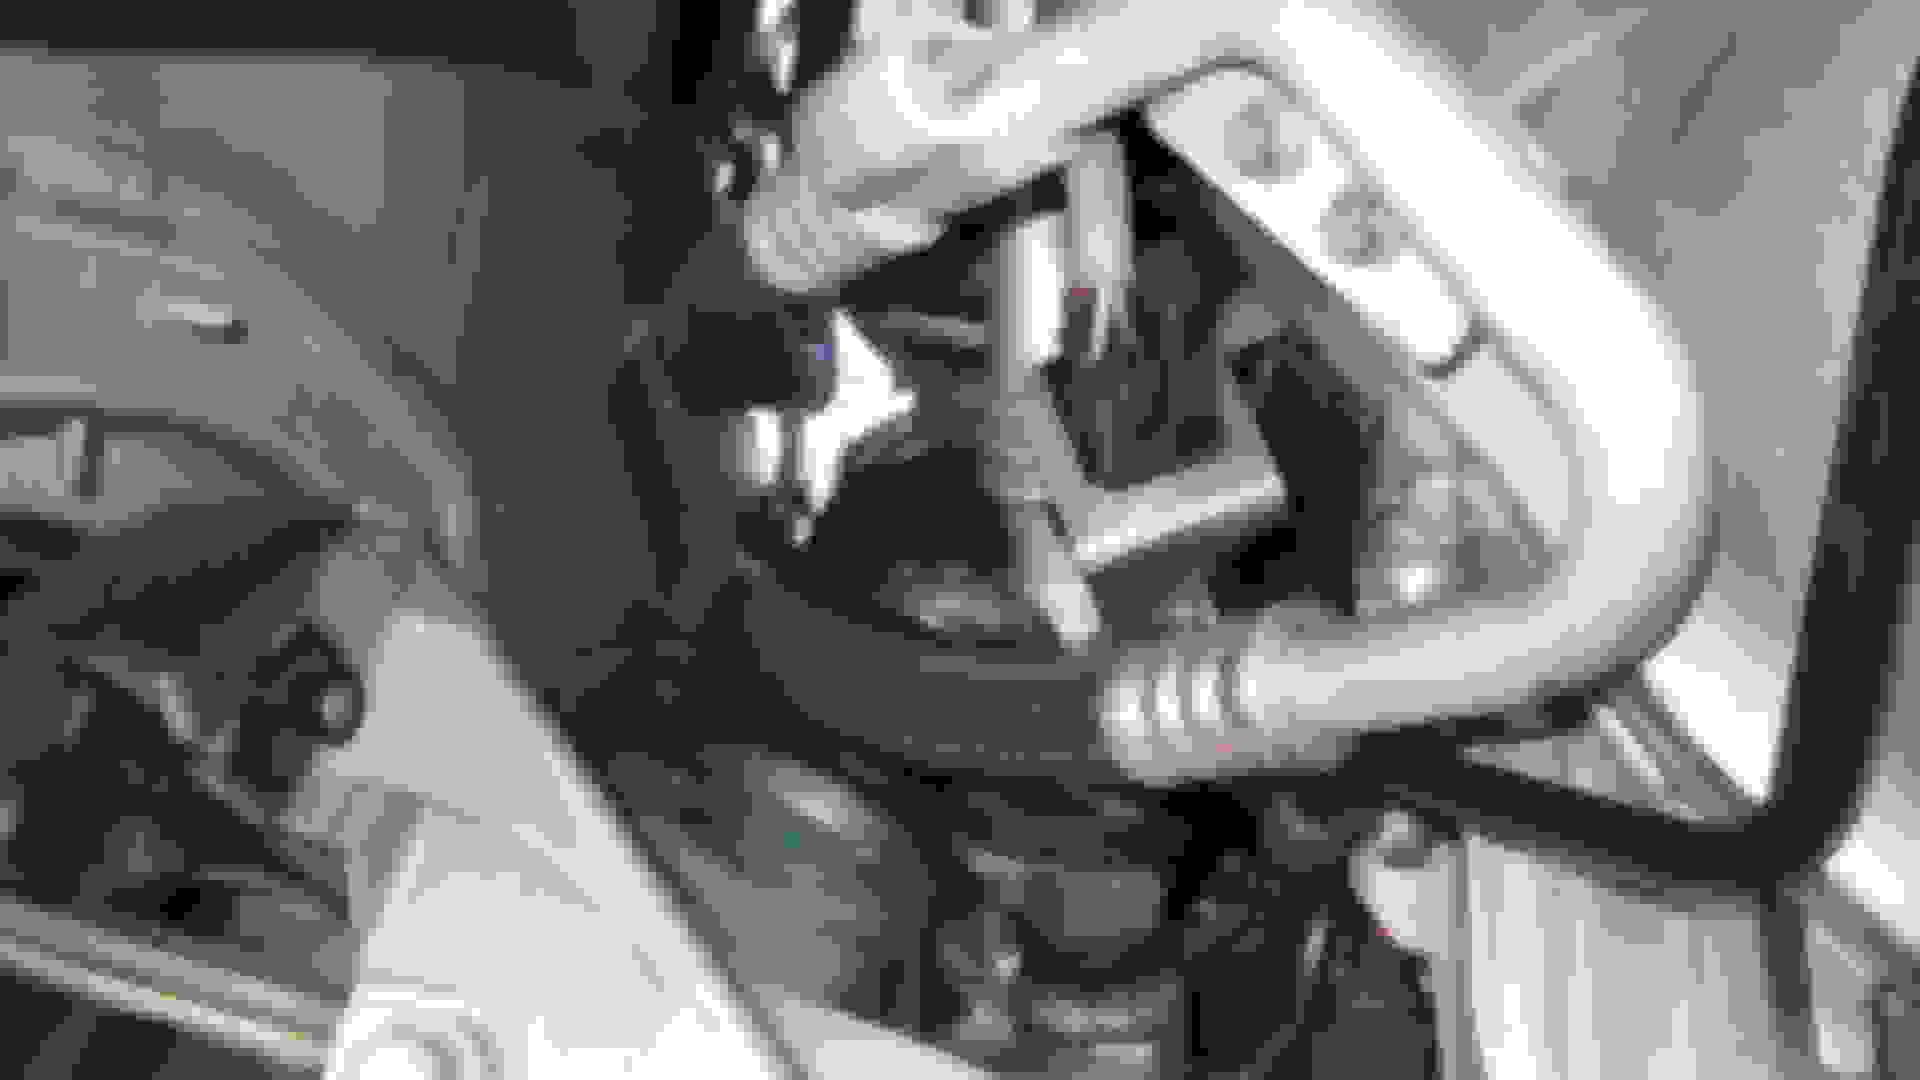
Speaking of, here is a photo looking from rearward under the car:
It looks like the U shaped bracket for that big hose can be unbolted from the engine block so the hose can be moved to the left to remove the mount. Doesn't look bad.
Not much clearance up there, but with fhe special offset wrench it doesn't look difficult. Might have to lift the engine off the mount a bit to get the bolt out though.
Fyi, the right side mount has the rubber dust cap and a metal heat shield covering it -- the left side mount has neither of these. Both have a counterweight(?) on top that the bolt goes through first.
** Quick update -- just drove to work, and the car is much quieter now, all of the startup/shutdown rumble is gone. My Mercedes is back!
The left side mount is still getting replaced next. Although it doesn't feel like it's bottomed out yet, after 10 years it's probably pretty close. I already replaced the rear tranny mount a couple of years back so after this one I'll be set with this area for a while. After that will be the flex disks ...
** Another update -- I ordered the left side mount, 203-240-19-17 from RME, and it arrived 24 hours later with free shipping ... can't beat that! Fyi the left side mount appears to be identical to the right side but lacking the rubber dust cover. I have to wait for the offset wrench to arrive before replacing this one.
Hey jkowtko,
Did you notice anything different(vibration, noise...) when your tranny mount was replaced??
I just got my front 2 engine mounts replaced but didn't notice much difference or I was expecting too much?? Hoping to quite down my "rumble" and exhaust leak like noise by replacing my tranny mount next week....
BTW my 05 C230 has 102k miles.....
 03-29-2012, 07:10 PM