M271 DIY Coolant Flush
 07-26-2014, 10:13 PM
#1
Senior Member
Thread Starter
M271 DIY Coolant Flush
Okay, the sticky DIY is incorrect in places, overly long, and raises more questions than it answers. So here's the updated version which will save you a lot of B.S. I only ask in return that you take the old coolant to your auto parts store and have them dispose of it b/c it's toxic and sweet which could be lethal to an animal or kid if consumed. Though 2005 and up models have coolant that is supposed to last the life of the car, after 10 years it might be a good idea to change it out. Especially if you have an error code to replace coolant temp. sensor or get the 'check coolant level' sign on your dash (my situation)
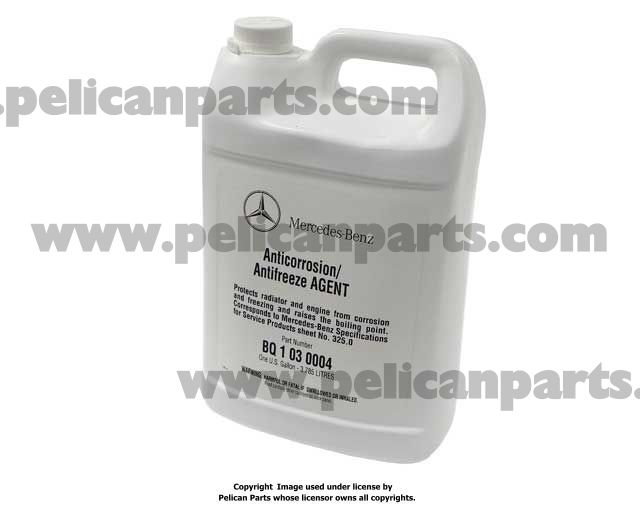
Tools 8mm wrench, a container AT LEAST 2.5 gallons, a container AT LEAST 5 gallons, latex gloves, a gallon of DISTILLED water & a gallon of mercedes coolant (Part #Q-1-03-0004)

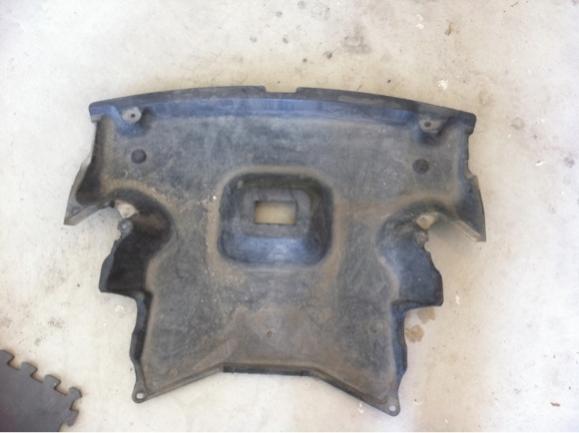
Step 1: Remove splash guard. You don't have to jack it up to do this. You need an 8mm wrench. Mine has 6 screws.

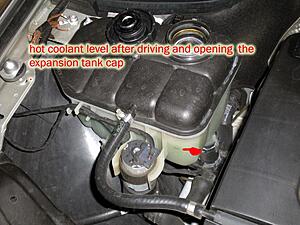
Step 2: With car COLD, unscrew radiator cap.
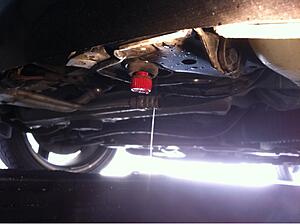
Now with latex gloves on (remember coolant is toxic), find the drain plug (it's red). Put the 2.5 to 3 gallon container underneath it (if too tall, now you have to jack up the driver side), use a flat head screw driver to loosen it and then pull it out. Let the coolant drain for about 10 minutes.
Step 3: Transfer coolant to 5 gallon container, put 2.5 or 3 gallon container back under red drain plug. Now fill the radiator with hose water and let it drain again.
Step 4: Transfer water/coolant to 5 gallon container. Tighten red drain plug. Fill with hose water all the way to the fill line (on c230 the fill line is the bottom of the black lid), screw the radiator cap on, turn on the car and with the heat on full blast, let it run for ten minutes (this will help get out remaining coolant).
Step 5: Shut off car, wait a couple minutes and with a towel unscrew the radiator cap (steam will escape- it's HOT so be careful and use a towel). Now put the 2.5 or 3 gallon container underneath and unscrew the red drain plug, let drain again. You probably can't transfer all water/coolant to 5 gallon container, but do your best. Now tighten that red drain plug!
Step 6! PRE-MIX the gallon of mercedes coolant with the gallon of distilled water (NO HOSE WATER) into your 2.5 or 3 gallon container. Note, this is why the container is at least 2.5 gallons. Now you have a 50:50 mix. If you dump the whole mercedes container of coolant into your radiator w/o pre-mixing, you'll end up with a higher ratio than 50:50 if your capacity is less than 2 gallons. For my car, if I did that, I'd have to redo the flush b/c the ratio would be so far from 50:50. Note, if you live in an igloo, you're ratio will be different. But for normal US of A climate, excluding alaska, you should be good.
Step 7: Put the funnel in the radiator and pour mix up to the fill level (check your owner's manual or look for it written on side of radiator). Screw radiator cap on. Squeeze the hose coming from the radiator and all subsequent hoses coming off to burp the air out of the system.
Step 8: Turn car on and let idle for 10 minutes. This should move some more air around and cause the coolant level to drop.
Step 9: Turn off car and check coolant level. If it dropped, fill back up to fill line. Now, put splash guard back on. Ya done, son! Take the left over coolant 50:50 mix and pour back into your empty mercedes coolant container. Keep the coolant and funnel in your trunk in case the next day the level drops some more.
Tools 8mm wrench, a container AT LEAST 2.5 gallons, a container AT LEAST 5 gallons, latex gloves, a gallon of DISTILLED water & a gallon of mercedes coolant (Part #Q-1-03-0004)
Step 1: Remove splash guard. You don't have to jack it up to do this. You need an 8mm wrench. Mine has 6 screws.
Step 2: With car COLD, unscrew radiator cap.

Now with latex gloves on (remember coolant is toxic), find the drain plug (it's red). Put the 2.5 to 3 gallon container underneath it (if too tall, now you have to jack up the driver side), use a flat head screw driver to loosen it and then pull it out. Let the coolant drain for about 10 minutes.

Step 3: Transfer coolant to 5 gallon container, put 2.5 or 3 gallon container back under red drain plug. Now fill the radiator with hose water and let it drain again.
Step 4: Transfer water/coolant to 5 gallon container. Tighten red drain plug. Fill with hose water all the way to the fill line (on c230 the fill line is the bottom of the black lid), screw the radiator cap on, turn on the car and with the heat on full blast, let it run for ten minutes (this will help get out remaining coolant).
Step 5: Shut off car, wait a couple minutes and with a towel unscrew the radiator cap (steam will escape- it's HOT so be careful and use a towel). Now put the 2.5 or 3 gallon container underneath and unscrew the red drain plug, let drain again. You probably can't transfer all water/coolant to 5 gallon container, but do your best. Now tighten that red drain plug!
Step 6! PRE-MIX the gallon of mercedes coolant with the gallon of distilled water (NO HOSE WATER) into your 2.5 or 3 gallon container. Note, this is why the container is at least 2.5 gallons. Now you have a 50:50 mix. If you dump the whole mercedes container of coolant into your radiator w/o pre-mixing, you'll end up with a higher ratio than 50:50 if your capacity is less than 2 gallons. For my car, if I did that, I'd have to redo the flush b/c the ratio would be so far from 50:50. Note, if you live in an igloo, you're ratio will be different. But for normal US of A climate, excluding alaska, you should be good.
Step 7: Put the funnel in the radiator and pour mix up to the fill level (check your owner's manual or look for it written on side of radiator). Screw radiator cap on. Squeeze the hose coming from the radiator and all subsequent hoses coming off to burp the air out of the system.
Step 8: Turn car on and let idle for 10 minutes. This should move some more air around and cause the coolant level to drop.
Step 9: Turn off car and check coolant level. If it dropped, fill back up to fill line. Now, put splash guard back on. Ya done, son! Take the left over coolant 50:50 mix and pour back into your empty mercedes coolant container. Keep the coolant and funnel in your trunk in case the next day the level drops some more.
Last edited by scottonfire; 07-27-2014 at 10:30 PM.
 07-26-2014, 10:34 PM
#2
MBWorld Fanatic!
I actually did "step 4" three times using distilled water. The third time the drained water was 98% clear, so I stopped there.
The way you did it, there is tap water still left in the engine block after you drain from the radiator. It's not a huge amount (a quart?), but it's there.
The way you did it, there is tap water still left in the engine block after you drain from the radiator. It's not a huge amount (a quart?), but it's there.
07-26-2014, 10:56 PM
#3
Senior Member
Thread Starter
I actually did "step 4" three times using distilled water. The third time the drained water was 98% clear, so I stopped there.
The way you did it, there is tap water still left in the engine block after you drain from the radiator. It's not a huge amount (a quart?), but it's there.
The way you did it, there is tap water still left in the engine block after you drain from the radiator. It's not a huge amount (a quart?), but it's there.
Last edited by scottonfire; 07-27-2014 at 12:12 AM.
 05-21-2015, 10:29 PM
#5
MBWorld Fanatic!
My THREE thoughts...
1.) If you have [REST] Feature - or can activate the electric water pump (if equipped) use it to circulate the water for you...it's nice.
2.) There is a special tool, a cap with a nozzle on it to hook up a vacuum pump...get one/make on...they're cheap - run a vacuum while you clean the shop - close the system and you will be amazed how much air it will pull out.
3.) Obtain a NEW cap/plug and seal...also cheap, plastic and subject to some decent heat...replace when doing this job and avoid a future weak spot. (Speaking of which...if you have an M271...get the adaptor from the expansion tank line to the block side pipe and leave one in the trunk...)


