
 06-09-2015, 12:17 PM
Last edit by: IB Advertising
See related guides and technical advice from our community experts:
Browse all: Exterior Guides
- Mercedes-Benz C-Class: How to Replace Door Lock Actuator
Step by step instructions for do-it-yourself repairs
Browse all: Exterior Guides

DIY: Replacing the door lock actuator
01-09-2015, 07:02 PM
#1
Newbie
Thread Starter

DIY: Replacing the door lock actuator
This is my first post and first DIY, so I appreciate any suggestions to make it better. I am not stating that this is the proper way to change a door lock actuator, but this is the way I did it, and it seems to work.
The door lock in the front passenger door was not responding to the door button or key, but I could hear the actuator engaging if I put my ear to the door, so I assumed there was probably a broken linkage, and that the actuator itself was good. These actuators are not supposed to be serviceable, but a broken linkage is an easy repair. The dealer quoted me $650 plus tax, and that�s reason enough to give it a try.
You will need the following
Hand riveter, and rivets up to 1/4 inch
Torx 20 and 30
Nylon pry tools (for the interior trim)
drill with 1/4 inch bit, and a slightly larger bit.
I first removed the interior trim using this guide:
C300 interior trim removal 2.pdf
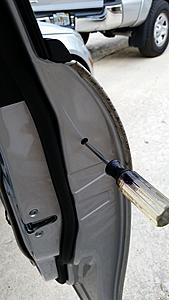
Then I removed the grommet covering the access hole to remove the outside door handle. You only need to retract the screw about half an inch. no need to remove it. Use a Torx 20.
The door handle mechanism is separated from the door by removing two torx 20 screws from the outside.
Then I removed 3 Torx 30 screws holding the door latch to the door. Sorry, no pics.
Next, I removed the window. There are two access holes in the metal panel, covered by rubber caps. Lower the window until you can see the two torx 30 screws holding the window. loosen these screws only, and remove the window pane. Again, no pictures.
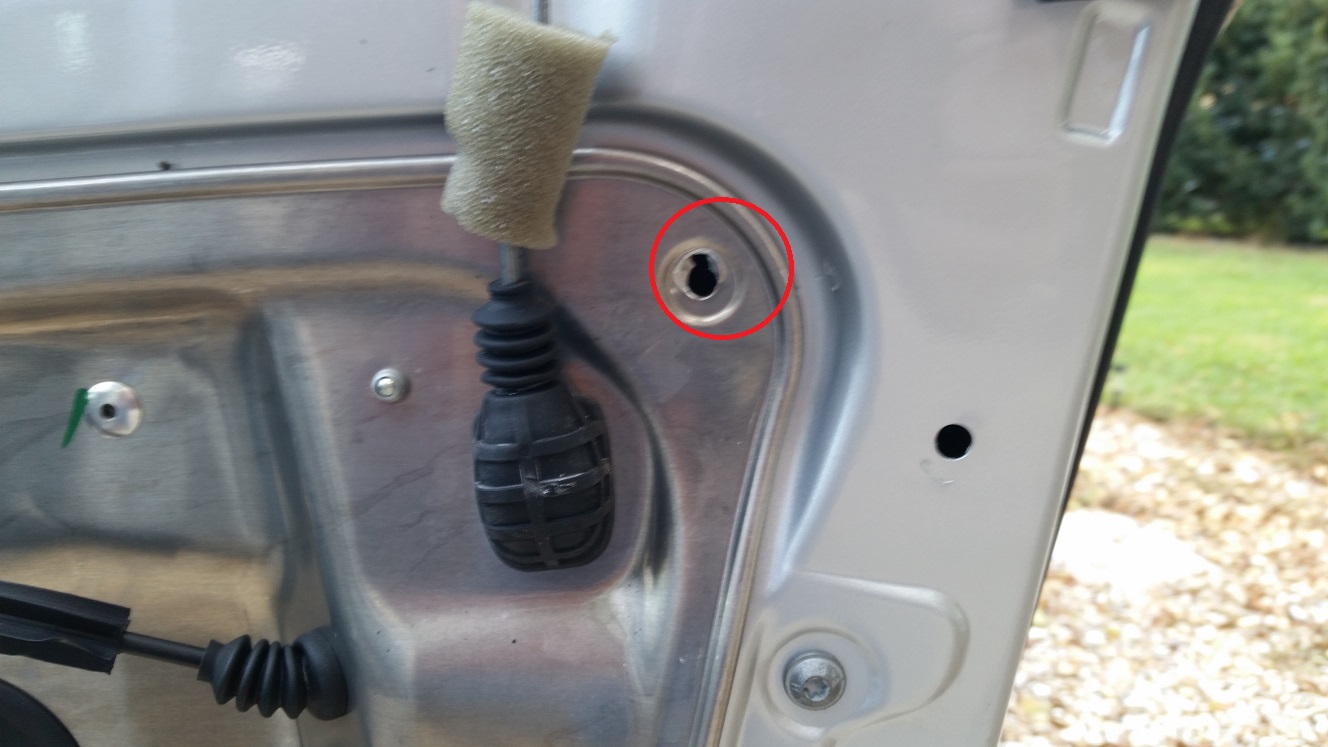
Next I drilled out the rivets holding the metal panel. Use the 1/4 inch drill bit, and a slightly larger bit if this is not enough.

Be careful not to drill a large hole, or your new rivets will not take hold.
The rivets you have to drill out are only on the perimeter, and look different from the other rivets. About 10 of them.
This is a pic of an improperly drilled out rivet, but when I reattached the panel, it held.

Disconnect all wires.
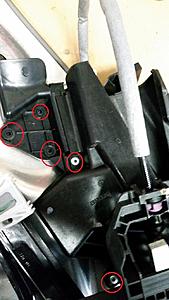
Now the metal panel comes out. Attached to the panel is the door latch/actuator assembly, as well as the handle mechanism. Both of these are riveted to the metal panel.
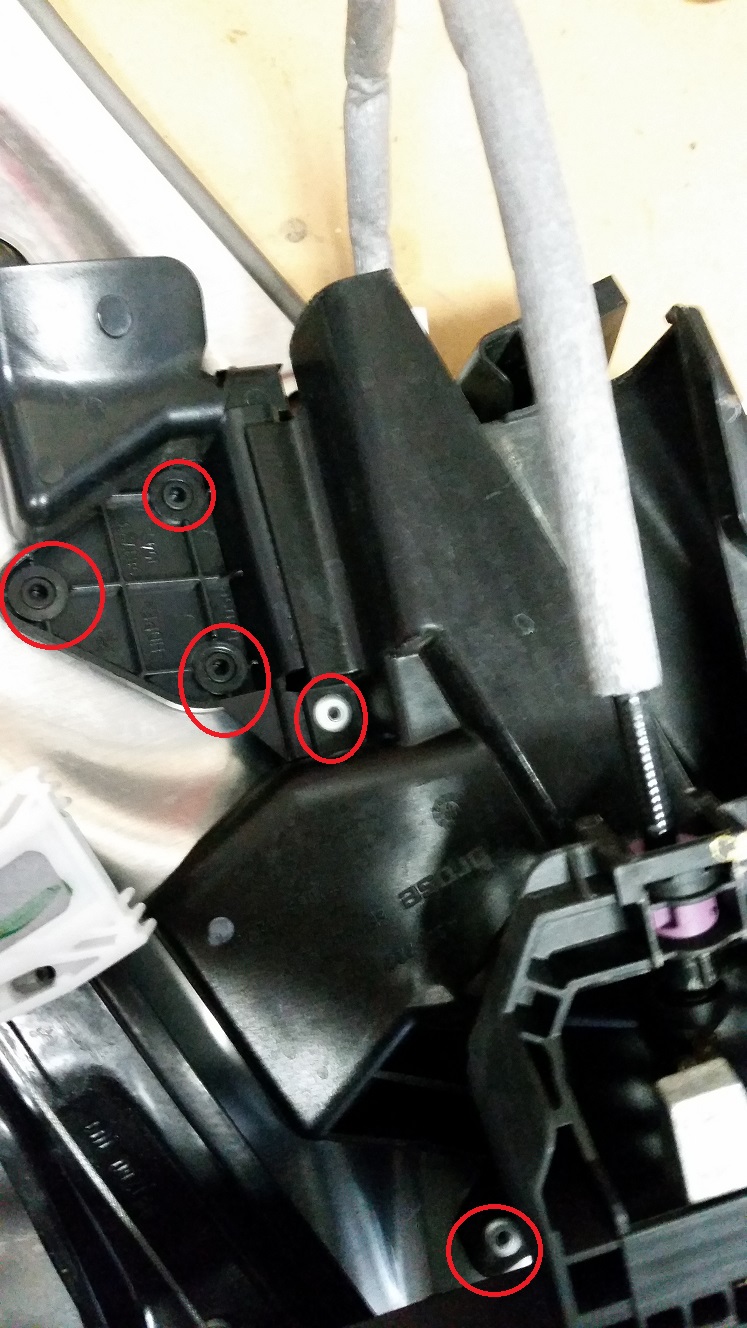
Now i drilled out the Nylon rivets holding the latch/actuator assembly, and drilled out the two metal rivets (1/8 inch) holding the door handle mechanism. NOTE: i did not have replacement nylon rivets, so I used 1/4 inch bolts to re-assemble.
This is thee moment when I discovered that the actuator was damaged beyond repair, and had to rush to the dealer to buy a new one, so my wife would have a locking door before morning. (The motor or solenoid, whatever it has inside, was getting power, but not able to move the mechanism. No broken linkages.)
$185 plus tax later, I put everything back together, and it works just fine.
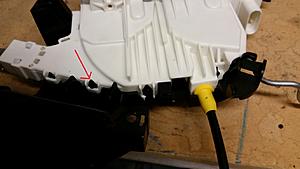
Take note that the latch/actuator assembly has a black cover that has to be removed and re-installed on the new unit. This cover is attached with tabs that don�t come out easily. You might have to break the plastic holding the tab. Since this part you�re breaking is the bad actuator, you�ll be throwing it out anyway. (Or holding on to it because, damn it, I�ll fix it one way or another.)
When you reinstall the metal panel, use the 1/4 inch rivets, and pretty much follow the instructions in reverse.
I Hope this helps
The door lock in the front passenger door was not responding to the door button or key, but I could hear the actuator engaging if I put my ear to the door, so I assumed there was probably a broken linkage, and that the actuator itself was good. These actuators are not supposed to be serviceable, but a broken linkage is an easy repair. The dealer quoted me $650 plus tax, and that�s reason enough to give it a try.
You will need the following
Hand riveter, and rivets up to 1/4 inch
Torx 20 and 30
Nylon pry tools (for the interior trim)
drill with 1/4 inch bit, and a slightly larger bit.
I first removed the interior trim using this guide:
C300 interior trim removal 2.pdf
Then I removed the grommet covering the access hole to remove the outside door handle. You only need to retract the screw about half an inch. no need to remove it. Use a Torx 20.
The door handle mechanism is separated from the door by removing two torx 20 screws from the outside.

Then I removed 3 Torx 30 screws holding the door latch to the door. Sorry, no pics.
Next, I removed the window. There are two access holes in the metal panel, covered by rubber caps. Lower the window until you can see the two torx 30 screws holding the window. loosen these screws only, and remove the window pane. Again, no pictures.
Next I drilled out the rivets holding the metal panel. Use the 1/4 inch drill bit, and a slightly larger bit if this is not enough.

Be careful not to drill a large hole, or your new rivets will not take hold.
The rivets you have to drill out are only on the perimeter, and look different from the other rivets. About 10 of them.
This is a pic of an improperly drilled out rivet, but when I reattached the panel, it held.
Disconnect all wires.
Now the metal panel comes out. Attached to the panel is the door latch/actuator assembly, as well as the handle mechanism. Both of these are riveted to the metal panel.
Now i drilled out the Nylon rivets holding the latch/actuator assembly, and drilled out the two metal rivets (1/8 inch) holding the door handle mechanism. NOTE: i did not have replacement nylon rivets, so I used 1/4 inch bolts to re-assemble.
This is thee moment when I discovered that the actuator was damaged beyond repair, and had to rush to the dealer to buy a new one, so my wife would have a locking door before morning. (The motor or solenoid, whatever it has inside, was getting power, but not able to move the mechanism. No broken linkages.)
$185 plus tax later, I put everything back together, and it works just fine.
Take note that the latch/actuator assembly has a black cover that has to be removed and re-installed on the new unit. This cover is attached with tabs that don�t come out easily. You might have to break the plastic holding the tab. Since this part you�re breaking is the bad actuator, you�ll be throwing it out anyway. (Or holding on to it because, damn it, I�ll fix it one way or another.)

When you reinstall the metal panel, use the 1/4 inch rivets, and pretty much follow the instructions in reverse.
I Hope this helps
 01-18-2015, 10:31 AM
#2
MBWorld Fanatic!
Just in time. Looks like my driver's rear door actuator has gone out and my car has less than 15k miles.
Question:
-I am assuming you need to release the glass from the window regulator so you can pull the metal panel that also holds the lock actuator off. Could you have loosened the screws that holds the glass, roll the glass up, tape the glass with duct tape to hold it up and then press switch to lower window slightly to release from the window regulator? And when reattaching the metal panel, lower the regulator so you can see it from the two access holes, then remove tape holding glass and guide it back into the window regulator that was holding the glass and retighten the two screws.
-Can you use 3/16 rivets?
-What hand riveter did you use? For 1/4 rivets, I saw one at Harbor Freight and it is quite large (total tool length 17.5").
Thanks for posting!
Last edited by Sincity; 01-18-2015 at 06:41 PM.
01-21-2015, 06:01 PM
#3
MBWorld Fanatic!
I ended up having a shop replace the rear actuator and watched the process. You do not need to remove the glass. Just loosen the bolt that holds the glass and tape the glass up. You also do not need to drill out the plastic rivets on the actuator. In the center of the plastic rivets, there is a pin you push out. However, installation is a PITA as you have to "press" those 3 plastic standoffs that you pushed the pin out of back into the metal panel. The cost is 2.4 hours (multiply the bodyshop rate for your area). Note bodyshop rate is much less than mechanical shops. If anyone is having a shop do it, take it to your local favorite bodyshop.
01-25-2015, 04:07 PM
#4
Newbie
Thread Starter
1) Yes, you could tape the window, but once you loosen the screws, isn't taking it out just the same? I just took the window out, put it aside, and replaced it when I was done. No difficulty at all.
2) I think the panel holes are too big for 3/16 rivets. Plus, any errant plunge of the drill will only widen the whole. The 17 1/2 inch riveter from Harbor Freight is only 19.95, and comes with several heads to handle smaller rivets. And ...son of a biscuit, it comes with 10 rivets of each size. It's the one I bought.
2) I think the panel holes are too big for 3/16 rivets. Plus, any errant plunge of the drill will only widen the whole. The 17 1/2 inch riveter from Harbor Freight is only 19.95, and comes with several heads to handle smaller rivets. And ...son of a biscuit, it comes with 10 rivets of each size. It's the one I bought.
06-01-2016, 07:37 PM
#5
MBWorld Fanatic!
Update: The driver door actuator is now out at 20k miles. Looks like I will try this myself. I also ended up buying the rivets from Mercedes this time.
07-17-2016, 04:44 AM
#6
Newbie

Join Date: Jul 2016
Posts: 1
Likes: 0
Received 0 Likes
on
0 Posts
Benz c300 (year 2010)
If you don't have all the tools required to perform this task, entire process would be cumbersome. Actually, entire process needs some level of expertise. The actuator console including three plastic reverts cover costed me around 230$ at a Benz retail dealer in California. I think you won't be able to dismantale or open actuator console without drilling or breaking three plastic rivets manually and be careful in handling the cover part with two riverts attached to three plastic rivets module. As if you broke it, would be difficult to find it from a local dealer.
Regrads,
Kedar Koti
Regrads,
Kedar Koti
Last edited by eshwa88888; 07-17-2016 at 04:52 AM.
07-18-2016, 07:21 AM
#7
MBWorld Fanatic!
^ I was able to reuse the part with the three plastic rivets. Though Mercedes will tell you that two parts (the plastic cover with the three rivets and the lock actuator rod) are superceeded with newer ones, all you really need is just the actuator itself.
Yes....very cumbersome project. The drilling/grinding of the rivets was a pain.
Yes....very cumbersome project. The drilling/grinding of the rivets was a pain.
Trending Topics
 10-04-2016, 09:54 AM
#9
Newbie

How old is your car?
My ML350 only 85k kilometers, roughly 50k miles, changed the drive door actuator, the entire piece. It cost me 620 CND in a small garage in Canada, dealership asked for 1030 CND.
I took the old lock assembly apart. found the small motor was working by connecting a battery. That means the mechanical mechanism was wrong, the plastic gears, cam etc. Does not Mercedes know how to make those plastic fittings more reliable?
12-03-2016, 05:30 AM
#10
Newbie

Join Date: Nov 2016
Posts: 1
Likes: 0
Received 0 Likes
on
0 Posts
2010 C300 Sport
Need help with actuator install 2010 C300
Need help with properly positioning manual door lock lever. The picture before removal must have been done incorrectly. No matter what I do, I cannot get the lever to properly move up or down to unlock or lock door. The replaced actuator works mechanically but does work electrically. I can hear click but nothing. All other door locks work perfectly. I am using a new Mercedes replacement part from advanced auto. Part didn't look like a return but new. Any help would be appreciated. An exploded view of the mechanism we be great to help me ensure that putting the lever in the correct hole. Thx
08-11-2020, 03:28 PM
#11
Junior Member

"Now i drilled out the Nylon rivets holding the latch/actuator assembly, and drilled out the two metal rivets (1/8 inch) holding the door handle mechanism."
There is no need to remove the nylon rivets, the actuator can be removed without removing the plastic around it.
There is no need to remove the nylon rivets, the actuator can be removed without removing the plastic around it.
 11-06-2023, 09:01 AM
#13

I know this is an old thread but replying because this is a really great writeup and helped me this weekend. This video did help to fill in some of the gaps.
.
For anyone like me with the earlier W204, mine is a 2008. I was looking for the front passenger (right side) door lock actuator and could not find anything online. Pretty much anything I found said it was not for the 08/09 models only 10-14. I found one and it ended up being the wrong part when I tried installing this weekend (8 pin connector instead of 4 pin). Went to MB with the part I removed and they searched the part number and said it was not in stock anywhere, not even to get it shipped from Germany. Parts guy did a bit of digging and found that there is a new part number 204-720-18-35. Searched the new part number this morning out of curiosity, spent 300+ at MB instead of 150 ish elsewhere.
For anyone like me with the earlier W204, mine is a 2008. I was looking for the front passenger (right side) door lock actuator and could not find anything online. Pretty much anything I found said it was not for the 08/09 models only 10-14. I found one and it ended up being the wrong part when I tried installing this weekend (8 pin connector instead of 4 pin). Went to MB with the part I removed and they searched the part number and said it was not in stock anywhere, not even to get it shipped from Germany. Parts guy did a bit of digging and found that there is a new part number 204-720-18-35. Searched the new part number this morning out of curiosity, spent 300+ at MB instead of 150 ish elsewhere.


