*DIY: Cheap (but not easy) Secondary Air Injection Pump Fix*
 07-01-2009, 08:47 AM
#26

Mine was running after I turned the car off one day so I pulled the plug on the unit then found the grey relay and pulled it. Went to the dealer paid 19.00 and plugged it in and all has been good for about two months now.
 07-01-2009, 10:35 PM
#27
Super Member

Join Date: May 2007
Location: Oakland, California
Posts: 636
Likes: 0
Received 0 Likes
on
0 Posts
07 E550, 02 C32, 91 300E
Got my car back today and they replaced the relay along with the pump. Didn't cost me anything cause of the extended warranty luckily. Thanks for the info again guys.
12-29-2009, 01:00 AM
#28
Junior Member

Join Date: Dec 2009
Posts: 45
Likes: 0
Received 0 Likes
on
0 Posts
02 C32
WOW nice write up. Hope i'm not to late to ask question in here. I found source for the brushes K45. Can anyone tell me if this thing will work.
http://buyitnow64.stores.yahoo.net/ki31mocabr.html
http://buyitnow64.stores.yahoo.net/ki31mocabr.html
12-29-2009, 01:26 PM
#29
Super Member
Thread Starter
WOW nice write up. Hope i'm not to late to ask question in here. I found source for the brushes K45. Can anyone tell me if this thing will work.
http://buyitnow64.stores.yahoo.net/ki31mocabr.html
http://buyitnow64.stores.yahoo.net/ki31mocabr.html
 - it may be worth a try in terms of cost; however, I don't think this brush will work.
There are a few reasons:
1. The shape of the brush itself (the brush in the pump motor is perfectly rectangular).
2. The brush in the pump motor has a braided copper lead directly attached to the brush. The spring is not actually attached to the brush. In the image from your link, I don't see any copper lead attached to the brush.
12-30-2009, 04:04 PM
#30
Junior Member
Join Date: Dec 2009
Posts: 45
Likes: 0
Received 0 Likes
on
0 Posts
02 C32
This could be the altrenative solution to our smog pump and headache. Thanks to boohooramblers information and help me with the pictures, i was able to find Bosch Brushes Catalog that could be what we are looking for or might be close. But first I need someone with the knowlegde about brushes to identify which can be use on our pump. In addtion, if you ever have a chance to remove ther motor of their air pump, please get some accurate measurement and provide some pictures (include holder and sourrounding part of the brushes) and post up here that would be perfect. Sorry guys i cant upload one PDF due to over limited space, so click on this link below. Noted, there's Bosch Starter Brusches PDF attached, but i think the Alternator on the link is the one.
http://www.stmaryscarbon.com/images/...oschAltGen.pdf
http://www.stmaryscarbon.com/images/...oschAltGen.pdf
Last edited by NamC32; 01-13-2010 at 05:17 PM.
12-31-2009, 12:45 AM
#32
Junior Member
Join Date: Dec 2009
Posts: 45
Likes: 0
Received 0 Likes
on
0 Posts
02 C32
Here go the pictures of the brushes everyone. According to boohooramblers measurement, the brush should be 11mm tall and ~8mm wide, but the lenght is a question for us because no one has never open a new pump before.
Last edited by NamC32; 01-13-2010 at 05:17 PM.
12-31-2009, 12:49 AM
#33
MBWorld Fanatic!

I do remember researching alternators, and it was stated that if the brushes have uneven wear the entire unit must be replaced... Does that apply in this case?
01-09-2010, 07:27 PM
#35
Super Member
Thread Starter
1. You install a resistor in place of the pump. As you know, the main culprit / weakness vis-a-vis the secondary air system is the relay. If the relay contacts stick (like they usually do), then you are left with the issue of serious heating of the resistor. This has presented as a problem for other circuits that have been bypassed using resistors, and as a result some people have had components melted.
Mind you, the space generated by removing the secondary air pump would allow a resistor to be isolated from contact with other parts.
2. As you know, the secondary air pump serves a function (however ridiculous it is). I noticed that before I fixed my pump, the occasional catalytic converter code would rear its ugly head due to lack of air 'infusion' upon start-up.
Relative to the functioning of the motor, etc., that isn't an issue. However, it can manifest itself as a check engine light.
At the end of the day, we (i.e. I used to be!) are concerned mostly with passing emissions and so we don't want the dreaded 'check engine' warning light.
02-24-2010, 09:44 PM
#36
Newbie

Join Date: Feb 2010
Posts: 5
Likes: 0
Received 0 Likes
on
0 Posts
c 32 AMG
Has anyone tried just retrofitting another mounting bracket to a NON-AMG pump instead? It is probably less hassle, in case only mounting the other pump is the issue. I am debating which way to go since my motor melted into the housing 
11-09-2010, 03:11 PM
#38
Newbie

Join Date: Nov 2010
Posts: 1
Likes: 0
Received 0 Likes
on
0 Posts
MB SL55
Good Job!
I fallow you steps to disassemble the motor, piece of cake. Until step 12 I just can not take the recess plate off, look like it stock to the motor case really good? Any trick to that(grease? oil? special tools?)?
I fallow you steps to disassemble the motor, piece of cake. Until step 12 I just can not take the recess plate off, look like it stock to the motor case really good? Any trick to that(grease? oil? special tools?)?
 01-30-2013, 10:25 PM
#41
MBWorld Fanatic!

FYI:
I sent my pump to this guy and he repaired my old one and sent it back to me very quickly with great communication!
$95
http://www.ebay.com/itm/Mercedes-Benz-secondary-air-pump-repair-R230-W220-W215-W211-W219-W203-AMG-/261162951170?pt=Motors_Car_Truck_Parts_Accessories &hash=item3cce866202
he goes by rostykf on eBay.
Just another option.
05-05-2014, 01:19 PM
#42
Part IV: Transplantation of the non-AMG motor into the �hybrid� housing.
What can you do when the plastic assembly is melted beyond repair and the brush assemblies are mangled? This is the more likely scenario since these smog pumps don�t see the type of use that is normally associated with carbon brush wear.
This is where fabrication of a �hybrid� pump comes in play. Clearly the AMG motor needs to be removed and replaced with the non-AMG motor. The two motors are, however, completely different (as seen in Part III) so many modifications need to be done in order to transplant the non-AMG motor into the AMG housing.
Refer to the corresponding labeled figures / photos with red arrows / circles / boxes:
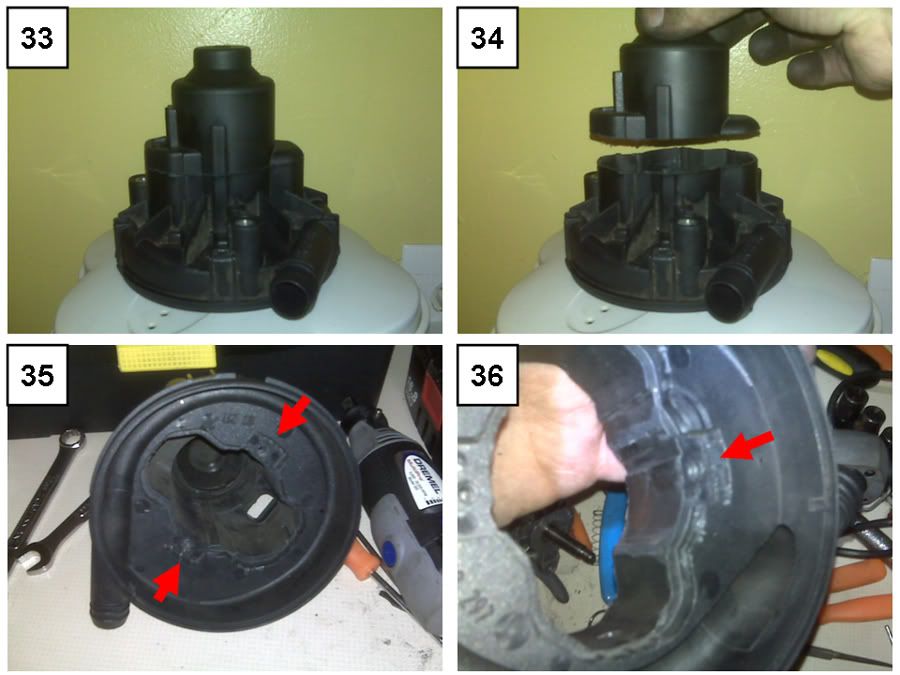
33. You have already removed the motor from the AMG pump (Part II). The non-AMG motor will not fit into this housing so it needs to be modified.
34. I cut off approximately 59 mm (measuring from the top) of the AMG plastic housing using a hacksaw. I made sure that I had a good even cut all the way around. Save the bottom part!
35. Then I took the bottom half of the housing and worked on that. The arrows point to where the outer edge of the tab needs to be filed a little to accommodate the new motor easily.
36. As you look into the housing from where the motor sits, you will see 4 protruding ridges (about 2 mm thick) running the length of the inside. Grind or file these down.
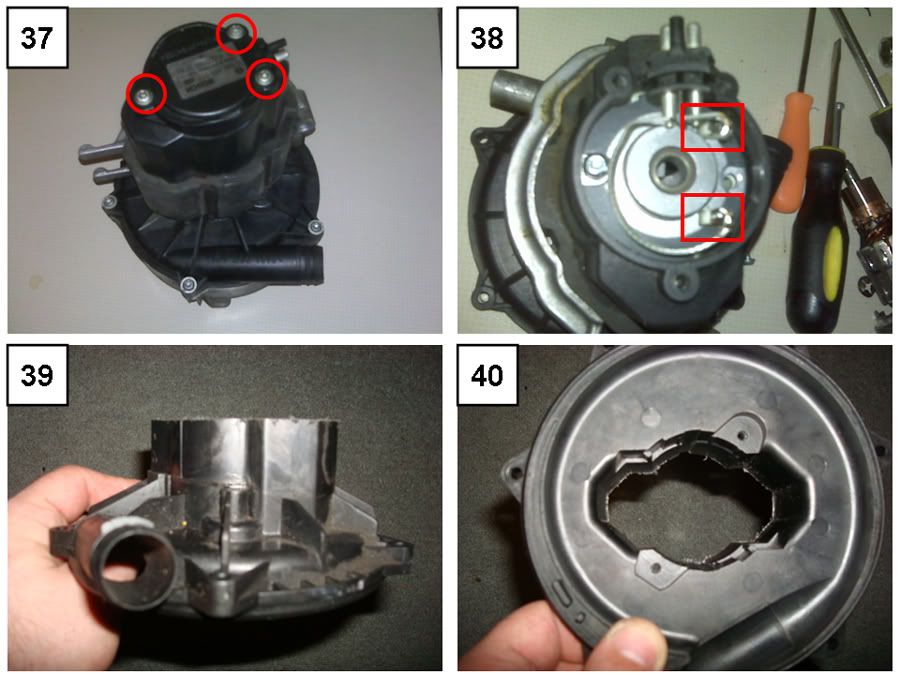
37. Now to removing the non-AMG motor! Unfortunately, it cannot be unscrewed from below and slid out of the plastic housing. First, you must unscrew the T20 torx screws (3 of them) to remove the top cover.
38. The electrical connection of the motor is now exposed. You will need to remove the connectors using a soldering iron. Carefully pull up on the electrodes as you free them. The black connector and the electrodes will slide upwards.
In contrast to the AMG motor, you will see a slot on the motor shaft from the top. You must use a slotted screwdriver to secure this while you remove the bottom nut from the motor shaft with an open-ended wrench (turn clockwise to open).
Remove all the impellers, spacers, and washers. Now the non-AMG motor is easy to remove. Unscrew the T20 torx screws (2 of them) securing the motor to the plastic housing and slide the motor out.
[Note: If you purchased the pump used, it would be wise to pull the motor apart (similar to above) and to at least check the brushes for excessive wear.]
39. By now, you�ve seen the two motors and you realize they are completely different and neither one will fit in its counterpart�s housing! Take the non-AMG housing and using a hacksaw, cut off the top of the housing so that about 59 mm (measuring from the bottom) remains. It is important for this part to be correct because it needs to articulate with the AMG housing and it also needs to allow proper fitment of the non-AMG electrical connector. Retain the top part of the non-AMG housing!
40. This photo again shows how different the non-AMG motor is secured to the housing.
Photos not shown: The metal wall of the non-AMG motor has two circular metal tabs protruding about 2 mm. Grind these down using a Dremel with a carbide tip. In addition, bore out the center holes of the AMG pump impellers to 12 mm so that they fit over the wider motor shaft.
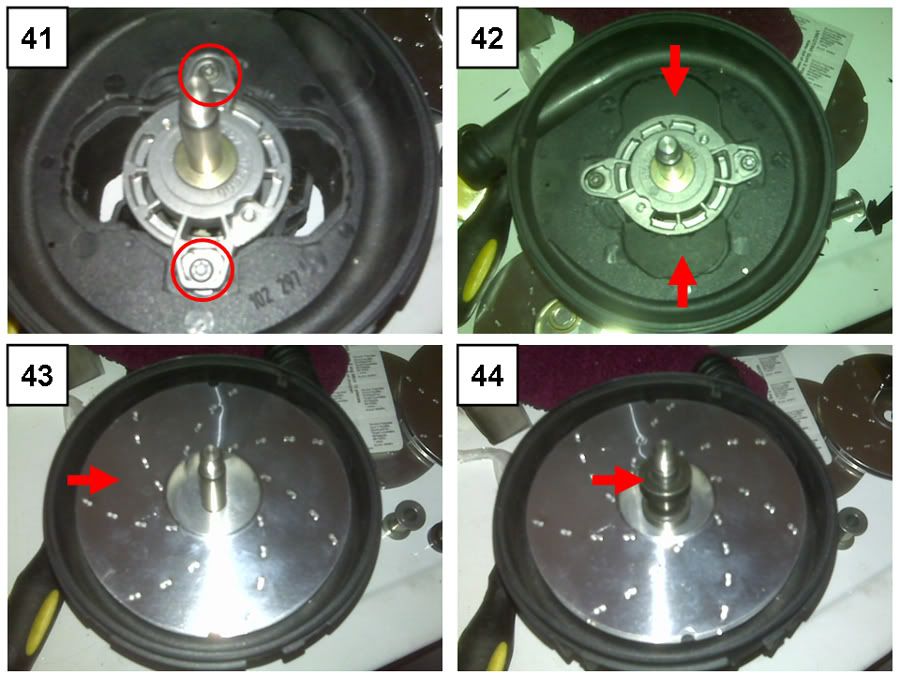
41. Insert the non-AMG motor into the bottom AMG housing and secure it to the housing using the existing T20 torx screw holes. However, use the 3 thin washers (listed in parts) each side to raise the pump up from the bottom of the recess about 4 mm. You want to secure the motor to the housing in such a way that the electrical connector is going to point upwards in the engine bay so keep this in mind! Also place the first spacer over the motor shaft.
42. Now we need to restrict the space between the motor and housing (i.e. the non-AMG motor doesn�t have a metal plate on top like the AMG motor). I used hard plastic and cut it down to size so that it fit the space on either side. I�m not sure if this is absolutely necessary; however, I can�t imagine the air flow dynamics would be optimal if air is allowed to go up through the housing on either side freely.
43. Insert the bottom AMG impeller with the widened center hole over the motor shaft.
44. Insert the tall spacer on top of the bottom impeller.
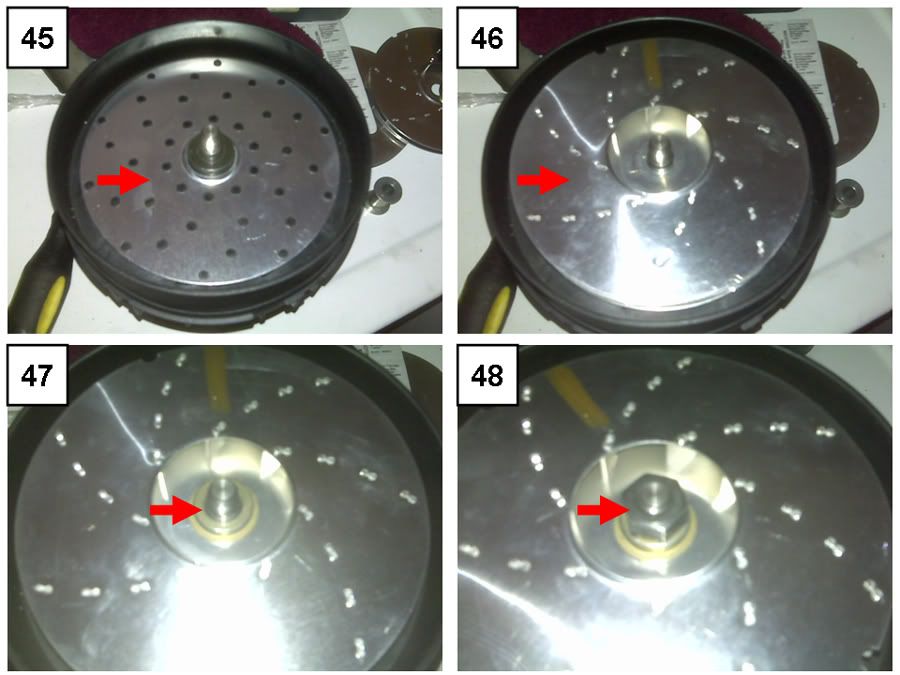
45. Insert the next plate over the shaft and tall spacer. The plastic sides of this plate should fit snugly into the rest of the plastic housing.
46. Insert the top AMG impeller with the widened center hole.
47. Insert the last spacer.
48. Secure all impellers onto the shaft using the nut. Use a slotted screwdriver in the slot at the other end of the shaft to stop rotation while you tighten this nut down. Use Loctite to ensure it remains fastened!
49. Install the air filter assembly onto the end of the pump and secure using the metal clasps.
50. Now the hybrid pump looks like this. No top yet!
51. Take the top that you cut off the non-AMG housing and place it over the top of the motor. You can see that it doesn�t align perfectly with the bottom part � no problem when you have plastic welder!
52. Re-solder the non-AMG electrical connector in such a way that the pins are pointing up when you install the pump in the car. If it is pointing downwards, that�ll be a big pain in the butt in terms of the connection.
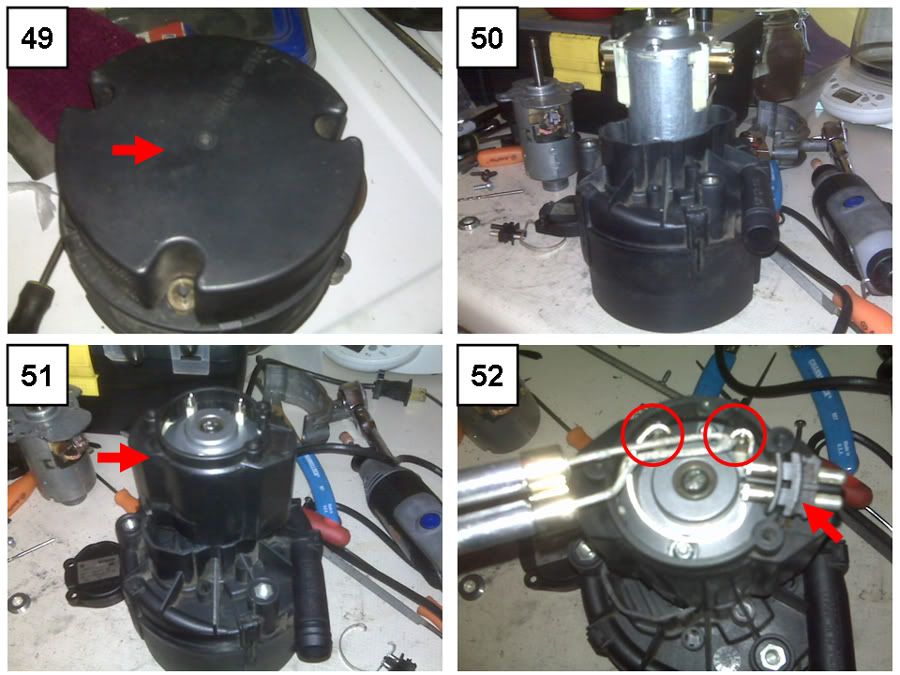
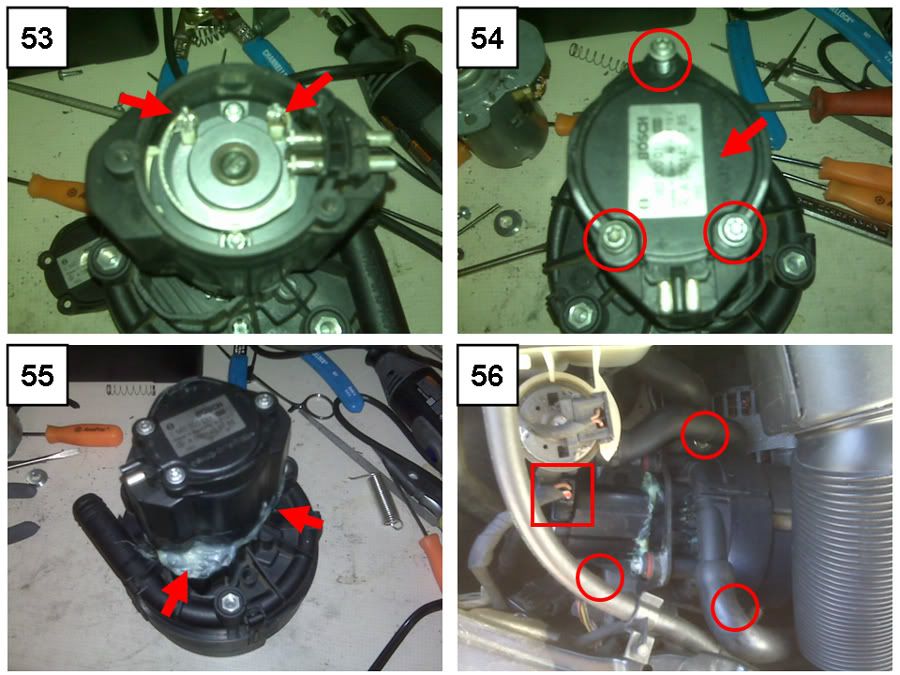
53. The re-soldered piece should look like this. Check your soldering skills using a multimeter.
54. Seal off the top using the black plastic plate with the T20 torx screws.
55. Now we need to join the non-AMG top to the AMG bottom using plastic welder and a few pieces of plastic that are cut to size (to account for the difference in shape and the fact that the 2 pieces are geometrically dissimilar).
Apply the plastic welder liberally (for the entire job, I used about half a tube of this stuff) so that the plastic housing is completely sealed from the environment. It�s not the prettiest sight in the world, but it�s sealed! Allow to set for about 30 minutes.
56. The hybrid pump is now complete and all you have to do is replace the stock mounting bracket (torque to 8 Nm) and put it back into its ascribed space in the engine bay (torque the 10 mm nuts to 4 Nm). Again, if you planned it correctly, the electrical connector is now pointing upwards (which makes it easier to install / remove) and the air output nozzle should be pointing towards the front of the car (like the AMG pump). Because the end of the non-AMG motor is longer, it will be a slightly tighter fit in the existing space; however, it fits just fine. Reconnect the rubber tubing and test out your pump (as described above)!
Short video clip of the hybrid pump in action:
(Note: the pump appears to be very loud � this is mostly due to the sound of air blowing out the open end of the tube. Apologies for the night-time video � not the clearest!)

Important points about this hybrid pump:
A) Due to the modifications to the housing, it is going to have different resonance and sound properties. This hybrid is louder to the point that you can hear it clearly in the cabin and you can hear it shut off after 40 seconds.
B) The air flow in this hybrid appears to be significantly more than the AMG pump. I say this based on how my stock pump used to flow; however, it may not have been flowing correctly due to its condition. In any case, I reduced the flow of air going to my valves by fitting a hose �Y� junction just before where the rubber air hose meets the aluminum tube. Be careful with your positioning of the open �Y� outlet!
What can you do when the plastic assembly is melted beyond repair and the brush assemblies are mangled? This is the more likely scenario since these smog pumps don�t see the type of use that is normally associated with carbon brush wear.
This is where fabrication of a �hybrid� pump comes in play. Clearly the AMG motor needs to be removed and replaced with the non-AMG motor. The two motors are, however, completely different (as seen in Part III) so many modifications need to be done in order to transplant the non-AMG motor into the AMG housing.
Refer to the corresponding labeled figures / photos with red arrows / circles / boxes:
33. You have already removed the motor from the AMG pump (Part II). The non-AMG motor will not fit into this housing so it needs to be modified.
34. I cut off approximately 59 mm (measuring from the top) of the AMG plastic housing using a hacksaw. I made sure that I had a good even cut all the way around. Save the bottom part!
35. Then I took the bottom half of the housing and worked on that. The arrows point to where the outer edge of the tab needs to be filed a little to accommodate the new motor easily.
36. As you look into the housing from where the motor sits, you will see 4 protruding ridges (about 2 mm thick) running the length of the inside. Grind or file these down.
37. Now to removing the non-AMG motor! Unfortunately, it cannot be unscrewed from below and slid out of the plastic housing. First, you must unscrew the T20 torx screws (3 of them) to remove the top cover.
38. The electrical connection of the motor is now exposed. You will need to remove the connectors using a soldering iron. Carefully pull up on the electrodes as you free them. The black connector and the electrodes will slide upwards.
In contrast to the AMG motor, you will see a slot on the motor shaft from the top. You must use a slotted screwdriver to secure this while you remove the bottom nut from the motor shaft with an open-ended wrench (turn clockwise to open).
Remove all the impellers, spacers, and washers. Now the non-AMG motor is easy to remove. Unscrew the T20 torx screws (2 of them) securing the motor to the plastic housing and slide the motor out.
[Note: If you purchased the pump used, it would be wise to pull the motor apart (similar to above) and to at least check the brushes for excessive wear.]
39. By now, you�ve seen the two motors and you realize they are completely different and neither one will fit in its counterpart�s housing! Take the non-AMG housing and using a hacksaw, cut off the top of the housing so that about 59 mm (measuring from the bottom) remains. It is important for this part to be correct because it needs to articulate with the AMG housing and it also needs to allow proper fitment of the non-AMG electrical connector. Retain the top part of the non-AMG housing!
40. This photo again shows how different the non-AMG motor is secured to the housing.
Photos not shown: The metal wall of the non-AMG motor has two circular metal tabs protruding about 2 mm. Grind these down using a Dremel with a carbide tip. In addition, bore out the center holes of the AMG pump impellers to 12 mm so that they fit over the wider motor shaft.
41. Insert the non-AMG motor into the bottom AMG housing and secure it to the housing using the existing T20 torx screw holes. However, use the 3 thin washers (listed in parts) each side to raise the pump up from the bottom of the recess about 4 mm. You want to secure the motor to the housing in such a way that the electrical connector is going to point upwards in the engine bay so keep this in mind! Also place the first spacer over the motor shaft.
42. Now we need to restrict the space between the motor and housing (i.e. the non-AMG motor doesn�t have a metal plate on top like the AMG motor). I used hard plastic and cut it down to size so that it fit the space on either side. I�m not sure if this is absolutely necessary; however, I can�t imagine the air flow dynamics would be optimal if air is allowed to go up through the housing on either side freely.
43. Insert the bottom AMG impeller with the widened center hole over the motor shaft.
44. Insert the tall spacer on top of the bottom impeller.
45. Insert the next plate over the shaft and tall spacer. The plastic sides of this plate should fit snugly into the rest of the plastic housing.
46. Insert the top AMG impeller with the widened center hole.
47. Insert the last spacer.
48. Secure all impellers onto the shaft using the nut. Use a slotted screwdriver in the slot at the other end of the shaft to stop rotation while you tighten this nut down. Use Loctite to ensure it remains fastened!
49. Install the air filter assembly onto the end of the pump and secure using the metal clasps.
50. Now the hybrid pump looks like this. No top yet!
51. Take the top that you cut off the non-AMG housing and place it over the top of the motor. You can see that it doesn�t align perfectly with the bottom part � no problem when you have plastic welder!
52. Re-solder the non-AMG electrical connector in such a way that the pins are pointing up when you install the pump in the car. If it is pointing downwards, that�ll be a big pain in the butt in terms of the connection.
53. The re-soldered piece should look like this. Check your soldering skills using a multimeter.
54. Seal off the top using the black plastic plate with the T20 torx screws.
55. Now we need to join the non-AMG top to the AMG bottom using plastic welder and a few pieces of plastic that are cut to size (to account for the difference in shape and the fact that the 2 pieces are geometrically dissimilar).
Apply the plastic welder liberally (for the entire job, I used about half a tube of this stuff) so that the plastic housing is completely sealed from the environment. It�s not the prettiest sight in the world, but it�s sealed! Allow to set for about 30 minutes.
56. The hybrid pump is now complete and all you have to do is replace the stock mounting bracket (torque to 8 Nm) and put it back into its ascribed space in the engine bay (torque the 10 mm nuts to 4 Nm). Again, if you planned it correctly, the electrical connector is now pointing upwards (which makes it easier to install / remove) and the air output nozzle should be pointing towards the front of the car (like the AMG pump). Because the end of the non-AMG motor is longer, it will be a slightly tighter fit in the existing space; however, it fits just fine. Reconnect the rubber tubing and test out your pump (as described above)!
Short video clip of the hybrid pump in action:
(Note: the pump appears to be very loud � this is mostly due to the sound of air blowing out the open end of the tube. Apologies for the night-time video � not the clearest!)
Important points about this hybrid pump:
A) Due to the modifications to the housing, it is going to have different resonance and sound properties. This hybrid is louder to the point that you can hear it clearly in the cabin and you can hear it shut off after 40 seconds.
B) The air flow in this hybrid appears to be significantly more than the AMG pump. I say this based on how my stock pump used to flow; however, it may not have been flowing correctly due to its condition. In any case, I reduced the flow of air going to my valves by fitting a hose �Y� junction just before where the rubber air hose meets the aluminum tube. Be careful with your positioning of the open �Y� outlet!
 05-05-2014, 05:58 PM
#43
Senior Member

Join Date: Mar 2011
Location: Bella Vista, AR
Posts: 324
Likes: 0
Received 2 Likes
on
2 Posts
05 C55 AMG
Here is a question. If ones smog pump fails and they don't necessarily care whether or not it , can't they just jump the wire on the harness for the pump? Wouldn't this get rid of the check engine?
01-23-2015, 08:12 AM
#45

I Installed yesterday BMW's (Pierburg) Secondary air pump instead of original AMG pump, BMW part number 11721715347
It cost only 60 Euros here in Finland (2hd pump including necessary hose).
It fifts direct to AMG:s holder, and I took hose adapter from BMW's hose (part number 7).
I took cable connector from old AMG pump and tin adapter for BMW pump.
You will need around one hour for this modification...
It cost only 60 Euros here in Finland (2hd pump including necessary hose).
It fifts direct to AMG:s holder, and I took hose adapter from BMW's hose (part number 7).
I took cable connector from old AMG pump and tin adapter for BMW pump.
You will need around one hour for this modification...
The following users liked this post:
kaixdiego (02-27-2020)
02-26-2020, 02:50 PM
#46
Newbie

Join Date: Aug 2019
Posts: 2
Likes: 0
Received 0 Likes
on
0 Posts
CLS 500
Has anyone noticed if it possible to buy just electric motor for secondary air pump? I can't find any sources.
Mine has melted plastic brush holder and know it makes noisy sound. Why pay for whole pump if I can only replace the motor
Mine has melted plastic brush holder and know it makes noisy sound. Why pay for whole pump if I can only replace the motor
02-17-2022, 04:54 PM
#47
Super Member
Join Date: Jul 2019
Location: LA
Posts: 749
Received 305 Likes
on
167 Posts
1987 Porsche 911. 2008 G55
resurrecting this as I am stumped on my M113k issue on my G55. Replaced the relay, twice! And replaced w a no-name cheaper brand. Just went and tore apart the old pump (This happened about a year ago) went offroading and a few weeks later I smelled burning and got the code.
Went through the old motor, it started when bench tested when I took it off, but taking it apart I could see that some condensation and maybe a bit of mud got inside (Its in front of the driver tire on the G55, really horrible spot).
Everything else aside from carbon build up looked fine inside the motor.
May just go and spend the cash on a legit OEM pump and see if I can finally get this damn CEL to go away.
Cheers!


