* M112K Crank pulley / Vibration Damper / Harmonic Balancer information *

 05-09-2009, 04:21 PM
#1
Super Member
Thread Starter
* M112K Crank pulley / Vibration Damper / Harmonic Balancer information *
Y'all -
There have been several threads recently pertaining to the M112K crank pulley and I thought it would be a good idea to have all the pertinent information in one thread. Also, perhaps it can serve as a starting point for a DIY for new enthusiasts if they are interested in replacing their crank pulley.
There have been several very nice threads on crank pulley installs (like MRAMG1's) with input from many people, however I don't think more information will hurt.
Our (M112K) crank pulley / vibration damper is deceiving in that it is a rather complex piece:
MB Part number 112 035 07 00. This is a rather expensive pulley and you can purchase it for ~$250 new.
Maintaining the integrity of this piece is crucial whether you have the stock configuration or an overdrive crank pulley.
Think about it - you have a rotating mass at 6,000 rpm essentially attached to your crankshaft! It requires near perfect dampening and balancing.
Figure 1 shows a schematic of the C32 crank pulley. Highlighted in red is the elastomer that is crucial to proper functioning of the crank pulley.
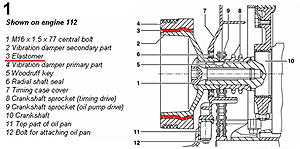
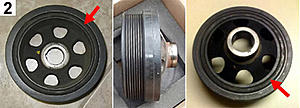
Figure 2 shows different views of the actual pulley and the red arrows show the elastomer.
You should periodically check the integrity of the elastomer on your pulley (if OE). If it is significantly compromised, you should probably replace it.
Even more importantly, if you are thinking of installing a used harmonic balancer / vibration damper, the elastomer is one of first things you want to inspect prior to use.
[photos courtesy of C32used, MRAMG1, and Wawy]
The second thing to look out for is obvious signs of defects to the metal itself (e.g. gouging of the pulley ribs and other dents, etc.). If you observe any such defects, then it is a mathematical (and physical) certainty that the pulley is now NOT perfectly balanced. The degree of unbalance may be minute and insignificant to proper functioning of the pulley; however, you shouldn't take that risk. PLEASE pay the extra $30 - $50 to get ANY used pulley rebalanced. Your motor deserves it.
Here is a link to show what is involved with balancing a generic pulley.
Many good machinists have the proper equipment required for balancing and I think that we have a sponsor or two in the C32 subforum who can do it. If you are one of these sponsors / individuals, please make it known that you can do this and what you charge for the process.
What is involved in the removal / installation of the crank pulley?
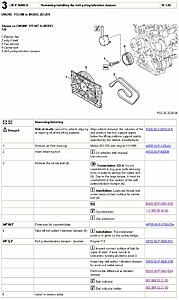
Figure 3 shows the protocol (taken from the STAR Service manual). It's definitely doable providing you have the appropriate tools and adhere to the specifications dictated by MBZ.
What are the most important things to note?
1. You need a counterholder for this procedure (depicted in Figure 3).
The MB part number for this counterholder is: 112 589 00 40 00.
You can purchase this tool on e-bay for ~$40. Here is an example of such an e-bay sale.
2. The center bolt. Should you re-use the old bolt or use a new one?
This is a somewhat controversial topic; however, you are best off using a NEW bolt.
You have spent ~$250 on an OE pulley or ~$1,000 on an overdrive pulley. PLEASE spend the extra $5 for a new center bolt if you are unsure as to the bolt's viability!
The center bolt is an M16 x 1.5 x 77 bolt. The MB part number is 112 031 00 71.
This shank length of this bolt is 77 mm long. As you all know, this bolt is designed to stretch slightly upon proper torquing.
Figure 4 shows that according to MB, the center bolt can be used if the shank length is less than 78 mm long.

3. Torque specifications for the center bolt.
This is one of the most important steps (next to proper seating of the pulley, etc.).
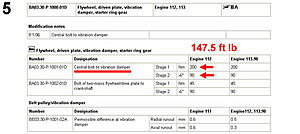
You MUST torque the center bolt to 200 Nm (147.5 ft lb to be exact) and then tighten a further 90 degrees.
There are horror stories all over MBWorld of inproper installations of crank pulleys doing damage to the motor and the culprit in many cases is improper torquing of the center bolt.
Figure 5 shows the proper torquing specifications for our center bolt. Splinter has provided this information several times in the past in various threads.
In addition, Figure 5 shows the allowable runout for the pulley after installation.
So your pulley is installed and you've torqued the center bolt correctly. You are NOT finished!
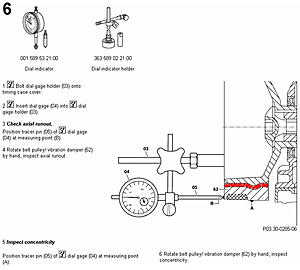
4. You should go the extra step and measure radial and axial run-out of the pulley.
To do this job, you need a dial indicator and use the tolerances specified in Figure 5.
Bottom line - if you suspect excess 'wobble' then you need to do something about it!
Figure 6 shows the tool and the protocol according to the STAR Service manual.
There have been several threads recently pertaining to the M112K crank pulley and I thought it would be a good idea to have all the pertinent information in one thread. Also, perhaps it can serve as a starting point for a DIY for new enthusiasts if they are interested in replacing their crank pulley.
There have been several very nice threads on crank pulley installs (like MRAMG1's) with input from many people, however I don't think more information will hurt.
Our (M112K) crank pulley / vibration damper is deceiving in that it is a rather complex piece:
MB Part number 112 035 07 00. This is a rather expensive pulley and you can purchase it for ~$250 new.
Maintaining the integrity of this piece is crucial whether you have the stock configuration or an overdrive crank pulley.
Think about it - you have a rotating mass at 6,000 rpm essentially attached to your crankshaft! It requires near perfect dampening and balancing.
Figure 1 shows a schematic of the C32 crank pulley. Highlighted in red is the elastomer that is crucial to proper functioning of the crank pulley.

Figure 2 shows different views of the actual pulley and the red arrows show the elastomer.
You should periodically check the integrity of the elastomer on your pulley (if OE). If it is significantly compromised, you should probably replace it.
Even more importantly, if you are thinking of installing a used harmonic balancer / vibration damper, the elastomer is one of first things you want to inspect prior to use.

[photos courtesy of C32used, MRAMG1, and Wawy]
The second thing to look out for is obvious signs of defects to the metal itself (e.g. gouging of the pulley ribs and other dents, etc.). If you observe any such defects, then it is a mathematical (and physical) certainty that the pulley is now NOT perfectly balanced. The degree of unbalance may be minute and insignificant to proper functioning of the pulley; however, you shouldn't take that risk. PLEASE pay the extra $30 - $50 to get ANY used pulley rebalanced. Your motor deserves it.
Here is a link to show what is involved with balancing a generic pulley.
Many good machinists have the proper equipment required for balancing and I think that we have a sponsor or two in the C32 subforum who can do it. If you are one of these sponsors / individuals, please make it known that you can do this and what you charge for the process.
What is involved in the removal / installation of the crank pulley?
Figure 3 shows the protocol (taken from the STAR Service manual). It's definitely doable providing you have the appropriate tools and adhere to the specifications dictated by MBZ.

What are the most important things to note?
1. You need a counterholder for this procedure (depicted in Figure 3).
The MB part number for this counterholder is: 112 589 00 40 00.
You can purchase this tool on e-bay for ~$40. Here is an example of such an e-bay sale.
2. The center bolt. Should you re-use the old bolt or use a new one?
This is a somewhat controversial topic; however, you are best off using a NEW bolt.
You have spent ~$250 on an OE pulley or ~$1,000 on an overdrive pulley. PLEASE spend the extra $5 for a new center bolt if you are unsure as to the bolt's viability!
The center bolt is an M16 x 1.5 x 77 bolt. The MB part number is 112 031 00 71.
This shank length of this bolt is 77 mm long. As you all know, this bolt is designed to stretch slightly upon proper torquing.
Figure 4 shows that according to MB, the center bolt can be used if the shank length is less than 78 mm long.

3. Torque specifications for the center bolt.
This is one of the most important steps (next to proper seating of the pulley, etc.).
You MUST torque the center bolt to 200 Nm (147.5 ft lb to be exact) and then tighten a further 90 degrees.
There are horror stories all over MBWorld of inproper installations of crank pulleys doing damage to the motor and the culprit in many cases is improper torquing of the center bolt.
Figure 5 shows the proper torquing specifications for our center bolt. Splinter has provided this information several times in the past in various threads.
In addition, Figure 5 shows the allowable runout for the pulley after installation.

So your pulley is installed and you've torqued the center bolt correctly. You are NOT finished!
4. You should go the extra step and measure radial and axial run-out of the pulley.
To do this job, you need a dial indicator and use the tolerances specified in Figure 5.
Bottom line - if you suspect excess 'wobble' then you need to do something about it!
Figure 6 shows the tool and the protocol according to the STAR Service manual.

 05-09-2009, 08:16 PM
#4
Super Moderator
Excellent thread and topic, boohooramblers.
Very much appreciate your continuing contributions to our forum.
Although you�re not likely to relinquish your tenured Professorial position anytime soon,
take comfort in knowing you could also earn an honest living as a respected technical author.
Very much appreciate your continuing contributions to our forum.
Although you�re not likely to relinquish your tenured Professorial position anytime soon,
take comfort in knowing you could also earn an honest living as a respected technical author.
05-09-2009, 09:15 PM
#5
Super Moderator Alumni
Excellent thread and topic, boohooramblers.
Very much appreciate your continuing contributions to our forum.
Although you�re not likely to relinquish your tenured Professorial position anytime soon,
take comfort in knowing you could also earn an honest living as a respected technical author.
Very much appreciate your continuing contributions to our forum.
Although you�re not likely to relinquish your tenured Professorial position anytime soon,
take comfort in knowing you could also earn an honest living as a respected technical author.
Last edited by ScottW911; 05-09-2009 at 09:17 PM.


Trending Topics
05-12-2009, 06:17 PM
#8
here's the photos below of what a BAD pulley looks like!! Black arrows show missing elastomer material in Harmonic Balancer area.
*** Note, the box that I got says the part # is A 112 035 16 00 ( I hope this is the correct one because it fit well! Did they change part #s on us for this piece???) (the above referenced # was 112 035 07 00 ???? )
05-12-2009, 06:27 PM
#9
here's the photos below of what a BAD pulley looks like!! Black arrows show missing material in Harmonic Balancer area.
*** Note, the box that I got says the part # is A 112 035 16 00 ( I hope this is the correct one because it fit well! Did they change part #s on us for this piece???) (the above referenced # was 112 035 07 00 ???? ) Update: I called MB and there was a part # change, could be different manufacturer, BUT the updated part # is the 112 035 16 00
05-12-2009, 09:14 PM
#10
Super Member
Thread Starter
Replaced the pulley/harmonic balancer today!!! Not as bad as I thought although the forearms and wrists got a workout!!!
here's the photos below of what a BAD pulley looks like!! Black arrows show missing material in Harmonic Balancer area.
*** Note, the box that I got says the part # is A 112 035 16 00 ( I hope this is the correct one because it fit well! Did they change part #s on us for this piece???) (the above referenced # was 112 035 07 00 ???? ) Update: I called MB and there was a part # change, could be different manufacturer, BUT the updated part # is the 112 035 16 00

On a side note, I was 20 feet from your 'sock and lotion' girl recently! Mesmerizing!

Unfortunately, your avatar came to mind and I felt dirty.
05-13-2009, 02:50 PM
#11
 Moosie still hasn't seen then light of day on her!!! Jealous???
On topic, the car now idles very smoothly with no noise like it did with the wobbly HB/Crank. I spoke to Carmine at Burdi's Benz repair and he tells me that the stock crank/HB has been somewhat of a problem and he's done more than one recently. The new # (see my post above with 112 035 16 00) according to Benz Parts would reflect a change in the part and/or part manufacturer. Maybe they realized there was a problem with the elastomer in the old ones. If you're replacing, be sure to get the new part #. Mine was perfectly round and balanced right out of the box. Apparently the elastomer goes bad from both heat and high revolutions. When it goes, from posts that I have read, it is not pretty!! The new bolt (same Part #) is about $5.00
02-23-2010, 01:59 AM
#12
MBWorld Fanatic!

Here soon I will be removing the 185MM crank to reinstall after a slight wobble developed. I would like to get more information to avoid future issues with pulley wobble. I've contacted Jerry at Eurocharged, but still waiting for his response. Lost the torque spec that should be used with the center bolt on 185MM. Any know off hand? From what I can remember it was around 220ft/lbs... I was only able to torque the bolt down to around 180ft/lbs when I originally installed it.
Edit: NM, not ft/lbs...
Locking the flywheel at the bell housing doesn't seem to be a good idea. I had part of the housing chip off on the original install when I removed the OE pulley. Service DVD states a pulley puller should be used to lock the crank pulley in the engine bay due to the high amount of required torque.
I did find a flywheel locker at Firestone which appears to be what I would need to properly lock it. They are willing to loan me out the tool. Don't want to risk damaging anything though. I found a pulley puller on ebay that is a knock off of the original shop tool used by Mercedes. I'm not sure if it would work on the 185MM though? I've also never used a pulley puller, and am unsure how it works. Are there specific points in the engine bay where the bar is designed to hit, and lock the pulley, or do those extensions lock on tabs behind the pulley on the engine?
http://cgi.ebay.com/ebaymotors/Merce...item519036d2b3
Another thing that has me confused... It states to reach the torque spec, and then tighten a full 90 degrees. Meaning the bolt will actually be torqued beyond the 200ft/lbs, correct? If someone could go into a little detail on this it would be appreciated. Thanks!
Last edited by gt4awd; 02-23-2010 at 04:06 AM.
02-23-2010, 10:40 AM
#13
Super Member
Thread Starter
Here soon I will be removing the 185MM crank to reinstall after a slight wobble developed. I would like to get more information to avoid future issues with pulley wobble. I've contacted Jerry at Eurocharged, but still waiting for his response. Lost the torque spec that should be used with the center bolt on 185MM. Any know off hand? From what I can remember it was around 220ft/lbs... I was only able to torque the bolt down to around 180ft/lbs when I originally installed it.
Edit: NM, not ft/lbs...
Locking the flywheel at the bell housing doesn't seem to be a good idea. I had part of the housing chip off on the original install when I removed the OE pulley. Service DVD states a pulley puller should be used to lock the crank pulley in the engine bay due to the high amount of required torque.
I did find a flywheel locker at Firestone which appears to be what I would need to properly lock it. They are willing to loan me out the tool. Don't want to risk damaging anything though. I found a pulley puller on ebay that is a knock off of the original shop tool used by Mercedes. I'm not sure if it would work on the 185MM though? I've also never used a pulley puller, and am unsure how it works. Are there specific points in the engine bay where the bar is designed to hit, and lock the pulley, or do those extensions lock on tabs behind the pulley on the engine?
http://cgi.ebay.com/ebaymotors/Merce...item519036d2b3
Another thing that has me confused... It states to reach the torque spec, and then tighten a full 90 degrees. Meaning the bolt will actually be torqued beyond the 200ft/lbs, correct? If someone could go into a little detail on this it would be appreciated. Thanks!
Edit: NM, not ft/lbs...
Locking the flywheel at the bell housing doesn't seem to be a good idea. I had part of the housing chip off on the original install when I removed the OE pulley. Service DVD states a pulley puller should be used to lock the crank pulley in the engine bay due to the high amount of required torque.
I did find a flywheel locker at Firestone which appears to be what I would need to properly lock it. They are willing to loan me out the tool. Don't want to risk damaging anything though. I found a pulley puller on ebay that is a knock off of the original shop tool used by Mercedes. I'm not sure if it would work on the 185MM though? I've also never used a pulley puller, and am unsure how it works. Are there specific points in the engine bay where the bar is designed to hit, and lock the pulley, or do those extensions lock on tabs behind the pulley on the engine?
http://cgi.ebay.com/ebaymotors/Merce...item519036d2b3
Another thing that has me confused... It states to reach the torque spec, and then tighten a full 90 degrees. Meaning the bolt will actually be torqued beyond the 200ft/lbs, correct? If someone could go into a little detail on this it would be appreciated. Thanks!
3. Torque specifications for the center bolt.
This is one of the most important steps (next to proper seating of the pulley, etc.).
You MUST torque the center bolt to 200 Nm (147.5 ft lb to be exact) and then tighten a further 90 degrees.
The bolt stretches somewhat and so the torque increase is not linear over distance.
So.... just torque to ~150 ft lb. THEN tighten a further 90 degrees. It would be a mistake to assume that ~150 ft lb + an extra 90 degrees of tightening = 200 ft lb.
I never had a 185mm pulley so I can't comment based on first-hand experience. However, from my reading, if you detected a wobble, the problem could equally be due to the hex bolts that hold the pulley together (if your center bolt was torqued properly and the pulley was seated correctly).
So - you may want to find out what the hex bolts need to be torqued to.
I do not know if the center bolt is different or needs to be torqued differently for the 185mm pulley.
02-23-2010, 10:03 PM
#14
MBWorld Fanatic!
Thanks for the reply. Has anyone used a pulley puller on the 185MM? I do remember hearing at one point that someone did. Don't want to buy it if it's not going to work obviously. Still waiting for Jerry to reply, but I will also ask him about the additional pulley bolts, and if they can contribute to wobble. From my understanding the 185MM is designed to where the outer belt ring can be removed thus allowing replacement of just the ring to increase, or decrease overall pulley size.
03-10-2010, 10:34 PM
#15
MBWorld Fanatic!
Join Date: Mar 2007
Location: Houston, TX
Posts: 1,948
Likes: 0
Received 3 Likes
on
2 Posts
C32/C55 AMG
Thanks for the reply. Has anyone used a pulley puller on the 185MM? I do remember hearing at one point that someone did. Don't want to buy it if it's not going to work obviously. Still waiting for Jerry to reply, but I will also ask him about the additional pulley bolts, and if they can contribute to wobble. From my understanding the 185MM is designed to where the outer belt ring can be removed thus allowing replacement of just the ring to increase, or decrease overall pulley size.
03-11-2010, 12:51 AM
#17
MBWorld Fanatic!
Did you ever find out any thing from Jerry? I'm thinking of installing my renntech crank pulley and I want to be as prepared a possible.
03-11-2010, 09:58 AM
#18
MBWorld Fanatic!
Join Date: Mar 2007
Location: Houston, TX
Posts: 1,948
Likes: 0
Received 3 Likes
on
2 Posts
C32/C55 AMG
No, didn't... However, I was able to get into contact with Eurocharged finally. Will be sending my 185MM back to them for inspection once I have the time to remove it. Hopefully tomorrow! I'll ask about using pulley puller, or what they recommend. I've always just locked up the bell housing. Removing the OE crank on the c32 caused a decent sized part to chip off the housing though, so I'm looking for an alternative way.
 05-10-2012, 07:17 AM
#24
Super Member
Thread Starter
Thanks for adding that!
Given the plethora of threads in the M113K section, the above values should serve to reinforce the importance of ensuring your crank pulley does not have significant radial or axial run-out.
Given the plethora of threads in the M113K section, the above values should serve to reinforce the importance of ensuring your crank pulley does not have significant radial or axial run-out.
05-10-2012, 09:38 AM
#25
Newbie

Join Date: Jan 2012
Location: Belgium
Posts: 11
Likes: 0
Received 0 Likes
on
0 Posts
C32 AMG estate
Hi all,
The reason I asked for the run out spec is the following;
Last week I saw on my C32 AMG a considerable wobble on the pulley. I checked the instructions to do the job myself but I deemed that too dangerous. 200Nm + 90� torqueing plus a special tool I thought wasn�t worth the aggravation. So I took the car to the local official MB dealer (wonderful guys BTW) and �670,00 later I collected the car last night.
Now I see that the wobble is still there! IMO exactly the same as before! The pulley is new, that�s clear. I called them and they asked me to come back ASAP.
Does anyone of you guys know what the issue could be? It seems that the inside of the pulley is wobbling with the outside which doesn�t indicate a rubber failure.
I will try to put up a film later.
Cheers,
Stig


