W204 Sidemarker Wrap or Replacement (DIY)
 01-23-2013, 11:36 PM
#1
Junior Member
Thread Starter

Join Date: Sep 2012
Posts: 43
Likes: 0
Received 0 Likes
on
0 Posts
2012 C63
Hi, so I recently posted a thread wondering how to change my sidemarkers, and I absolutely could not find anything that really helped me. ed4 helped me out, so I am here to help you guys out.
1. Turn your wheel the opposite way from the side you're working on. (Changing left side marker, turn wheel right [inside the driver's seat perspective])
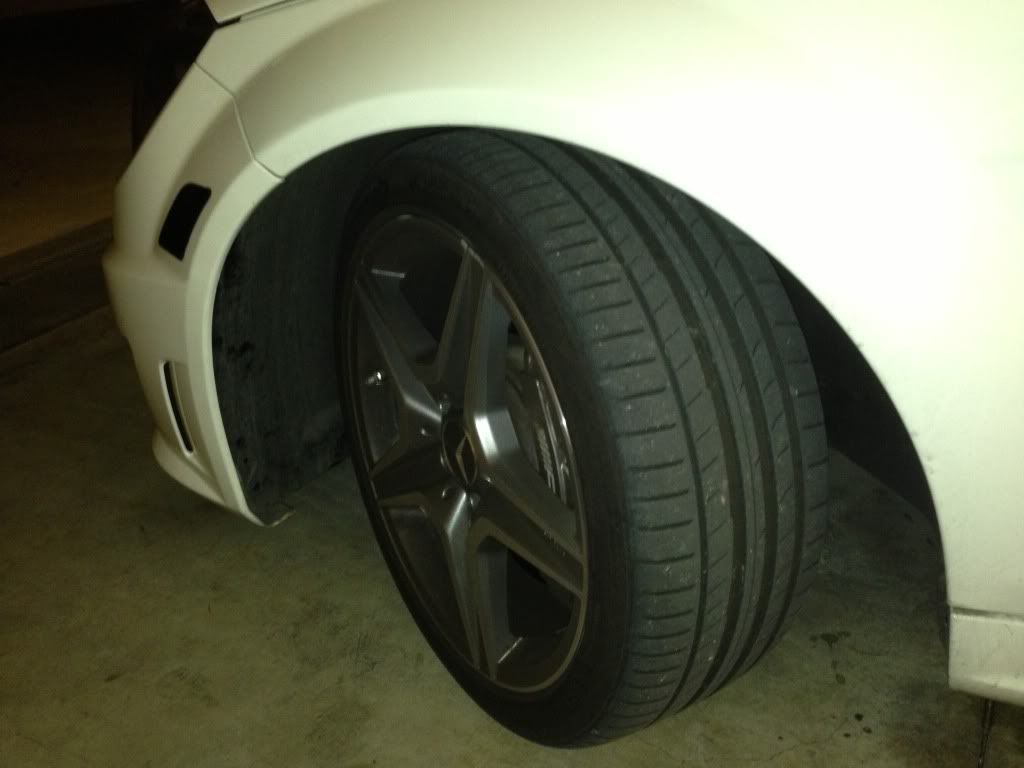
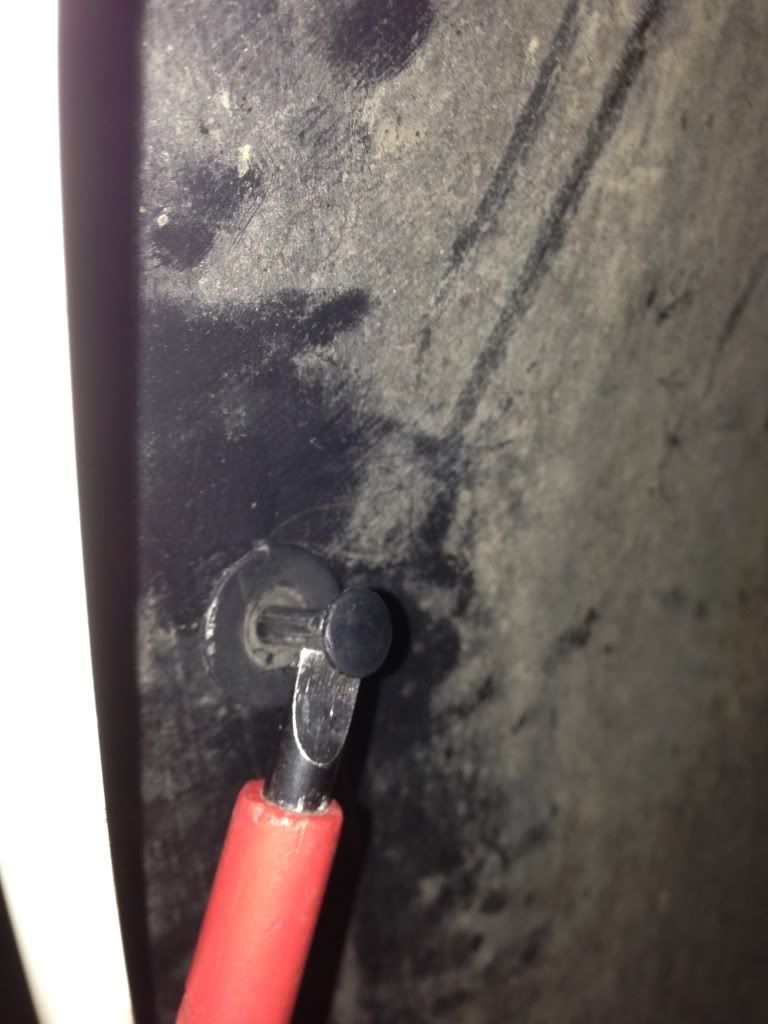
2.In the wheel well, close to the fender, you will see a couple of rivets (screw looking things). Get a flat head screw driver (be careful) and pull three pins out. (lowest one, and work your way up) Once they are pulled out like they are in the picture, just take them out from the pins. If the pins get pulled out when you are doing this, just get the flathead and take out the rivet from the base. [If you break the rivet, just go to your dealership, they are $2 a piece]
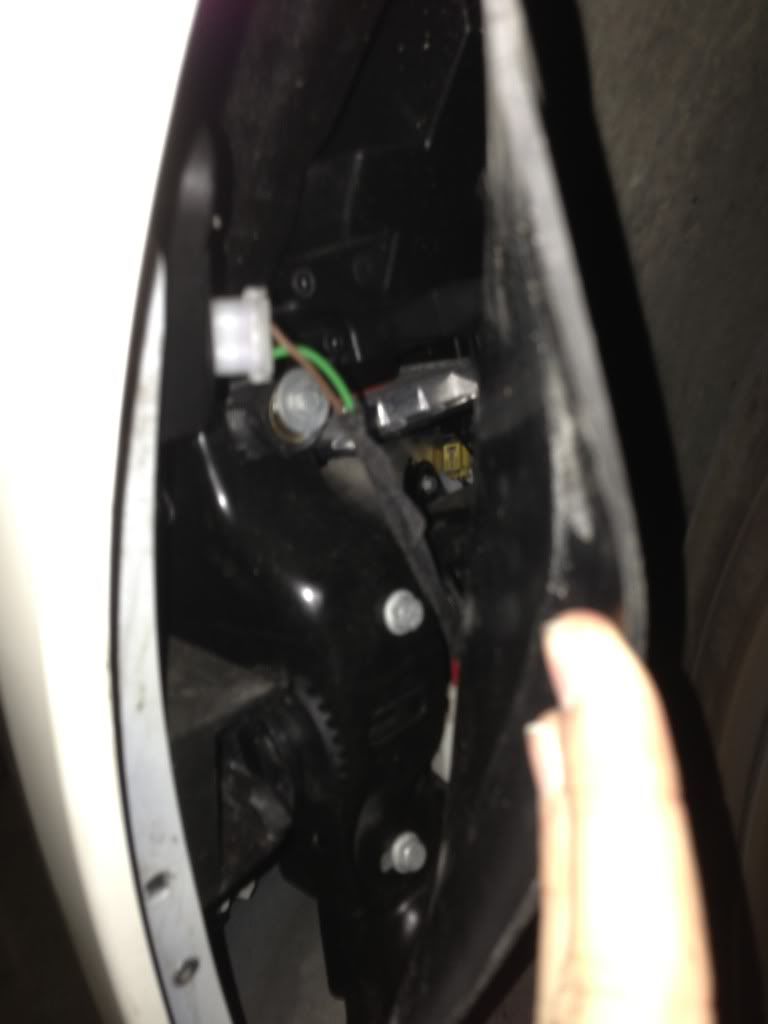
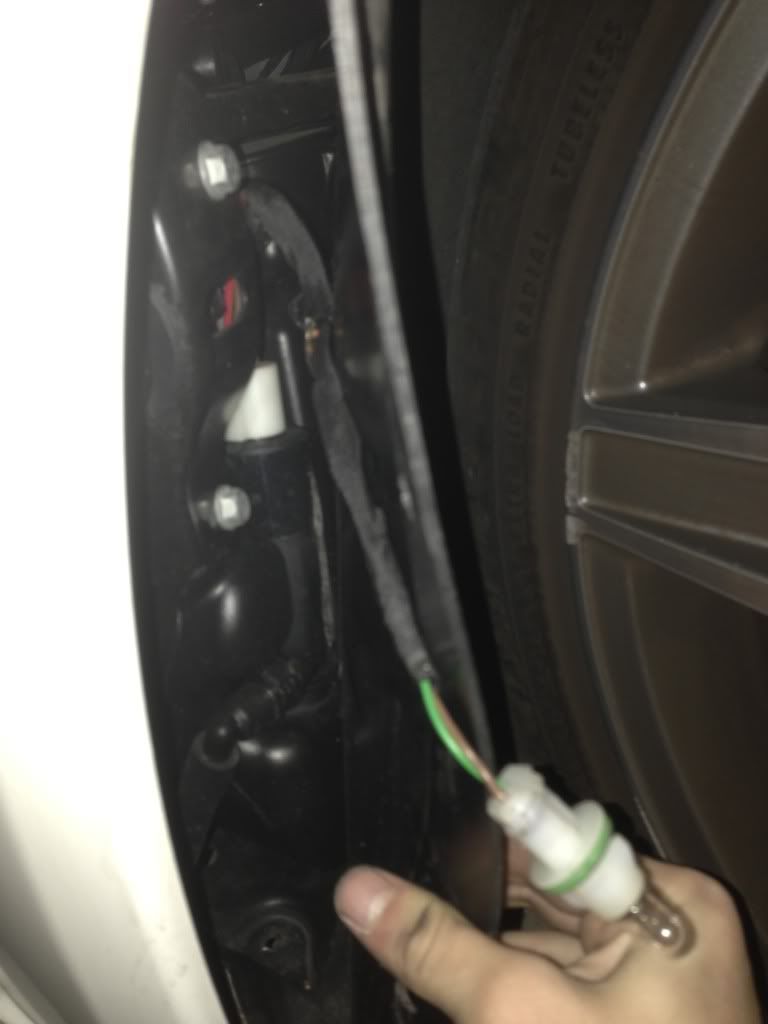
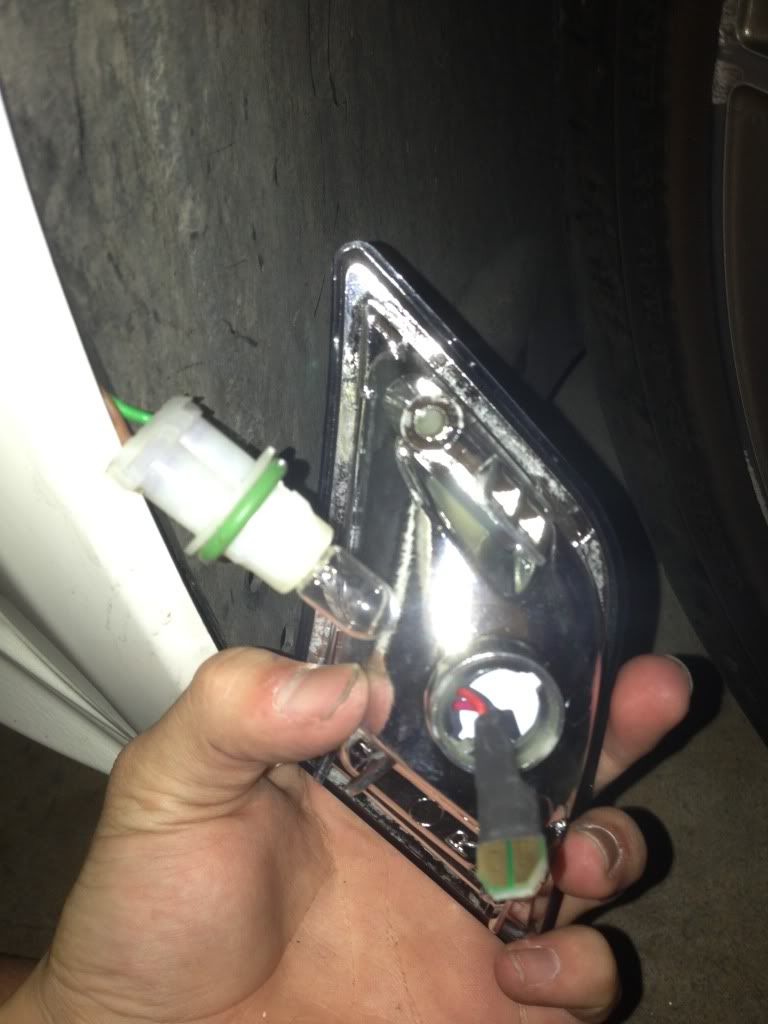
3. Once you pulled out the rivets, you can open up the wheel well, towards the fender. It should look something like this. Turn the LED counter-clockwise (white plastic with brown and green wire attatched to it).
4. There is a side marker portion, and basically a casing for the side marker. The casing is on the inside of the car and the sidemarker is on the outside. On the inside of the car, look for this tab and push it downward, this will release the side marker from the casing.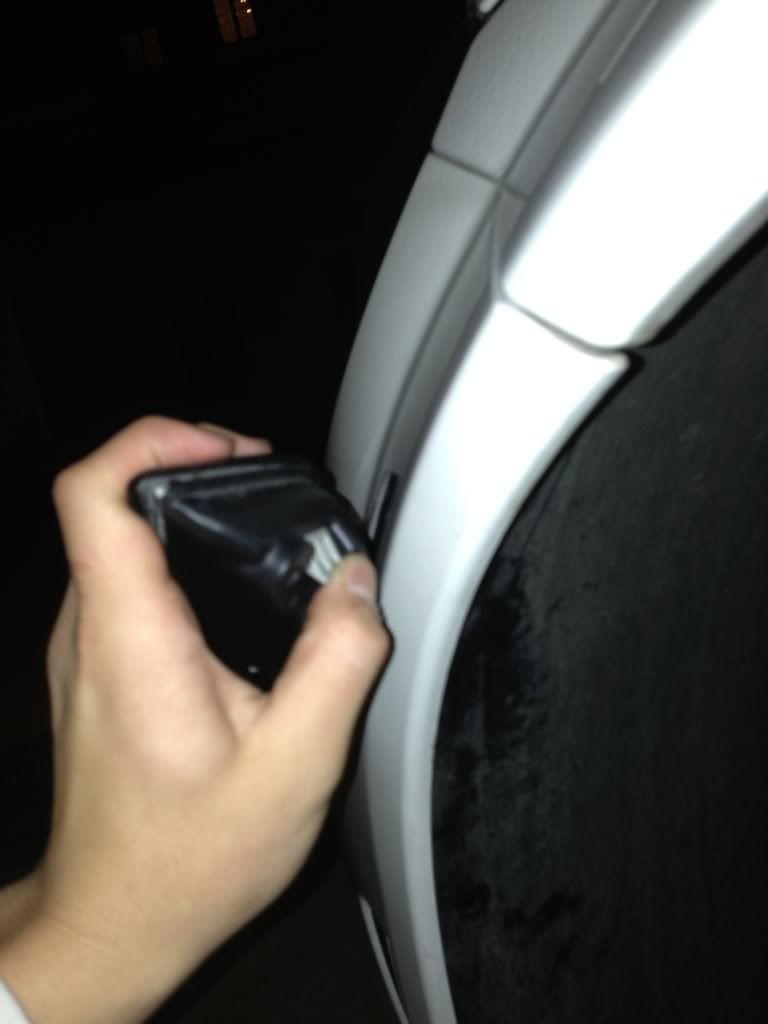
5. Once you do that, place your new side marker in its original position, and fit the side marker into its black casing from the inside of the wheel well.
6. After you do that, just get the LED and put it inside the sidemarker and just turn it back clockwise to lock it in place. Then just close off the wheel well and push back the rivets and you're done.
4 1/2. IF you purchase a side marker that looks like this, then you will have to wiggle the LED light bulb until it comes out. Don't put too much stress where it would feel like it would break, just wiggle it with a little force. Once the LED is out, you just put the "blade" of the new sidemarker into where the light bulb will go.
1. Turn your wheel the opposite way from the side you're working on. (Changing left side marker, turn wheel right [inside the driver's seat perspective])
2.In the wheel well, close to the fender, you will see a couple of rivets (screw looking things). Get a flat head screw driver (be careful) and pull three pins out. (lowest one, and work your way up) Once they are pulled out like they are in the picture, just take them out from the pins. If the pins get pulled out when you are doing this, just get the flathead and take out the rivet from the base. [If you break the rivet, just go to your dealership, they are $2 a piece]
3. Once you pulled out the rivets, you can open up the wheel well, towards the fender. It should look something like this. Turn the LED counter-clockwise (white plastic with brown and green wire attatched to it).
4. There is a side marker portion, and basically a casing for the side marker. The casing is on the inside of the car and the sidemarker is on the outside. On the inside of the car, look for this tab and push it downward, this will release the side marker from the casing.
5. Once you do that, place your new side marker in its original position, and fit the side marker into its black casing from the inside of the wheel well.
6. After you do that, just get the LED and put it inside the sidemarker and just turn it back clockwise to lock it in place. Then just close off the wheel well and push back the rivets and you're done.
4 1/2. IF you purchase a side marker that looks like this, then you will have to wiggle the LED light bulb until it comes out. Don't put too much stress where it would feel like it would break, just wiggle it with a little force. Once the LED is out, you just put the "blade" of the new sidemarker into where the light bulb will go.
Last edited by kenster96; 01-24-2013 at 12:36 AM.
 01-23-2013, 11:40 PM
#2
MBWorld Fanatic!
if you open the hood you can stick your hand in there and twist it then pull light bulb i there...takes 30 seconds if you got hand eye coordination
01-23-2013, 11:43 PM
#3
Junior Member
Thread Starter
Join Date: Sep 2012
Posts: 43
Likes: 0
Received 0 Likes
on
0 Posts
2012 C63
 did not know that. Thanks though
01-24-2013, 12:25 AM
did not know that. Thanks though
01-24-2013, 12:25 AM
#4
MBWorld Fanatic!

Join Date: Mar 2012
Location: Toronto
Posts: 2,051
Likes: 0
Received 0 Likes
on
0 Posts
my wife bananas! :D
nice writeup.
this was the same steps i did as well when i installed my side marker lights last year. didnt know about going through the hood.. will have to try that
this was the same steps i did as well when i installed my side marker lights last year. didnt know about going through the hood.. will have to try that
01-24-2013, 01:51 PM
#5
Member
Go through the hood
I did mine through the hood. It is a little frustrating doing the first one, as it is all by feel, but it really isnt difficult and took me about 15 minutes total for both sides.
Now I just need to get some LED bulbs as the stock bulbs are not white LED light like the LED fogs or the LEDs in the headlights and the sidemarkers now look stupid at night!
Anyone know where to get the bulbs?
Now I just need to get some LED bulbs as the stock bulbs are not white LED light like the LED fogs or the LEDs in the headlights and the sidemarkers now look stupid at night!
Anyone know where to get the bulbs?
01-24-2013, 02:29 PM
#6
MBWorld Fanatic!

Join Date: Feb 2010
Posts: 5,493
Received 431 Likes
on
354 Posts
2012 C63;1971 280SE 3.5(Sold);2023 EQS 450 SUV 4 Matic (Wife's)
I did mine through the hood. It is a little frustrating doing the first one, as it is all by feel, but it really isnt difficult and took me about 15 minutes total for both sides.
Now I just need to get some LED bulbs as the stock bulbs are not white LED light like the LED fogs or the LEDs in the headlights and the sidemarkers now look stupid at night!
Anyone know where to get the bulbs?
Now I just need to get some LED bulbs as the stock bulbs are not white LED light like the LED fogs or the LEDs in the headlights and the sidemarkers now look stupid at night!
Anyone know where to get the bulbs?
 01-24-2013, 03:57 PM
#7
SPONSOR/MBworld Guru

BTW, the DIY for this (and most DIY for w204 platform) is on the non-AMG w204 subforum. One additional note to what you have, on some models (was never determined if it was by model year or by assembly plant), there's a screw that holds the sidemarker to the bracket so if you have a hard time pulling out the housing, you might have the model that has the screw.
Trending Topics
01-24-2013, 04:16 PM
#8
MBWorld Fanatic!
BTW, the DIY for this (and most DIY for w204 platform) is on the non-AMG w204 subforum. One additional note to what you have, on some models (was never determined if it was by model year or by assembly plant), there's a screw that holds the sidemarker to the bracket so if you have a hard time pulling out the housing, you might have the model that has the screw.

I got my bulbs from AZN and actually while slightly off topic, could you PM a price for all the interior to a 5K (thats white right)? I have a 2012 so idk what bulbs I need.
01-25-2013, 10:53 AM
#9

BTW, the DIY for this (and most DIY for w204 platform) is on the non-AMG w204 subforum. One additional note to what you have, on some models (was never determined if it was by model year or by assembly plant), there's a screw that holds the sidemarker to the bracket so if you have a hard time pulling out the housing, you might have the model that has the screw.
01-25-2013, 06:06 PM
#10
MBWorld Fanatic!
Join Date: Feb 2010
Posts: 5,493
Received 431 Likes
on
354 Posts
2012 C63;1971 280SE 3.5(Sold);2023 EQS 450 SUV 4 Matic (Wife's)
You should be able to do it from the engine bay. Look at the passenger side first as it is a little easier to see and reach with your hand. Take a good look you should be able to figure it out!
01-25-2013, 06:21 PM
#11
Member
Join Date: Nov 2012
Location: NY
Posts: 248
Likes: 0
Received 0 Likes
on
0 Posts
E63 AMG S
just bought a set of these today from ebay (varying prices from different seller, but presuming they are all made by the same manufacturer)...
anyways, thanks for this thread
anyways, thanks for this thread
 05-22-2014, 03:35 PM
#17
Super Member
Yup, go via the engine bay. It was a little fiddly (since there's so much engine in there), but took 20 mins. Start on passenger side as outlined above, you can see housing from engine bay, rotate bulb housing 90 degrees and it will release. Then push down clip that retains lens within housing (then lens releases to outside of car, housing to inside of engine bay). This is the time to replace the bulb, if you're doing so (so before you put in the replacement lens). The new lens will then slide into 2 tabs at the bottom of the housing, and then click into the tab at the top - this part is a bit fiddly but it works fine and then clicks into place. Last step is to put bulb back into housing, rotate 90 degrees clockwise, and it's done. Other side's a bit more challenging since less room, but all together darn easy. Thanks for the help all.
04-27-2015, 06:55 PM
#18
Newbie

Join Date: Apr 2015
Posts: 1
Likes: 0
Received 0 Likes
on
0 Posts
2011 C250 Sport
I used the instructions as described in the photos by Kenster 96. It worked perfectly and it is 100% easier than going through the engine bay. Taking out the rivets is simple, once you have done it once.


