CL Climate Control - Interior Temperture Sensor
 10-19-2011, 05:16 PM
#1
Senior Member
Thread Starter
CL Climate Control - Interior Temperture Sensor
Is there one or two Interior Temperature Sensors in the CL 55/65, W215's?
If there is only one, is it the one that's in the overhead console light where there is an aspirator motor temperture sensor?
I'm got the famous Auto Air Climate issue where it blows hot air when in full "Auto" until you drop it down to 54 degrees..
So far it works ok in manual mode and I can compensate for it and it doesn't bug me, but having "Auto" work would be nice.
I did the "Hold REST" for 5 seconds Air Diagnostic test and 01 - Internal Temperature is at 0 degrees.. which explains why it blows hot until you drop it manually to LO.. guess the sensor is not picking up the temps.
I even did the "Hold Charcoal Button with REST" button and did the auto left and auto right Reset and the procedure worked but it didn't "fix" it.
What's weird is that it wasn't working initially, then it started working, and now it's not working after I swapped out the original battery with a nice fresh one.
The only thing I had to re-sync after the battery swap was to do a re-sync of the back windows (hold down for 3 sec, hold up for 3 sec procedure).
Is there an Air Climate "Re-Sync" procedure other then the one I mentioned?
I've got a replacement overhead light console coming also with a hopefully functioning aspirator motor/ temp sensor that I'm going to swap out to see if it fixes the problem.
ps. By the way, I also did the check aspirator motor trick where you take a pice of 1/2 inch paper and hold it up to the passenger side grill next to the over head light console and the paper stayed put, air sucking is good..
Here is a link that shows you what I mean, but not sure how do you determine which sensor it is? Can Xentry/DAS see which sensor is bad?
http://www.benzworld.org/forums/w220...ml#post3618602
Last edited by NRL; 10-19-2011 at 06:16 PM.
 10-21-2011, 11:58 AM
#2
Senior Member
Thread Starter
Well, I'm pretty sure there is two interior temperture sensors.
Looks like I'll break open my DAS STAR Diag this weekend and run through the tests to find out which one it is.
Seems to be just fine and comfortable with it set at low fan 54-55 in manual mode. AC still works, it just thinks it's at 0 Degrees..
Looks like I'll break open my DAS STAR Diag this weekend and run through the tests to find out which one it is.
Seems to be just fine and comfortable with it set at low fan 54-55 in manual mode. AC still works, it just thinks it's at 0 Degrees..
10-21-2011, 05:15 PM
#3

Well, I'm pretty sure there is two interior temperture sensors.
Looks like I'll break open my DAS STAR Diag this weekend and run through the tests to find out which one it is.
Seems to be just fine and comfortable with it set at low fan 54-55 in manual mode. AC still works, it just thinks it's at 0 Degrees..
Looks like I'll break open my DAS STAR Diag this weekend and run through the tests to find out which one it is.
Seems to be just fine and comfortable with it set at low fan 54-55 in manual mode. AC still works, it just thinks it's at 0 Degrees..
hook up das and read the overhead. this should tell you. if it is the case you can disassemble and check for obvious. mine had a cold solder connection on one side of the sensor that needed to be reflown. if you cant find the problem - the overhead console can be head for about $300 used- if you find one. be careful- they all look the same, but they are different and not compatible. you need the specific part # for your car.
Last edited by alx; 10-21-2011 at 05:18 PM.
10-22-2011, 12:50 PM
#4
Senior Member
Thread Starter
Thanks,
Hooked it up to SDS(Star Diagnostics) and found out it must be the N70B1 Temperature sensor. It says it's reading 146.6 F! And it doesn't fluctuate. I also ran a actual on the other Temperature sensor it it had the right measurements.
I think the Overhead Console would be easier to replace then the other one.
I'm going to take apart the Overhead Console next and grab the part#, and probably take a look at it.. I think there is 3 different part#s..
10-22-2011, 01:02 PM
#5
Thanks,
Hooked it up to SDS(Star Diagnostics) and found out it must be the N70B1 Temperature sensor. It says it's reading 146.6 F! And it doesn't fluctuate. I also ran a actual on the other Temperature sensor it it had the right measurements.
A
I think the Overhead Console would be easier to replace then the other one.
I'm going to take apart the Overhead Console next and grab the part#, and probably take a look at it.. I think there is 3 different part#s..
Last edited by alx; 10-22-2011 at 01:06 PM.
10-22-2011, 09:34 PM
#6
Senior Member
Thread Starter
Thanks Man,
Wasn't too bad to take the overhead console out. Got it out perfect with the right tools; plastic clip tool(2 of em) and torx.
Had to figure out how to pull the cables out but got that part, removed the back cover, torx screws and checked out the Thermistor and it was a gonner.. the thin Thermistor wires was all deteriorating, they are really thin and hangs on that Cover that suspends over the fan that sucks the air in.
Figured out how to remove the cover, snipped and yanked the old Thermistor, replaced it was another similar Thermistor, soldered it back on the two spots on the motherboard, carefully put the cover for the suck fan, put on the back cover, plugged it in, and did a quick test before I put it all back as it was. Held down the REST, and 01 (inside temperature sensor) now reads the correct temps!
They want $768.00 (Brand new) or more for that overhead console.. so I guess I saved some change. Nice afternoon tinkering..
Last edited by NRL; 10-23-2011 at 04:05 AM.
10-22-2011, 11:15 PM
#7
Senior Member
Thread Starter
Put the overhead console back in...
Resyned the roof just in case. And went for a test drive. The auto climate control is working great now.
Resyned the roof just in case. And went for a test drive. The auto climate control is working great now.
Trending Topics
10-23-2011, 10:12 PM
#9
Nice work. Yours is the 3rd one that I've seen/ heard about that has the thermistor's wires disintegrate. If you can post the thermistor characteristics/ part number it would be a great piece of knowledge that will help fellow enthusiasts save a chunk of money.
10-24-2011, 04:22 PM
#10
Senior Member
Thread Starter
http://www.meas-spec.com/downloads/E...ed_1K3A351.pdf
Or anything similar: 1k range +/-500 ohms
The two wires are really really thin..
Last edited by NRL; 10-24-2011 at 04:50 PM.
10-24-2011, 04:54 PM
#11
http://parts.digikey.com/1/parts/953...312-73-d1.html
Or anything similar: 1k range +/-500 ohms
The two wires are really really thin..
Or anything similar: 1k range +/-500 ohms
The two wires are really really thin..
so at 80 degrees it could read anywhere from 76 to 84...
but cabin temps are not an exact science anyway so... it might just work
it is certainly better than the temp controls going haywire...
10-24-2011, 04:58 PM
#12
Senior Member
Thread Starter
this one might be a little too inaccurate for our purpose... resistance tolerance is 10% according to its data sheet
so at 80 degrees it could read anywhere from 76 to 84...
but cabin temps are not an exact science anyway so... it might just work
it is certainly better than the temp controls going haywire...
so at 80 degrees it could read anywhere from 76 to 84...
but cabin temps are not an exact science anyway so... it might just work
it is certainly better than the temp controls going haywire...
10-24-2011, 08:38 PM
#13
Junior Member

Join Date: Nov 2008
Posts: 36
Likes: 0
Received 0 Likes
on
0 Posts
Murcielago, Diablo, F.. 348, CL65, ML500
How bout this one?
http://www.newark.com/vishay-dale/02...tor/dp/41K9374
I too have NR.01 - 0C
Thanks for the good info guys!
Frank
http://www.newark.com/vishay-dale/02...tor/dp/41K9374
I too have NR.01 - 0C
Thanks for the good info guys!
Frank
10-30-2011, 08:09 PM
#14
Junior Member
Join Date: Nov 2008
Posts: 36
Likes: 0
Received 0 Likes
on
0 Posts
Murcielago, Diablo, F.. 348, CL65, ML500
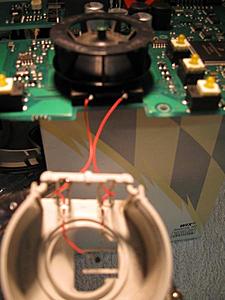
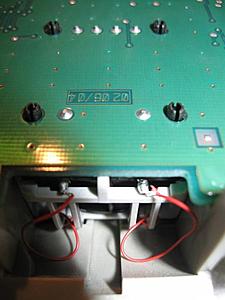
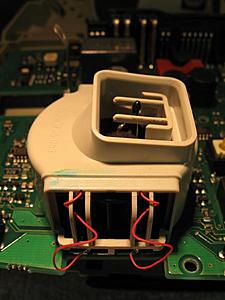
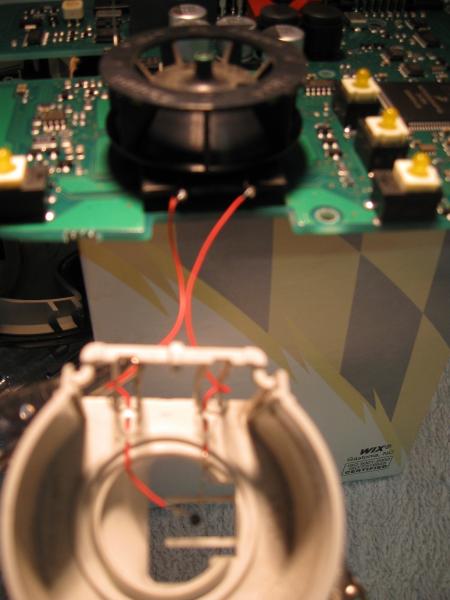
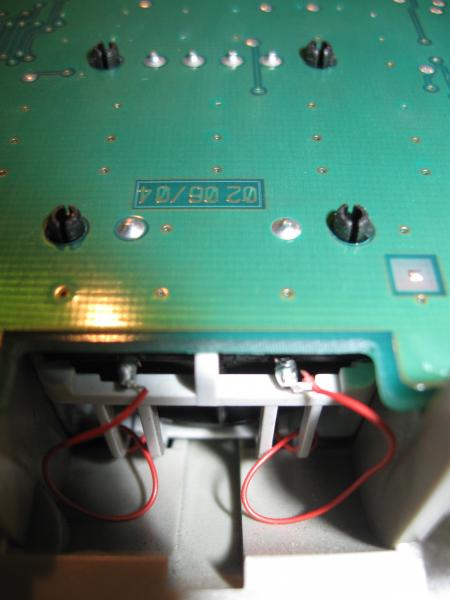
Repair
Here�s some photos of my repair. One of the wires broke off close to the thermistor when I was prepping for soldering, so I cut both about the same length and soldered there. The solder connections were about 1/4� from the thermistor. I used very small insulated wire that would slide through the same holes in the fan housing. And I made sure there was a good amount outside the housing to allow for flex. Both thermistor wires were broken, and though the wires looked a little corroded, the fan housing can move around so much, that I suspect fatigue is partly to blame.
Warning, you can�t do the prep and solder job without magnifiers to view with.
Thanks for the info guys.
Warning, you can�t do the prep and solder job without magnifiers to view with.
Thanks for the info guys.
 10-31-2011, 04:33 PM
#16

super job!!!! thanks
03-10-2012, 02:47 PM
#17
Junior Member
Join Date: Nov 2011
Location: Clearwater, FL
Posts: 21
Likes: 0
Received 0 Likes
on
0 Posts
CL55 AMG
Did this today, I am pretty sure I got the correct thermistor. It was reading 0C, after install now I am reading 58C, and my dome lights are not working. There is power to the sunroof, is there a short or does this stuff need to be re synced or re booted?
03-12-2012, 05:42 AM
#18
Junior Member
Join Date: Nov 2011
Location: Clearwater, FL
Posts: 21
Likes: 0
Received 0 Likes
on
0 Posts
CL55 AMG
Turns out the lighting issue was my stupidity it was all good.
The sensor never did work correctly so I took it out entirely and the fan underneath it but put back on the plastic cover.
The climate control works now?????????? I guess it is just taking its readings from the sensor on the dash near the air controls. I am going to keep my eye on it, but looks like you can run off one sensor and still have climate control.
03-12-2012, 12:37 PM
#19
Senior Member
Thread Starter
What does the diag mode say now?
Hold REST" for 5 seconds Air Diagnostic test and 01 - Internal Temperature is at ? degrees..
Hold REST" for 5 seconds Air Diagnostic test and 01 - Internal Temperature is at ? degrees..
03-12-2012, 01:40 PM
#20
Junior Member
Join Date: Nov 2011
Location: Clearwater, FL
Posts: 21
Likes: 0
Received 0 Likes
on
0 Posts
CL55 AMG
04-14-2016, 06:34 PM
#21
Member

Thanks!
04-14-2016, 06:35 PM
#22
Member
Thanks!
04-17-2016, 11:23 PM
#23
Senior Member
Thread Starter
Hope somebody sees this resurrection of an old thread. I am trying to do this now but for the life of me I cannot figure out how to disconnect the wires. I got a couple of them but there is one block that has a bunch of connectors going to it that I cannot budge. If anyone has a thought please let me know
Thanks!
Thanks!
From my feeble memory I remember two set's for wires going to a cartridge like connector, but it's been years.. Use a thin screw driver to dislodge the connector lock. You have to unscrew the whole light assembly out too, then unplug the wire connectors.. It's been awhile sorry... can you upload some pics?
11-21-2022, 01:43 PM
#24
Member

I think I'm having this issue with mine.
It's a shame there's so little description of what those links are pointing to above as after 11 years of course they're all dead and I've no idea what parts I should be looking for if I want to do the repair.
Is there only one sensor in the interior light console at the roof that goes bad?
It's a shame there's so little description of what those links are pointing to above as after 11 years of course they're all dead and I've no idea what parts I should be looking for if I want to do the repair.
Is there only one sensor in the interior light console at the roof that goes bad?
03-16-2023, 10:52 AM
#25
Member
Just got around to doing this job. It seems the issues have been described in another post on a different forum but I'll add them here to help anyone who finds just this post by itself.
Basically the thermistor which is like a temp sensor in the overhead console (where the rear view mirror is) breaks away from the circuit board. A lot of people have reported finding the legs of the thermistor corroded and easily broken. I imagine this happens from years of the small fan drawing moisture across the metal and over time causing it to corrode. In my case the metal legs are corroded on one side of the fan only. On top of the fan the thermistor legs are fine. On the side of the fan the thermistor legs are basically dust they have corroded so much.
Other people have also reported that the shroud (cover) over the fan is wobbly. Mine is wobbly as well and I'm sure it is meant to be like that as nothing appears broken.
The issue comes when the thermistor legs have become brittle enough that the wobbly fan cover can break the legs. This is also the reason why the fix has only worked temporarily for some people. When they have fixed it the legs have remained brittle and as soon as they've started to drive the car the wobbly fan cover is smashing into the legs and breaking them again.
I've only just started work on this so I don't know if my fix will be permanent but I noticed the legs were solid on top of the fan. The plastic moulding which supposedly holds the thermistor in place was allowing my thermistor to wobble. I thought whilst that may be deliberate to stop the fan blade from contacting the thermistor and tearing it out that the risk of leaving it wobbly in the housing was more likely to cause problems. So I added a couple of blobs of the wife's nail varnish onto the part of the plastic shroud where the legs pass through. I would have used superglue but I don't have any. I think the nail varnish will hold as an alternative.
When the nail varnish has dried I'm going to use the bypass repair that other people have used where you run wires from the good part of the legs on the thermistor down to the circuit board.
Will update if this is unsuccessful.


