Look what Eurocharged sent me..
 12-20-2012, 02:09 AM
#1
Banned
Thread Starter

Join Date: Nov 2012
Posts: 331
Likes: 0
Received 8 Likes
on
8 Posts
550HP+ ///AMG CL55 Kompressor, Ducati 916bp, Yamaha R1 WSBK replica
...With no hardware, hoses or instructions 
Oh well. I guess It's a drill and fit affair. Are you guys removing and replacing the stock charge cooler/heat exchanger with the uprated one, or running the stock AND new one in series? How are you pluming it in? ANyone got some instructions they can link up?
Thanks!

Oh well. I guess It's a drill and fit affair. Are you guys removing and replacing the stock charge cooler/heat exchanger with the uprated one, or running the stock AND new one in series? How are you pluming it in? ANyone got some instructions they can link up?
Thanks!
Last edited by nidyanazo; 12-20-2012 at 02:44 AM.
 12-20-2012, 11:10 AM
#2
MBWorld Fanatic!
cant speak for the CL but I know for my car I took off the old one, drilled that one into the front cross member, hoses plug in to the same spot, and done. Looks to be the same idea
12-20-2012, 12:11 PM
#3
SPONSOR
Join Date: Jul 2007
Location: Houston/ Austin /Toronto / UAE / Minneapolis / Orlando /Cincinnati
Posts: 5,459
Received 149 Likes
on
109 Posts
Eurocharged Performance ML63 and TT lambo
...With no hardware, hoses or instructions
Oh well. I guess It's a drill and fit affair. Are you guys removing and replacing the stock charge cooler/heat exchanger with the uprated one, or running the stock AND new one in series? How are you pluming it in? ANyone got some instructions they can link up?
Thanks!
Oh well. I guess It's a drill and fit affair. Are you guys removing and replacing the stock charge cooler/heat exchanger with the uprated one, or running the stock AND new one in series? How are you pluming it in? ANyone got some instructions they can link up?
Thanks!
Instructions are on our website as always:
http://www.eurocharged.com/documents/documents
 12-20-2012, 04:07 PM
#4
Banned
Thread Starter
Join Date: Nov 2012
Posts: 331
Likes: 0
Received 8 Likes
on
8 Posts
550HP+ ///AMG CL55 Kompressor, Ducati 916bp, Yamaha R1 WSBK replica
Oh cool,
I sent Jerry an email asking about that (what tools and hardware/ hoses are needed) but he wasn't able to get back with me, only giving the tracking number.
Those instructions say they are for the c32 and slk32, would you say it's the same procedure minus the petcock valve draining and bleeding, since these cars self bleed?
I read some people have plumbed this IC in additionally WITH the stock one, in series. Is that recommended? Or just get rid of the stock one?
Thanks!
12-20-2012, 04:29 PM
#5
SPONSOR
Join Date: Jul 2007
Location: Houston/ Austin /Toronto / UAE / Minneapolis / Orlando /Cincinnati
Posts: 5,459
Received 149 Likes
on
109 Posts
Eurocharged Performance ML63 and TT lambo
Oh cool,
I sent Jerry an email asking about that (what tools and hardware/ hoses are needed) but he wasn't able to get back with me, only giving the tracking number.
Those instructions say they are for the c32 and slk32, would you say it's the same procedure minus the petcock valve draining and bleeding, since these cars self bleed?
I read some people have plumbed this IC in additionally WITH the stock one, in series. Is that recommended? Or just get rid of the stock one?
Thanks!
I sent Jerry an email asking about that (what tools and hardware/ hoses are needed) but he wasn't able to get back with me, only giving the tracking number.
Those instructions say they are for the c32 and slk32, would you say it's the same procedure minus the petcock valve draining and bleeding, since these cars self bleed?
I read some people have plumbed this IC in additionally WITH the stock one, in series. Is that recommended? Or just get rid of the stock one?
Thanks!
Get rid of the stock unit
12-20-2012, 07:48 PM
#7
Banned
Thread Starter
Join Date: Nov 2012
Posts: 331
Likes: 0
Received 8 Likes
on
8 Posts
550HP+ ///AMG CL55 Kompressor, Ducati 916bp, Yamaha R1 WSBK replica
No, it does not apply. I'm uploading a video now. Those instructions have NOTHING to do with our 55k cars.
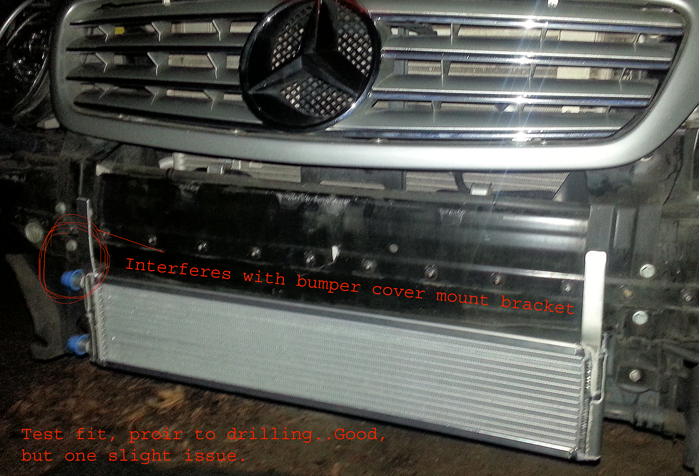
I'm actually fairly disappointed now, since I took off the bumper, and the intercooler is nowhere near a direct bolt on.
https://mbworld.org/forums/cl55-amg-...appointed.html
I'm actually fairly disappointed now, since I took off the bumper, and the intercooler is nowhere near a direct bolt on.
https://mbworld.org/forums/cl55-amg-...appointed.html
Last edited by nidyanazo; 12-20-2012 at 11:35 PM.
Trending Topics
 12-21-2012, 06:29 PM
#9
Banned
Thread Starter
Join Date: Nov 2012
Posts: 331
Likes: 0
Received 8 Likes
on
8 Posts
550HP+ ///AMG CL55 Kompressor, Ducati 916bp, Yamaha R1 WSBK replica
So here are the required parts to fit the heat exchanger.
1/4" Drill bit.
2' of 3/4"id heater hose
MB Coolant.
Distilled Water.
Hose clamps.
Optional: Foam Rubber insulation

1/4" Drill bit.
2' of 3/4"id heater hose
MB Coolant.
Distilled Water.
Hose clamps.
Optional: Foam Rubber insulation

 12-23-2012, 04:05 AM
#13
Nice job !
Great to see everything on the video as well.
It looks like to me from the pictures & video the oil cooler is second in line via air flow after the intercooler. Am I seeing that correctly ? If so did the manufacturers address this to your satisfaction ?
Great to see everything on the video as well.
It looks like to me from the pictures & video the oil cooler is second in line via air flow after the intercooler. Am I seeing that correctly ? If so did the manufacturers address this to your satisfaction ?
12-23-2012, 04:06 AM
#14
Banned
Thread Starter
Join Date: Nov 2012
Posts: 331
Likes: 0
Received 8 Likes
on
8 Posts
550HP+ ///AMG CL55 Kompressor, Ducati 916bp, Yamaha R1 WSBK replica
Thanks, I'll have everything back together tomorrow.. I took an extra day to redo my side grilles. Basically removed the fog lamps and made custom grills to clean up things a tad.
12-23-2012, 04:13 AM
#15
Banned
Thread Starter
Join Date: Nov 2012
Posts: 331
Likes: 0
Received 8 Likes
on
8 Posts
550HP+ ///AMG CL55 Kompressor, Ducati 916bp, Yamaha R1 WSBK replica
The main issue is not the lack of customer service (although that is a problem) it's that they are Giving out INCORRECT information, which really aggravates me.
The way I plumbed it is in series, with the new eurocharged cooler as the last-line before bringing the fluid back to the supercharger.
So the the hot fluid comes out of the supercharger, and gets pumped into the stock heat exchanger. It gets cooled down some, but not all the way. The then slightly cooled fluid passes out, and into the eurocharged unit for further cooling, and then back into the uprated bosch 010 I/C pump, and back up to the supercharger to start the heat transfer cycle over again.
And yes, in terms of airflow for the oil cooler, it is directly behind the new eurocharged cooler. There is no way to change that. I'm sure it will be fine.


