Removing/Installing convertible canvas top

 11-17-2015, 12:37 PM
#1
Senior Member
Thread Starter
Removing/Installing convertible canvas top
The glued canvas top seam is coming apart on both sides. I thought I'd take it off and sew it, as glue does not work here. Searched the internet and couldn't find anything on taking the top off so I just went by the WIS instructions. Not the most complete instructions.
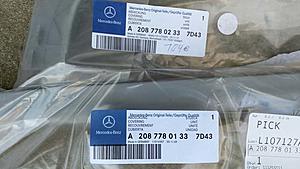
If you're going to do this you might want to just go ahead and order the rear window trim pieces before starting. I think it would be pretty hard to take them off without breaking them. Two pieces make the trim around the rear window. 7D43 is the color code for grey.


1. Lower the top and stop before the top lid comes down.
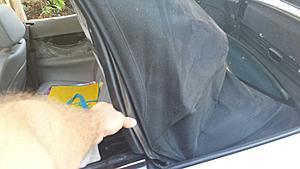
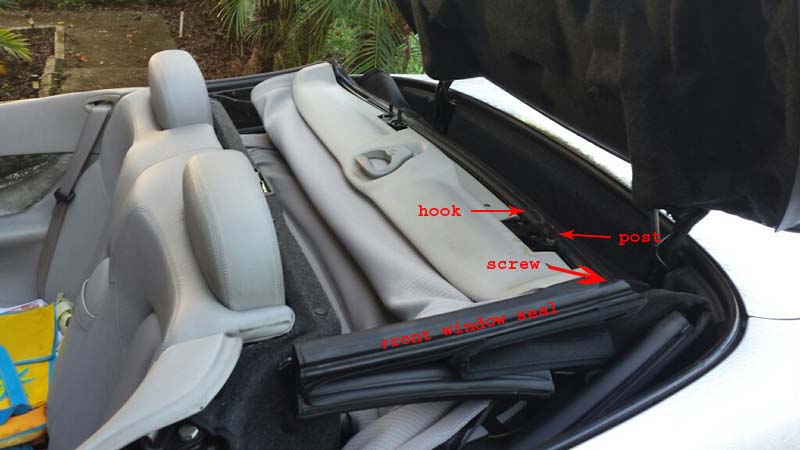
2. Remove the screw on the front window seal and pull the seal out, do both sides.
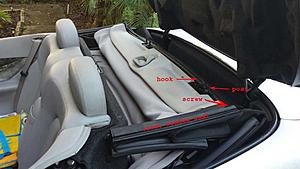
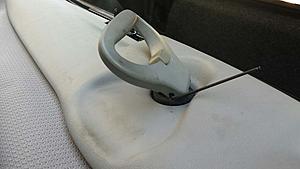
3. Raise and turn the top handle to where you can get an allen wrench on the screw. It's a 2.5mm allen wrench. To keep the handle open, zip tie the hook to the post. (sorry no pic)
4. Remove the allen head pin and remove the handle.
5. Remove the 4 screws holding the panel on and remove the panel.
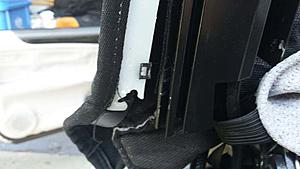
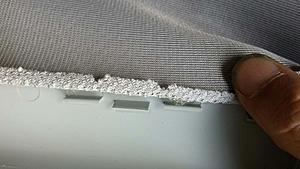
6. Now remove the canvas top retaining strip. It keeps the front top canvas mounting rail in place. It's a plastic strip and is dug in pretty good. I used a mechanics pick to get it started. After you get one of the ends lifted, you can pull it out.
7. Once that is out, pry up the front canvas top mounting rail with a big screwdriver.
8. Unclip the right and left canvas mounting rails from the frame, again a big screwdriver helps.
9. Push the right and left tension cable ends down and out of the frame.

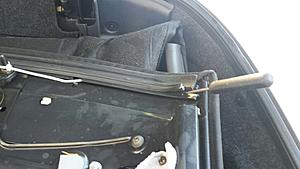
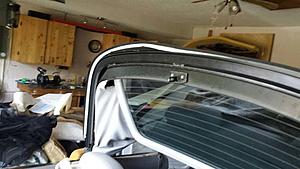
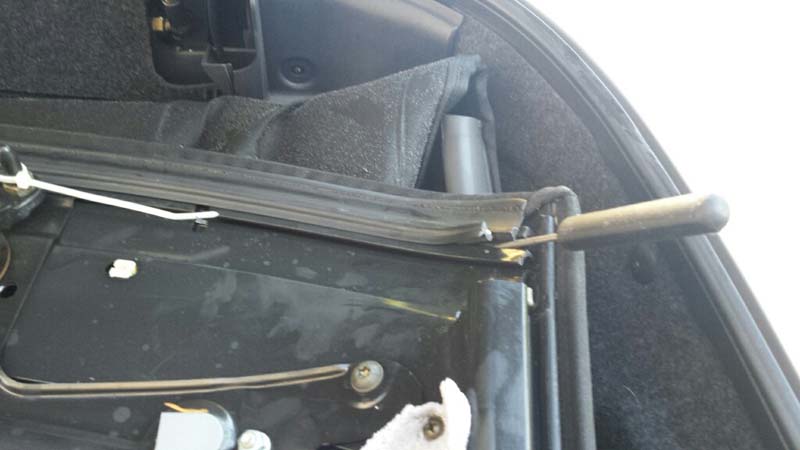
10. All done with the top in that position. Now raise the top about half way. You'll be removing the rear top seal. It is one long rubber piece that starts at the top front of one rear window and extends over to the top front of the other rear window.
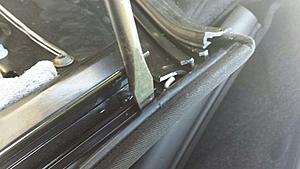
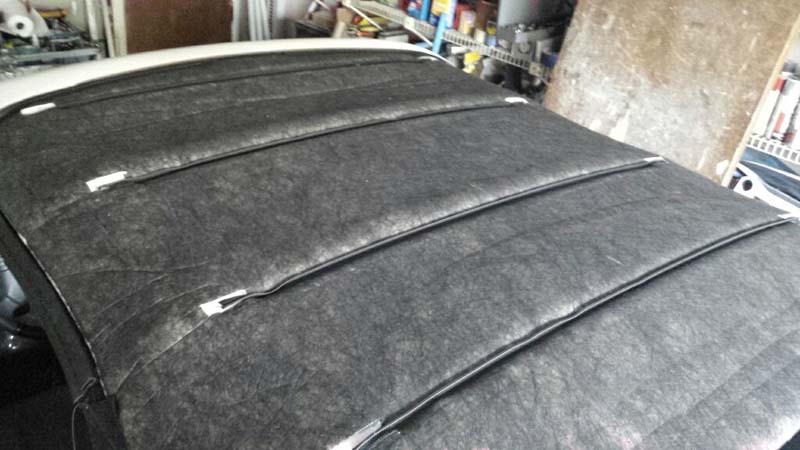
11. Before pulling the rear seal, make an alignment mark on the rear top frame, canvas, and rubber seal. It will help you reinstall them. If your putting on a new top you obviously don't need to mark the canvas. Use a white grease pencil on the frame and chalk on the canvas and rubber. Mark in the middle and not off to the side the way I have it in the pic.
12. Start pulling the seal out from the back of the rear window. The beginning of the seal is "plugged" into the frame, you'll see how it comes out.
There are no screws or fasteners holding the seal on. The seal continues under the tops main hinge then under the back of the top and over to the other window. I believe I had to adjust the position of the top for the seal to come out of the hinge area.
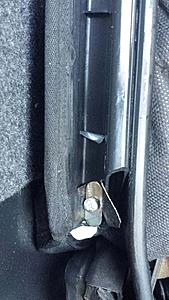
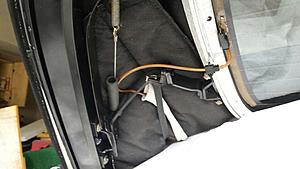
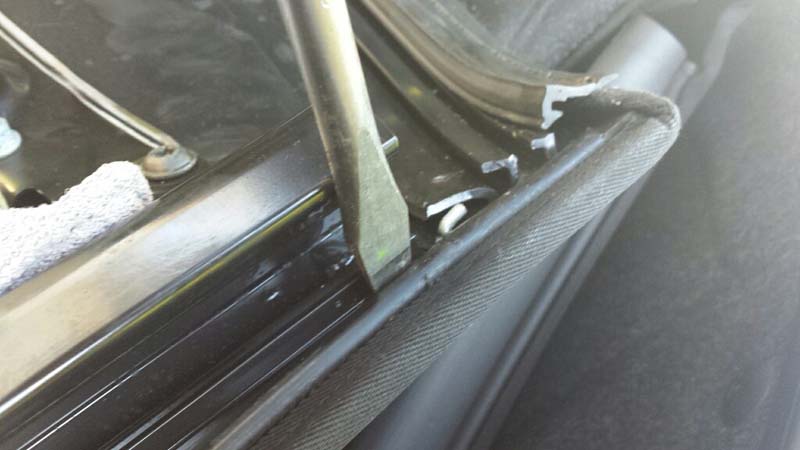
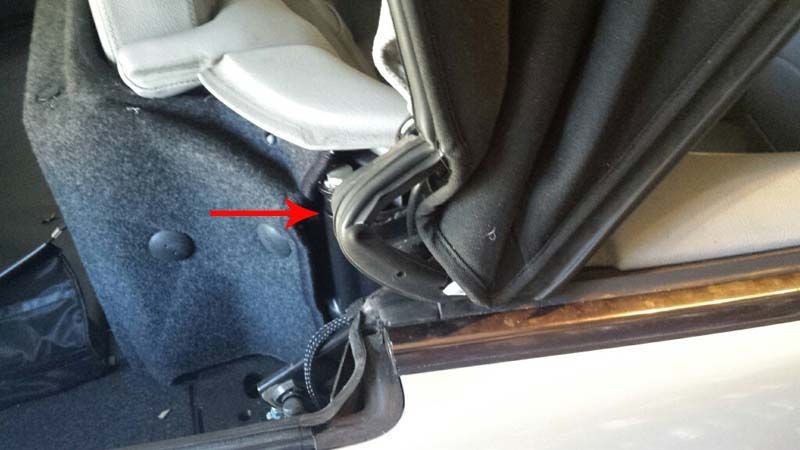
13. Removing the seal exposes the screws for the top mounting to frame brackets. Remove the screws on the right and left brackets.
Watch out for the bottom screw, it has a washer/retainer on it. Hold onto it while taking out the screw or it might fall into the abyss. Pull the brackets out on both sides.
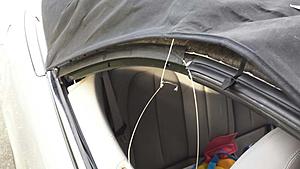
14. Tie a string to the end of the tension cable at the front of the top. The cable is exposed where the front and rear top seals meet. Pull the cable out through the top from there. Cut the string leaving a couple of feet of slack on both sides. Makes it alot easier to reinstall the cable.
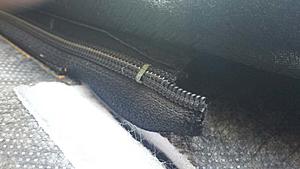
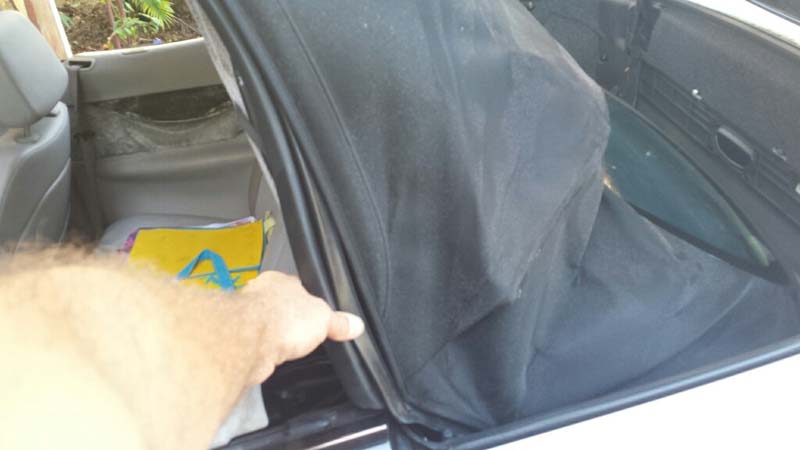
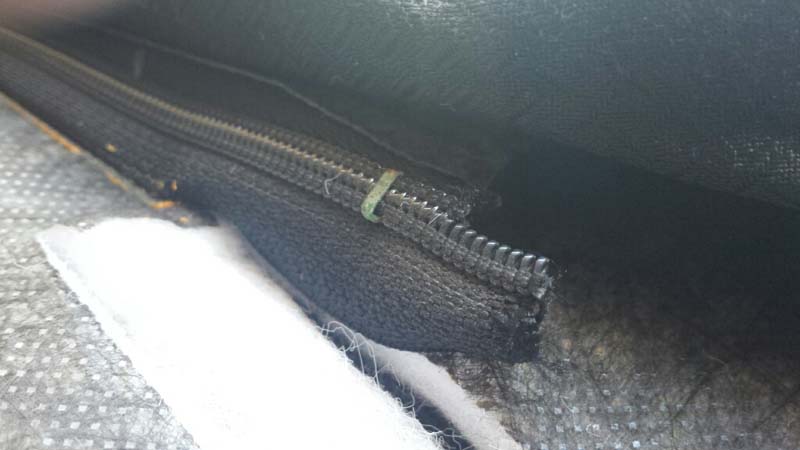
15. Lay the top down, pull back on the front part of the canvas and you'll see a zipper. Cut the retaining clip on the ends of the zipper and pull the zipper apart. There are 4 zippers, pull them all apart and then lay the canvas back to the front.

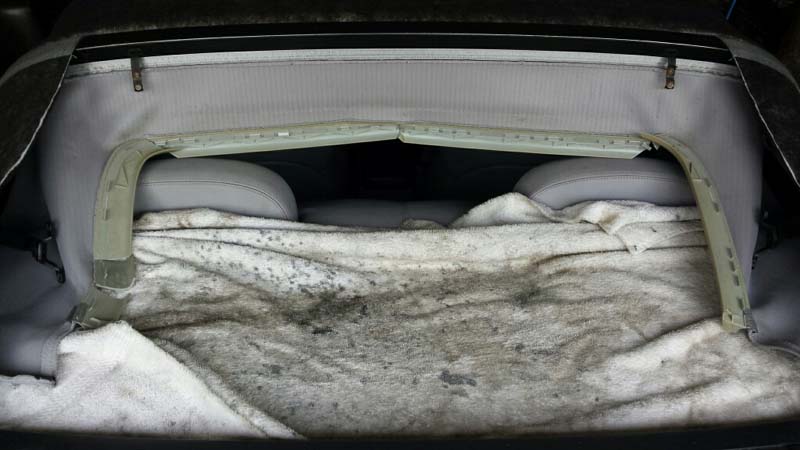
16. Lift the rear part of the top as high as it will go, it should rest there on it's own. You can leave the rear cover lid up or lower it and put a big towel on it to protected it. Lowering it makes it easier.
17. Remove the rear canvas top retainer from the channel in the frame. The retainer is sewn into the canvas. There are about 11 little clips holding the retainer in. Pry out the retainer with a big screwdriver. Don't forget to make an alignment mark in the middle for the canvas to frame if reusing the canvas. Don't lose the little clips.
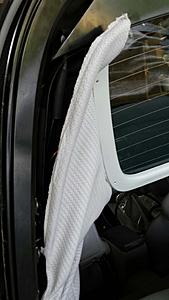
18. Pull out the headliner outer edges on the right and left from the rear top frame. The retainers are sewn into the headliner. I only have an after pic for this.
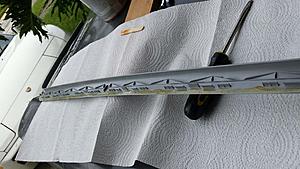
19. Now the hard part. Removing the window trim piece without breaking it.
It is very weak and brittle. The trim is snapped into groves of the window aluminum surround. Very carefully pry up the lower piece where it meets the upper piece. You don't have to completely remove the lower piece, just lift it enough where you can get the upper piece out. I don't have good advice as how to pry up the piece, as I broke mine in several places. If you can get it out intact, you'll save yourself a lot of trouble replacing it. I'll have a write up at the end on how I replaced mine.
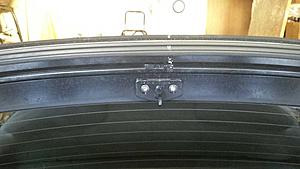
20. Once the trim is off, take a picture of the rear window area for heater wire routing and such. Remove the window heater connector. Careful here, the base connector is soldered to the heater, mine lifted off when pulling the connector lead. Had to resolder it.
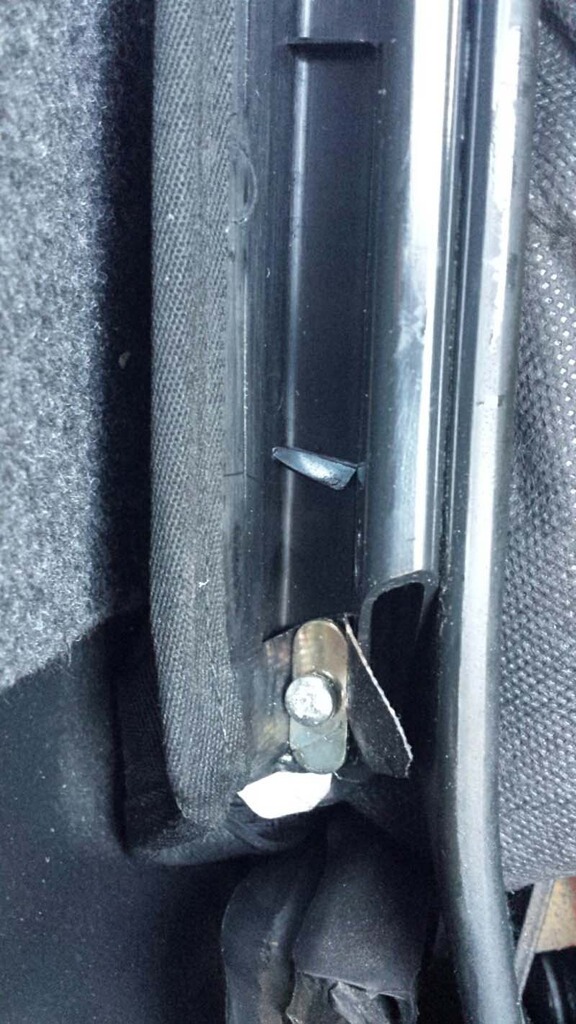
21. Remove the nuts on the window bracket hinge at the window frame. Both sides. Pull the brackets off the window.
22. Lift the window up and lay it on the top. Drill the rivet out of each retaining strap.

Writing this from memory, hopefully I didn't miss anything. You should be able to completely remove the top now.
This was not hard, much of it is self explanatory. Of course, removing most anything is easy once you know how.
I'll follow up later with the top install and the new window trim piece install.
If you're going to do this you might want to just go ahead and order the rear window trim pieces before starting. I think it would be pretty hard to take them off without breaking them. Two pieces make the trim around the rear window. 7D43 is the color code for grey.


1. Lower the top and stop before the top lid comes down.
2. Remove the screw on the front window seal and pull the seal out, do both sides.
3. Raise and turn the top handle to where you can get an allen wrench on the screw. It's a 2.5mm allen wrench. To keep the handle open, zip tie the hook to the post. (sorry no pic)
4. Remove the allen head pin and remove the handle.
5. Remove the 4 screws holding the panel on and remove the panel.

6. Now remove the canvas top retaining strip. It keeps the front top canvas mounting rail in place. It's a plastic strip and is dug in pretty good. I used a mechanics pick to get it started. After you get one of the ends lifted, you can pull it out.
7. Once that is out, pry up the front canvas top mounting rail with a big screwdriver.
8. Unclip the right and left canvas mounting rails from the frame, again a big screwdriver helps.
9. Push the right and left tension cable ends down and out of the frame.

10. All done with the top in that position. Now raise the top about half way. You'll be removing the rear top seal. It is one long rubber piece that starts at the top front of one rear window and extends over to the top front of the other rear window.
11. Before pulling the rear seal, make an alignment mark on the rear top frame, canvas, and rubber seal. It will help you reinstall them. If your putting on a new top you obviously don't need to mark the canvas. Use a white grease pencil on the frame and chalk on the canvas and rubber. Mark in the middle and not off to the side the way I have it in the pic.

12. Start pulling the seal out from the back of the rear window. The beginning of the seal is "plugged" into the frame, you'll see how it comes out.
There are no screws or fasteners holding the seal on. The seal continues under the tops main hinge then under the back of the top and over to the other window. I believe I had to adjust the position of the top for the seal to come out of the hinge area.
13. Removing the seal exposes the screws for the top mounting to frame brackets. Remove the screws on the right and left brackets.
Watch out for the bottom screw, it has a washer/retainer on it. Hold onto it while taking out the screw or it might fall into the abyss. Pull the brackets out on both sides.
14. Tie a string to the end of the tension cable at the front of the top. The cable is exposed where the front and rear top seals meet. Pull the cable out through the top from there. Cut the string leaving a couple of feet of slack on both sides. Makes it alot easier to reinstall the cable.

15. Lay the top down, pull back on the front part of the canvas and you'll see a zipper. Cut the retaining clip on the ends of the zipper and pull the zipper apart. There are 4 zippers, pull them all apart and then lay the canvas back to the front.
16. Lift the rear part of the top as high as it will go, it should rest there on it's own. You can leave the rear cover lid up or lower it and put a big towel on it to protected it. Lowering it makes it easier.
17. Remove the rear canvas top retainer from the channel in the frame. The retainer is sewn into the canvas. There are about 11 little clips holding the retainer in. Pry out the retainer with a big screwdriver. Don't forget to make an alignment mark in the middle for the canvas to frame if reusing the canvas. Don't lose the little clips.

18. Pull out the headliner outer edges on the right and left from the rear top frame. The retainers are sewn into the headliner. I only have an after pic for this.

19. Now the hard part. Removing the window trim piece without breaking it.
It is very weak and brittle. The trim is snapped into groves of the window aluminum surround. Very carefully pry up the lower piece where it meets the upper piece. You don't have to completely remove the lower piece, just lift it enough where you can get the upper piece out. I don't have good advice as how to pry up the piece, as I broke mine in several places. If you can get it out intact, you'll save yourself a lot of trouble replacing it. I'll have a write up at the end on how I replaced mine.
20. Once the trim is off, take a picture of the rear window area for heater wire routing and such. Remove the window heater connector. Careful here, the base connector is soldered to the heater, mine lifted off when pulling the connector lead. Had to resolder it.
21. Remove the nuts on the window bracket hinge at the window frame. Both sides. Pull the brackets off the window.

22. Lift the window up and lay it on the top. Drill the rivet out of each retaining strap.

Writing this from memory, hopefully I didn't miss anything. You should be able to completely remove the top now.
This was not hard, much of it is self explanatory. Of course, removing most anything is easy once you know how.
I'll follow up later with the top install and the new window trim piece install.
Last edited by marko69; 11-22-2015 at 09:23 AM. Reason: added a pic
 11-18-2015, 12:42 AM
#2
Senior Member
Thread Starter
Installation
Installation.
My old top was in good shape except for the seam coming apart at the top rear corners and down the sides. I decided to sew it together instead of spending 5 or $600 for a new one.
The window is held to the canvas by about 26 rivets. Instead of opening up that potential can of worms, I sewed the seam with the window still attached to the canvas. Not easy but doable. If you've bought a new top, you'll have to transfer the window to the new top.
Installation is the reverse order of removal.
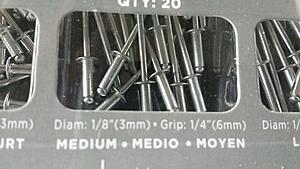
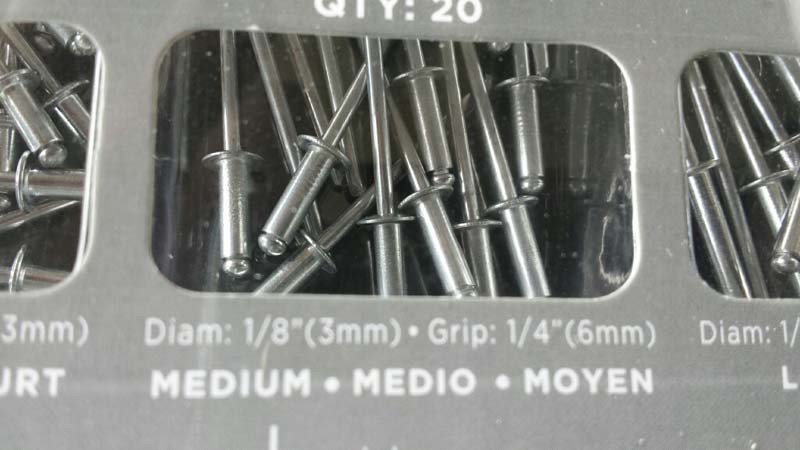
-Lay the canvas on the top with the window folded back on the top as before. Install one rivet on each retainer strap to the window frame. Obviously you need a rivet gun and the correct rivet. Here is the size that works.
-Bolt on the window hinge brackets to window frame
-Connect the window heater leads
-Snap in the window trim piece
-Snap in the headliner edge retainers
-Snap in the rear canvas retainer strip into the frame channel. Don't forget to put any of -the little clips back in if they had fallen out. Line up the marks you made before you removed it.
-Fold the front of the canvas to the back and connect the rearmost zipper. SAAAY WHAAAT??
Manual says to use zipper pliers. I couldn't find any zipper pliers anywhere on ebay or anywhere else. The dealer told me their WIS says to use staples. I'm sure there is a hand held type stapler that will work, but I couldn't find one. I tried hog rings but they were to bulky and I was worried they would wear on the canvas. Smaller hog rings then the one's I have might have worked. I tried about 4 different zipper heads from Joann's but none of those worked. In the end, I cut off a zipper head from an old tool bag and it worked....sort of. I'd zip it up about half way, then the zipper wouldn't close the teeth anymore. I monkeyed around with this for hours and gave up. My wife gave it a shoot and she was able to close all 4 zippers.
So the question is, what should you use to close the zippers??? Use whatever works.
There is probably a special little clip to close the zipper ends, but I just hand sewed it together.
- Attach the string to the tension cable and pull the cable to the front of the top. Push it through the hole in the frame.
-Insert the top brackets that are at the back of the rear windows and install the screws.
-Insert the long rubber rear main seal. Note the alignment mark you made. The shape of the loop at the bottom of the rear main hinge should look similar on both sides. If not, one side will be tighter than the other when the frame is closed.
-Fold the top down into the rear compartment.
-Attach the side canvas retainers to the frame. The first side will be easy, the second side will be difficult as the the top will be very tight across. Use a big screwdriver to pry up the back end corner of the retainer to get it over the edge while pushing it on with your other hand. Then work it on toward the front.
-Snap in the front canvas retaining rail to the frame channel.
-Insert the front canvas retainer plastic piece into the channel. I used a rubber mallet to hammer it in. The end of a wooden hammer works well to get around post and hook areas.
-Insert the front paneling with 4 screws.
-Attach the handle and screw in the pin.
-Attach the front rubber seals with one screw each and your done.
More to come with the installation of a new window trim piece.
My old top was in good shape except for the seam coming apart at the top rear corners and down the sides. I decided to sew it together instead of spending 5 or $600 for a new one.
The window is held to the canvas by about 26 rivets. Instead of opening up that potential can of worms, I sewed the seam with the window still attached to the canvas. Not easy but doable. If you've bought a new top, you'll have to transfer the window to the new top.
Installation is the reverse order of removal.
-Lay the canvas on the top with the window folded back on the top as before. Install one rivet on each retainer strap to the window frame. Obviously you need a rivet gun and the correct rivet. Here is the size that works.
-Bolt on the window hinge brackets to window frame
-Connect the window heater leads
-Snap in the window trim piece
-Snap in the headliner edge retainers
-Snap in the rear canvas retainer strip into the frame channel. Don't forget to put any of -the little clips back in if they had fallen out. Line up the marks you made before you removed it.
-Fold the front of the canvas to the back and connect the rearmost zipper. SAAAY WHAAAT??
Manual says to use zipper pliers. I couldn't find any zipper pliers anywhere on ebay or anywhere else. The dealer told me their WIS says to use staples. I'm sure there is a hand held type stapler that will work, but I couldn't find one. I tried hog rings but they were to bulky and I was worried they would wear on the canvas. Smaller hog rings then the one's I have might have worked. I tried about 4 different zipper heads from Joann's but none of those worked. In the end, I cut off a zipper head from an old tool bag and it worked....sort of. I'd zip it up about half way, then the zipper wouldn't close the teeth anymore. I monkeyed around with this for hours and gave up. My wife gave it a shoot and she was able to close all 4 zippers.
So the question is, what should you use to close the zippers??? Use whatever works.
There is probably a special little clip to close the zipper ends, but I just hand sewed it together.
- Attach the string to the tension cable and pull the cable to the front of the top. Push it through the hole in the frame.
-Insert the top brackets that are at the back of the rear windows and install the screws.
-Insert the long rubber rear main seal. Note the alignment mark you made. The shape of the loop at the bottom of the rear main hinge should look similar on both sides. If not, one side will be tighter than the other when the frame is closed.

-Fold the top down into the rear compartment.
-Attach the side canvas retainers to the frame. The first side will be easy, the second side will be difficult as the the top will be very tight across. Use a big screwdriver to pry up the back end corner of the retainer to get it over the edge while pushing it on with your other hand. Then work it on toward the front.
-Snap in the front canvas retaining rail to the frame channel.
-Insert the front canvas retainer plastic piece into the channel. I used a rubber mallet to hammer it in. The end of a wooden hammer works well to get around post and hook areas.
-Insert the front paneling with 4 screws.
-Attach the handle and screw in the pin.
-Attach the front rubber seals with one screw each and your done.
More to come with the installation of a new window trim piece.
Last edited by marko69; 11-18-2015 at 12:44 AM. Reason: grammar
11-22-2015, 01:30 PM
#3
Senior Member
Thread Starter
Installing a new window trim piece
My window trim piece broke in about 4 places when removing it from the window frame. To replace it the factory way, you'd need to take off the canvas top then remove the entire headliner and take it to an upholsterer as the plastic piece is sewn into the headliner. The headliner looks like a real pita to take off. The rear section is glued to the top frame and I wanted to avoid messing with that part.
There's a much easier way, just glue it to the headliner with contact cement. Contact cement is very strong and it will last.
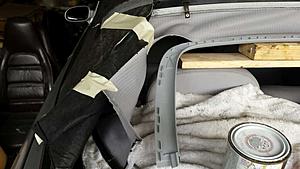
If you are just replacing the trim piece and not taking off the canvas top, you won't have to remove anything from the front section of the canvas. You only need to remove the parts that will allow you to flip back the window and lay it on the top. You will have to remove the rear canvas retainer strip, the rear window frame brackets, window heater connector, and rear headliner edges, steps 17-21 above. You may have to remove the long rubber rear main seal and rear side canvas retaining brackets, steps 11-13. You may be able to flip the window back without having to do this, but it's not a whole lot of extra time if you do.
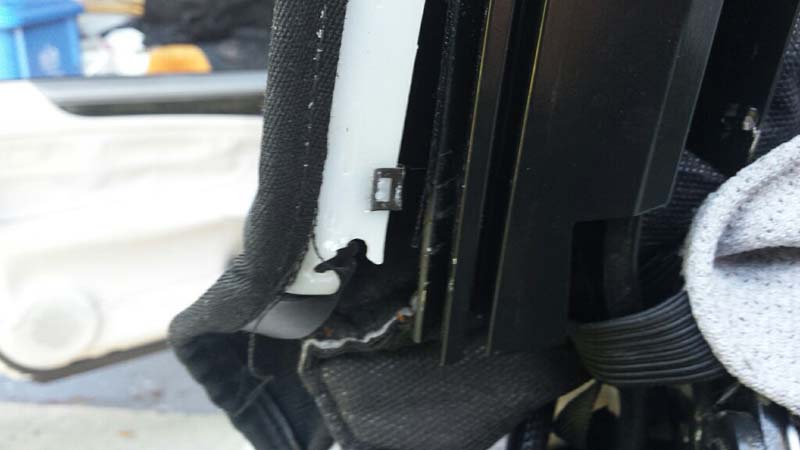
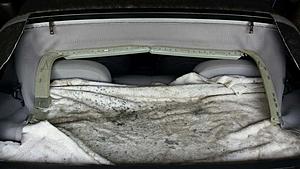
With the trim piece off and the window flipped back, it should look like this. (if doing just the trim piece, window retaining straps should still be intact)
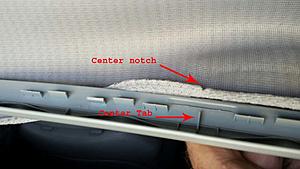
Before removing the old broken retainer pieces from the headliner, take a look at the notches in the frabic in relation to the plastic piece. There is one in the center and a few double notches around the trim piece. They should line up like the pictures below. If not, line up the new piece against the old, take a sharpie and mark the new plastic piece exactly where the notches are. This will help you place the fabric to the new piece. I did not do this, but it was apparent where the notches should have been.
Now take a razor blade and cut the thread holding the fabric to the plastic, be careful not to cut the fabric.
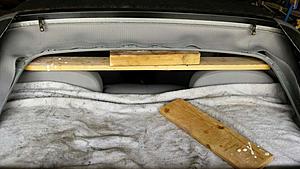
The fabric is going to have a crease in it all the way around. I placed a 2x4 under the fabric and ironed out the crease.
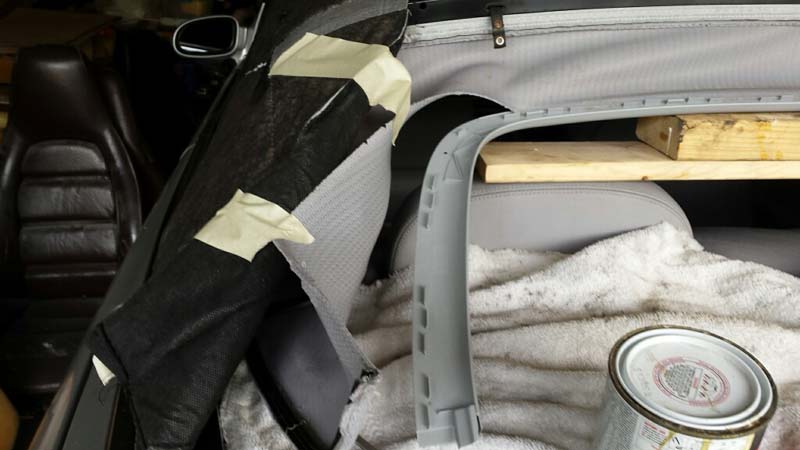
I put contact cement along the top straight section of the plastic piece and stopped at the corners. Didn't want to do too much at once or the glue might dry before your finished. I put the glue a bit shy of the protruding plastic tabs as I feared the piece may not snap back into the window frame properly with fabric butted against the retaining tabs, but I don't think that would have been a concern. You should be able to see the sharpie marks thru the glue, but you might have to extend the marks past the plastic tabs.
Put the glue on the straight section of the fabric. You're putting the glue on the good side of the fabric. Don't make the line of glue to wide or it will show. If you don't have a steady hand, you might want to use a line of masking tape. Watch that you stop and start the cement in the same place as the plastic piece.
Now, when the contact cement is tacky, not gooey, (follow the directions on the cement container) place the plastic piece up onto the headrests. Try not to disturb the glue. Use some blocks of wood to get the piece high enough.
Start from the middle and carefully align the middle notch of the fabric to the middle tab of the plastic. Once it's down you shouldn't pull it up and readjust it. Work you way to one corner, aligning the notches, then do the other side. (The glue is not on yet in this pic or I wouldn't have laid the fabric down like that)
Wait a bit for it to dry, then do both sides one at a time. Put glue on the plastic first while taping back the fabric. Then glue the fabric and hold it in your hand while waiting for it the get tacky. (unless you have an easier way not to make a mess)
Wait for everything to dry then install the trim piece and put everything back together.
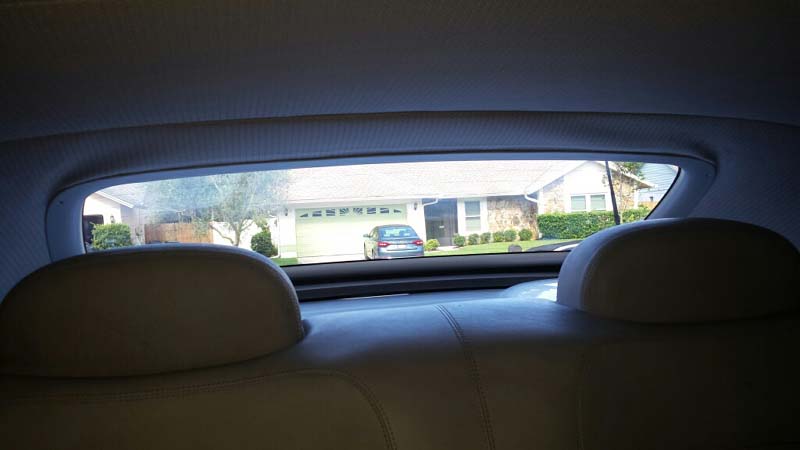
Not perfect, a little loose on the corners but I don't remember what it looked like before. I didn't mark the notches before removing the old plastic, they might have been off a little. At least the piece is the right color now and not a faded out ugly tan.

There's a much easier way, just glue it to the headliner with contact cement. Contact cement is very strong and it will last.
If you are just replacing the trim piece and not taking off the canvas top, you won't have to remove anything from the front section of the canvas. You only need to remove the parts that will allow you to flip back the window and lay it on the top. You will have to remove the rear canvas retainer strip, the rear window frame brackets, window heater connector, and rear headliner edges, steps 17-21 above. You may have to remove the long rubber rear main seal and rear side canvas retaining brackets, steps 11-13. You may be able to flip the window back without having to do this, but it's not a whole lot of extra time if you do.
With the trim piece off and the window flipped back, it should look like this. (if doing just the trim piece, window retaining straps should still be intact)
Before removing the old broken retainer pieces from the headliner, take a look at the notches in the frabic in relation to the plastic piece. There is one in the center and a few double notches around the trim piece. They should line up like the pictures below. If not, line up the new piece against the old, take a sharpie and mark the new plastic piece exactly where the notches are. This will help you place the fabric to the new piece. I did not do this, but it was apparent where the notches should have been.


Now take a razor blade and cut the thread holding the fabric to the plastic, be careful not to cut the fabric.
The fabric is going to have a crease in it all the way around. I placed a 2x4 under the fabric and ironed out the crease.
I put contact cement along the top straight section of the plastic piece and stopped at the corners. Didn't want to do too much at once or the glue might dry before your finished. I put the glue a bit shy of the protruding plastic tabs as I feared the piece may not snap back into the window frame properly with fabric butted against the retaining tabs, but I don't think that would have been a concern. You should be able to see the sharpie marks thru the glue, but you might have to extend the marks past the plastic tabs.

Put the glue on the straight section of the fabric. You're putting the glue on the good side of the fabric. Don't make the line of glue to wide or it will show. If you don't have a steady hand, you might want to use a line of masking tape. Watch that you stop and start the cement in the same place as the plastic piece.
Now, when the contact cement is tacky, not gooey, (follow the directions on the cement container) place the plastic piece up onto the headrests. Try not to disturb the glue. Use some blocks of wood to get the piece high enough.
Start from the middle and carefully align the middle notch of the fabric to the middle tab of the plastic. Once it's down you shouldn't pull it up and readjust it. Work you way to one corner, aligning the notches, then do the other side. (The glue is not on yet in this pic or I wouldn't have laid the fabric down like that)

Wait a bit for it to dry, then do both sides one at a time. Put glue on the plastic first while taping back the fabric. Then glue the fabric and hold it in your hand while waiting for it the get tacky. (unless you have an easier way not to make a mess)
Wait for everything to dry then install the trim piece and put everything back together.
Not perfect, a little loose on the corners but I don't remember what it looked like before. I didn't mark the notches before removing the old plastic, they might have been off a little. At least the piece is the right color now and not a faded out ugly tan.
The following users liked this post:
RECook (06-03-2021)

The following users liked this post:
burgca (09-07-2016)
11-25-2015, 07:51 AM
#5
Senior Member
Thread Starter
I think it will eventually happen to everyone's top who uses it. Once the seam starts separating, the whole seam is going to eventually come apart. I don't understand why Mercedes used glue at that seam. They did a great job engineering the top to avoid any wear spots to the canvas, but then they glue the seam? If I were going to buy a new top for it, I'd look for one that has a seam that is sewn and not glued.
My Porsche top also lasted about 15 years, but they sewed everything that was attached on the canvas. Unfortunately, there were places where the frame was wearing out the canvas and the plastic window turned so yellow you couldn't see through it.
My Porsche top also lasted about 15 years, but they sewed everything that was attached on the canvas. Unfortunately, there were places where the frame was wearing out the canvas and the plastic window turned so yellow you couldn't see through it.
11-25-2015, 02:47 PM
#6

Although I have no current need for this procedure. Thia was an excellent post, thank you very much for documenting & sharing your experience! I'm sure this will be very valuable to may d-i-y'ers. Thanks!

Trending Topics
12-27-2015, 08:44 PM
#9
MBWorld Fanatic!
Join Date: Oct 2012
Location: Florida
Posts: 1,425
Received 98 Likes
on
88 Posts
2002 CLK 55 AMG cabriolet Eurocharged
Well Done Bro!!! I will be reading this again in the future for the rear molding install.
MODERATORS!!! Please move to DIY sticky
PPPPLease.
MODERATORS!!! Please move to DIY sticky
PPPPLease.
The following users liked this post:
RECook (06-03-2021)
06-20-2019, 12:41 PM
#11
Newbie

Join Date: Dec 2008
Posts: 1
Likes: 0
Received 0 Likes
on
0 Posts
85 190d
I am going to replace my Convertible Top on the 1999 CLK 320. My question is about the rear retainer clips. The rear canvas top retainer is sewn into the canvas. There are about 11 little clips holding the retainer in. They do not all seem to be there.
Does anyone know what they are and have a source for them?
I specifically asked if the new top came with new retainer clips before ordering. It did not leading me to believe they need to reused after removing them from the old top.
I did find in the archives that MB P/N 208 779 00 70 was brought up. Upon research it is for 2011 up CLK 430's.
Brion S.
Last edited by brions; 06-20-2019 at 06:38 PM. Reason: Added more information.
 06-03-2021, 03:22 PM
#13
I had the outer canvas replaced, and the guy said he ordered a kit with the plastic trim; however, none arrived, and he was told it wasn't available anymore. What do you guys do?


