I'm Back and lots of little new things to share
 09-13-2014, 11:48 AM
#1
Super Member
Thread Starter
I'm Back and lots of little new things to share
Howdy Chaps
Been a while since I last posted on MBWorld.
Work has kept me busy and overseas so my 300CE sat patiently waiting.
A couple of MODS I have done since my return. Things have been sitting in boxes waiting for action.
Some you may like - some you may not like.
What matters is I like
Been a while since I last posted on MBWorld.
Work has kept me busy and overseas so my 300CE sat patiently waiting.
A couple of MODS I have done since my return. Things have been sitting in boxes waiting for action.
Some you may like - some you may not like.
What matters is I like
 09-13-2014, 11:54 AM
#2
Super Member
Thread Starter
Zender Star 16x8 Wheels - Polished not yet fitted
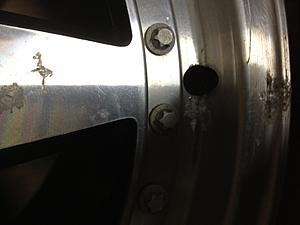
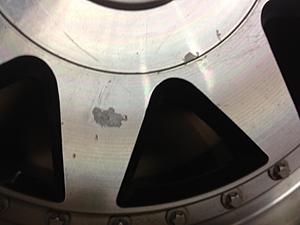
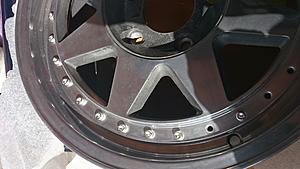
Okay I bought these from a guy in Germany off fleaBay.
Was uncertain whether they would arrive but got them for a bargain price and yes obviously they did arrive.
They had a bit of surface corrosion (salty roads hate it) and clear coat was failing.
So the only solution was to have them polished. Unfortunately that meant removing the original fake rim bolts which all snapped coming out
So here is what arrived.


Last edited by stormtigers; 09-13-2014 at 11:58 AM.
09-13-2014, 11:57 AM
#3
Super Member
Thread Starter
Zender Star Wheels Part 2
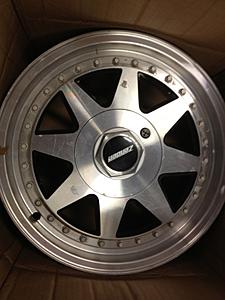
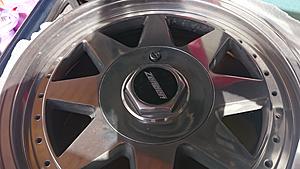
And here is where we are at now.
Replacement rim bolts were very hard to source and those I found were expensive as all heck. So I have decided to use stainless steeel M5 bolts in with adhesive instead which are about 40cents each.
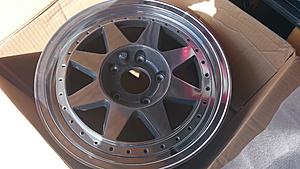
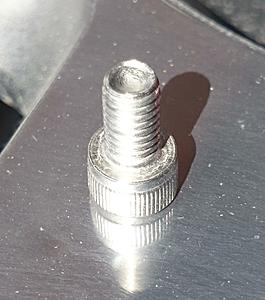
You'll have to wait a little while longer for the finished product and fitment.
Although they should look something like this.
 09-13-2014, 12:12 PM
#4
Super Member
Thread Starter
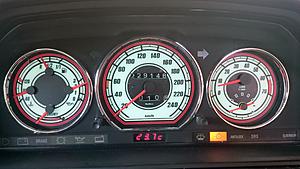
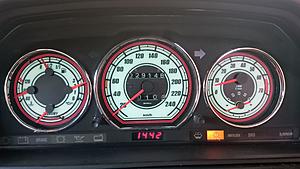
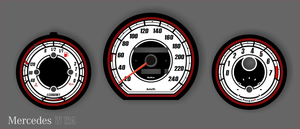
Custom Plasma Gauge Faces
Well those who have been around for awhile since I bought my CE would know I have never really been that happy with standard gauge illumination.
I experimented with LED lighting and that worked pretty well but it just gave me well lit but (IMO) staid dials.
Now Zender was a creative man and my car reflects much of the Zenders product available back in the late 1980's (bodykit and soon wheels).
So I searched high and low and settled on a design for new dial face that I thought would follow his vision and was more functional and modern.
It is a far cry from the classic so be brace yourselves !
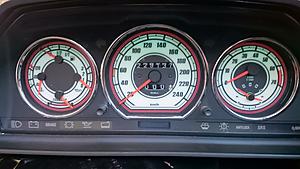
Where they really shine is night operations.
Have a look at the youtube video below - Love it !
Last edited by stormtigers; 09-13-2014 at 12:23 PM.
09-13-2014, 12:21 PM
#5
Super Member
Thread Starter
3 Function Gauge replacement OT Temp Gauge
Okay I never had one to start with. And I could only find Fahrenheit gauges from the US. But I wanted a bit more and my clock had stopped working.
So with a bit of modding,here is a Voltmeter, Clock and Temp Gauge in the bottom of the instrument cluster. Still need to run the temperature sender out to the front bumper so whats showing is inside the car.'
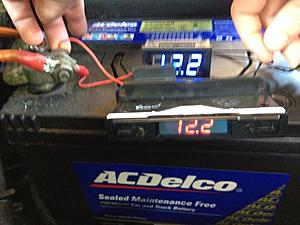

So with a bit of modding,here is a Voltmeter, Clock and Temp Gauge in the bottom of the instrument cluster. Still need to run the temperature sender out to the front bumper so whats showing is inside the car.'


 09-15-2014, 12:51 PM
#6
wow, great job man! I like it! And i especially like your work on the time/temp/volt display, not something you see in a w124. are those custom guages you modded to look like that, or something you found that you liked?
Also, your accent is WAY stronger than i imagined it to be for some reason...!
Also, your accent is WAY stronger than i imagined it to be for some reason...!
Trending Topics
09-15-2014, 06:28 PM
#9
Super Member
Thread Starter
Thanks Guys !
Zed I poked around the Moman website and the other plasma site as well for some time.
Whilst I like some of their ideas they just didn't grab me.
I like the modern angled font and the colored circles to add something contrasting to the design
Then I happened across the BMW motorcycle gauges at Moman and essentially that's what the design is based on.

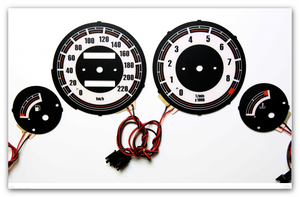
And with a little bit borrowed from the Opel Tigra as well.

They willingly made up a design to my specifications and desires.
A few fine tuning things (Moman were very patient as countless emails went back and forward before I settled on the design) and I got them.
Then they sat on the shelf for about a year Hahahahahaha
I was too busy to spend the time (scared more like) to go making the mods to power etc required blah blah.
Then when I came across the voltmeter mini led and did some mods to the spare OT temp gauge holder.
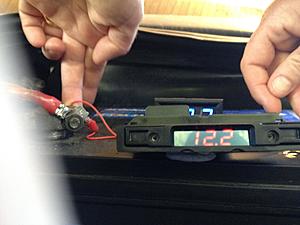
But then I found the 3 function version and spent a bit of time hacking the crap out of a spare cluster setup.
As you can see below it stuck out by a couple of mm's top and bottom.
It wasn't going to go fit in without substantial mods to the cluster housing.
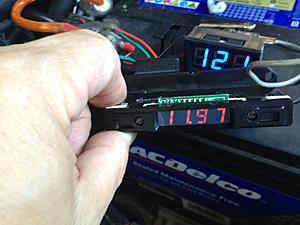
Eventually I thought no this isn't the way to do it I need to have the gauge modded.
And being useless with a soldering iron I enlisted the support of a guy that works on modern video machines.
He unsoldered the LED contact points and fitted a licorice cable so the pcb could lie flat behind the LED display.
BINGO it fitted like a glove.
Zed I poked around the Moman website and the other plasma site as well for some time.
Whilst I like some of their ideas they just didn't grab me.
I like the modern angled font and the colored circles to add something contrasting to the design
Then I happened across the BMW motorcycle gauges at Moman and essentially that's what the design is based on.


And with a little bit borrowed from the Opel Tigra as well.

They willingly made up a design to my specifications and desires.
A few fine tuning things (Moman were very patient as countless emails went back and forward before I settled on the design) and I got them.

Then they sat on the shelf for about a year Hahahahahaha
I was too busy to spend the time (scared more like) to go making the mods to power etc required blah blah.
Then when I came across the voltmeter mini led and did some mods to the spare OT temp gauge holder.

But then I found the 3 function version and spent a bit of time hacking the crap out of a spare cluster setup.
As you can see below it stuck out by a couple of mm's top and bottom.
It wasn't going to go fit in without substantial mods to the cluster housing.

Eventually I thought no this isn't the way to do it I need to have the gauge modded.
And being useless with a soldering iron I enlisted the support of a guy that works on modern video machines.
He unsoldered the LED contact points and fitted a licorice cable so the pcb could lie flat behind the LED display.
BINGO it fitted like a glove.
Last edited by stormtigers; 09-15-2014 at 06:56 PM.
09-20-2014, 12:41 AM
#10
Member

Nice work mate. I have those chrome rings and they have been sitting on my workbench for a few months because I have no idea how to get them in the gauges? How did you do it?
09-23-2014, 08:26 PM
#11
Super Member
Thread Starter
The outer rings get done first by passing them through the speedo hole.
What you need to do is peel a small bit of adhesive backing off BUT DON'T PULL IT OFF.
Leave the peeled backing hanging in towards the centre of the ring.
Put the ring into position and push down and adjust the position.
Hold it in the correct position then peel off the remaining backing whilst pushing the revealed sections into place.
The shape of the speedo is such that you can pass it through the speedo hole and then the same procedure applies.


 09-29-2014, 01:15 AM
#14
Super Member
Thread Starter

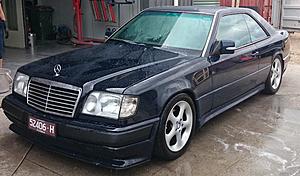
During the recent Mercedes Cruise Day in Melbourne.
A professional photographer onbord one of the support vehicles caught my Coupe in full flight during the climb up to Mt. Dandenong lookout.
One of the best pictures of her I have seen.
03-22-2015, 09:17 AM
#17
Super Member
Thread Starter
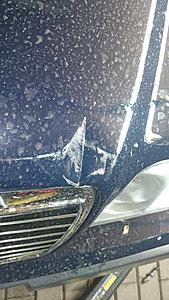
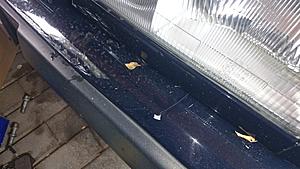
Egad damage !
We had a little accident recently.
Big wind during storm blew a 2 door steel cabinet onto the front !
Fortunately a friend in the repair industry who has a gorgeous 350sel he rebuilt from scratch did the repairs for me. She looks gorgeous as ever !
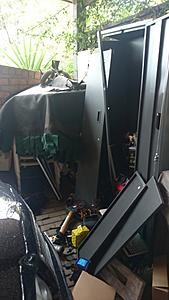

Drum Rolll please............................................ .....
Big wind during storm blew a 2 door steel cabinet onto the front !
Fortunately a friend in the repair industry who has a gorgeous 350sel he rebuilt from scratch did the repairs for me. She looks gorgeous as ever !


Drum Rolll please............................................ .....
 03-22-2015, 10:42 PM
#18
MBWorld Fanatic!
Lookin' good!
I've gotten another gift from Rochester this winter.
I now have rust up both sides of my doors, and my exhaust got ripped out of the underside of my car by I-90 West going to work.
I prefer your mods
I've gotten another gift from Rochester this winter.
I now have rust up both sides of my doors, and my exhaust got ripped out of the underside of my car by I-90 West going to work.
I prefer your mods
03-23-2015, 02:13 AM
#19
Super Member
Thread Starter

So thankful we don't have them down under.
You gonna remove and fix or replace doors or whats the plan mate ?


