DIY Alcantera Headliner & Roof Rattle Fix
 12-18-2009, 03:02 PM
#76
MBWorld Fanatic!
Join Date: Oct 2006
Location: Caribbean/Florida/Colorado
Posts: 3,642
Likes: 0
Received 11 Likes
on
11 Posts
E-ZGO 53hp., 1999 E 430 sport, 2004 E 55, 2008 Tahoe LTZ on 24"s
DIY Alcantera Headliner & Roof Rattle Fix
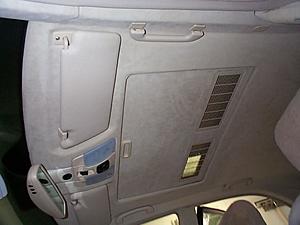
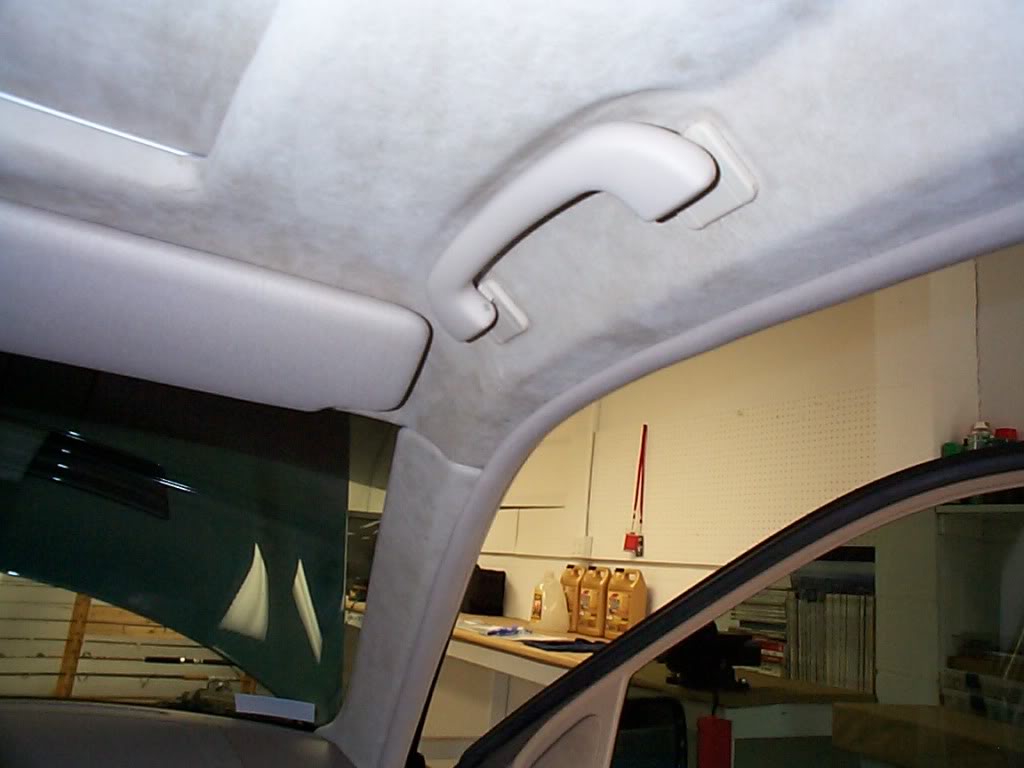
Remove the sun visor catches, you only need to remove the screws
the catch is two pieces.
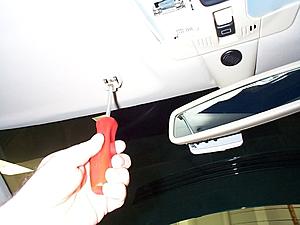
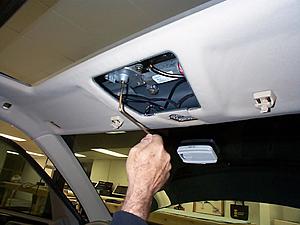
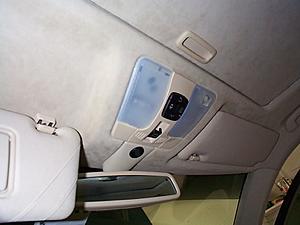
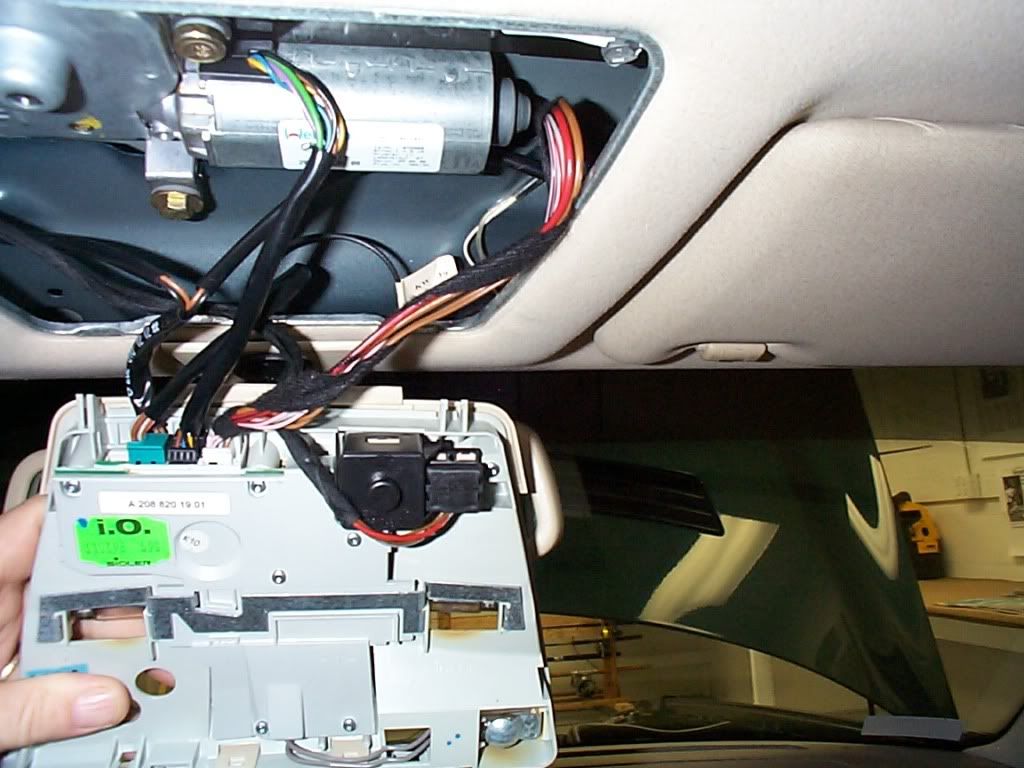
Now remove the lens on the over head lights, you will see the metal
release catch on the over head console.
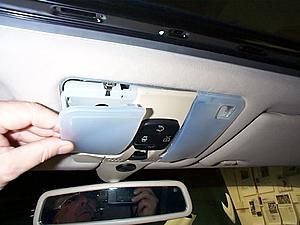
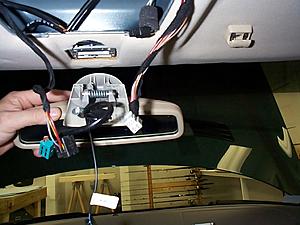
Release the catches and swing the console down and remove the wires.
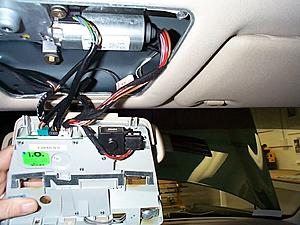
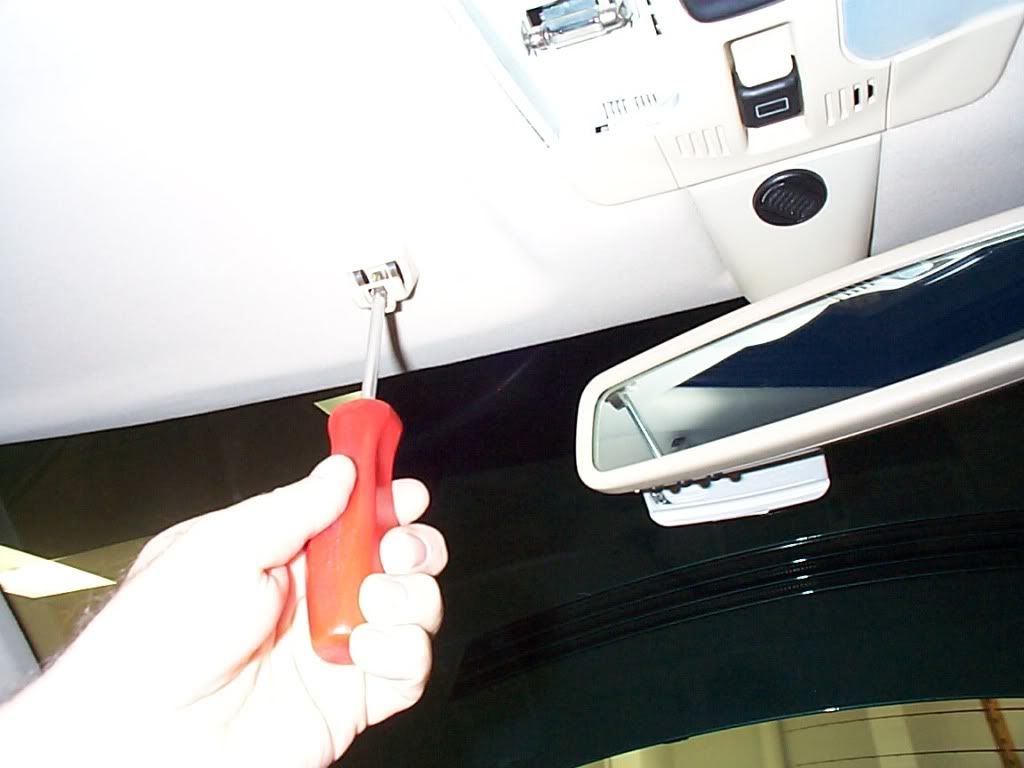
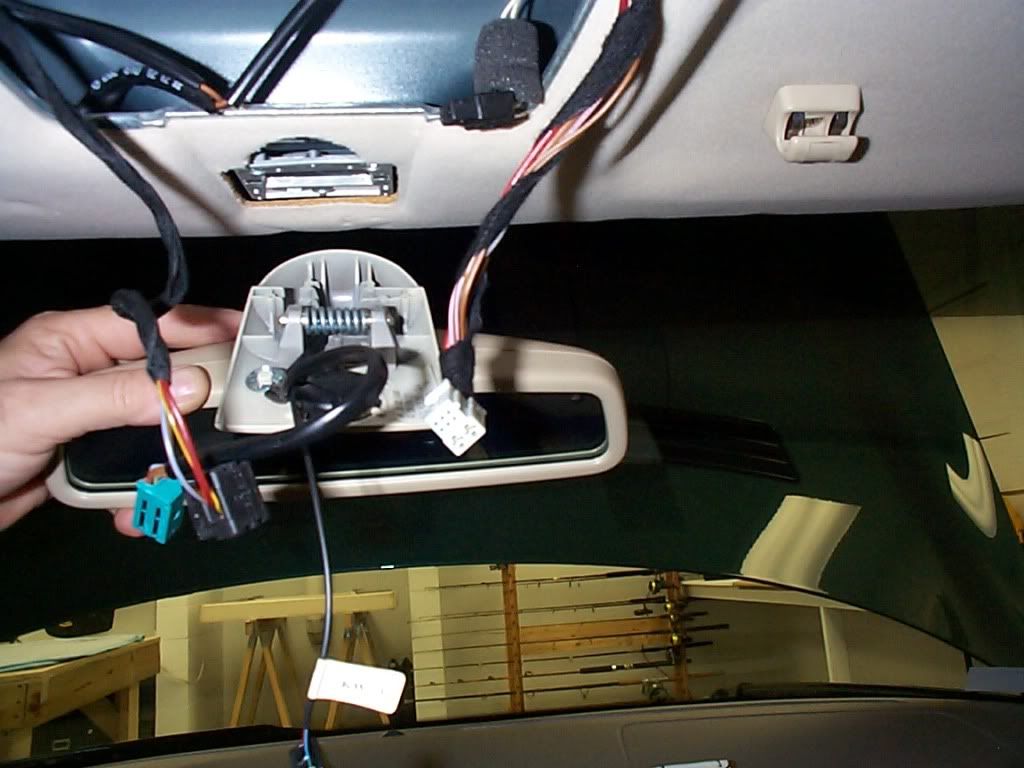
Unplug the wires to the rear view mirror and pull the mirror straight
down.
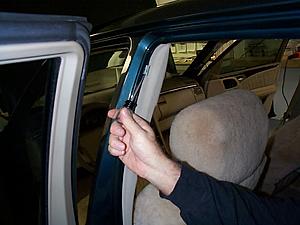
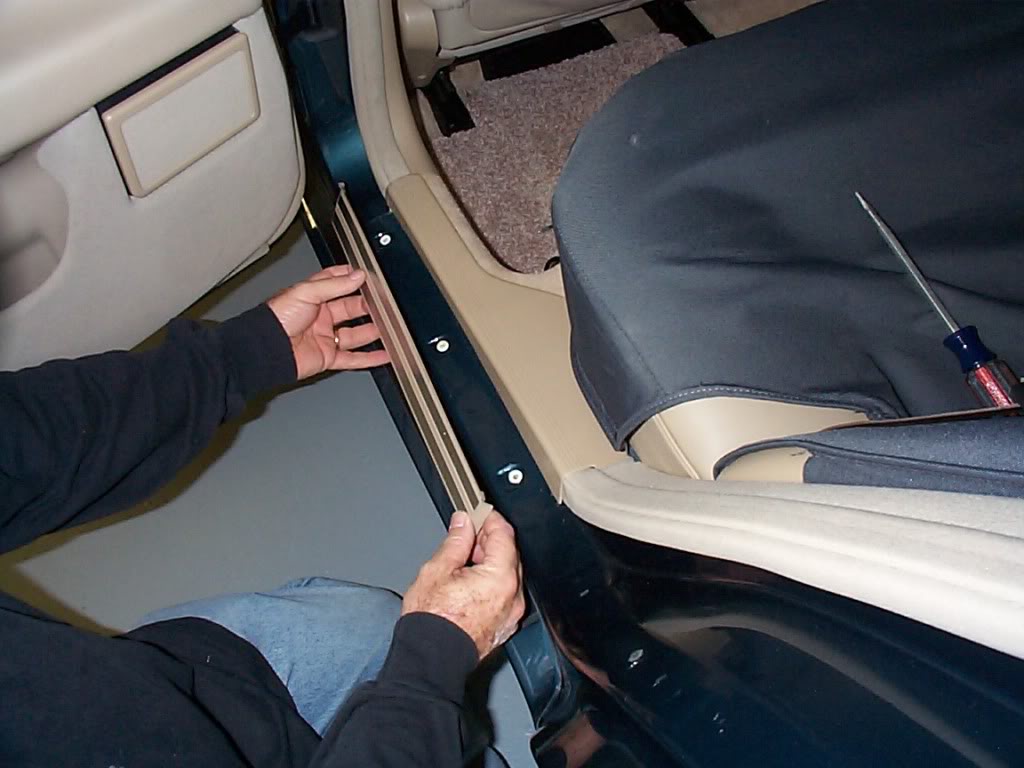
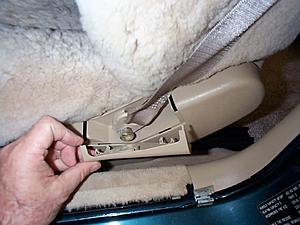
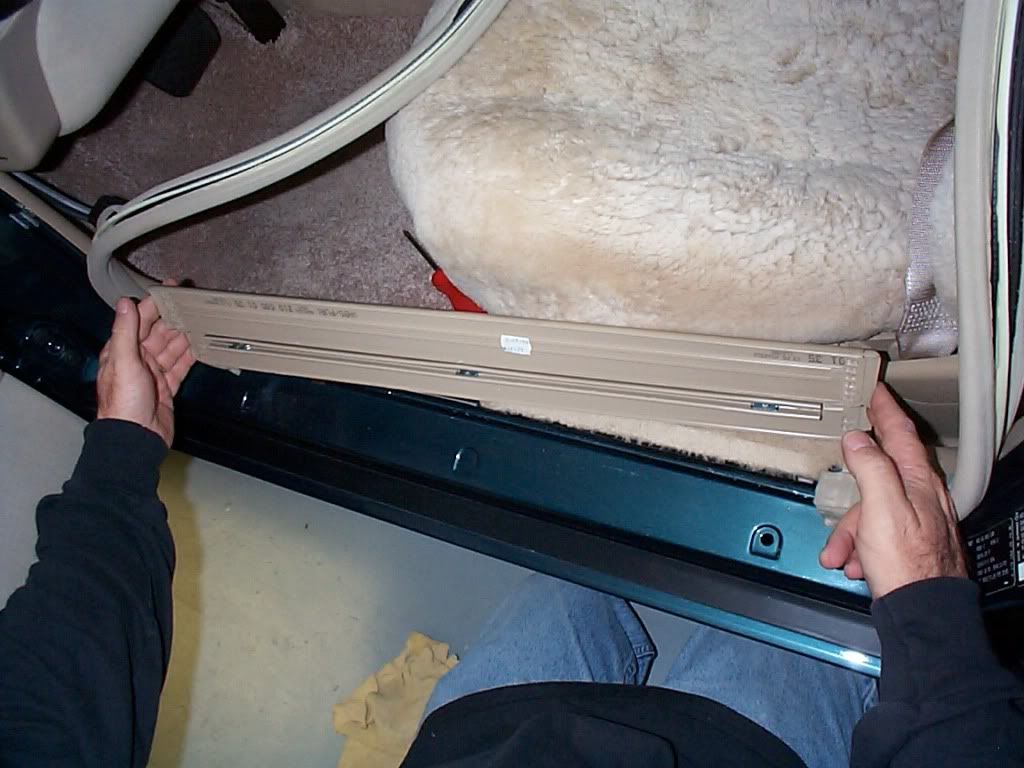
To remove the door seals it is best to remove the thresholds first.

There are two pieces in the rear, see the clip location.
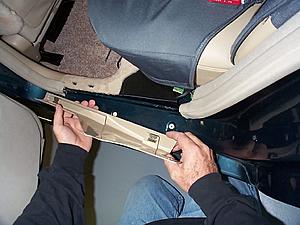
Front door one piece note clip location. Once the thresholds have been removed
you can remove the door bead/seal and mark them with their location.

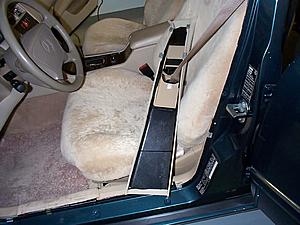
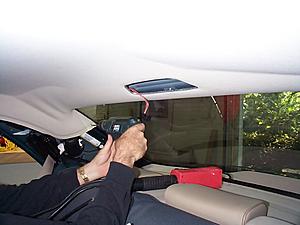
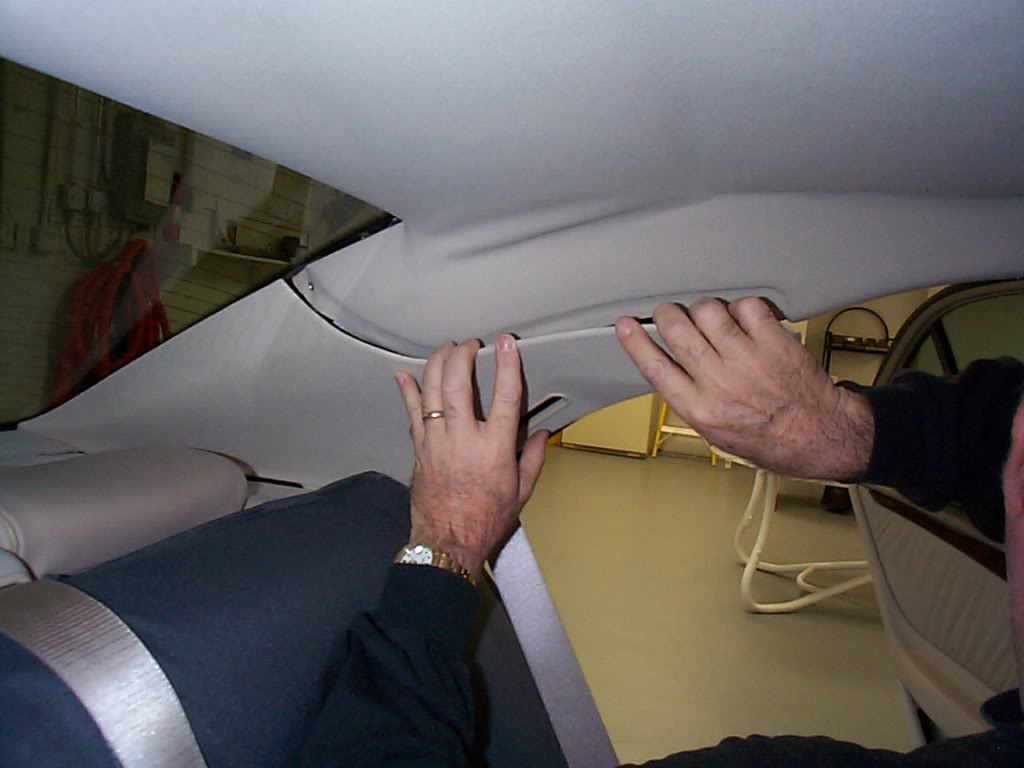
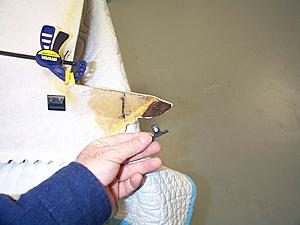
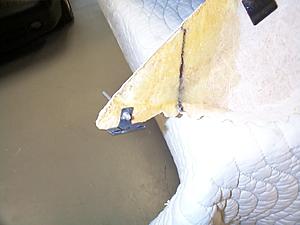
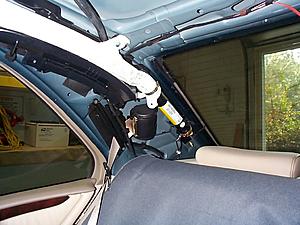
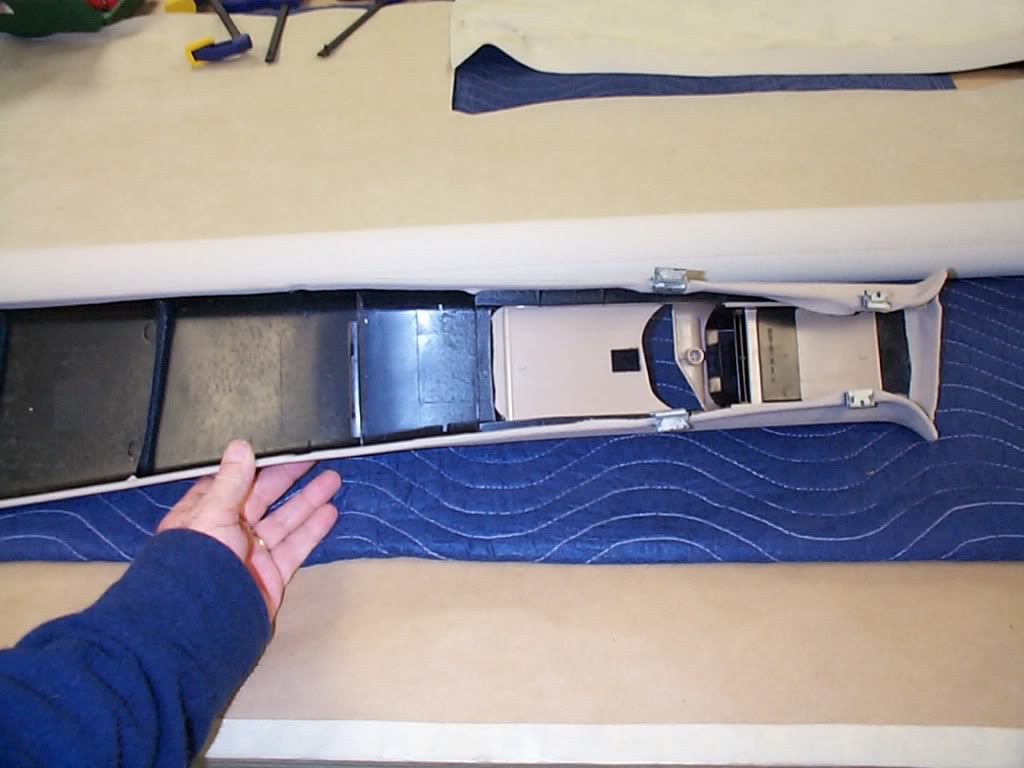
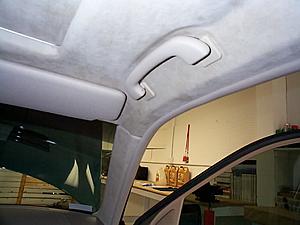
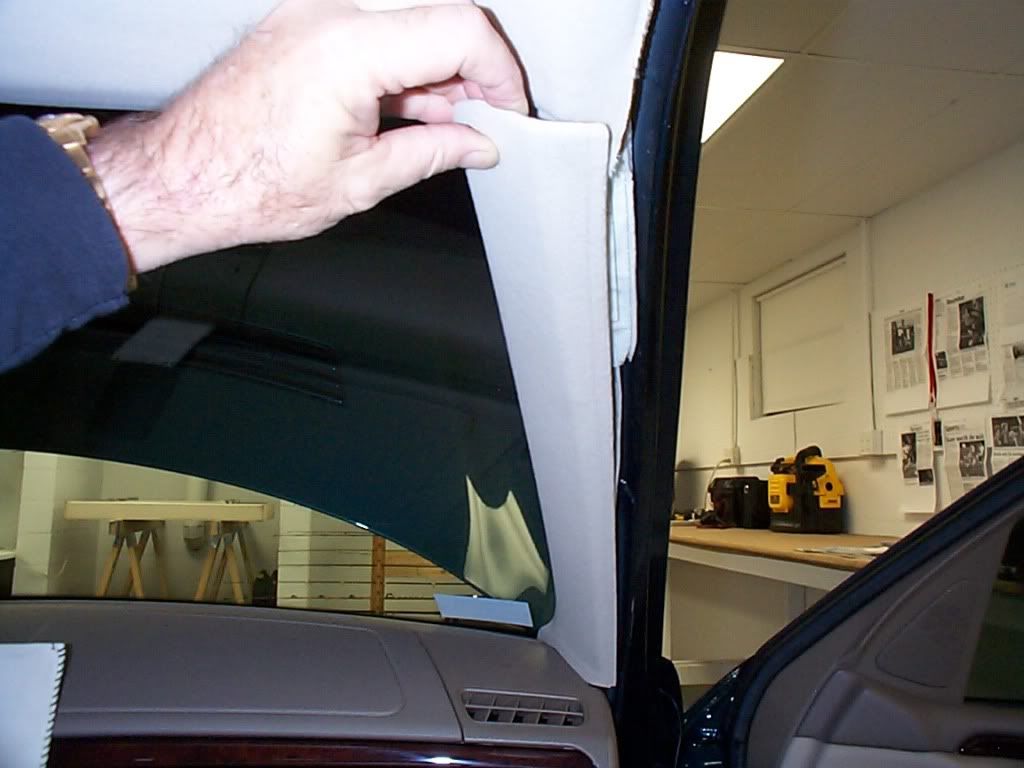
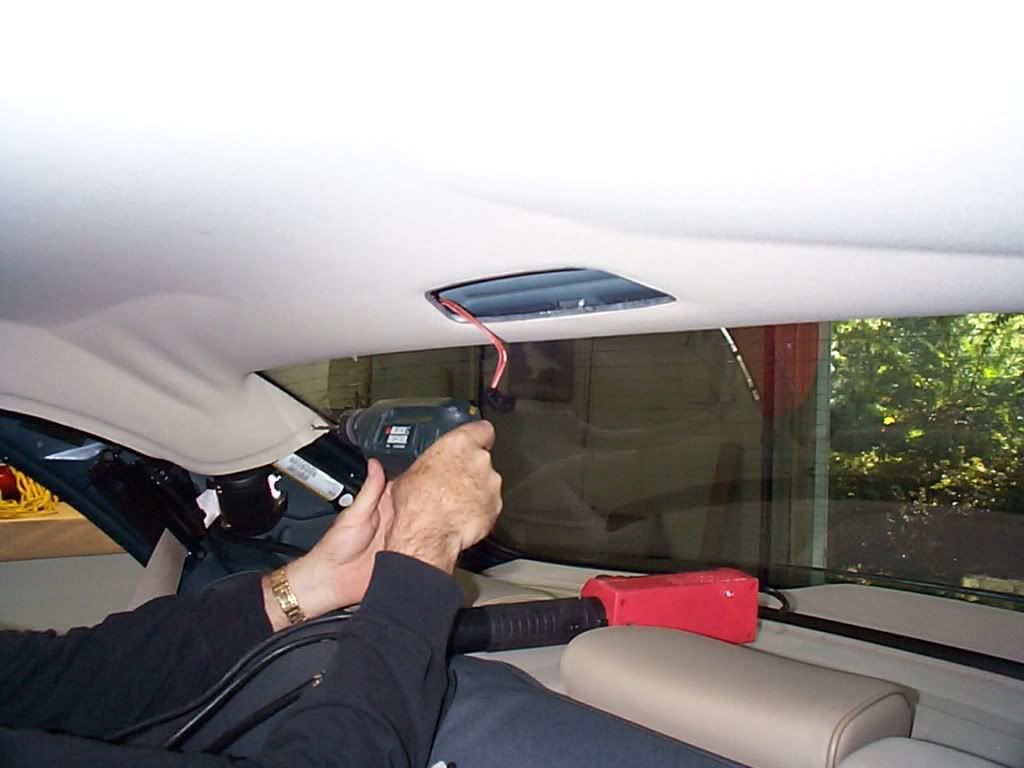
The "A" pillar has 6 clips that are tight, start by pulling at the top, straight away
from the pillar. Don't use any tool to pry the cover off, there are many wires and
an airbag inside.

Here is a better pic of the angle to pull at.
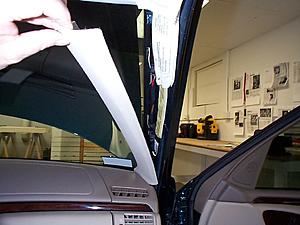
This is why you should not any pry tool, wires and airbag.
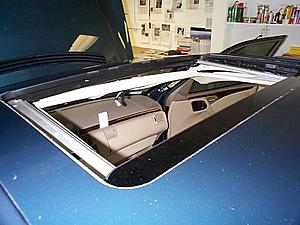
In your OEM tool kit you will have a sunroof emergency tool
to open or close your sunroof. for the next item the roof
needs to be open.
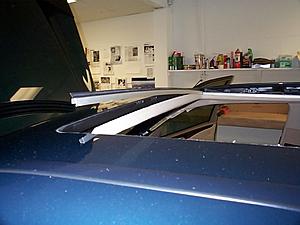
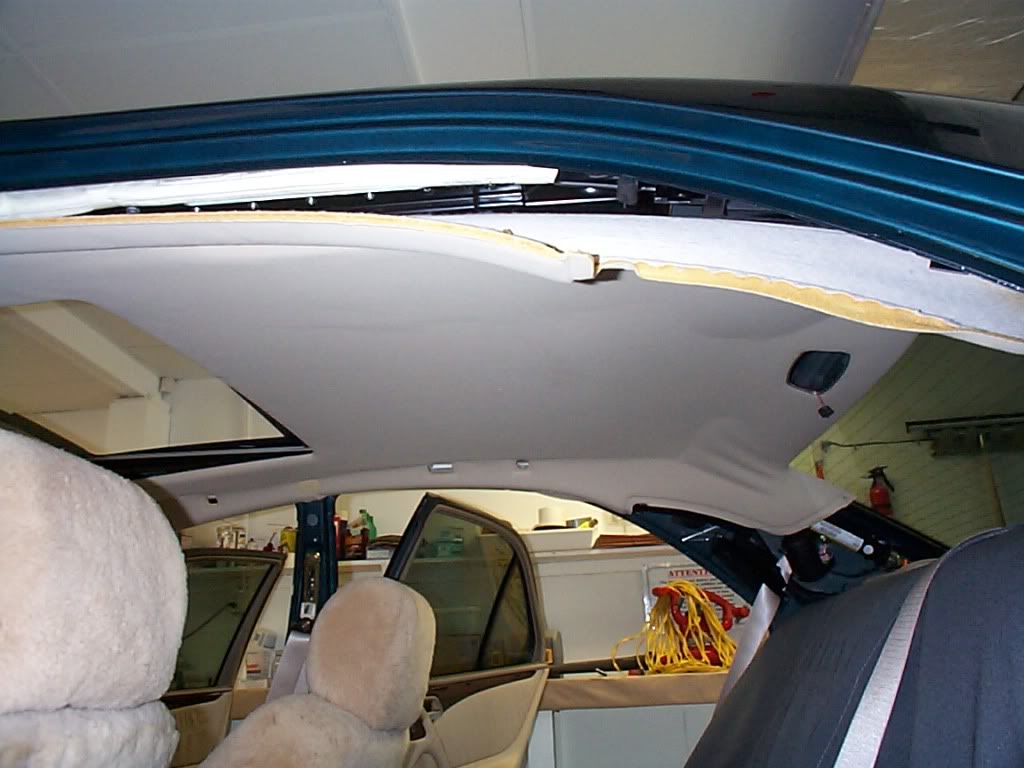
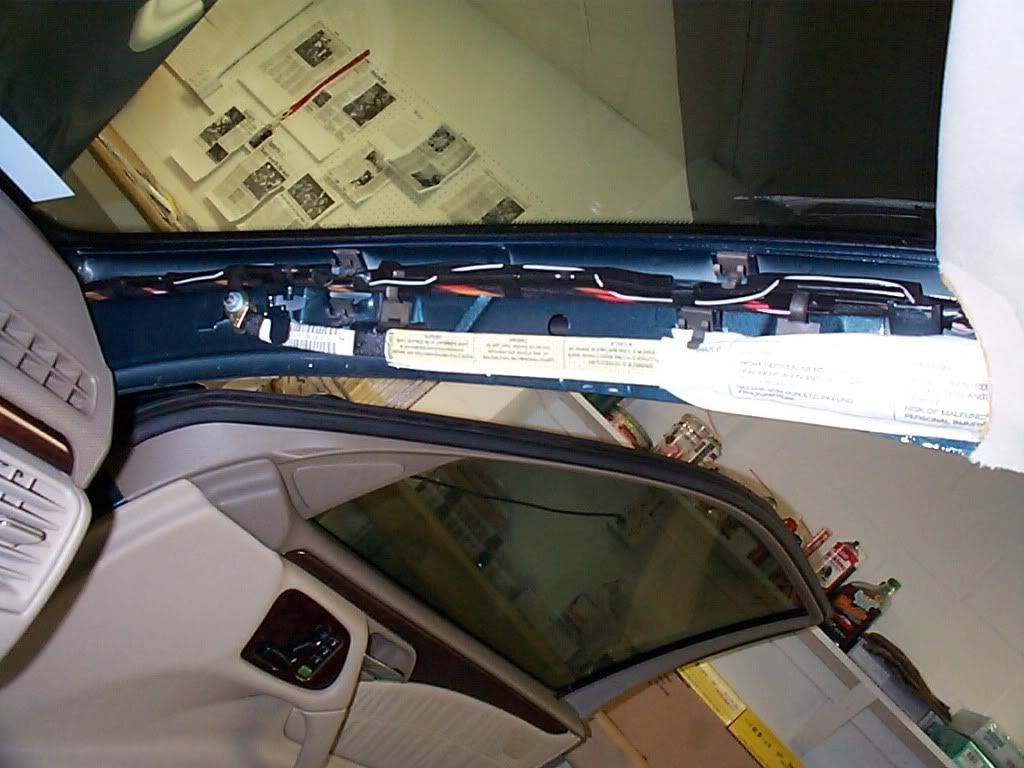
Along the front edge of the sunroof is a channel with a rubber
seal on it, this piece locks the headliner in place. to remove it
pry it straight up.
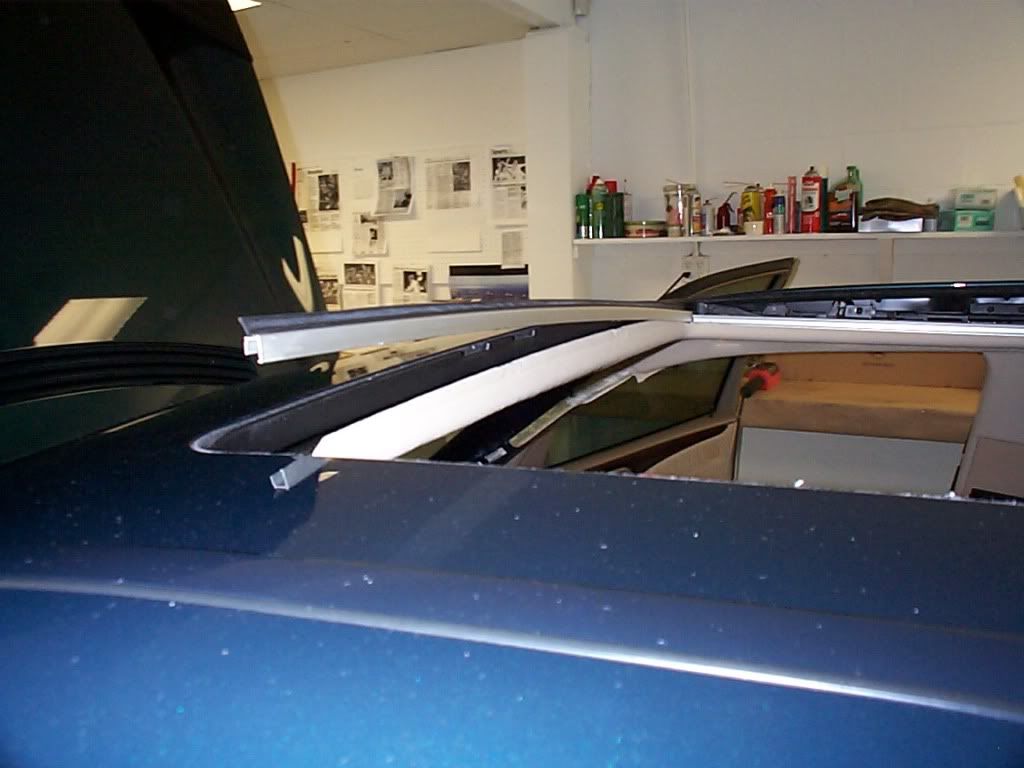
Now you can release the 4 clips on the "B" pillar, and move
them out of the way. I plan to recover all the pillars "A,B,C"
I will remove them later.
To remove the "B" an "C" panels you need to disconnect the seat belts.
The "C" pillar has 4 clips 3 in the forward section and one in the rear.
once released from the clips pull the panel forward to release the
locking tab in the lower section.

At this point you can swing the "C" panel out of the way.
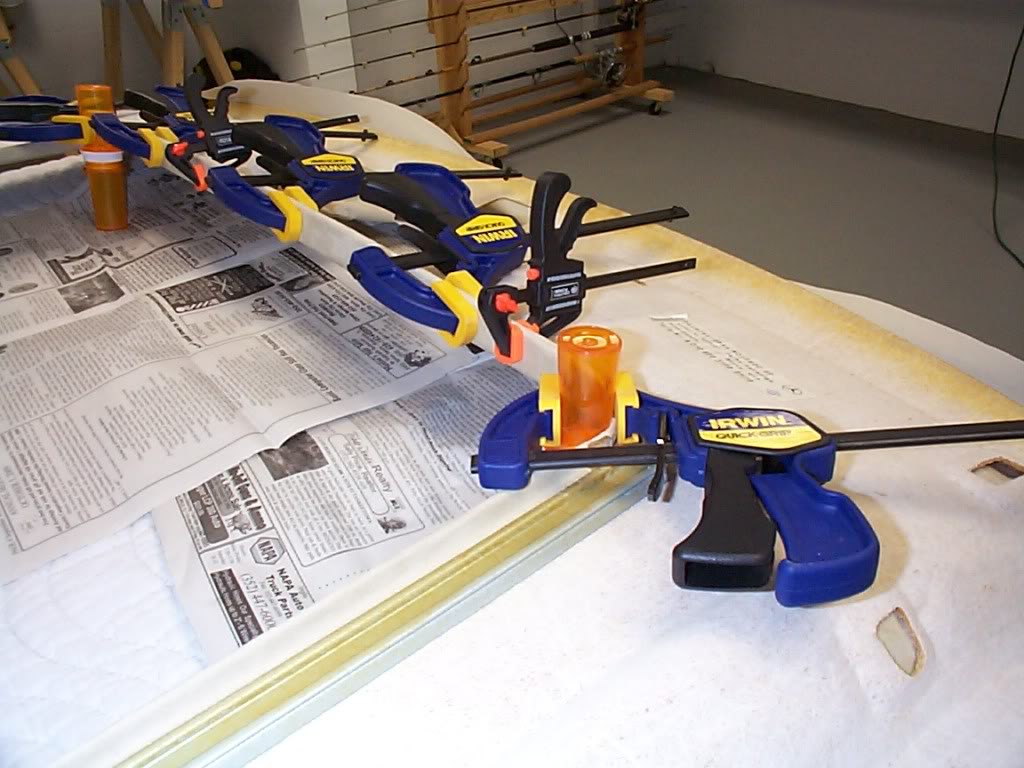
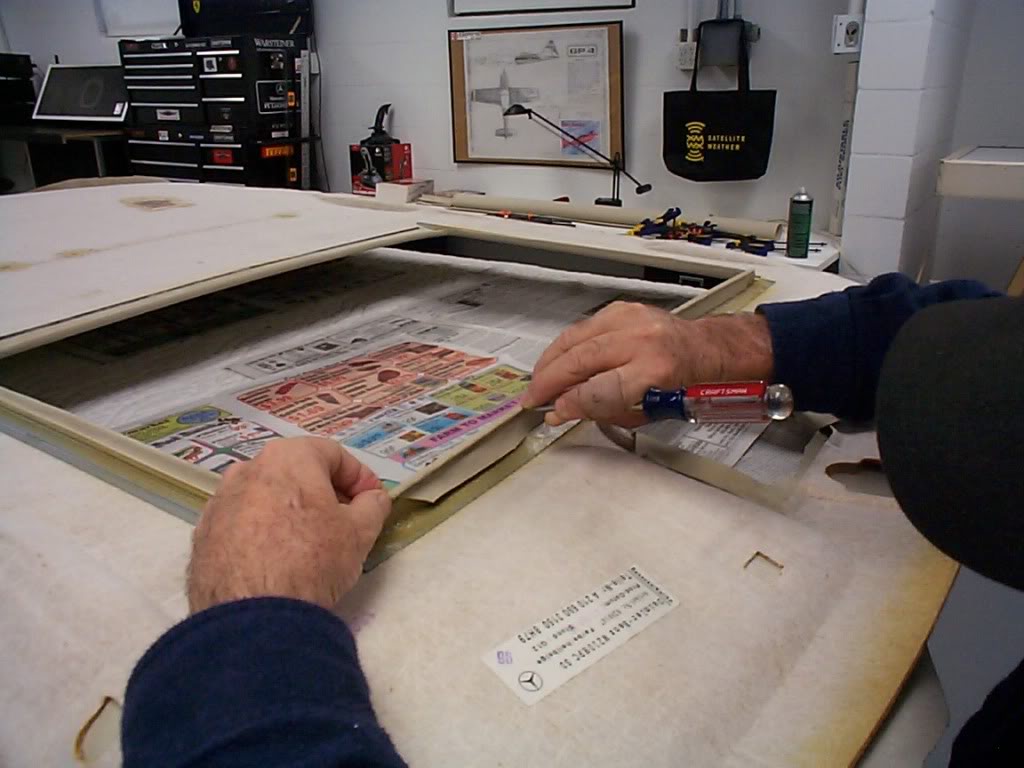
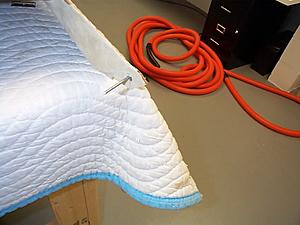
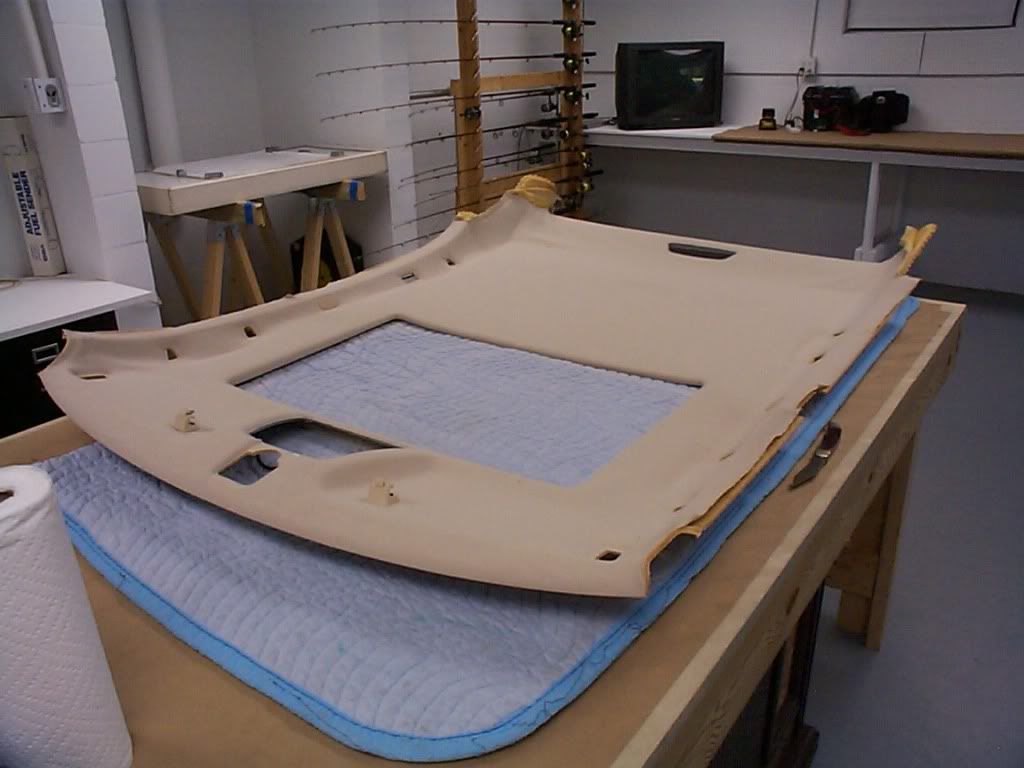
Next we drill out the pop rivets.
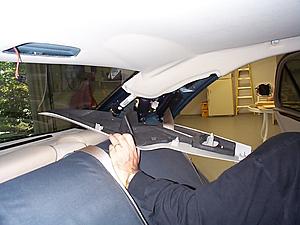
Now the headliner is hanging on the rear sunroof interlock.

To lower the headliner it is a good idea to have a helper
one person on the left one on the right. holding the forward
part of the headliner down slide it forward, and in one
inch it will release from the rear interlock in the sunroof support.
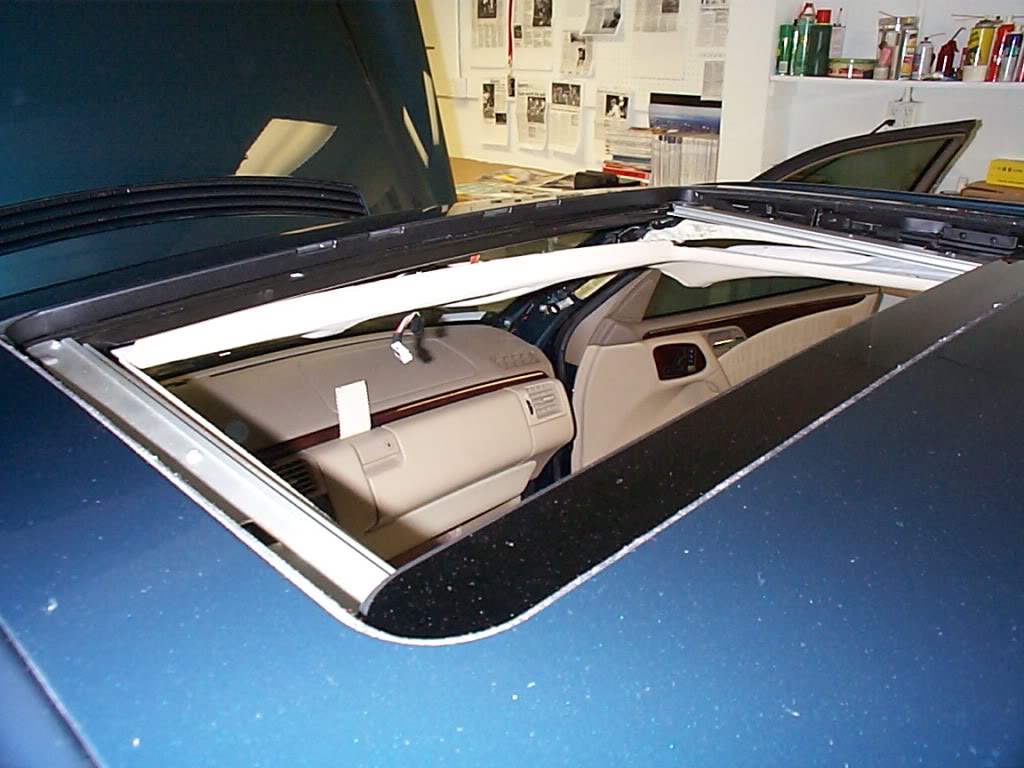
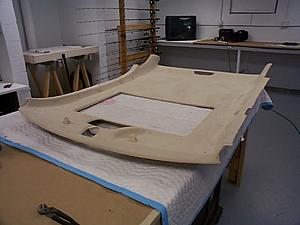
Now that it is free you can withdraw it through the front passenger door.
I don't know if that is the best way or not, I did have to give it a bend
like a taco. It is not easy to remove, but it can be done. try to avoid
bending the metal frame around the sunroof opening.
Poof it's out, sorry no pics in process, I had my hands full.

the catch is two pieces.

Now remove the lens on the over head lights, you will see the metal
release catch on the over head console.

Release the catches and swing the console down and remove the wires.

Unplug the wires to the rear view mirror and pull the mirror straight
down.

To remove the door seals it is best to remove the thresholds first.
There are two pieces in the rear, see the clip location.

Front door one piece note clip location. Once the thresholds have been removed
you can remove the door bead/seal and mark them with their location.

The "A" pillar has 6 clips that are tight, start by pulling at the top, straight away
from the pillar. Don't use any tool to pry the cover off, there are many wires and
an airbag inside.

Here is a better pic of the angle to pull at.

This is why you should not any pry tool, wires and airbag.

In your OEM tool kit you will have a sunroof emergency tool
to open or close your sunroof. for the next item the roof
needs to be open.

Along the front edge of the sunroof is a channel with a rubber
seal on it, this piece locks the headliner in place. to remove it
pry it straight up.

Now you can release the 4 clips on the "B" pillar, and move
them out of the way. I plan to recover all the pillars "A,B,C"
I will remove them later.

To remove the "B" an "C" panels you need to disconnect the seat belts.

The "C" pillar has 4 clips 3 in the forward section and one in the rear.
once released from the clips pull the panel forward to release the
locking tab in the lower section.
At this point you can swing the "C" panel out of the way.

Next we drill out the pop rivets.

Now the headliner is hanging on the rear sunroof interlock.
To lower the headliner it is a good idea to have a helper
one person on the left one on the right. holding the forward
part of the headliner down slide it forward, and in one
inch it will release from the rear interlock in the sunroof support.
Now that it is free you can withdraw it through the front passenger door.
I don't know if that is the best way or not, I did have to give it a bend
like a taco. It is not easy to remove, but it can be done. try to avoid
bending the metal frame around the sunroof opening.
Poof it's out, sorry no pics in process, I had my hands full.

Last edited by Yacht Master; 12-18-2009 at 03:42 PM.
 12-18-2009, 03:08 PM
#77
MBWorld Fanatic!
Join Date: Oct 2006
Location: Caribbean/Florida/Colorado
Posts: 3,642
Likes: 0
Received 11 Likes
on
11 Posts
E-ZGO 53hp., 1999 E 430 sport, 2004 E 55, 2008 Tahoe LTZ on 24"s
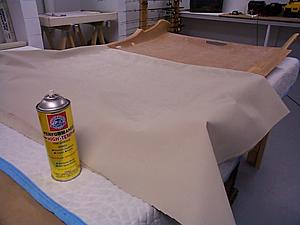
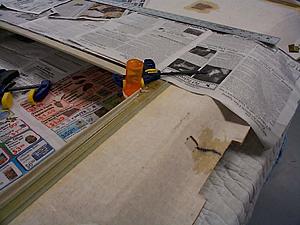
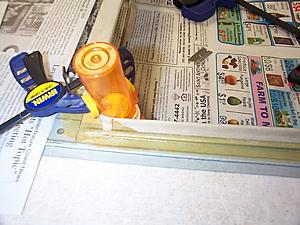
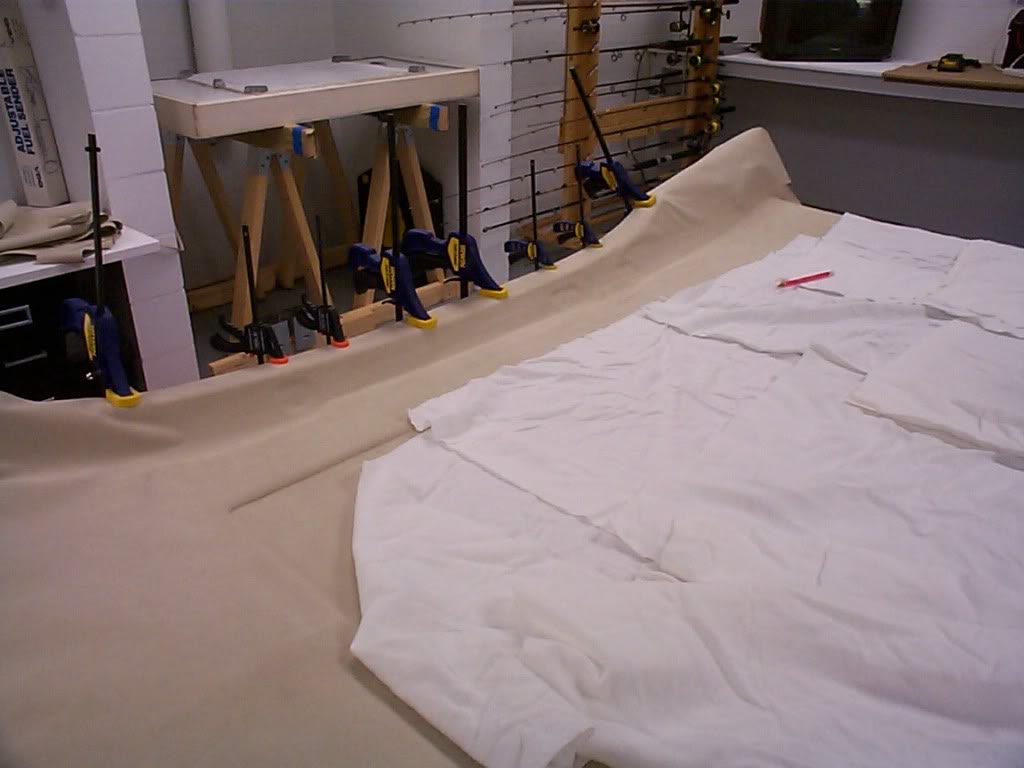
The old fabric comes off quite easily, but the foam backing
is a huge mess.
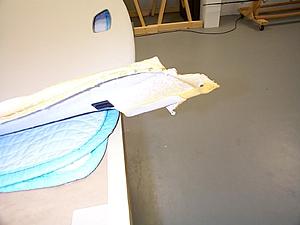
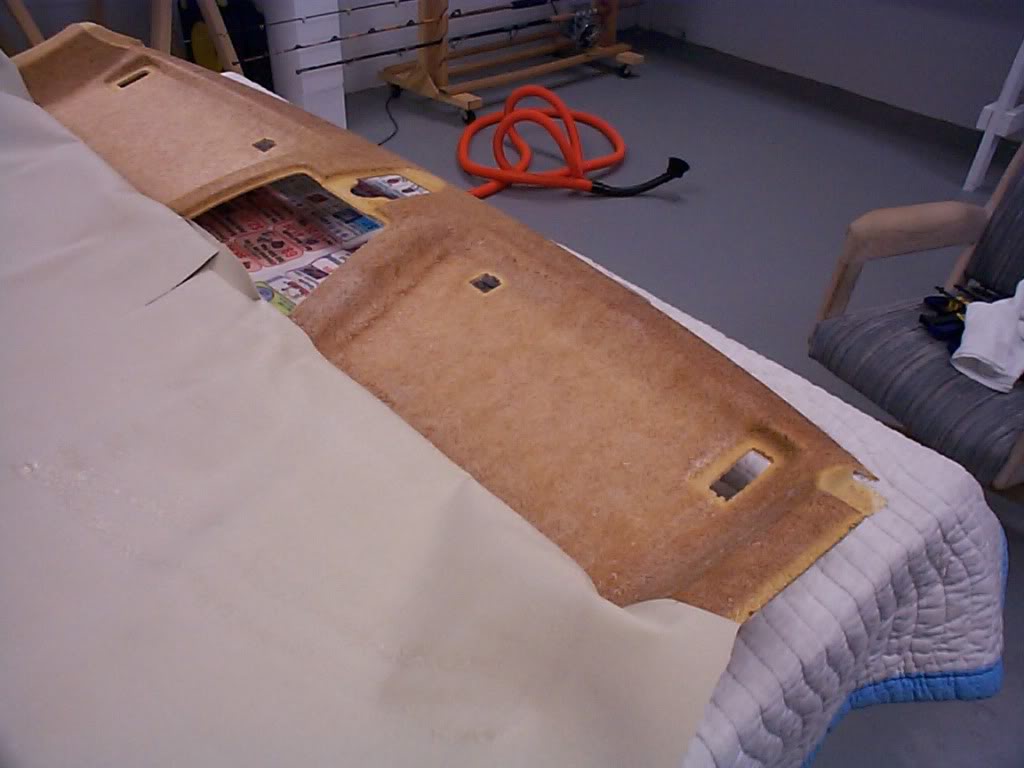
Once the fabric was removed we cleaned what was left of old
foam and adhesive, took hours to get it smooth. This part was
important because I have decided to go with Alcantera with out
a foam backing so I did not want imperfections to show through.
Sunroof door cleaned up nice.

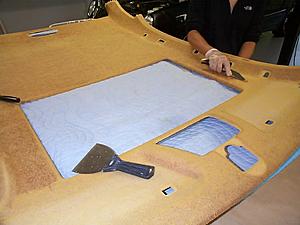
Here is the first glue, only did the large center part to start with.

This is the adhesive I used note High Temp, it is a contact cement
and requires a few minutes to tack.
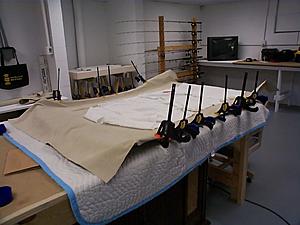
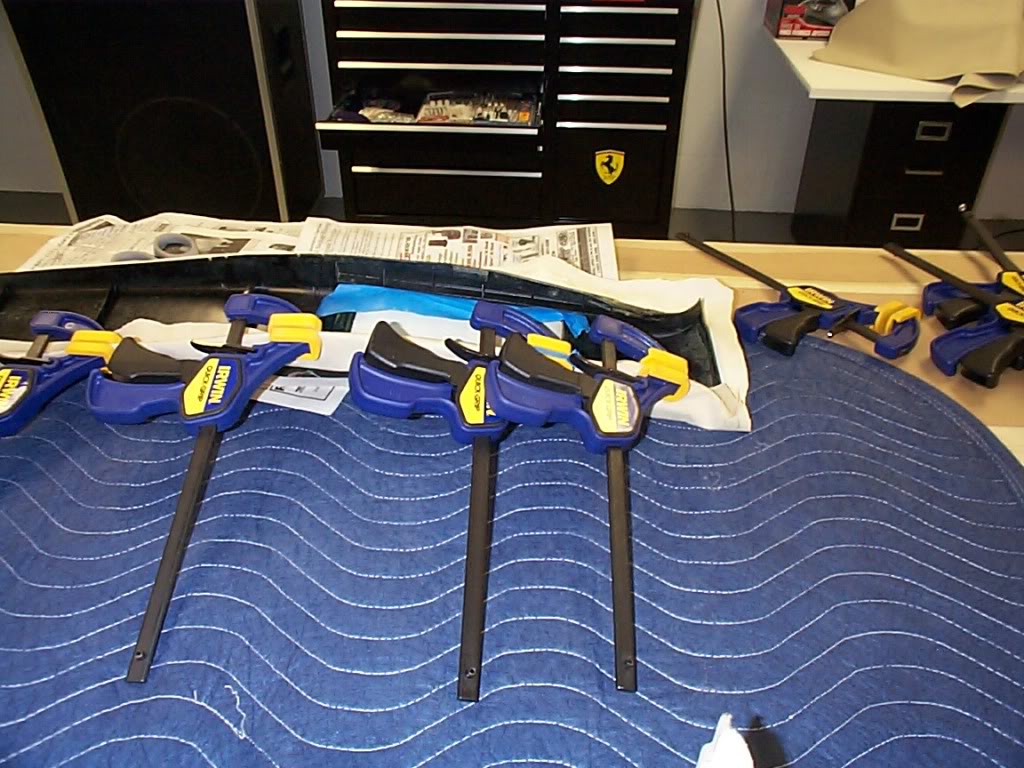
Here you can see I slowly worked the Alcantera in to the couture
of the headliner shell. (glue, stretch, clamp) This was very difficult
because the Alcantera has very little stretch.

Many times I would stretch and clamp the Alcantera over night
just to make it fit better.
Here from the start was my greatest fear, the recess for the sun visors
I glued and clamped right up to it. Then I stretched it and stretched it and
stretched it.
Much to my surprise the rear over head handles fit the contour of
the sun visor, so I used them as a tool and clamped them to hold
the Alcantera in place. (for a week)

To pass the time I started to cover the "A" pillars
went right over the OEM covering, no problem.
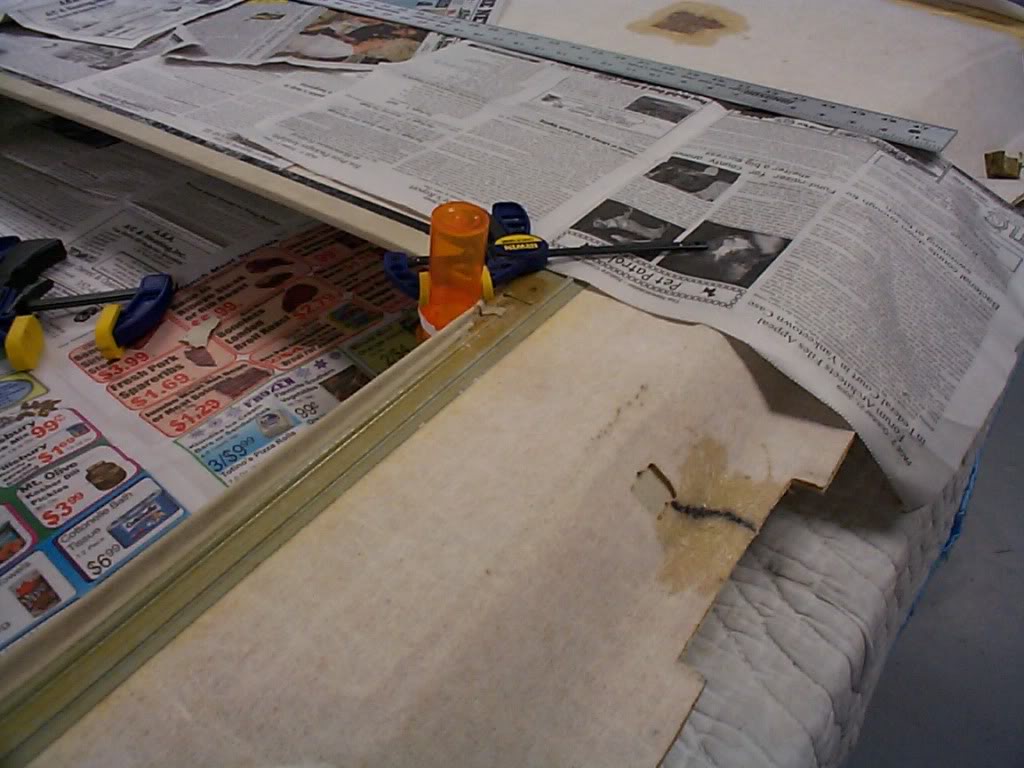
OK between my previous rattle repair and this complete removal,
the headliner shell has suffered some damage. The black lines you
see are cracks. I repaired this condition with some fiberglass mat
and west system epoxy.
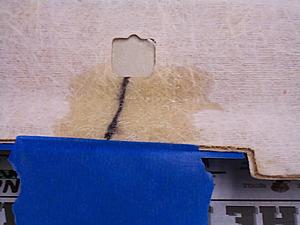
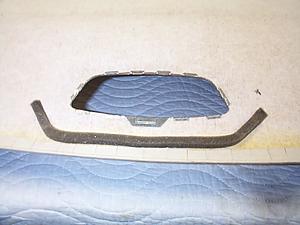
This is the site of the two metal clips in the aft center section.
During my rattle repair I glued the clips on with 3M 5200 (forever)
when I removed the headliner part of the shell stayed on the clips
so I had to glass over that damage.
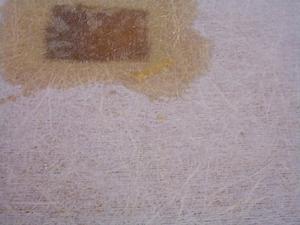
Patch over the "B" pillar, This is a natural flex point.
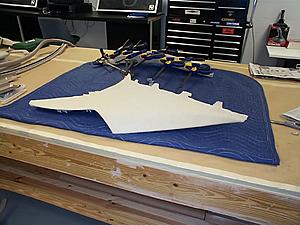
Stretch and clamp the sunroof opening.
Like my tool, I have lots of prescription bottles. So ya, see a
sober person would never DIY a headliner. That is my best
advise.
More stretch, glue & clamp......
The corner radius in the sunroof opening is all the Alcantera can do
it is stretched to the max.
The forward edge of the sunroof frame requires the Alcantera to be glued
to the underside of the frame.

All most done, time to trim all openings and reinstall forward overhead
console metal frame.
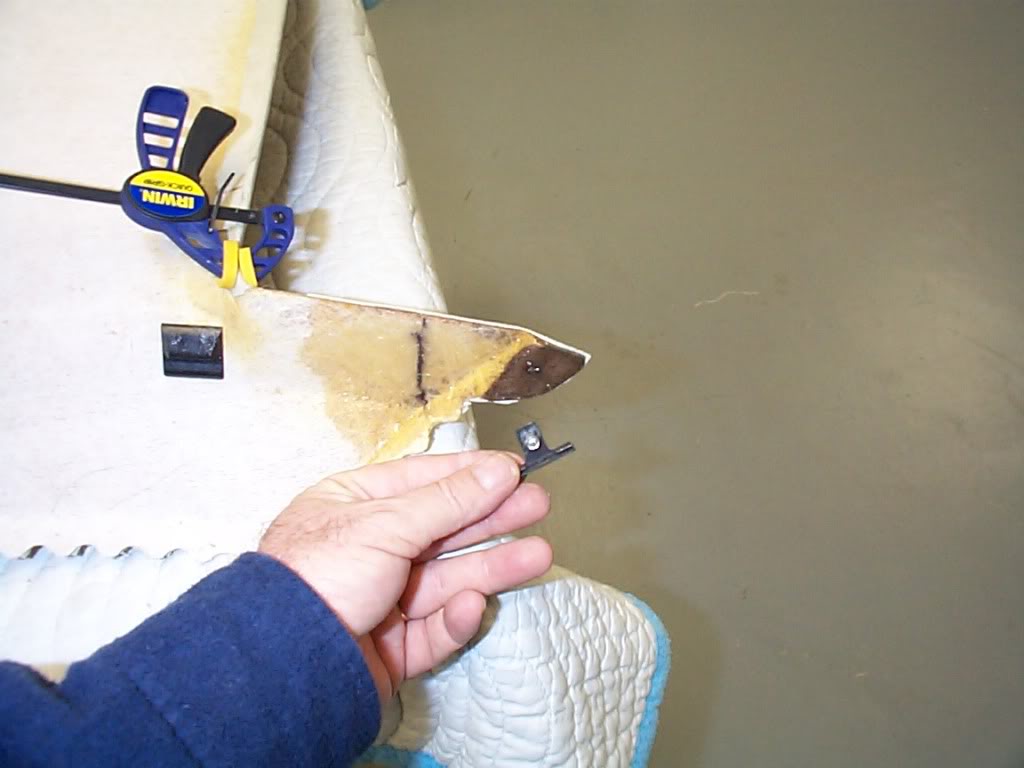
The rear clips were found to be removable, so I pop them out to
remove the old rivets.
is a huge mess.

Once the fabric was removed we cleaned what was left of old
foam and adhesive, took hours to get it smooth. This part was
important because I have decided to go with Alcantera with out
a foam backing so I did not want imperfections to show through.

Sunroof door cleaned up nice.

Here is the first glue, only did the large center part to start with.

This is the adhesive I used note High Temp, it is a contact cement
and requires a few minutes to tack.

Here you can see I slowly worked the Alcantera in to the couture
of the headliner shell. (glue, stretch, clamp) This was very difficult
because the Alcantera has very little stretch.
Many times I would stretch and clamp the Alcantera over night
just to make it fit better.

Here from the start was my greatest fear, the recess for the sun visors
I glued and clamped right up to it. Then I stretched it and stretched it and
stretched it.
Much to my surprise the rear over head handles fit the contour of
the sun visor, so I used them as a tool and clamped them to hold
the Alcantera in place. (for a week)

To pass the time I started to cover the "A" pillars
went right over the OEM covering, no problem.

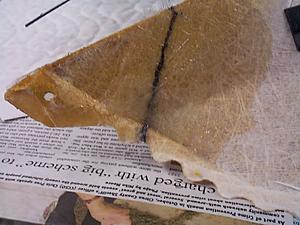
OK between my previous rattle repair and this complete removal,
the headliner shell has suffered some damage. The black lines you
see are cracks. I repaired this condition with some fiberglass mat
and west system epoxy.

This is the site of the two metal clips in the aft center section.
During my rattle repair I glued the clips on with 3M 5200 (forever)
when I removed the headliner part of the shell stayed on the clips
so I had to glass over that damage.

Patch over the "B" pillar, This is a natural flex point.

Stretch and clamp the sunroof opening.
Like my tool, I have lots of prescription bottles. So ya, see a
sober person would never DIY a headliner. That is my best
advise.

More stretch, glue & clamp......
The corner radius in the sunroof opening is all the Alcantera can do
it is stretched to the max.

The forward edge of the sunroof frame requires the Alcantera to be glued
to the underside of the frame.
All most done, time to trim all openings and reinstall forward overhead
console metal frame.

The rear clips were found to be removable, so I pop them out to
remove the old rivets.
Last edited by Yacht Master; 12-18-2009 at 03:58 PM.
12-18-2009, 03:12 PM
#78
MBWorld Fanatic!
Join Date: Oct 2006
Location: Caribbean/Florida/Colorado
Posts: 3,642
Likes: 0
Received 11 Likes
on
11 Posts
E-ZGO 53hp., 1999 E 430 sport, 2004 E 55, 2008 Tahoe LTZ on 24"s
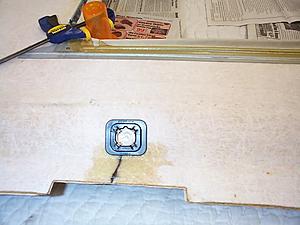
Here we install the metal frame for the rear lamp.
Test fit new hole for rivet.
Test fit rivet and clip.
At this point I know that I will not have to do a "do over"
and will now have enough Alcantera to cover the "B & C"
pillars. So to remove the "B" pillar I will have to disconnect
the seat belt from the seat.
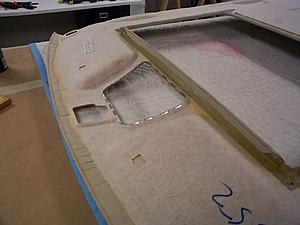
The "B" pillar is ready to be striped.

"B" pillar in process.
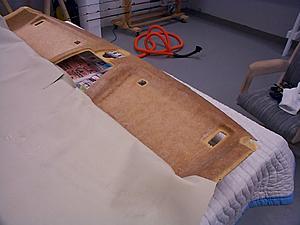
Other panels begin recover process.

TaDa the headliner is DONE and ready to be re-installed.
Other parts all most finished.
Inspection before re-installation.
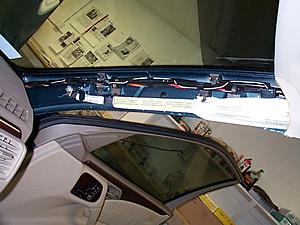
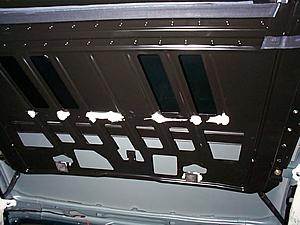
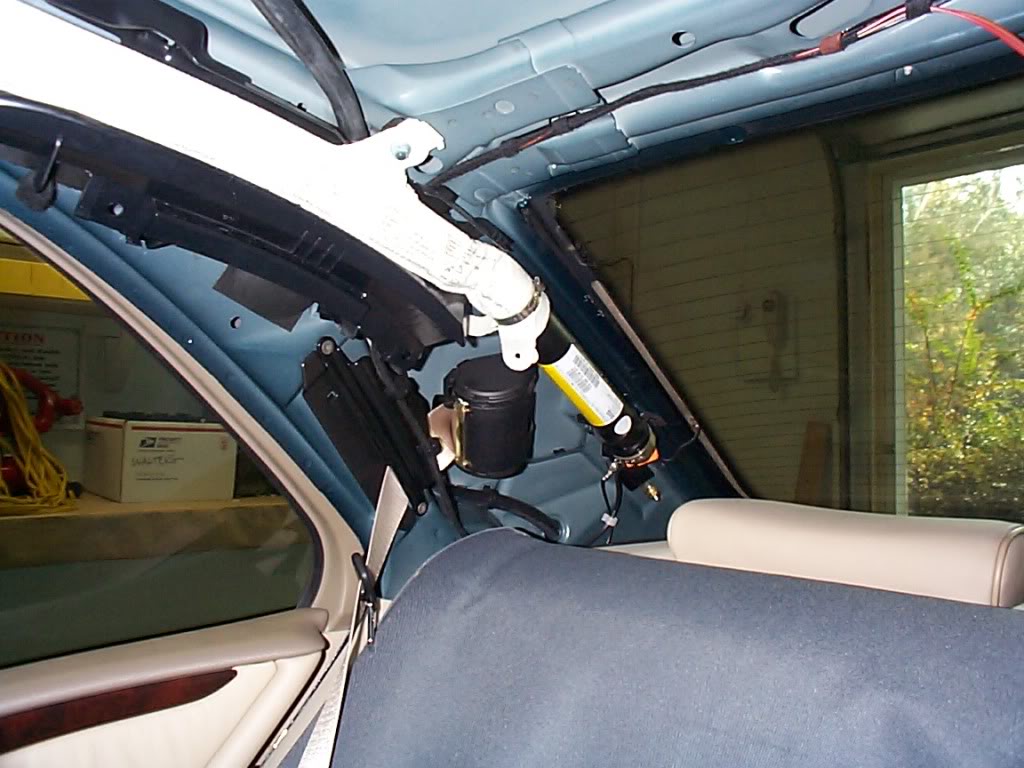
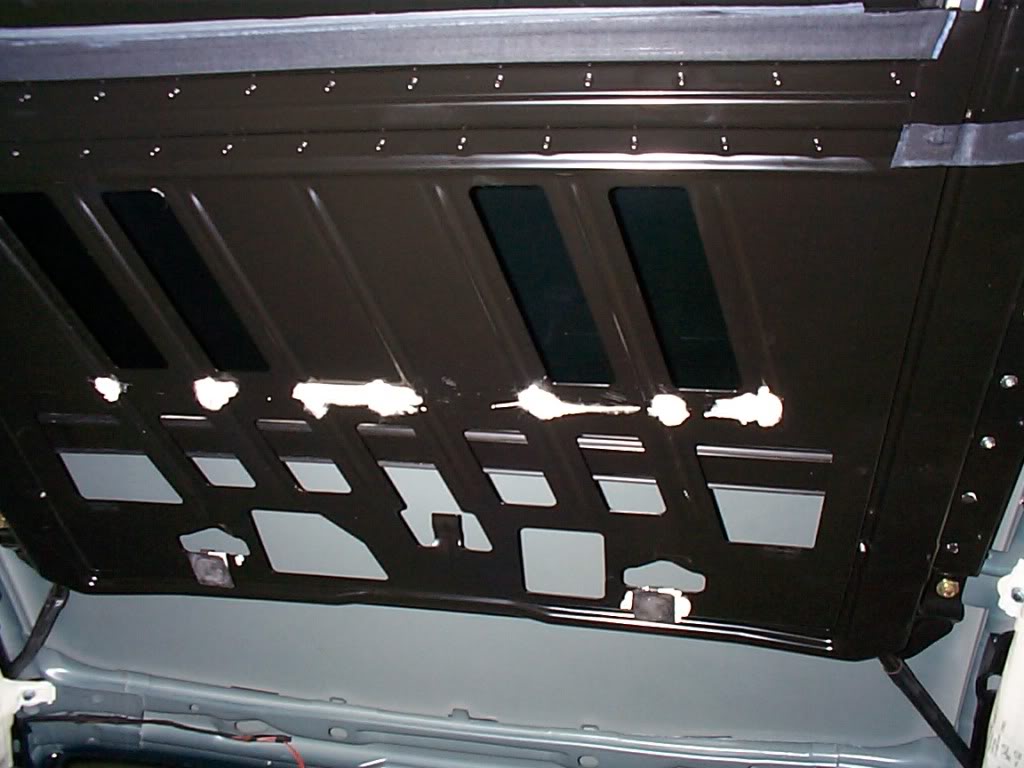
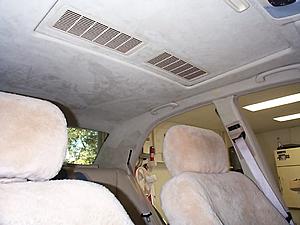
OK this is looking at the sunroof and sunroof frame in side the car.
The part with the 6-7 white dots is the frame that causes the rattle.
I put 7 dabs of 3M 5200 marine sealant to fix my rattle it worked and
I intend to use the same method again (headliner glued to frame). If
you look at the rear of the frame you can see the the two clips (gray)
they will be glued to the headliner by same means with 5200. I did
install the headliner but I have no pics yet cause I have a support
in the car to hold the headliner up while the 5200 dries (7 days)
I will post up pics of the finished product and other information next week.

Test fit new hole for rivet.

Test fit rivet and clip.

At this point I know that I will not have to do a "do over"
and will now have enough Alcantera to cover the "B & C"
pillars. So to remove the "B" pillar I will have to disconnect
the seat belt from the seat.

The "B" pillar is ready to be striped.
"B" pillar in process.
Other panels begin recover process.

TaDa the headliner is DONE and ready to be re-installed.

Other parts all most finished.

Inspection before re-installation.
OK this is looking at the sunroof and sunroof frame in side the car.
The part with the 6-7 white dots is the frame that causes the rattle.
I put 7 dabs of 3M 5200 marine sealant to fix my rattle it worked and
I intend to use the same method again (headliner glued to frame). If
you look at the rear of the frame you can see the the two clips (gray)
they will be glued to the headliner by same means with 5200. I did
install the headliner but I have no pics yet cause I have a support
in the car to hold the headliner up while the 5200 dries (7 days)
I will post up pics of the finished product and other information next week.
Last edited by Yacht Master; 12-18-2009 at 04:45 PM.
The following users liked this post:
andy_m94 (02-28-2017)
12-18-2009, 03:40 PM
#79
MBWorld Fanatic!
Join Date: Feb 2008
Location: Charleston, SC
Posts: 1,803
Likes: 0
Received 12 Likes
on
10 Posts
GL450
Awesome write up.
I need to change mine as well. Any thoughts on changing color? I'd like to change the light gray to charcoal/black, but I'm worried about all of the other gray parts not matching well.
I need to change mine as well. Any thoughts on changing color? I'd like to change the light gray to charcoal/black, but I'm worried about all of the other gray parts not matching well.
12-18-2009, 03:42 PM
#80
Senior Member

Join Date: Mar 2004
Location: The Sunshine State
Posts: 264
Likes: 0
Received 0 Likes
on
0 Posts
01 W210 E Klasse | 02 W 463 G-Wagen | 06 Land Rover LR3 HSE
Best thread ever, but I am unable to see any pics just see the X's. I will try from my Mac and see if I have better luck.
This is a great project Yach Master if you don't mind can you kindly pm me the cost for the Alcantera Headliner and how many yards were needed.
Cheers
This is a great project Yach Master if you don't mind can you kindly pm me the cost for the Alcantera Headliner and how many yards were needed.
Cheers
12-18-2009, 04:47 PM
#81
MBWorld Fanatic!
Join Date: Oct 2006
Location: Caribbean/Florida/Colorado
Posts: 3,642
Likes: 0
Received 11 Likes
on
11 Posts
E-ZGO 53hp., 1999 E 430 sport, 2004 E 55, 2008 Tahoe LTZ on 24"s
OK here is a followup link with more information.
https://mbworld.org/forums/e-class-w...attle-fix.html
https://mbworld.org/forums/e-class-w...attle-fix.html
12-18-2009, 04:57 PM
#82
MBWorld Fanatic!
Join Date: Oct 2006
Location: Caribbean/Florida/Colorado
Posts: 3,642
Likes: 0
Received 11 Likes
on
11 Posts
E-ZGO 53hp., 1999 E 430 sport, 2004 E 55, 2008 Tahoe LTZ on 24"s
Best thread ever, but I am unable to see any pics just see the X's. I will try from my Mac and see if I have better luck.
This is a great project Yach Master if you don't mind can you kindly pm me the cost for the Alcantera Headliner and how many yards were needed.
Cheers
This is a great project Yach Master if you don't mind can you kindly pm me the cost for the Alcantera Headliner and how many yards were needed.
Cheers
I will post all the details and finish pics this Monday, I am away from the shop.
12-18-2009, 11:16 PM
#83
MBWorld Fanatic!
super super job, YM. 
i've compiled as a PDF if anyone needs. some wonderful DIYs have
disappeared over the years when the links to the pics die. so, capturing
for prosperity...ergo the PDF. 12mb
i've compiled as a PDF if anyone needs. some wonderful DIYs have
disappeared over the years when the links to the pics die. so, capturing
for prosperity...ergo the PDF. 12mb
 12-21-2009, 01:46 PM
#85
MBWorld Fanatic!
Join Date: Feb 2008
Location: Charleston, SC
Posts: 1,803
Likes: 0
Received 12 Likes
on
10 Posts
GL450
I've found suede both plain and with a 1/8" foam backing. You can also buy the 1/8" foam by itself. I'm debating how to do this:
I'm wondering if foam backed suede would be easiest, since it should give more having the layer of foam there. On the other hand, the foam is what breaks down over time, so maybe it's better to just use plain suede.
Any thoughts? Did you choose plain Alcantara just because of availability?
- Just suede,
- Suede over foam,
- Or foam backed suede
I'm wondering if foam backed suede would be easiest, since it should give more having the layer of foam there. On the other hand, the foam is what breaks down over time, so maybe it's better to just use plain suede.
Any thoughts? Did you choose plain Alcantara just because of availability?
12-21-2009, 01:56 PM
#86
MBWorld Fanatic!
Join Date: Oct 2006
Location: Caribbean/Florida/Colorado
Posts: 3,642
Likes: 0
Received 11 Likes
on
11 Posts
E-ZGO 53hp., 1999 E 430 sport, 2004 E 55, 2008 Tahoe LTZ on 24"s
Finish Pics
Well the hard part is done, and for the most part I am happy. No matter how careful you are there will always be a few flaws, the only finishing touches will be, a finish bead at the top of "B" pillar. I used Alcantara only no foam backing so there is a slight gap at the top of "B". and I have not decided what to do with my sun visors, I would like to put some kind of screen, movies on the right and GPS nav screen on left.
So far so good the Alcantara is holding on the pronounced contours.
I did not take the time to brush the nap one direction.
The color match was much better than OEM could not have been better.
I would like to Thank Joe and Lucy at Gulf Fabrics, Inc.
They are the US importer for Alcantara and located in Tampa FL.
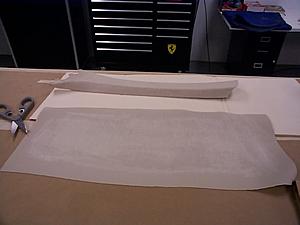
The headliner as depicted here requires 4 yards of pannel.
Contact information,
Gulf Fabrics, Inc.
3709 N. Armenia Avenue
Tampa, Florida 33607-1303
P.O.Box 7725
Tampa, Florida 33673-7725
813-875-2707 local
813-348-9540 fax
800-237-6677
http://www.gulffabrics.com
gulffab1@aol.com

So far so good the Alcantara is holding on the pronounced contours.

I did not take the time to brush the nap one direction.

The color match was much better than OEM could not have been better.
I would like to Thank Joe and Lucy at Gulf Fabrics, Inc.
They are the US importer for Alcantara and located in Tampa FL.
The headliner as depicted here requires 4 yards of pannel.
Contact information,
Gulf Fabrics, Inc.
3709 N. Armenia Avenue
Tampa, Florida 33607-1303
P.O.Box 7725
Tampa, Florida 33673-7725
813-875-2707 local
813-348-9540 fax
800-237-6677
http://www.gulffabrics.com
gulffab1@aol.com
The following users liked this post:
_Mad_Max_ (03-10-2016)
04-11-2010, 02:52 PM
#88

Here are some pics of mine 
Refer to this thread: https://mbworld.org/forums/w210-amg/...headliner.html
Hope all like it
Fabio Daniel
Refer to this thread: https://mbworld.org/forums/w210-amg/...headliner.html
Hope all like it
Fabio Daniel
 05-07-2010, 02:19 PM
#94
Member
Join Date: Nov 2006
Location: Charlotte, N.C.
Posts: 229
Likes: 0
Received 0 Likes
on
0 Posts
06 CLS500, 04 Tahoe, 04 Infiniti G35 Sedan, Boeing 737
Hey Master......I am impressed! Not only can you drive a boat you can actually take pics without using your hands, ie, I saw one of your sunroof cover vent removal pics with both your hands in it. How the hell did you do that? Use your chin?? 
Only kidding. Great DIY. Makes me want to run right out into the garage and jump right in.......................Naw......... maybe not.
Jeff
Only kidding. Great DIY. Makes me want to run right out into the garage and jump right in.......................Naw.........
maybe not.Jeff
 07-29-2010, 10:22 PM
#96
Newbie

Join Date: Oct 2009
Posts: 3
Likes: 0
Received 0 Likes
on
0 Posts
1999 E430, 2005 Lotus Elise
Super!
Master - thanks very much for the fantastic writeup! My headliner is drooping too, so I'm about to take the plunge.
I know that I'm half a year late to the party, but wanted to ask a few questions:
1) Are you happy with it after a year?
2) Has the glue held - would you use a different glue next time?
3) You mentioned that the fabric was a very tight stretch - has this affected it in any way (has it come loose in areas)?
I was considering just re-using the fabric that's already there, which is pretty stretchy, and looks like it'd be forgiving if I didn't glue it exactly straight, since it's fuzzy and the weave/threads aren't really visible.
Any thoughts or comments?
Thanks again!
Last edited by jndale; 07-29-2010 at 10:25 PM.
08-04-2010, 11:38 PM
#97
Newbie
Join Date: Oct 2009
Posts: 3
Likes: 0
Received 0 Likes
on
0 Posts
1999 E430, 2005 Lotus Elise
I removed the headliner, and used a scraper (pocketknife with a nice curved blade) to remove all the foam and most of the adhesive.
There is still a slightly gooey layer of adhesive - like the business end of a post-it note, no matter how much I scrape. I left it sitting for a few days too, because it seemed that the adhesive was hardening up, so I thought it'd be easier to scrape, but it doesn't seem to completely come off.
Is there any way to get rid of this? Acetone and goo-gone don't seem to get rid of it, and the fiberglass is so thin that I'm afraid that an abrasive like sandpaper will just chew up the fiberglass.
Any suggestions? Is this a legitimate concern, or will the new adhesive adhere to this just fine?
10-12-2010, 09:51 PM
#98
Newbie
Join Date: Oct 2009
Posts: 3
Likes: 0
Received 0 Likes
on
0 Posts
1999 E430, 2005 Lotus Elise
Ok, the gooey leftover isn't adhesive at all - the fiberglass resin / epoxy or whatever it is just feels like that. I tried some 3M adhesive remover, and all it managed to do was dissolve some of the fiberglass resin.
If you want to do the same thing as Yacht Master, but also have a foam back, I have a process that works like a champ.
I decided not to do an Alcantera headliner, since the headliner isn't a high-wear area and doesn't receive much direct sunlight, but through a lot of experiments, I did figure out a nice technique to bond some microsuede to some inexpensive foam-backed headliner material from Jo-Ann's, and I'm thrilled with the results. It should work with Alcantara as well. It's been on for a month and looks and feels fantastic. The trick is to glue the foam-backed headliner material to the fiberglass roof with heavy-duty 3M headliner glue, and then use what's called a 'fusible interfacing' material to attach the suede to that with a hot iron. The foam material gives it a nice soft feel, absorbs sounds, hides imperfections, does not allow the 3M glue to soak through and make spots on the fabric, etc. I had to do dozens of experiments with different materials, and what order to perform the steps in to get it right, but here's the rundown:
1) Get 4 yards of Microsuede/Alcantara, 4 yards of foam headliner material of any color, and 6 yards of "Clear-Fuse" polyamide fusible interfacing from Jo-Ann's
2) Use a hot iron to fuse the interfacing onto the foam headliner material, according to their directions.
3) Use the 3M glue to attach the foam to the fiberglass headliner
4) Use the iron again to attach the microsuede to the fusible interfacing.
For the sunroof, the process was the same, except I used some felt material instead of the foam because it was a little bit thinner. I have tons of pics and info, if anyone has any specific questions.
Last edited by jndale; 10-12-2010 at 10:07 PM.
05-01-2013, 05:09 PM
#99

Remove the sun visor catches, you only need to remove the screws
the catch is two pieces.
Now remove the lens on the over head lights, you will see the metal
release catch on the over head console.

Release the catches and swing the console down and remove the wires.
Unplug the wires to the rear view mirror and pull the mirror straight
down.
To remove the door seals it is best to remove the thresholds first.

There are two pieces in the rear, see the clip location.

Front door one piece note clip location. Once the thresholds have been removed
you can remove the door bead/seal and mark them with their location.
The "A" pillar has 6 clips that are tight, start by pulling at the top, straight away
from the pillar. Don't use any tool to pry the cover off, there are many wires and
an airbag inside.
Here is a better pic of the angle to pull at.

This is why you should not any pry tool, wires and airbag.
In your OEM tool kit you will have a sunroof emergency tool
to open or close your sunroof. for the next item the roof
needs to be open.

Along the front edge of the sunroof is a channel with a rubber
seal on it, this piece locks the headliner in place. to remove it
pry it straight up.
Now you can release the 4 clips on the "B" pillar, and move
them out of the way. I plan to recover all the pillars "A,B,C"
I will remove them later.

To remove the "B" an "C" panels you need to disconnect the seat belts.

The "C" pillar has 4 clips 3 in the forward section and one in the rear.
once released from the clips pull the panel forward to release the
locking tab in the lower section.

At this point you can swing the "C" panel out of the way.

Next we drill out the pop rivets.
Now the headliner is hanging on the rear sunroof interlock.

To lower the headliner it is a good idea to have a helper
one person on the left one on the right. holding the forward
part of the headliner down slide it forward, and in one
inch it will release from the rear interlock in the sunroof support.
Now that it is free you can withdraw it through the front passenger door.
I don't know if that is the best way or not, I did have to give it a bend
like a taco. It is not easy to remove, but it can be done. try to avoid
bending the metal frame around the sunroof opening.

Poof it's out, sorry no pics in process, I had my hands full.
the catch is two pieces.
Now remove the lens on the over head lights, you will see the metal
release catch on the over head console.
Release the catches and swing the console down and remove the wires.
Unplug the wires to the rear view mirror and pull the mirror straight
down.
To remove the door seals it is best to remove the thresholds first.
There are two pieces in the rear, see the clip location.
Front door one piece note clip location. Once the thresholds have been removed
you can remove the door bead/seal and mark them with their location.
The "A" pillar has 6 clips that are tight, start by pulling at the top, straight away
from the pillar. Don't use any tool to pry the cover off, there are many wires and
an airbag inside.
Here is a better pic of the angle to pull at.
This is why you should not any pry tool, wires and airbag.
In your OEM tool kit you will have a sunroof emergency tool
to open or close your sunroof. for the next item the roof
needs to be open.
Along the front edge of the sunroof is a channel with a rubber
seal on it, this piece locks the headliner in place. to remove it
pry it straight up.
Now you can release the 4 clips on the "B" pillar, and move
them out of the way. I plan to recover all the pillars "A,B,C"
I will remove them later.
To remove the "B" an "C" panels you need to disconnect the seat belts.
The "C" pillar has 4 clips 3 in the forward section and one in the rear.
once released from the clips pull the panel forward to release the
locking tab in the lower section.
At this point you can swing the "C" panel out of the way.
Next we drill out the pop rivets.
Now the headliner is hanging on the rear sunroof interlock.
To lower the headliner it is a good idea to have a helper
one person on the left one on the right. holding the forward
part of the headliner down slide it forward, and in one
inch it will release from the rear interlock in the sunroof support.
Now that it is free you can withdraw it through the front passenger door.
I don't know if that is the best way or not, I did have to give it a bend
like a taco. It is not easy to remove, but it can be done. try to avoid
bending the metal frame around the sunroof opening.
Poof it's out, sorry no pics in process, I had my hands full.
Qwill
The following users liked this post:
_Mad_Max_ (03-10-2016)


