DIY: Plastic seat trim creaking fix
 04-17-2012, 01:45 AM
#1
MBWorld Fanatic!
Thread Starter
Join Date: Dec 2008
Location: Bay Area, CA
Posts: 2,394
Likes: 0
Received 37 Likes
on
28 Posts
2007 SL55 AMG
DIY: Plastic seat trim creaking fix
Ever since I got the car, the plastic seat trim next to the door on the seat has always creaked. It was a minor annoyance, but it eventually got on my nerves. This weekend I removed the seat and fixed it using some thin felt (moleskin for door panels). I cut pieces out and stuck it to the seat frame where the plastic contacted. The result is no more creaking!
My next project is to fix the rattle that the headrests make. My w210 has quite a few rattles. I'm not sure if its just mine or is it all 210s. Does anybody else's car have a bunch of rattles?
Few pics on where I placed the felt:
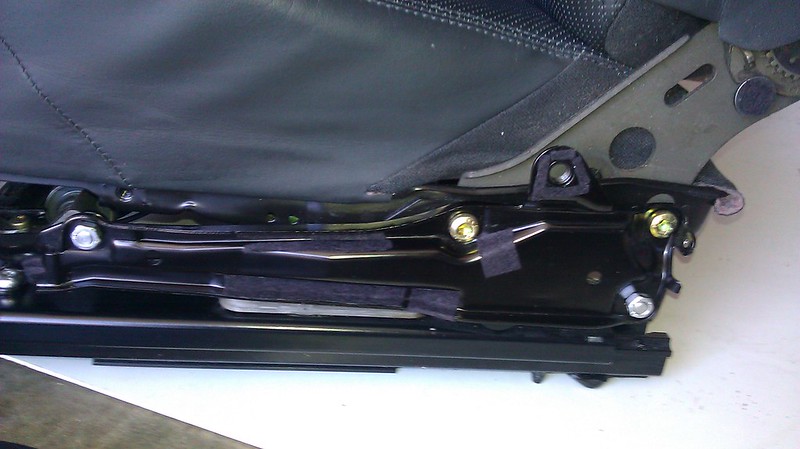
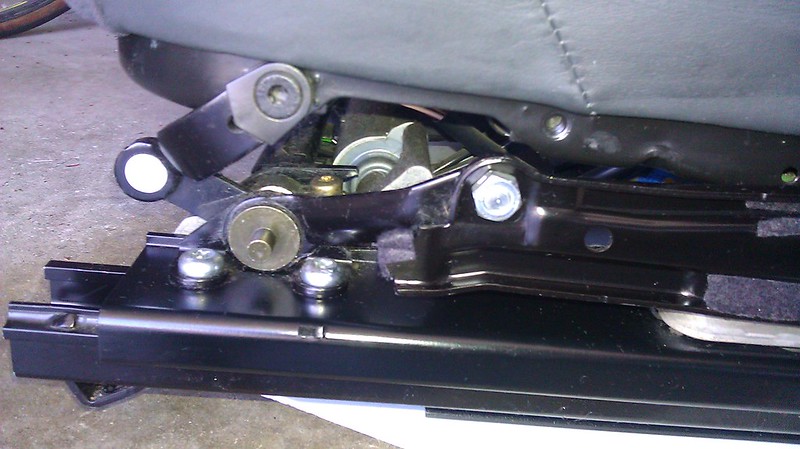
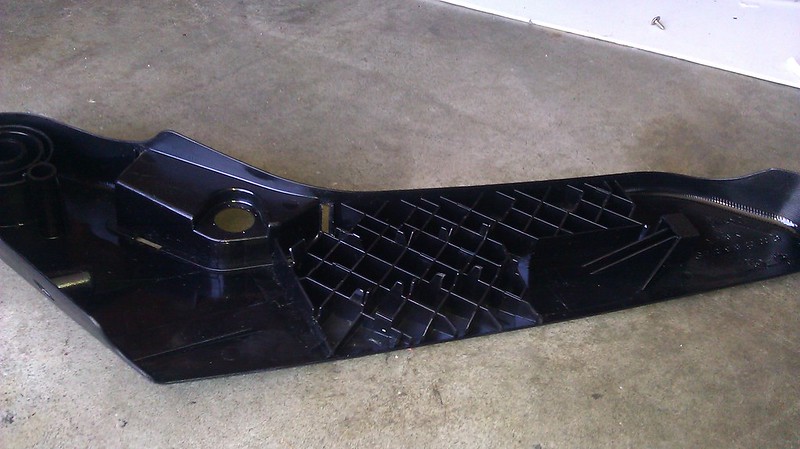
Basically all these baffles that stick up from the plastic trim is what caused the creaking when it rubbed against the metal seat frame.
On the other hand, I hit 140k mi last week. Still runs like a champ and I'm loving every second of it!


My next project is to fix the rattle that the headrests make. My w210 has quite a few rattles. I'm not sure if its just mine or is it all 210s. Does anybody else's car have a bunch of rattles?
Few pics on where I placed the felt:
Basically all these baffles that stick up from the plastic trim is what caused the creaking when it rubbed against the metal seat frame.
On the other hand, I hit 140k mi last week. Still runs like a champ and I'm loving every second of it!
Last edited by desired_speeds; 04-17-2012 at 01:51 AM.
 04-17-2012, 10:10 PM
#3
Senior Member
Join Date: Mar 2008
Posts: 340
Likes: 0
Received 0 Likes
on
0 Posts
1999 E320 & 2008 S550 Designo
Ever since I got the car, the plastic seat trim next to the door on the seat has always creaked. It was a minor annoyance, but it eventually got on my nerves. This weekend I removed the seat and fixed it using some thin felt (moleskin for door panels). I cut pieces out and stuck it to the seat frame where the plastic contacted. The result is no more creaking!
My next project is to fix the rattle that the headrests make. My w210 has quite a few rattles. I'm not sure if its just mine or is it all 210s. Does anybody else's car have a bunch of rattles?
Few pics on where I placed the felt:
Basically all these baffles that stick up from the plastic trim is what caused the creaking when it rubbed against the metal seat frame.
On the other hand, I hit 140k mi last week. Still runs like a champ and I'm loving every second of it!
My e320 creaks when I accelerate, brake and I think maybe turning as well.
I also feel like the seat moves about 1/4" or so....and thinking perhaps the seat frame is cracked or broken.
It sounds more like a metal creaking and not a plastic creaking...but who knows...you may have solve my problem.
How easy to remove the seat and put back? any special tools required?
thanks
04-18-2012, 12:06 AM
#4
MBWorld Fanatic!
if you dilly-dally, it may take 5-10 mins. it's that simple. even the power
connectors are easy as they only fit into one possible socket. still, it wouldn't
hurt to label them as you unplug.
i seem to recall that it may be easier to remove the 2 rear anchor bolts first before
the front 2 bolts, then unplugging the electricals.
requires external torx #15 to unfasten the 4 bolts, each of which are behind
small plastic valances. good to mark which end up or you'll stare at it trying to
figure how to fit back into the rails.
04-18-2012, 09:09 PM
#6
Senior Member
Join Date: Mar 2008
Posts: 340
Likes: 0
Received 0 Likes
on
0 Posts
1999 E320 & 2008 S550 Designo
Thanks Raymond
if you dilly-dally, it may take 5-10 mins. it's that simple. even the power
connectors are easy as they only fit into one possible socket. still, it wouldn't
hurt to label them as you unplug.
i seem to recall that it may be easier to remove the 2 rear anchor bolts first before
the front 2 bolts, then unplugging the electricals.
requires external torx #15 to unfasten the 4 bolts, each of which are behind
small plastic valances. good to mark which end up or you'll stare at it trying to
figure how to fit back into the rails.
connectors are easy as they only fit into one possible socket. still, it wouldn't
hurt to label them as you unplug.
i seem to recall that it may be easier to remove the 2 rear anchor bolts first before
the front 2 bolts, then unplugging the electricals.
requires external torx #15 to unfasten the 4 bolts, each of which are behind
small plastic valances. good to mark which end up or you'll stare at it trying to
figure how to fit back into the rails.
04-18-2012, 11:38 PM
#7
MBWorld Fanatic!
Thread Starter
Join Date: Dec 2008
Location: Bay Area, CA
Posts: 2,394
Likes: 0
Received 37 Likes
on
28 Posts
2007 SL55 AMG
over really bad roads I get a few loud thunks from the headliner. It's bearable on a daily basis though. My center console creaks/shifter area creaks also. I gotta get around to that next.
Trending Topics
04-19-2012, 12:03 AM
#8
MBWorld Fanatic!
out all of the seats and replaced them with Designo multi-contour seats from a
wrecked E55. i wanted more lumbar support for my back and the air bladders
did the trick. i used a pillow for a few months then was alerted that the E55
seats were available.
04-19-2012, 12:06 AM
#9
MBWorld Fanatic!
- removed hand rails above rear doors,
- pulled out door gasket
- removed C pillar cabin liner
- popped off rear dome light
- carefully lowered headliner and slid in a sheet of 1" bubble wrap from each side
- sewed it back up
very quiet now
04-19-2012, 12:15 AM
#10
MBWorld Fanatic!
Thread Starter
Join Date: Dec 2008
Location: Bay Area, CA
Posts: 2,394
Likes: 0
Received 37 Likes
on
28 Posts
2007 SL55 AMG
headliner chatter. this is what i did (overview):
very quiet now
- removed hand rails above rear doors,
- pulled out door gasket
- removed C pillar cabin liner
- popped off rear dome light
- carefully lowered headliner and slid in a sheet of 1" bubble wrap from each side
- sewed it back up
very quiet now


