2010 LED Tail light Swap
 01-14-2011, 06:24 PM
#51
Newbie

Join Date: Oct 2010
Posts: 8
Likes: 0
Received 0 Likes
on
0 Posts
GL450
Finally!
I was finally able to have the dealership install the LED Tail Lights.
Picked up the truck yesterday. They look great. In the end I had to have a new updated rear sam installed to make them work properly. No resistors were needed with this setup. The new sam takes care of the proper voltage and current.
Picked up the truck yesterday. They look great. In the end I had to have a new updated rear sam installed to make them work properly. No resistors were needed with this setup. The new sam takes care of the proper voltage and current.

 03-22-2011, 05:36 AM
#53
Junior Member

Join Date: Aug 2010
Posts: 23
Likes: 0
Received 0 Likes
on
0 Posts
.
European version led tail lights
I think that I have found the part numbers for the European tail lights with amber turn signals:
164 820 33 64
164 820 34 64
These should be for the 2010- GL
I have ordered a pair, so I'll soon now if I got the right type (amber turn signals)
164 820 33 64
164 820 34 64
These should be for the 2010- GL
I have ordered a pair, so I'll soon now if I got the right type (amber turn signals)
Last edited by RoyM; 03-23-2011 at 01:53 PM.
09-07-2011, 03:02 PM
#55
Member


Much Easier Than I Thought....
All:
Save yourself time and money. I have a 2007 GL 450. I purchased the LED tail lights from the newer model.
1. They are plug and play (the connector anyway).
2. I didn't need to reprogram a computer or purchase a new SAM.
To get the lights to work, I ordered (2) 50W 6Ohm LED Load Resistors for $6.99/each.
I bought 2, one for each light. Because there is a shop near my home that does SUPERB work (MD/DC/VA folks let me know if you need their info) I knew even if I didn't have the right resistors they could make it work.
I can't give you a DIY because I had the shop do it for me. Along with installing my running boards, HID headlight/foglights, and replacing the driving/park lights, tag lights LED to match the HID 8000K lights. I also had them do a swaparoo on my RES screens as one is damaged (the one my daughter uses, as I don't like her sitting behind me when driving).
I do know a few things. One those resistors get VERY hot so when you mount them, mount them to the frame, using this white pasty stuff (it disperses heat or something). Sorry to sound like a doofus. And try to mount it somewhere where it can breathe.
I came to this conclusion because I had a CLS500 which I upgrade the tails to LED tail lights. The lights weren't plug and play. The harness had to be modified. I instead opted to buy them from some guy on eBay who premodified the harness/connector, and made them plug and play. I remember the same gold resistors and the pasty white substance. That lead me to believe since my connector on the GL was the same as the newer model, all I really needed was the resistors. BAM. Done deal.
I will say I'm disappointed that the LED tails aren't like the CLS LED tails I had with an orange almost arrow like flasher " > " but they still beat the stock "pissy" bulbs as I like to call them.
When I can get some good lighting (dusk) I'll grab photos of the HID/8000K, the LED park/running lights (which match flawlessly with the HID 8000K) the running boards (I paid $700) from eBay, they're knock off OEM style, but look exactly the same, and the tails. While I'm bragging...I bought a Cheetah Speed C50 (right light/speed camera detector). NIIIIICE! Look that up too.

UPDATE:
Added a photo I had lying around. Fog lights and running/parking lights are on. You can see the LED park/running lights match up nice. Sorry I didn't have my headlights on when I took the pic. You also see my bo-bo knock off eBay running boards. I'll get some better pics.
Save yourself time and money. I have a 2007 GL 450. I purchased the LED tail lights from the newer model.
1. They are plug and play (the connector anyway).
2. I didn't need to reprogram a computer or purchase a new SAM.
To get the lights to work, I ordered (2) 50W 6Ohm LED Load Resistors for $6.99/each.
I bought 2, one for each light. Because there is a shop near my home that does SUPERB work (MD/DC/VA folks let me know if you need their info) I knew even if I didn't have the right resistors they could make it work.
I can't give you a DIY because I had the shop do it for me. Along with installing my running boards, HID headlight/foglights, and replacing the driving/park lights, tag lights LED to match the HID 8000K lights. I also had them do a swaparoo on my RES screens as one is damaged (the one my daughter uses, as I don't like her sitting behind me when driving).
I do know a few things. One those resistors get VERY hot so when you mount them, mount them to the frame, using this white pasty stuff (it disperses heat or something). Sorry to sound like a doofus. And try to mount it somewhere where it can breathe.
I came to this conclusion because I had a CLS500 which I upgrade the tails to LED tail lights. The lights weren't plug and play. The harness had to be modified. I instead opted to buy them from some guy on eBay who premodified the harness/connector, and made them plug and play. I remember the same gold resistors and the pasty white substance. That lead me to believe since my connector on the GL was the same as the newer model, all I really needed was the resistors. BAM. Done deal.
I will say I'm disappointed that the LED tails aren't like the CLS LED tails I had with an orange almost arrow like flasher " > " but they still beat the stock "pissy" bulbs as I like to call them.
When I can get some good lighting (dusk) I'll grab photos of the HID/8000K, the LED park/running lights (which match flawlessly with the HID 8000K) the running boards (I paid $700) from eBay, they're knock off OEM style, but look exactly the same, and the tails. While I'm bragging...I bought a Cheetah Speed C50 (right light/speed camera detector). NIIIIICE! Look that up too.
UPDATE:
Added a photo I had lying around. Fog lights and running/parking lights are on. You can see the LED park/running lights match up nice. Sorry I didn't have my headlights on when I took the pic. You also see my bo-bo knock off eBay running boards. I'll get some better pics.
Last edited by lexnoir; 09-07-2011 at 03:08 PM. Reason: Added a photo I had lying around. Fog lights and running/parking lights are on. You can see the LED park/running lights matc
09-09-2011, 09:51 PM
#56
Junior Member

Join Date: Apr 2010
Posts: 27
Likes: 0
Received 0 Likes
on
0 Posts
GL450
I have the same model as yours, I alos have the ebay running boards which looks good and cant really tell from the OEM ones.
Got a few Questions regarding the LED install.
Can you tell us what wire to tap for the resistors? Also where is it mounted? And the name of the white stuff you used. Thanks.
Got a few Questions regarding the LED install.
Can you tell us what wire to tap for the resistors? Also where is it mounted? And the name of the white stuff you used. Thanks.
09-12-2011, 10:28 AM
#57
Member
Exactly, saved a bit of money on the eBay running boards, and you're right the difference is negligible.
I wish I could answer your other question(s). But here's what I got.
1. Remember, I didn't install the resistor, or the lights. I had a shop do that, along with a bunch of other small things I wanted done. They are highly reputable, and know their shtuff. They're QA is top notch, never had to bring my car back for an issue. They tend to be more expensive than others, but it's worth it.
2. I don't know which wires to tap which is why I had a shop do it.
3. I do know they are mounted on the body of the car, INTERNALLY. Basically it's somewhere behind or near the fuse box in the rear (right side). The left tail light resistor is mounted on the left side behind or near the storage compartment (emergency kit holder thingy). They're mounted on the body of the car I assume this helps dissipate the heat.
4. The white pasty stuff is thermal paste (I've seen it called thermal grease as well). If you've worked on computers/CPUs in the past, you dab some between the heatsink and the processor (at least back in the day that's how it was done. It's been a while since I cracked open a desktop and replaced a processor. Basically it's thermal paste very common stuff, nothing earth shattering. It basically is spread on the back of the resistor between the body of the car, and the resistor. It acts as sort of a glue to hold it in place and dissipate the heat.
If you go to that website I linked you to, to buy the resistors, somewhere they had a diagram of how to tap the wires. But those resistors and instructions reference flashers/turn signals. Not sure how much it varies for tail lights. But a t-tap will help you neatly tap into the wires. Wish I could help you more.
UPDATE: Here's the link for instructions on tapping the wires with the resistor. Seems simple enough.
Last edited by lexnoir; 09-12-2011 at 10:32 AM. Reason: FOUND LINK TO WIRE TAPPING INSTRUCTIONS

 09-05-2012, 10:02 PM
#61
Senior Member
Im really jealous that you alll can do this so easily, the C219 CLS's need like a $200 module to do the work -__-
I wish life was as simple as plug-n-play
I wish life was as simple as plug-n-play
09-06-2012, 04:17 AM
#62
Super Member

Also very interested in doing this properly, ie with a new SAM, but only with the euro amber-turn taillights. Please post part #'s & prices if anyone successfully gets the euro LED tails installed.
03-04-2013, 02:37 PM
#63
Super Member
Just tested wiring for the LED Tailight on my 2007 GL450
I had to connect 2 resistor to each side to work. Plug is the same.
Brown - Negative
Purple/black - tail/brake light bulb 1 (middle one) Positive
green/red - tail/brake light bulb 2 Positive.
I connected a 25w resistor to each bulb. So that is 2x25w resistor on each side. that did the trick. The bulb on the tailight are 23w bulbs. didnt think 50w resister would be anymore beneficial.
Resistor do get hot but I dont think it will be as hot as 50watts
03-06-2013, 04:43 PM
#64
Super Member
I realize that the main 10 LED is on all the time and it get brighter when I press the brake. strange.. didn't think LED did that. I have to modify my wiring. The OEM 2010 LED tails only have the horizontal LED bar on at taillight.
I end up cutting the 10 Main LED wire and attached it to the 3rd brake light. Leaving the resistor in place to act as phantom light bulbs.
Here is a crude wiring diagram. Please let me know if there is a better way.
I end up cutting the 10 Main LED wire and attached it to the 3rd brake light. Leaving the resistor in place to act as phantom light bulbs.
Here is a crude wiring diagram. Please let me know if there is a better way.
03-09-2013, 04:51 AM
#65
Junior Member
Join Date: Apr 2010
Posts: 27
Likes: 0
Received 0 Likes
on
0 Posts
GL450
Hi fkong, I attached a pic of the back on the LED tails. Can you draw where exactly the resistors are connected?
Also did you just splice the main to the 3rd brake light wire(green)? And what do you mean by phantom light bulbs? Where did you mount the resistor so it wont burn anything?
After your wiring mod did it tails function the way it should?
Sorry for all the questions but I'm really interested in doing this swap to my '07.
Thanks
[IMG]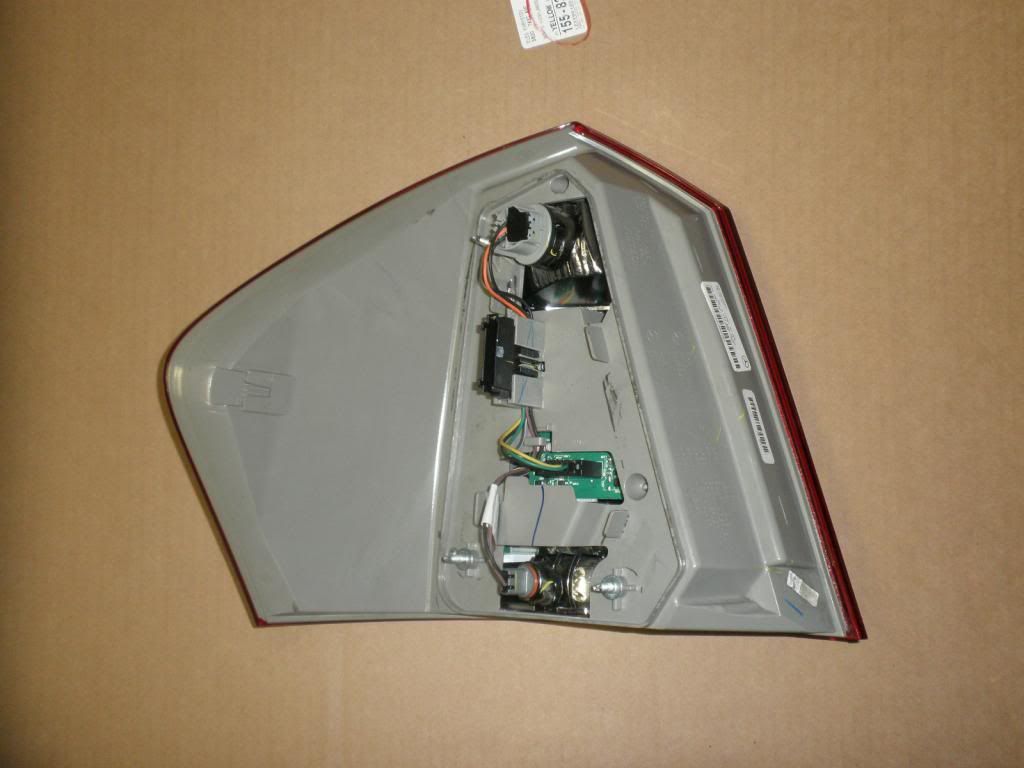 [/IMG]
Also did you just splice the main to the 3rd brake light wire(green)? And what do you mean by phantom light bulbs? Where did you mount the resistor so it wont burn anything?
After your wiring mod did it tails function the way it should?
Sorry for all the questions but I'm really interested in doing this swap to my '07.
Thanks
[IMG]
[/IMG]
Last edited by tambay; 03-09-2013 at 04:57 AM. Reason: added pic
03-09-2013, 11:07 AM
#66
Super Member
I actually did all the connection on the harness side, didn’t touch the new LED taillight at all. Look on my diagram and think of it in the harness side it should make more sense. The color on the diagram is arbitrary. As for the resistor, I mounted them on an old PC CPU heat sink with a hose clamp. That way you can just tug it away in the back.
As for the phantom light bulb, think of the resistor as basically a lightbulb. The car will need it to think it is still driving a true light bulb. Otherwiseit will throw errors and try to use another part of the taillight as brakelight and push Warning - Tail light out! notices.
When I’m done I will get more pics. here is a pic of the heat sink & resistors
Last edited by fkong777; 03-09-2013 at 02:07 PM.
03-24-2013, 11:24 AM
#68
Super Member
Done for now. I ended up using 2 50watt resistor on each side because they seem to give off less heat than the 25 watts ones. However the heatsink still do get hot. I'm not close to the idea of actually using the a light bulb similar to the OEM ones. since bulb may actually give off less heat.
wiring is not picture worthy... it was rather a mess.. but it works.

wiring is not picture worthy... it was rather a mess.. but it works.
 08-03-2013, 03:15 PM
#70
Newbie

Join Date: Sep 2010
Location: Schaumburg, Illinois
Posts: 3
Likes: 0
Received 1 Like
on
1 Post
2007 GL320CDI
The rear SAM number I used on my 2007 was an A164 900 54 01. This is the correct SAM for trucks WITH a trailer hitch. Plug and play on my car. Bought two tail lights off of ebay. Paid about $250 for both. Then bought the SAM from http://www.getmercedesparts.com/ for $330. Plug all in. All worked perfectly with no trip to the dealership and the related costs. took me about a half an hour to complete the conversion with simple hand tools.
09-19-2013, 05:28 PM
#73
Newbie

Join Date: Sep 2013
Posts: 5
Likes: 0
Received 0 Likes
on
0 Posts
mercedes gl450, bmw 750 ,lexus gs300 , vw passat,
The rear SAM number I used on my 2007 was an A164 900 54 01. This is the correct SAM for trucks WITH a trailer hitch. Plug and play on my car. Bought two tail lights off of ebay. Paid about $250 for both. Then bought the SAM from http://www.getmercedesparts.com/ for $330. Plug all in. All worked perfectly with no trip to the dealership and the related costs. took me about a half an hour to complete the conversion with simple hand tools.
09-19-2013, 06:56 PM
#74
Newbie
Join Date: Sep 2010
Location: Schaumburg, Illinois
Posts: 3
Likes: 0
Received 1 Like
on
1 Post
2007 GL320CDI
LED Tail lights GL
I bought the two tail lights off of Ebay. You'll want to read every bit of script, or check with the seller, because most that are for sale there have bad led segments. BE CAREFUL! I used the aforementioned SAM that I bought brand new. It is for a 2010 w/LED's. It just plugs in. I also used a flasher unit found here:
http://www.superbrightleds.com/cat/l...7-561--528376/
Good luck, CK
http://www.superbrightleds.com/cat/l...7-561--528376/
Good luck, CK
09-20-2013, 08:27 AM
#75
Newbie
Join Date: Sep 2013
Posts: 5
Likes: 0
Received 0 Likes
on
0 Posts
mercedes gl450, bmw 750 ,lexus gs300 , vw passat,
I bought the two tail lights off of Ebay. You'll want to read every bit of script, or check with the seller, because most that are for sale there have bad led segments. BE CAREFUL! I used the aforementioned SAM that I bought brand new. It is for a 2010 w/LED's. It just plugs in. I also used a flasher unit found here:
http://www.superbrightleds.com/cat/l...7-561--528376/
Good luck, CK
http://www.superbrightleds.com/cat/l...7-561--528376/
Good luck, CK


