DIY - GL320CDI 2007 - Front upper control arms
 02-03-2016, 12:51 PM
#1
Junior Member
Thread Starter

Join Date: Dec 2007
Posts: 23
Likes: 0
Received 0 Likes
on
0 Posts
C240
DIY - GL320CDI 2007 - Front upper control arms
Hello all
I am about to replace front upper control arms on my GL, drivers side has a torn bushing and I can fill some vibration/movement on that side.
The process will require some open hood work to access nuts. The question is, does anyone has any tips before I start the diy with pics. I will go over the tightening the nuts under the load, have tools and idea how to do it without the wheels on.
Thanks
 03-13-2020, 08:27 PM
#2
Junior Member

Hello all
I am about to replace front upper control arms on my GL, drivers side has a torn bushing and I can fill some vibration/movement on that side.
The process will require some open hood work to access nuts. The question is, does anyone has any tips before I start the diy with pics. I will go over the tightening the nuts under the load, have tools and idea how to do it without the wheels on.
Thanks
I am about to replace front upper control arms on my GL, drivers side has a torn bushing and I can fill some vibration/movement on that side.
The process will require some open hood work to access nuts. The question is, does anyone has any tips before I start the diy with pics. I will go over the tightening the nuts under the load, have tools and idea how to do it without the wheels on.
Thanks
03-16-2020, 12:34 PM
#3
Junior Member
So, I did finally find the torque specs for the upper control arms. It's 61 Nm or 45 ft lbs. I torqued the passenger's side and that side is now complete. However, the driver's side is another story. I tried accessing from under the hood, but you can barely see the front one and access is impossible. The back is not even visible or reachable. I thought maybe I could access them from under the wheel well, but no, you cannot. So, the driver's side seems to be a job that may have to be done at the shop. Doesn't seem to be a diy type of repair.
03-16-2020, 02:42 PM
#4
MBWorld Fanatic!

Papu, I can't quite picture exactly what you're trying to get at in my head, but... can you remove the wheel well liner for better access? In most cases the well liners, while bulky, are pretty easy/quick to remove.
 03-16-2020, 03:36 PM
#5
Junior Member
Hi Dennis, Yes, I did remove the liner but you cannot get to the bolt that way either. The flange where the bellow of airstrut sits, and to which the control arm bolts onto, is closed. I don't know how to explain it better than that but you can't get to the other side of flange where the nut is from underneath. I had to move the liner on the passenger side as well in order to change the air filter for the airmatic, and I checked on that side you can't see the other side of the flange either. But on the passenger side it's not a problem because you can access the bolt from inside the hood. As a side note, I'm installing the new Arnott on the driver's side and it's twisted. The screws don't all the way out at the top for the 3 mounting bolts, and at the bottom, the holes in the fork don't line up perfectly with the holes in the lower control arm, so the the bolt is trying to go through at an angle. This is a replacement strut, so I'm a little miffed that they've wasted my time with a defective part.
03-20-2020, 01:16 PM
#6
Junior Member
Accessing Nuts on Upper Control Arm
So these are the removal and installation instructions. Look at steps 9 and 10. As I said, the passenger side is really straightforward and easy because you can see the nuts, both front and back. However, on the driver's side you can just see the front nut, cannot really access it, and as far as the back nut, you cannot even see it, let alone access it.
The following users liked this post:
texas008 (01-17-2023)
01-27-2023, 11:16 PM
#7
Thread revival, rather than starting a new one... I'm almost committed to doing this job, but getting those bolts out is keeping me away form it! I found a total of one video showing the process, and that guy used a sawzall to cut off the bolt and pull the pieces out. He then puts them in from the engine bay side and nuts on the wheel well side. Janky or legit? But that driver's side rear one sounds like a no-go! @Papushkian did you ever figure out a way to access it? I read/heard somewhere that it can be accessed from below, but nothing really more than that.
I'm thinking if I can release the air from the airsprings, that will let them compress enough to clear the bolts? I don't have STAR as mentioned, but looks like they can be hot-wired: https://blog.fcpeuro.com/how-to-rele...atic-air-strut
But either way, need to get access to that driver/rear bolt/nut at some point!!!
Any help is appreciated!!!
Trending Topics
01-28-2023, 03:09 PM
#8
Junior Member
Thread revival, rather than starting a new one... I'm almost committed to doing this job, but getting those bolts out is keeping me away form it! I found a total of one video showing the process, and that guy used a sawzall to cut off the bolt and pull the pieces out. He then puts them in from the engine bay side and nuts on the wheel well side. Janky or legit? But that driver's side rear one sounds like a no-go! @Papushkian did you ever figure out a way to access it? I read/heard somewhere that it can be accessed from below, but nothing really more than that.
I'm thinking if I can release the air from the airsprings, that will let them compress enough to clear the bolts? I don't have STAR as mentioned, but looks like they can be hot-wired: https://blog.fcpeuro.com/how-to-rele...atic-air-strut
But either way, need to get access to that driver/rear bolt/nut at some point!!!
Any help is appreciated!!!
I'm thinking if I can release the air from the airsprings, that will let them compress enough to clear the bolts? I don't have STAR as mentioned, but looks like they can be hot-wired: https://blog.fcpeuro.com/how-to-rele...atic-air-strut
But either way, need to get access to that driver/rear bolt/nut at some point!!!
Any help is appreciated!!!
It's going on 3 years since I did this, but I recall it was a pain to get that driver's side. Passenger's side is no problem, but on the driver's side, you have things in the way. You should be able to see and manage to get hold of the nut that faces the front of the car. You might have to do some wrangling to be able to get a wrench or ratchet to reach it, but you should be able to figure it. It goes without saying that you need a 2nd pair of hands to hold the nut from above, while you wrench from below. As for the nut that faces the dash, YOU WILL NEED A CAMERA. There is no other way to even see where that nut is. I picked up an automotive snake camera for under $100 (Canadian), so if you're in the States, you should probably get a much better deal. You need to move covers out of the way, from what I recall, and then you can slide the snake camera down and locate the nut. Now for the difficult part. Once you know exactly where it is, you need someone very skinny to get a wrench on it. I recruited my teenage son. You can watch on the camera to make sure you get the wrench on properly, but once you do, you're good to remove the bolt from below. Putting that nut back on was a challenge as well. I can't remember if my son was able to get his hand there and hold the nut while I put the bolt through, or if we used magnet to hold it there. They sell those extension magnets at Harbor Freight. Once you get hold of that nut, it's a very easy job. However, Mercedes should have welded those nuts in place. I have no idea why they put a nut there that is so difficult to reach. Also, just to clarify, you cannot access the nuts from under the wheel well. I hope it works out for you. If you have any other questions, let me know. Also, please post how it turns out for you. Take care.
The following users liked this post:
StradaRedlands (01-28-2023)
01-28-2023, 08:19 PM
#9
Senior Member

@StradaRedlands I did this job few months ago. I accessed that bolt from the top by removing the air filter. It made access much easier. Its way back and down there to be accessed easily from any other way. You still another person to hold the bolt from wheel well.
The following users liked this post:
StradaRedlands (01-28-2023)
01-28-2023, 08:25 PM
#10
THANK YOU for the replies, @Papushkian & @TX07GL450 ! I spent the morning plotting and scheming, and pretty close to abandoning! I'm at least putting it off to a later date! I took the wheels off, and really looked from above and underneath to try to find the nut. Best I could figure out is that it is underneath some sort of weatherproofing strip, which is under the brake/ABS plumbing. No way I can get my hand in there for sure. From underneath I think I can visualize the general vicinity, but not the actual nut. I could see the steering linkage which is mentioned as needing to be disconnected, but that's pretty much as close as I got. I didn't even mess with trying to depressurize the airshocks!
So yeah, for now it's put it off to another day, but most likely going to have to take it into my indy to do. For good or for bad I bought the hardware already, so now just need to figure out what to do with it!!!
Thanks again for the information!!!
So yeah, for now it's put it off to another day, but most likely going to have to take it into my indy to do. For good or for bad I bought the hardware already, so now just need to figure out what to do with it!!!
Thanks again for the information!!!
Last edited by StradaRedlands; 01-28-2023 at 08:29 PM.
01-28-2023, 09:02 PM
#11
Senior Member
I wasn't able to visualize it from underneath either. I was about to give up but I decided to see what I can remove in that general vicinity from top. I used the passenger side as a guide to imagine where the nut will be on driver side. I took off air filter housing, put a blanket on engine top, got on top of it and I could feel the nut. I used a small rachet and it was pretty easy from that point onwards.
01-28-2023, 09:16 PM
#12
I wasn't able to visualize it from underneath either. I was about to give up but I decided to see what I can remove in that general vicinity from top. I used the passenger side as a guide to imagine where the nut will be on driver side. I took off air filter housing, put a blanket on engine top, got on top of it and I could feel the nut. I used a small rachet and it was pretty easy from that point onwards.
 01-29-2023, 06:57 AM
#13
Junior Member
THANK YOU for the replies, @Papushkian & @TX07GL450 ! I spent the morning plotting and scheming, and pretty close to abandoning! I'm at least putting it off to a later date! I took the wheels off, and really looked from above and underneath to try to find the nut. Best I could figure out is that it is underneath some sort of weatherproofing strip, which is under the brake/ABS plumbing. No way I can get my hand in there for sure. From underneath I think I can visualize the general vicinity, but not the actual nut. I could see the steering linkage which is mentioned as needing to be disconnected, but that's pretty much as close as I got. I didn't even mess with trying to depressurize the airshocks!
So yeah, for now it's put it off to another day, but most likely going to have to take it into my indy to do. For good or for bad I bought the hardware already, so now just need to figure out what to do with it!!!
Thanks again for the information!!!
So yeah, for now it's put it off to another day, but most likely going to have to take it into my indy to do. For good or for bad I bought the hardware already, so now just need to figure out what to do with it!!!
Thanks again for the information!!!
Apart from the GL, I have an S Class, a C Class and a BMW. Things don't go wrong on these cars very often, but when they do, unless it's electrical, they are pretty easy to repair on your own - as long as you have patience and think critically. Don't give up on it. Once you get that back nut, you'll get an immense sense of satisfaction!
By the way, were you able to get the front nut?
01-29-2023, 01:23 PM
#15
Pics I took this morning. I see no bolt anywhere!
Enhance:

Enhance:

Where the bolt should be, but is covered by a plastic trim piece:

It looks like that fender nut on the left is holding down the trim piece... am I thinking correctly on that? That was never mentioned in conversation. The front nuts on both sides are readily visible, and the rear nut on passenger side is under the cabin air filter, but looks pretty accessible. I didn't do any work as I knew the driver/rear one was the key. If I can't get at that, the job is going nowhere!
Question on getting the bolts out, as everything I've read/seen shows they don't clear the air shocks. The only video I've found shows the hack mechanic cutting them off which I am definitely not going to do! But you're saying they don't need to be depressurized/removed to get the bolts out? I know taht's a next step sort of thing, but trying to get everything worked out before digging in!
Also of note: This is for a GL450 gasser... I got excited and posted on this thread for a GL320 thinking the suspension is the same.
Does that throw the whole conversation out the window?
Enhance:
Enhance:
Where the bolt should be, but is covered by a plastic trim piece:
It looks like that fender nut on the left is holding down the trim piece... am I thinking correctly on that? That was never mentioned in conversation. The front nuts on both sides are readily visible, and the rear nut on passenger side is under the cabin air filter, but looks pretty accessible. I didn't do any work as I knew the driver/rear one was the key. If I can't get at that, the job is going nowhere!
Question on getting the bolts out, as everything I've read/seen shows they don't clear the air shocks. The only video I've found shows the hack mechanic cutting them off which I am definitely not going to do! But you're saying they don't need to be depressurized/removed to get the bolts out? I know taht's a next step sort of thing, but trying to get everything worked out before digging in!
Also of note: This is for a GL450 gasser... I got excited and posted on this thread for a GL320 thinking the suspension is the same.
Does that throw the whole conversation out the window?
Last edited by StradaRedlands; 01-29-2023 at 01:29 PM.
01-29-2023, 09:21 PM
#16
Senior Member
Mine is 450 gasser too.
You will have to de-pressurize the air bag to flex it inwards to clear the bolt. It takes like a min to slowly unscrew the air line to allow slow escape of air. I didn't completely take it off. Just enough to allow air to escape slowly.
The nut is about 6-8 inches down and rear wards/ left wards from your red circle. I don't think that bushing nut was holding any trim piece.
The following users liked this post:
texas008 (01-30-2023)
01-29-2023, 09:35 PM
#17
Mine is 450 gasser too.
You will have to de-pressurize the air bag to flex it inwards to clear the bolt. It takes like a min to slowly unscrew the air line to allow slow escape of air. I didn't completely take it off. Just enough to allow air to escape slowly.
The nut is about 6-8 inches down and rear wards/ left wards from your red circle. I don't think that bushing nut was holding any trim piece.
You will have to de-pressurize the air bag to flex it inwards to clear the bolt. It takes like a min to slowly unscrew the air line to allow slow escape of air. I didn't completely take it off. Just enough to allow air to escape slowly.
The nut is about 6-8 inches down and rear wards/ left wards from your red circle. I don't think that bushing nut was holding any trim piece.
01-30-2023, 02:06 PM
#18
Super Member
I also remember it being a colossal pain to get fingers on it, but it should be possible without removing any plastic panels or anything. I don't have small arms and I hated life for a few hours afterwards, but I was able to do it.
The following users liked this post:
StradaRedlands (01-30-2023)

The following users liked this post:
StradaRedlands (01-30-2023)
01-31-2023, 10:07 PM
#20
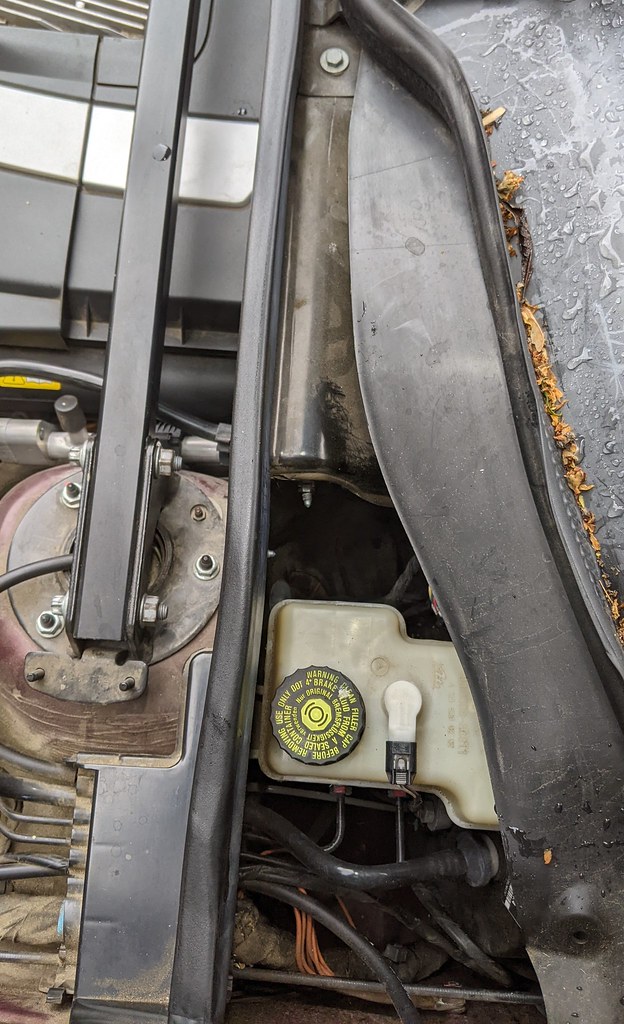
OK, I figured out the problem!!! I was looking underneath the brake fluid reservoir, but it's forward/inboard of that spot and on the other side of the panel partitioning that area off!!
I was looking in the area with the X, but it's really in the area I circled:

Here's the ol' Rick Deckard enhancement:

And what I think is the tip of it poking out on a cold day:

When the air filter housing was mentioned above, I processed that as meaning the cabin filter housing on the passenger side. But nope, it's the full assembly sitting on top of the engine. I imagine taking that off will expose it pretty well!
So now that I've got that figured out (it takes a village) I want to confirm depressurizing the air shocks: I just need to loosen the nut where the line attaches on top, and they'll be flexible enough to wiggle the bolts out? And then just re-tighten easy peasy no drama?
THANKS again, internet friends!
I was looking in the area with the X, but it's really in the area I circled:
Here's the ol' Rick Deckard enhancement:
And what I think is the tip of it poking out on a cold day:
When the air filter housing was mentioned above, I processed that as meaning the cabin filter housing on the passenger side. But nope, it's the full assembly sitting on top of the engine. I imagine taking that off will expose it pretty well!
So now that I've got that figured out (it takes a village) I want to confirm depressurizing the air shocks: I just need to loosen the nut where the line attaches on top, and they'll be flexible enough to wiggle the bolts out? And then just re-tighten easy peasy no drama?
THANKS again, internet friends!
Last edited by StradaRedlands; 01-31-2023 at 11:38 PM.
01-31-2023, 11:43 PM
#21
Senior Member
I should have paid more attention to where your initial red circle was. I am glad that you figured it out.
Yes, it is the engine air filter assembly and top stabilizer bar, both need to come out. Use latex gloves and long sleeve shirt to prevent scratches on dorsal side of your left arm/hand when you maneuver to reach the nut.
Regarding depressurizing, disconnect the battery, and slowly loosen the airline nut. Once you start hearing hissing sound, stop and give it about a min, the whole bag will be deflated. You will be able to compress it by hand to clear the bolt. Once done, you can tighten the airline nut adequately. It has a low torque value. It is important to disconnect the battery or at least take out the airmatic relay/fuse so that if you accidently open the door, the other side will try to inflate and it might imbalance your jacks etc.
Remember, the final tightening of bushing nut is done once car is lowered at the ground and is operating position. Otherwise, you will tear the newly installed bushing if you would lower it after tightening.
The following users liked this post:
StradaRedlands (01-31-2023)
01-31-2023, 11:54 PM
#22
I was 100% searching the wrong area! Definitely feel better about this now. It kinda' seems like a bit of an easy job, that's why felt fine taking it on. That stupid bolt was flummoxing me though. Weird as there isn't a lot of information and step by steps for what I presume is a pretty common job. I think we're a go for this one!
02-03-2023, 12:07 AM
#23
Update: All four UCA bolts are loosened up and ready to come out! Once the air filter housing was off, it is pretty easy to get access to that driver's side bolt. The other three were a piece of cake with a set of 16mm spanners! I have to run out to Autozone and borrow a tie rod separator for the pressed in bearing, then I think it will be a pretty quick job to R&R!!! Will report back with my status!

Last edited by StradaRedlands; 02-03-2023 at 12:10 AM.
02-04-2023, 12:43 AM
#24
Old UCAs off, new ones on, everything loosely assembled. I'm doing sway links and bushings while I have it apart, so will do those tomorrow and hopefully finish everything up! Bolts were no issue at all to get out after letting air out of the bags. Only sort of awkward bit was getting the left/front nut off and putting it back on the bolt while hidden behind the brake apparatus. Had to use a reach-it magnet to basically hold the nut there as no way to start it by hand. I went with some Delphi brand parts as they seemed to be the cheapest/best quality parts not form China. Made in Turkey, same as Lemforder.
Thanks again for the advice and encouragement, a really straightforward job that needed to be done!


Thanks again for the advice and encouragement, a really straightforward job that needed to be done!
02-04-2023, 01:22 PM
#25
Aaaaand done! Couldn't get the sway links off without power tools, so I'm ignoring them for now. But UCAs are good to go! Right side was incredibly easy, and all torqued to spec. Left side involved a lot more best guesses and snugging them up as best as I could. Did it all with the GL back on the ground and shocks at ride height. Good to go!

The following 2 users liked this post by StradaRedlands:
atraudes (02-06-2023),
eric_in_sd (02-08-2023)


