Curt Hitch Install 2015 ML350 Bluetech
#1
Senior Member
Thread Starter
Curt Hitch Install 2015 ML350 Bluetech
Installation of Aftermarket Curt Trailer Hitch and Wiring 2015 ML350
I’m writing this info up for people that may decide they need a hitch but didn’t order one with their ML. I believe that the 2012 ML up will be the same, but mine was a 2015 ML350 Btech (Canada), so wiring may be different color combo. I didn’t take photos and this was done a month ago, with my memory fading…. Any Questions… just ask and I’ll try to answer.
Curt Part #’s:
Hitch = 13117 (Hint some retailers sell w/ shipping included! My bill was $250 Can to my door!)
Trailer Harness = 59146 (about $40. Can)
Total= $300.00 +-
Hitch Install
The install of the hitch was pretty straightforward, just follow Curt’s Install sheet and there should not be any issues.
https://www.curtmfg.com/masterlibrar..._13117_INS.PDF
3 Notes to mention…
a) mine is a Bluetec… when removing base strap of Bluetec reservoir, make sure you place a temporary support under tank. Another poster on here, had a shop install, only to have an issue with Bluetec dash warnings… dealer diagnosed some broken/shorted wires to the tank resulting from sloppy workmanship… no tank support used!
b) When trimming heat shield, I used some ordinary tin snips to cut out, worked very well and easy. When refitting heat shield, add 2 or 3 sheet metal screws to retain rigidity, and you won’t have any heat shield rattles!
c) The removable center (Chrome) base of bumper (possibly there to hide factory hitch) has a small loop at lower end… I simply dremeled off the loop to maintain center Chrome piece and hitch looks seamless!
Wiring Harness
I used Curt Harness 59146 (pretty generic but uses battery connection to power everything, thus not ML computer sensing & sending codes to the dash!).
Some Notes:
a) I situated the harness module in rear passenger compartment because of easier access to battery under rear passenger seat. The harness is built to live in the driver’s side rear(meaning extra long harness Green wire(right turn signal) needs to be shortened, and conversely… Left turn signal (YELLOW) needs to be lengthened!
b) All wire taps were connected in rear passenger side taillight cavity, except for single Yellow(left turn signal) which needed to tap into left side cavity.
c) Wire was run/hidden under rear chrome trunkplate… easily removed by a center Torz screw located under spare tire compartment door. Once screw are removed, carefully pry upwards, and plate will release from spring clip inserts!
d) The battery wire was fed through right edge of spare tire compartment, up and over hump(under floor material, to the battery easily accessed under passenger rear seat. The fuse was then added/crimped to Black (trailer harness wire+) and the eyelet end was attached to +side connection(I believe Sirius connector) positive connection….. definitely fused LOL!
e) The Neg side of harness was attached in the passenger rear light compartment, where there is a ground post built in!
f) Lastly, the output wires to the trailer, were routed under chrome base plate and out through center base of vehicle. There is a convenient rubber plug/bung in center rear, looking up inside rear bumper…. Forward (hard to describe)there is a plug there(I assume for factory wire harness) Anyway, removed rubber plug, found out trailer plug would not fit through frame hole so…. Cut trailer output harness wires 12” from module, fed harness wires up through rubber bung, reinserted into frame hole, and spliced the 4 wire together inside the vehicle and taped up/ty-rapped so that nothing will get at it. If you make the splice outside, the elements will soon deteriorate the connection! They sell proper trailer harness holder/mounts that simply mount beside the hitch with 2 sheet metal screws
g) Wiring connections:
All light connections were made tapping into wires(just below) the white multiple wire connector female plug of each taillight. I had problems at first…. Easy to identify the brake and turn signal on 1 wire, and running lights on another. NOT SO FAST!!! It turns out that the MB engineers used a 3rd wire, that only powers the turn signal… (when white male plug is inserted in light module)must be some sort of grd from the Canbus! In any event… here are the important wire colors….
Light Trailer Harness ML350 harness Location
Brake--- Red----- Green w/ Black Tracer---- Pass side light Compartment
Lights--- Brown-- Grey w/ Black Tracer------ “ “
Rt Turn--Green---Violet w/ Black Tracer------ “ “
Lt Turn--Yellow----Black----------------------- Drivers " "
Note: white vehicle male connectors must be reinserted into tail light plugs to work properly and avoid codes!
Enjoy your hitch. Please note, the factory hitch utilizes factory computer sway control among other things…. If you’re going to tow something huge/heavy… it might be advisable to go with an ordered factory hitch. If towing a small boat or utility trailer, etc. this would be fine. The hitch is built to tow 5,000 lbs!!! I believe if you’re towing something greater…. Buy a BIGGER TRUCK!
Any questions: just ask…
My .02
Last edited by Koenig1; 06-01-2015 at 12:50 PM.
#2
Senior Member
Thread Starter
I'll try and take some after the fact pics today. Another note... I relayed all my findings back to Curt Industries, and they were very happy with my imput, as there is no info that I could find concerning wire harness colors!
#3
Senior Member
Thread Starter
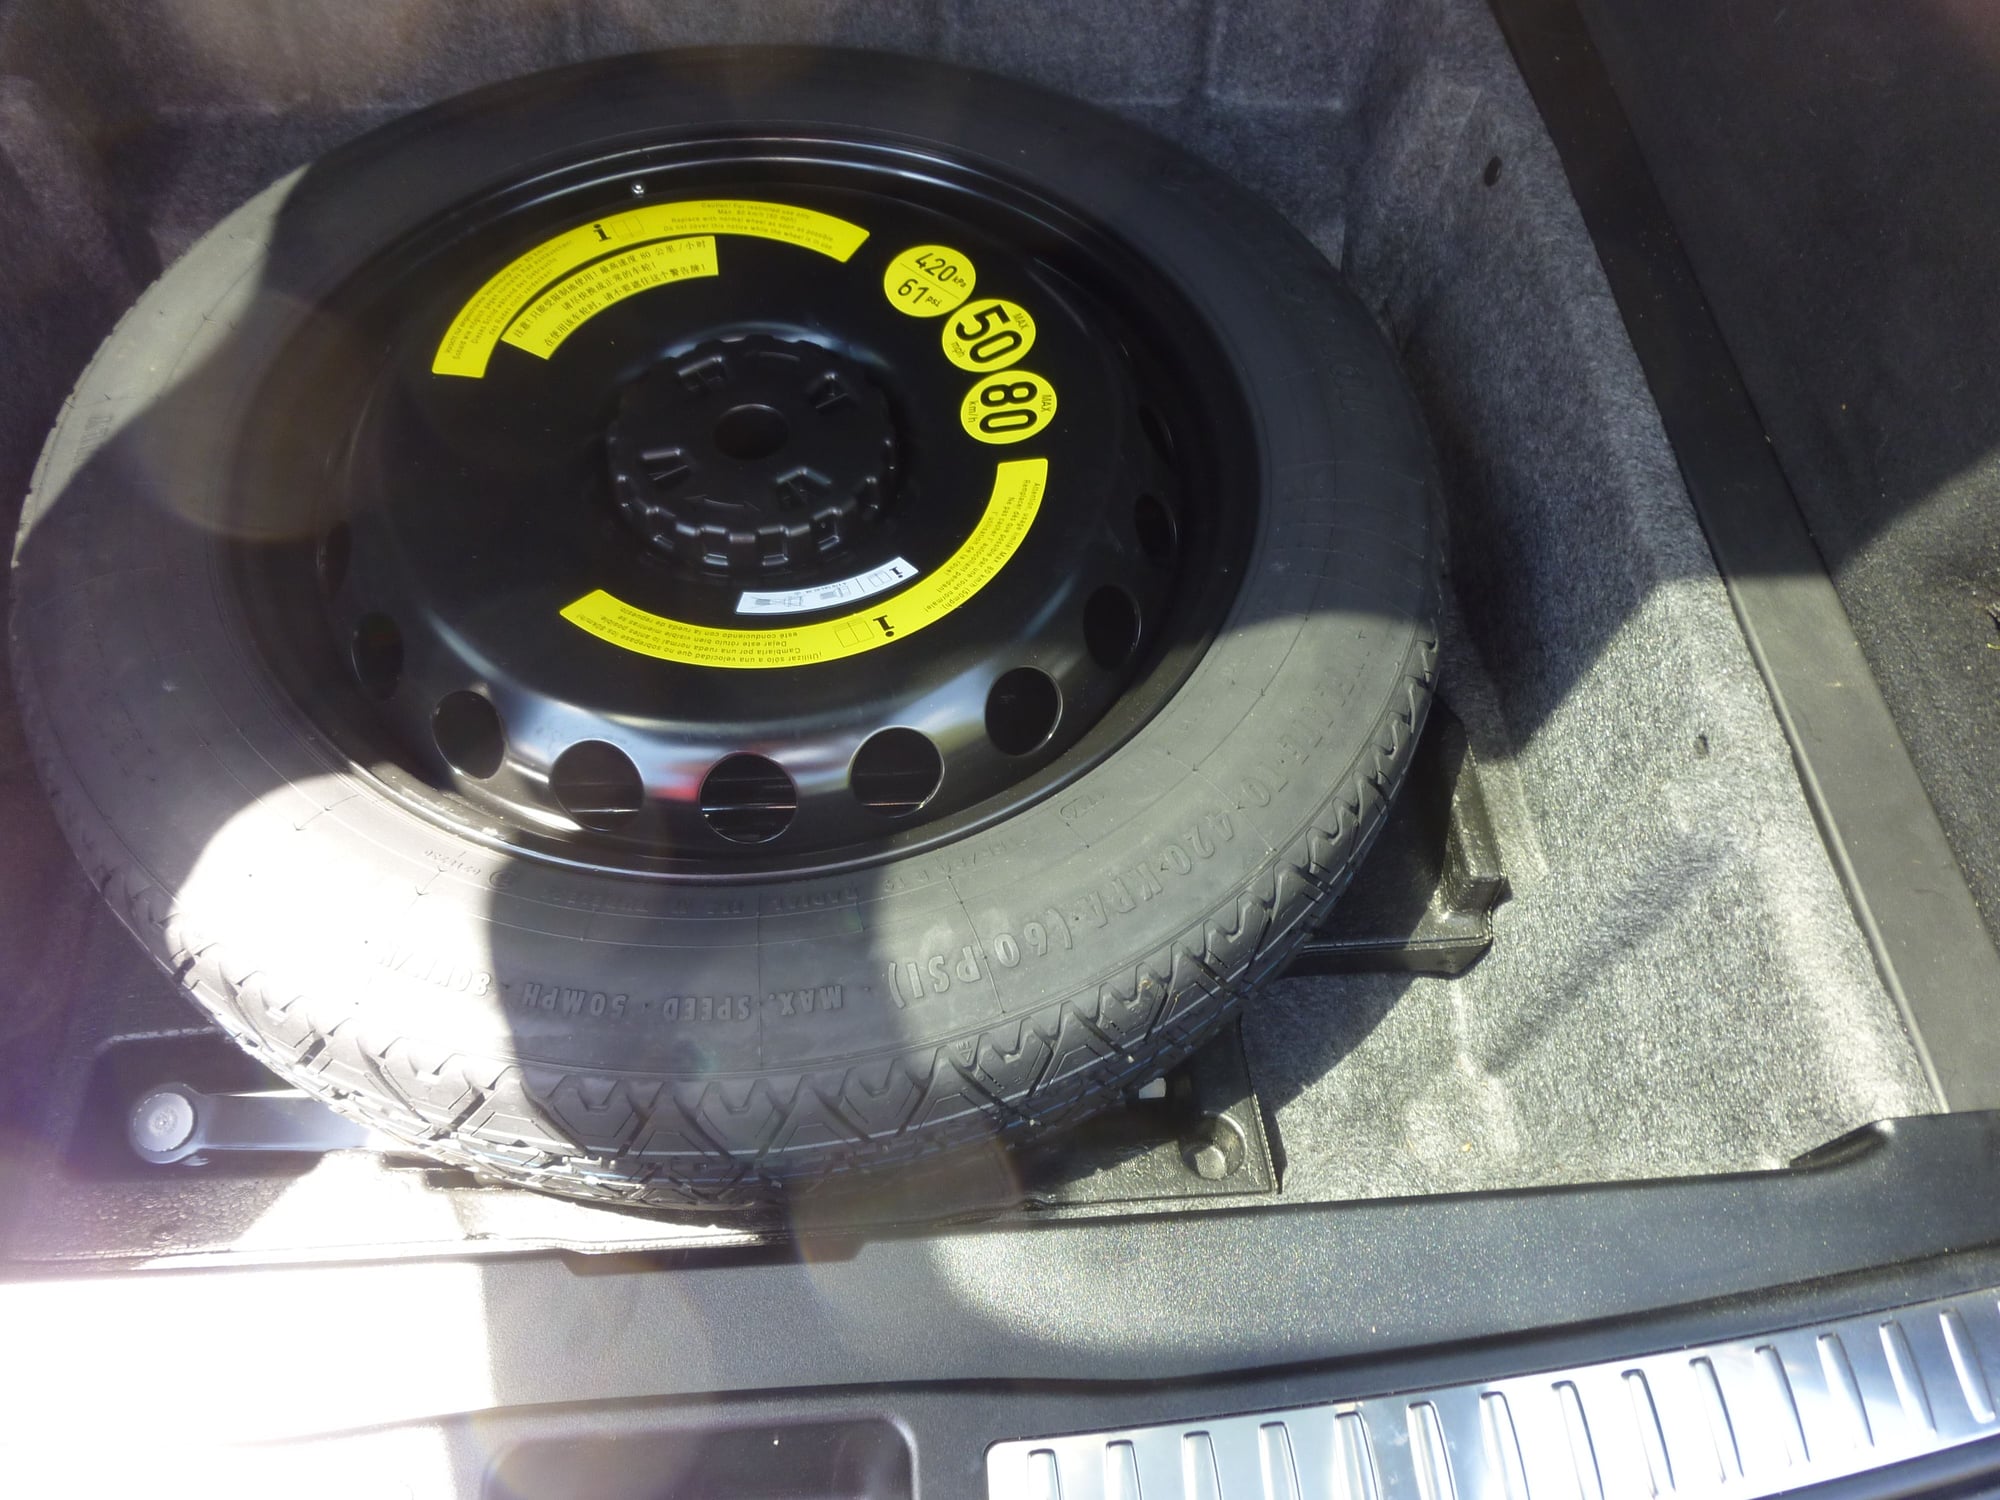
Wheel well w/ rear chrome base plate.
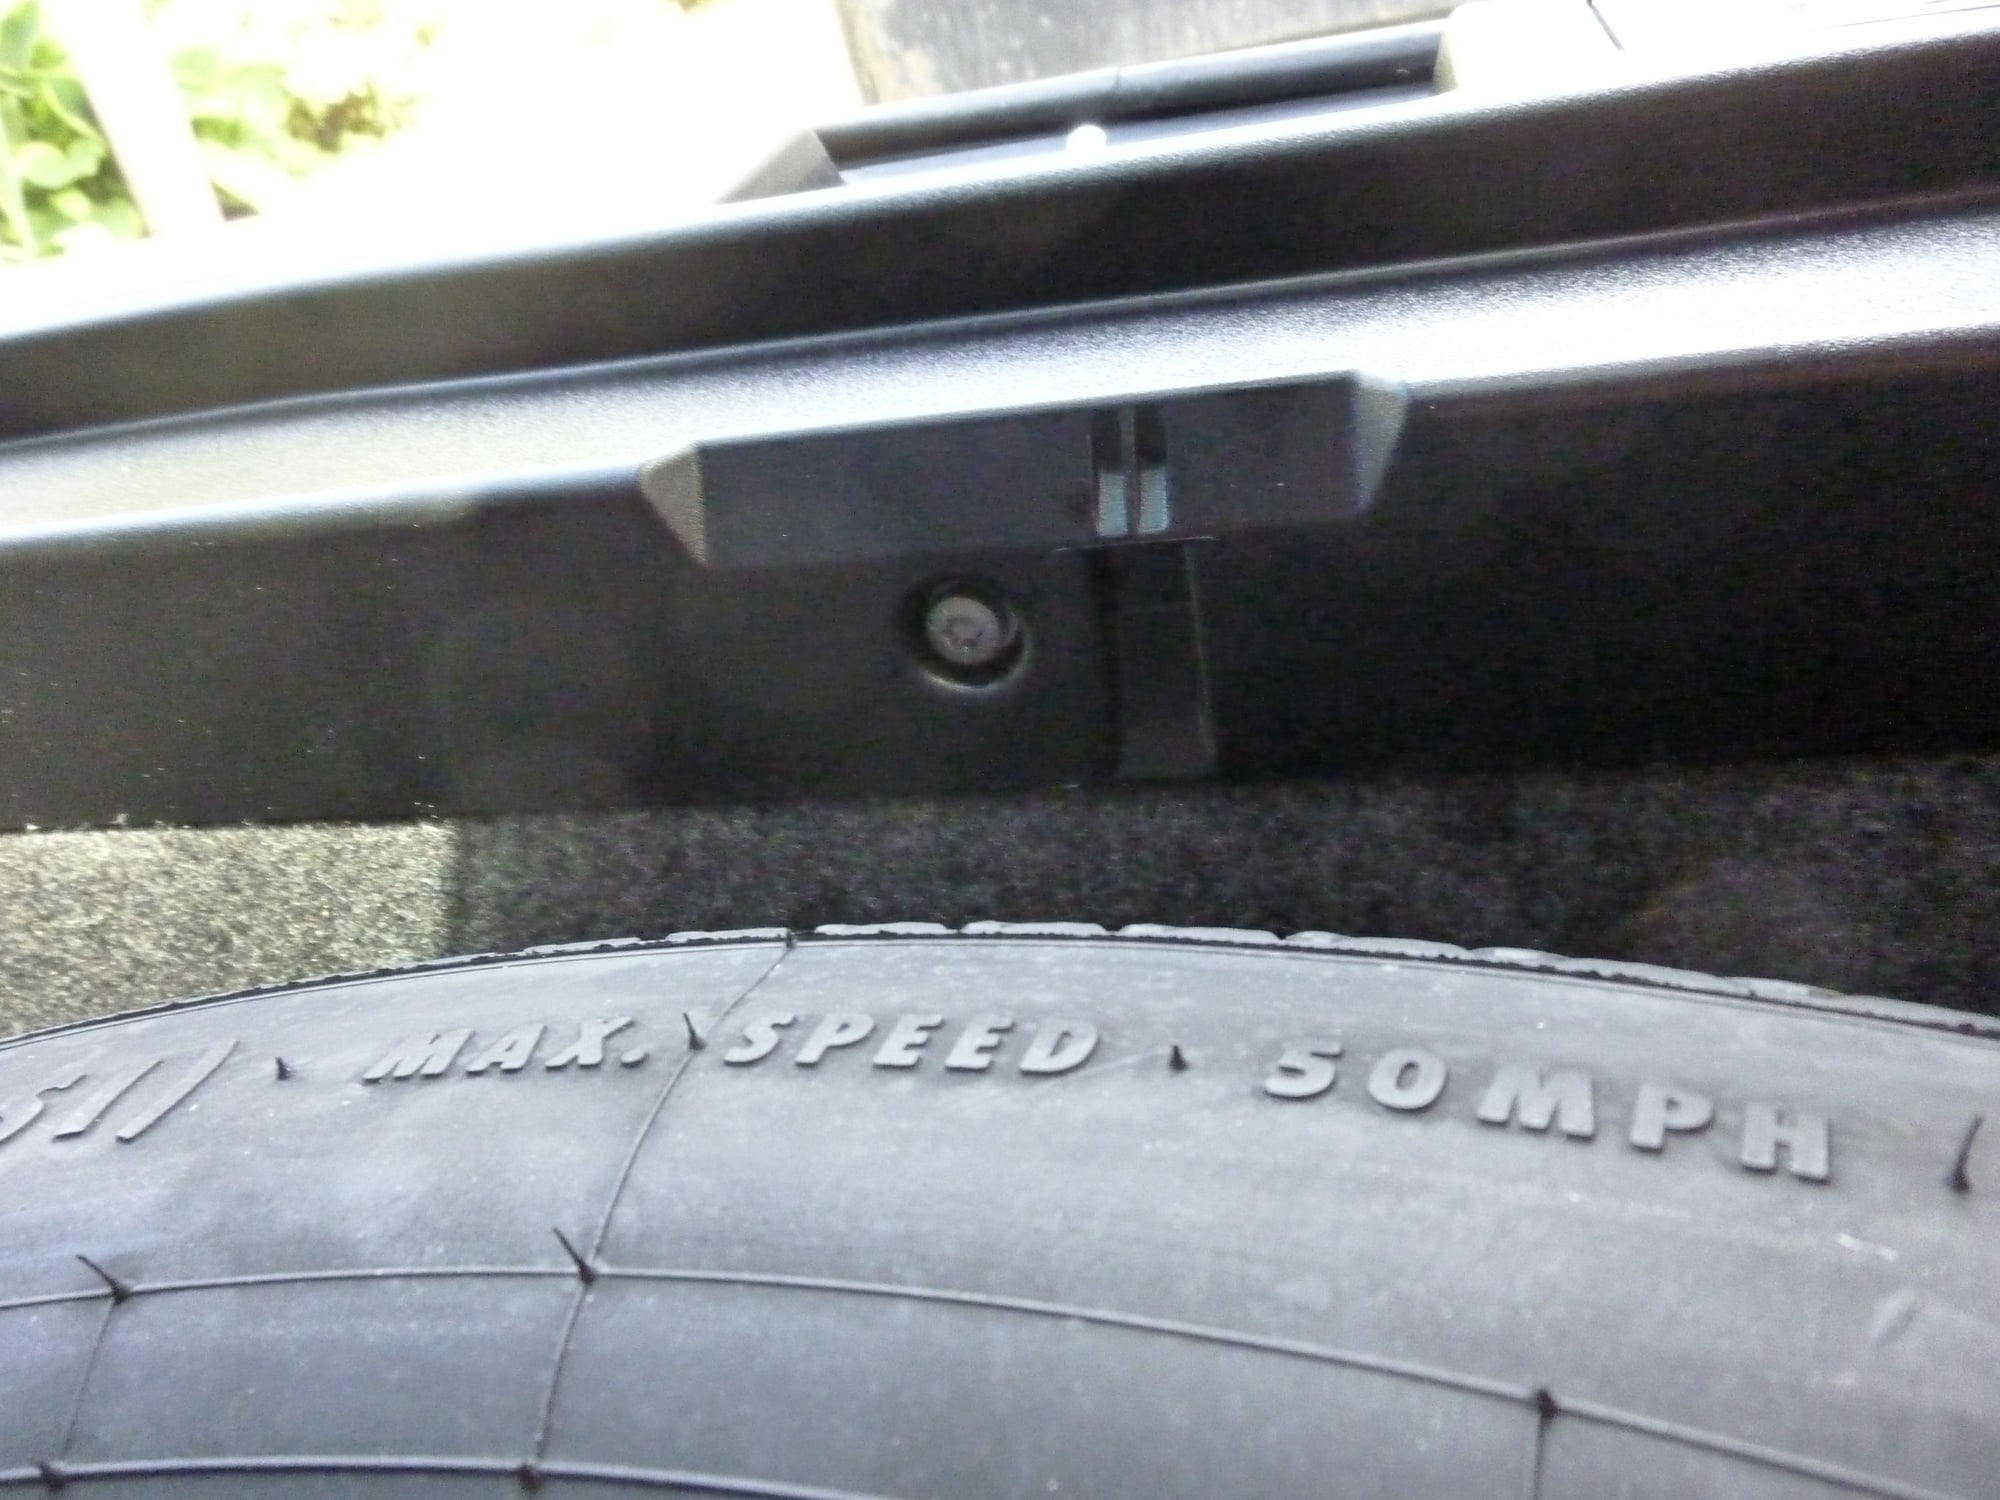
Torx screw, rear base plate
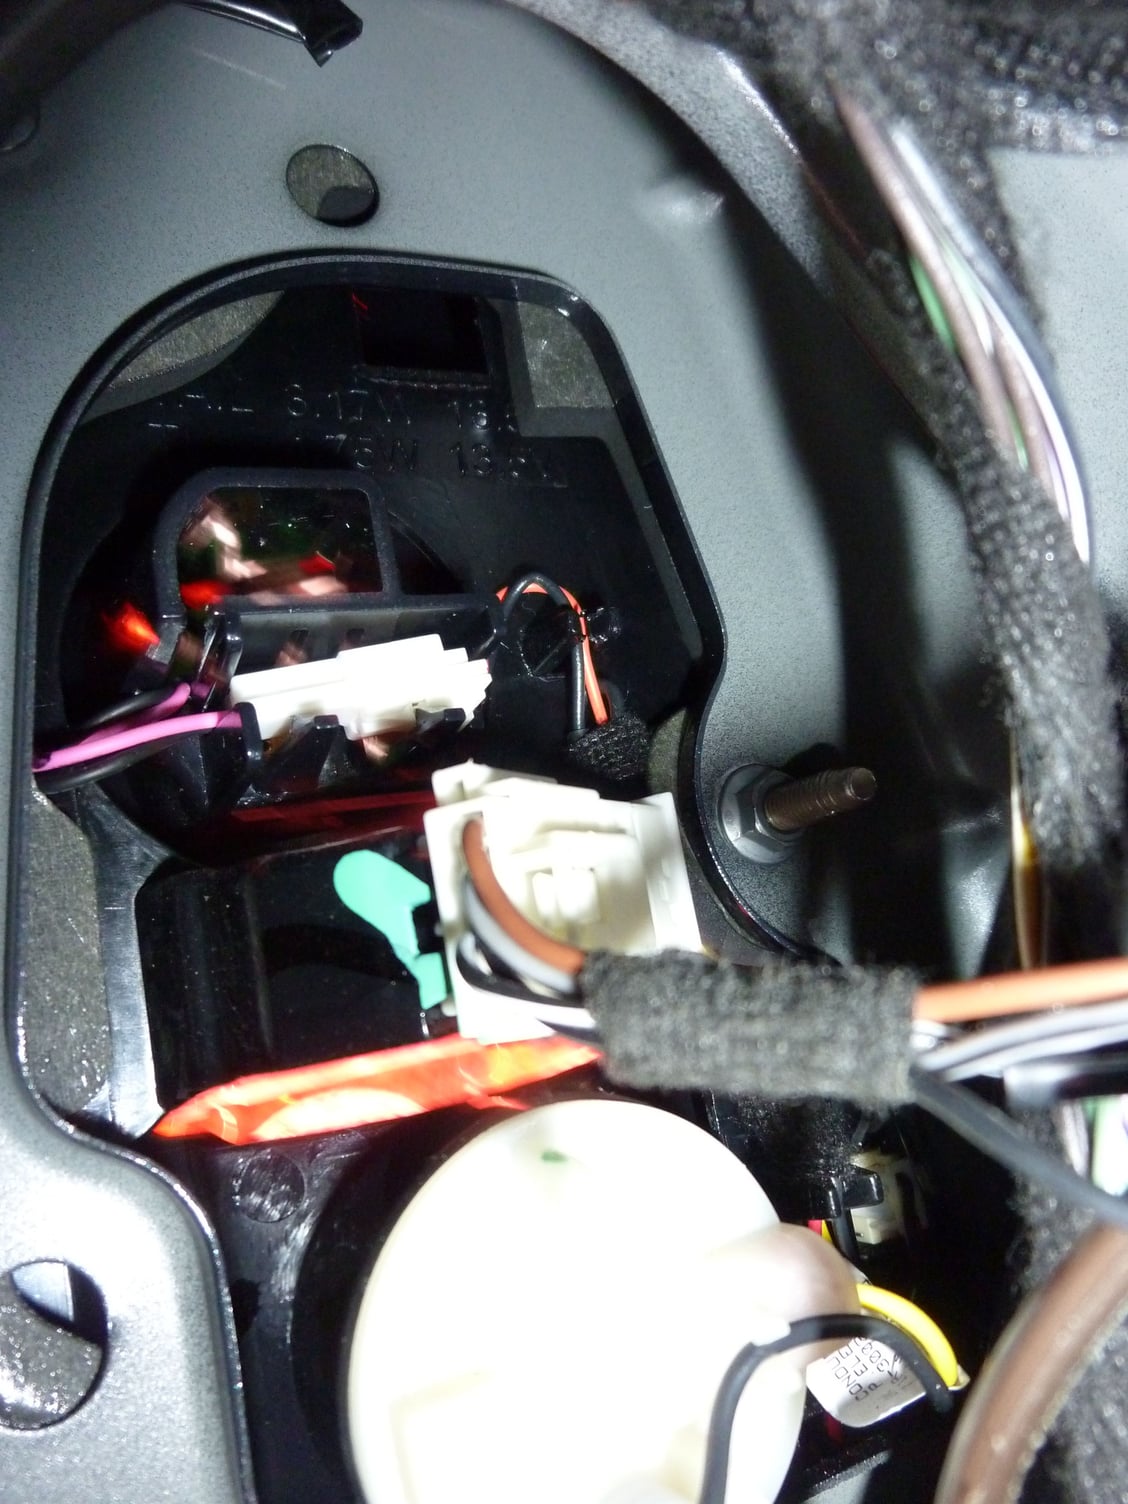
Drivers rear taillight connector
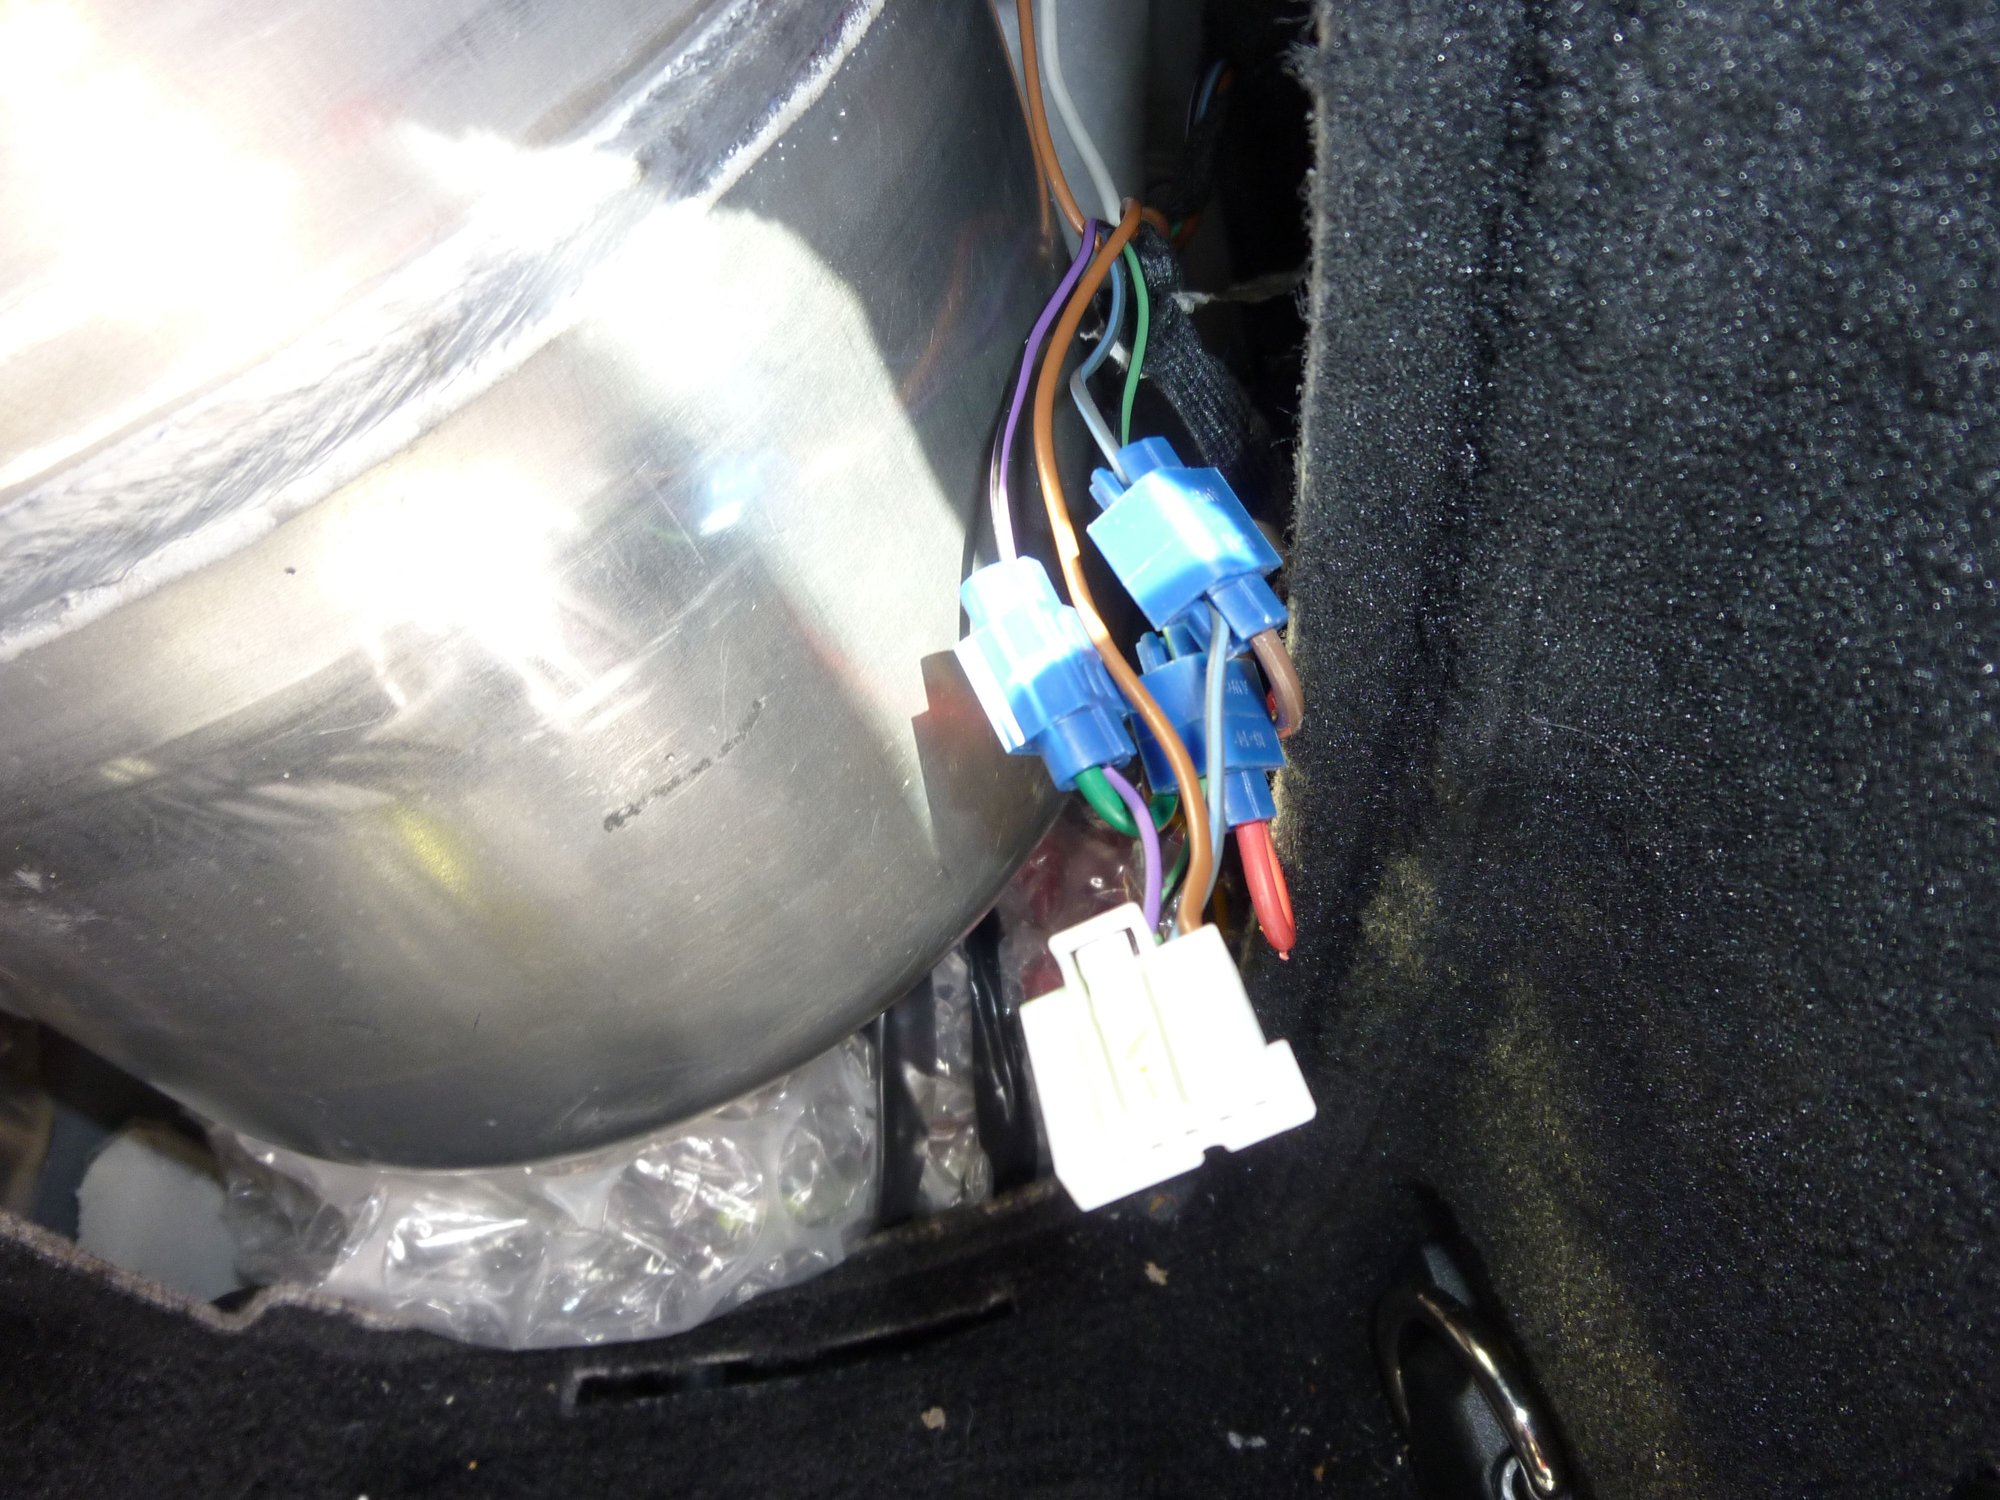
Passenger side white female connector bridgetapped for brake, R.turn, and running lights.
Trailer Module is plasti wrapped for any moisture or rattle!
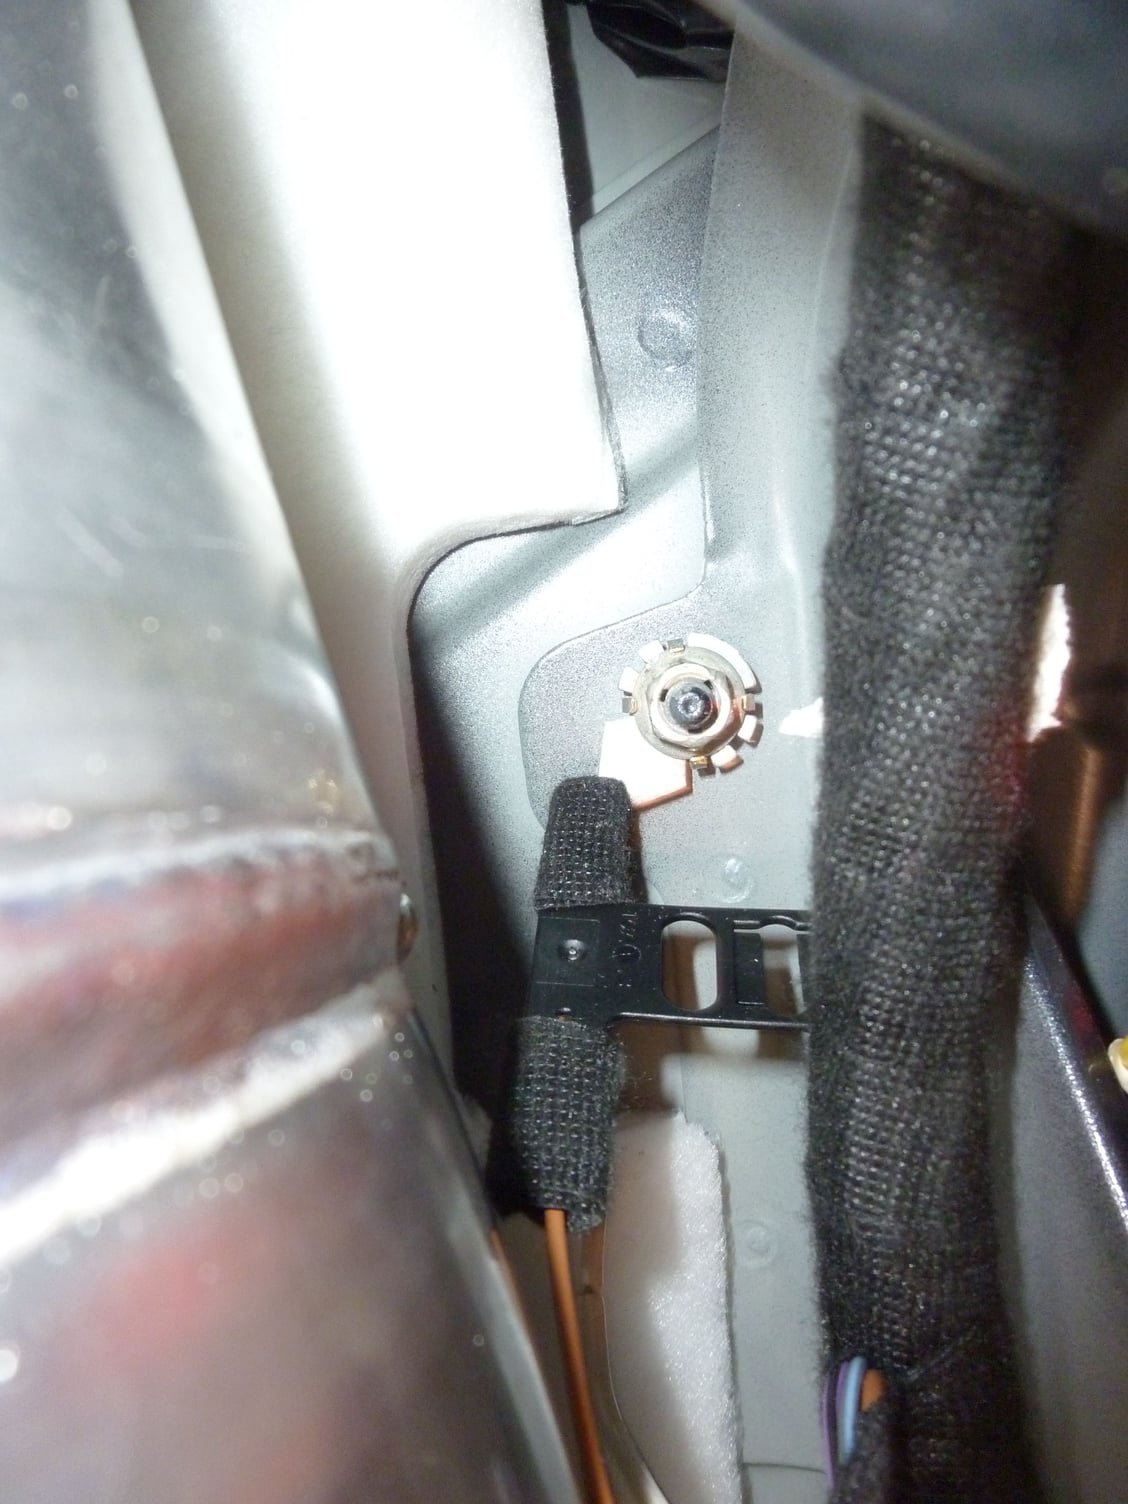
Ground Post passenger side cover
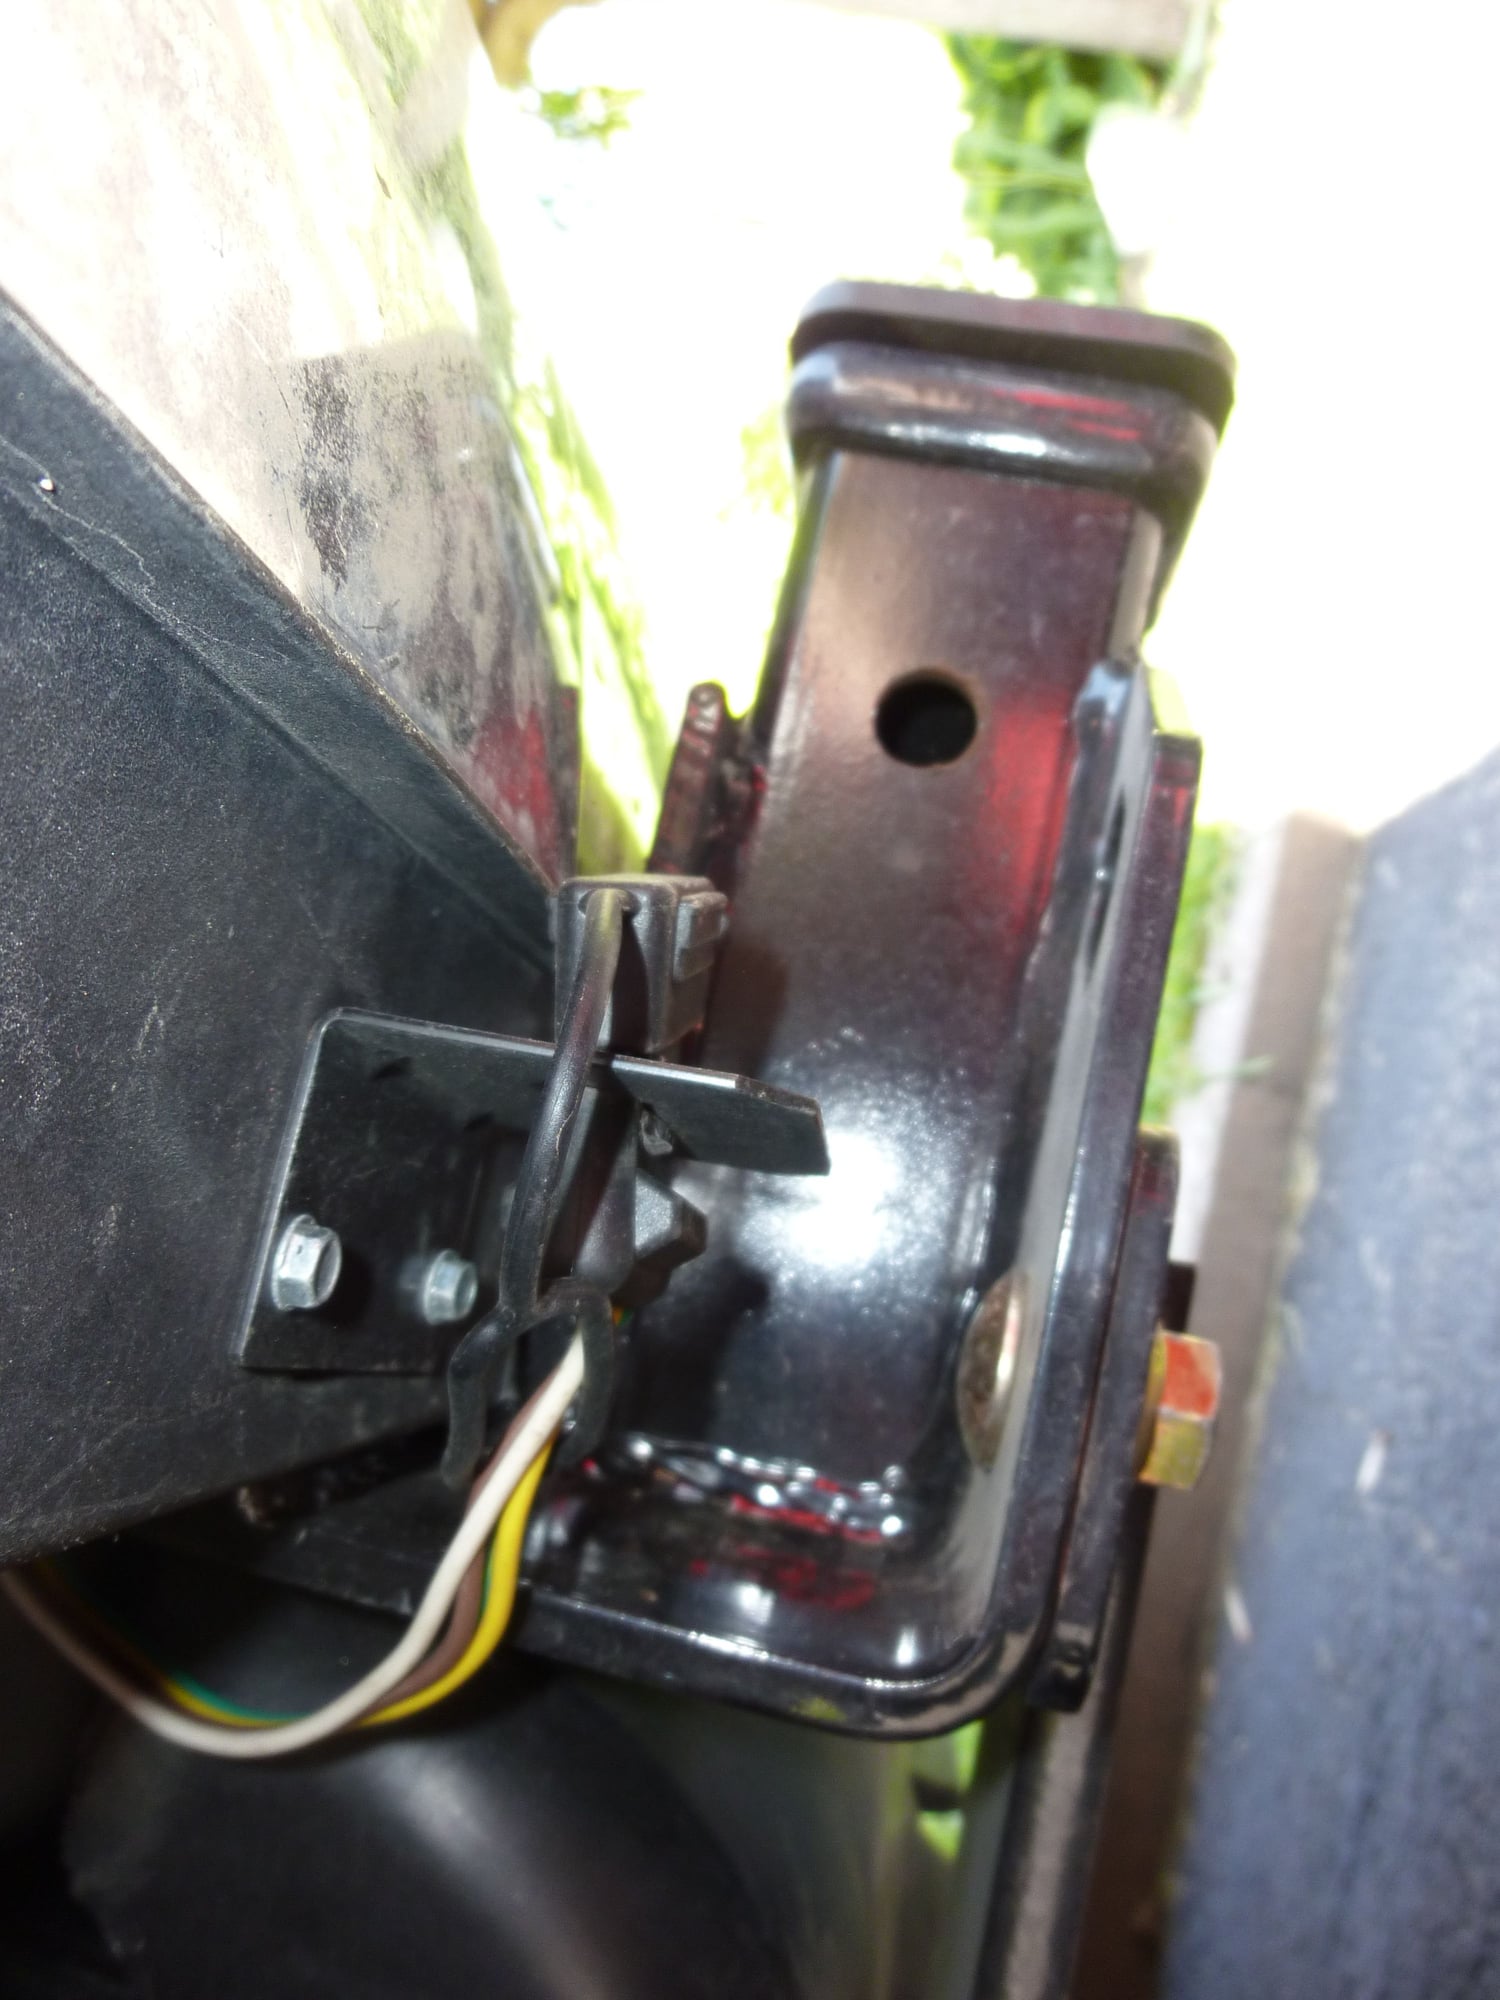
Left side view of hitch with harness mount.
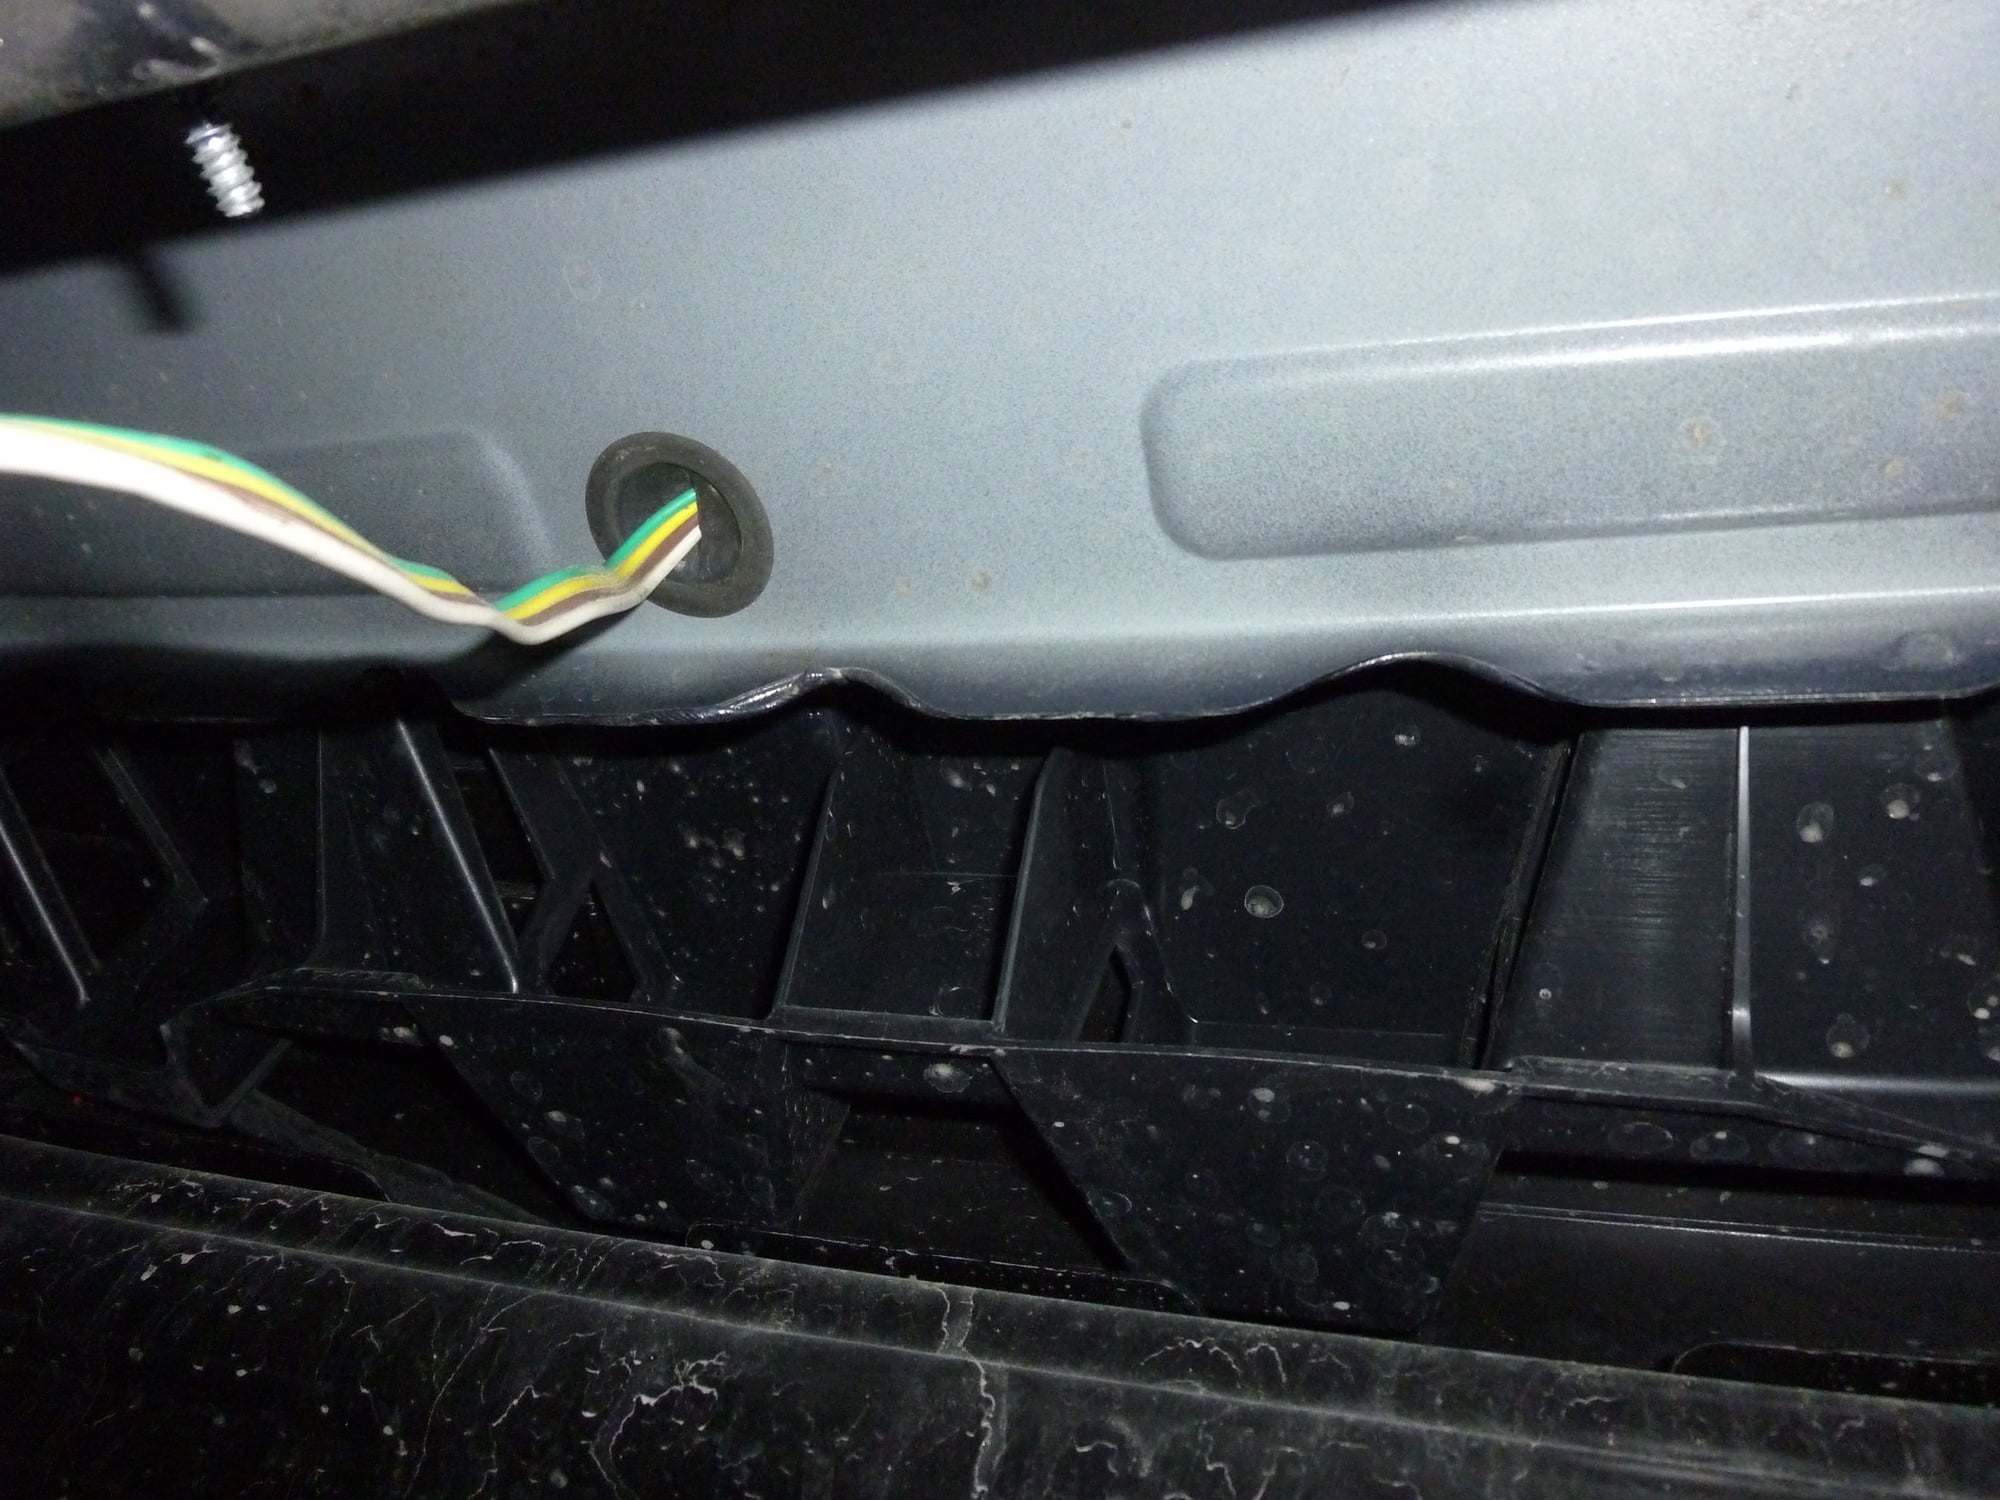
Trailer harness exit underneath from spare tire/ rear chrome plate, with inside of bumper (black portion) showing
The following users liked this post:
Etienne Lau (05-24-2021)
#5
Curt Hitch Install 2015 ML350 Bluetech
Hi Koenig,
I live in Ottawa as well and would like to install the same setup on my 2012 ML Bluetech.
Where did you source your parts from?
Thanks,
Vince.
I live in Ottawa as well and would like to install the same setup on my 2012 ML Bluetech.
Where did you source your parts from?
Thanks,
Vince.
Installation of Aftermarket Curt Trailer Hitch and Wiring 2015 ML350
I’m writing this info up for people that may decide they need a hitch but didn’t order one with their ML. I believe that the 2012 ML up will be the same, but mine was a 2015 ML350 Btech (Canada), so wiring may be different color combo. I didn’t take photos and this was done a month ago, with my memory fading…. Any Questions… just ask and I’ll try to answer.
Curt Part #’s:
Hitch = 13117 (Hint some retailers sell w/ shipping included! My bill was $250 Can to my door!)
Trailer Harness = 59146 (about $40. Can)
Total= $300.00 +-
Hitch Install
The install of the hitch was pretty straightforward, just follow Curt’s Install sheet and there should not be any issues.
https://www.curtmfg.com/masterlibrar..._13117_INS.PDF
3 Notes to mention…
a) mine is a Bluetec… when removing base strap of Bluetec reservoir, make sure you place a temporary support under tank. Another poster on here, had a shop install, only to have an issue with Bluetec dash warnings… dealer diagnosed some broken/shorted wires to the tank resulting from sloppy workmanship… no tank support used!
b) When trimming heat shield, I used some ordinary tin snips to cut out, worked very well and easy. When refitting heat shield, add 2 or 3 sheet metal screws to retain rigidity, and you won’t have any heat shield rattles!
c) The removable center (Chrome) base of bumper (possibly there to hide factory hitch) has a small loop at lower end… I simply dremeled off the loop to maintain center Chrome piece and hitch looks seamless!
Wiring Harness
I used Curt Harness 59146 (pretty generic but uses battery connection to power everything, thus not ML computer sensing & sending codes to the dash!).
Some Notes:
a) I situated the harness module in rear passenger compartment because of easier access to battery under rear passenger seat. The harness is built to live in the driver’s side rear(meaning extra long harness Green wire(right turn signal) needs to be shortened, and conversely… Left turn signal (YELLOW) needs to be lengthened!
b) All wire taps were connected in rear passenger side taillight cavity, except for single Yellow(left turn signal) which needed to tap into left side cavity.
c) Wire was run/hidden under rear chrome trunkplate… easily removed by a center Torz screw located under spare tire compartment door. Once screw are removed, carefully pry upwards, and plate will release from spring clip inserts!
d) The battery wire was fed through right edge of spare tire compartment, up and over hump(under floor material, to the battery easily accessed under passenger rear seat. The fuse was then added/crimped to Black (trailer harness wire+) and the eyelet end was attached to +side connection(I believe Sirius connector) positive connection….. definitely fused LOL!
e) The Neg side of harness was attached in the passenger rear light compartment, where there is a ground post built in!
f) Lastly, the output wires to the trailer, were routed under chrome base plate and out through center base of vehicle. There is a convenient rubber plug/bung in center rear, looking up inside rear bumper…. Forward (hard to describe)there is a plug there(I assume for factory wire harness) Anyway, removed rubber plug, found out trailer plug would not fit through frame hole so…. Cut trailer output harness wires 12” from module, fed harness wires up through rubber bung, reinserted into frame hole, and spliced the 4 wire together inside the vehicle and taped up/ty-rapped so that nothing will get at it. If you make the splice outside, the elements will soon deteriorate the connection! They sell proper trailer harness holder/mounts that simply mount beside the hitch with 2 sheet metal screws
g) Wiring connections:
All light connections were made tapping into wires(just below) the white multiple wire connector female plug of each taillight. I had problems at first…. Easy to identify the brake and turn signal on 1 wire, and running lights on another. NOT SO FAST!!! It turns out that the MB engineers used a 3rd wire, that only powers the turn signal… (when white male plug is inserted in light module)must be some sort of grd from the Canbus! In any event… here are the important wire colors….
Light Trailer Harness ML350 harness Location
Brake--- Red----- Green w/ Black Tracer---- Pass side light Compartment
Lights--- Brown-- Grey w/ Black Tracer------ “ “
Rt Turn--Green---Violet w/ Black Tracer------ “ “
Lt Turn--Yellow----Black----------------------- Drivers " "
Note: white vehicle male connectors must be reinserted into tail light plugs to work properly and avoid codes!
Enjoy your hitch. Please note, the factory hitch utilizes factory computer sway control among other things…. If you’re going to tow something huge/heavy… it might be advisable to go with an ordered factory hitch. If towing a small boat or utility trailer, etc. this would be fine. The hitch is built to tow 5,000 lbs!!! I believe if you’re towing something greater…. Buy a BIGGER TRUCK!
Any questions: just ask…
My .02
I’m writing this info up for people that may decide they need a hitch but didn’t order one with their ML. I believe that the 2012 ML up will be the same, but mine was a 2015 ML350 Btech (Canada), so wiring may be different color combo. I didn’t take photos and this was done a month ago, with my memory fading…. Any Questions… just ask and I’ll try to answer.
Curt Part #’s:
Hitch = 13117 (Hint some retailers sell w/ shipping included! My bill was $250 Can to my door!)
Trailer Harness = 59146 (about $40. Can)
Total= $300.00 +-
Hitch Install
The install of the hitch was pretty straightforward, just follow Curt’s Install sheet and there should not be any issues.
https://www.curtmfg.com/masterlibrar..._13117_INS.PDF
3 Notes to mention…
a) mine is a Bluetec… when removing base strap of Bluetec reservoir, make sure you place a temporary support under tank. Another poster on here, had a shop install, only to have an issue with Bluetec dash warnings… dealer diagnosed some broken/shorted wires to the tank resulting from sloppy workmanship… no tank support used!
b) When trimming heat shield, I used some ordinary tin snips to cut out, worked very well and easy. When refitting heat shield, add 2 or 3 sheet metal screws to retain rigidity, and you won’t have any heat shield rattles!
c) The removable center (Chrome) base of bumper (possibly there to hide factory hitch) has a small loop at lower end… I simply dremeled off the loop to maintain center Chrome piece and hitch looks seamless!
Wiring Harness
I used Curt Harness 59146 (pretty generic but uses battery connection to power everything, thus not ML computer sensing & sending codes to the dash!).
Some Notes:
a) I situated the harness module in rear passenger compartment because of easier access to battery under rear passenger seat. The harness is built to live in the driver’s side rear(meaning extra long harness Green wire(right turn signal) needs to be shortened, and conversely… Left turn signal (YELLOW) needs to be lengthened!
b) All wire taps were connected in rear passenger side taillight cavity, except for single Yellow(left turn signal) which needed to tap into left side cavity.
c) Wire was run/hidden under rear chrome trunkplate… easily removed by a center Torz screw located under spare tire compartment door. Once screw are removed, carefully pry upwards, and plate will release from spring clip inserts!
d) The battery wire was fed through right edge of spare tire compartment, up and over hump(under floor material, to the battery easily accessed under passenger rear seat. The fuse was then added/crimped to Black (trailer harness wire+) and the eyelet end was attached to +side connection(I believe Sirius connector) positive connection….. definitely fused LOL!
e) The Neg side of harness was attached in the passenger rear light compartment, where there is a ground post built in!
f) Lastly, the output wires to the trailer, were routed under chrome base plate and out through center base of vehicle. There is a convenient rubber plug/bung in center rear, looking up inside rear bumper…. Forward (hard to describe)there is a plug there(I assume for factory wire harness) Anyway, removed rubber plug, found out trailer plug would not fit through frame hole so…. Cut trailer output harness wires 12” from module, fed harness wires up through rubber bung, reinserted into frame hole, and spliced the 4 wire together inside the vehicle and taped up/ty-rapped so that nothing will get at it. If you make the splice outside, the elements will soon deteriorate the connection! They sell proper trailer harness holder/mounts that simply mount beside the hitch with 2 sheet metal screws
g) Wiring connections:
All light connections were made tapping into wires(just below) the white multiple wire connector female plug of each taillight. I had problems at first…. Easy to identify the brake and turn signal on 1 wire, and running lights on another. NOT SO FAST!!! It turns out that the MB engineers used a 3rd wire, that only powers the turn signal… (when white male plug is inserted in light module)must be some sort of grd from the Canbus! In any event… here are the important wire colors….
Light Trailer Harness ML350 harness Location
Brake--- Red----- Green w/ Black Tracer---- Pass side light Compartment
Lights--- Brown-- Grey w/ Black Tracer------ “ “
Rt Turn--Green---Violet w/ Black Tracer------ “ “
Lt Turn--Yellow----Black----------------------- Drivers " "
Note: white vehicle male connectors must be reinserted into tail light plugs to work properly and avoid codes!
Enjoy your hitch. Please note, the factory hitch utilizes factory computer sway control among other things…. If you’re going to tow something huge/heavy… it might be advisable to go with an ordered factory hitch. If towing a small boat or utility trailer, etc. this would be fine. The hitch is built to tow 5,000 lbs!!! I believe if you’re towing something greater…. Buy a BIGGER TRUCK!
Any questions: just ask…
My .02
#6
Senior Member
Thread Starter
Hi Vince, the hitch was sourced out online & shipped in. The module was purchased in Gatineau at some hitch store on Maloney Blvd (atelier de hitch) or some such name... He just had the module in stock when phoning around. Hitch & wiring have worked out well...
#7
MBWorld Fanatic!
Please understand for 2015+ W166 and X166 - Mercedes has a "hitch kit" which contains hitch/wiring harness - and for 2015+ the rear SAM does not need to be changed, and factory kit gives you full electronic function as well.
Kit is pricey - like $950 - and install instructions are in Mercedes WIS, estimated 3 hrs.
Again - the "kit" 2015+
Kit is pricey - like $950 - and install instructions are in Mercedes WIS, estimated 3 hrs.
Again - the "kit" 2015+
Trending Topics
#8
Senior Member
Thread Starter
Hmm... good to know...! Too bad the Canadian dealers haven't a clue about this! I'll hazard a guess that the bill would be closer to $1400.Can up here! Too much of a monetary gap to make it worthwhile for me... But again, good to know the kit is out there for other folks!
#9
Can’t decide between Curt C 13117 or Draw Tite 76141
Hi. Just curious to know why you went with Curt as opposed to Draw Tite which has higher tongue weight and towing capacity. I’m undecided which one to go with on my 2015 ML350 Bluetech. Thx.
#10
Senior Member
Thread Starter
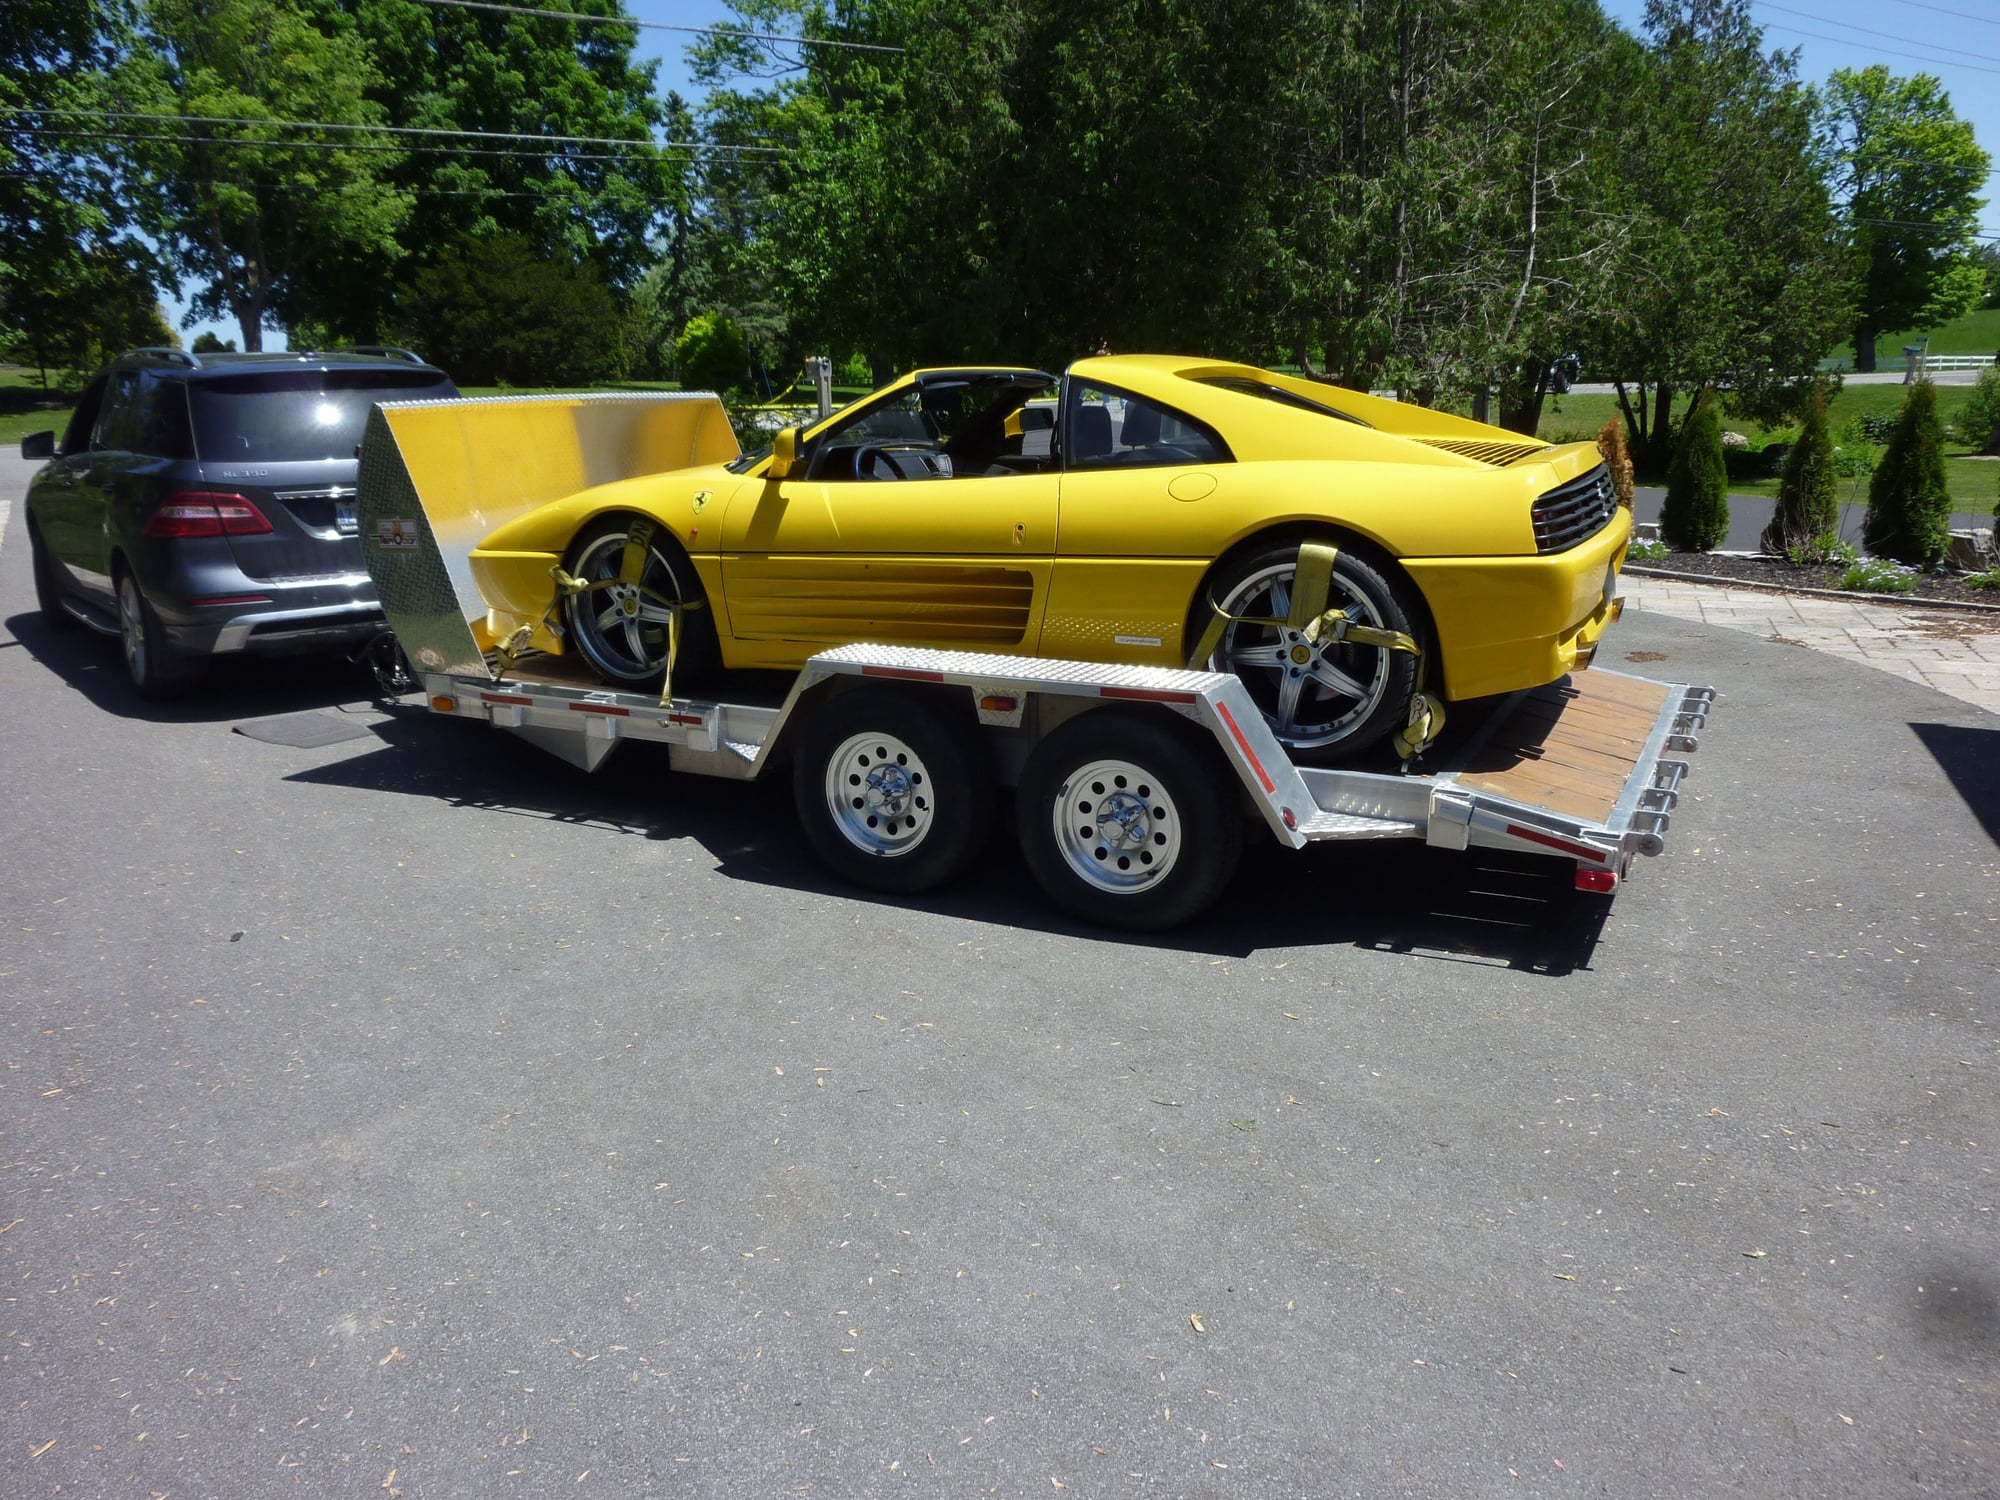
Hi, this has been awhile... I choose because of availability and as stated in the thread.... If you need to tow a heavier weight, buy a bigger truck!!! Personally, I tow an aluminum trailer with a Ferrari 348 to Florida & back each Fall and Spring... never and issue. Trailer is 1200 lbs, Ferrari is 3000lbs!
#11
Junior Member
Join Date: Dec 2016
Location: BC
Posts: 63
Likes: 0
Received 7 Likes
on
7 Posts
2015 ML350 BlueTEC 4Matic
Just to add to this I was quoted by Mercedes dealer in Langley, BC $2600 (cdn) for hitch/wiring and installation! They claimed labour was up to 10 hrs as they have to remove seats, carpeting, etc. to run the wires to the front console for the anti-sway (or something similar connection). In Edmonton, Alberta I was quoted over $4100 for the same install as they were going to add additional rad cooler or bigger fan...some other BS as well.
These quotes were over a year ago so not sure if they've gotten cheaper - yeah, right.
These quotes were over a year ago so not sure if they've gotten cheaper - yeah, right.
Last edited by TA Canada; 09-24-2019 at 01:58 AM. Reason: Added wording
#12
Senior Member
Thread Starter
Not sure if you've read this thread yet
https://mbworld.org/forums/m-class-w...50-blutec.html
but using a wireless brake package is working great for me! The only change I made to the original wiring was add a 7 way output(from the 4 way connector).... basically the same wires for trailer plus a power source. The power source output was fused to the battery under the right/rear seat. No tearing the interior apart other than the trunk. If you go with a MB Dealer, go with deep pockets! This is not a difficult job.... certainly does not require high paid, part replacers.....
Hey, it's my Ferrari on the back.... and I do care to have it stay there, LOL!


