DIY replace crank sensor on R class
 04-13-2013, 01:08 AM
#1
Member
Thread Starter

Join Date: Jul 2011
Location: Brooklyn, NY
Posts: 123
Likes: 0
Received 10 Likes
on
8 Posts
2006 R500
DIY replace crank sensor on R class
there are several DIY's for crank sensor replacement on other parts of the forum for other models
but the R is different and a bit trickier to get at.
I just did mine and took a few pictures that may help anyone else who wants to replace it themselves.
my R is an R500 but the 6 cylinder R350 really should be about the same I think
the crank sensor is located at the back of the motor, behind the left cylinder head,
right at the edge of the motor where it mates to the transmission.
on most other Mercedes you can just bend over the left side fender and reach down and get at it,
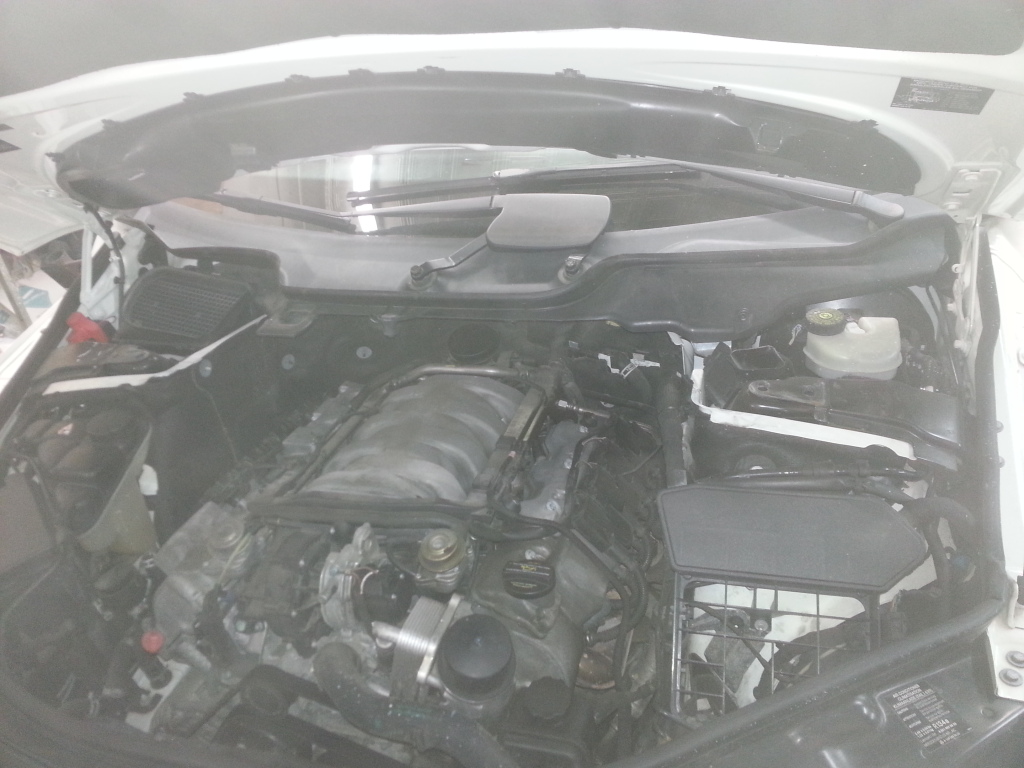
but on the R the engine is set way back under the cowl.
you must remove the whole cowl plate just to even see the rear half of the engine.
the cowl plate is removed by first pulling the weather strip off of it's front edge,
then remove the 2 bolts on the left and 2 bolts on the right.
the last bolt is right in the center and it is an uncommon size.
it is a #8 inverted torx and you will see this bolt protruding out in the center of the cowl panel.
you may be able to get this bolt off with something other than the correct inverted torx socket,
but the crank sensor itself is held in place by a same sized #8 inverted torx bolt too,
and if you are going to do this job then you really should at least get the correct socket for this.
once the 2 bolts on either side and the center bolt is removed
the whole cowl plate can be pulled forward and removed.
at this point the front engine cover with the Mercedes star can be removed by puling the whole front edge up until the clips disengage,
then pulling it forward releasing the 2 clips holding the rear of this cover
to the air cleaner assembly
then the whole air cleaner assembly should be removed.
there are no bolts or locking anything,
the air cleaner is held in place with 4 spring clips that simply pop in and out of place.
to remove the air cleaner just lift the whole assembly and pop it straight up.
once all 4 clips are released the whole assembly can then be slid forward and removed from the engine
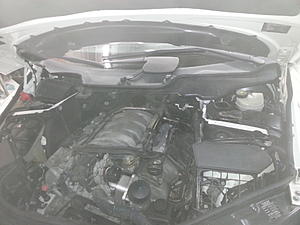
this is what it looks like with the cowl plate and the air cleaner/engine cover removed,
the engine is still set pretty far back in there but it no longer looks impossible
at this point I recommend using a stepping stool or a milk crate to get up on the motor as you will need to,
you should be able to climb up on the radiator support. don't put your weight on the headlight,
instead first place your right knee on the steel support behind the headlight,
then lift yourself up to having your right knee also up on the steel
radiator support and prop yourself up with your left forearm
on the intake manifold and your whole upper torso needs to be leaning way into the engine compartment to be able to reach this thing,
reach behind the engine with your right hand and reach down and feel around.
you will eventually feel a wire, feeling down the wire will lead to a plug which is clipped onto the head of the crank sensor.
to give you an idea of how far down the sensor is, in this shot I have my hand extended straight down behind the motor
and I am just touching the tip of the plug for this sensor with the tip of my fingers.
the clip is released by squeezing the end, you'll feel the tab easy enough,
then while still squeezing this tab pull the plug off from the crank sensor.
in this shot I have lifted the plug out from behind the motor. you can see how much reach it has to go down behind the motor
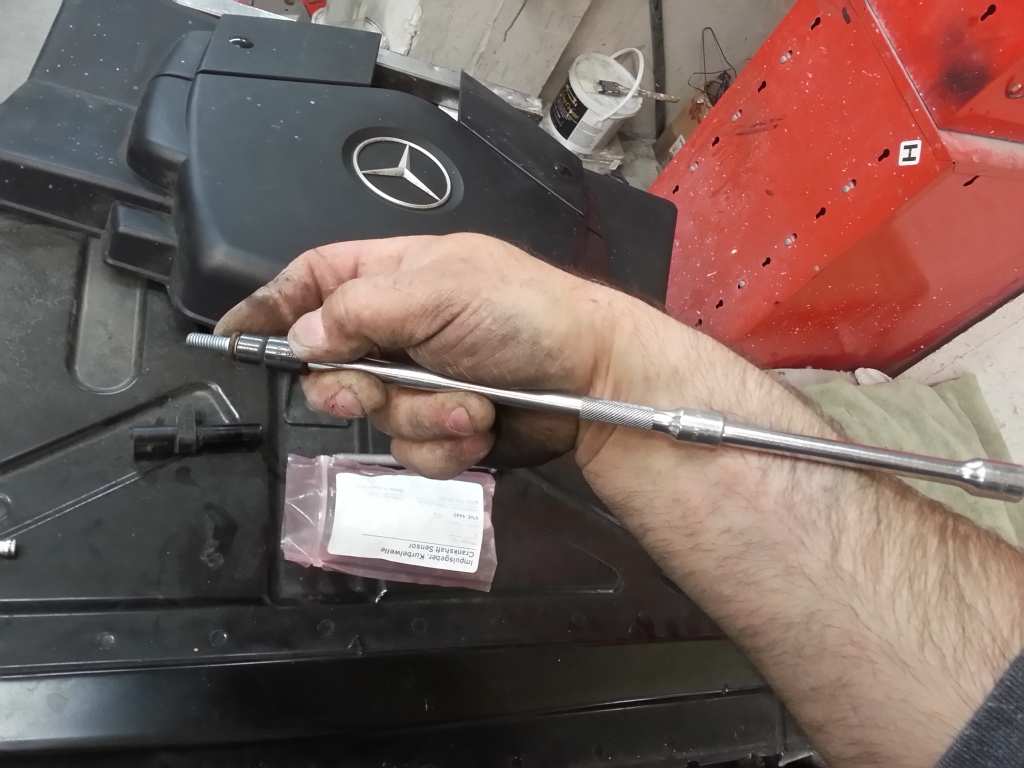
using my hand as a rough measurement I selected an extension combo that was a bit longer than my hand.

for this job I wouldn't recommend any flexible joints,
a straight ridged extension is best and easiest to line up and remove/replace the hold down bolt.
just guide the front of the socket down with your finger tip on the leading edge,
feeling your way and guiding the socket to the head of the bolt holding the sensor down.
feel around in the a bit before trying to stick the extension down in there so you are familiar with what you are doing
and it really isn't that difficult but you will be doing this whole thing strictly by feel alone,
you will def not be able to see anything
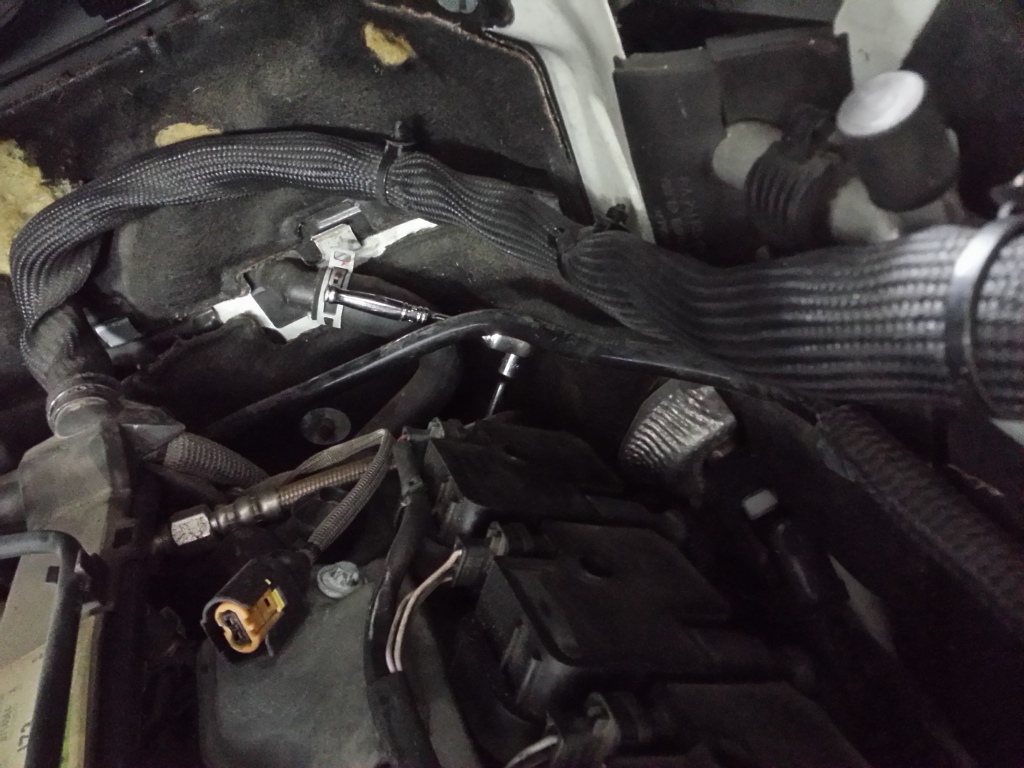
in this shot you can see the 1/4" drive ratchet connected to the extension length as shown,
and the socket is on the crank sensor bolt.

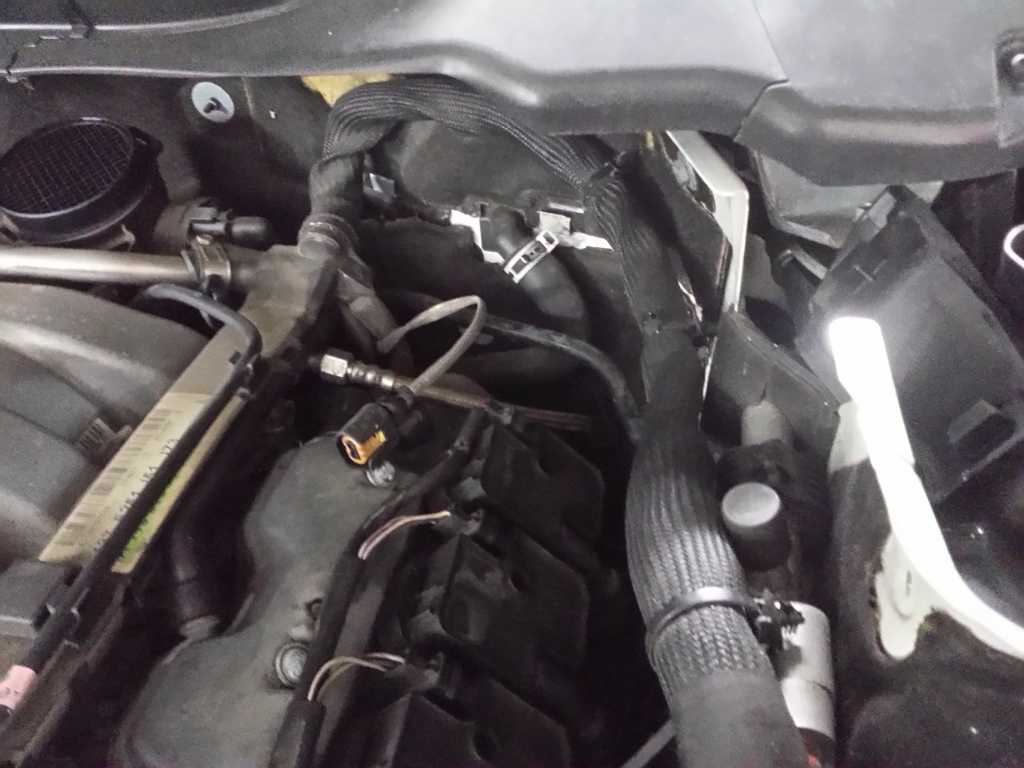
incidentally, that plastic hose that you will find to be in the way,
you should unhook it from the clip that holds it to the side wall so you can move it up and down so you can reach in there.
you want to move it with just a little stress rather than really stressing it by trying to squeeze in there without moving it.
it's easy to unclip it and move it
this is the bolt that holds the crank sensor in place.
now this thing is really far down in the back of the motor and you really don't want to drop it
so I recommend that you do not try to insert or remove this bolt by itself or even with just the bolt in the socket alone.
I recommend that you unscrew it and when it is unscrewed you never remove the socket,
instead you hold the bolt into the head of the socket with your fingertips as you remove the whole socket extension assy.
in this way there is almost no chance of dropping the bolt.
after the bolt is out, remove the crank sensor by twisting t a little and puling it out,
insert the new one,try to orient the bolt tab to the right orientation and ten you need to fish the new bolt back in there
again, to run the least risk of dropping the bolt on reinsertion I suggest you hold the bolt in the socket with the extension attached,
then using your fingertips leading edge to guide it way down there and align it wit the hole,
when the bolt is in the hole you can then hold the end of the extension and keep it pushed into the hole,
again eliminating most chance of dropping the bolt and aiding in getting it straight and threaded back in.

tighten the bolt slightly, then snug it just a little more,
enough that there's no chance it's going to vibrate loose but not much more than that.
you don't want to really crank down on it too much
after the sensor is bolted in your done, plug it back in and fire it up to make sure it starts,
then reinstall the air cleaner/engine cover and the cowl plate.
to reinstall the cowl plate pay attention to the shelf it sits on and the clips that engage it in the rear,
then make sure all the bolts line up and snug the cowl plate down, tighten the center inverted torx bolt first.
this draws the cowl plate into the cowl and the 4 side bolt holes are slotted to allow the plate to slide into the cowl.
lastly tighten the 4 outer cowl plate bolts, slide the weather-strip back on and your done....
but the R is different and a bit trickier to get at.
I just did mine and took a few pictures that may help anyone else who wants to replace it themselves.
my R is an R500 but the 6 cylinder R350 really should be about the same I think
the crank sensor is located at the back of the motor, behind the left cylinder head,
right at the edge of the motor where it mates to the transmission.
on most other Mercedes you can just bend over the left side fender and reach down and get at it,
but on the R the engine is set way back under the cowl.
you must remove the whole cowl plate just to even see the rear half of the engine.
the cowl plate is removed by first pulling the weather strip off of it's front edge,
then remove the 2 bolts on the left and 2 bolts on the right.
the last bolt is right in the center and it is an uncommon size.
it is a #8 inverted torx and you will see this bolt protruding out in the center of the cowl panel.
you may be able to get this bolt off with something other than the correct inverted torx socket,
but the crank sensor itself is held in place by a same sized #8 inverted torx bolt too,
and if you are going to do this job then you really should at least get the correct socket for this.
once the 2 bolts on either side and the center bolt is removed
the whole cowl plate can be pulled forward and removed.
at this point the front engine cover with the Mercedes star can be removed by puling the whole front edge up until the clips disengage,
then pulling it forward releasing the 2 clips holding the rear of this cover
to the air cleaner assembly
then the whole air cleaner assembly should be removed.
there are no bolts or locking anything,
the air cleaner is held in place with 4 spring clips that simply pop in and out of place.
to remove the air cleaner just lift the whole assembly and pop it straight up.
once all 4 clips are released the whole assembly can then be slid forward and removed from the engine
this is what it looks like with the cowl plate and the air cleaner/engine cover removed,
the engine is still set pretty far back in there but it no longer looks impossible
at this point I recommend using a stepping stool or a milk crate to get up on the motor as you will need to,
you should be able to climb up on the radiator support. don't put your weight on the headlight,
instead first place your right knee on the steel support behind the headlight,
then lift yourself up to having your right knee also up on the steel
radiator support and prop yourself up with your left forearm
on the intake manifold and your whole upper torso needs to be leaning way into the engine compartment to be able to reach this thing,
reach behind the engine with your right hand and reach down and feel around.
you will eventually feel a wire, feeling down the wire will lead to a plug which is clipped onto the head of the crank sensor.
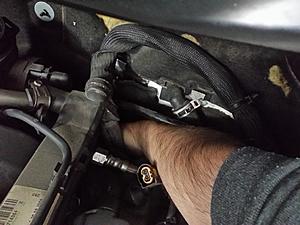
to give you an idea of how far down the sensor is, in this shot I have my hand extended straight down behind the motor
and I am just touching the tip of the plug for this sensor with the tip of my fingers.

the clip is released by squeezing the end, you'll feel the tab easy enough,
then while still squeezing this tab pull the plug off from the crank sensor.
in this shot I have lifted the plug out from behind the motor. you can see how much reach it has to go down behind the motor
using my hand as a rough measurement I selected an extension combo that was a bit longer than my hand.
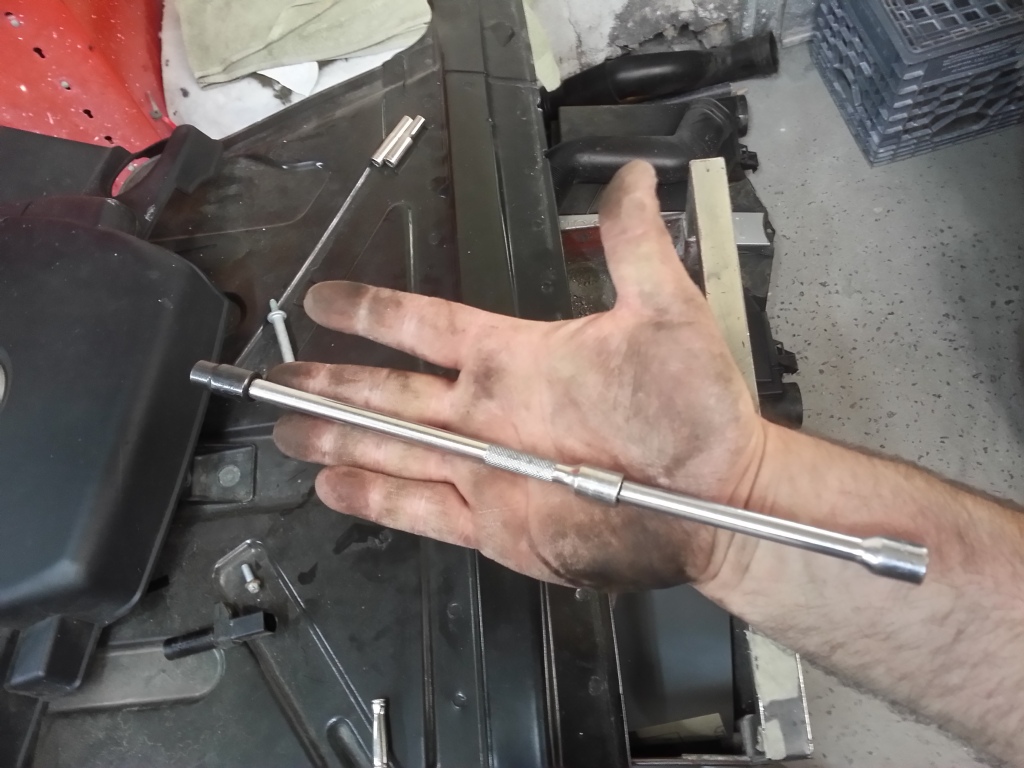
for this job I wouldn't recommend any flexible joints,
a straight ridged extension is best and easiest to line up and remove/replace the hold down bolt.
just guide the front of the socket down with your finger tip on the leading edge,
feeling your way and guiding the socket to the head of the bolt holding the sensor down.
feel around in the a bit before trying to stick the extension down in there so you are familiar with what you are doing
and it really isn't that difficult but you will be doing this whole thing strictly by feel alone,
you will def not be able to see anything
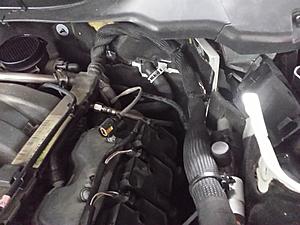
in this shot you can see the 1/4" drive ratchet connected to the extension length as shown,
and the socket is on the crank sensor bolt.
incidentally, that plastic hose that you will find to be in the way,
you should unhook it from the clip that holds it to the side wall so you can move it up and down so you can reach in there.
you want to move it with just a little stress rather than really stressing it by trying to squeeze in there without moving it.
it's easy to unclip it and move it
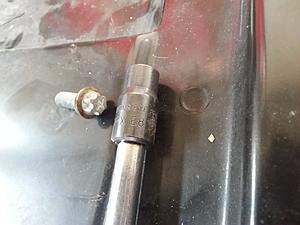
this is the bolt that holds the crank sensor in place.

now this thing is really far down in the back of the motor and you really don't want to drop it
so I recommend that you do not try to insert or remove this bolt by itself or even with just the bolt in the socket alone.
I recommend that you unscrew it and when it is unscrewed you never remove the socket,
instead you hold the bolt into the head of the socket with your fingertips as you remove the whole socket extension assy.
in this way there is almost no chance of dropping the bolt.
after the bolt is out, remove the crank sensor by twisting t a little and puling it out,
insert the new one,try to orient the bolt tab to the right orientation and ten you need to fish the new bolt back in there
again, to run the least risk of dropping the bolt on reinsertion I suggest you hold the bolt in the socket with the extension attached,
then using your fingertips leading edge to guide it way down there and align it wit the hole,
when the bolt is in the hole you can then hold the end of the extension and keep it pushed into the hole,
again eliminating most chance of dropping the bolt and aiding in getting it straight and threaded back in.
tighten the bolt slightly, then snug it just a little more,
enough that there's no chance it's going to vibrate loose but not much more than that.
you don't want to really crank down on it too much
after the sensor is bolted in your done, plug it back in and fire it up to make sure it starts,
then reinstall the air cleaner/engine cover and the cowl plate.
to reinstall the cowl plate pay attention to the shelf it sits on and the clips that engage it in the rear,
then make sure all the bolts line up and snug the cowl plate down, tighten the center inverted torx bolt first.
this draws the cowl plate into the cowl and the 4 side bolt holes are slotted to allow the plate to slide into the cowl.
lastly tighten the 4 outer cowl plate bolts, slide the weather-strip back on and your done....

The following users liked this post:
ChrsBowman (09-26-2022)
04-13-2013, 10:56 AM
#2
Member
Join Date: Dec 2012
Location: Connecticut
Posts: 168
Likes: 0
Received 0 Likes
on
0 Posts
R500 + SLK55 AMG
Great write up. You are a braver man than I. At what mileage / age did your CPS fail? Is the sensor more accessible if the car is on a lift?
Mercedes apparently has a long history of failures with this sensor. My SLK32 AMG is plagued by the same failure. The forums are full of people experiencing this problem. Luckily, on that Mercedes product, the fix is a 20 minute affair while you're downing a beer. If / when my R500 sensor fails, I'll probably just let Mercedes or an Indy garage tackle it.
Mercedes apparently has a long history of failures with this sensor. My SLK32 AMG is plagued by the same failure. The forums are full of people experiencing this problem. Luckily, on that Mercedes product, the fix is a 20 minute affair while you're downing a beer. If / when my R500 sensor fails, I'll probably just let Mercedes or an Indy garage tackle it.
Last edited by Spud_Racer; 04-13-2013 at 11:00 AM.
04-15-2013, 12:06 AM
#3
Member
Thread Starter
Join Date: Jul 2011
Location: Brooklyn, NY
Posts: 123
Likes: 0
Received 10 Likes
on
8 Posts
2006 R500
my R is a little over 92k miles and the sensor just started acting up. personally I intend on doing just about everything myself on this car, only way to not go broke owning a used benz that's starting to get up there in years and miles
 05-30-2015, 06:42 AM
#6
Member


The following users liked this post:
R3504Matic (10-11-2021)
01-10-2016, 10:21 AM
#7
Newbie

Join Date: Jan 2016
Location: CT
Posts: 1
Likes: 0
Received 0 Likes
on
0 Posts
r350
my 2007 r350 has a 3 prong cps. has a t20 (male) socket bolt, not e8
also has problem removing due to interference with another sensor in head above cps
any suggestion for removal?
also has problem removing due to interference with another sensor in head above cps
any suggestion for removal?
Last edited by Paulgriffiths; 01-10-2016 at 12:12 PM. Reason: solved problem, just kept twisting and pulling on the darn little thing
Trending Topics
 02-05-2016, 06:42 PM
#9
MBWorld Fanatic!
03-27-2016, 11:56 PM
#10
Junior Member

Join Date: Sep 2008
Posts: 35
Likes: 0
Received 0 Likes
on
0 Posts
R500
Thanks for the writeup dude!
Was planning to have my car towed to the dealer thinking that I needed a new fuel pump. Luckily I came across this CPS issue and your writeup. I bought the bosch part on amazon for $35 and replaced it in about an hour. Replaced the air filters while I was at it...they were gross, even had leaves in there! Problem solved! No more cutoffs or failure to start. It even seems to be running better. Idk if the new sensor improved performance or if it was just the new air filters. Anyway, I'm sure I saved a small fortune. Thanks again 
 11-05-2020, 12:09 PM
#12

Would like to thank turbocad for the post, had the pleasure of performing this procedure yesterday and wanted to add a few things. First, theres a little piece of trim that removes to help access the area right below the wiper trough, push it up and it pops right off. Secondly, I found it necessary to obtain and use 1/4 E-8 socket as the the 3/8 drive one I owned would not allow fitment due to the size of the tool, a deep 3/8 may work. The last thing is, I found that I could use my phone in video mode to actually see what I was working with and where I need to go as I have large hands and found it difficult (and painful to squeeze my hand and arm down there) the phone really helped. One more thing...don't forget about the service mode on the hood...on driver side hydraulic piston theres a red push button to get the hood to go almost straight vertically...push it again to put it down.
09-27-2022, 01:05 PM
#13
Newbie

Join Date: Sep 2022
Location: Seattle, WA
Posts: 12
Received 0 Likes
on
0 Posts
2008 r350 4matic
I have a torx bolt holding down my sensor. I have a 2008 r350.

This is the bolt, have holding down the crankshaft sensor. I have a 2008 r350 4matic. I use this post...to tackle this crankshaft sensor. Thanks for the write up.
09-27-2022, 01:40 PM
#14
Newbie
Join Date: Sep 2022
Location: Seattle, WA
Posts: 12
Received 0 Likes
on
0 Posts
2008 r350 4matic

Easy to unplug....i thought it was going to be hard...but no.

I took out the last spark plug coil....to make it easier. Doing this post as I work on the car.

When i took out my fuel pump...i ended cutting the carpet.....im using this to kneel on. This was the carpet that covers the fuel pump ground. BtW...i do have continuity ground, going back to the relay...just no signal. Hence the reason, im replacing the Crankshaft sensor.
09-27-2022, 01:55 PM
#15
Newbie
Join Date: Sep 2022
Location: Seattle, WA
Posts: 12
Received 0 Likes
on
0 Posts
2008 r350 4matic
Also this is a T30 bolt(08 R350 4matic)..highly recommend a Endoscope(In the US.....get one from Autozone doing the loan a tool program. I paid $160 deposit)

 09-27-2022, 10:43 PM
#18
Newbie
Join Date: Sep 2022
Location: Seattle, WA
Posts: 12
Received 0 Likes
on
0 Posts
2008 r350 4matic
Car started...drove home. I had an SRS malfunction right rear needs service(figured I got that, when I took out the passenger seat to get to the fuel pump). When I got home, I put everything back together. Went to start the car...and no start. Don't think it's the crankshaft sensor, but the SRS code.


