Ongoing Maintenance and Repair for a 2003 S600.

 02-20-2012, 07:30 AM
#51
Senior Member
Thread Starter

Join Date: Dec 2011
Location: Ontario, Canada
Posts: 401
Likes: 0
Received 46 Likes
on
29 Posts
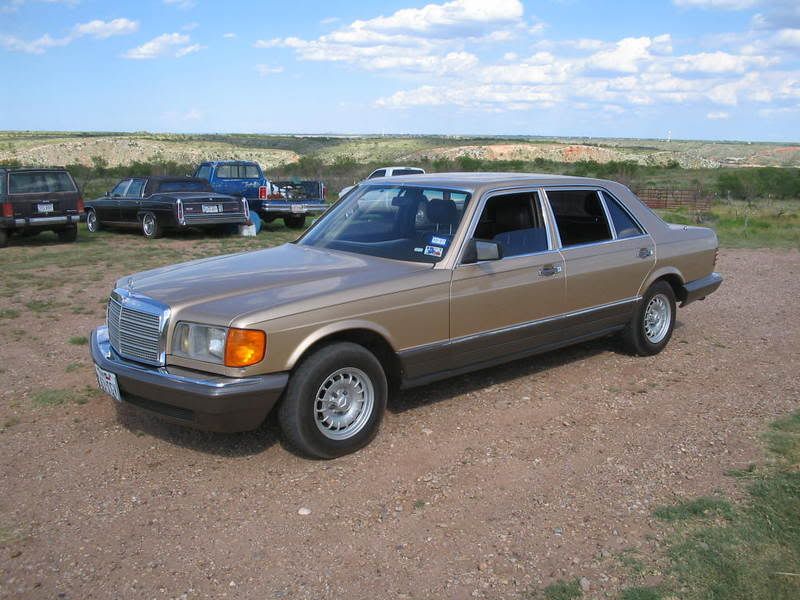
MB 2003 S600. Volvo 2003 XC70.

I'll fix the rust by myself.
For the front fender, there is only a tiny rust spot.
But for the rear fenders, need bumper off, sand down metal to shiny, prepare the surface.
I have to admit the paint work will be a chanllenge, I know how hard it will be to achieve an acceptable result, let alone professional quality.
But anyway nothing hurt to try, at least I can understand more about car painting and improve my skill.
Crappy works will be aviod which can't match these car's name. So if I won't be satisfied I'll send her to a paint shop.
For sure I'll post before and after pictures for your guys to judge.
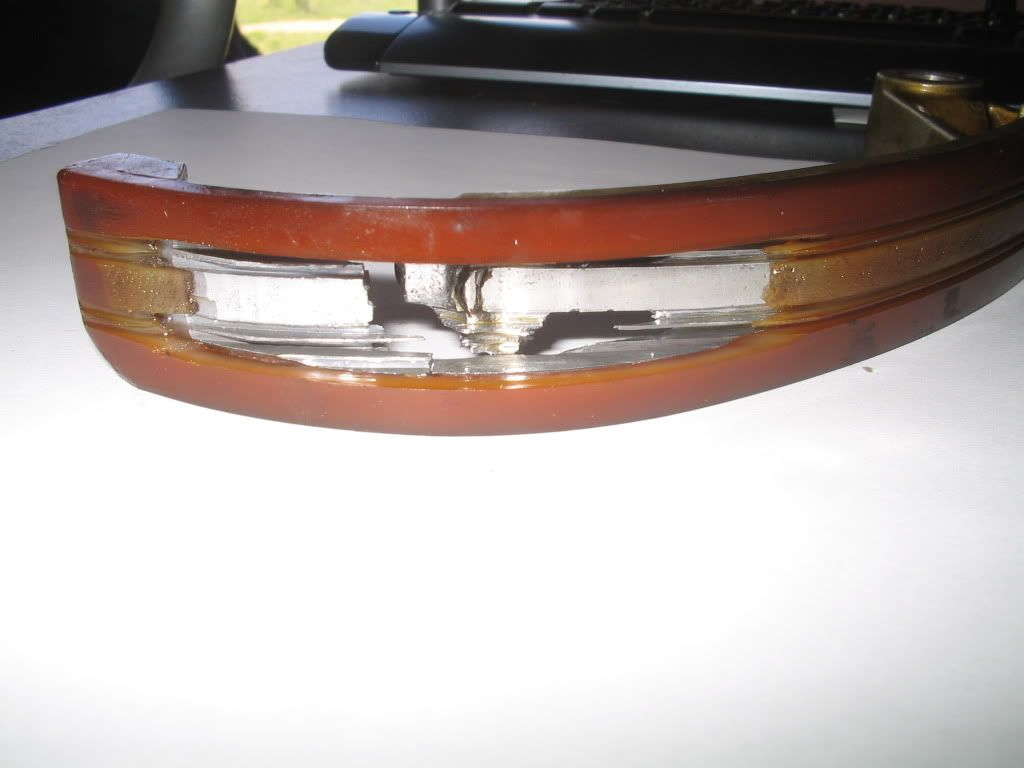
By the way, I've already fixed and painted the winter rims:
- Picture 1 is before fix, you could see curb damages;
- Picture 2 is after fix and painting, epoxy used as filler to replace the lost chunk of alloy, to achieve weight balance and durability.
The paint is not as good as the original, but for wheels it is acceptable.
Thanks and talk later.
Howard
Last edited by haoz129; 02-20-2012 at 07:32 AM.
 02-20-2012, 08:16 AM
#52
Senior Member
Thread Starter
Join Date: Dec 2011
Location: Ontario, Canada
Posts: 401
Likes: 0
Received 46 Likes
on
29 Posts
MB 2003 S600. Volvo 2003 XC70.
Hey Howard,
Well I wish we lived closer and I would let you come over and use my garage. I have repaired rust before severe and surface so I do have some experience in it. Actually I use to work at a MB restoration shop where we did minor repairs as well as full on restorations. I learned a lot and I still remember a fair amount.
...
 !
!These information really helps. I believe it will be achievable with your professional opinions.
Yes, to find out the source is a key. Actually I think I found the cause of the fender rust. The previous owner attatched chrome trims on the fender. I didn't see it as it was removed by the dealer. But two things I know:
- I don't like that kind of decoration, my wife called it "improper prosthesis";
- It damage the painting and helped trapping water hence lead to the rust.
For the painting I know the hardest part is the joint between the original painting and the new painting, as I won't touch the majority part of the panel. Any idea how to make the transition area smooth from the new painting to the original painting ?
Thanks again Johan, without your guys help I can't enjoy this beauty for sure.
Howard
02-20-2012, 09:11 AM
#53
Senior Member
Thread Starter
Join Date: Dec 2011
Location: Ontario, Canada
Posts: 401
Likes: 0
Received 46 Likes
on
29 Posts
MB 2003 S600. Volvo 2003 XC70.
Issue description:
Front Right Marker was broken and water penetrated;
Front Right Parking Sensor misaligned;
Front Right Bumper Chrome Strip damaged;
Cause:
Previous impact
Parts and Tools:
Super glue (for sealing the marker)
Chrome & clear coat
Repair:
Seal the Marker by align and apply super glue then clear coating Marker
Reenforce braket inside the bumper strip by using super glue then align/install parking sensor properly
Chrome coating the Bumper Chrome Strip then clear coating
Result:
Before, picture 1;
After, picture 2.
Cost:
$20 for Chrome & Clear coat, actually reused some left over from previous works.
1 hour needed from disassemble bumper strip, repair to reinstall. Not continuous since the glue and coating need time to dry. This repair was a rest in between my work, my boss said it's his time, .
.
Front Right Marker was broken and water penetrated;
Front Right Parking Sensor misaligned;
Front Right Bumper Chrome Strip damaged;
Cause:
Previous impact
Parts and Tools:
Super glue (for sealing the marker)
Chrome & clear coat
Repair:
Seal the Marker by align and apply super glue then clear coating Marker
Reenforce braket inside the bumper strip by using super glue then align/install parking sensor properly
Chrome coating the Bumper Chrome Strip then clear coating
Result:
Before, picture 1;
After, picture 2.
Cost:
$20 for Chrome & Clear coat, actually reused some left over from previous works.
1 hour needed from disassemble bumper strip, repair to reinstall. Not continuous since the glue and coating need time to dry. This repair was a rest in between my work, my boss said it's his time,
.
02-22-2012, 08:39 AM
#54

Hey Howard,
I have done both spraying and small repair but it all depends on how big it is.
Do you have access to a buffing wheel? I had a lot of luck on my car by filling in large chips then wet sanding with 2500 and then 3000 grit wet sandpaper then buffing it. I now have to look real hard for the blemishes.
I agree with you that you may not want to paint the entire panel since paint is not that easy to do at all. Let's see what you find and go from there.
Johan
02-22-2012, 09:19 AM
#55
Senior Member
Thread Starter
Join Date: Dec 2011
Location: Ontario, Canada
Posts: 401
Likes: 0
Received 46 Likes
on
29 Posts
MB 2003 S600. Volvo 2003 XC70.
Hey Howard,
I have done both spraying and small repair but it all depends on how big it is.
Do you have access to a buffing wheel? I had a lot of luck on my car by filling in large chips then wet sanding with 2500 and then 3000 grit wet sandpaper then buffing it. I now have to look real hard for the blemishes.
I agree with you that you may not want to paint the entire panel since paint is not that easy to do at all. Let's see what you find and go from there.
Johan
I have done both spraying and small repair but it all depends on how big it is.
Do you have access to a buffing wheel? I had a lot of luck on my car by filling in large chips then wet sanding with 2500 and then 3000 grit wet sandpaper then buffing it. I now have to look real hard for the blemishes.
I agree with you that you may not want to paint the entire panel since paint is not that easy to do at all. Let's see what you find and go from there.
Johan
Sure, Johan.
I'd better to have some tools ready. I will buy a buffing wheel and some sandpaper as well.
I believe if I would paint the whole panel it will not match the car. Then I will end up with paint the whole car but I'm afraid my car won't match other Benzs,
 .
.Thanks again.
Howard
02-29-2012, 11:23 AM
#56
Senior Member
Thread Starter
Join Date: Dec 2011
Location: Ontario, Canada
Posts: 401
Likes: 0
Received 46 Likes
on
29 Posts
MB 2003 S600. Volvo 2003 XC70.
When I cleaned the engine cover, I accidently peeled off the chrome from the MB Star logo,  .
.
But I came up with an idea to make something different. Now I have a unique V12 engine cover, the logo is bigger than others,. The bigger the better.
Have a nice day and enjoy your ride.
Howard
.But I came up with an idea to make something different. Now I have a unique V12 engine cover, the logo is bigger than others,
. The bigger the better.Have a nice day and enjoy your ride.
Howard
Last edited by haoz129; 02-29-2012 at 01:23 PM.
03-03-2012, 09:20 PM
#57
Senior Member
Thread Starter
Join Date: Dec 2011
Location: Ontario, Canada
Posts: 401
Likes: 0
Received 46 Likes
on
29 Posts
MB 2003 S600. Volvo 2003 XC70.
Issue description:
Brown marks left on all 4 fenders' painting.
Cause:
The previous owner put chrome trims on the fenders. After removal, brown marks left due to adhesive used.
The marks penetrated into the paint and can't be removed by cleaner.
Material and Tools:
Car wax polishing wheel.
Regular buffing compound.
Repair:
Use polishing wheel to apply the compound.
The brown marks were gradually grinded away.
Result:
See pictures:
- 1st is front right fender which was not treated yet
- 2nd is the front left fender which showed no sign of residue after buffing.
- 3rd is the compound used which was bought from a local painting supplier.
Cost:
$20 for the compound.
Labor:
With this old and slow polishing wheel, on average, 1 hour spent on each fender.
I believe a professional buffing wheel will make this job easier and more effective.
This is a pilot work for my next rust clean and painting job.
Last edited by haoz129; 03-03-2012 at 09:41 PM.
 03-25-2012, 11:28 PM
#59
Senior Member
Thread Starter
Join Date: Dec 2011
Location: Ontario, Canada
Posts: 401
Likes: 0
Received 46 Likes
on
29 Posts
MB 2003 S600. Volvo 2003 XC70.
Very strange weather we got this year, but as a bonus. Ideal painting temperature normally would come in May. But last ten days, in March this year, weather coorperates with me for treating this rust issue.
All rust of my 2003 S600 have been addressed, fenders re-painted as well. This really give me a peace of mind as there is no cancer growing under the skin.
The paint result is not great but it's acceptable. I spent few hunderds buying tools and chemicals comparing with MB bodyshop's 7-8k quote.
Plus I learned a new skill and more equipments left in my tool box. Quite excited as this is my first time to do bodywork.
Here is some info to share.
When bought the car, inspection shows rust and bubbles:
- 1 area on left front fender
- 3 areas on left rear fender, see picture 1 & 2;
- 2 areas on right rear fender, see picture 3 & 4;
With bumper off more rust spots identified, see picture 5.
And the rusts are more severe than showed, see picture 6.
Cause:
Previous owner drilled holes on fenders to attach chrome trim around fenders.
Trim cover, on lower C pillar, helps traping dirt and water which lead to rust on the quater panel, see picture 7. You won't be surprised to see some dirt and rust if you take off the trim cover.
Repair:
1, Sand and grind all the rust and bubble areas make sure all rust revealed and nothing hide behind paint. Through this process I found much bigger areas are rusted. But I drilled down under every little rust spot since I am already here. Even areas on the rear edge of the rear fenders which didn't show rust from outside, see picture 8 & 9.
2, Apply 2 layers of rust converter to convert rust into primer. After converting the rust will be stabilized and sealed, see picture 10 & 11.
- Most areas rusted so severe that I couldn't grind down to the bare metal. Too much metal will be lost and the panel will be too thin if I grind it hard.
- I did clean up all the loose rust and sand/grind as much as I could.
3, Apply fiber glass filler to back of the panels to seal the sheet and make it water proof, see picture 12.
- This is very important to make sure rust won't start from the back, especially for the Trim Cover area I mentioned.
4, Apply body filler to cover metal surface which was grinded lower. Apply glaze putty on top of the filler to cover small dents left. 220 grid sanding to make it as smooth as I can, see picture 13.
5, Apply 3 layers of self etch primer to cover all repaired areas. Any metal left must be covered by primer, 600 grid sanding to smooth the surface further, see picture 14.
6, Re-tape and masking the car very well, make sure all area except painting area are covered.
- I was too lazy left part of the trunk un-covered which lead to more cleanup works for the over spray.
7, Apply 3 layers of silver base coat, see picture 15 & 16.
8, Apply 3 layers of clear coat to make it glossy, see picture 17 & 18.
- First coat should be thin to prevent stiring the silver coat;
- Second coat could be medium;
- Last coat should be heavy to make the surface smooth. Mine is a bit bumpy as the clear coat is not heavy enough. You may want to add a little bit more reducer for the third layer of clear coat, but only a little bit. Otherwise the whole paint will be ruined.
9, Correct any imperfections before take tape and masking off. I did 2000 grid sanding on clear coat as it feels bumpy. Then apply another clear coat.
- Be very careful sanding the clear coat, if you don't know what you are doing just leave the clear coat un-touched and stop here;
- Even 2000 grid sanding may take clear coat off in some spot. If this happen you have to re-apply all 3 clear coat again.
- If you apply heavy clear coat in the spot sanded too much, disaster will come. Silver coat will crack and most likely you need do all the paint again.
10, Wait for one day make sure paint dry thoroughly then buffing the blending areas.
11, Spray Anti Rust Asphalt into the Trim Cover hole and apply Asphalt Undercoating to the back of the repaired panels to give additional water proof.
Result, see picture 19 & 20.
Looks ok, but far away from the factory paint for sure as I didn't practice with the spray gun.
I can tell the color difference, new paint looks greenish.
The clear coat is not as glossy as the original either.
At least all rust are gone.
Cost:
Too many to list and here are some major stuff:
- $400 for 20 gallon air compressor, 25 feet hose, spray gun, gauge and filter;
- $50 for respirator, google, gloves, measuring cups, paint strainers, sanding blocks, tapes;
- $50 for sand papers, sanding wheel;
- $200 for all the chemicals including base coat, clear coat, primer, filler, rust converter, glaze putty, wax grease remover, thiner, glaze compound...
More than 40 hours spent. Most of the time used to treat the rust and prepare for the painting.
Picture 01 - 06
Last edited by haoz129; 03-26-2012 at 10:34 AM.
The following users liked this post:
Welwynnick (03-12-2016)
The following users liked this post:
paste (01-18-2021)
04-17-2012, 12:03 AM
#66
Senior Member
Thread Starter
Join Date: Dec 2011
Location: Ontario, Canada
Posts: 401
Likes: 0
Received 46 Likes
on
29 Posts
MB 2003 S600. Volvo 2003 XC70.
Actually this S600 is already in a great condition now. All major issues have been addressed. Other maintenace will be handled according to schedule.
I'm pretty confident driving this super machine. For all the long trips definitely I will be with her which really make every trip short.
Best regards.
Howard
04-17-2012, 04:40 PM
#67
Junior Member

Howard,
You have inspired me to finish up my timing chain and get my car back on the road where it belongs. Thank you, and again, good job and great attitude.
You have inspired me to finish up my timing chain and get my car back on the road where it belongs. Thank you, and again, good job and great attitude.

The following users liked this post:
paste (01-18-2021)
04-18-2012, 03:53 AM
#68
Senior Member
Thread Starter
Join Date: Dec 2011
Location: Ontario, Canada
Posts: 401
Likes: 0
Received 46 Likes
on
29 Posts
MB 2003 S600. Volvo 2003 XC70.
What's the reason you need fix the timing chain?
How many miles we need to maintain it?
Any symptom would lead us start to worry the timing chain ?
I was thinking it's maintenance/worry free most of the time.
Nice to see your baby is back on road and great job!
Thanks.
Howard
04-18-2012, 06:20 PM
#69
Junior Member
Wow, that's a big work.
What's the reason you need fix the timing chain?
How many miles we need to maintain it?
Any symptom would lead us start to worry the timing chain ?
I was thinking it's maintenance/worry free most of the time.
Nice to see your baby is back on road and great job!
Thanks.
Howard
What's the reason you need fix the timing chain?
How many miles we need to maintain it?
Any symptom would lead us start to worry the timing chain ?
I was thinking it's maintenance/worry free most of the time.
Nice to see your baby is back on road and great job!
Thanks.
Howard
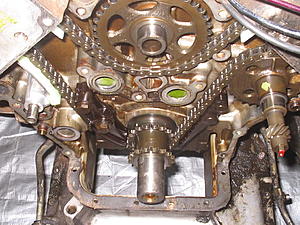
The timing chain ate through the tension guide and rail. I took off the timing case to inspect and replace lower guides. I assume at some time it suffered a lubrication loss. The cams, mains, cylinders and compression are OK. Its a 1983 380 SEL. 85,000 miles with single row timing chain. Almost like new condition inside and out.
I have had many Mercedes over the years...your thread and others have me interested in a 220 600. I believe I'll call Bruce and get insurance when the time comes.

I don't think you have anything to worry about regarding your timing chain. Mercedes no doubt strengthened their timing components after this engine. It was produced for only 2 years with the single row chain and is known for many failures.
Eric
04-19-2012, 09:05 AM
#71
Super Member

Join Date: Jan 2008
Location: california high desert
Posts: 508
Likes: 0
Received 1 Like
on
1 Post
2003 S500, 03 C240, 03 E320, 03 tahoe
stellar, fantastic,inspiring!
just finished reading every post you have made howard, absolutely fantastic!. proves that ownership outside warranty even of their flagship models is completely possible with the right attitude and skill set. im a mech and have never met an EE that could get through the grease, hardware and mount locations of components to then troubleshoot/repair a circuit!.  great work on the coil pack repair and the TCM massage.
great work on the coil pack repair and the TCM massage.
04-19-2012, 09:24 AM
#72
Senior Member
Thread Starter
Join Date: Dec 2011
Location: Ontario, Canada
Posts: 401
Likes: 0
Received 46 Likes
on
29 Posts
MB 2003 S600. Volvo 2003 XC70.
Yeah, the 220 600 is a fantastic machine which would serve you nicely.
All the best.
Howard
04-19-2012, 09:48 AM
#73
Senior Member
Thread Starter
Join Date: Dec 2011
Location: Ontario, Canada
Posts: 401
Likes: 0
Received 46 Likes
on
29 Posts
MB 2003 S600. Volvo 2003 XC70.
just finished reading every post you have made howard, absolutely fantastic!. proves that ownership outside warranty even of their flagship models is completely possible with the right attitude and skill set. im a mech and have never met an EE that could get through the grease, hardware and mount locations of components to then troubleshoot/repair a circuit!. great work on the coil pack repair and the TCM massage.
great work on the coil pack repair and the TCM massage.It's great that you enjoy this thread.
Yes, I don't have warranty for both of my Benz and Volvo currently.
I did purchase a 3 years warranty for my Volvo 5 years ago as I had no idea about cars at that time. After 1 year self maintenance I found the warranty is useless.
But for average MB owner I still suggest to have a decent warranty though. Repairs are simply too expensive if handled by dealer.
I do have that kind of love about my cars just like Jeff(MB-Dude) mentioned.
I want to take care of them, like I have two more kids, but only a single father for this matter (my wife added).
Best regards.
Howard
Last edited by haoz129; 04-19-2012 at 10:31 AM.
The following users liked this post:
paste (01-18-2021)
04-21-2012, 01:04 AM
#74
Senior Member
Thread Starter
Join Date: Dec 2011
Location: Ontario, Canada
Posts: 401
Likes: 0
Received 46 Likes
on
29 Posts
MB 2003 S600. Volvo 2003 XC70.
To keep ABC healthy replace hydraulic fluid and filter are must.
I believe refresh them every 50K miles (80KKm) is sufficient.
- This car has 75K miles on the clock and I guess the hydraulic fluid have not been replaced;
- ABC filter is still the old version which can't catch small particales less than 10 micrometers. New one can catch particles bigger than 3 micrometers.
- After sitting few days the rear will drop which is normal but I hope new fluid and filter would make it better.
So today I gave it a try.
I build a home made flush system to pull old fluid and push fresh fluid in.
1) Suck as much as posibble the old fluid out of the ABC fluid tank, 1.8 liters come out.
2) Change new filter. I spilled oil as the old filter hold some. Next time I will catch them to avoid spending time on clean the mess.
3) Push new fluid in through the filter, see picture 1.
4) Loose the return line which is on top of the ABC tank filter cap. And attached my flush system in between, see picture 2.
5) Pre-Pressurize my flush system then start the car and idle.
6) Keep pressing raise vehicle button. Or active ABC pitching mode let the car moved up and down (front to back alternatively). As designed old fluid came out and new fluid was pushed in, see picture 2 & 3. The old fluid is dark green and not very bad.
Finally the fluid come out of the return line looks fresh.
Had an accident and Lesson learned: never get too excited, never show off.
After active the ABC suspension pitching mode the car moved up and down. Then I was so exited and asked my daughters come and see. Since I didn't monitor the fluid level closely, suddenly I saw bubbles came out of the return line, . I jumped into the car and shut her down right away.
I know I shouldn't let the tandem pump draw any air.
I checked the fluid level it was fine but there are already some consequences:
- Car sit low;
- Car can't be raised;
- ABC red warning pup up "Drive Carefully";
- ABC system pressue only 10 bars.
To correct this issue:
- Push more fluid in the tank;
- Pre-pressurized the tank to 1 bar (15 psi). This is a must which feed the pump with fluid just like install a new pump.
- Start the car and let the tandem pump get fluid and running again.
- Then the car can be raised and ABC system pressure backed to 197 bars.
All in all the fluid and filter are replaced and will check whether the car takes longer to drop.
Parts and cost:
New version filter: A 003 184 61 01, $46;
Fluid: Pentosin CHF11S (MB fluid is BQ 1 32 0001). ABC hold 4 liters in total, 8-9 liters is enough for me to do this flush, $200;
Other stuff to build the home made flush system.
Have lots of rugs and towels ready. Use lint free towel to clean anything you want put back to the ABC system.
A hand pump which can produce pressure and vacuum is pretty handy. Mine is Mityvac which is a must have to handle fluid works.
Labor: 2-3 hours work, including show off,
I believe refresh them every 50K miles (80KKm) is sufficient.
- This car has 75K miles on the clock and I guess the hydraulic fluid have not been replaced;
- ABC filter is still the old version which can't catch small particales less than 10 micrometers. New one can catch particles bigger than 3 micrometers.
- After sitting few days the rear will drop which is normal but I hope new fluid and filter would make it better.
So today I gave it a try.
I build a home made flush system to pull old fluid and push fresh fluid in.
1) Suck as much as posibble the old fluid out of the ABC fluid tank, 1.8 liters come out.
2) Change new filter. I spilled oil as the old filter hold some. Next time I will catch them to avoid spending time on clean the mess.
3) Push new fluid in through the filter, see picture 1.
4) Loose the return line which is on top of the ABC tank filter cap. And attached my flush system in between, see picture 2.
5) Pre-Pressurize my flush system then start the car and idle.
6) Keep pressing raise vehicle button. Or active ABC pitching mode let the car moved up and down (front to back alternatively). As designed old fluid came out and new fluid was pushed in, see picture 2 & 3. The old fluid is dark green and not very bad.
Finally the fluid come out of the return line looks fresh.
Had an accident and Lesson learned: never get too excited, never show off.
After active the ABC suspension pitching mode the car moved up and down. Then I was so exited and asked my daughters come and see. Since I didn't monitor the fluid level closely, suddenly I saw bubbles came out of the return line,
. I jumped into the car and shut her down right away.I know I shouldn't let the tandem pump draw any air.
I checked the fluid level it was fine but there are already some consequences:
- Car sit low;
- Car can't be raised;
- ABC red warning pup up "Drive Carefully";
- ABC system pressue only 10 bars.
To correct this issue:
- Push more fluid in the tank;
- Pre-pressurized the tank to 1 bar (15 psi). This is a must which feed the pump with fluid just like install a new pump.
- Start the car and let the tandem pump get fluid and running again.
- Then the car can be raised and ABC system pressure backed to 197 bars.
All in all the fluid and filter are replaced and will check whether the car takes longer to drop.
Parts and cost:
New version filter: A 003 184 61 01, $46;
Fluid: Pentosin CHF11S (MB fluid is BQ 1 32 0001). ABC hold 4 liters in total, 8-9 liters is enough for me to do this flush, $200;
Other stuff to build the home made flush system.
Have lots of rugs and towels ready. Use lint free towel to clean anything you want put back to the ABC system.
A hand pump which can produce pressure and vacuum is pretty handy. Mine is Mityvac which is a must have to handle fluid works.
Labor: 2-3 hours work, including show off,
Last edited by haoz129; 04-21-2012 at 07:24 AM.
The following 2 users liked this post by haoz129:
Astro14 (03-15-2016),
Welwynnick (03-12-2016)
04-21-2012, 06:46 PM
#75

I know this car was thinking right after Howard bougtht it "Ha, I'm going to teach another owner a lesson on why they should not buy a $125K car for $25K. I'll bankrupt him!"
Now after a few months, the car is like a colt that was never ridden before, and is saddled up and listens to all commands from its owner.
He 'broke' that car, but in a good way.
Way to go Howard! Don't let that colt bite you like it tried to do when you rodeo'd it for too long. Keep the reigns tight.
Bruce


