W208 How To's

 09-16-2005, 02:50 PM
#1
MBWorld Fanatic!
Thread Starter
W208 How To's
GENERAL HOW TO'S FOR THE W208 320 AND 430:
* If you have any how to's, please feel free to add to this thread of PM me with the how-to's and I will add them. Also, please only contribute to this thread if you have advice on How-to's etc. Let's keep it clean...Thanks!*
Engine:
Change your spark plugs:
https://mbworld.org/forums/showthrea...ht=spark+plugs
Change your fuel filter:
1: In your trunk, remove the fuse #1 (fuel pump relay). Start the car several times until it doesn�t start to release the pressure from the lines.
2: Under the car in the rear, you will remove 2 10 mm plastic nuts that hold the cover to the fuel pump/filter on.
3: Loosen the Phillips screw that holds the clamp around the fuel filter.
4: You then remove the lines one at a time, and put them on the new filter making sure you put them in the right place. Draw a picture before and after, it will help. There are 4 lines in total. I personally did the 2 small lines without clamps first, then cut the band clamps on the other 2, and installed them on the new filter. If you break the clamps, which is quite easy to do, you will need 2 or 3 new hose clamps from the hardware store. Also, it will help if you put a vice grip on the fuel tank line (it will say Fuel Tank on it) so that the flow of gas will stop after you pull the line from the filter.
5: Reconnect the hoses, tighten the clamps and put your fuse back in and start the car. Check for leaks. If no leeks, you�re done! Compliments of x15jq
Replace the MAF sensor (aka Mass air flow meter):
1: Remove the snorkels that go from the front grill area to your intake housing. These simply snap off and out.
2: Lift your engine cover off of your engine. There are 4 clips holding your cover down. Simply just pull up and they will detach.
3: On the back portion of your intake (behind the engine, where your intake housing connects to the engine, you will see the MAF sensor. Using a flat head screwdriver, unclip the metal clip on the back of the MAF and then unclip the plastic clips on the front.
4: Unplug the wire on the right and place it somewhere where you will find it again. Then gently pull the MAF out of it�s place and reverse the directions to put it back together.
Change your Motor Mounts:
Front mounts:
-Disconnect batter (VERY IMPORTANT, especially if you replace the right mount. You don't want to short your alternator)
-Place car on 4 jack stands as high as you can
-Unbolt bottom bolt of two front mounts.
-Unbolt 2 screw/bolts holding a shield that is blocking the view of the right mount.
-Move shield out of the way so you can manage your and through that area to access the top bolt of the right mount. (This part is a little tricky, but with a little patience and thought it's not a big deal)
-Unscrew top bolt on both right and left mount
-Remove both covers from both mounts.
-Lift engine about 3 inches
-Remove both mounts (The right mount should not be a problem but the left mount was a real PITA to get out. WIS tells you to dismantle the steering damper and to take the drag link off at the pitman arm to free up the space required, but that would require a special tool so I worked around it)
-Install new mounts in opposite order. Make sure to follow proper torque specifications for all bolts.
Rear Mount:
-Car still jacked up
-Support transmission with floor jack.
-Remove 6 bolts holding bracket (then set bracket aside)
-Remove 2 bolts holding mount
-Install new mount in opposite order.
-Lower car
-Open Beer
Compliments of TresX
https://mbworld.org/forums/showthrea...ght=Idle+rough
Replace Harmonic Balancer:
It has been recalled on various Mercedes. Give the dealer your VIN # and they will determine if yours is part of the recall.
Install a CLK55 AMG Intake on a CLK430:
http://www.benzworld.org/forums/foru...posts=7&fid=20
Last edited by str8ridin; 09-17-2005 at 12:16 PM.

The following 2 users liked this post by str8ridin:
Chuck Mosely (05-26-2017),
josieclk320 (06-01-2016)
09-16-2005, 02:51 PM
#2
MBWorld Fanatic!
Thread Starter
Exterior/Body:
Remove Front Bumper:
You'll need an 8 and 10 mm ratchet, a 13 mm open ended and a phillips head screw driver.
1. You need to detach the fog light splash shields from the car (you can leave them attached to the bumper) using the screwdriver.
2. Using the 8mm, disconnect the 4 bolts around the headlights.
3. With the 10mm ratchet, remove the bolts on either side of the bumper where it meets the fender (near the wheel).
4. To access the next two fasteners, you'll need to remove the side marker and part of the impact strip (or remove it from underneath the car). They're elongated bolts with a 10mm head on either side of the bumper. Loosen them until they drop down but don't remove them from the bumper.
5. Finally, remove the front fan shroud and you'll be able to access the two 13mm nuts. Remove them.
6. CAREFULLY remove the bumper (it is advised to have 2 people do it so that you don't scratch the fender with the sides).
7. If you didn't disconnect the wiring and temperature sensor from below before removing all the hardware, then disconnect everything before you pull the bumper very far off the car.
Make sure to organize the bolts so that you know where they go back. I drew a picture of the front of the car on a pad and placed the bolts on there so I remembered.
It should take about 40 minutes the first time. The bumper is quite light, so it should just slide out. If it doesn't, then you forgot some bolts. Compliments of Josh K and str8ridin
Remove rear Bumper:
The following 2 users liked this post by str8ridin:
2MERKS (01-25-2018),
Chuck Mosely (05-26-2017)
09-16-2005, 02:51 PM
#3
MBWorld Fanatic!
Thread Starter
Suspension:
Remove spring pads without a compressor:
http://www.benzworld.org/forums/foru...84158&posts=20
Remove spring pads without a compressor:
http://www.benzworld.org/forums/foru...84158&posts=20
The following users liked this post:
Chuck Mosely (05-26-2017)
09-16-2005, 02:52 PM
#4
MBWorld Fanatic!
Thread Starter
Interior:
Changing the cabin filter:
https://mbworld.org/forums/showthrea...change+filters
Under the dash on the passenger side, you will remove the 4 or so Phillips retaining screws that hold the black plastic cover in place under the dash. This black cover will then come out. You will then have access to the box that holds the cabin air filter. The box holds the filter in the vertical position and has two white plastic retaining clips that hold the bottom cover of the box in place. Slide them off and the cover will come off and you will have access to the filter. It�s a tight squeeze but a pretty easy DIY job. My cabin filter didn�t really need replacement, just needed to remove some big particles like pieces of leaves, etc. Should take you about 20 minutes or less. Compliments of bbearden
The following 2 users liked this post by str8ridin:
Chuck Mosely (05-26-2017),
retrozen (07-11-2020)
The following users liked this post:
JonEB (01-08-2022)
 09-16-2005, 07:30 PM
#7
MBWorld Fanatic!
Are we just submitting stuff for factory maintenance or DIY mods too?
If we're doing mods, here's how to DIY install a Passport SRX
Detector: http://homepage.mac.com/joshking/PhotoAlbum3.html
Front Jammers: http://homepage.mac.com/joshking/PhotoAlbum10.html
Rear Jammer : http://homepage.mac.com/joshking/PhotoAlbum7.html
If we're doing mods, here's how to DIY install a Passport SRX
Detector: http://homepage.mac.com/joshking/PhotoAlbum3.html
Front Jammers: http://homepage.mac.com/joshking/PhotoAlbum10.html
Rear Jammer : http://homepage.mac.com/joshking/PhotoAlbum7.html
Trending Topics
09-16-2005, 09:03 PM
#8
Crankshaft Position Sensor:
-Remove engine cover
-Locate Torx screw/bolt holding CPS (See pic)
-Remove screw
-Remove sensor
-Install in opposite order
P.S. get one of those extendable magnets before starting this project so you can pick up the screw when you drop it.
Oil Change: (topsider method: better because you get more of the old oil out)
- Open hood
- pull dip stick
- insert topsider tube down dip stick tube
- suck out all oil
- Remove and replace oil filter and o-rings
- Replace oil filter cap (torque: 25Nm)
-open oil cap
-pour 8 1/2 quarts
-close cap
Oil Change:
- Jack up front of car
- Open Hood
- take off oil filler cap
- drain oil from oil pan
- replace drain plug (torque: 30Nm)
- Remove and replace oil filter and O-rings
- Replace oil filter cap (torque:25Nm)
- Pour in 8 quarts of oil.
- Start engine and let car warm up
- Check oil level with dipstick and add if necessary.
09-16-2005, 09:09 PM
#9
Almost a Member!

Join Date: Apr 2005
Location: wilmington nc
Posts: 35
Likes: 0
Received 0 Likes
on
0 Posts
99 CLK320 / 2003 WRX Wagon
Valentine 1 Hardwire from MMgrad:
They are in there a ways down, and there used to be pictures.
MMgrad Directions
My own experience: I have a 320.
I got the plastic trim out, the wood in my center console really needed some pulling on to get it to pop out but it did without breaking. I unscrewed the two screws for the ashtray. The ashtray did require allot of maneuvering to get out, but it will come out (it goes back in easier than it comes out). This is where things were a little different than explained in some other threads. I was expecting to find a black wire with a yellow stripe leading to the cigarette lighter but there was no black wire with a yellow stripe. There were two gray wires leading to the light for the ashtray, a brown wire leading to the lighter and two pink wires with green stripes that lead into one connection for the lighter. I suspected that the pink wires with the green stripe (could have been green with a pink stripe) were the 12V switched and that the brown was ground (a friend who has done stereos in German cars for sometime said that brown should always be the ground in a German car unless they went and changed the complete wiring system). I went and bought a voltmeter at Wally World and verified that it was correct. I used the t-connector and taped onto one of the pink/w green striped wires. I grounded it to one of the screws that requires an alan head to the left of the gear selector and everything worked great!!. I mounted the concealed display to my upper left on top of the driver air vent and it sits pretty well without any sticky tape. It is angled perfectly towards my eyes. Radar dectors are not illegal in NC and you will only see it if you are passing me. I was going to mount it in the instrument cluster but if the steering wheel is turned (I dirive on a twisty road quite a bit) it gets in the way of my line of sight. To get the concealed unit wire under the drivers leg compartment I used the air vent like the one on the passenger side and fed the wire up and around (behind the petals and over a few objects so that it will never hang down. I then just fished it up beside the dash like on the passenger side. Everything assembled easier than it came out and it looks great. I went on a road trip over the weekend and it kept me from getting a ticket where I think my old cheap unit would not have.
09-16-2005, 09:33 PM
#11
Transmission Oil and Filter Change
(Models post 99 can not do this service at home properly because there is no drain plug for the torque convertor on post 99 models. You ahve to take the car to get mechanically flushed in order to get all of the old fluid out)
- Jack up car as high as you can on 4 jack stands
- Drain tran. oil pan. (about 3 quarts will come out)
- Replace drain plug
- Rotate engine counterclockwise with 22mm socket on crankshaft until you can see the torque convertor drain plug through the oval bell housing.
- remove Torque conv. drain plug. (about 3 quarts will come out)
- Remove 6 bolts holding trans. pan. (Be careful because there will be about 1/2" of fluid left in the pan)
- Remove and replace filter
- Change gasket and replace pan
- Lower car on flat surface
- Fill to proper amount based on tranny model
- Use dip stick tool to check fluid level at hot mark when the trans. pan is 80C. (Level should be inbetween low and max mark of high reading)
(Make sure you torque the pan bolts, and drain plugs properly)
The following users liked this post:
josieclk320 (06-01-2016)
09-27-2005, 02:11 AM
#13
Originally Posted by TresX
Transmission Oil and Filter Change
(Models post 99 can not do this service at home properly because there is no drain plug for the torque convertor on post 99 models. You ahve to take the car to get mechanically flushed in order to get all of the old fluid out)
- Jack up car as high as you can on 4 jack stands
- Drain tran. oil pan. (about 3 quarts will come out)
- Replace drain plug
- Rotate engine counterclockwise with a 15mm hex bit on the crankshaft pully nut, until you can see the torque convertor drain plug through the oval bell housing.
- remove Torque conv. drain plug. (about 3 quarts will come out)
- Remove 6 bolts holding trans. pan. (Be careful because there will be about 1/2" of fluid left in the pan)
- Remove and replace filter
- Change gasket and replace pan
- Lower car on flat surface
- Fill to proper amount based on tranny model
- Use dip stick tool to check fluid level at hot mark when the trans. pan is 80C. (Level should be inbetween low and max mark of high reading)
(Make sure you torque the pan bolts, and drain plugs properly)
Correction.....
- To turn the engine in order to position the torque converter drain plug, use a 15mm hex bit with a long breaker bar. (Not a 22mm socket)
(it will be very difficult to find one at ANY parts store, I looked everywhere. What I ended up doing was getting a 15mm bolt and nut from the hardware store. I then secured the nut on the end of hte bolt until the nut was flush with the end of the bolt. Took it to a friends muffler shop, where he welded it into place for me. I stuck it in and placed a 15mm socket on my breaker bar. If this is too much effort for some of you guys, you can get the hex bit online or off of those Snap On trucks. I saw them on Ebay for $20. I spent $1.75, it's up to you. REMEMBER: the rear wheels must be elevated to turn the engine manually.
The following users liked this post:
gina326beaches (10-04-2021)
10-03-2005, 11:47 AM
#14
MBWorld Fanatic!
Changing MY'00+ Side Mirror Lights
Changing the Side Mirror Lights from Orange to White
HERE WE GO!!!
First, you'll need some tools and the bulbs. They are sylvania bulbs (available at PepBoys) model #2721 or #2723. Both will work. 2723 is a little bit brighter. You'll need between 3-6 packs to complete this job. Next, you'll need 2 torx screwdrivers. The proper size is #10. If you can, get a hold of a #9 also.
REMOVING THE MIRROR HOUSING:
There are four screws in total accessible from the mirror side. Use the controls to move the mirror away so it can be accessed easier. Use the #10 screwdriver to remove 3 screws, but use the #9 for the inside corner screw. Its hard to get the screwdriver in there, so a slightly smaller size head would work well.
The screws are basically located in each of the four corners. You will have to move the mirror everytime you remove 1 screw. For instance, move mirror to the inside, and to the top... then you can access the bottom right screw. Just follow that form to remove the other 3 screws.
After removing the screws, tug carefully until the outer lip of the mirror cover is out. Then, lift the outside housing UP then OUT... It won't come all the way off, but enough for you to work with the bulbs.
To change the bulbs, just use a small, flat screwdriver to pop the lights up. Don't try pulling the wires as you might break them. Simply pull those orange lights out, and put the new ones in.
Now, you can change all 6 bulbs per housing, but I recommend not to. I suggest you just change the 3 on the outside. Doing so will automatically shutoff the 3 on the inside (diff voltage). You can change all 6 per housing, and all 6 will light up, but it won't be as bright as if you only changed the outside 3. BUT, DO NOT REMOVE the 3 orange bulbs inside. Just leave them in place. Just change the outside 3.
And thats it. Just go backwards to put everything back. BUT, PLEASE TEST that everything works and all lights blink and flash appropriately before re-assembling the mirror housing.
Pictorial Comparison:
Original (Left) vs. New (Right)
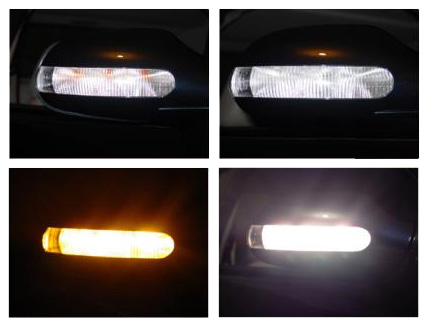
Good luck, and hope this helped.
Danny
HERE WE GO!!!
First, you'll need some tools and the bulbs. They are sylvania bulbs (available at PepBoys) model #2721 or #2723. Both will work. 2723 is a little bit brighter. You'll need between 3-6 packs to complete this job. Next, you'll need 2 torx screwdrivers. The proper size is #10. If you can, get a hold of a #9 also.
REMOVING THE MIRROR HOUSING:
There are four screws in total accessible from the mirror side. Use the controls to move the mirror away so it can be accessed easier. Use the #10 screwdriver to remove 3 screws, but use the #9 for the inside corner screw. Its hard to get the screwdriver in there, so a slightly smaller size head would work well.
The screws are basically located in each of the four corners. You will have to move the mirror everytime you remove 1 screw. For instance, move mirror to the inside, and to the top... then you can access the bottom right screw. Just follow that form to remove the other 3 screws.
After removing the screws, tug carefully until the outer lip of the mirror cover is out. Then, lift the outside housing UP then OUT... It won't come all the way off, but enough for you to work with the bulbs.
To change the bulbs, just use a small, flat screwdriver to pop the lights up. Don't try pulling the wires as you might break them. Simply pull those orange lights out, and put the new ones in.
Now, you can change all 6 bulbs per housing, but I recommend not to. I suggest you just change the 3 on the outside. Doing so will automatically shutoff the 3 on the inside (diff voltage). You can change all 6 per housing, and all 6 will light up, but it won't be as bright as if you only changed the outside 3. BUT, DO NOT REMOVE the 3 orange bulbs inside. Just leave them in place. Just change the outside 3.
And thats it. Just go backwards to put everything back. BUT, PLEASE TEST that everything works and all lights blink and flash appropriately before re-assembling the mirror housing.
Pictorial Comparison:
Original (Left) vs. New (Right)
Good luck, and hope this helped.
Danny
The following users liked this post:
gina326beaches (10-04-2021)
10-04-2005, 07:10 PM
#16
Out Of Control!!

That pics is of the wrong car. The crankshaft position sensor is actually located in the back of the engine (drivers side) close to the transmission (between firewall and engine). You should remove your airbox to get a good view of it.
12-02-2005, 10:16 PM
#17
Member

Join Date: Aug 2003
Location: Berkeley
Posts: 103
Likes: 0
Received 0 Likes
on
0 Posts
Cabin motor / blower voltage regulator
Part #: (Mine is a 2000 430 cab)
210-820-62-10
https://mbworld.org/forums/clk-class-w208/128140-cabin-fan-blower-fluctuates-like-crazy.html
Symptom: The airflow will fluctuate as if it can't stabelize it's fan speed. Unless powered off, no matter what fan level you set the blower will blow on various speed randomly.
Fix: Just like replacing a in-cabin air filter. Revmove the passenger side foot well's plastic panel. There is a plastic cover held by 2 slideing clips. Remove the cover to expose the blower. Replace the regulator that's screwed in by 2 torx screws.
Last edited by yuanja888; 12-02-2005 at 10:19 PM.
12-02-2005, 10:18 PM
#18
Member
Join Date: Aug 2003
Location: Berkeley
Posts: 103
Likes: 0
Received 0 Likes
on
0 Posts
Stop lamp switch
Part # 001-545-64-09
https://mbworld.org/forums/clk-class-w208/125080-bas-esp-abs-problem-diy-repair.html
https://mbworld.org/forums/clk-class-w208/125080-bas-esp-abs-problem-diy-repair.html
12-10-2005, 03:50 AM
#19
Member

Join Date: Jan 2005
Location: Richmond BC, Canada
Posts: 111
Likes: 0
Received 0 Likes
on
0 Posts
335is
umm after i remove my front bumper and reinstall my front bumper... the side markers don't work at all... both side don't work, got any ideas? i didn't pry out the side markers but when i pulled out the bumper i twisted the bulb+wiring out... and now it doesnt work, got any ideas?
12-13-2005, 11:24 PM
#20
Member
Join Date: Sep 2004
Location: San Diego
Posts: 79
Likes: 0
Received 0 Likes
on
0 Posts
2000 CLK430 Cabrio
Heres a few "How to" DYI pictorials I found helpful, all written by former member Greg210. These were done on an E class (210) but all of them should also apply to the CLK as well since these parts are mostly the same.
Brake Job - Changing pads and rotors
Oil Change
Steering Wheel Removal / Swap
Brake Job - Changing pads and rotors
Oil Change
Steering Wheel Removal / Swap
12-28-2005, 10:48 PM
#21
Super Member

Cabin Filter Replacement
*Mods* Please move this post to the top
The removal of the cabin filter is an easy DIY that will require a screw driver and your hands.
Here is the cabin filter i purchased for $30 shipped

The cabin filter is located on the passenger's side, below the glove compartment.

You will remove three screws so your can open the panel

The panel will loosen up and fall open

This is where you will be working. Slide the clips away from each other


When you remove this long, thin piece, be careful when removing it. There is a thin piece of plastic that you can easily snap off if removed improperly so slide this piece off carefuly

Once you remove the plastic piece, the cabin filter is revealed

Replace the old filter with the new one. Remember which way the filter was placed into the slot so you don't end up guessing. It's a tight area to work with so it's best to remove any mats you have on the passenger floor, you'll be needing as much room as you can.
After you replace the filter, you'll need to put the panel back on. There is a clip that holds the panel to the bottom of the glove compartment. Connect them.


Total time should take no longer than 20 minutes.
The removal of the cabin filter is an easy DIY that will require a screw driver and your hands.
Here is the cabin filter i purchased for $30 shipped
The cabin filter is located on the passenger's side, below the glove compartment.
You will remove three screws so your can open the panel
The panel will loosen up and fall open
This is where you will be working. Slide the clips away from each other
When you remove this long, thin piece, be careful when removing it. There is a thin piece of plastic that you can easily snap off if removed improperly so slide this piece off carefuly
Once you remove the plastic piece, the cabin filter is revealed
Replace the old filter with the new one. Remember which way the filter was placed into the slot so you don't end up guessing. It's a tight area to work with so it's best to remove any mats you have on the passenger floor, you'll be needing as much room as you can.
After you replace the filter, you'll need to put the panel back on. There is a clip that holds the panel to the bottom of the glove compartment. Connect them.
Total time should take no longer than 20 minutes.
Last edited by myNAMESterry; 12-29-2005 at 02:30 AM.
12-29-2005, 02:31 AM
#23
Super Member
Originally Posted by jtbeche
You didn't throw in the http://
Also, in the second pic you put 2/jpg rather than 2.jpg
Just letting you know.
Also, in the second pic you put 2/jpg rather than 2.jpg
Just letting you know.
 01-21-2006, 11:31 PM
#24
MBWorld Fanatic!
KEY HOUSING SWAP (Black star keys to Chrome star keys)
https://mbworld.org/forums/clk-class-w208/134131-i-have-solved-key-housing-swap-delimma.html
https://mbworld.org/forums/clk-class-w208/134131-i-have-solved-key-housing-swap-delimma.html
01-25-2006, 03:00 AM
#25
MBWorld Fanatic!
OOOOOO Just found some great squeak fixes in the C-class forums (i need to look over there more often)
https://mbworld.org/forums/c-class-w203/88346-rattles-ticking-knocking-rattling-diy-fix.html
https://mbworld.org/forums/c-class-w203/88346-rattles-ticking-knocking-rattling-diy-fix.html


