
Vogtland Springs......
 02-26-2015, 01:57 PM
#1
Senior Member
Thread Starter
Vogtland Springs......
........and spring compressor arrived this week. I'm going to reuse the original spring pads and let everything settle before deciding if I need to tweak either axle. Looking forward to the visual drop as well as the ride and handling changes. I just need some time and warmth to do the work - probably next week. I will take some install pics and post driving impressions when done. Excited!
 02-26-2015, 03:13 PM
#3
Senior Member
Thread Starter
02-26-2015, 05:22 PM
#4
MBWorld Fanatic!
02-26-2015, 06:01 PM
#5
Senior Member
Thread Starter
I bought it from an eBay vendor called mechanicstopia. It was $133 including shipping. Oddly enough, they have the same kit in their store for $120 but it has a $25 shipping charge. The tool kit weight was listed at 12 pounds and the springs at 20 pounds.
Last edited by ddb; 02-27-2015 at 08:04 PM.
03-02-2015, 07:33 PM
#6
Senior Member
Thread Starter
Long with a lot of pictures......
I was able to get my springs installed this weekend. As promised, I took some pictures and will share some of my thoughts for those who will be doing the same in the future. The details about the springs and spring compressor are in the posts above. Here are some full size pictures of the springs and the compressor:


I started on the driver’s side front spring and jacked up the car using the side front jacking point. I removed the front tire for more access. It may be possible to remove / install the springs without removing the tire, especially if you turn the wheel all the way to the left while working on the driver’s side. I just removed the tire and left the steering pointed straight. A picture of the spring with the wheel off:

It is important to note how the bottom of the spring rests in the spring base in the lower control arm. There's a raised circular section that the spring surrounds and there is an indentation that the end of the spring coil rests against. You want to make sure the new spring is sitting in the base like the old one was sitting. The same is true with the rear springs, but it is more difficult to see it. You can feel the indentation in the rear control arm and make sure the spring is properly seated rather easily. Here is a picture of the front spring base in the lower control arm:

The spring compressor kit comes with two sets of discs and the telescoping cylinder. For our cars, we use the two smaller discs:
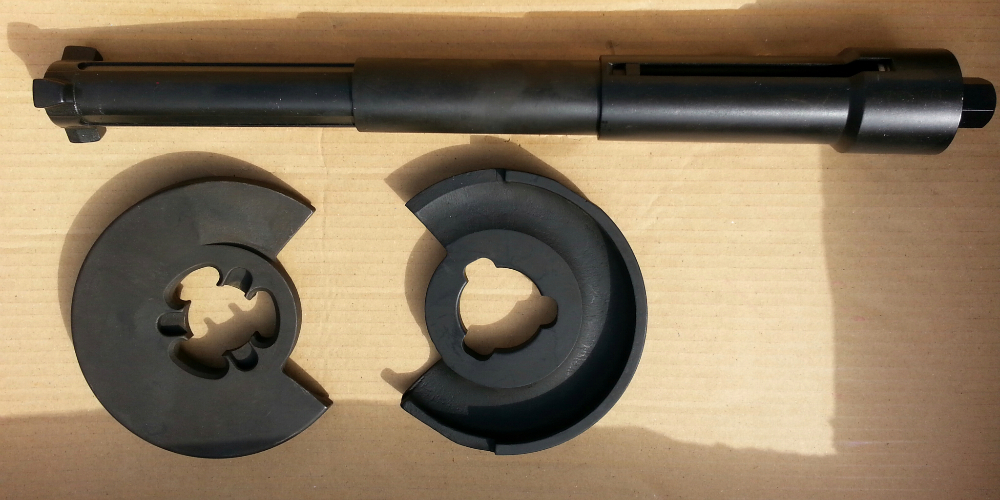
Note that the discs are different. There’s an upper disc and a lower disc. The upper disc has 3 large semi-oval holes to allow the triangular, top of the cylinder to go through it, plus 3 sets of indentations to allow the cylinder to lock in place to prevent, or minimize, the chances of the cylinder and upper disc to separate under tension:

It is rather simple from here. You just insert the upper disc towards the top of the spring and the lower disc towards the bottom of the spring; insert the cylinder through the hole in the bottom of the lower control arm feeding it through the lower disc up to the upper disc; then rotate the cylinder until it locks in the three indents that secure the cylinder with the upper disc. My first attempt at compressing and removing the spring was unsuccessful. I didn’t have the upper disc high enough or the lower disc low enough. Although the spring was compressed, it wasn’t compressed enough to get it out. I had to decompress the spring, spread the discs out as far as possible, and compress it again. It then came out easily. So just make sure you start with the discs spaced as high and low as the discs will securely sit on the coils. You need a 19mm socket with an extension to ratchet the cylinder to compress and decompress the springs. Here is a picture of the front spring being compressed and of it removed from the car:


My car, like most others that I’ve read about, has # 3 spring pads that I reused:

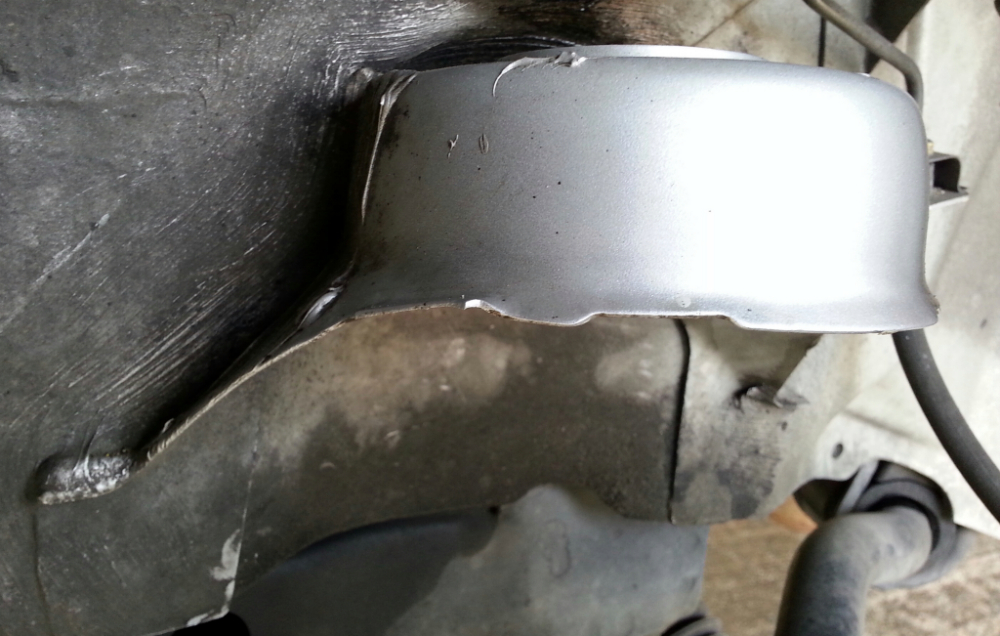
This is a good time to inspect the front, upper spring mounts that are known to rust, weaken, and eventually fail if they are in really bad shape. I had looked at mine previously, but with the front springs out you have really good access. I cleaned and inspected them and fortunately they were in good shape:

While the springs are out it is a good idea to clean the lower spring base in the lower control arms. Mine had grit and debris in them. Especially the front ones, which aren’t covered like the rear control arms:

You are now ready to compress the new spring, install the spring pad on top of the spring, and install it in the car. The tricky part during this step is spacing the discs apart far enough to compress the spring enough to squeeze it in place, but not apart so far that you won’t be able to get the top and bottom of the spring to sit in place without interference from the discs. I had this problem and had to decompress the spring, shorten the distance between the two discs, and compress it again to get it to fit properly. You just have to try and adjust until you get it to work. Once you get the spring to sit properly in the base, make sure you have the bottom end of the coil lined up with the indentation on the bottom of the lower control arm. You are now ready to decompress the spring, ensuring that the top is going correctly in the upper spring mount. You are done with the front. I’m glad you can’t see these colors once the tires are on the car.

I next moved to the driver’s side rear. I actually removed the first rear spring with the rear tire on the car. I later removed the rear tire when I experienced some difficulty during the installation of the new spring, and would recommend removing the rear tires. You first remove the plastic cover that protects the lower control arm by removing two, 10mm screws, and then popping the cover off. This gives you access to the hole in the bottom of the control arm for the cylinder to feed through. For removing the springs in the rear it is not as important to have as much spacing as possible with the discs because even with maximum spacing you will not be able to get the spring out, at least I couldn’t. Maybe others have been successful. So I had to remove the inside pivot bolt on the control arm. You need two 18mm sockets / ratchets (or wrench ) to remove the nut and bolt. Once the bolt is removed you can easily lower the control arm down and remove the compressed spring. Some remove the springs without compressing it by using a floor jack to control the lowering of the control arm until all of the tension is off of the spring. I wouldn’t suggest this method. I think it is much safer to compress the spring before lowering the control arm. Picture of the OE rear spring, spring being compressed, and the control arm pivot bolt removed:


With the control arm bolt removed, placing the new, compressed spring in place is easy. On one side, I had a very difficult time getting the holes in the control arm to line up and the bolt in. On the other side, it couldn’t have gone more smoothly. One difference between the two sides, and I don’t know if it contributed to the difficulty on one side, was that I had compressed the new spring a lot on the difficult side. I could easily force the end of the control arm up with my hands attempting to get the bolt in, which I finally did. On the other side, where the bolt went in easily, I didn’t compress the new spring as much (inadvertently), and wasn’t able to move the control arm up with my own power. So I used an extra floor jack to move up the control arm and the bolt went directly in. I’m not sure, but I think the tension helped line up the bolt holes where it naturally was suppose to be. I wasn’t able to find the proper torque for this bolt. If anyone knows the torque specification, please let me know. The installed rear spring:

I would guess it took me around 8 hours to do the install.That includes time to snap pictures, frustration breaks, lunch, cleaning the barrel of the wheels etc. It isn’t an easy job, especially without a lift. You are on your back, lifting a decent amount of weight, ratcheting the compressor (more times than you should in my case) which gets old after a while. I can’t emphasize the need to be careful making sure the car is stable while working under it, and to be careful compressing and decompressing the springs. I couldn’t avoid thinking about what would happen if the compressor failed. So I always would try to position myself, and the spring, in the safest possible fashion. I’m sure I could shave a lot of time off the job if I had to do it again.
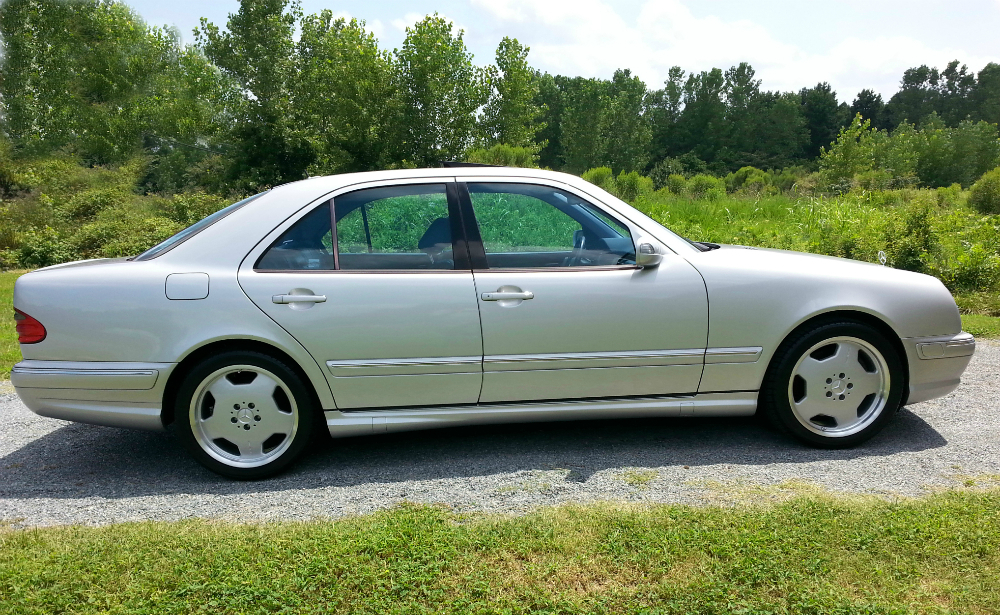
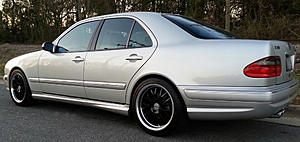
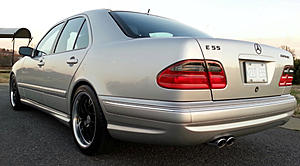
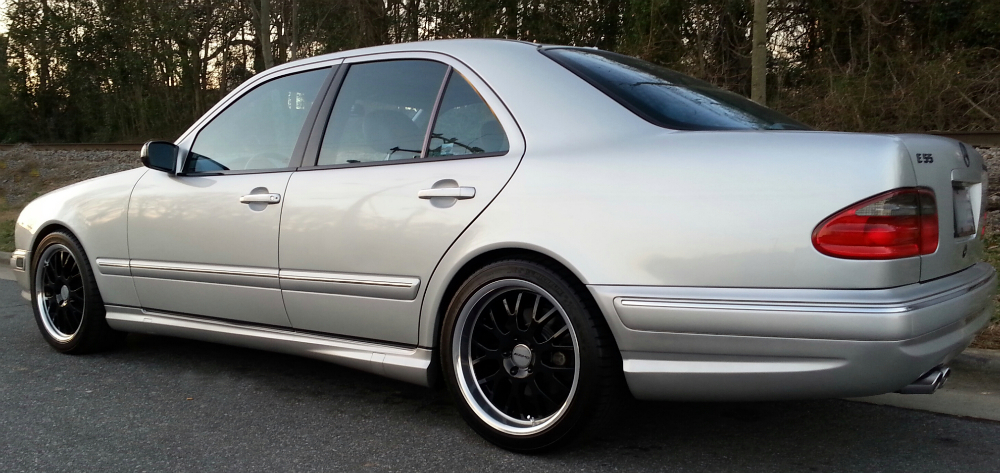
I’ve driven the car 40 miles since the install. The new springs are stiffer than the US OE springs, but they aren’t offensive at all. I haven’t pushed the car yet so I don’t know how the car will feel when the springs get into their compound spring rates. I did some rough measurements before the install and after the 40 miles, on average, the car is one inch lower. I’m sure the car will settle some more as I put more miles on it. I will drive it untilI think everything is settled and then go in for an alignment to ensure everything is good.
Some before and after pictures:


Last edited by ddb; 03-03-2015 at 07:46 AM.
03-02-2015, 07:36 PM
#7
Senior Member
Thread Starter
Sorry for the typos. I copied the text from Word and for some reason it ran a lot of words together. Now I can't seem to fix them.
Typos corrected. At least most of them.
Typos corrected. At least most of them.
Last edited by ddb; 03-02-2015 at 08:39 PM.
Trending Topics
03-03-2015, 03:47 AM
#9
Super Member

Join Date: Dec 2009
Location: Dhahran, KSA
Posts: 743
Received 91 Likes
on
73 Posts
2020 E 300 Coupe and 2019 GLS 400
Well done! I would never tackle a spring job. It just makes me nervous.
The ride looks great now . I used to have H&R but re-installed the factory springs
  .
.
Faiz
The ride looks great now
. I used to have H&R but re-installed the factory springs .Faiz
03-03-2015, 08:07 AM
#10
Senior Member
Thread Starter
03-03-2015, 08:11 AM
#11
Senior Member
Thread Starter
03-03-2015, 08:33 AM
#12
MBWorld Fanatic!
When I took the rear spring out on my 4-matic I just removed the bolt on the bottom of the shock and pushed the control arm down a bit by hand and the spring came right out. Took less than 15 minutes per side and did not need a compressor. I just used a floor jack to lift the control arm into place and line up the bolt for the reinstall.
03-04-2015, 08:31 AM
#15
Senior Member
Thread Starter
Thanks, Tall Giraffe. Yes, # 3 spring pads in the rear as well. The front and rear spring pads are unique with different part numbers. I know owners sometimes run pads with different thicknesses in the front versus the rear. But I don't know if it is possible to have different thicknesses installed from the factory.
03-04-2015, 08:37 AM
#16
Senior Member
Thread Starter
Got it - makes a lot of sense dealing with your weather. I have mixed feeling on lowering. Although I don't think I will change back, I'm holding on to the OE springs. Time will tell if the harsher ride will become annoying to me down the road.
03-08-2015, 11:32 AM
#17
Senior Member
Thread Starter
Update
I only have 135 miles on the springs so I feel like they will settle some more. Thus far, I'm really liking the lowered look; it is right about what I wanted. I always have the option down the road of replacing the #3 pads with #1's if I want it lower.
I had planned on installing my second set of wheels on the first of April, but decided I wanted to see them with the new springs now.


I had planned on installing my second set of wheels on the first of April, but decided I wanted to see them with the new springs now.


 03-09-2015, 12:20 PM
#18
MBWorld Fanatic!
Looking good!!
This is so on my near future to do list. At the moment though, I am due for brakes and rotors all the way around and I am heavily debating C32 Brakes vs stock replacements.
Some questions.
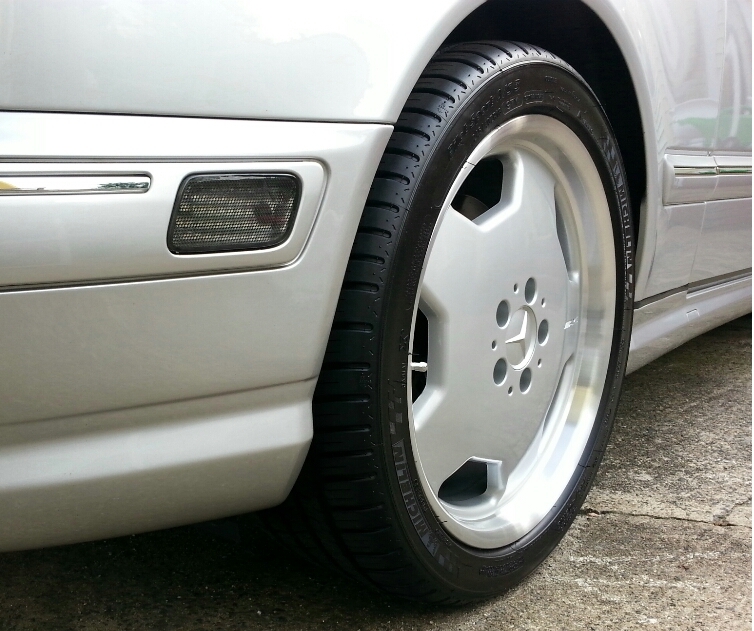
Those look like 18", so how is the ride quality after a week? I have 18" Replicas now but have considered going to 19" but I don't want to chip my teeth on every bump.
Also (off topic) did you refinish your front window trim? I see the back window trim is purpling slightly. I am about to powder coat the trim in Black Chrome.
This is so on my near future to do list. At the moment though, I am due for brakes and rotors all the way around and I am heavily debating C32 Brakes vs stock replacements.
Some questions.
Those look like 18", so how is the ride quality after a week? I have 18" Replicas now but have considered going to 19" but I don't want to chip my teeth on every bump.
Also (off topic) did you refinish your front window trim? I see the back window trim is purpling slightly. I am about to powder coat the trim in Black Chrome.
03-09-2015, 05:49 PM
#19
Senior Member
Thread Starter
Looking good!!
This is so on my near future to do list. At the moment though, I am due for brakes and rotors all the way around and I am heavily debating C32 Brakes vs stock replacements.
Some questions.
Those look like 18", so how is the ride quality after a week? I have 18" Replicas now but have considered going to 19" but I don't want to chip my teeth on every bump.
Also (off topic) did you refinish your front window trim? I see the back window trim is purpling slightly. I am about to powder coat the trim in Black Chrome.
Keep us informed if you go with the C brakes. That will be an interesting project to follow.
I now have 175 miles on the new springs and the ride is great. The springs are stiffer, which was more noticeable right after the install, but now the ride feels very similar to the old ride. I don't know if I've simply adapted to the slightly stiffer ride or if the springs have settled some and feel more compliant.
My aftermarket TSW wheels are indeed 18's. I would love having 19's, but didn't want the added weight usually gained with larger tires and wheels. I've gone that route previously on another car and it was amazing how sluggish the car became with the bigger, heavier setup. The TSW's weigh around the same as the OE wheels.
Are you referring to the trim around the windshield? I haven't touched it. I have replaced the horizontal door trim pieces. I thought about having them re-anodized after deciding not to paint the pieces myself. But I opted to buy the four horizontal door pieces new a year and a half ago. So far they are decent, but I can see some discoloration in them. Powder coating sounds like a great idea. Let us know how it turns out. What all are you going to include? The four horizontal door pieces? The two vertical pieces that separate the rear door glass from the stationary section? I tried to figure out how to remove the vertical trim pieces but didn't make any progress. What about the trim around the rear glass?
Thanks,
ddb
03-09-2015, 09:46 PM
#20
MBWorld Fanatic!
Looking really clean! You should really look into Depo Headlights/Retro fit. It will completely transform the nose of the car. Plus you will enjoy being able to cut down trees with your laser show 
*LED for rear license plate, LED for city driving lights and matching LED for fogs (Also don't forget LED for cabin) Did I say LED all around
Armani
*LED for rear license plate, LED for city driving lights and matching LED for fogs (Also don't forget LED for cabin) Did I say LED all around
Armani
03-09-2015, 11:17 PM
#21
Senior Member
Thread Starter
Looking really clean! You should really look into Depo Headlights/Retro fit. It will completely transform the nose of the car. Plus you will enjoy being able to cut down trees with your laser show
*LED for rear license plate, LED for city driving lights and matching LED for fogs (Also don't forget LED for cabin) Did I say LED all around
Armani
*LED for rear license plate, LED for city driving lights and matching LED for fogs (Also don't forget LED for cabin) Did I say LED all around
Armani
 03-10-2015, 02:27 PM
#22
MBWorld Fanatic!
Thanks, T G.
Keep us informed if you go with the C brakes. That will be an interesting project to follow.
I now have 175 miles on the new springs and the ride is great. The springs are stiffer, which was more noticeable right after the install, but now the ride feels very similar to the old ride. I don't know if I've simply adapted to the slightly stiffer ride or if the springs have settled some and feel more compliant.
My aftermarket TSW wheels are indeed 18's. I would love having 19's, but didn't want the added weight usually gained with larger tires and wheels. I've gone that route previously on another car and it was amazing how sluggish the car became with the bigger, heavier setup. The TSW's weigh around the same as the OE wheels.
Are you referring to the trim around the windshield? I haven't touched it. I have replaced the horizontal door trim pieces. I thought about having them re-anodized after deciding not to paint the pieces myself. But I opted to buy the four horizontal door pieces new a year and a half ago. So far they are decent, but I can see some discoloration in them. Powder coating sounds like a great idea. Let us know how it turns out. What all are you going to include? The four horizontal door pieces? The two vertical pieces that separate the rear door glass from the stationary section? I tried to figure out how to remove the vertical trim pieces but didn't make any progress. What about the trim around the rear glass?
Thanks,
ddb
I have read where the weight of the rotors and calipers are less on the "C32" setup than OEM but cant prove it myself with numbers. I also have BP S04 which I read are a few lbs heavier. This go around I will opt for a lighter Michelin PSS whether 18" or 19" So the thinking is the difference in weight of the 19" and tire would be reduced by the weight reduction in brakes and slightly lighter tires, at least up front. Maybe I'm wrong and I would hate to have reverse wheel remorse. I debated heavily when I bought the replicas but went with 18" for your same reasons. Looking at CLK550 reman calipers and C32 rotors. Performance difference of OEM and mod brakes is also a consideration.
Here is what I am working with.

I think a plastic trim wedge or screwdriver wrapped in painters tape is the method to carefully remove trim. The longer horizontal is an upward motion and I think the trim on the back window requires getting underneath the rubber and prying up.The rear window starts similarly with the caps first then the longer pieces. I think with the vertical CF window pillar, I would wrap in vinyl either carbon fiber or silver carbon fiber for fun. I wanted to "Hematite" but the durability and look of the powder coating seemed the better choice as recommended by a forum member here in one of the threads. I may paint those and the calipers at the same time.
Originally Posted by armaniE55
You should really look into Depo Headlights/Retro fit...Plus you will enjoy being able to cut down trees with your laser show
I love the stock too but never can have too much light.TG
03-10-2015, 03:54 PM
#23
Senior Member
Thread Starter
Yes, Koni Sport Adjustables. I like them. I installed them a year or a year and a half ago. At the time, I thought I would play with the settings until I had them just perfect. I installed them on the softest setting and haven't touched them since. So in retrospect, maybe I should have chosen the Koni FSD's. If I ever wear these out I will probably go with the FSD's. The front adjustments are easy to get to, so at some point I may turn them up just to experience the difference. The rear adjustments are a little more difficult to reach (behind the trunk cladding).
I don't think you will suffer any remorse if you go with 19's. They will look terrific and ride just fine. Have you decided on a wheel? The spring drop will make such a nice change as well.
She's a beauty! How many miles? I like the modern E wheels.
Yep, I used a plastic trim wedge to remove the horizontal door trim pieces, but didn't see a way to get that rear window vertical piece out. I took the door panel off without any luck. I have a set of these vertical pieces and they have holes that aren't seen when installed and appear to be there for a bolt to go through. I can't find the bolt. I'm probably missing something simple.
Have you removed the rear windshield trim with the caps? It looks easy, but I'm afraid of making a mess out of it.
I removed the b-pillar CF looking pieces and had them hydro-dipped to match my grill, mirrors, HVAC fresh air vents on the hood, and engine cover. For some reason they didn't look as dark as the other pieces. I had them redone to make them look darker and they still didn't look right to me. So I attempted to darken them myself with some rattle can tinted clear. After wet sanding and polishing them I was able to get them to look the way I wanted them, but they don't look perfectly smooth like they did before I attempted to fix them. So at some point, I will try something else, maybe a wrap. It won't match the other CF bits, but shouldn't be that noticeable.
I have read where the weight of the rotors and calipers are less on the "C32" setup than OEM but cant prove it myself with numbers. I also have BP S04 which I read are a few lbs heavier. This go around I will opt for a lighter Michelin PSS whether 18" or 19" So the thinking is the difference in weight of the 19" and tire would be reduced by the weight reduction in brakes and slightly lighter tires, at least up front. Maybe I'm wrong and I would hate to have reverse wheel remorse. I debated heavily when I bought the replicas but went with 18" for your same reasons. Looking at CLK550 reman calipers and C32 rotors. Performance difference of OEM and mod brakes is also a consideration.
She's a beauty! How many miles? I like the modern E wheels.
I think a plastic trim wedge or screwdriver wrapped in painters tape is the method to carefully remove trim. The longer horizontal is an upward motion and I think the trim on the back window requires getting underneath the rubber and prying up.The rear window starts similarly with the caps first then the longer pieces. I think with the vertical CF window pillar, I would wrap in vinyl either carbon fiber or silver carbon fiber for fun. I wanted to "Hematite" but the durability and look of the powder coating seemed the better choice as recommended by a forum member here in one of the threads. I may paint those and the calipers at the same time.
Have you removed the rear windshield trim with the caps? It looks easy, but I'm afraid of making a mess out of it.
I removed the b-pillar CF looking pieces and had them hydro-dipped to match my grill, mirrors, HVAC fresh air vents on the hood, and engine cover. For some reason they didn't look as dark as the other pieces. I had them redone to make them look darker and they still didn't look right to me. So I attempted to darken them myself with some rattle can tinted clear. After wet sanding and polishing them I was able to get them to look the way I wanted them, but they don't look perfectly smooth like they did before I attempted to fix them. So at some point, I will try something else, maybe a wrap. It won't match the other CF bits, but shouldn't be that noticeable.
03-10-2015, 06:42 PM
#24
MBWorld Fanatic!
Shocks - These are my next to last item to replace though I wonder how the OEM would respond to Vogtlands?
Wheels- Well I am a little leery of the added weight which was my original reason I opted away from the 19". That and ride quality. Maybe the springs and future shocks can soften the blows. I drive cautiously and stay away from the beat up streets as much as possible. Sweetness will definitely be in the looks! Would you believe that I would keep the same wheels yet bigger? I like to mix the old and new which is why I liked the E63 wheels- just seems to work. Ive considered the multispoke on the new S63/E63 but do not think they would look good on our body styles. Either way lowering it would!
Thank you! Just turned the century mark last night. Its a great car!
Once time becomes available and weather clears Ill attempt to dismantle the trim pieces and Ill let you know.
TG
Wheels- Well I am a little leery of the added weight which was my original reason I opted away from the 19". That and ride quality. Maybe the springs and future shocks can soften the blows. I drive cautiously and stay away from the beat up streets as much as possible. Sweetness will definitely be in the looks! Would you believe that I would keep the same wheels yet bigger? I like to mix the old and new which is why I liked the E63 wheels- just seems to work. Ive considered the multispoke on the new S63/E63 but do not think they would look good on our body styles. Either way lowering it would!
Thank you! Just turned the century mark last night.
Its a great car!Once time becomes available and weather clears Ill attempt to dismantle the trim pieces and Ill let you know.
TG


