When you click on links to various merchants on this site and make a purchase, this can result in this site earning a commission. Affiliate programs and affiliations include, but are not limited to, the eBay Partner Network.
K-MAC Bushing Install Guide for W211 with Airmatic
Finally had time to install my K-MAC bushings in the front end. Sadly, we did not have time to install the rear bushings, so we will do that in a few weeks and I will update this thread at that time. Here is the process as I documented it.
Here is a side-profile picture looking down the side of the car. You can see the negative camber our lowered rides are dealing with. Note that I am running the MB crash bolts in the front, which only allow so much adjustment, definitely not enough to get back to factory specs.
These are my alignment specs before any work was done. Turns out I had some pretty bad front end toe issues. Last alignment was about 9-12 months ago.
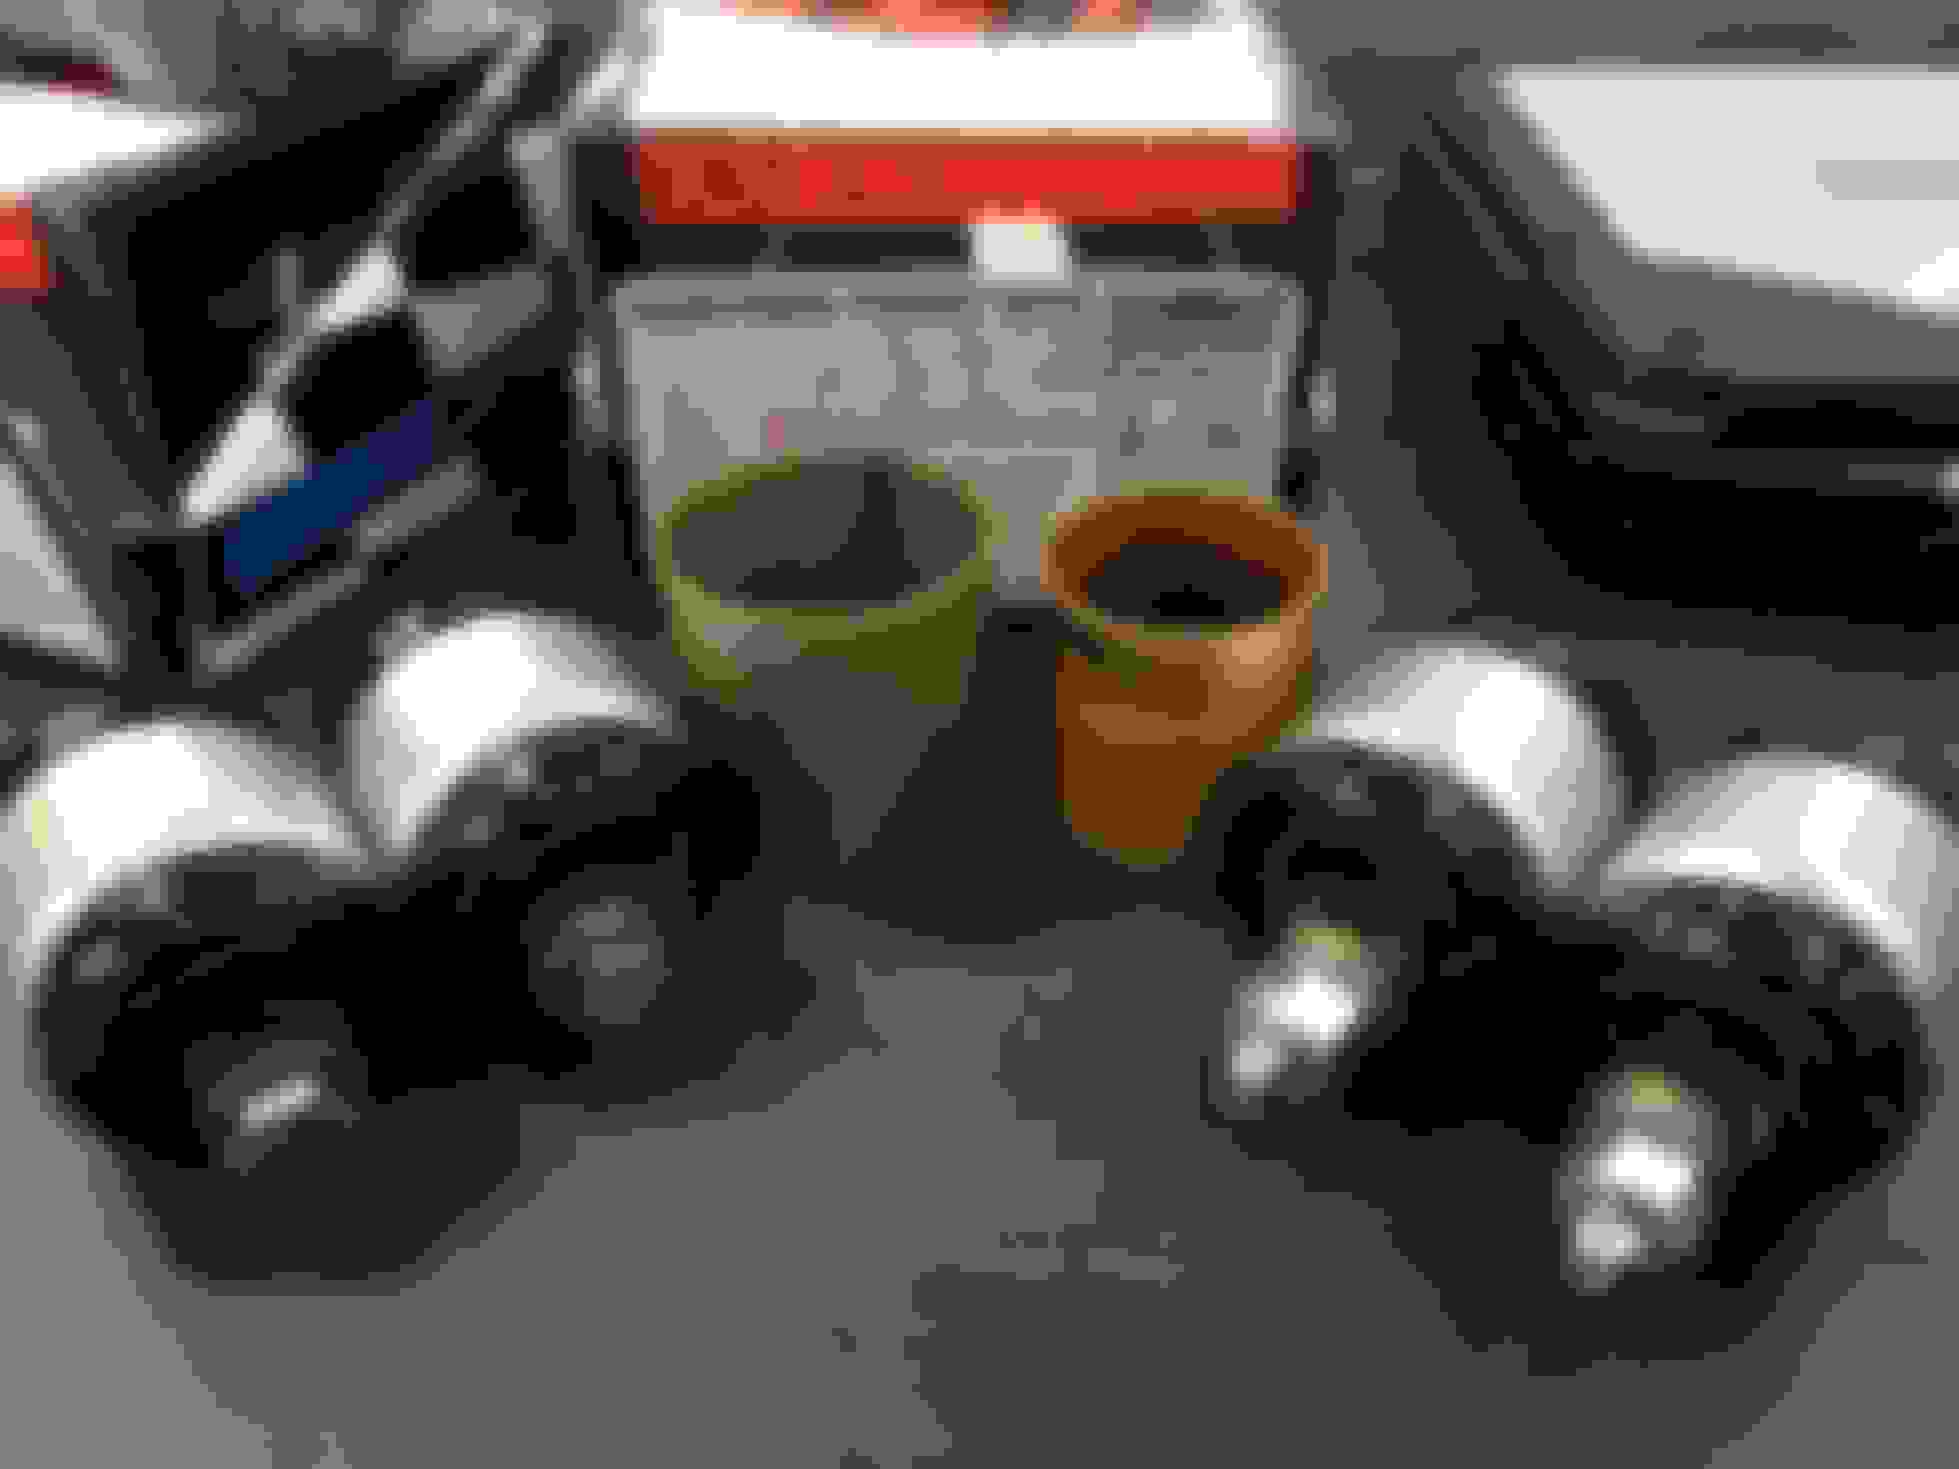
This is what you get in the Front End kit (part #502216 K). 4 identical bushings, 1 extractor tool & 1 press tool seat.
Step 1) Remove both front wheels and all three front belly pans. Also, deflate the front struts into the service position (3 BAR of pressure) using STAR DAS.
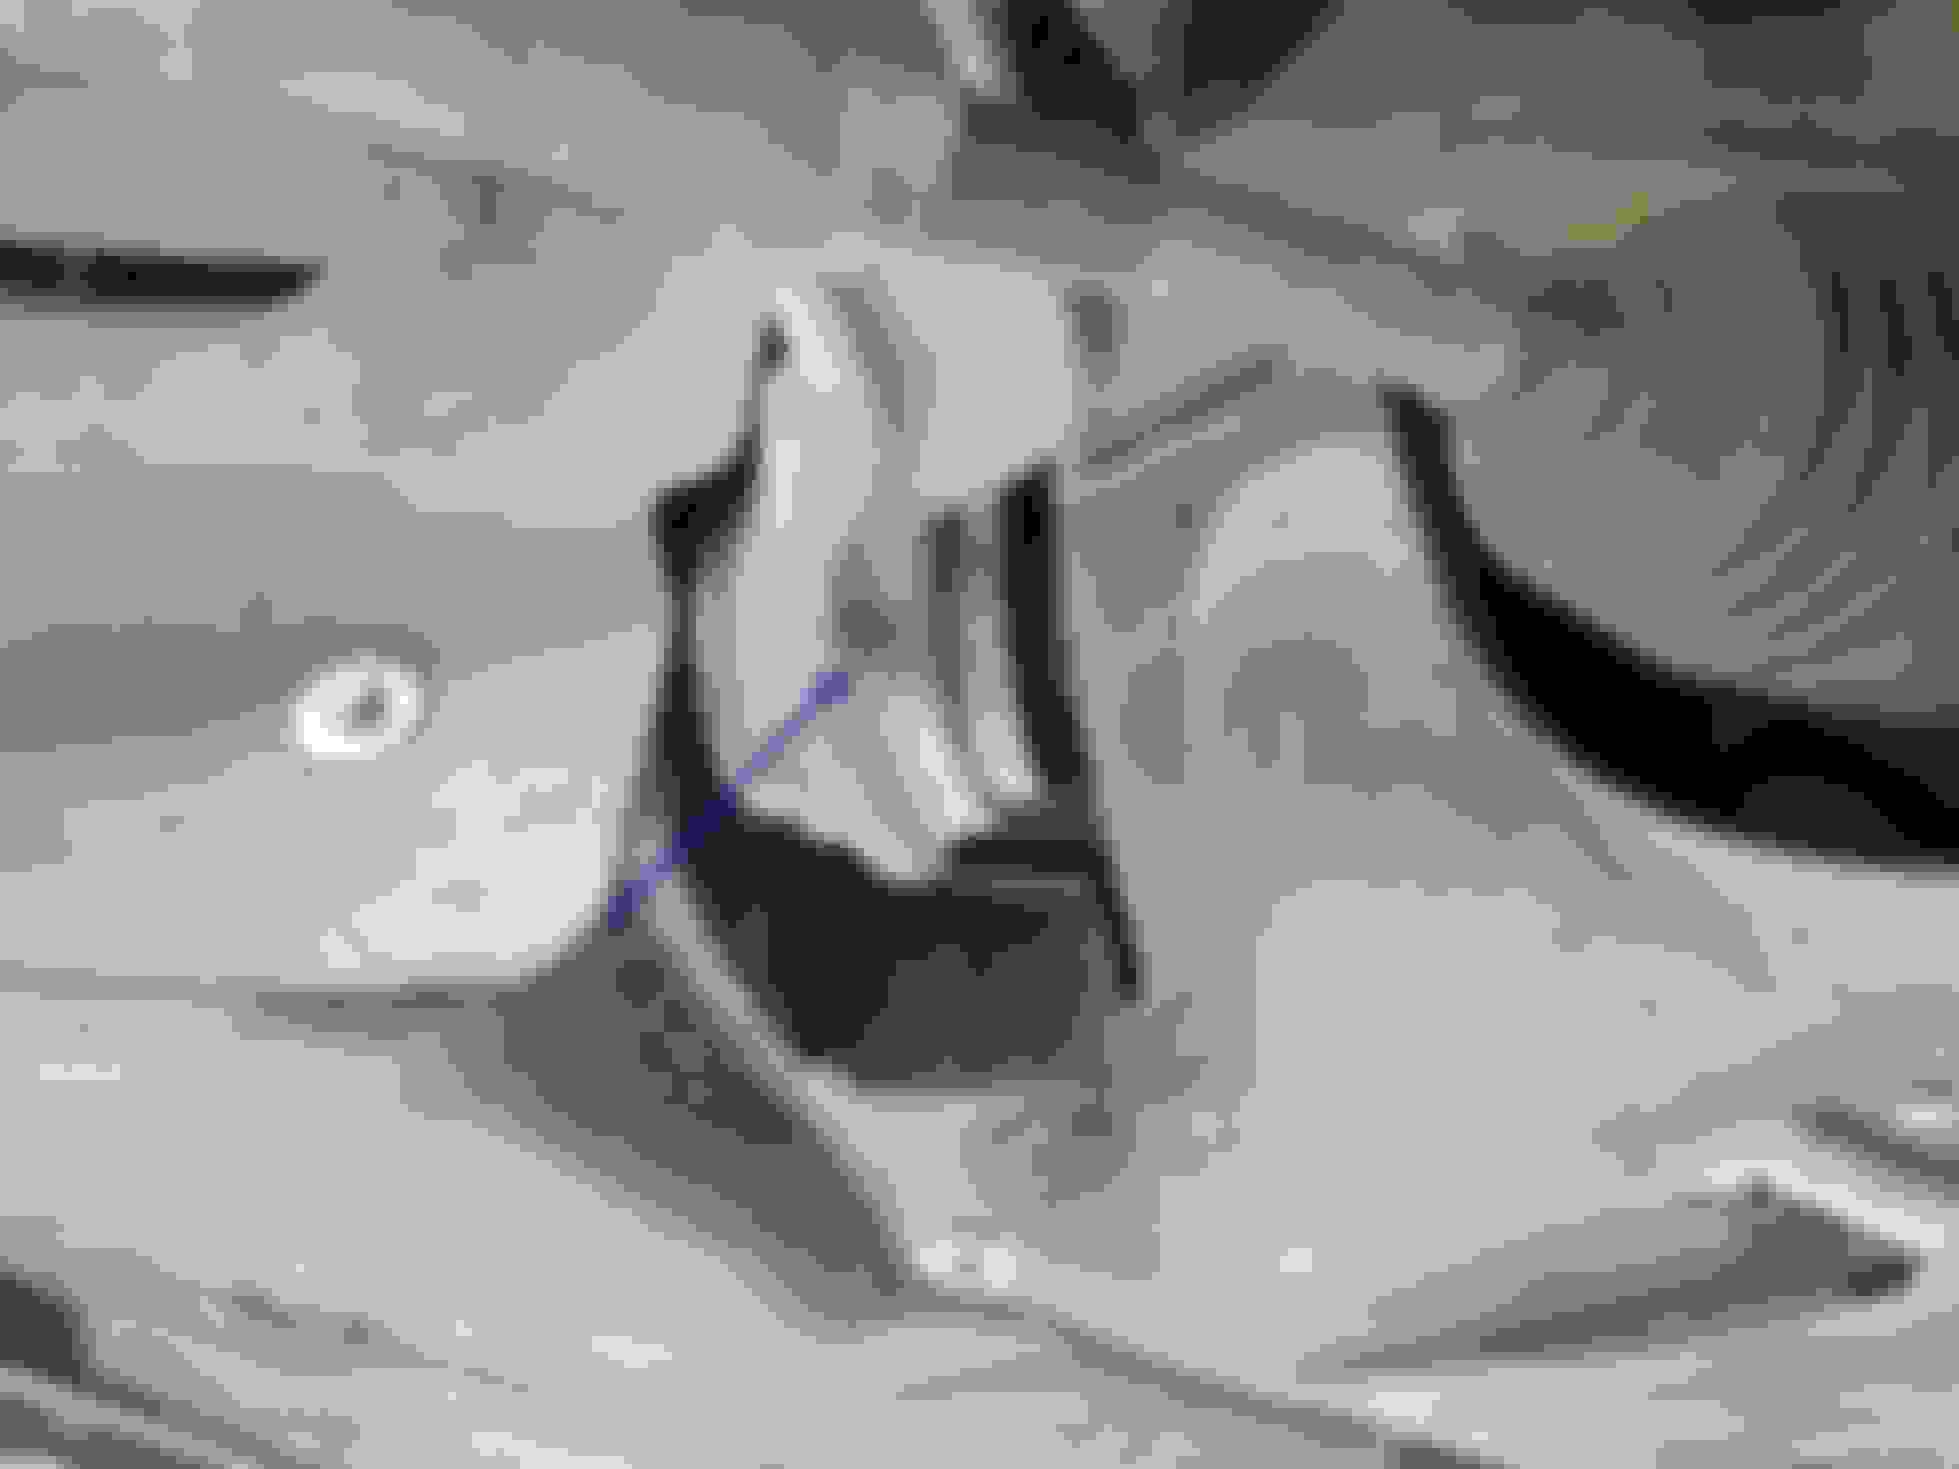
Step 2) Unbolt the torque arm ball joint (blue arrow) from the steering knuckle. If you want more working room, as I did, then also unbolt the tie rod (yellow arrow) from the steering knuckle. If you don't have special tools for removing the ball joints, then you will have to use a big *******g hammer to hit the spots the arrows indicate in order to break the ball joints loose from the knuckle. The BJs are coned, so when they let go, they will pop out. I recommend spraying the area with some sort of lubricating spray and then letting it soak for a while in order to make it easier. Note: Never, ever hit the end of the ball joint in an attempt to dislodge it as you will mushroom the head and ruin it.
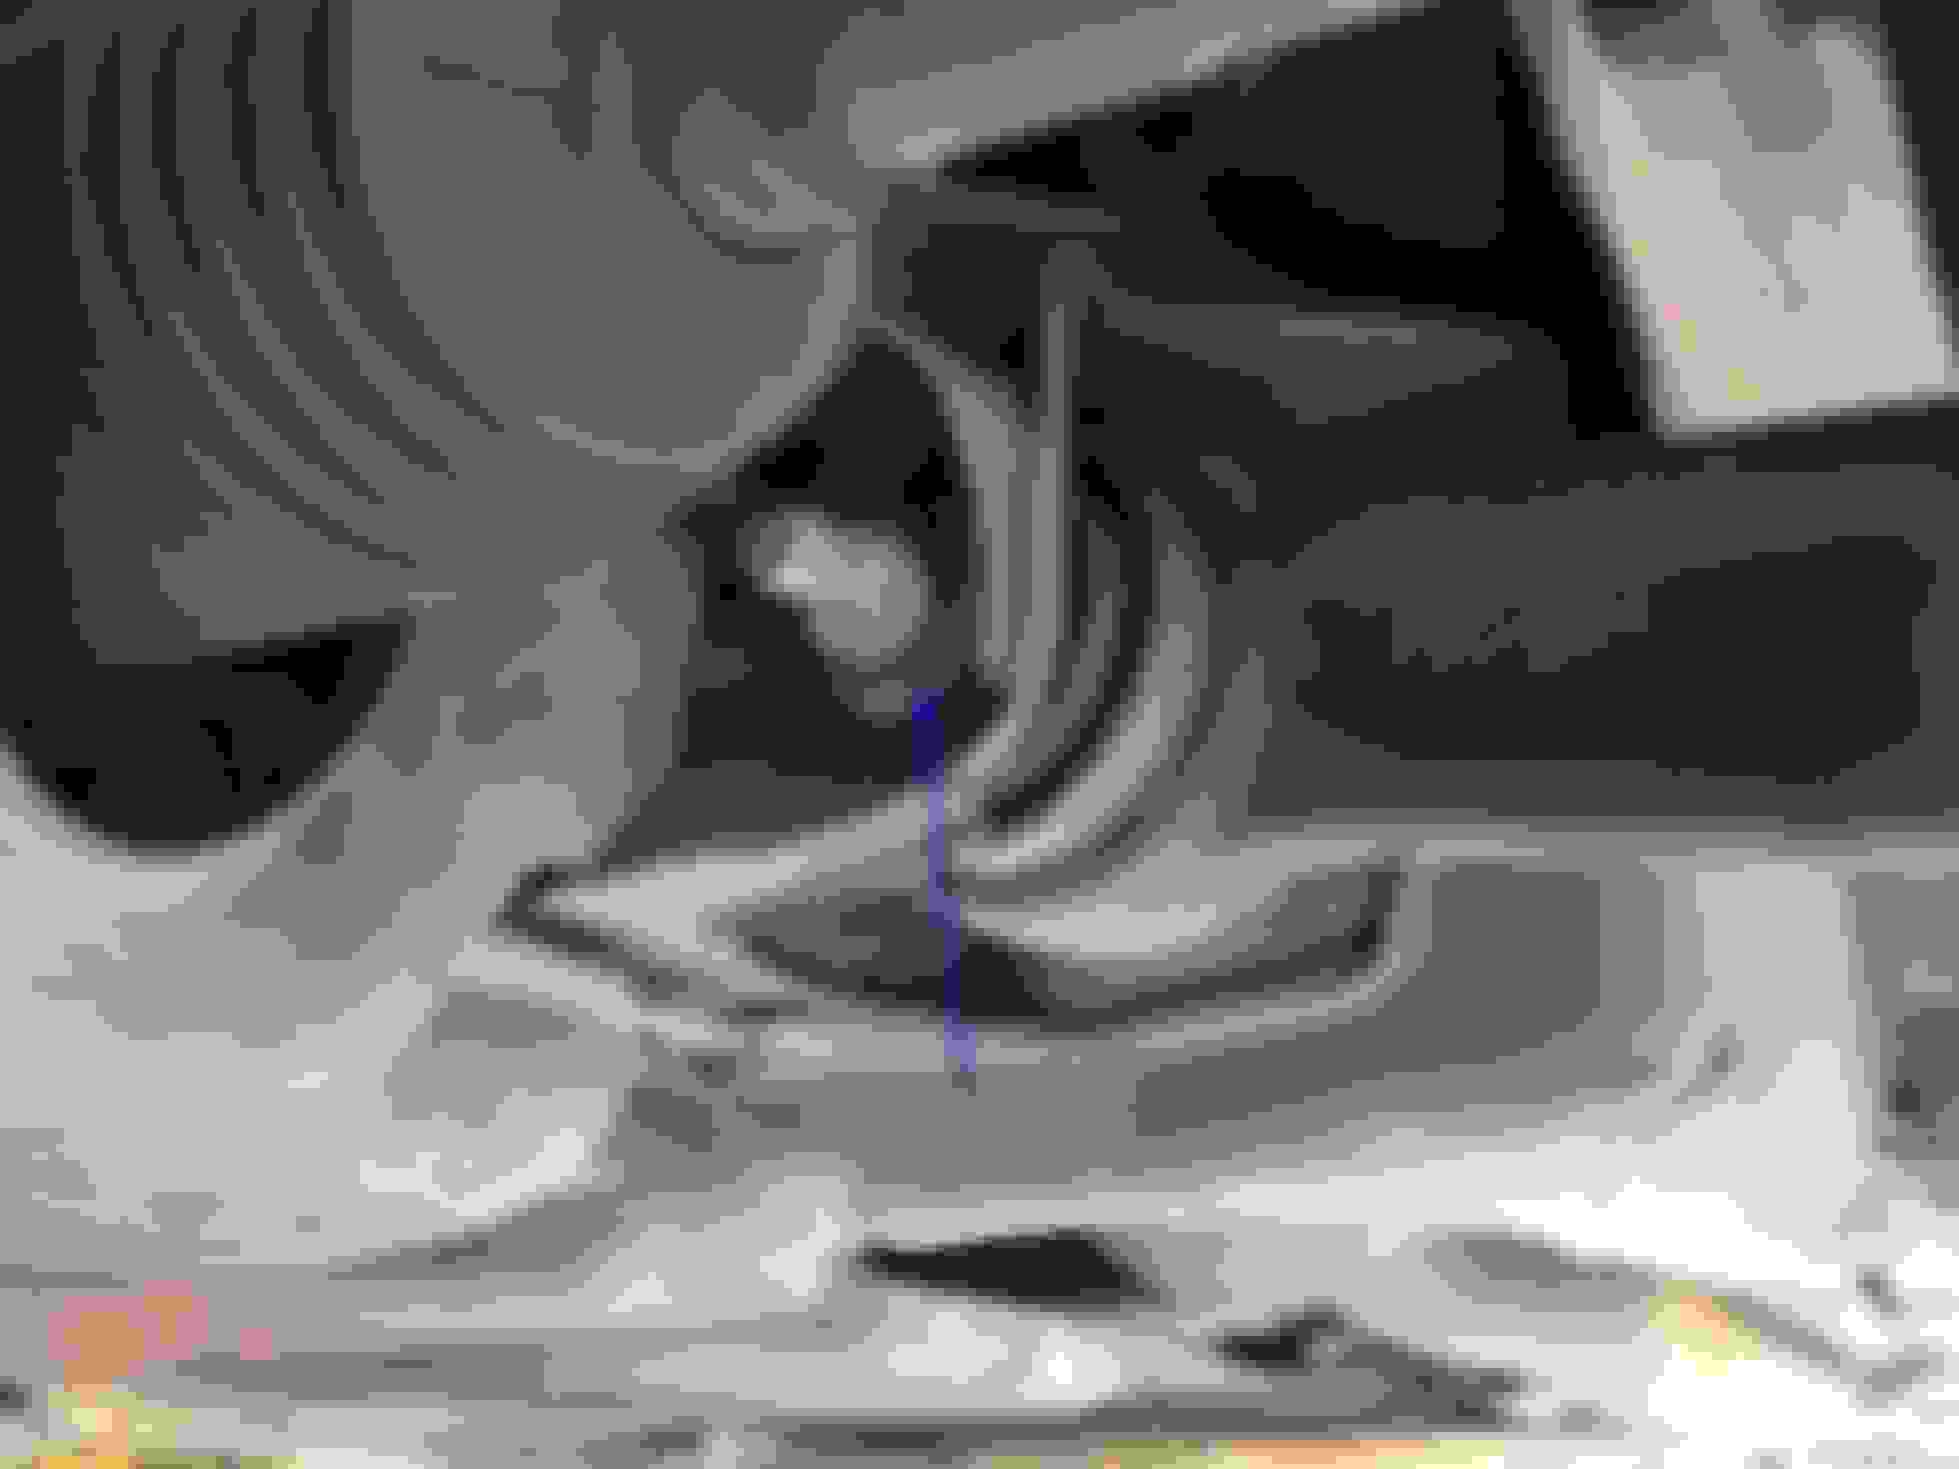
Step 3) Unbolt the other end of the torque arm from the body. Make note of the direction that the bolt is installed before removing it. You will not be re-using this bolt. If needed, you can do this step before step #2 in order to move the torque arm around while trying to dislodge the ball joint from the steering knuckle.
*This picture was taken before the belly pan was removed.
Step 4) Now unbolt the strut arm from the body. Again, note the direction the bolt is installed. You will not be re-using this bolt.
Step 5) Unbolt the air strut (yellow arrow) and swaybar endlink (blue arrow) from the strut arm.
Step 6) Now unbolt the strut arm ball joint from the steering knuckle, hitting it with your hammer in the spot indicated if you don't have a special tool. You can rotate this arm and hit it on either side. Again, it will help to soak this with a lubricating penetration spray. At this point, the upper A-arm will be the only part holding the steering knuckle on. Do not worry as this will not damage anything.
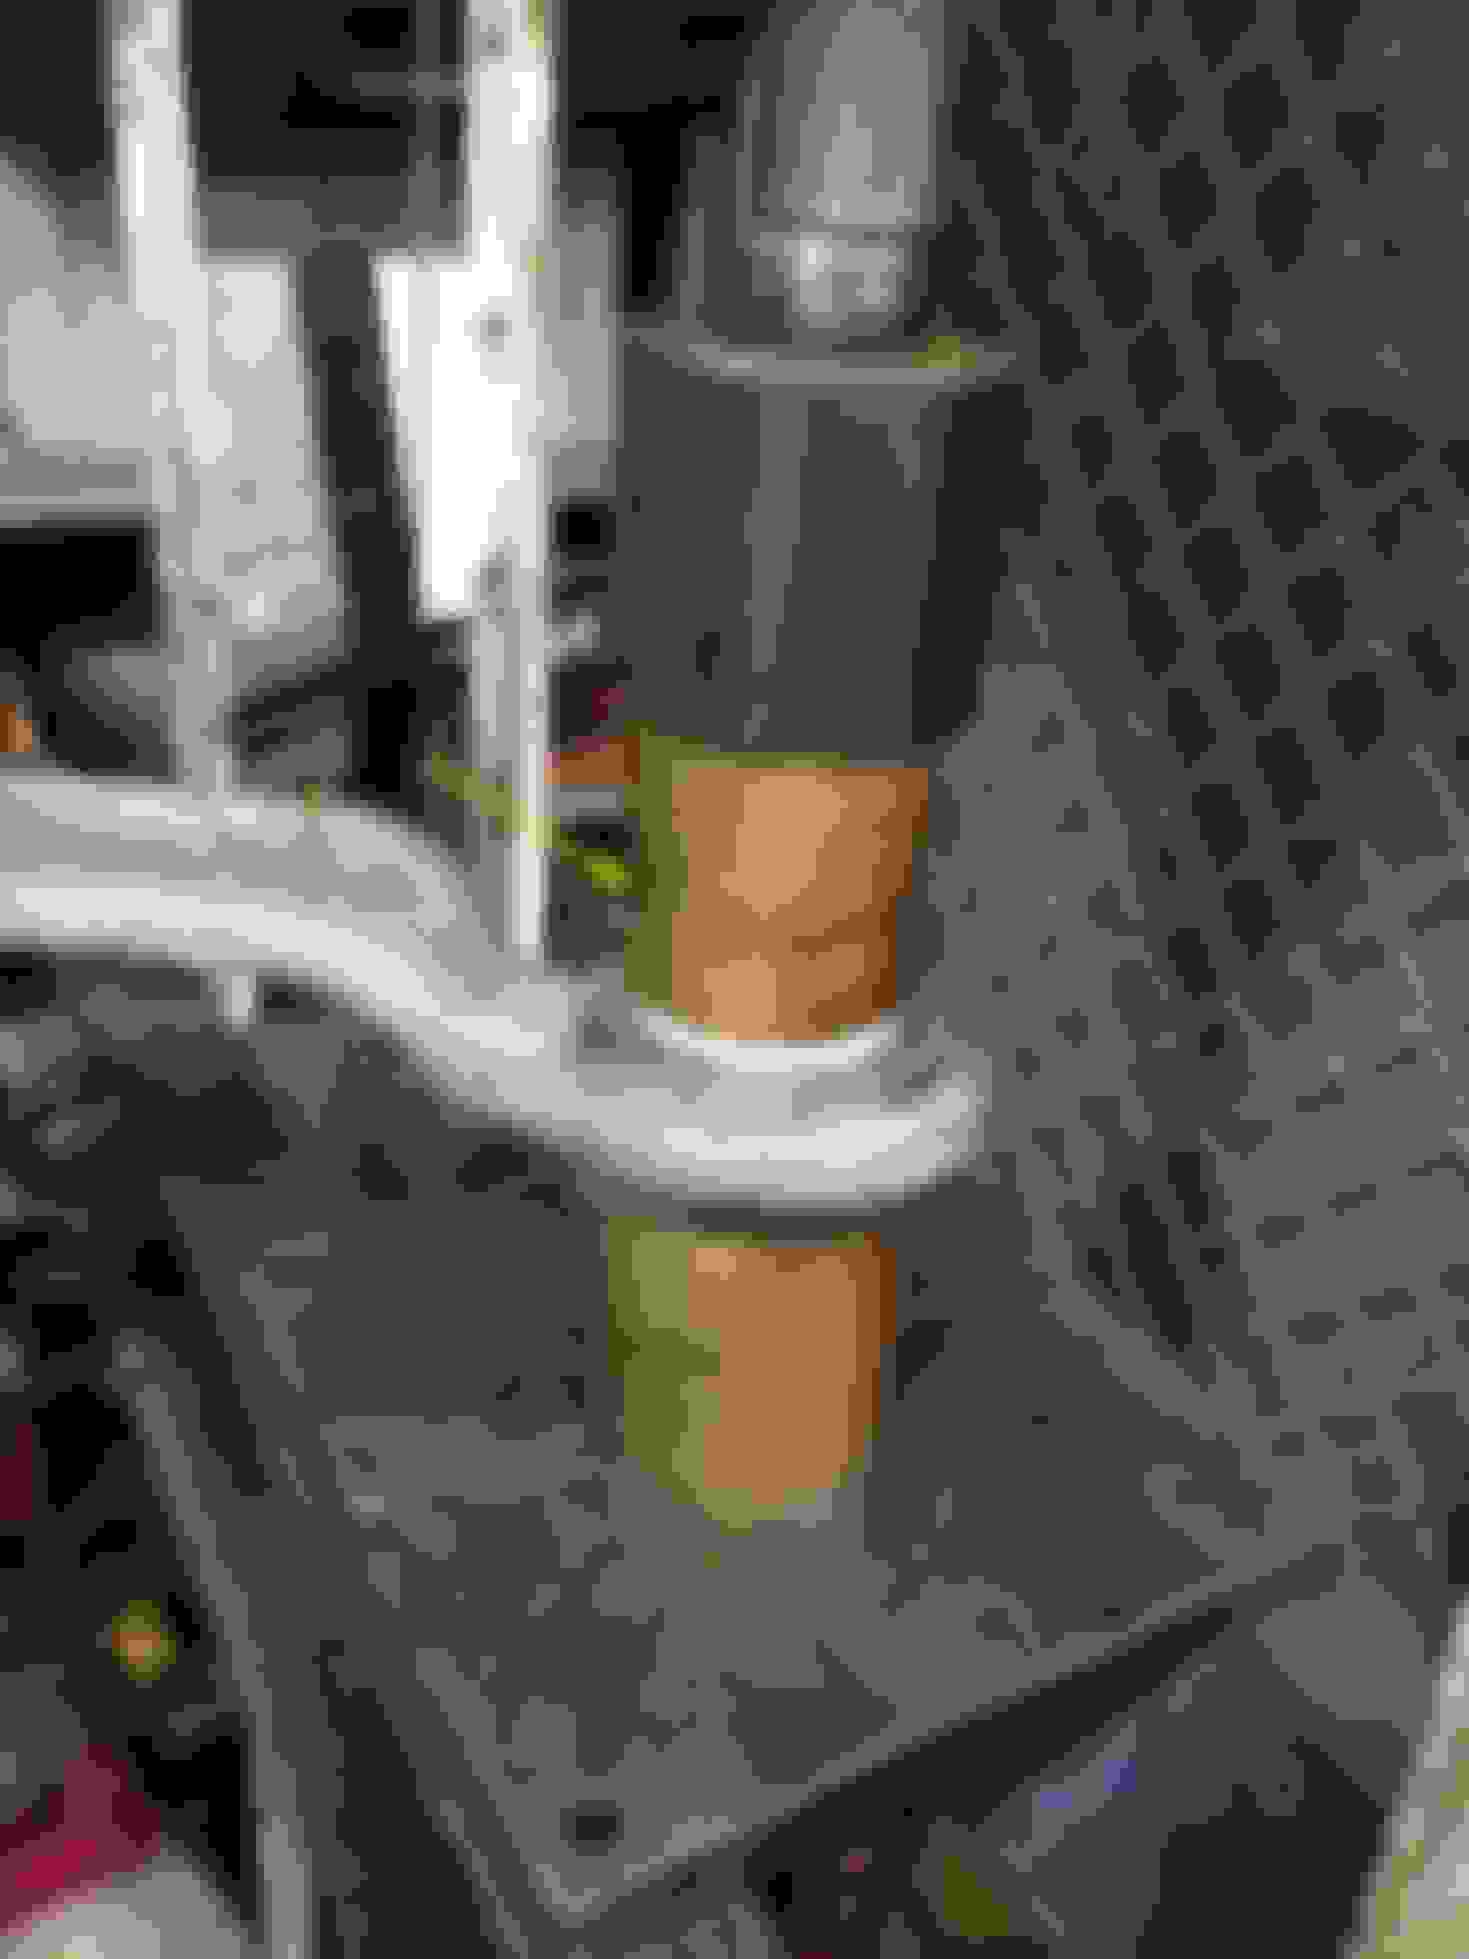
Step 7) These next 4 steps requires a press. Place the larger bushing extractor tool underneath the arm. Make sure the entire bushing sticking out of the torque arm sits inside the tool. Using the smaller tool, press the old bushing out. Note that the smaller tool is conical in shape. the larger end is used to press the old bushing out and the smaller in is for pressing the new bushing in.
Step 8) Now, using the small end of the conical tool, press the new bushing in. Make sure that the bushing goes in straight. The natural tendency is to go straight, but it never hurts to make sure. The bushing will go almost all of the way through the arm before it is centered inside.
Step 9) Repeat the previous 2 steps with the strut arm. Note that the strut arm is thinner, so the new bushing will stick out on either side of the arm. Periodically check it as you press it in to center it on both sides of the arm.
Step 9) Put the torque arm in a vice and rotate the inner area of the bushing until the bolt hole is at 12 o'clock in relation to the ball joint. Note that my picture shows the bushing in the 6 o'clock position. You could try and get this in place on the press, but working the inner bushing a little bit once installed makes the alignment easier later. The inner bushing can be a little stubborn the first time you try and rotate it.
Step 10) Now put the strut arm in a vice and rotate the inner area of the bushing until the bolt hole is at the "top" of the arm. The bump indicated by the yellow arrow is the top of the arm. Also note that my picture shows the bushing in the 6 o'clock position. Again, you could try and get this in place on the press, but working the inner bushing a little bit once installed makes the alignment easier later. The inner bushing can be a little stubborn the first time you try and rotate it.
Step 11) Re-install the strut arm, followed by the torque arm and tie-rod in the reverse order that you removed them using the new K-MAC D-bolts in the new K-MAC bushings. Make sure to tighten all bolts down securely. In my case, I just moved the car across the lot to an alignment rack, so I didn't torque them down to K-Mac's specs. If you have to drive the car from home to an alignment shop, then try and eyeball your alignment and torque all K-MAC bolts to 90 ft/lbs before hand. NO NOT adjust anything with the car on the ground as you could rip the bushings apart while trying to drag the tires across the ground. Adjusting the bushings on an alignment rack is fine as the moving plates will allow the tires to move as you make adjustments.
Step 12) Repeat this process for the other side.
Step 13) Get the car aligned ASAP. No matter how good your eyes are, your alignment will be fubared.
Here are my front alignment specs after the install. This alignment took my father and I well over an hour as adjusting either caster, camber or toe affects the other two. Also, caster cannot be measured instantly like camber and toe. Caster is a sweep measurement of camber, so that adds time. Be prepared to pay more for the alignment than a regularly priced one.
Immediate impressions are great. The front end feels smoother and more "connected" to the road. I will get a new "after" pic once the rear bushings are installed.
Big thanks to Kevin at K-MAC for the group buy price on these kits, to Shardul for letting me use his STAR system this weekend and to my father for wasting his Saturday with me at the shop yet again.
Last edited by HeissRod; 12-06-2019 at 01:54 AM.
Reason: Fixed broken link pics
When you install the rear KMACS, you should consider toe-links (IE EvoSport) at that time. the complete setup makes an incredible improvement in feel and handling.
Gives me confidence to give this a try in the spring.
I bought the front and rear K-MAC kits and already have the MBArts toe links out back..... Once it's all installed and dialed in, the results should be awesome!
Gives me confidence to give this a try in the spring.
I bought the front and rear K-MAC kits and already have the MBArts toe links out back..... Once it's all installed and dialed in, the results should be awesome!
-G
Get the Quaife and the LSD and you will be cutting some serious 60 foot times on slicks.
i recently lowered my 63 with star and have since been really hating the ride. It's just way too low, about 24-3/4' from floor to fender. So i ordered a star setup from Shardul, once i get it i'm gone raise it up about a half inch then get the alignment. My question is this, will the car ride better lowered and aligned to factory specs than it did when it was completely stock? mind you i am now on 19's with 275/245.
Why do toe links if the rear K-MAC bushings adjust toe?
Maybe I don't understand where the toe links mount....
Toe links replace the existing toe links and add much needed stability under hard acceleration and cornering (especially if an LSD is installed). Combined with KMAC camber bushings, you will have a whole new car.
Get the Quaife and the LSD and you will be cutting some serious 60 foot times on slicks.
The Quaife was installed back in June along with those toe links.....
I've got plenty of traction now with my 275 PSS's.... Now the only thing I'm chasing is a slight rear end "wiggle" under full-throttle acceleration. I've had 3 alignments so far but still can't find an obvious issue.
The Quaife was installed back in June along with those toe links.....
I've got plenty of traction now with my 275 PSS's.... Now the only thing I'm chasing is a slight rear end "wiggle" under full-throttle acceleration. I've had 3 alignments so far but still can't find an obvious issue.
-G
When installed, the rear KMACS should tighten things up for you. Anything in rubber is going to flex.
When installed, the rear KMACS should tighten things up for you. Anything in rubber is going to flex.
Ag,
Thanks for the tip!
I know you've posted your alignment specs in the past, but I'm wondering if they are any different these days with all of the K-MAC parts and toe links installed??
I'd love to have a set of target values to shoot for once all the installation work is completed. I tried doing a performance alignment with the car lowered about 1" over stock (using my ELM) but as expected, I couldn't get the camber within spec..... eventually I just gave up and put the car back to factory height and had it aligned to factory specs (still have the rear toe links installed though).
I just got a call from my SA, and he indicated that one of the toe links was "loose"... I am assuming that he meant the jam nuts so obviously if the link could rotate there's a good chance that my rear toe has drifted again. I'm having them check all the alignment specs and report back...
-G
Factory toe links are not adjustable. If it's loose, it's worn and that certainly will cause "wiggle."
"No changes since my last alignment. I prefer 2 deg rear camber. There will be minimally more wear to the inside of the tires over their life. Keeping the rear tires at 42 psi helps. I just installed Yokohama Advan V105's and find them to be the stickiest so far. I will keep an eye on the wear pattern.
Also, as most Japanese performance tires, they are perfectly round and never need to be trued.
Just to clarify... I have the MBArts toe links installed now, so I actually DO have the ability to mess with toe settings as needed. Getting rid of the stamped factory parts (with rubber bushings) certainly should give me a better result once I finally get the alignment right.
-G
EDIT: I should probably double-check my tire pressures too. There's a good chance that these temps down in the 30s are probably resulting in lower tire pressures than I actually want....
2005 E55, 2011 Honda Push Mower (21 inch deck bishes)
*BUMP*
Have the rears been done yet? I just had to order ANOTHER set of rear tires after only 7K because my inner 1/2 of the tires are bald. I have got to fix this. I'd just like to see how involved the rear installation is so I can figure out if one of the local guys with and Indy shop and STAR will even tackle it. I'm lowered all the way around but my fronts actually seem fine. Anyone that has had the rear done, how much shop time was billed?
Thanks.
Not to Jack your thread Heiss, got my rears installed, and max my tech could fix the rears is -1.1, I will have to double check this, because the after install spec and pre-alignment left a -0.2, I wonder why the alignment tech could only do -1.1 for rears. My fronts -1.8, I'm thinking thats not good enough either. They say it's maxed out. I am about 25inches from fender to ground, sport mode 2.
'03 E55, Range Rover Sport Supercharged, Ducati 748R
Originally Posted by pnoyworx
Not to Jack your thread Heiss, got my rears installed, and max my tech could fix the rears is -1.1, I will have to double check this, because the after install spec and pre-alignment left a -0.2, I wonder why the alignment tech could only do -1.1 for rears. My fronts -1.8, I'm thinking thats not good enough either. They say it's maxed out. I am about 25inches from fender to ground, sport mode 2.
I don't remember my numbers off hand but at my lowered height (fender at tire) I still couldn't get the rears in spec either. And that was before the bushings started giving away to the torque.
Not to Jack your thread Heiss, got my rears installed, and max my tech could fix the rears is -1.1, I will have to double check this, because the after install spec and pre-alignment left a -0.2, I wonder why the alignment tech could only do -1.1 for rears. My fronts -1.8, I'm thinking thats not good enough either. They say it's maxed out. I am about 25inches from fender to ground, sport mode 2.
Take a look at the specified ranges on my post-alignment print-out. The OEM camber range for the rear is -1.2� to -2.2�, obviously with -1.7� being ideal. If your tech set you at -1.1�, then that's fine. Chasing tenths of a degree can be maddening. What is your cross camber for the rear?
Same with the fronts, the range is -1.1� to -1.7�, with -1.4� being ideal. -1.8� is also close enough, but I'm confused as to why they can't get that lower. It was possible to set mine lower than -1.0�.
My cross camber for the rear is 0.1. I guess Im wondering how the install allowed the tech to set the rear to -0.2 after the install and not after the alignments? I will try to get more from the fronts. Fronts cross is also 0.1.
Your cross camber in the front and rear are great values. I wouldn't worry about those.
As far as the rear between install and alignment, when you change toe, camber or caster it affects the other values. In the rear, you only have toe and camber adjustment, so setting your toe may have changed the available range for your camber. When your camber was -0.2�, your toe range may not have been within spec.

 10-28-2013, 12:59 AM


 so obviously if the link could rotate there's a good chance that my rear toe has drifted again. I'm having them check all the alignment specs and report back...


