
Fully Adjustable Rear Camber and Toe Arms kits in Stock
 09-19-2014, 10:51 AM
#1
Former Vendor of MBWorld
Thread Starter
iTrader: (1)

Join Date: May 2008
Location: Houston
Posts: 12,139
Received 292 Likes
on
241 Posts
2003 W211 E55, 2003 W220 S600
Fully Adjustable Rear Camber and Toe Arms kits in Stock
The UPD suspension kits have been in development and testing for over a year now and we have over a 1000 parts in stock for many different AMG`s and non AMG models. We are releasing kits for the AMG and non AMG mercedes W211, W219, R230 and some models of the W212 up to year 2011. Please state year, model and body style when ordering, so correct kit can be shipped. W215, W220 and most all the latest AMG models kits will be released soon, so check back with us, if you are looking for a particular kit.
More traction, even tire wear, improved handling, better braking and firm muscular road feel are some of the features attained with the new UPD rear suspension kit. Lowered cars and cars with larger tires can quickly adjust suspension back to factory or custom alignments. Wearing out the inside patch of your 300+ dollar tires every 4000 miles can be tuned out with quick on the car tuning.
With more tire contact on the ground creating better traction, your car will be faster from a dig or a roll. We have seen from a 30-100 mph roll, up to .4 tenths quicker time by improving traction , reducing rolling resistance with better toe angles and less tire wobble.
The factory camber and toe arms are made with soft rubber bushings that allow a plush mushy luxury ride and compounded by age and use, you get toe and camber wobble.
Features:
*Full heavy duty, adjustable race camber and toe arm kit
* 6061 aircraft grade, 1.25" solid hexagon aluminum
* Massive 3/4" adjustable chrome molly rod ends
* Self lubricating, self sealing , injected nylon races
* Easy to adjust toe and camber settings while on the car
* Over 26000 lbs radial static load rated rod ends
* One year warranty
* Price is $ 799.00 plus shipping
Last edited by shardul; 09-19-2014 at 11:18 AM.

 09-19-2014, 05:21 PM
#5
Senior Member

Is this just for the rear? What is the install process like? Any custom work needed, like cutting or drilling of stock components or is it a simple replacement part? Some better pics would be awesome, maybe in the air on a lift? Extremely interested!
09-19-2014, 05:36 PM
#6
Former Vendor of MBWorld
Thread Starter
iTrader: (1)
Join Date: May 2008
Location: Houston
Posts: 12,139
Received 292 Likes
on
241 Posts
2003 W211 E55, 2003 W220 S600
yes this is for the rear
Toe links are easy to install, for the camber arms air bag will need to come off for ease of install, some people have done it without removing them. Professional installation is recommended.
Toe links are easy to install, for the camber arms air bag will need to come off for ease of install, some people have done it without removing them. Professional installation is recommended.
09-19-2014, 05:44 PM
#7
Senior Member
Will there be a kit for the front made at any point in time? My front camber is terrible as well. also, any chance on some better pics of them installed so as to get a better idea of what's involved with installation?
Trending Topics
09-19-2014, 07:16 PM
#9
MBWorld Fanatic!
Join Date: Oct 2011
Location: A to the Z (the state)
Posts: 2,279
Likes: 0
Received 25 Likes
on
20 Posts
'06 E55
I'll chime in here since I installed a set on my hooptie ricemobile.
I just came back from the alignment shop. I will say that my car is lowered and the camber wear prior to this was atrocious. I got 7,000 miles out of my last set of rear tires, and Michelin PSS tires are not cheap.
The alignment shop was able to dial in my suspension to the exact specs I wanted. With the car in Sport 2, I am at a meager -0.5 degrizzle of camber and I have toe at 0. I have only hit it once from a dig so far, but I got much less wheelspin than I would have before. The alignment guys were really impressed with the arms and said I could come back anytime if I needed some adjustments made. They said dialing it in was a piece of cake.
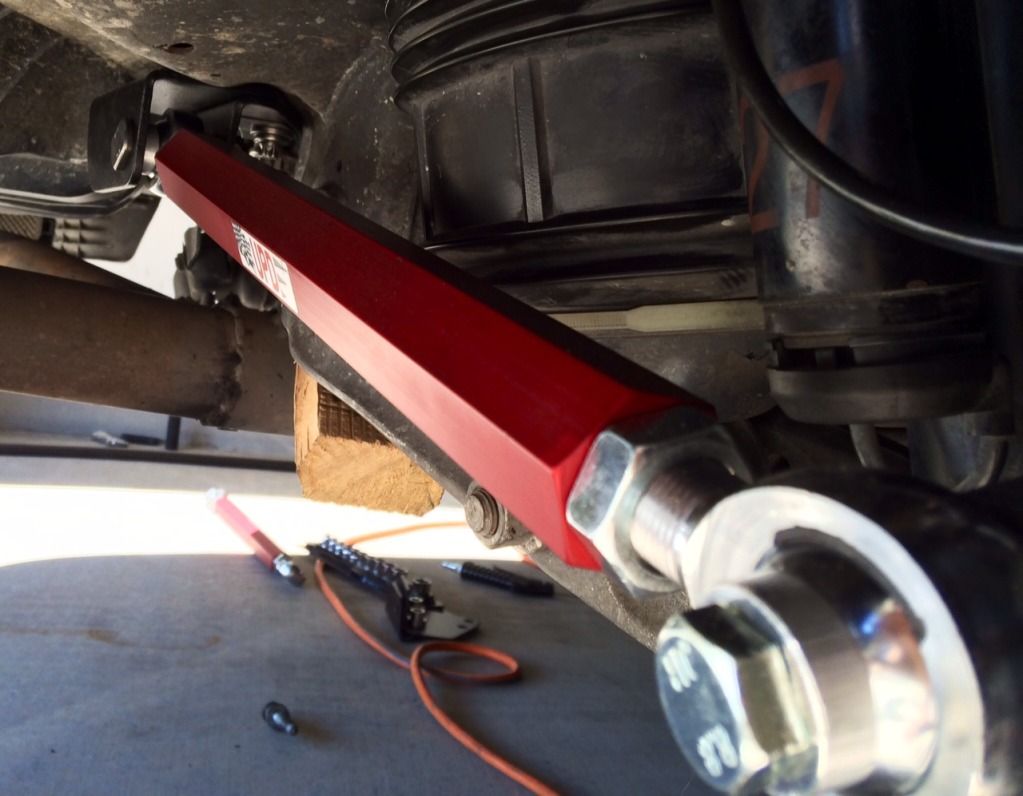
The pics really don't show how massive these things are. The shipping label on the box said 18 lbs. They are seriously heavy duty. And they look amazing. Too pretty to cover up. Between these and the MBH headers, I have a damn art museum under my car.
Install "can be done" on jack stands (I did it), but if you value your sanity, definitely get access to a lift. Every problem I encountered was due to the strange German engineering design choices, the worst part, by far, being the bolt location for the upper camber arm. Plus, being suspension pieces, it takes some serious torque to break these bolts loose. It's hard to get leverage when laying on a creeper
Seeing as how there are only four bolts per side plus two more for the brackets, you need a ridiculous amount of tools. WTF, Germany!? You will need (at a minimum): Torx, E-Torx (inverted Torx), Triple Square (aka spline) bits, Hex wrench, and a variety of box wrenches. Having access to pry bars and stuff like that is helpful.
Note: suspension pieces may be slightly different between model years. My E55 is an '06 and I think a few of the bolts are different than earlier years.
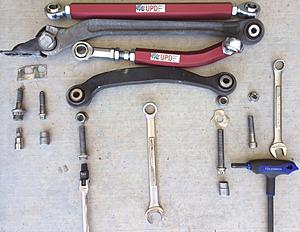
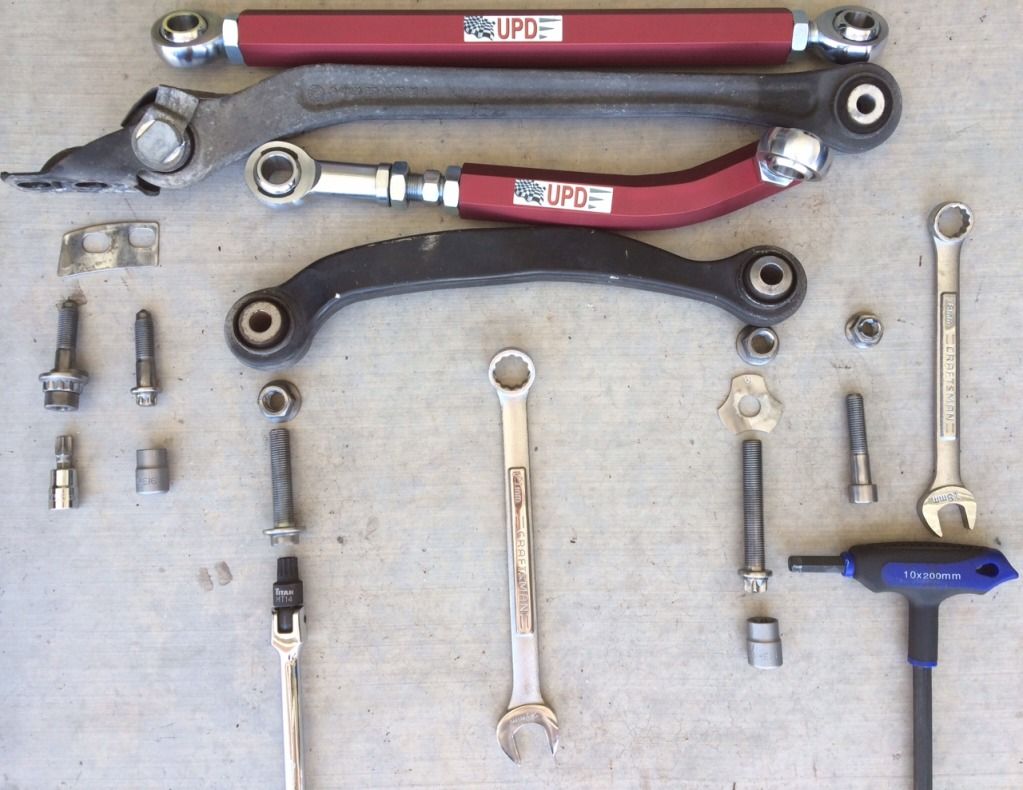
Here's a handy pic that shows what tools are needed for the hardware. All the stock bolts and nuts are reused. Good thing MB did a good job making quality pieces. I cleaned all of mine up before reusing them. The Torx/E-Torx bits are T-55 and E-16 & E-18. Triple square bit is an MT-14. This is for the upper part of the camber arm and is not easy to get to. The hex wrench is a 10mm. As for box wrenches, you will need 18, 19, and 21mm. I'd recommend having several sizes +/- these sizes in case your setup is different.
Note: That little spacer plate on the left, just below the toe arm bracket... I only had one on the passenger side.
Here's what some of them look like:
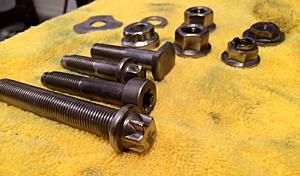
The bolt with the flat head comes from the inboard side of the toe arm. It takes a 19mm wrench to hold it in place. The "thin" nut goes to this bolt and is an 18mm. Unless you have a very thin 19mm wrench, you will not be able to remove this nut/bolt until after you remove the toe arm from the bracket. Breaking this one loose with the arm already off the car was pretty frustrating. The bolt head is really thin and the wrench loves to slip right off.
The new toe arm brackets will use these two bolts. They go into two holes on the frame, but getting them in there is... unusual. The threads inside the frame are in this weird little bracket. The washers for the bolts are weird. You need to make sure that all washers and spacers are reused, maybe consider adding a couple of washers to both of the bolts. The reason being that it is easy to run out of threads before everything is nice and tight since the entire bolt is not threaded.

I recommend leaving one side intact until the other side is complete. This will let you use it as a reference in case you need to see how something goes on again.
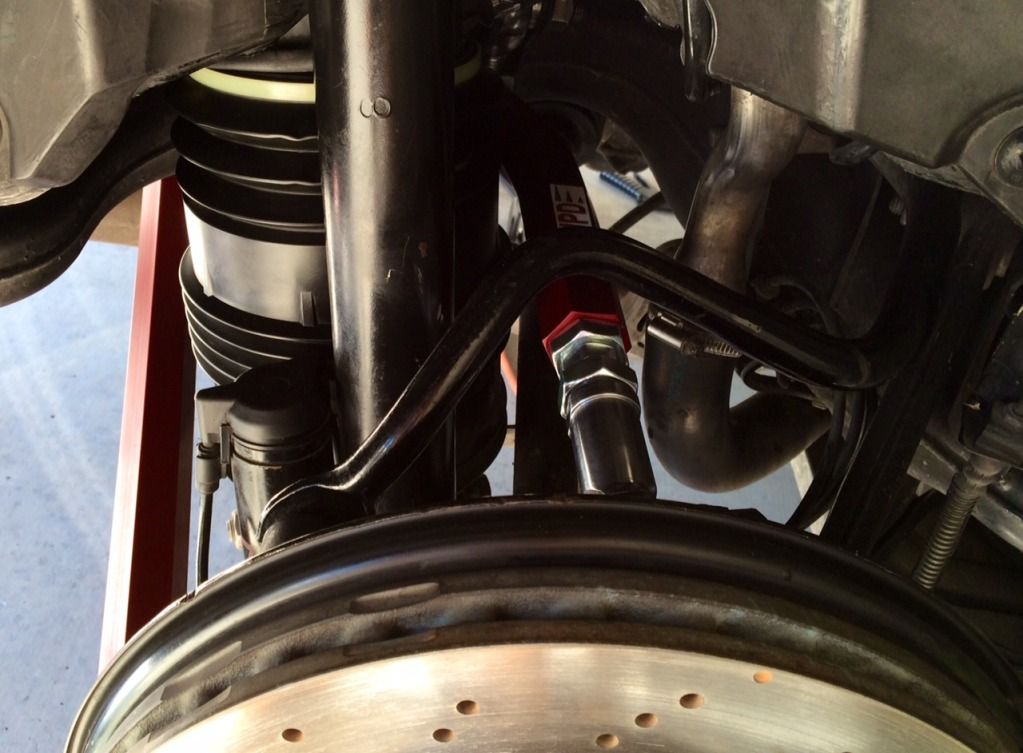
Also, my exhaust setup had the pipes going from resonator to the mufflers right in the way of the bolts to undo the toe arm brackets. I was able to flex the exhaust downward and then jam a piece of 2x4 in there somewhere to give me the clearance needed.
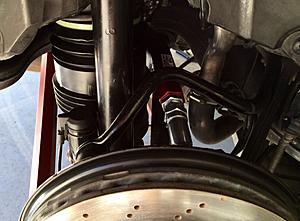
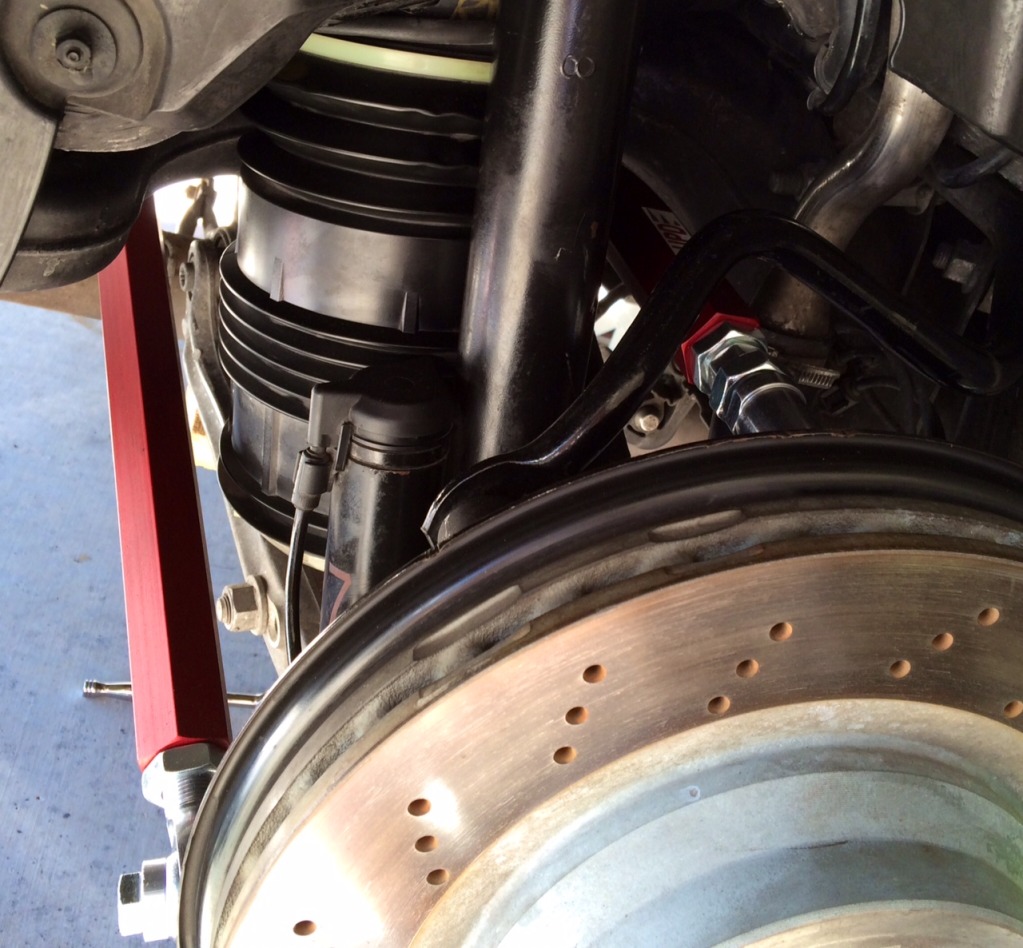
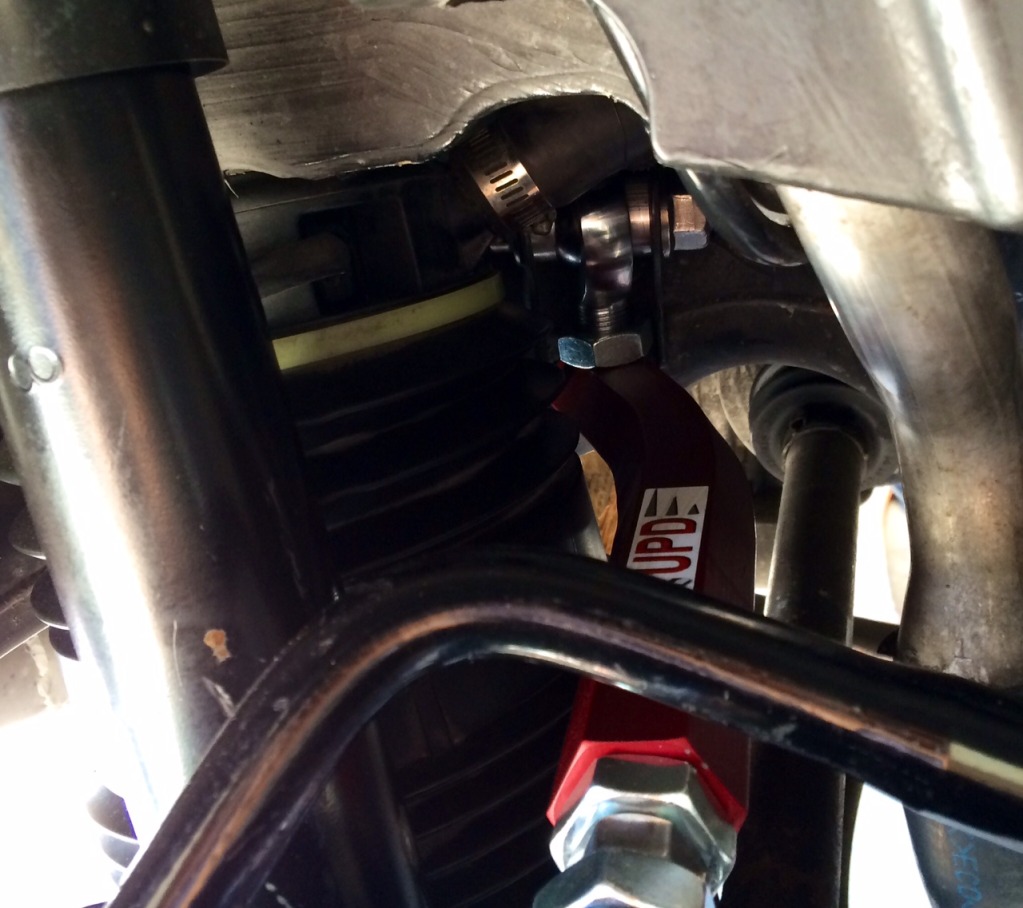
Take your time as you go and it isn't too bad. The worst part, by far, is the upper camber arm bolt. It has a really fat collar on it and to remove it, you need to take the nut off, which is difficult. It is too close to the frame to get a socket around it, so air tools won't work. You can't even get a ratcheting wrench around it. Doing it from the side is not possible unless you remove the sway bar. Getting at it from underneath is the way to do it. It's a 21mm. I used a 24mm wrench as my extension to get some torque on it. You can only get a little bit of a turn on it, so it take a long time. To make matters worse, the head of the bolt (uses the triple square bit) is way up there between the top of the airbag assembly and the frame. You need to hold the bolt to get the nut off. Use the breaker bar to go up from the bottom and try your best to get the bit in there. This part is really hard if you have big titty-squeezers (hands, duh) like me. You can try to reach around the airbag to get the bit in there. Once the nut is off, use a long screwdriver or prybar to push the bolt out. Odds are that the collar will hit the airbag assembly. Don't be a pu55y and hit it with some force to get it out of there. To get it back in, I put some masking tape on the bit and jammed it into the head of the bolt. Putting the bit on a short extension let me insert it from behind the airbag. Again, huge pain in *** and *****.
Hope that helps someone. Ask more questions and I or someone else will try to answer.
Some other pics:


I just came back from the alignment shop. I will say that my car is lowered and the camber wear prior to this was atrocious. I got 7,000 miles out of my last set of rear tires, and Michelin PSS tires are not cheap.
The alignment shop was able to dial in my suspension to the exact specs I wanted. With the car in Sport 2, I am at a meager -0.5 degrizzle of camber and I have toe at 0. I have only hit it once from a dig so far, but I got much less wheelspin than I would have before. The alignment guys were really impressed with the arms and said I could come back anytime if I needed some adjustments made. They said dialing it in was a piece of cake.
The pics really don't show how massive these things are. The shipping label on the box said 18 lbs. They are seriously heavy duty. And they look amazing. Too pretty to cover up. Between these and the MBH headers, I have a damn art museum under my car.
Install "can be done" on jack stands (I did it), but if you value your sanity, definitely get access to a lift. Every problem I encountered was due to the strange German engineering design choices, the worst part, by far, being the bolt location for the upper camber arm. Plus, being suspension pieces, it takes some serious torque to break these bolts loose. It's hard to get leverage when laying on a creeper
Seeing as how there are only four bolts per side plus two more for the brackets, you need a ridiculous amount of tools. WTF, Germany!? You will need (at a minimum): Torx, E-Torx (inverted Torx), Triple Square (aka spline) bits, Hex wrench, and a variety of box wrenches. Having access to pry bars and stuff like that is helpful.
Note: suspension pieces may be slightly different between model years. My E55 is an '06 and I think a few of the bolts are different than earlier years.
Here's a handy pic that shows what tools are needed for the hardware. All the stock bolts and nuts are reused. Good thing MB did a good job making quality pieces. I cleaned all of mine up before reusing them. The Torx/E-Torx bits are T-55 and E-16 & E-18. Triple square bit is an MT-14. This is for the upper part of the camber arm and is not easy to get to. The hex wrench is a 10mm. As for box wrenches, you will need 18, 19, and 21mm. I'd recommend having several sizes +/- these sizes in case your setup is different.
Note: That little spacer plate on the left, just below the toe arm bracket... I only had one on the passenger side.

Here's what some of them look like:

The bolt with the flat head comes from the inboard side of the toe arm. It takes a 19mm wrench to hold it in place. The "thin" nut goes to this bolt and is an 18mm. Unless you have a very thin 19mm wrench, you will not be able to remove this nut/bolt until after you remove the toe arm from the bracket. Breaking this one loose with the arm already off the car was pretty frustrating. The bolt head is really thin and the wrench loves to slip right off.
The new toe arm brackets will use these two bolts. They go into two holes on the frame, but getting them in there is... unusual. The threads inside the frame are in this weird little bracket. The washers for the bolts are weird. You need to make sure that all washers and spacers are reused, maybe consider adding a couple of washers to both of the bolts. The reason being that it is easy to run out of threads before everything is nice and tight since the entire bolt is not threaded.

I recommend leaving one side intact until the other side is complete. This will let you use it as a reference in case you need to see how something goes on again.
Also, my exhaust setup had the pipes going from resonator to the mufflers right in the way of the bolts to undo the toe arm brackets. I was able to flex the exhaust downward and then jam a piece of 2x4 in there somewhere to give me the clearance needed.
Take your time as you go and it isn't too bad. The worst part, by far, is the upper camber arm bolt. It has a really fat collar on it and to remove it, you need to take the nut off, which is difficult. It is too close to the frame to get a socket around it, so air tools won't work. You can't even get a ratcheting wrench around it. Doing it from the side is not possible unless you remove the sway bar. Getting at it from underneath is the way to do it. It's a 21mm. I used a 24mm wrench as my extension to get some torque on it. You can only get a little bit of a turn on it, so it take a long time. To make matters worse, the head of the bolt (uses the triple square bit) is way up there between the top of the airbag assembly and the frame. You need to hold the bolt to get the nut off. Use the breaker bar to go up from the bottom and try your best to get the bit in there. This part is really hard if you have big titty-squeezers (hands, duh) like me. You can try to reach around the airbag to get the bit in there. Once the nut is off, use a long screwdriver or prybar to push the bolt out. Odds are that the collar will hit the airbag assembly. Don't be a pu55y and hit it with some force to get it out of there. To get it back in, I put some masking tape on the bit and jammed it into the head of the bolt. Putting the bit on a short extension let me insert it from behind the airbag. Again, huge pain in *** and *****.
Hope that helps someone. Ask more questions and I or someone else will try to answer.
Some other pics:


The following users liked this post:
IE55 (01-14-2024)


 09-20-2014, 10:46 PM
#16
MBWorld Fanatic!

Join Date: Jan 2014
Location: Republic of Texas
Posts: 3,218
Received 927 Likes
on
719 Posts
'99 and '05 E55 AMG
Good writeup on the installation. I wish more purveyors of merchandise would provide "real" installation information such as you did. This makes it much more likely I will purchase as I know what I will be getting myself into....
These look like a Xmas present to myself. :-)
These look like a Xmas present to myself. :-)
09-22-2014, 08:34 PM
#19
PLATINUM SPONSOR
This little video I took, shows how soft and flimsy the stock bushings are. The camber and other controls arms are all hooked up and this is just with one end of the toe rod un-hooked. Look how much the tire wobbles, with just slight wiggling of the toe. All this movement and lack of wheel support conributes to the dreaded under-carriage bolt snapping on the W211 among the other tires issues mentioned.
http://vid991.photobucket.com/albums...psbff98fa8.mp4
http://vid991.photobucket.com/albums...psbff98fa8.mp4
__________________

E63 Biturbo, UPD Cold Air induction kit, UPD performance crank pulley and UPD adjustable rear suspension with ride height adjustment.
CL55 UPD Cold Air Boost kit, UPD 3000 stall converter, UPD 77mm SC clutched pulley and beltwrap kit, Custom long tubes, UPD crank pulley , UPD suspension kit, UPD SC pulley, Aux. HE, Trunk tank w/rule 2000 pump, Mezeire pump, UPD 5pc idler set, Aluminum rotor hats.
www.ultimatepd.com
instagram @ultimate_pd
facebook.com/ultimatepd

 09-24-2014, 09:37 PM
#23
MBWorld Fanatic!
I'll chime in here since I installed a set on my hooptie ricemobile.
I just came back from the alignment shop. I will say that my car is lowered and the camber wear prior to this was atrocious. I got 7,000 miles out of my last set of rear tires, and Michelin PSS tires are not cheap.
The alignment shop was able to dial in my suspension to the exact specs I wanted. With the car in Sport 2, I am at a meager -0.5 degrizzle of camber and I have toe at 0. I have only hit it once from a dig so far, but I got much less wheelspin than I would have before. The alignment guys were really impressed with the arms and said I could come back anytime if I needed some adjustments made. They said dialing it in was a piece of cake.
The pics really don't show how massive these things are. The shipping label on the box said 18 lbs. They are seriously heavy duty. And they look amazing. Too pretty to cover up. Between these and the MBH headers, I have a damn art museum under my car.
Install "can be done" on jack stands (I did it), but if you value your sanity, definitely get access to a lift. Every problem I encountered was due to the strange German engineering design choices, the worst part, by far, being the bolt location for the upper camber arm. Plus, being suspension pieces, it takes some serious torque to break these bolts loose. It's hard to get leverage when laying on a creeper
Seeing as how there are only four bolts per side plus two more for the brackets, you need a ridiculous amount of tools. WTF, Germany!? You will need (at a minimum): Torx, E-Torx (inverted Torx), Triple Square (aka spline) bits, Hex wrench, and a variety of box wrenches. Having access to pry bars and stuff like that is helpful.
Note: suspension pieces may be slightly different between model years. My E55 is an '06 and I think a few of the bolts are different than earlier years.
Here's a handy pic that shows what tools are needed for the hardware. All the stock bolts and nuts are reused. Good thing MB did a good job making quality pieces. I cleaned all of mine up before reusing them. The Torx/E-Torx bits are T-55 and E-16 & E-18. Triple square bit is an MT-14. This is for the upper part of the camber arm and is not easy to get to. The hex wrench is a 10mm. As for box wrenches, you will need 18, 19, and 21mm. I'd recommend having several sizes +/- these sizes in case your setup is different.
Note: That little spacer plate on the left, just below the toe arm bracket... I only had one on the passenger side.
Here's what some of them look like:

The bolt with the flat head comes from the inboard side of the toe arm. It takes a 19mm wrench to hold it in place. The "thin" nut goes to this bolt and is an 18mm. Unless you have a very thin 19mm wrench, you will not be able to remove this nut/bolt until after you remove the toe arm from the bracket. Breaking this one loose with the arm already off the car was pretty frustrating. The bolt head is really thin and the wrench loves to slip right off.
The new toe arm brackets will use these two bolts. They go into two holes on the frame, but getting them in there is... unusual. The threads inside the frame are in this weird little bracket. The washers for the bolts are weird. You need to make sure that all washers and spacers are reused, maybe consider adding a couple of washers to both of the bolts. The reason being that it is easy to run out of threads before everything is nice and tight since the entire bolt is not threaded.

I recommend leaving one side intact until the other side is complete. This will let you use it as a reference in case you need to see how something goes on again.
Also, my exhaust setup had the pipes going from resonator to the mufflers right in the way of the bolts to undo the toe arm brackets. I was able to flex the exhaust downward and then jam a piece of 2x4 in there somewhere to give me the clearance needed.
Take your time as you go and it isn't too bad. The worst part, by far, is the upper camber arm bolt. It has a really fat collar on it and to remove it, you need to take the nut off, which is difficult. It is too close to the frame to get a socket around it, so air tools won't work. You can't even get a ratcheting wrench around it. Doing it from the side is not possible unless you remove the sway bar. Getting at it from underneath is the way to do it. It's a 21mm. I used a 24mm wrench as my extension to get some torque on it. You can only get a little bit of a turn on it, so it take a long time. To make matters worse, the head of the bolt (uses the triple square bit) is way up there between the top of the airbag assembly and the frame. You need to hold the bolt to get the nut off. Use the breaker bar to go up from the bottom and try your best to get the bit in there. This part is really hard if you have big titty-squeezers (hands, duh) like me. You can try to reach around the airbag to get the bit in there. Once the nut is off, use a long screwdriver or prybar to push the bolt out. Odds are that the collar will hit the airbag assembly. Don't be a pu55y and hit it with some force to get it out of there. To get it back in, I put some masking tape on the bit and jammed it into the head of the bolt. Putting the bit on a short extension let me insert it from behind the airbag. Again, huge pain in *** and *****.
Hope that helps someone. Ask more questions and I or someone else will try to answer.
Some other pics:


I just came back from the alignment shop. I will say that my car is lowered and the camber wear prior to this was atrocious. I got 7,000 miles out of my last set of rear tires, and Michelin PSS tires are not cheap.
The alignment shop was able to dial in my suspension to the exact specs I wanted. With the car in Sport 2, I am at a meager -0.5 degrizzle of camber and I have toe at 0. I have only hit it once from a dig so far, but I got much less wheelspin than I would have before. The alignment guys were really impressed with the arms and said I could come back anytime if I needed some adjustments made. They said dialing it in was a piece of cake.
The pics really don't show how massive these things are. The shipping label on the box said 18 lbs. They are seriously heavy duty. And they look amazing. Too pretty to cover up. Between these and the MBH headers, I have a damn art museum under my car.
Install "can be done" on jack stands (I did it), but if you value your sanity, definitely get access to a lift. Every problem I encountered was due to the strange German engineering design choices, the worst part, by far, being the bolt location for the upper camber arm. Plus, being suspension pieces, it takes some serious torque to break these bolts loose. It's hard to get leverage when laying on a creeper
Seeing as how there are only four bolts per side plus two more for the brackets, you need a ridiculous amount of tools. WTF, Germany!? You will need (at a minimum): Torx, E-Torx (inverted Torx), Triple Square (aka spline) bits, Hex wrench, and a variety of box wrenches. Having access to pry bars and stuff like that is helpful.
Note: suspension pieces may be slightly different between model years. My E55 is an '06 and I think a few of the bolts are different than earlier years.
Here's a handy pic that shows what tools are needed for the hardware. All the stock bolts and nuts are reused. Good thing MB did a good job making quality pieces. I cleaned all of mine up before reusing them. The Torx/E-Torx bits are T-55 and E-16 & E-18. Triple square bit is an MT-14. This is for the upper part of the camber arm and is not easy to get to. The hex wrench is a 10mm. As for box wrenches, you will need 18, 19, and 21mm. I'd recommend having several sizes +/- these sizes in case your setup is different.
Note: That little spacer plate on the left, just below the toe arm bracket... I only had one on the passenger side.
Here's what some of them look like:
The bolt with the flat head comes from the inboard side of the toe arm. It takes a 19mm wrench to hold it in place. The "thin" nut goes to this bolt and is an 18mm. Unless you have a very thin 19mm wrench, you will not be able to remove this nut/bolt until after you remove the toe arm from the bracket. Breaking this one loose with the arm already off the car was pretty frustrating. The bolt head is really thin and the wrench loves to slip right off.
The new toe arm brackets will use these two bolts. They go into two holes on the frame, but getting them in there is... unusual. The threads inside the frame are in this weird little bracket. The washers for the bolts are weird. You need to make sure that all washers and spacers are reused, maybe consider adding a couple of washers to both of the bolts. The reason being that it is easy to run out of threads before everything is nice and tight since the entire bolt is not threaded.
I recommend leaving one side intact until the other side is complete. This will let you use it as a reference in case you need to see how something goes on again.
Also, my exhaust setup had the pipes going from resonator to the mufflers right in the way of the bolts to undo the toe arm brackets. I was able to flex the exhaust downward and then jam a piece of 2x4 in there somewhere to give me the clearance needed.
Take your time as you go and it isn't too bad. The worst part, by far, is the upper camber arm bolt. It has a really fat collar on it and to remove it, you need to take the nut off, which is difficult. It is too close to the frame to get a socket around it, so air tools won't work. You can't even get a ratcheting wrench around it. Doing it from the side is not possible unless you remove the sway bar. Getting at it from underneath is the way to do it. It's a 21mm. I used a 24mm wrench as my extension to get some torque on it. You can only get a little bit of a turn on it, so it take a long time. To make matters worse, the head of the bolt (uses the triple square bit) is way up there between the top of the airbag assembly and the frame. You need to hold the bolt to get the nut off. Use the breaker bar to go up from the bottom and try your best to get the bit in there. This part is really hard if you have big titty-squeezers (hands, duh) like me. You can try to reach around the airbag to get the bit in there. Once the nut is off, use a long screwdriver or prybar to push the bolt out. Odds are that the collar will hit the airbag assembly. Don't be a pu55y and hit it with some force to get it out of there. To get it back in, I put some masking tape on the bit and jammed it into the head of the bolt. Putting the bit on a short extension let me insert it from behind the airbag. Again, huge pain in *** and *****.
Hope that helps someone. Ask more questions and I or someone else will try to answer.
Some other pics:
09-25-2014, 10:09 AM
#25
MBWorld Fanatic!
I have come close many times to pulling the trigger on a toe link kit from the other guys, but the price always stops me. Your kit looks like just the ticket and the price is much more palatable.


