


Don Nguyen | **Vinyl Roof Wrapping Services + Stickers/Graphics and more!**

Thread Starter
Former Vendor of MBWorld
Joined: Mar 2008
Posts: 19,593
Likes: 30
From: Irvine, CA
Euros
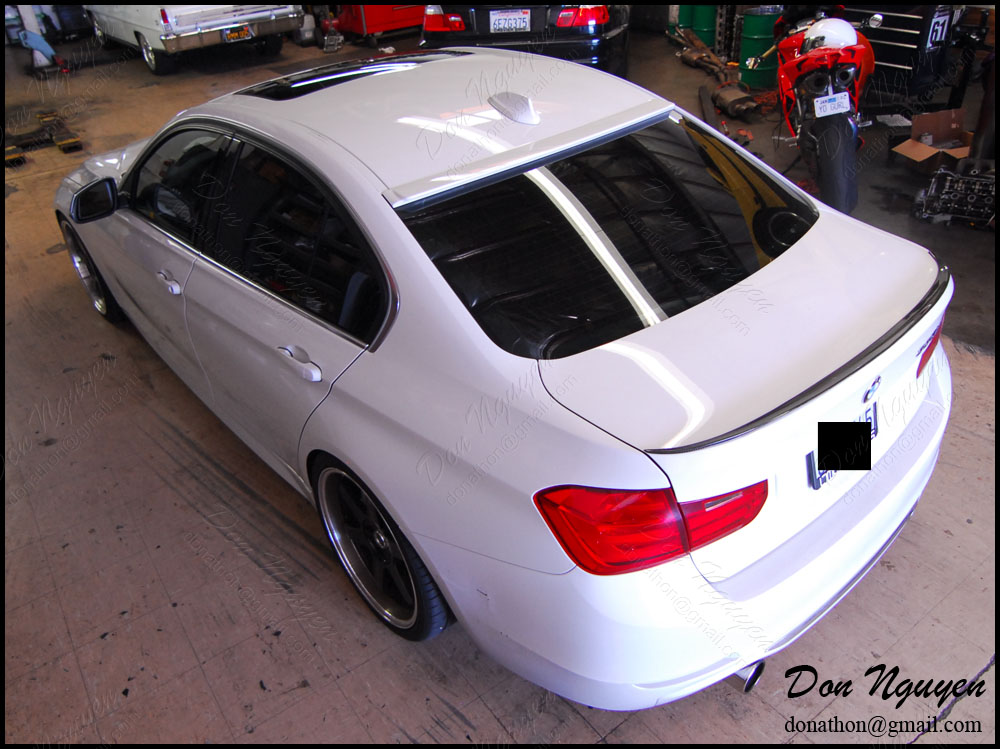
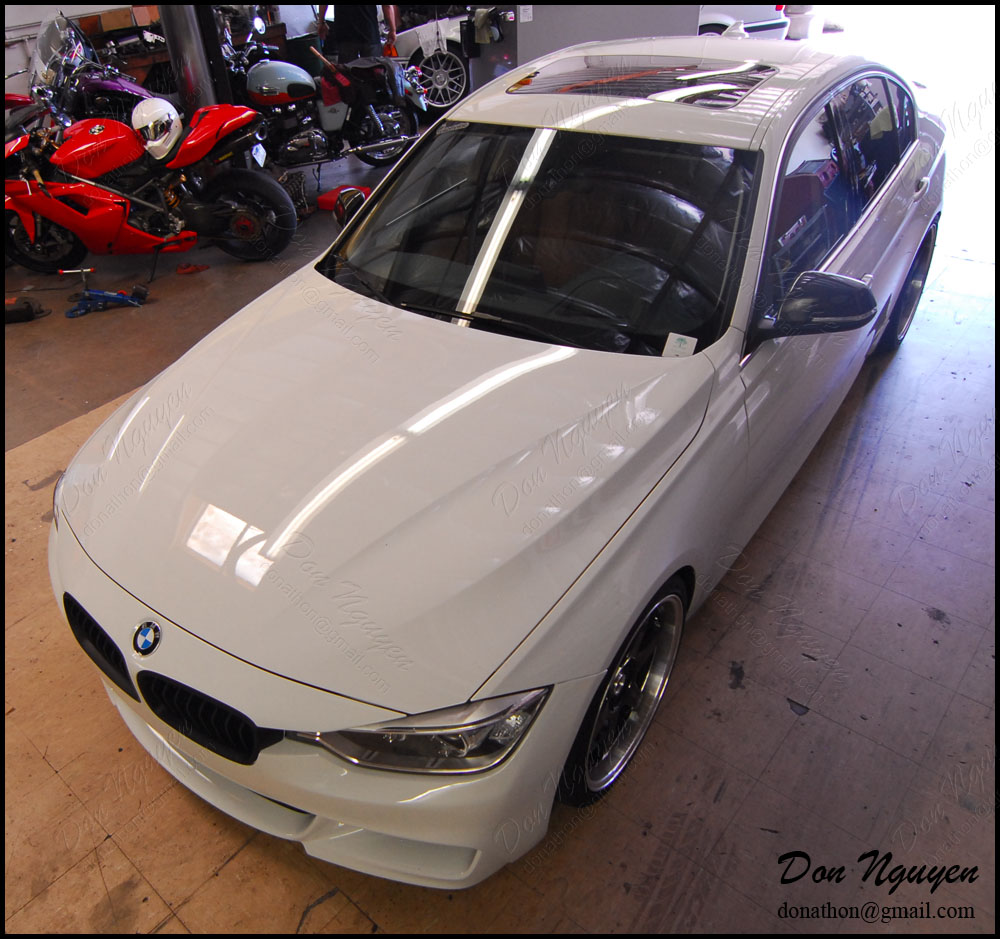
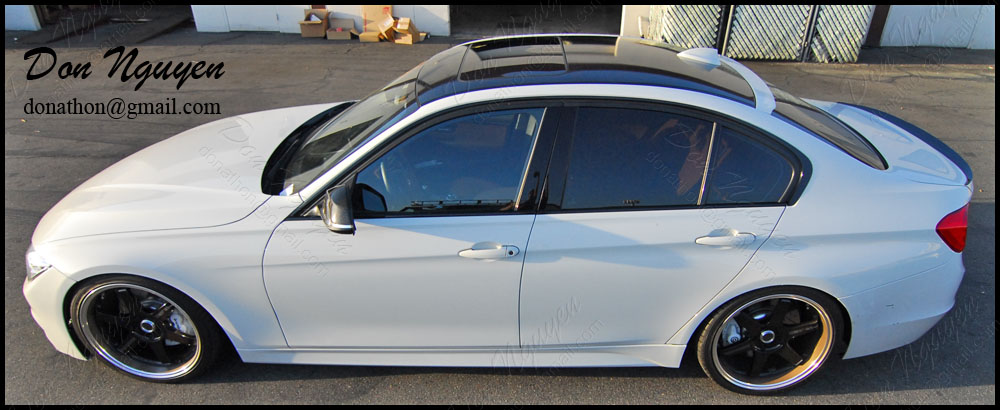
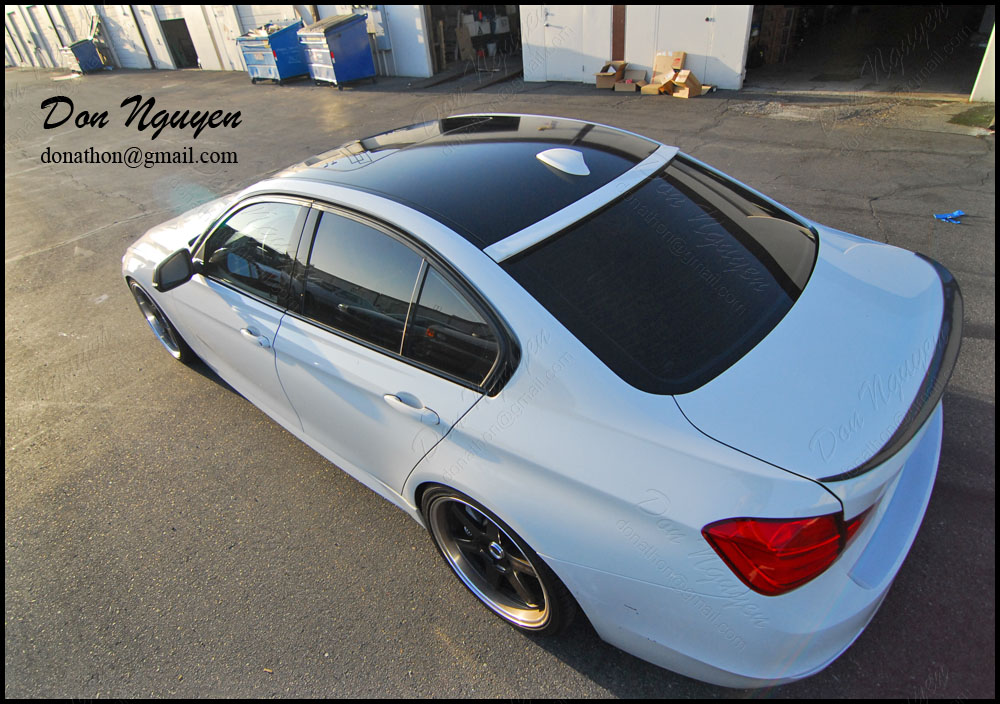
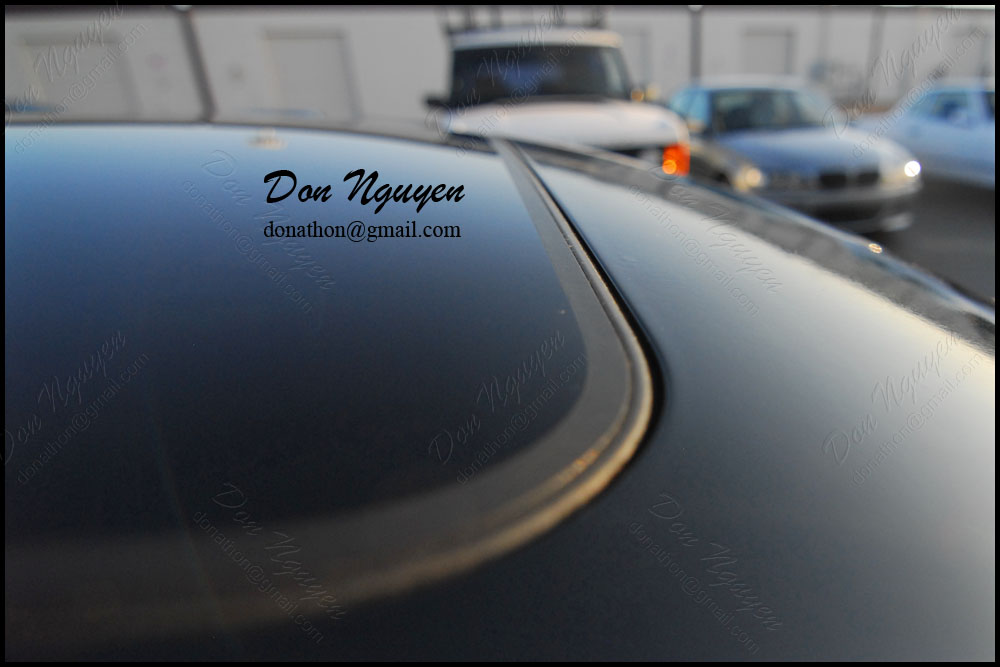
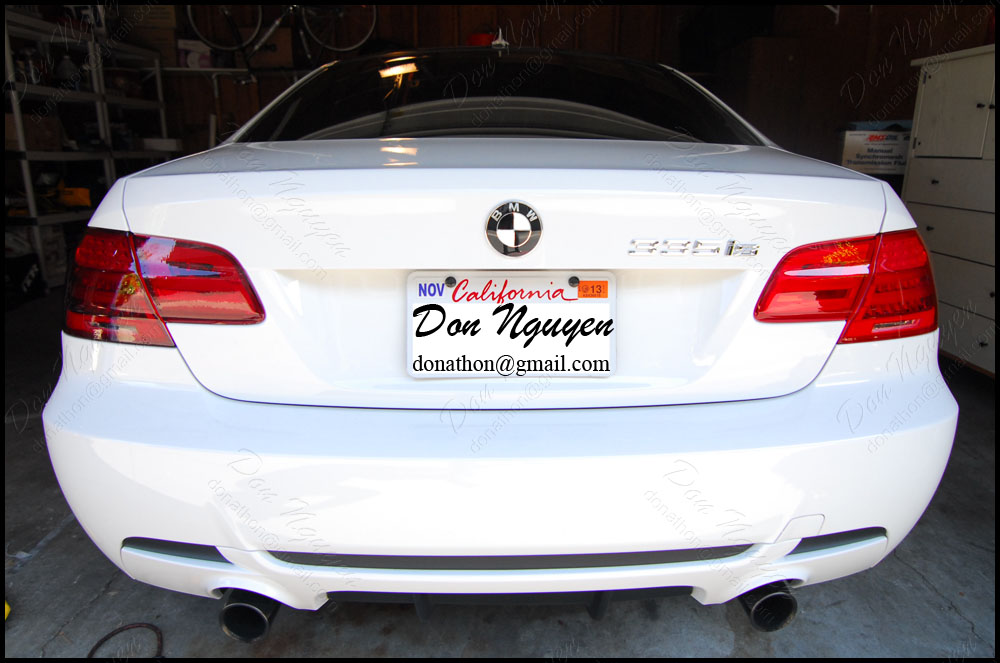
This brand new BMW F30 335i sedan came in to have me vinyl wrap the roof in my gloss black vinyl material and to also black out his chrome window trim with the gloss black vinyl material as well. I took some more detailed and up close pictures of the work to show you guys how everything looks once done and to see the finer details of my work/installations. If you guys ever have any specific requests, feel free to let me know. The owner of this car drove out to me in Anaheim Hlls/Orange County to have the installation done.
Before:
After:


-Don Nguyen
donathon@gmail.com
Before:
After:
-Don Nguyen
donathon@gmail.com
Thread Starter
Former Vendor of MBWorld
Joined: Mar 2008
Posts: 19,593
Likes: 30
From: Irvine, CA
Euros
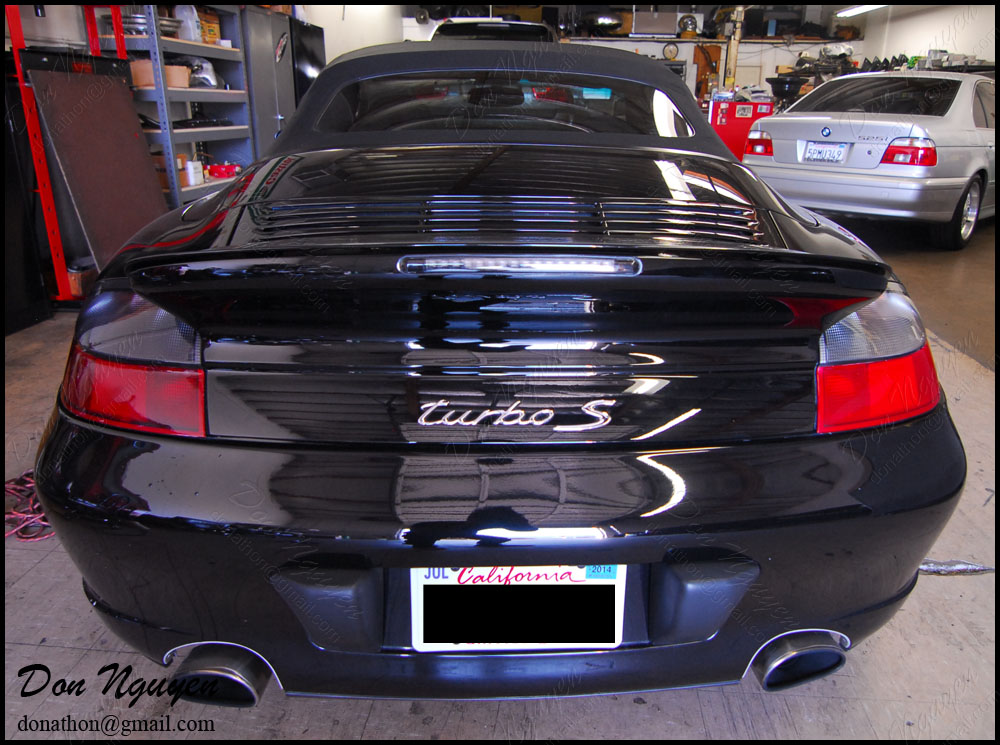
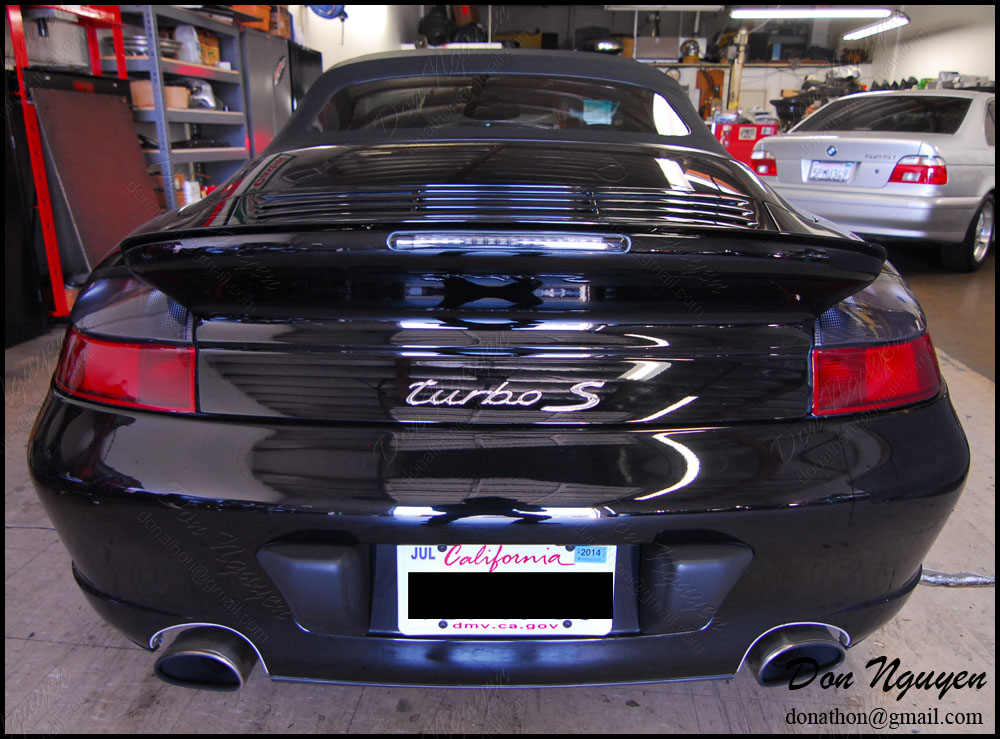
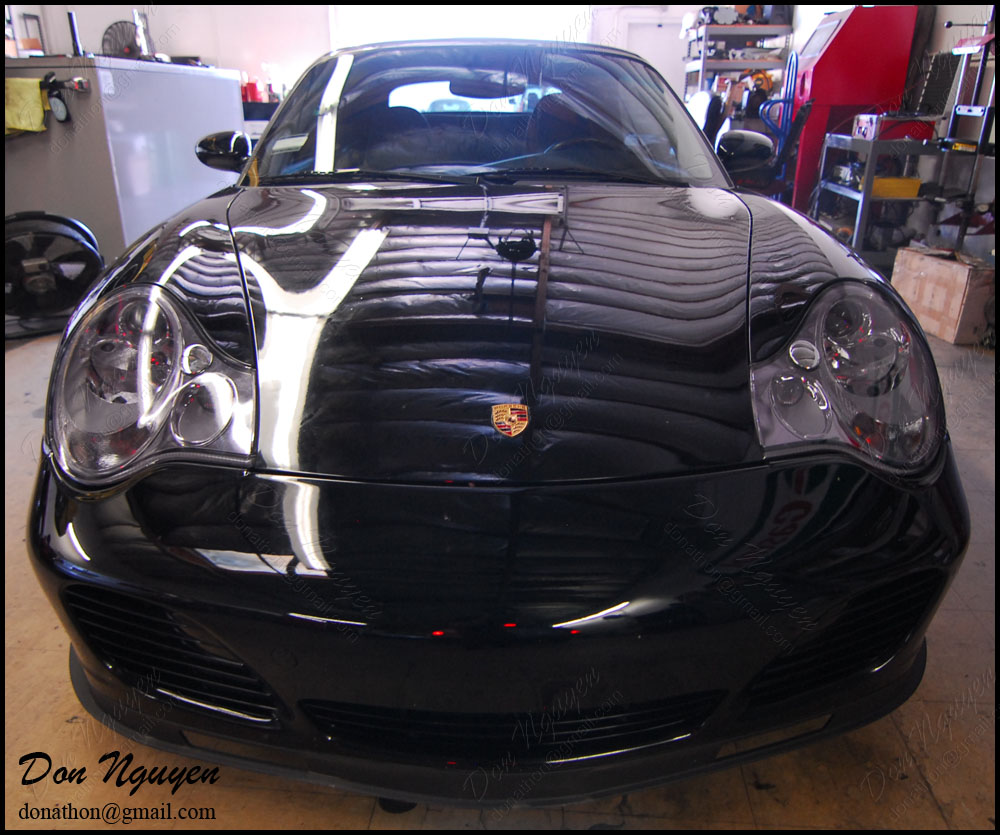
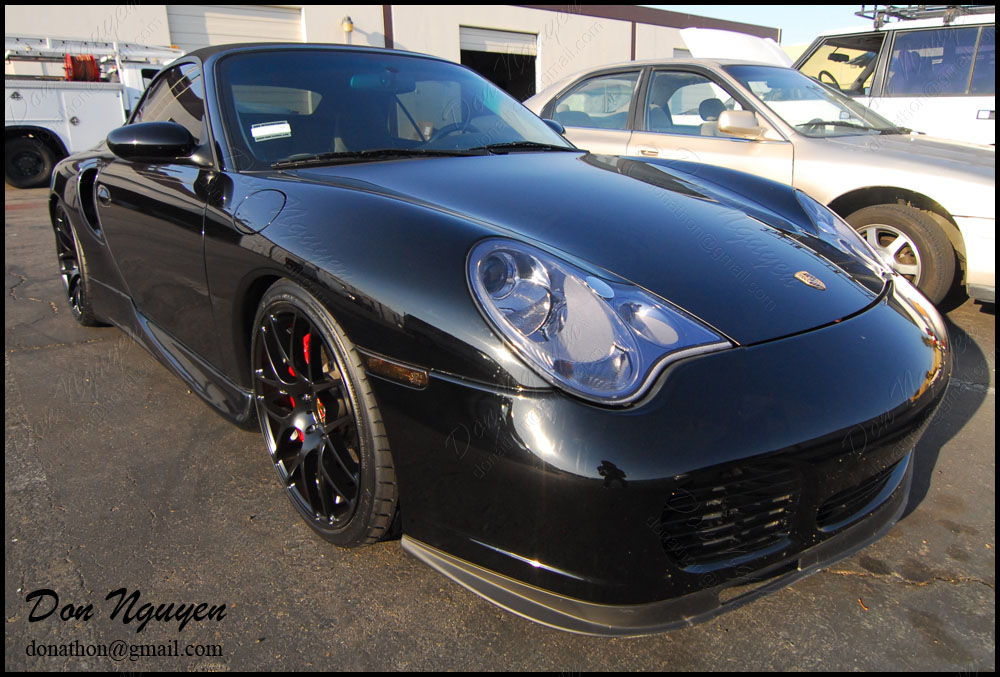
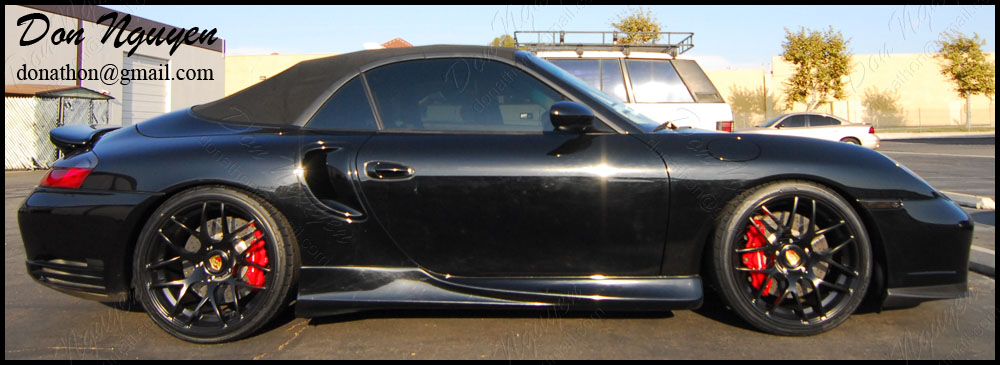
This black Porsche Turbo S brought his car in to have me lightly tint/smoke both the headlights and tail lights on his car all around. I took some pictures of the car outside and inside to help better show you guys the subtle slight changes in how the lights looked with my light smoke/tint film applied. Also took some pictures of one of the lights stock and the other tinted/smoked to show you how they look like side by side. The owner of this car was from Irvine and drove out to me in Anaheim Hills/Orange County to have the work done. Overall, I think the light shade was a nice subtle change to the look of this black car.
Before:


After:
During - Passenger/left side stock, driver/right side tinted/smoked:
During - Passenger/right side stock, driver/left side tinted/smoked:
After:


-Don Nguyen
donathon@gmail.com
Before:
After:
During - Passenger/left side stock, driver/right side tinted/smoked:
During - Passenger/right side stock, driver/left side tinted/smoked:
After:
-Don Nguyen
donathon@gmail.com
Thread Starter
Former Vendor of MBWorld
Joined: Mar 2008
Posts: 19,593
Likes: 30
From: Irvine, CA
Euros
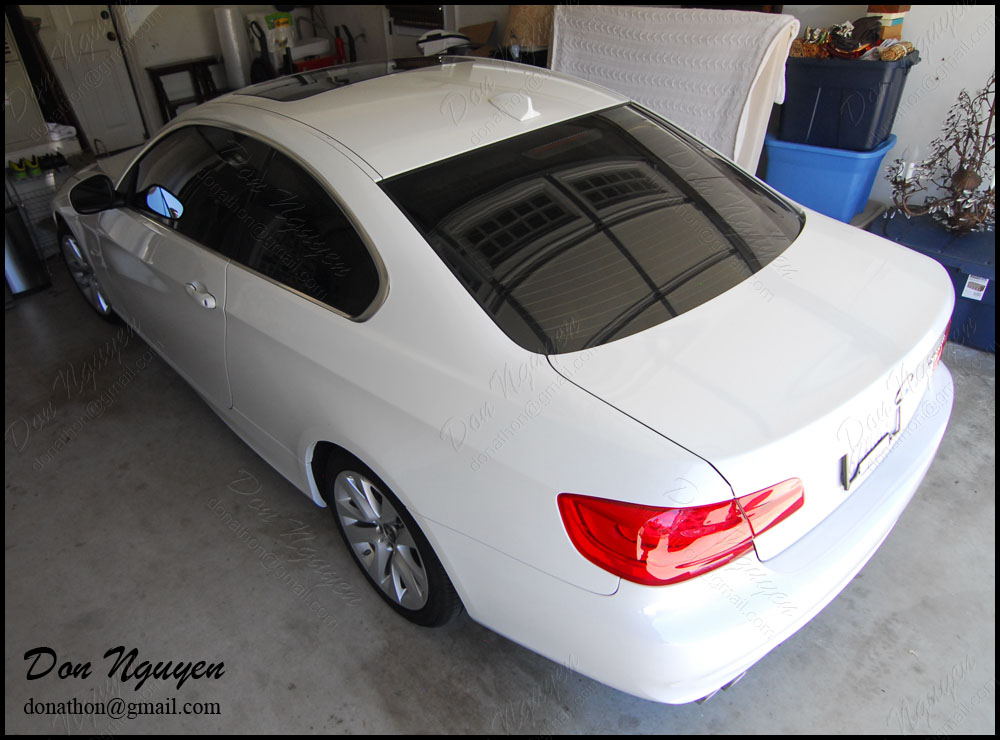
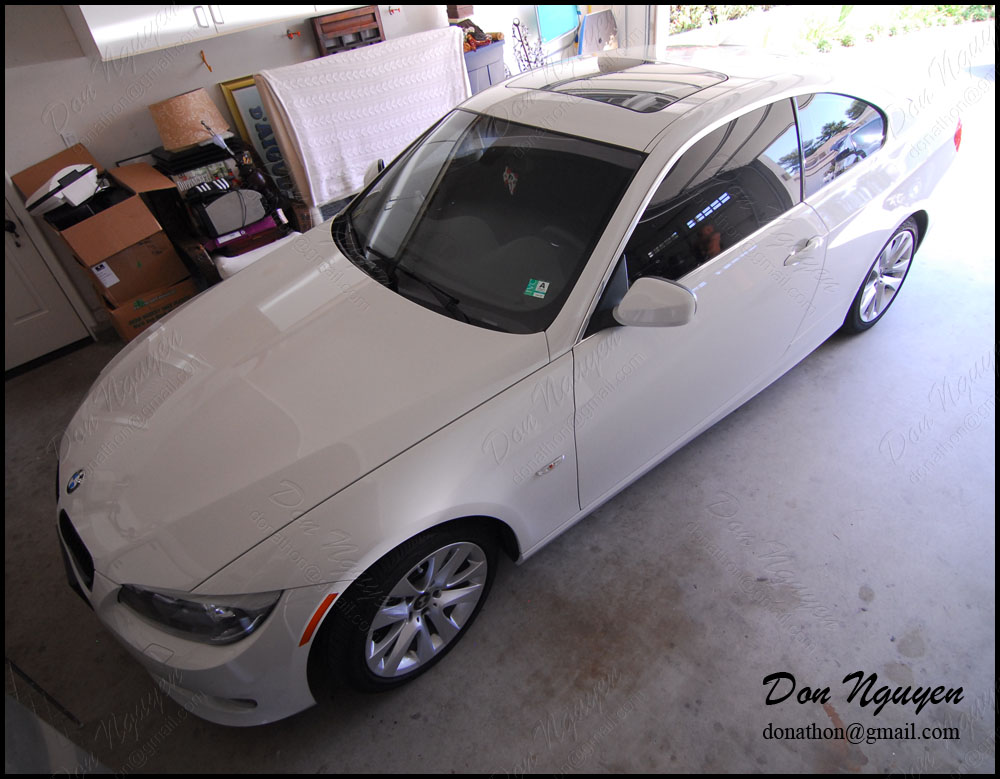
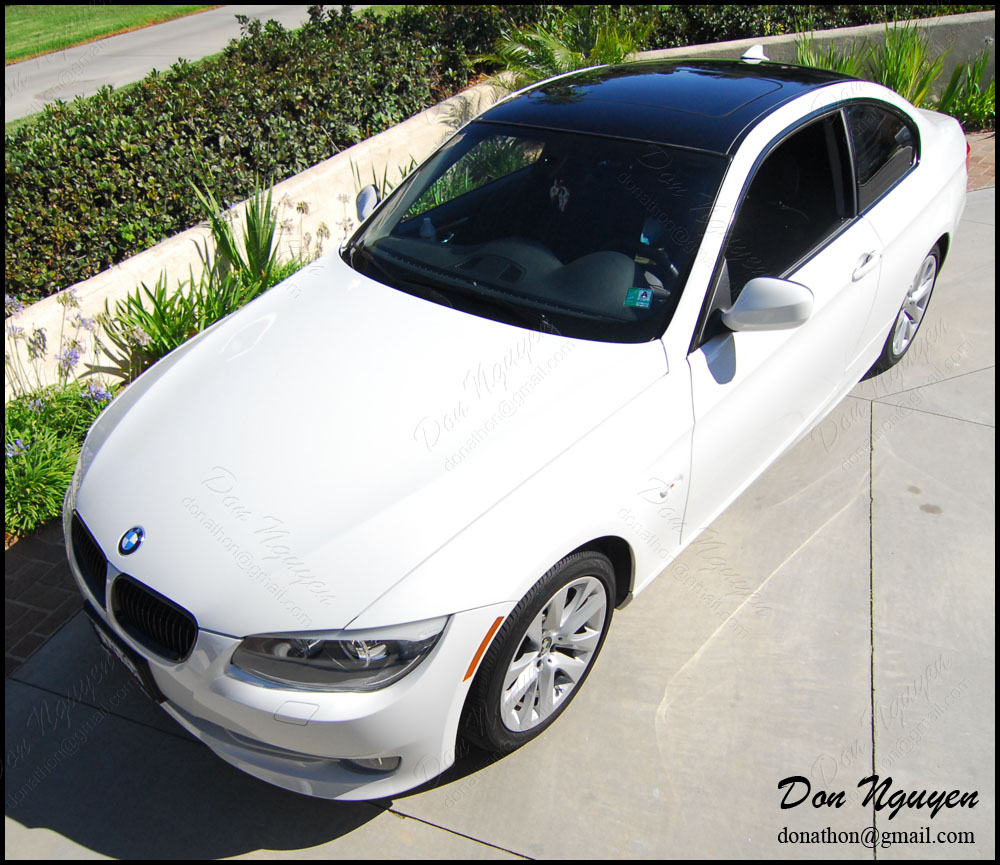
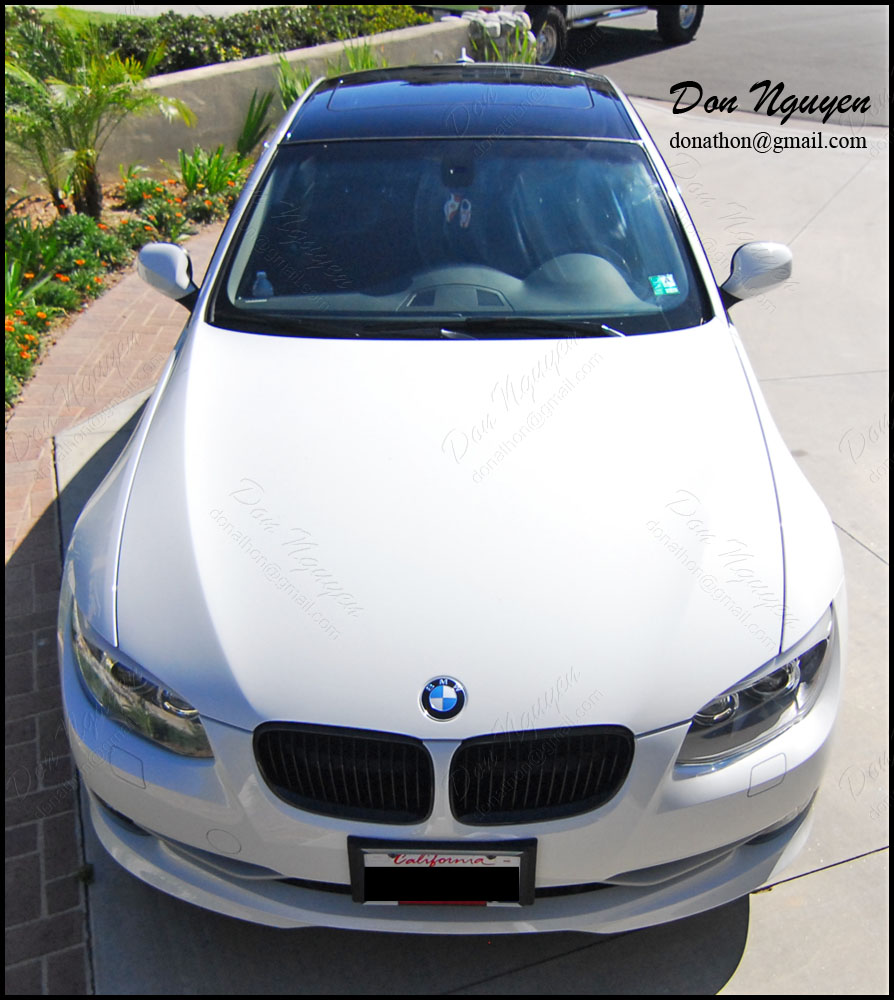
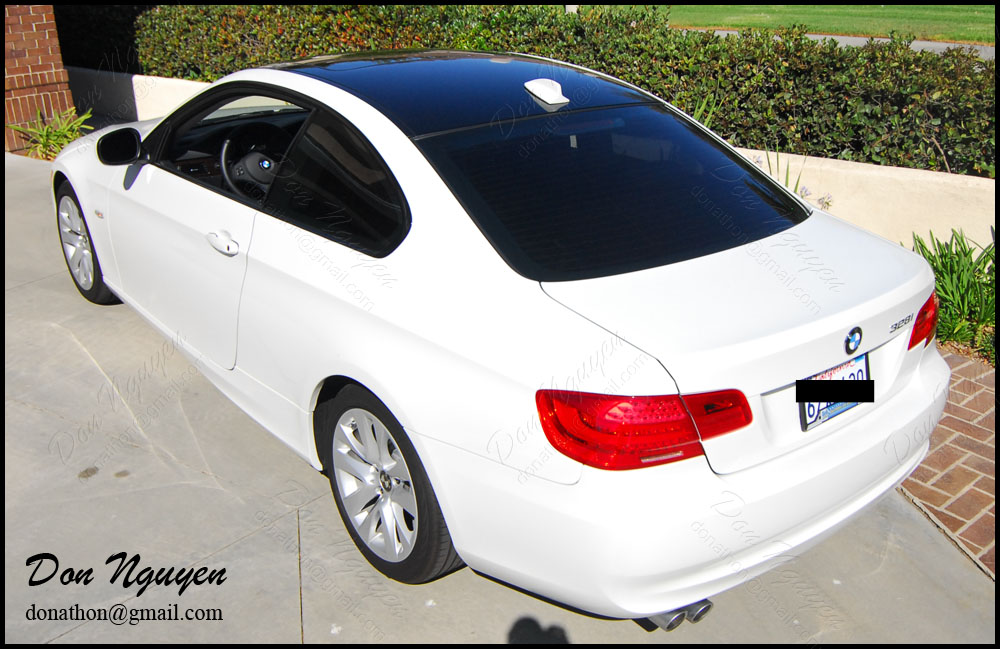
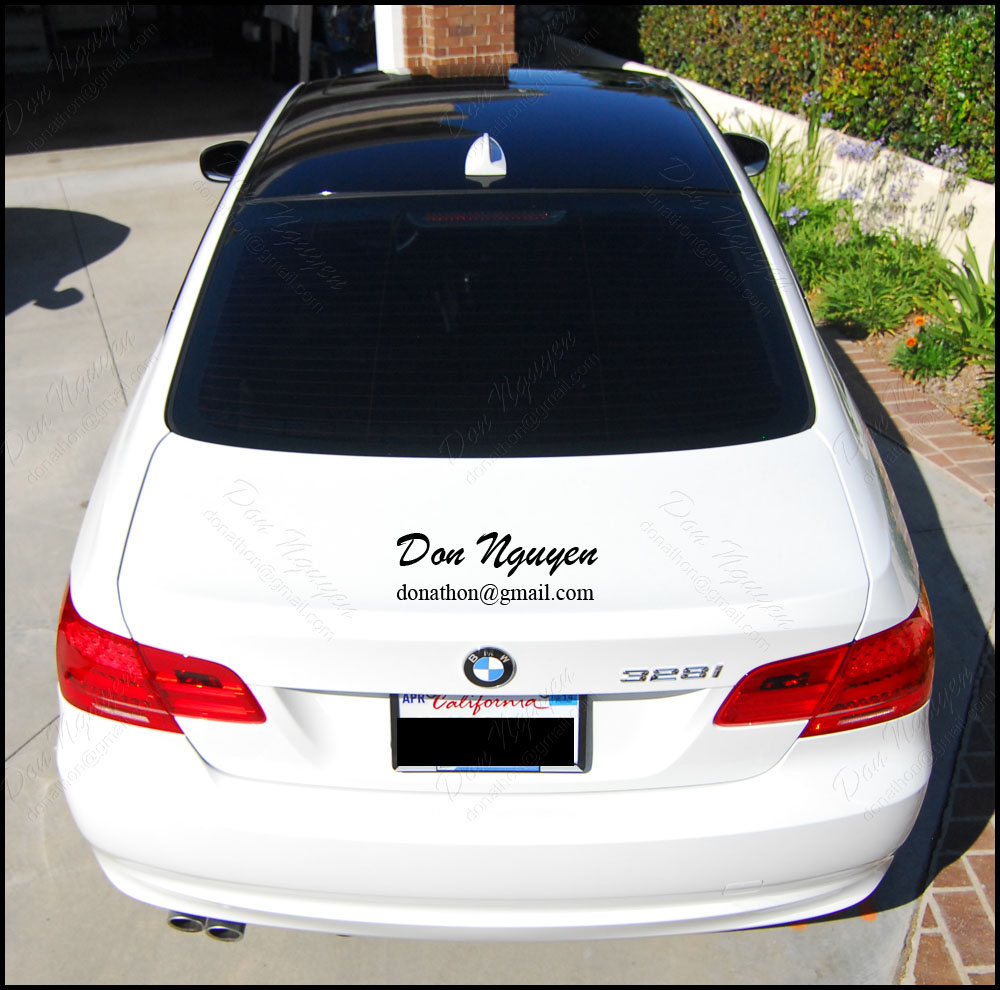
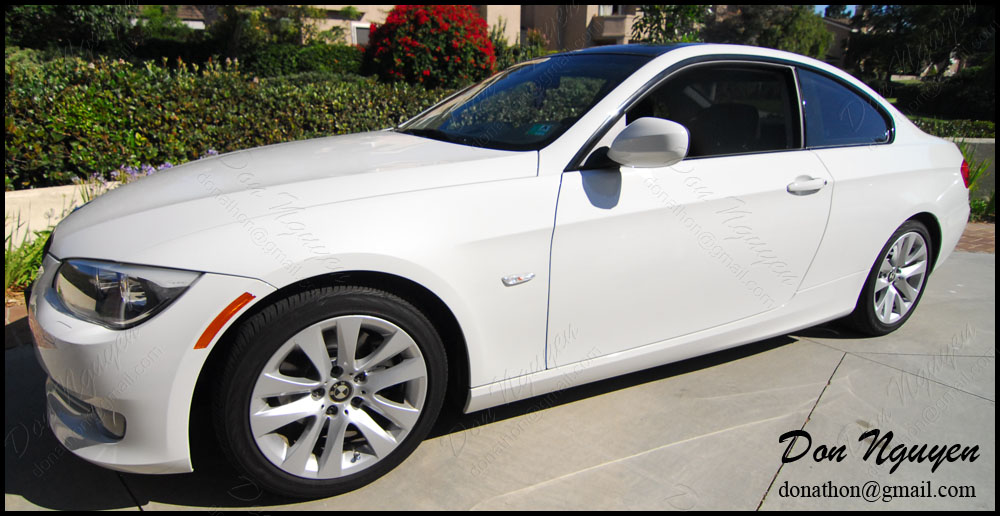
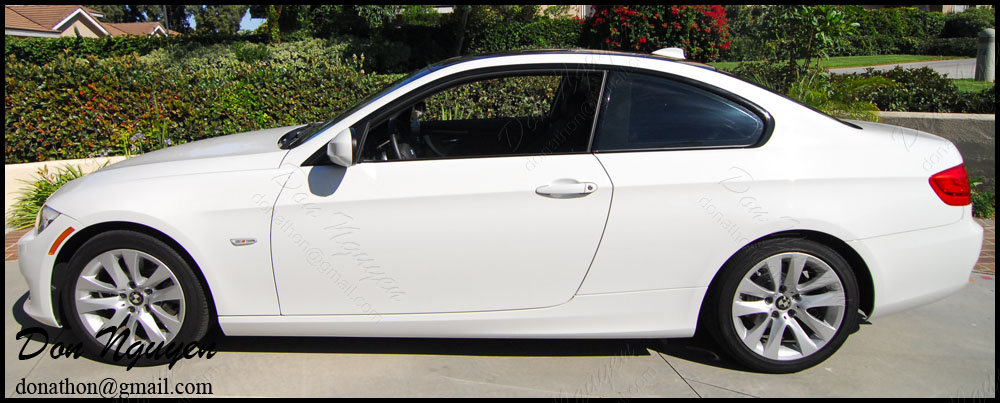
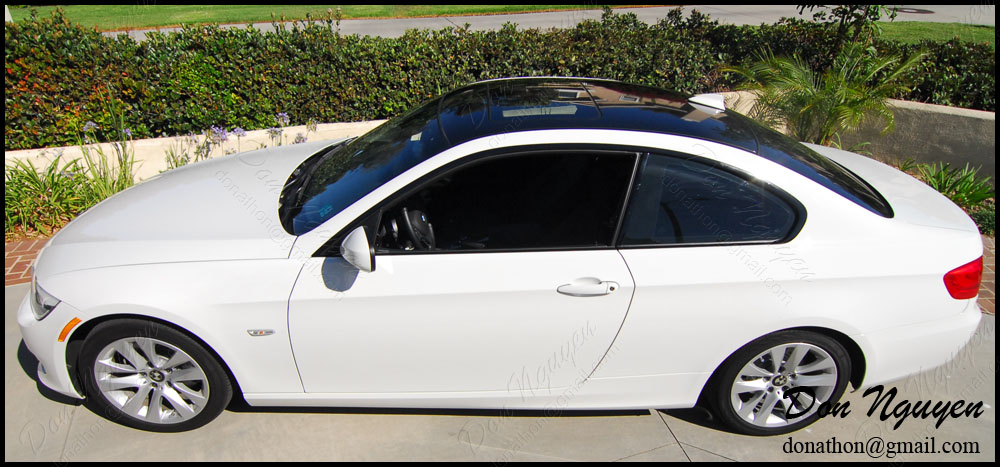
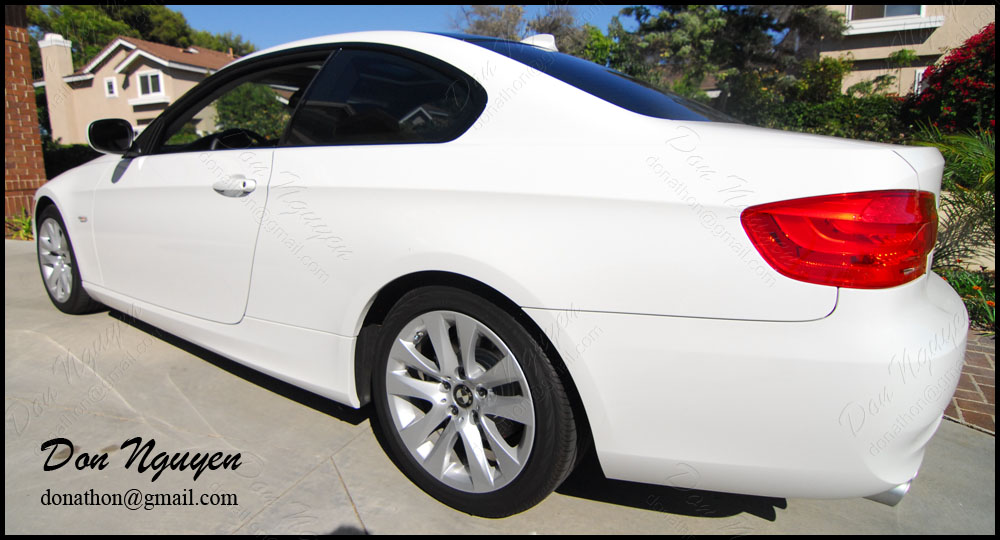
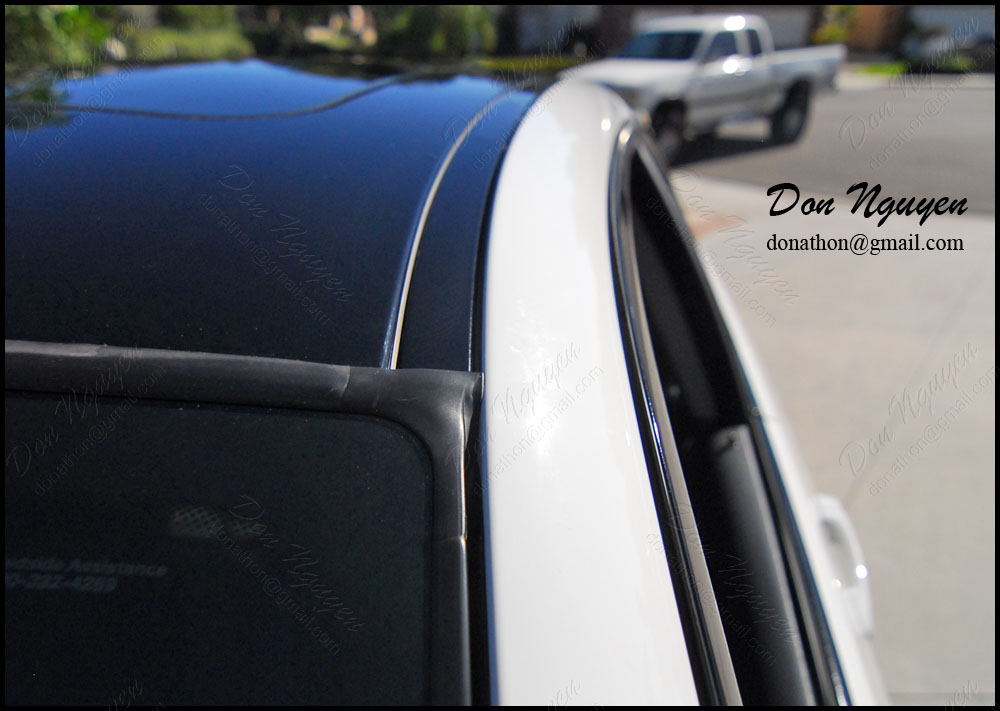
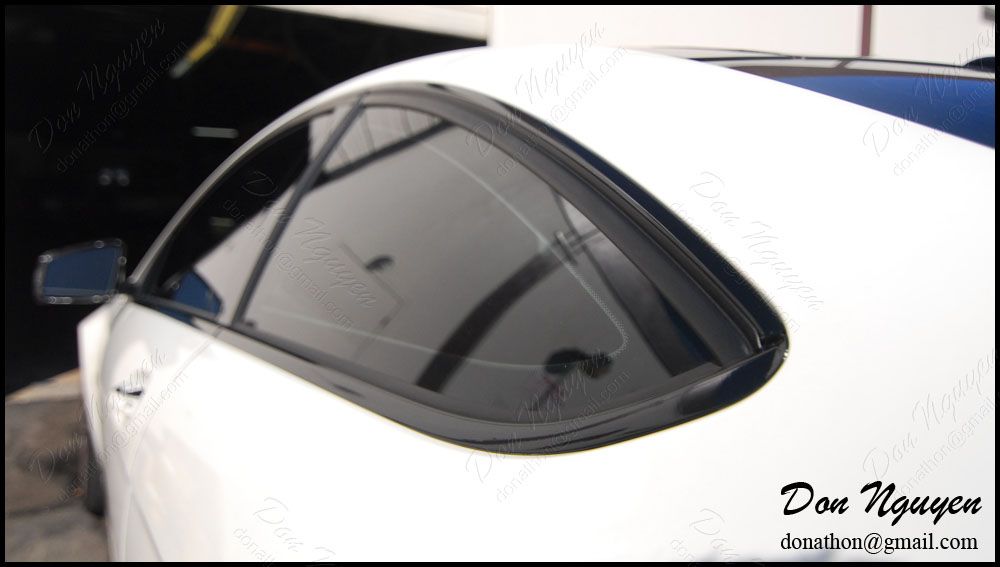
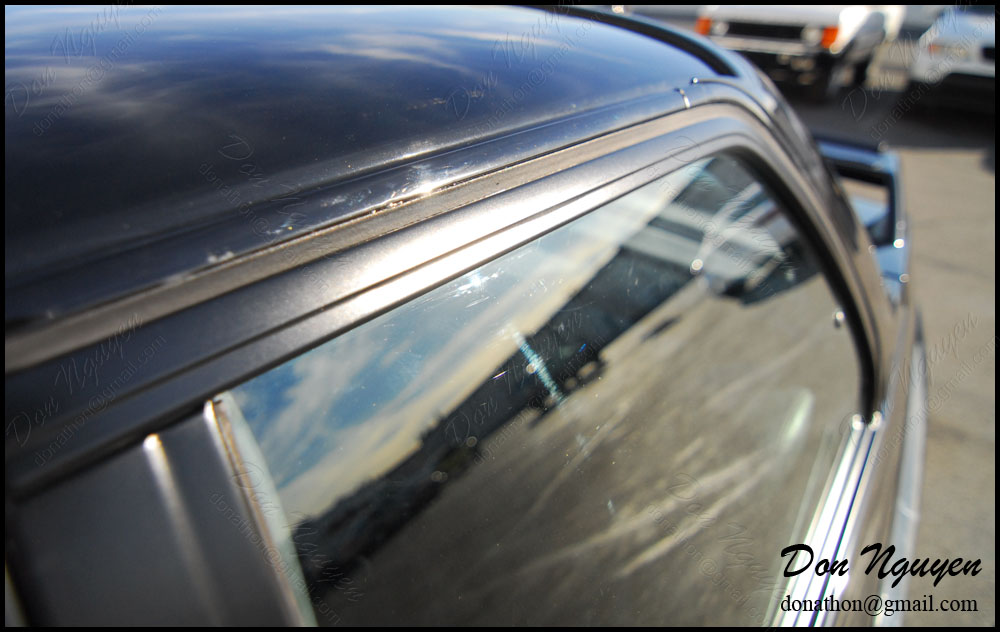
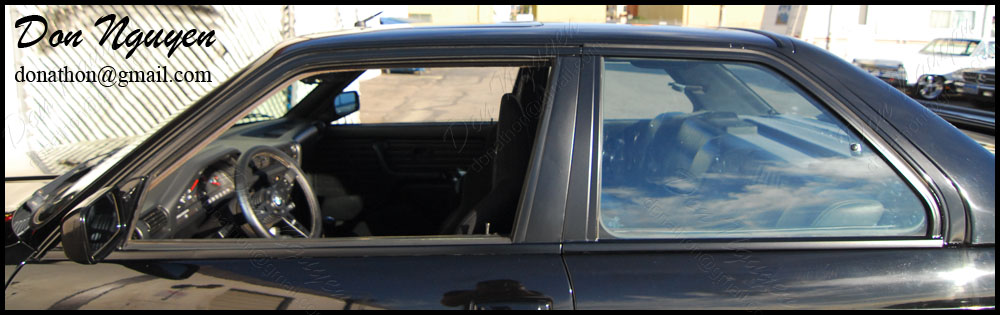
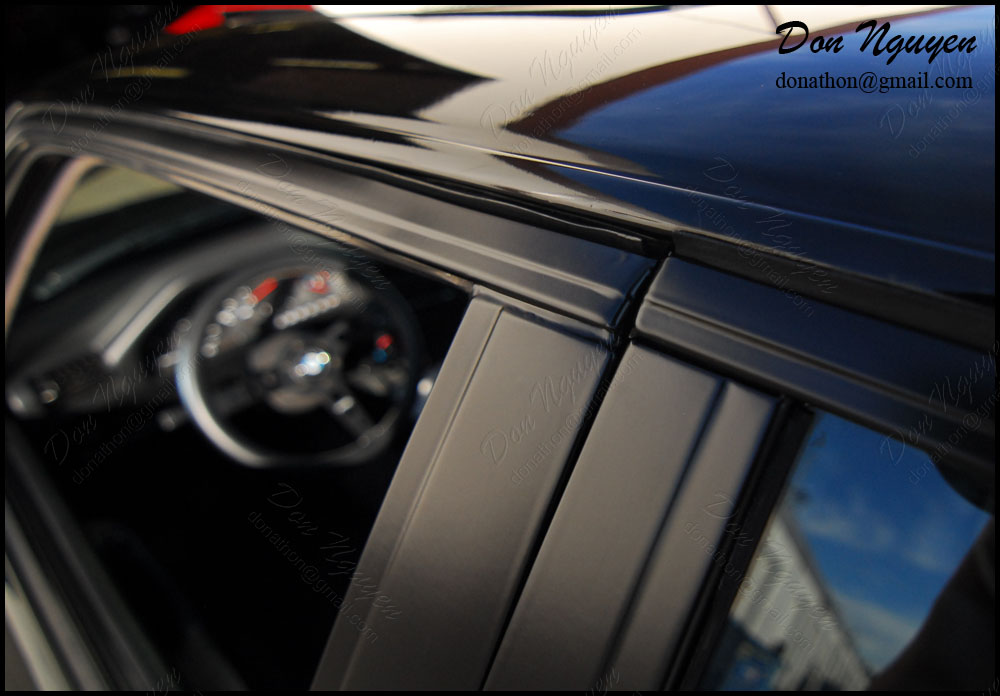
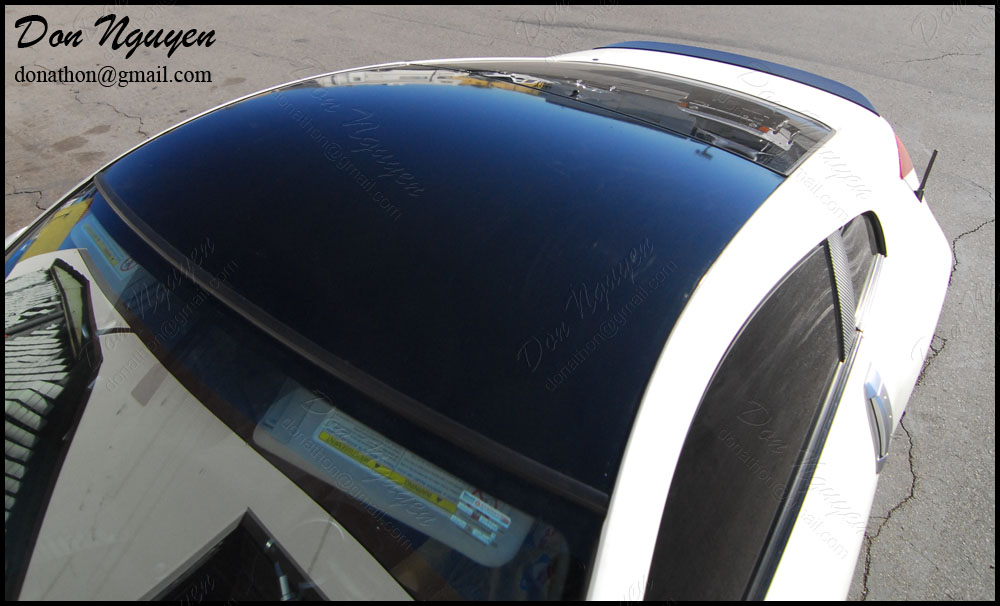
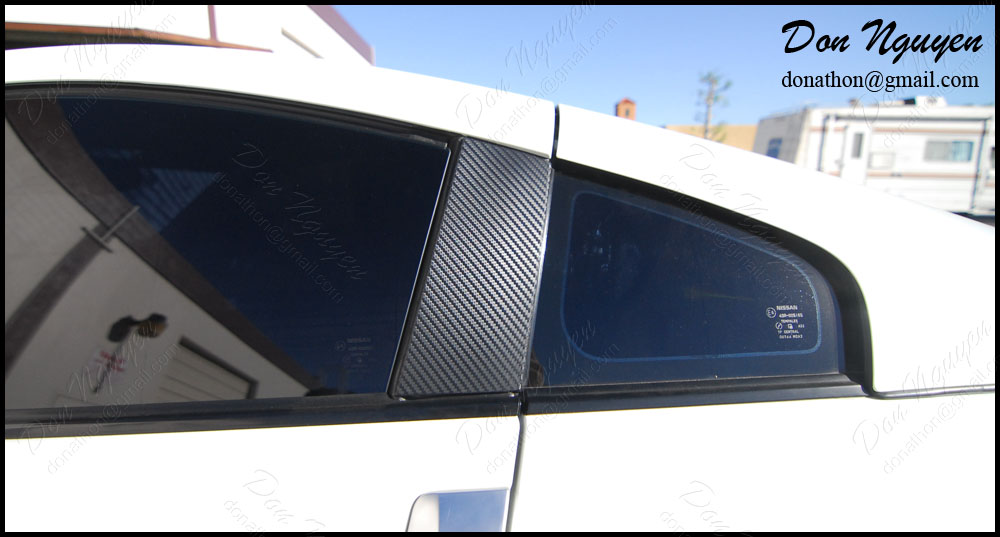
This is another old customer of mine that is had me do some vinyl work on his new car. I typically do not make house calls, but being that he was an old customer and also lived down the street from me in Irvine/Orange County, I made an exception. For his white E92 328i coupe, he had me vinyl wrap the roof of his car in my gloss black vinyl material and also black out the chrome/brushed aluminum window trimmings in gloss black as well to give it the shadow line look that's offered from the factory for BMW. The car was brand new and stock, but these two changes and modifications to the car really changed the look of the car without making it look out of place or too modified.
Before:
After:


-Don Nguyen
donathon@gmail.com
Before:
After:
-Don Nguyen
donathon@gmail.com
Thread Starter
Former Vendor of MBWorld
Joined: Mar 2008
Posts: 19,593
Likes: 30
From: Irvine, CA
Euros
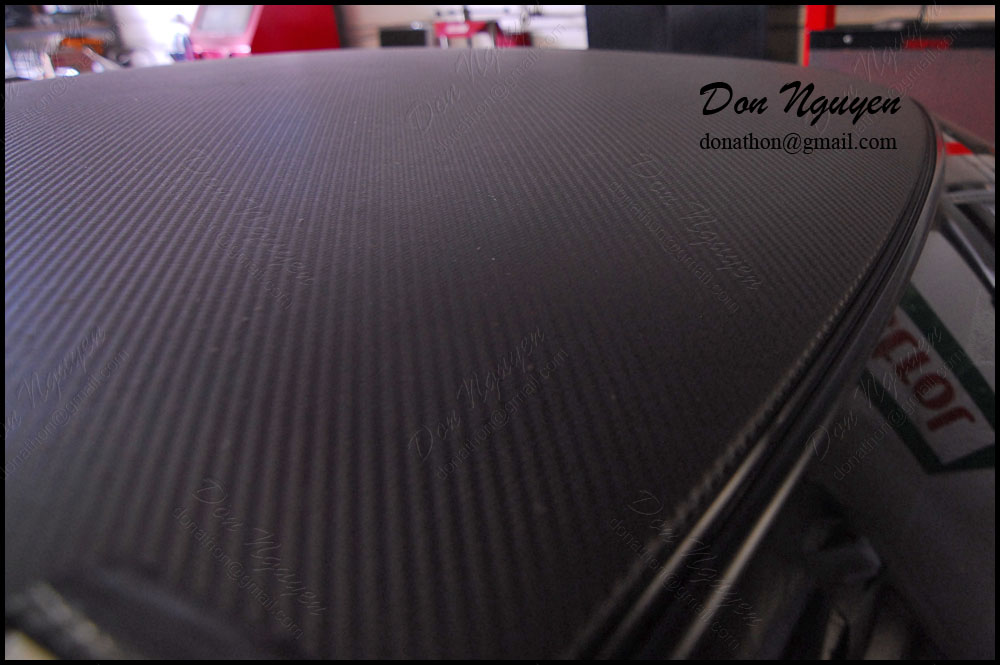
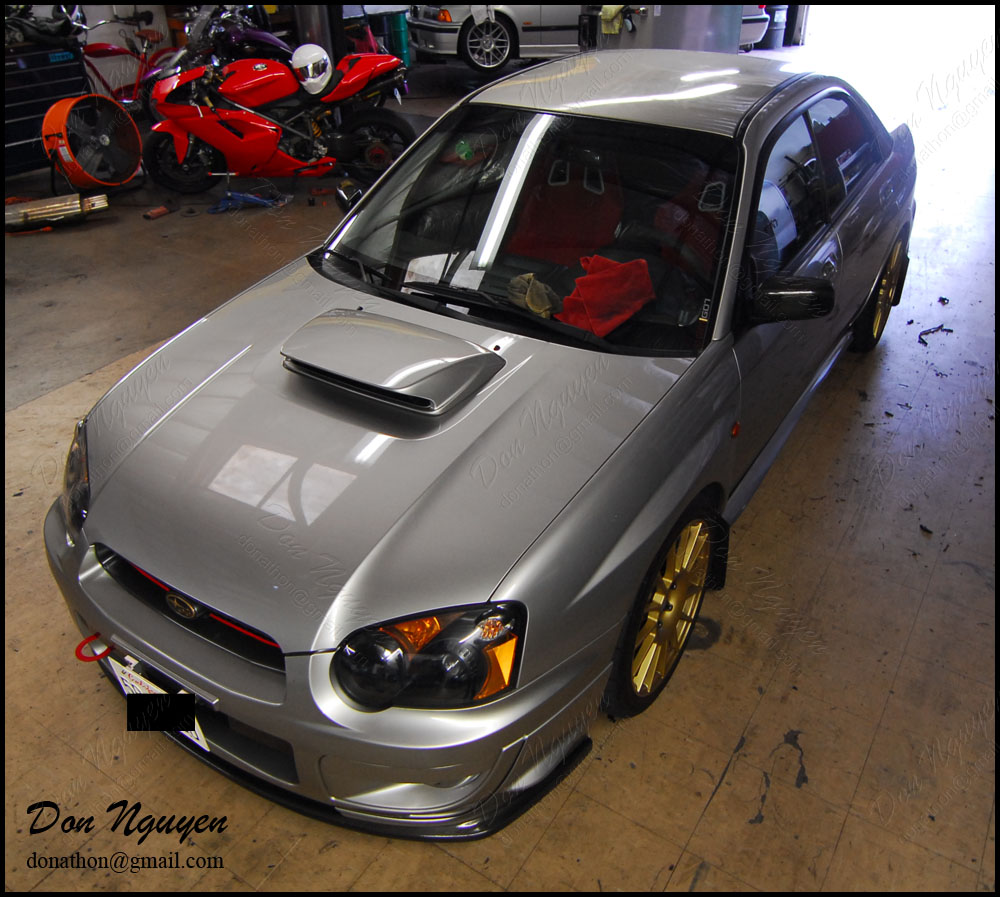
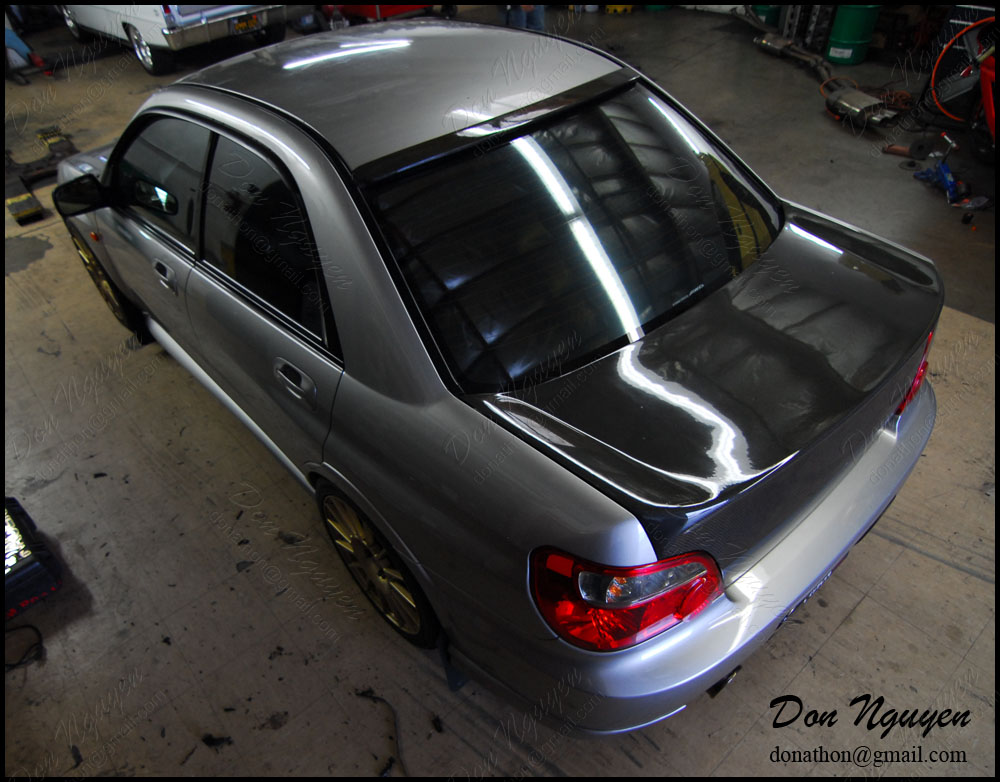
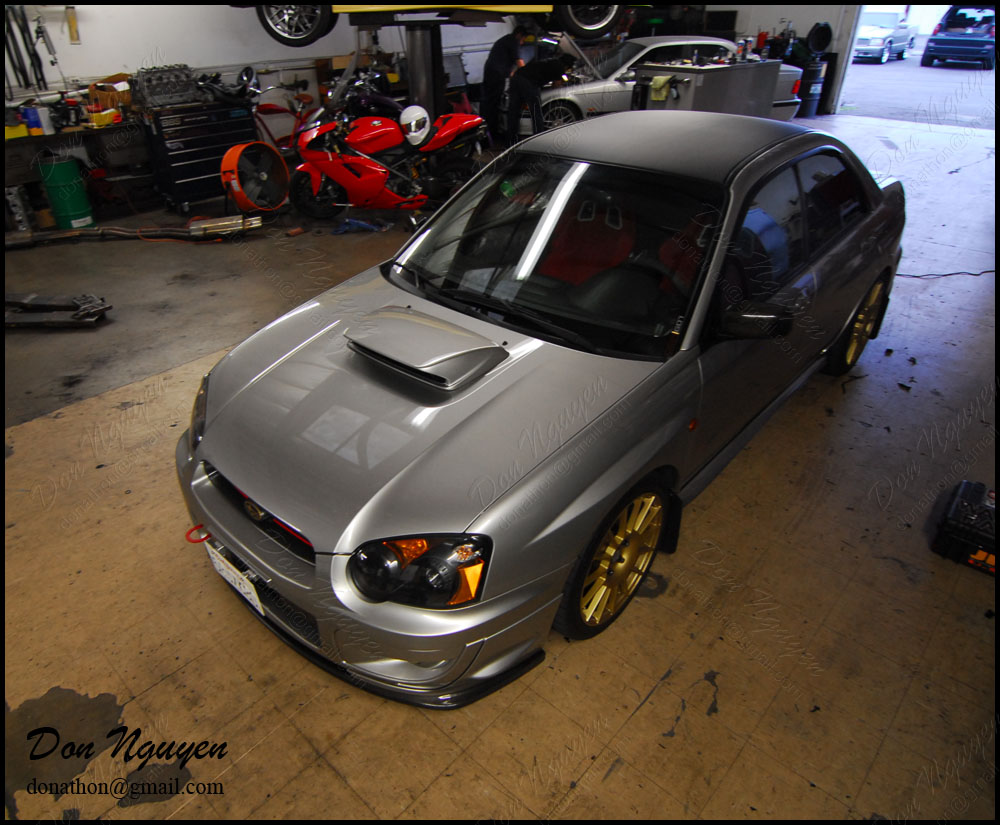
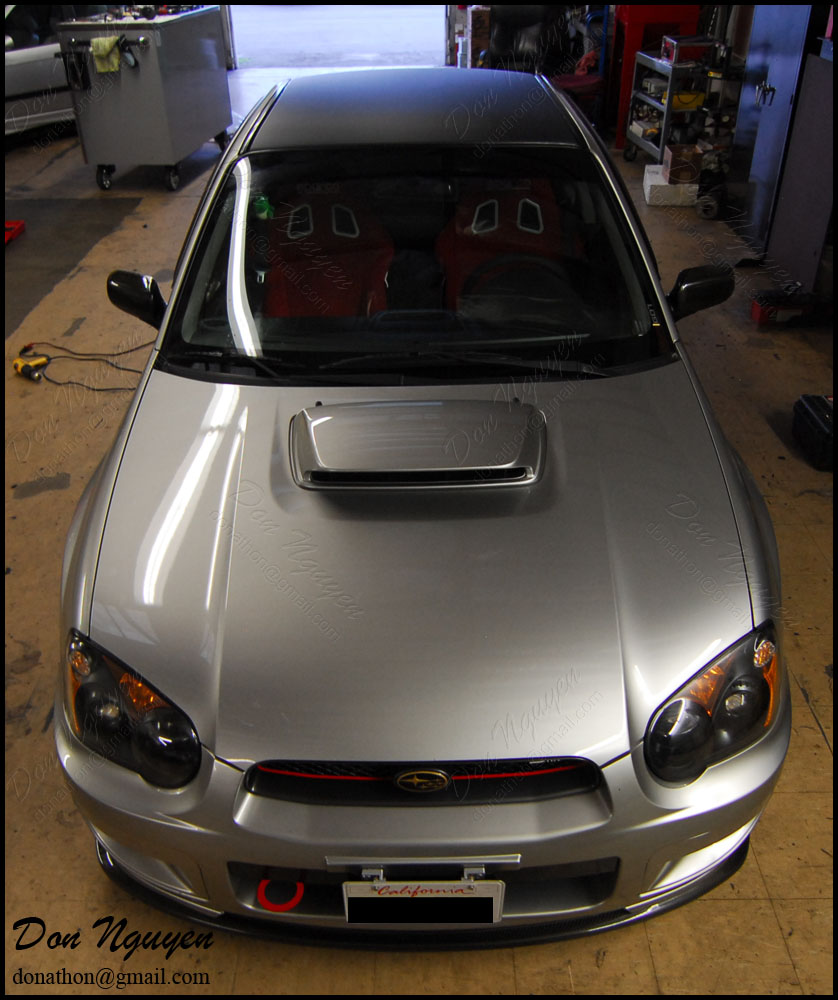
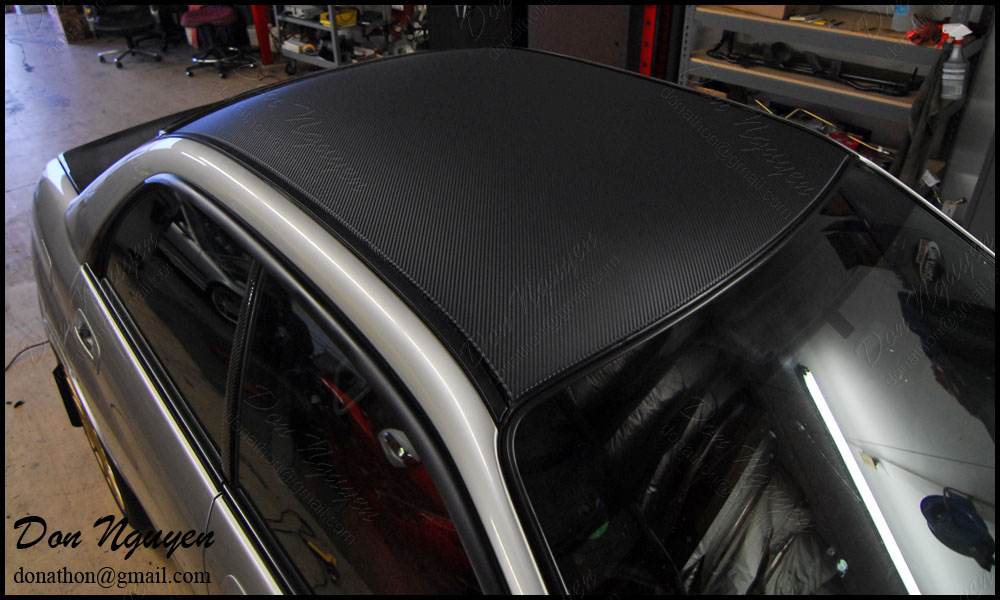
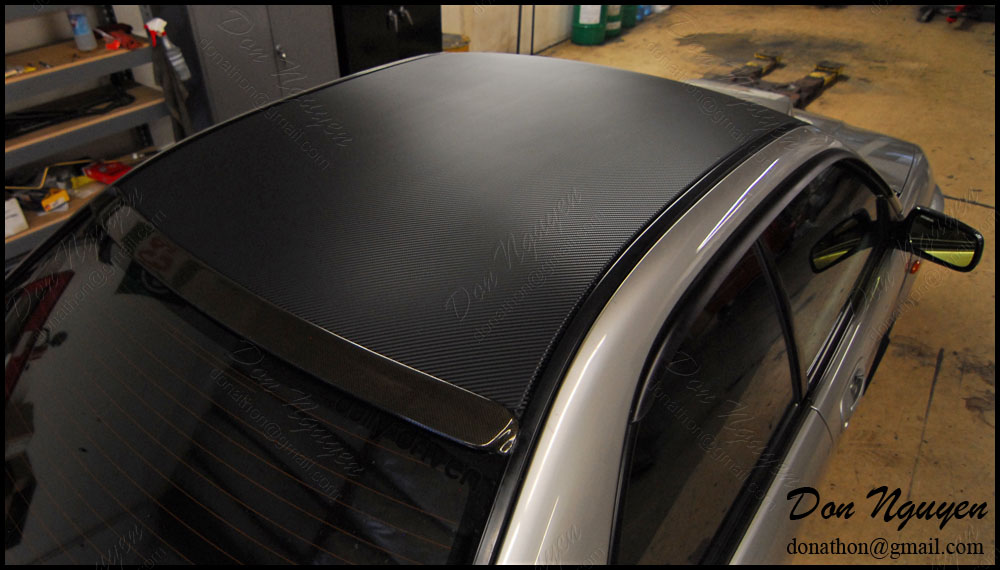
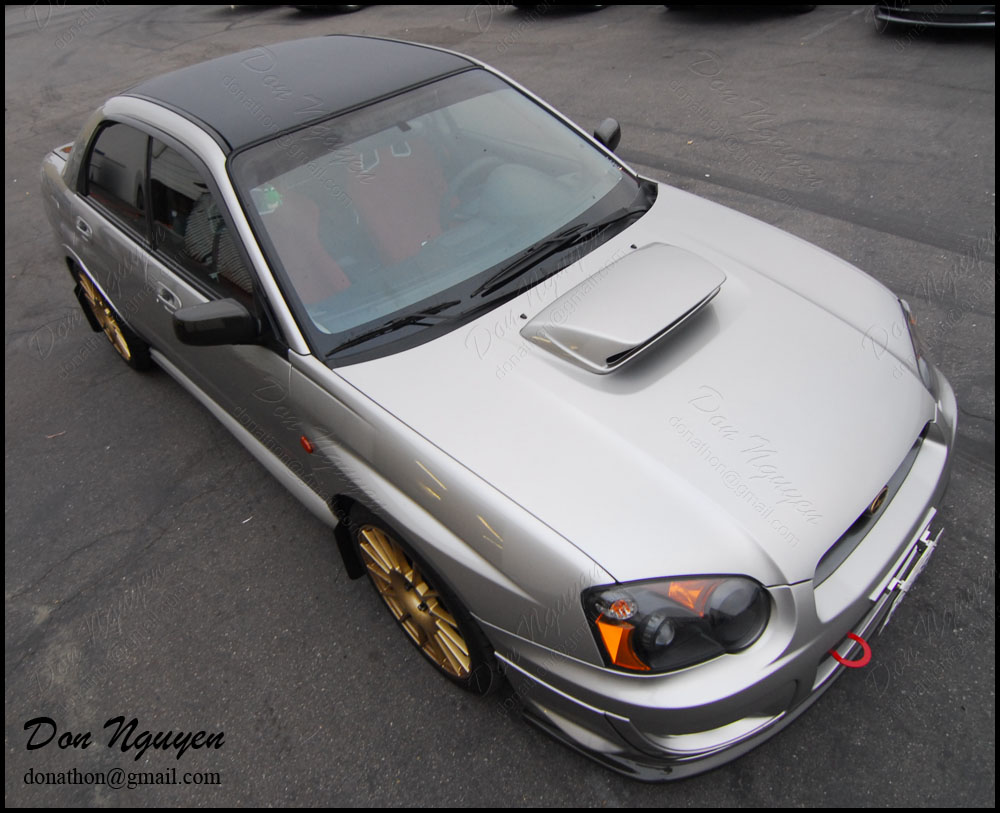
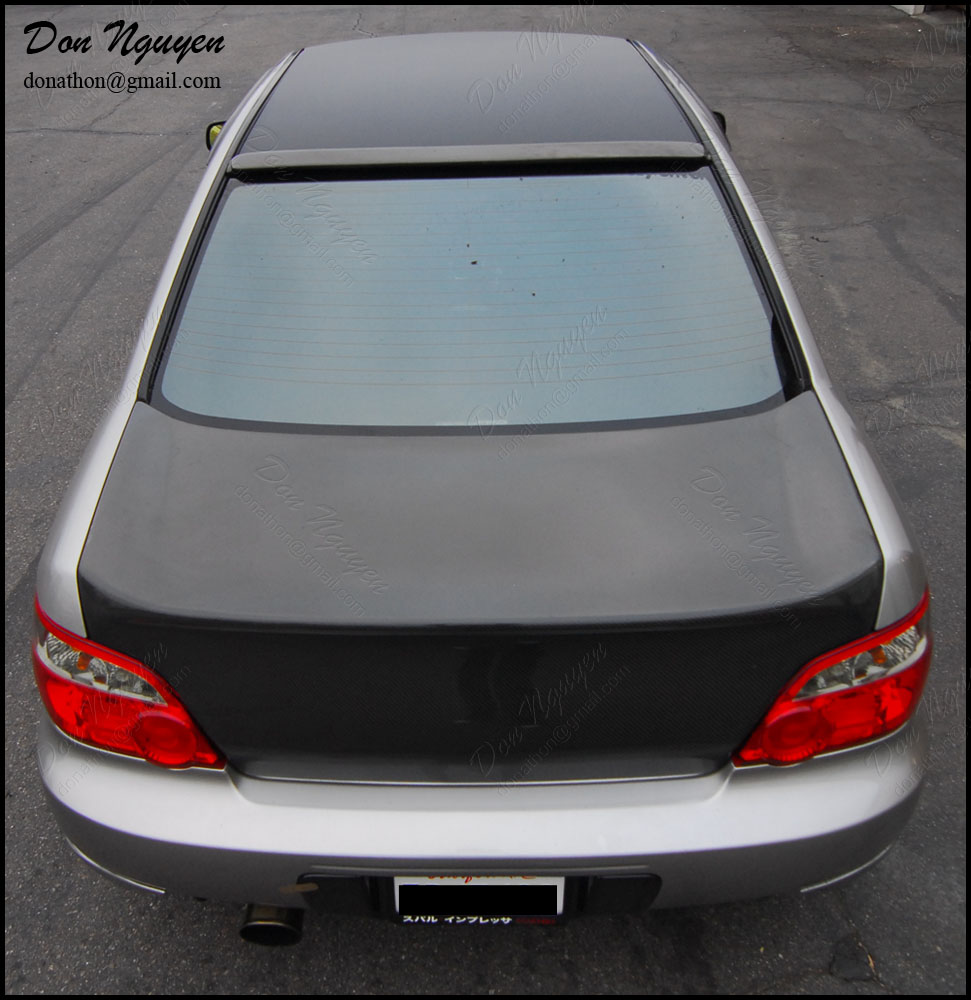
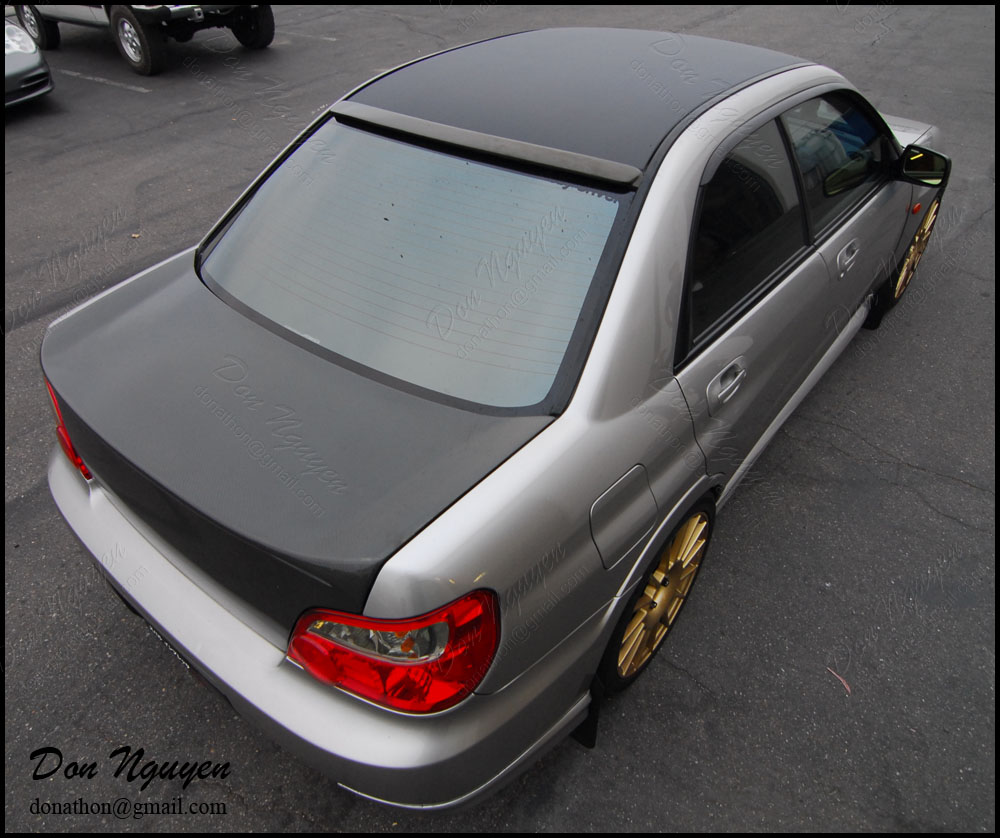
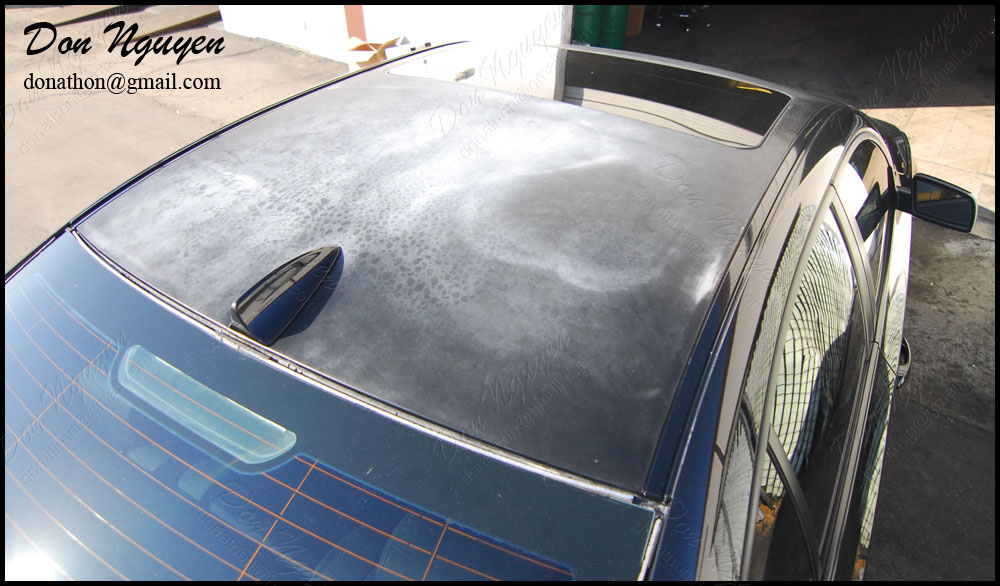
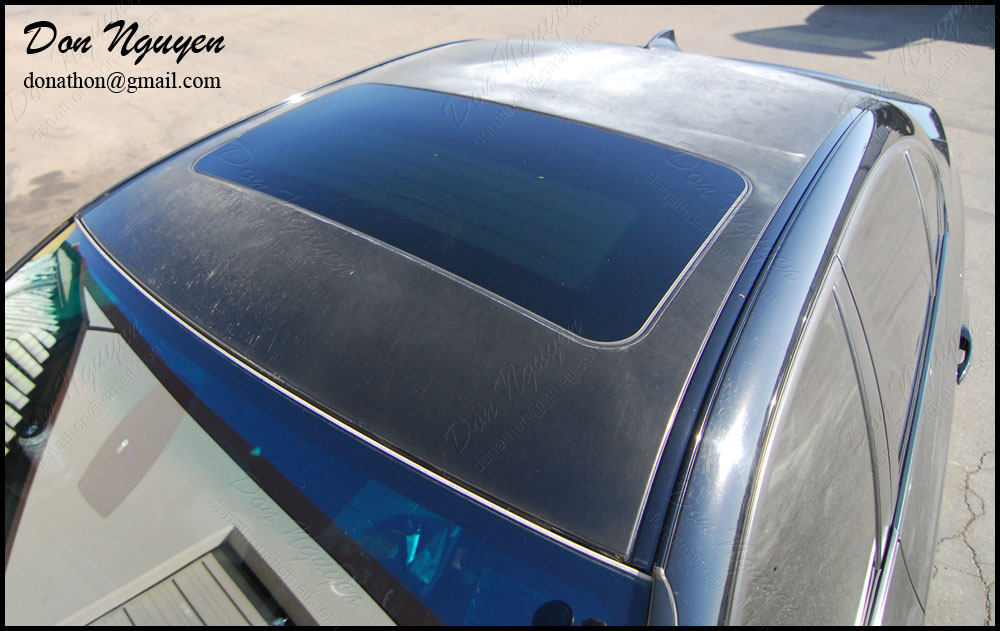
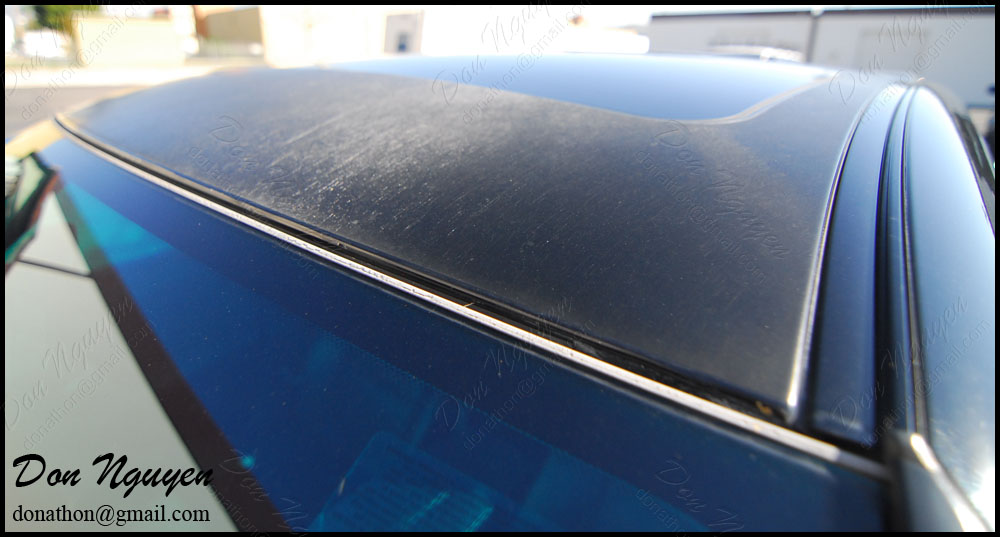
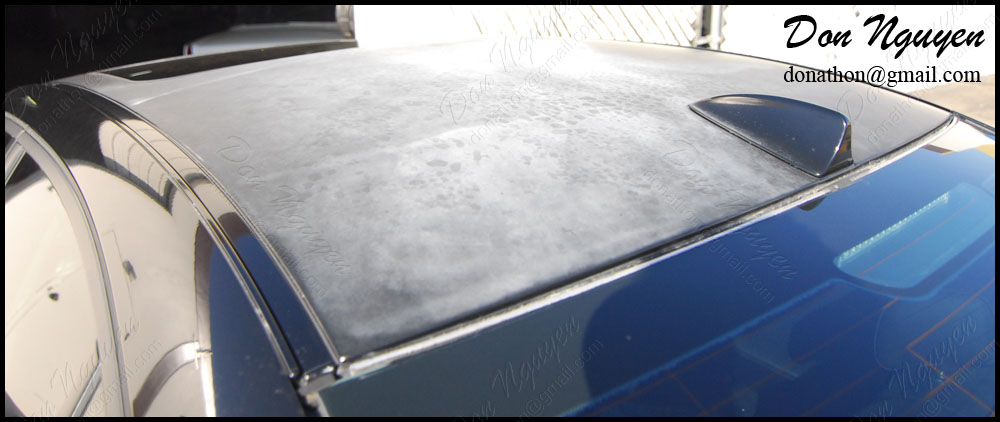
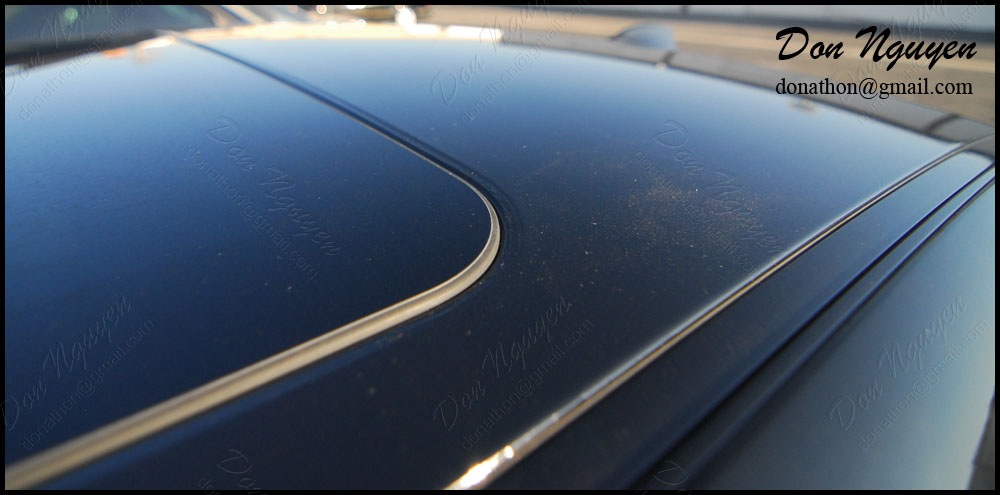
This was one of the first cars that I did when 3M came out with the di-noc matte carbon fiber finish, which was about 4 years ago. The owner of this silver Subaru WRX STI came by to have me re-wrap his roof with the same 3M dinoc matte carbon fiber vinyl material. I took some close ups of the before to show you guys how the material looks like and holds up over time. The carbon fiber weave and all of the details are there, but it had started to lose some of its luster, which was why the owner of this car came back to have me redo the roof for him.
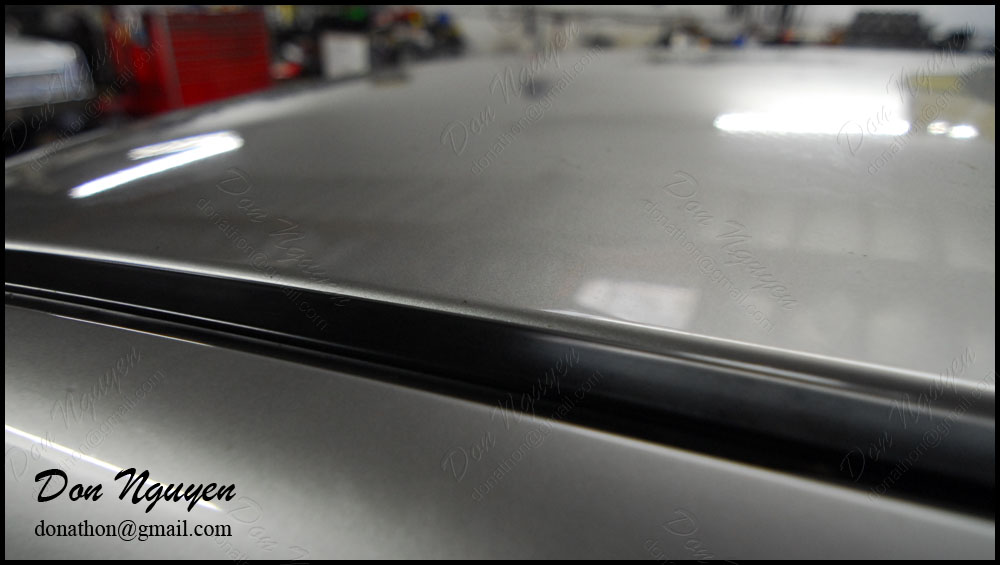
In the pictures with the vinyl removed, that was how the paint looked like right after removal and no or very minimal clean up was done at that point. I took pictures of the paint/roof right after the vinyl was removed to show you guys what the condition of the paint looks like that has had vinyl installed on a roof for roughly 4 years, which is probably going to be longer than most own people own their cars.
The lighting wasn't very good, since it was overcast that day, so I did my best to try and take some pictures to show you guys how the old material looks like compared to the new material. Hopefully you guys are able to see the details and differences in the up close pictures.
Before w/ old vinyl:

Old vinyl removed:

After w/ new vinyl installed:

-Don Nguyen
donathon@gmail.com
In the pictures with the vinyl removed, that was how the paint looked like right after removal and no or very minimal clean up was done at that point. I took pictures of the paint/roof right after the vinyl was removed to show you guys what the condition of the paint looks like that has had vinyl installed on a roof for roughly 4 years, which is probably going to be longer than most own people own their cars.
The lighting wasn't very good, since it was overcast that day, so I did my best to try and take some pictures to show you guys how the old material looks like compared to the new material. Hopefully you guys are able to see the details and differences in the up close pictures.
Before w/ old vinyl:
Old vinyl removed:
After w/ new vinyl installed:
-Don Nguyen
donathon@gmail.com
Thread Starter
Former Vendor of MBWorld
Joined: Mar 2008
Posts: 19,593
Likes: 30
From: Irvine, CA
Euros
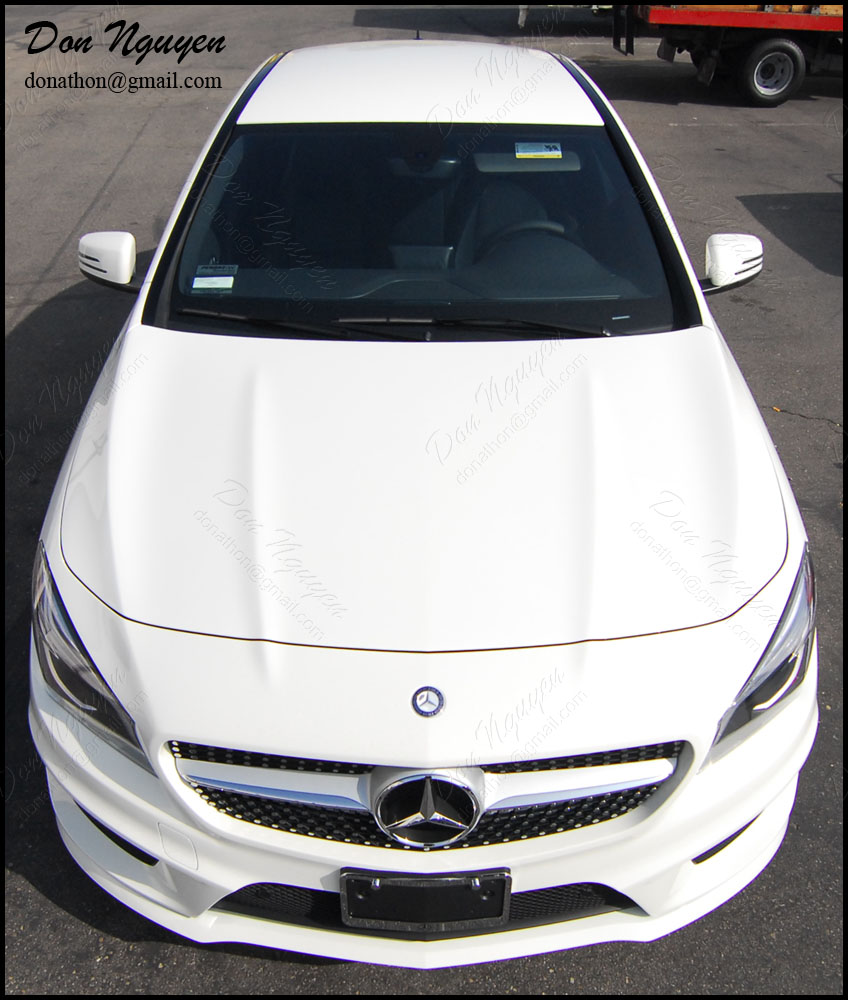
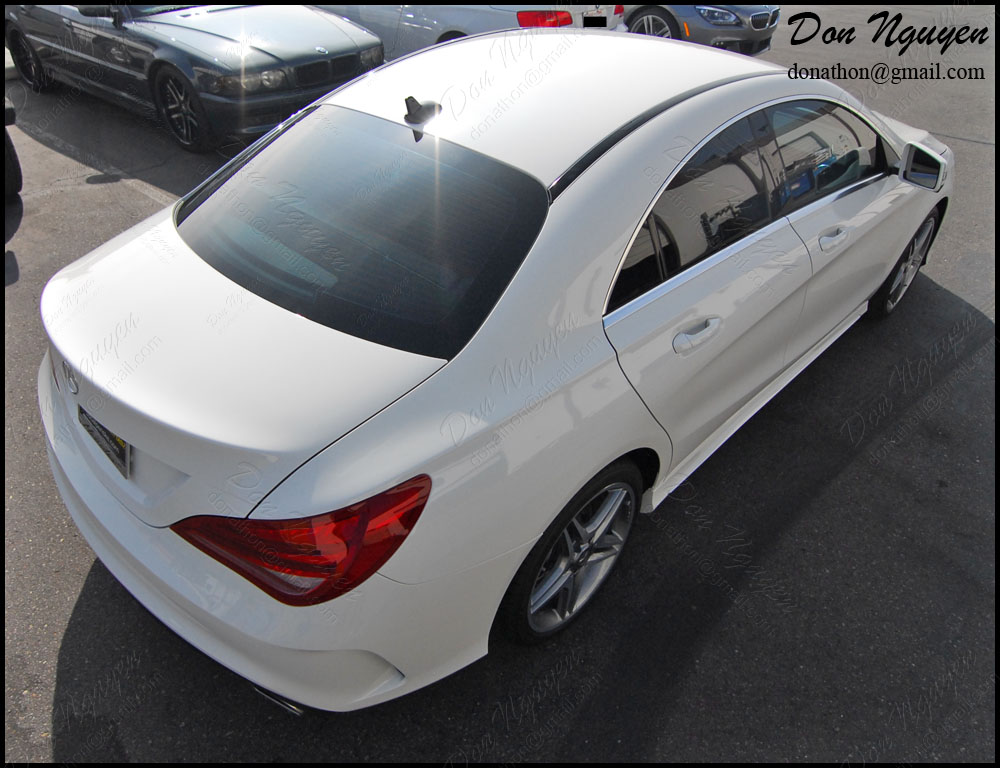
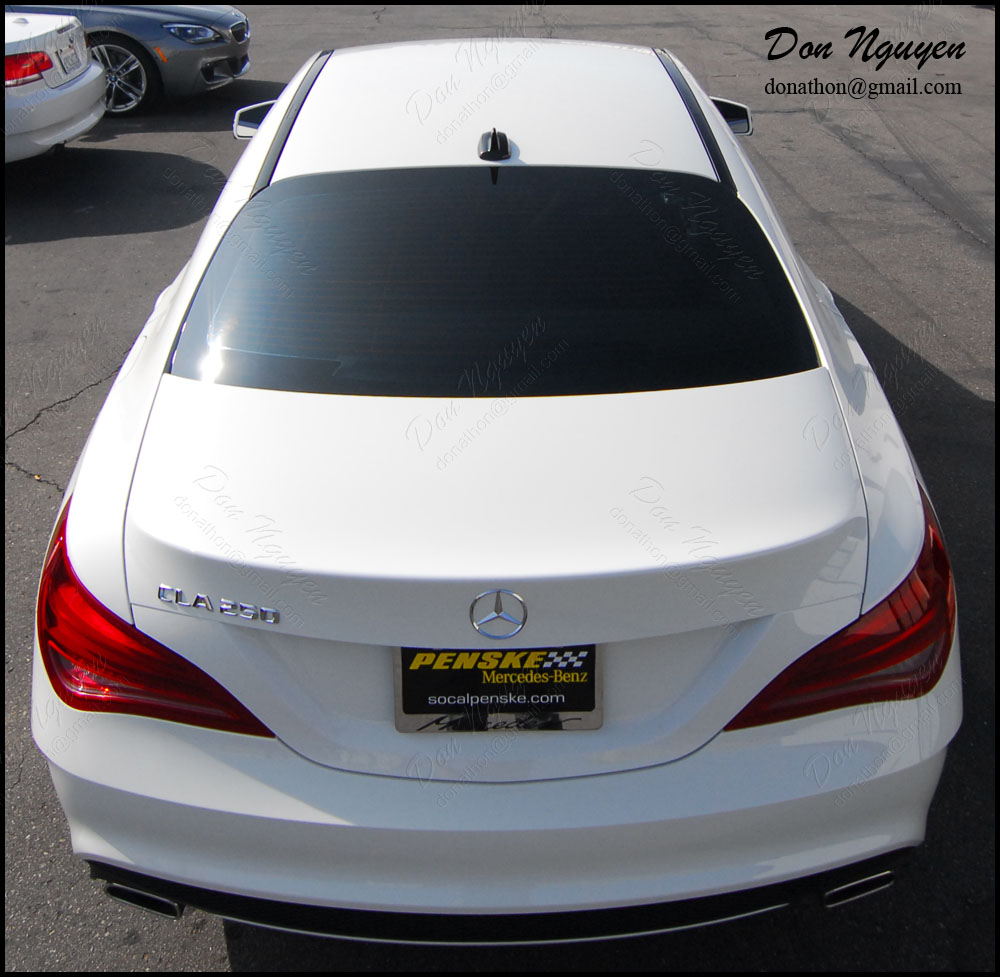
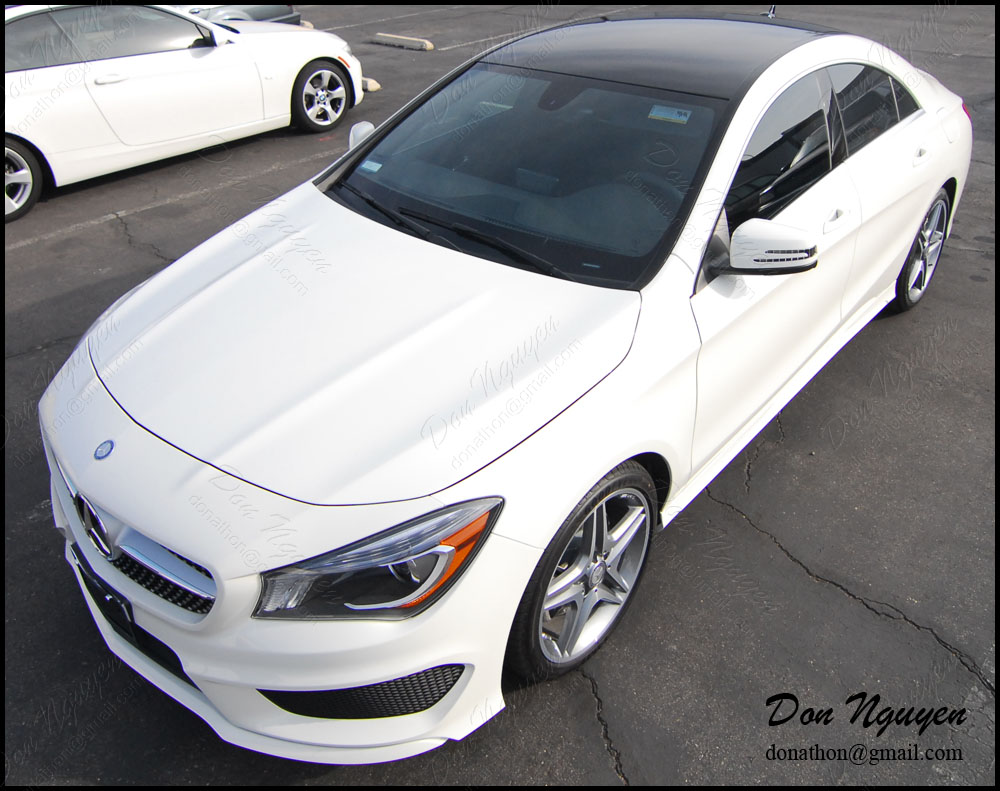
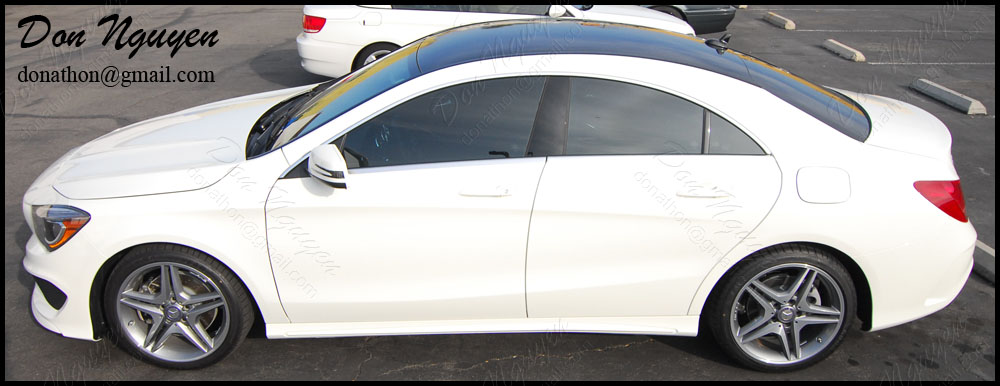
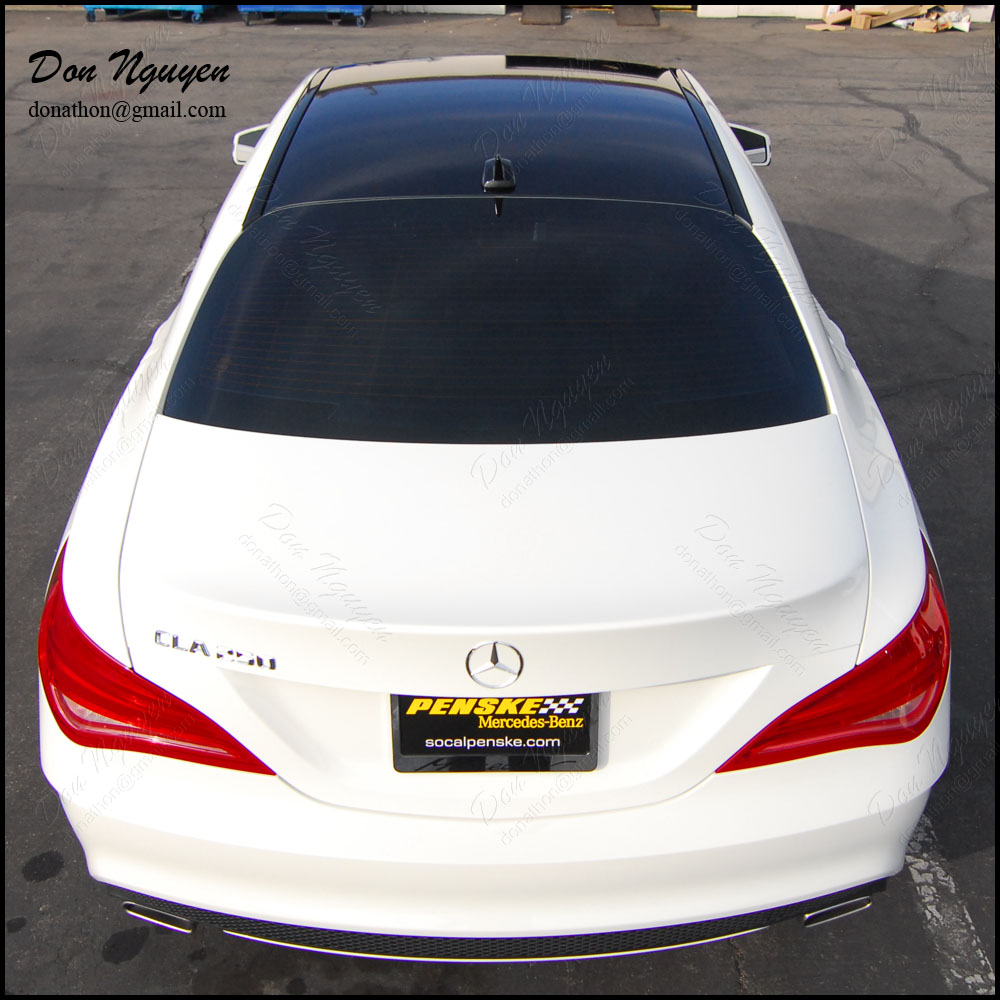
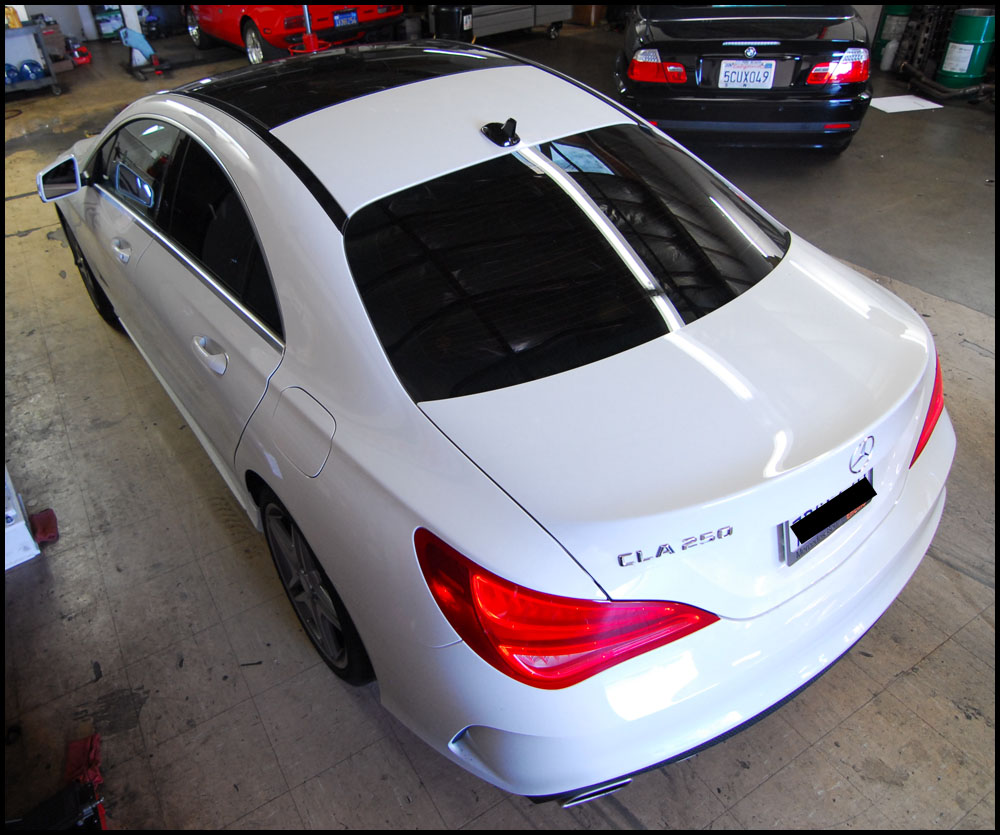
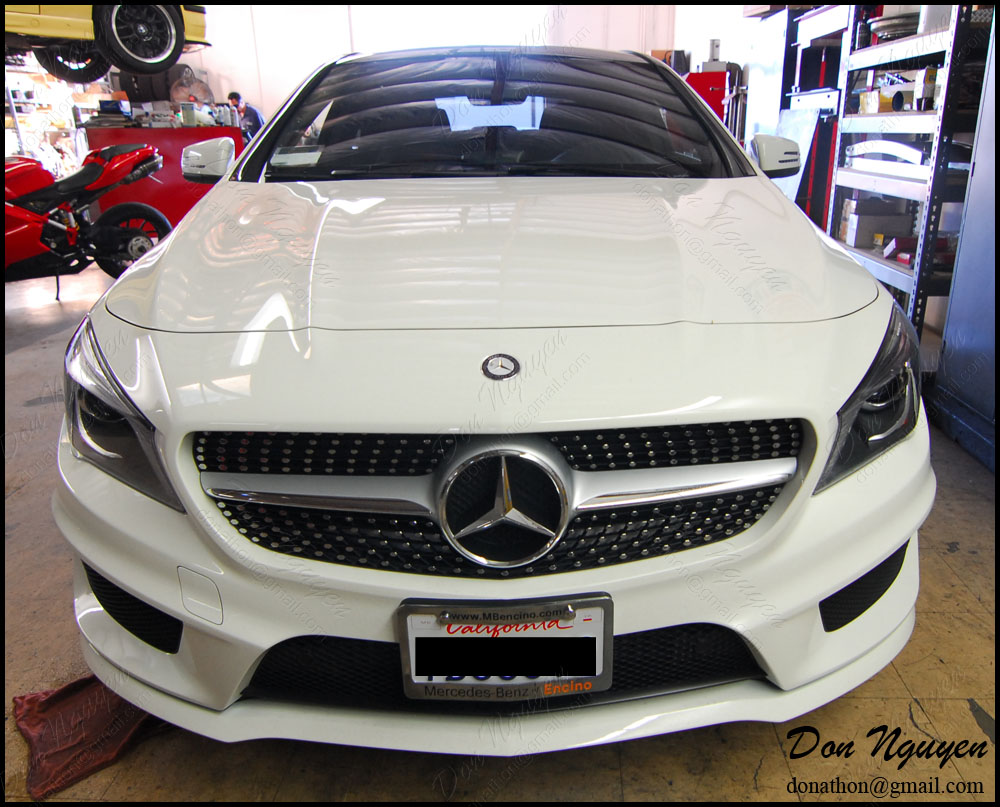
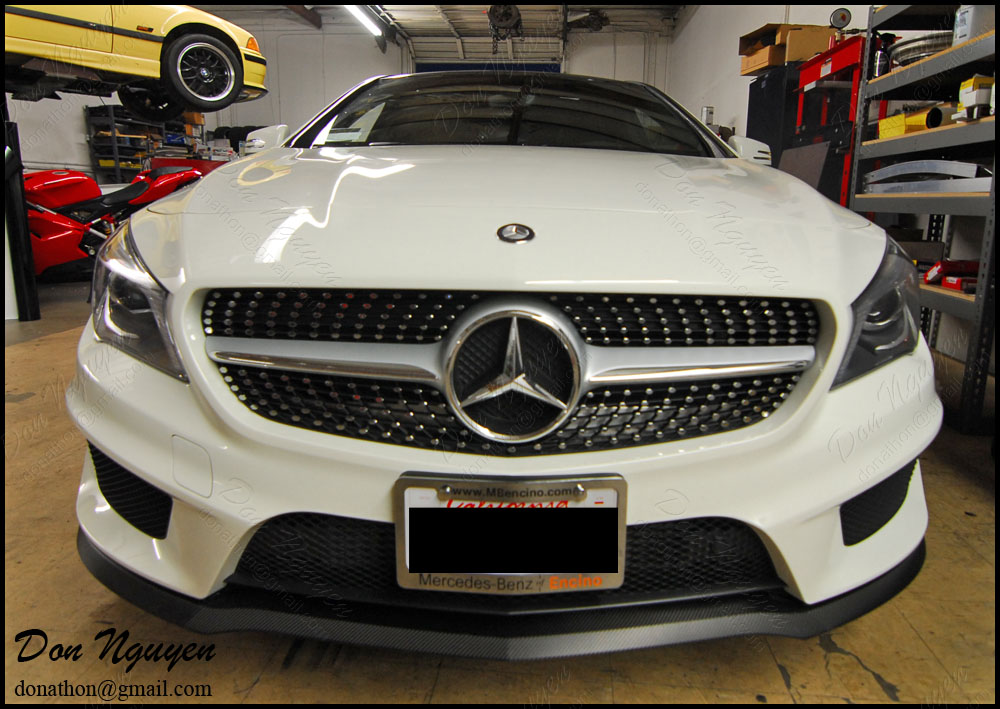
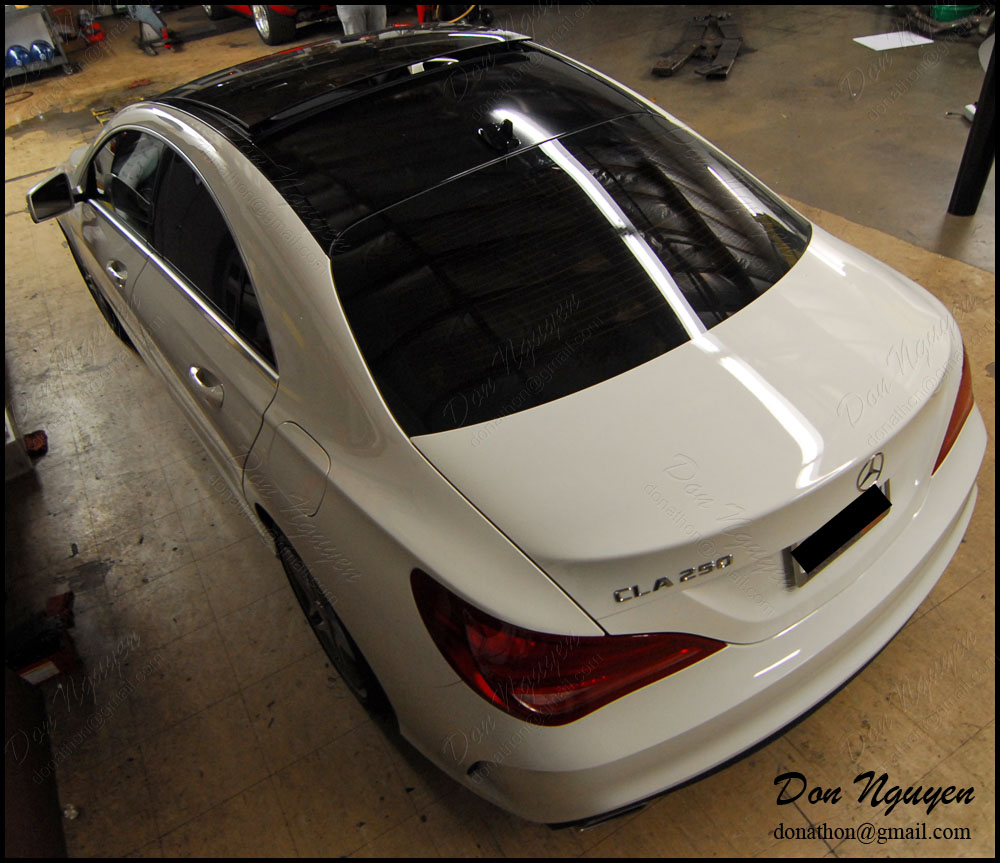
I had this brand new white Mercedes Benz CLA 250 come in to have me vinyl wrap the roof of his car. We went with gloss black vinyl finish for his roof over the matte black or carbon fiber, to give it that factory panoramic look. The owner of this car was from around Irvine / Orange County and came out to me in Anaheim Hills to have the work done. I think the gloss black roof added a lot of character to the car, for such a simple change. The other thing I could have suggested to do on this car was to black out the chrome around the windows too, but that comes down to preference and depends on what type of look you're going after.
Before:


After:


-Don Nguyen
donathon@gmail.com
Before:
After:
-Don Nguyen
donathon@gmail.com
Thread Starter
Former Vendor of MBWorld
Joined: Mar 2008
Posts: 19,593
Likes: 30
From: Irvine, CA
Euros
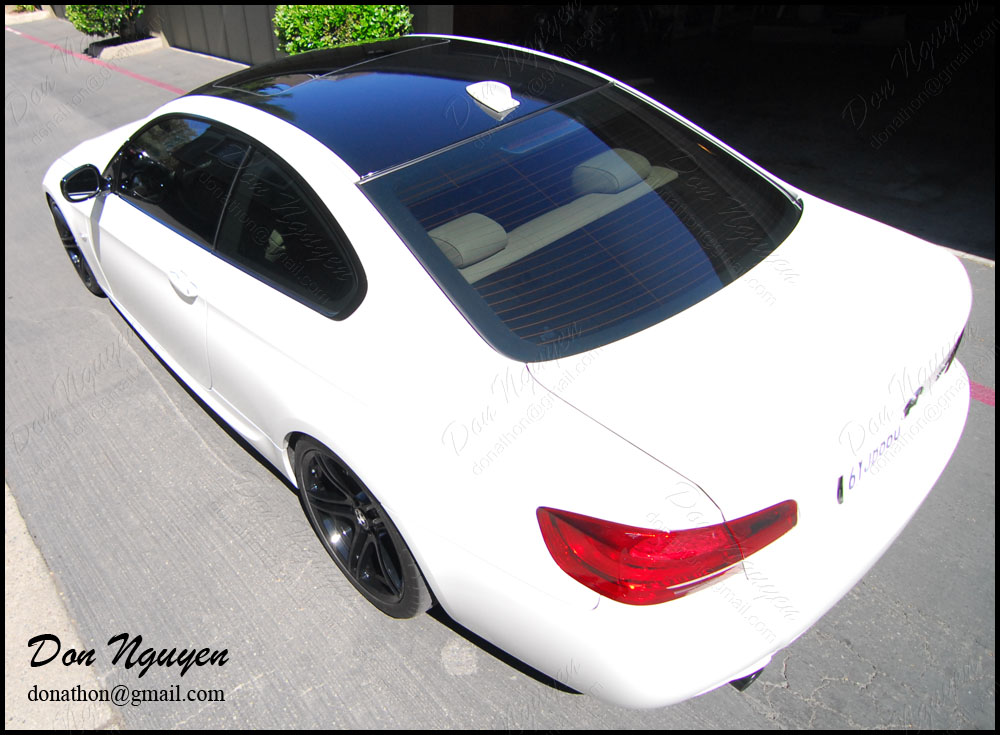
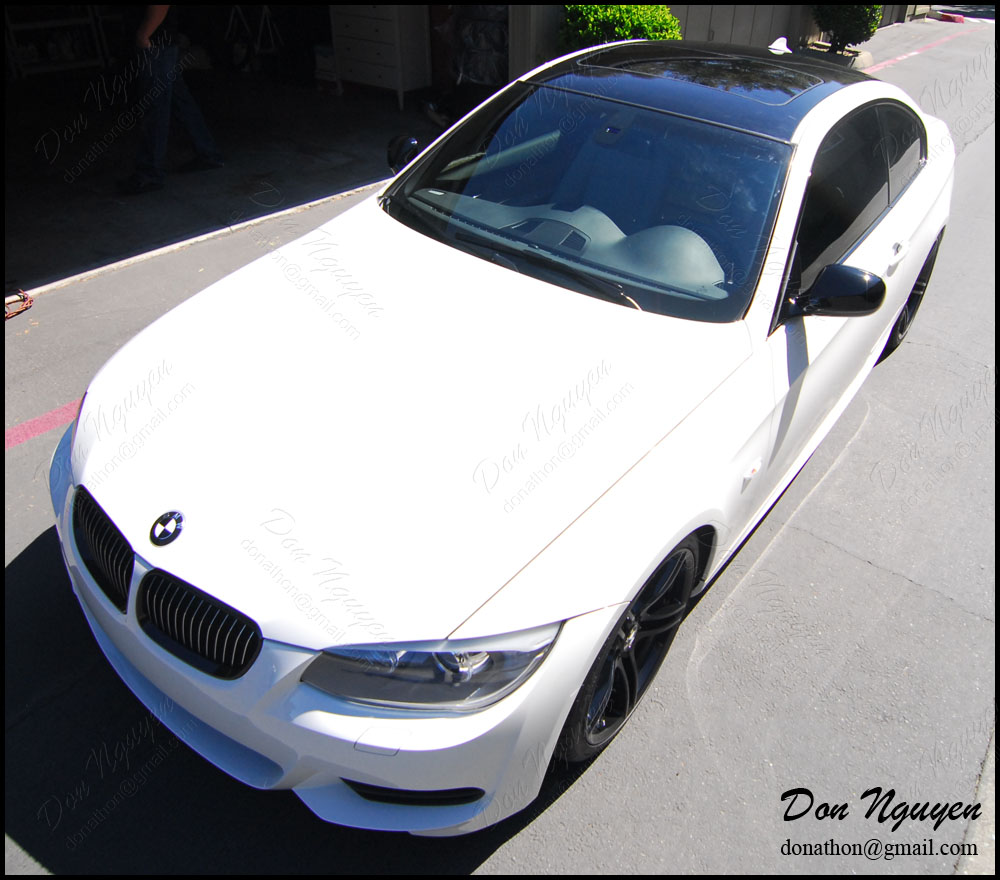
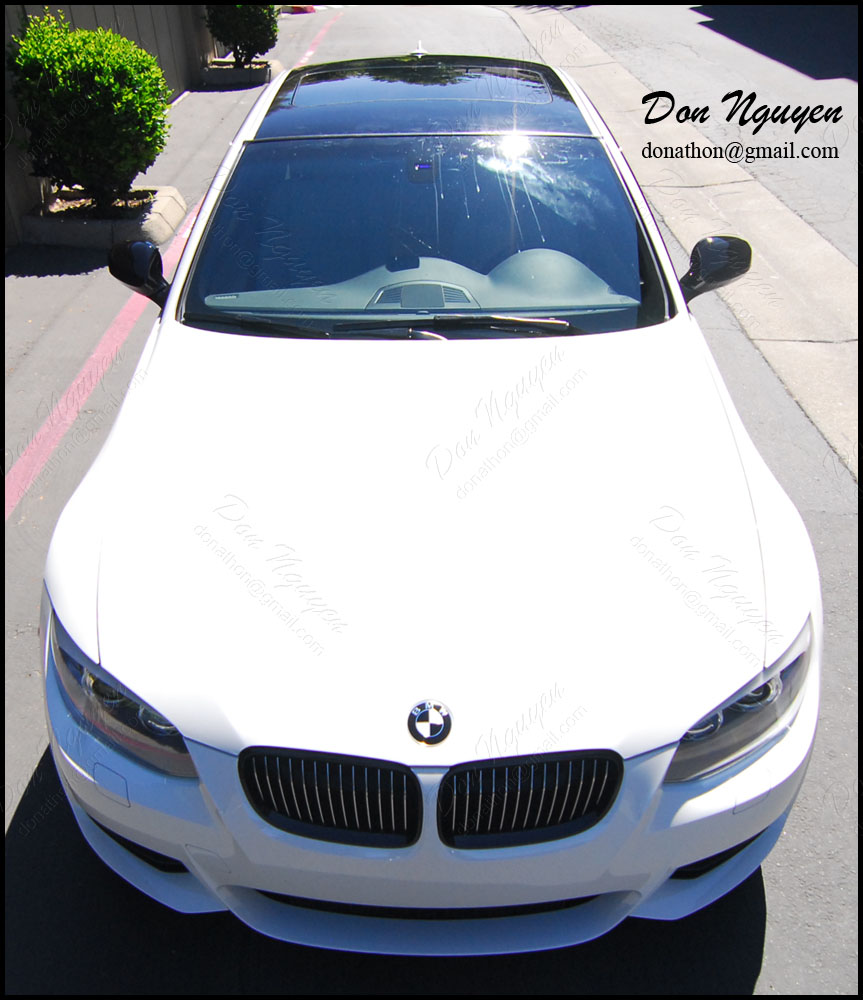
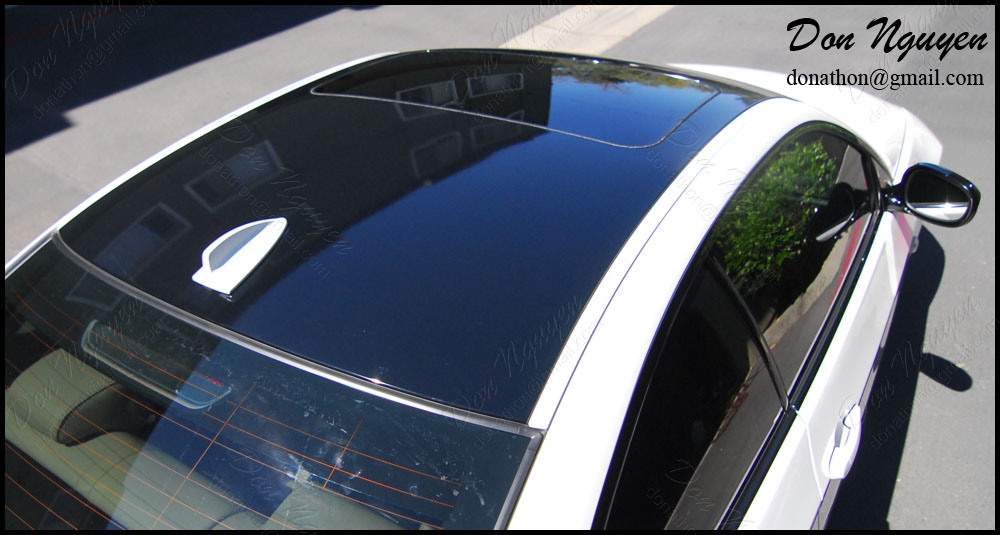
Here's pictures of one of the cars that I did on one of my norcal vinyl wrapping trips up to the bay/San Jose area. I make these trips once or twice a year, depending on how my schedule is like down here in socal/orange county. The owner of this white BMW E92 335i coupe had me vinyl wrap the roof of his car in my gloss black vinyl material and also lightly tint/smoke his tail lights as well. He opted to not have the side roof rails wrapped, so these pictures will help those who were thinking about if they should get their rails wrapped or not.


-Don Nguyen
donathon@gmail.com
-Don Nguyen
donathon@gmail.com
Thread Starter
Former Vendor of MBWorld
Joined: Mar 2008
Posts: 19,593
Likes: 30
From: Irvine, CA
Euros
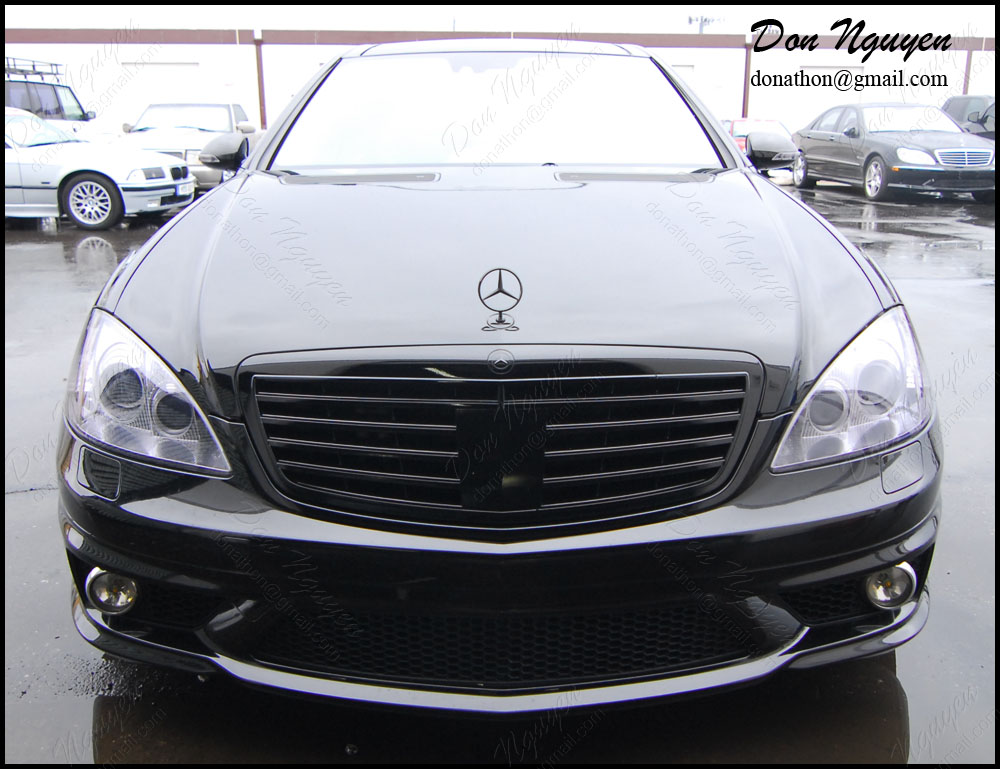
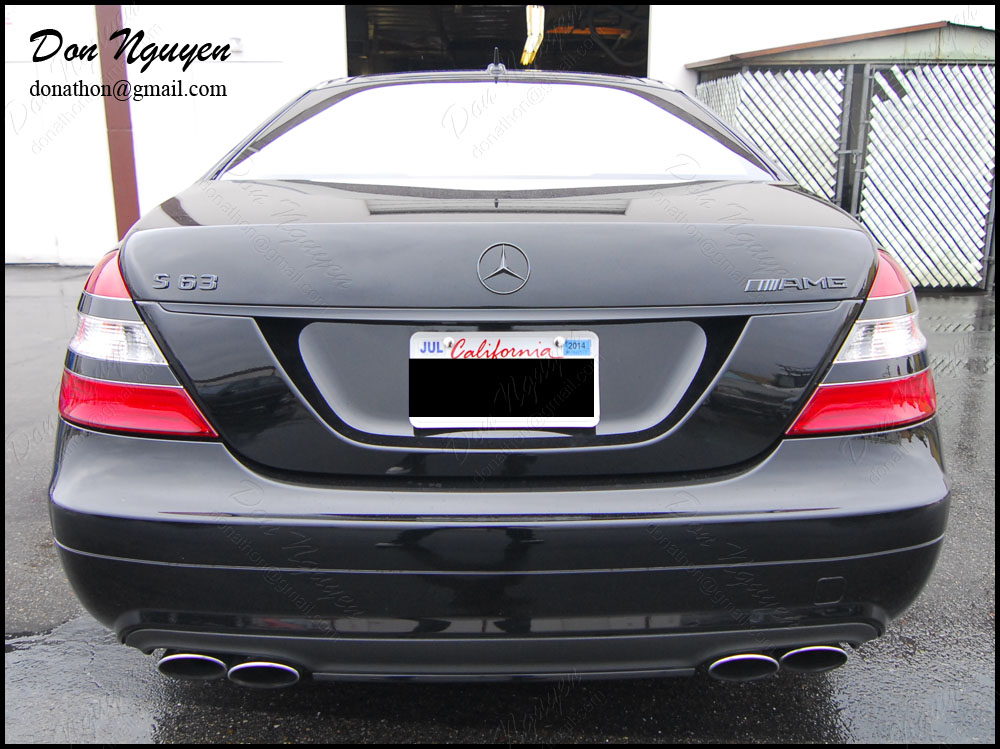
I think many would not think about it, but even this black Mercedes Benz S63 AMG looks good with the chrome blacked out. Even with the brighter colored/finished wheels, the blacked out chrome/brushed aluminum trim still goes with the look of the car very well and actually makes the car look very sleek imo. In addition to the window trim, I also blacked out the lower door chrome pieces that run the length of the car. I also tinted the headlights and turn signal reflectors with my light tint/smoke film. For this car, we went with my gloss black vinyl finish to match the already gloss black vertical pillars and overall the gloss black just suited this car better than matte black would have. The owner of this car brought his car up to me in Anaheim Hills/Orange County from San Diego to get the vinyl work done.
Before:
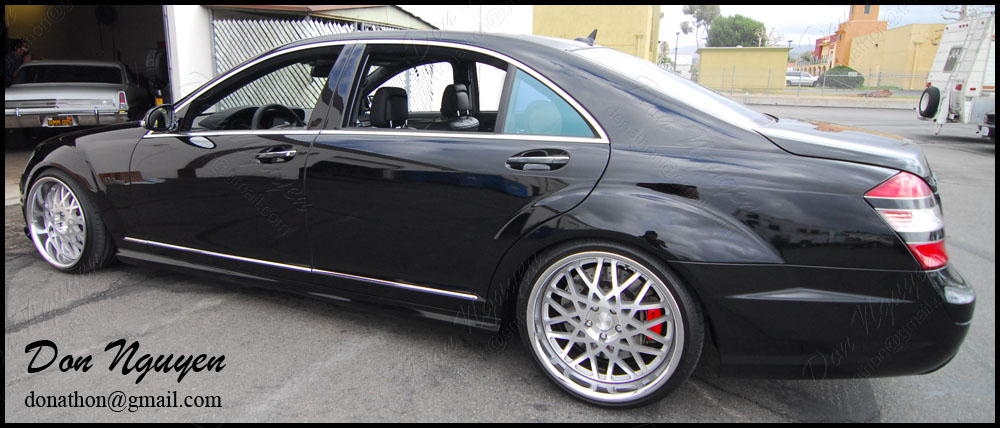
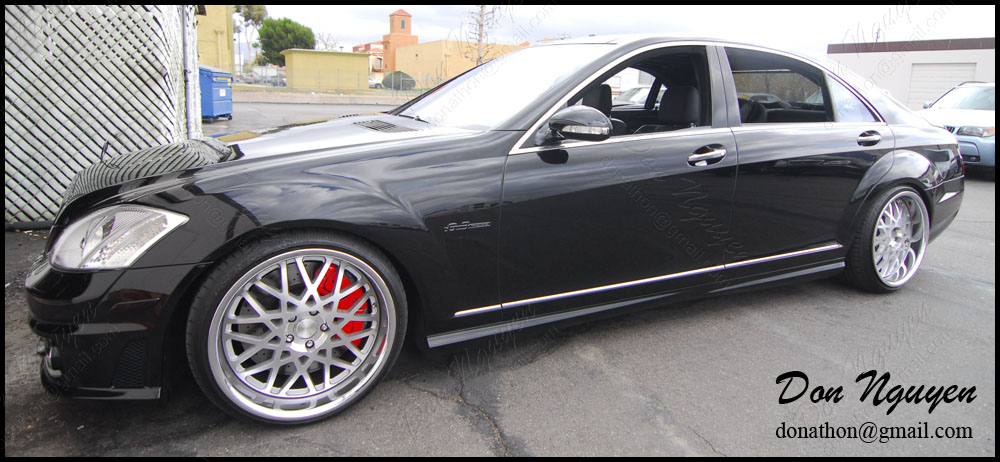

During (note driver side headlight and mirror turn signals are tinted, while passenger side is stock)
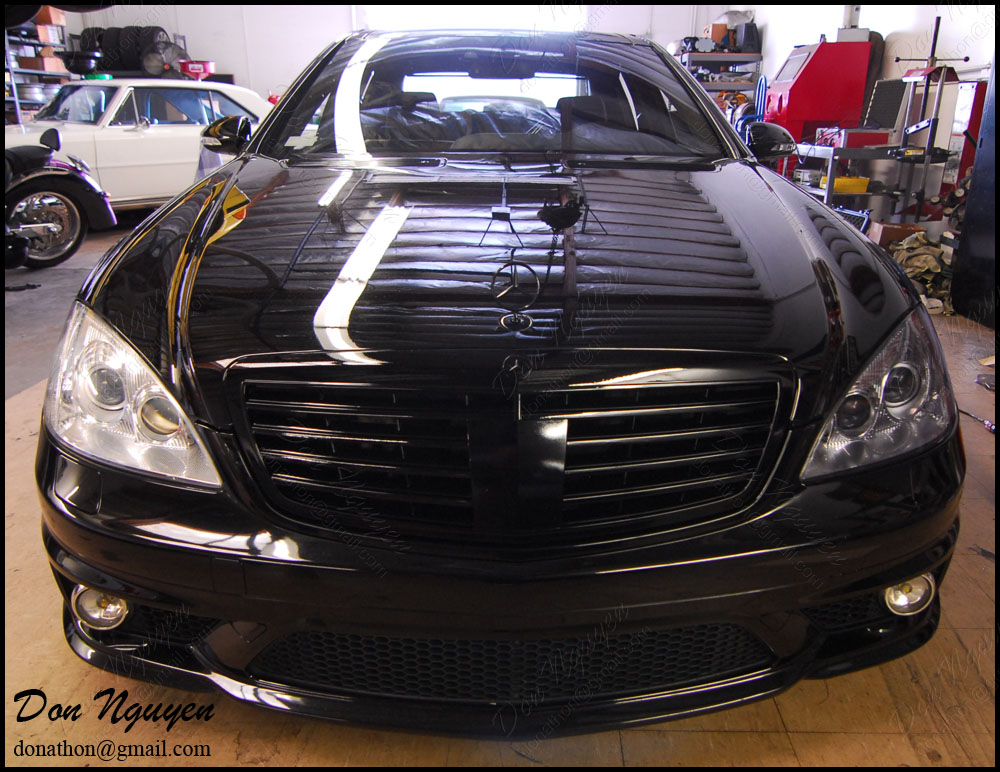
After:
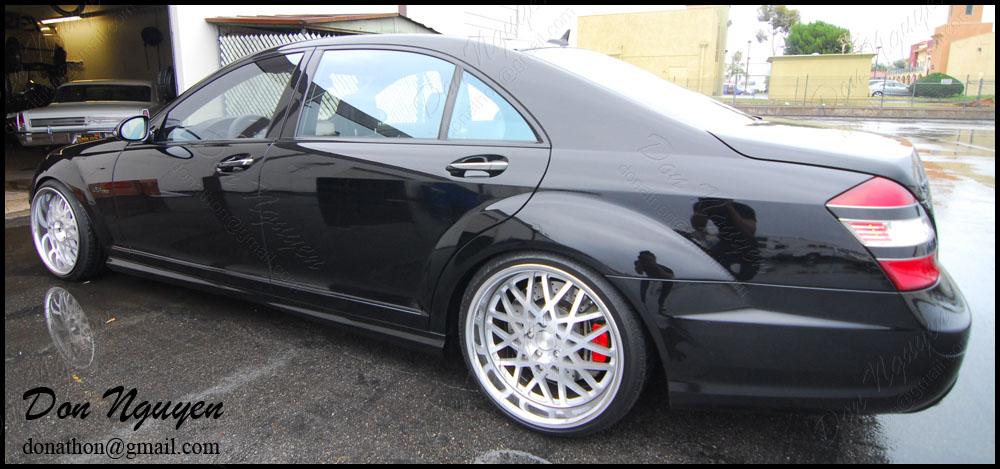


-Don Nguyen
donathon@gmail.com
Before:
During (note driver side headlight and mirror turn signals are tinted, while passenger side is stock)
After:
-Don Nguyen
donathon@gmail.com
Thread Starter
Former Vendor of MBWorld
Joined: Mar 2008
Posts: 19,593
Likes: 30
From: Irvine, CA
Euros
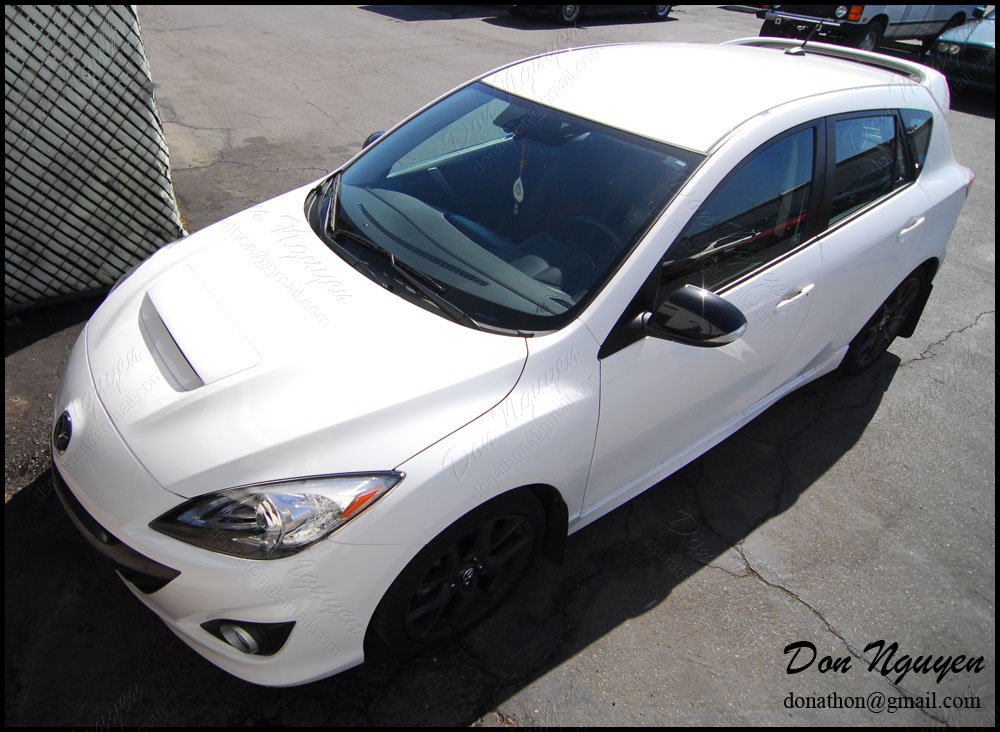
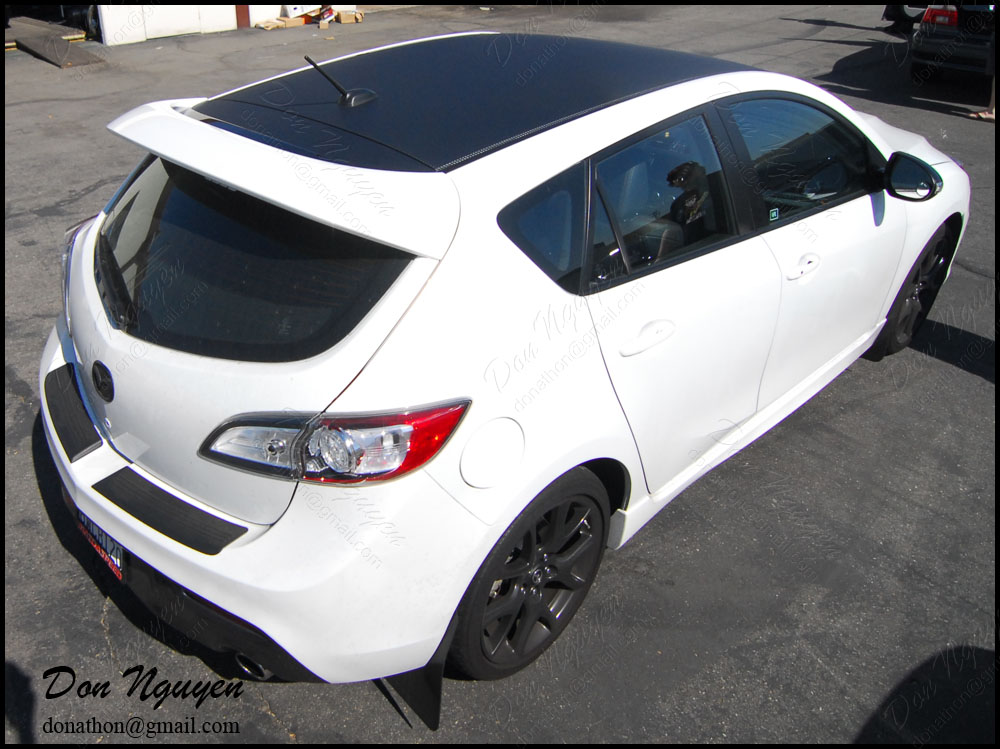
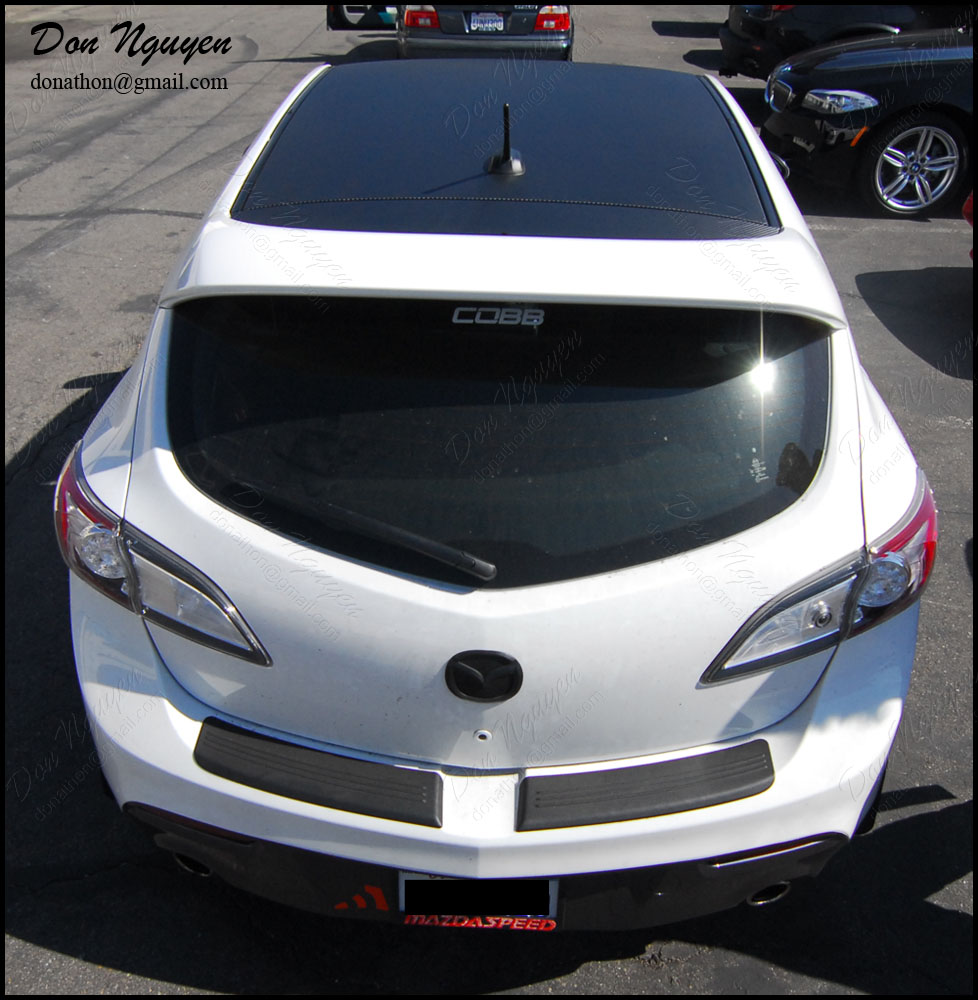
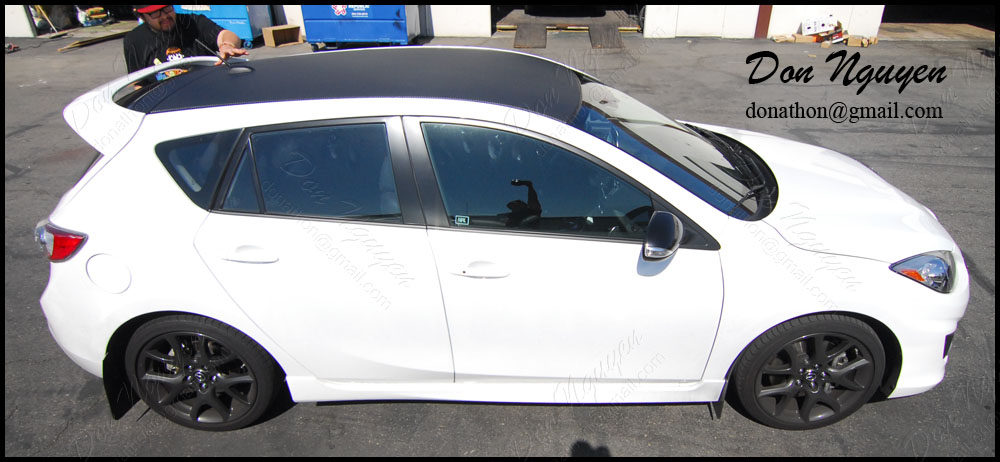
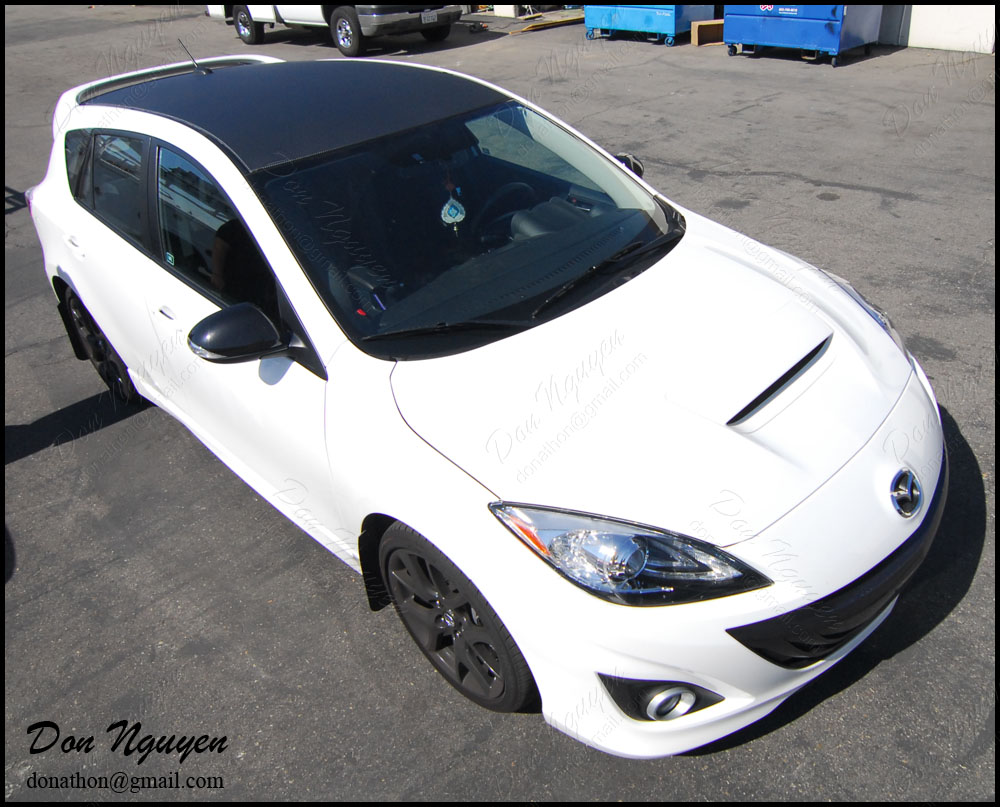
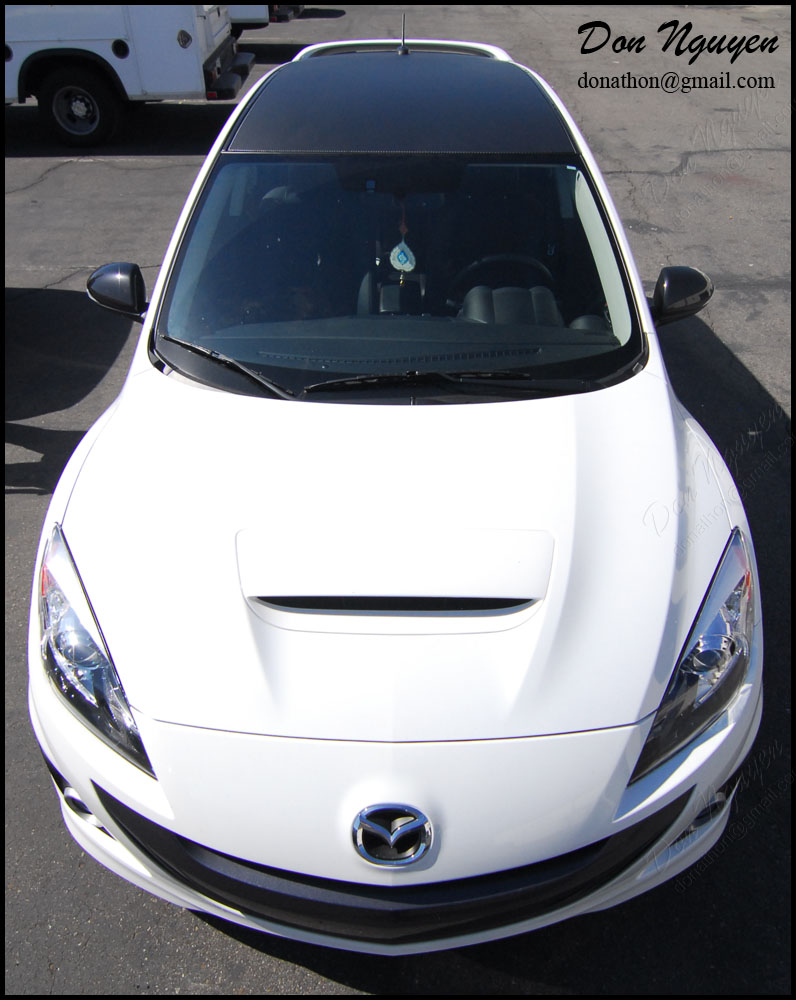
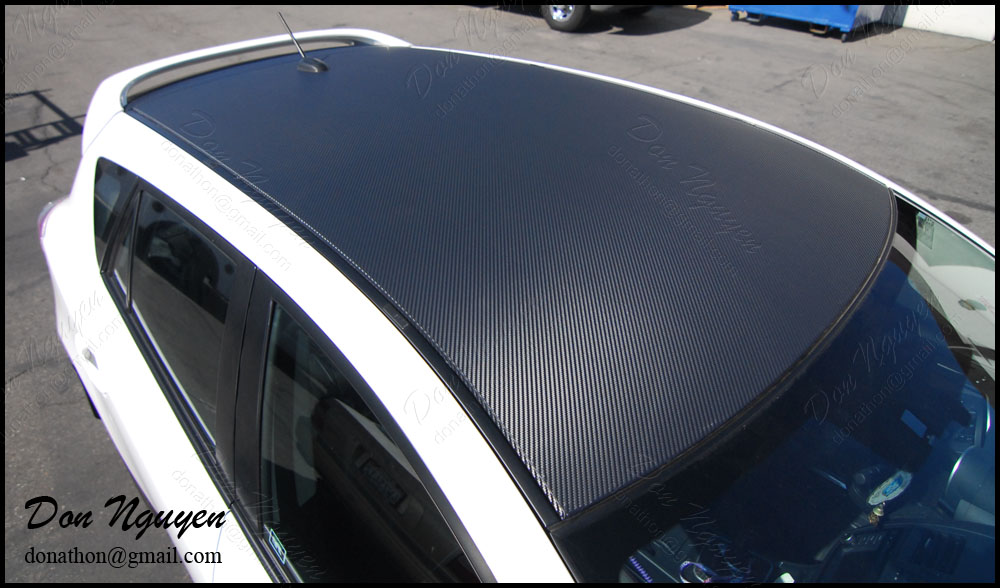
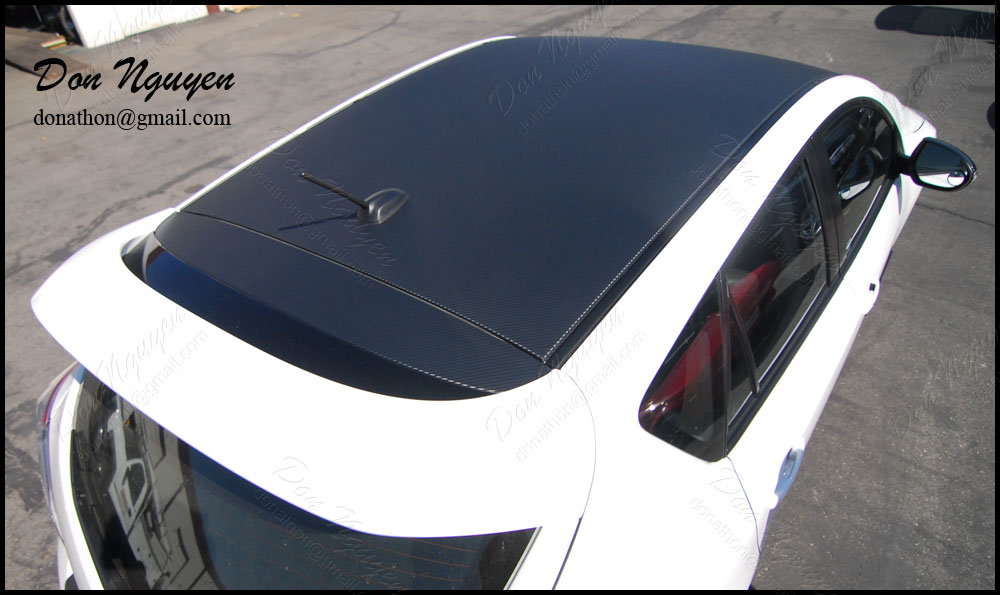
I had this white Mazda MazdaSpeed3 come in to have me vinyl wrap the roof of his car in the 3M dinoc matte carbon fiber vinyl material. The owner of this car drove out to me in Anaheim Hills/Orange County to have the work done. As you can see from the pictures, the carbon fiber weave is more noticeable at certain angles and depending on how the light hits it. In some pictures it'll look like just a matte/flat black roof, while in other pictures you can really notice the carbon fiber weave/pattern, which gives it a very cool effect.
Before:
After:

-Don Nguyen
donathon@gmail.com
Before:
After:
-Don Nguyen
donathon@gmail.com
MB World Stories
The Best of Mercedes & AMG

Manual Mercedes? 6 Times Sindelfingen Let Drivers Have All The Fun
Verdad Gallardo
Mercedes SLR McLaren 722 S Is Extremely Rare Example Modified by McLaren
Verdad Gallardo
8 Classic Boxy Mercedes Designs That Have Aged Like Fine Wine
Verdad Gallardo
Flawlessly Restored Mercedes 190E Evo II Heads to Auction
Verdad Gallardo
Electric Mercedes C-Class Unveiled: 11 Things You Need to Know
Verdad Gallardo
Mercedes EQS Gets A Major Update: Everything You Need to Know
Verdad Gallardo
5 Underrated Mercedes-Benz Models That Don't Get the Love They Deserve
Verdad Gallardo
Mercedes 300D Has Pushed Well Past 1 Million Miles and It Ain't Stopping
Verdad Gallardo
10 Most Reliable Mercedes-Benz Models You Can Buy Used
Verdad Gallardo
Thread Starter
Former Vendor of MBWorld
Joined: Mar 2008
Posts: 19,593
Likes: 30
From: Irvine, CA
Euros
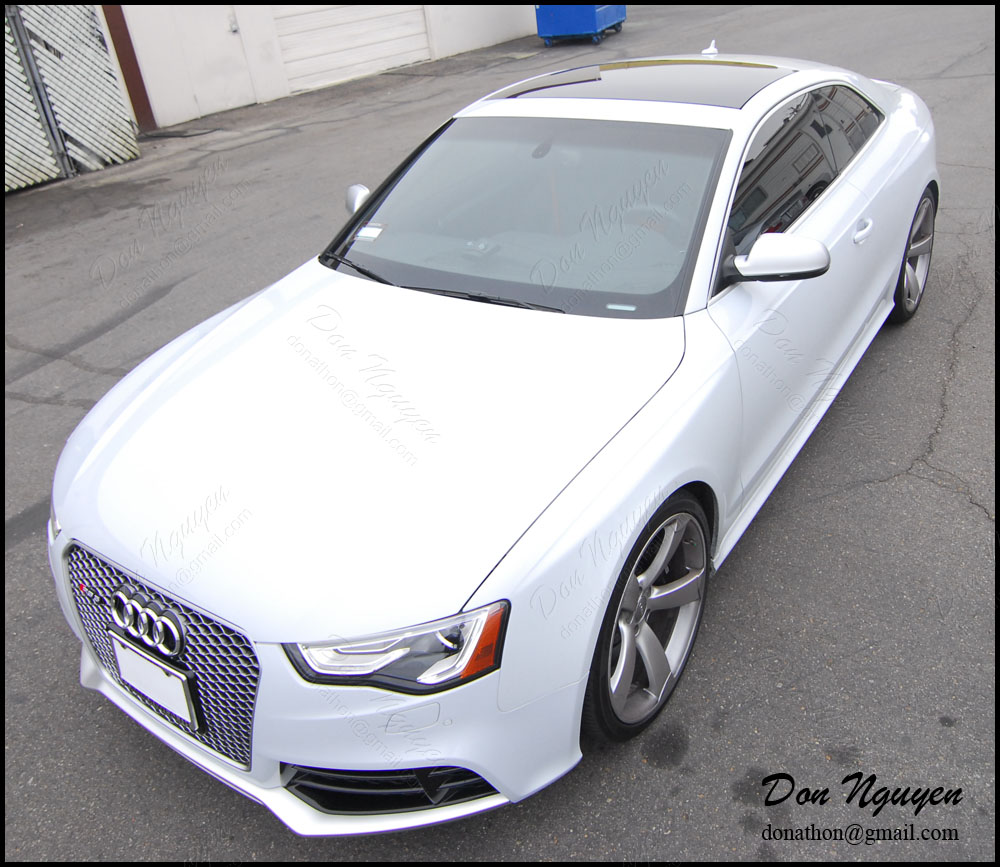
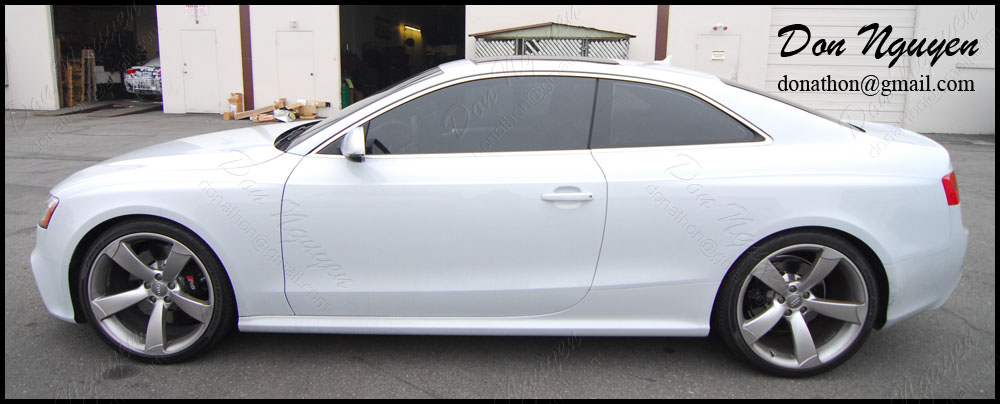
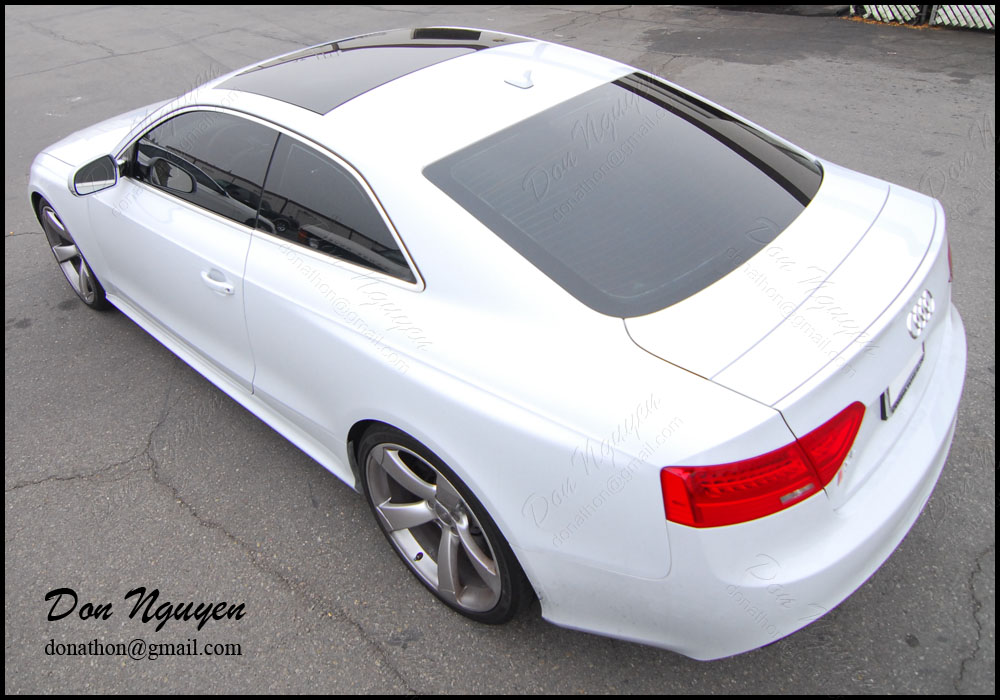
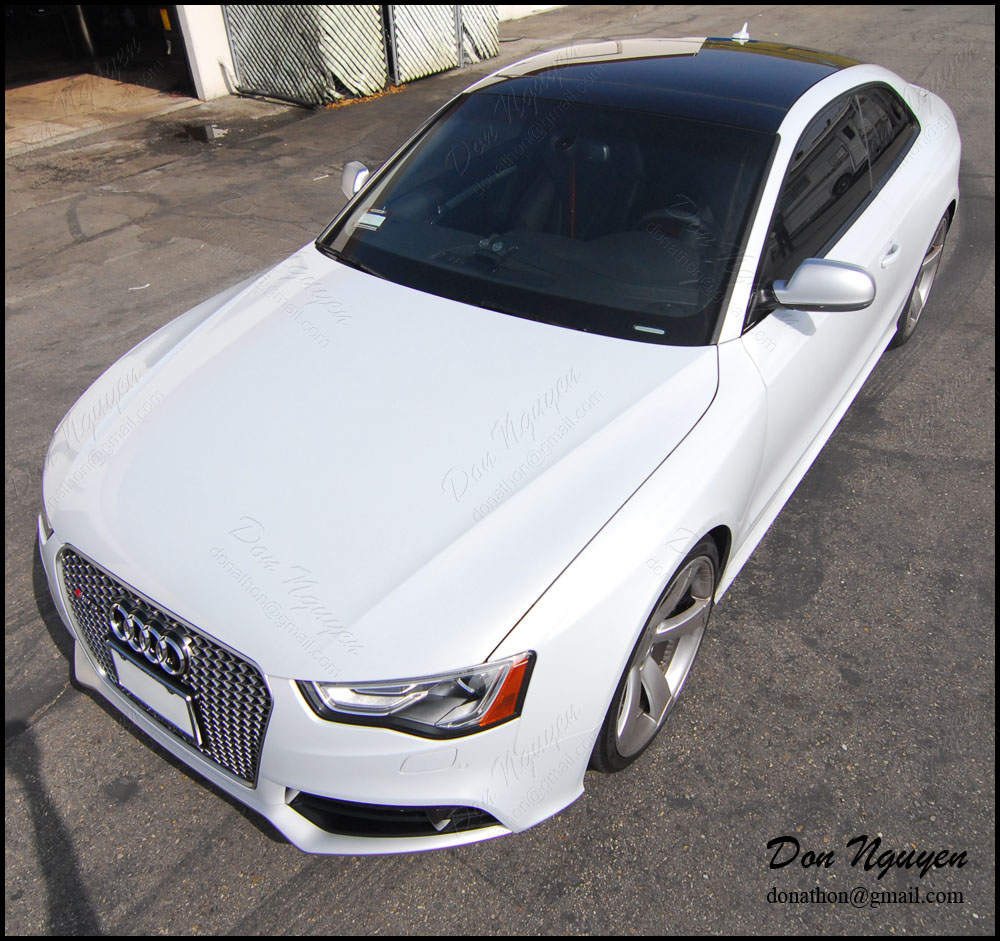
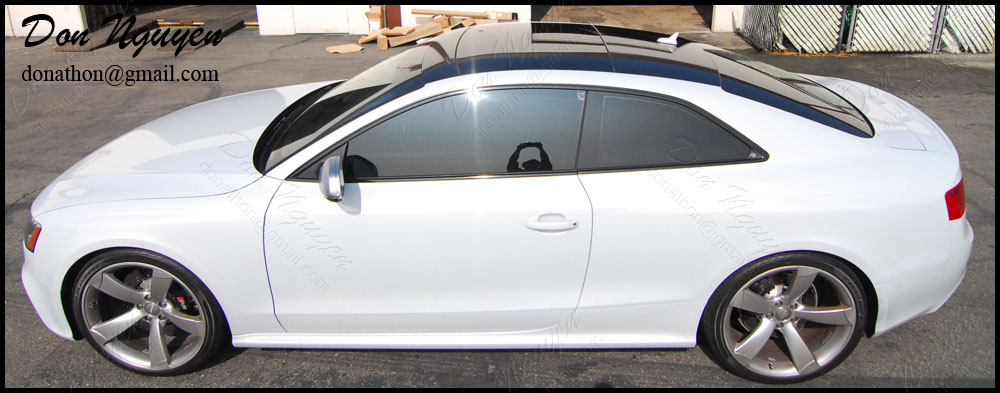
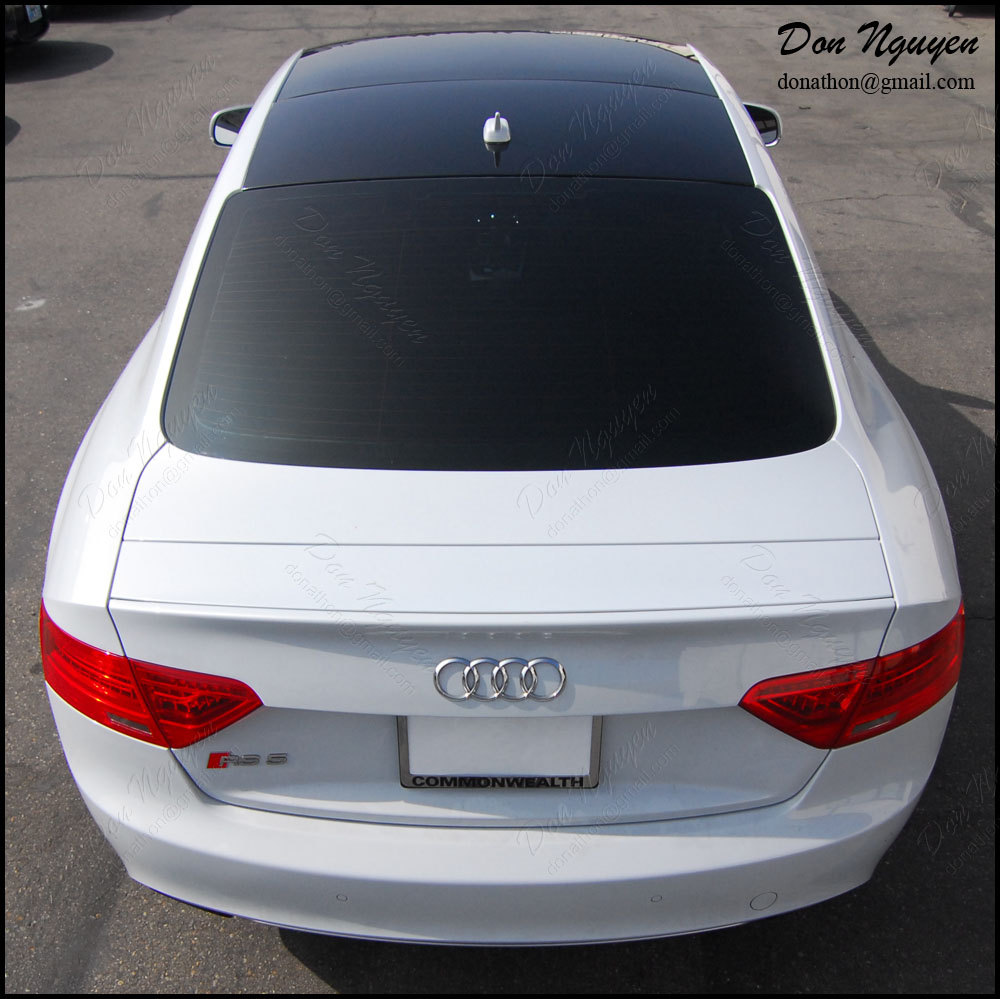
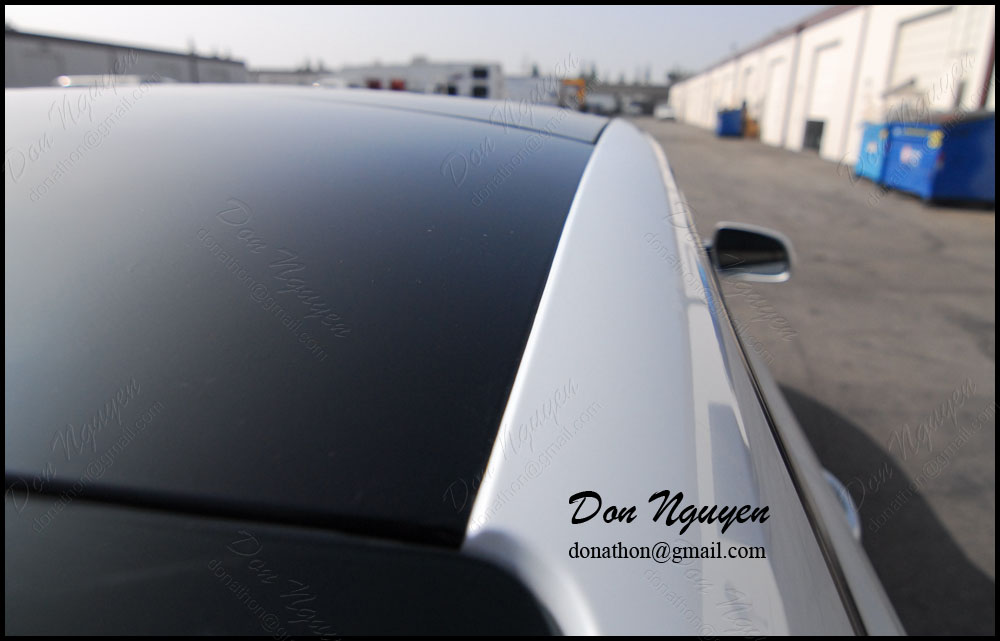
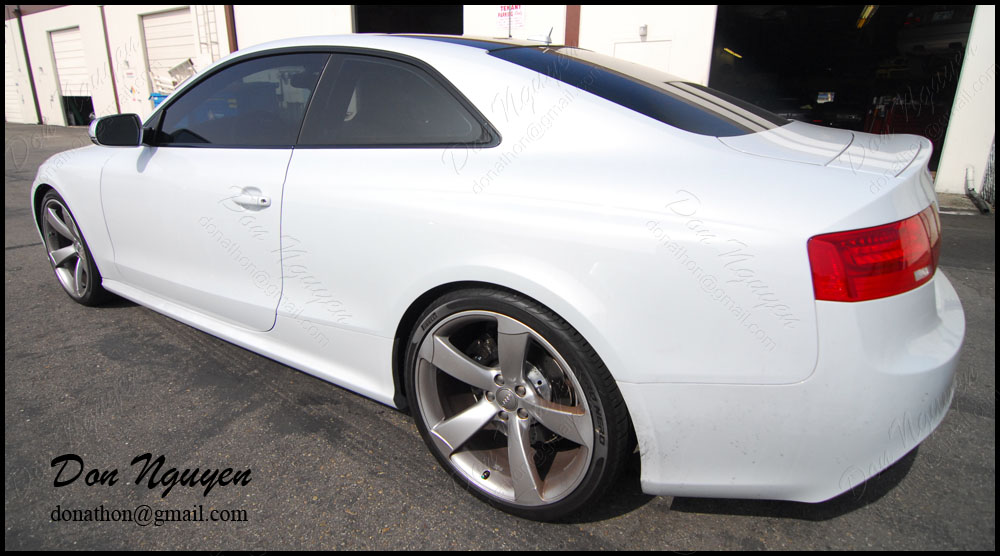
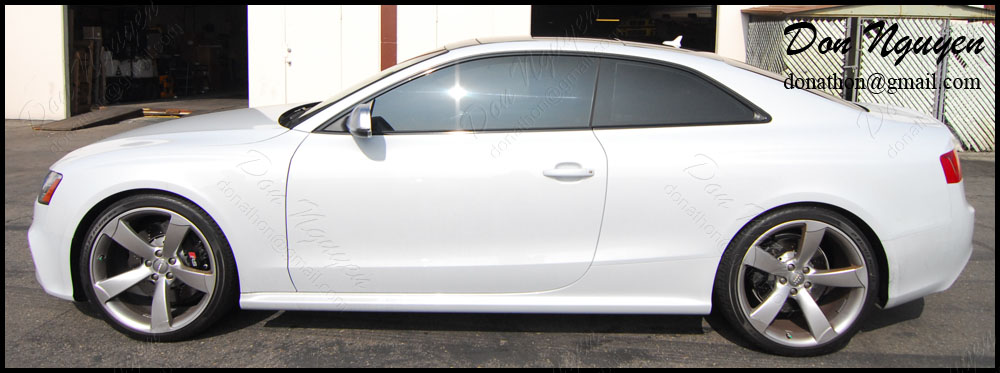
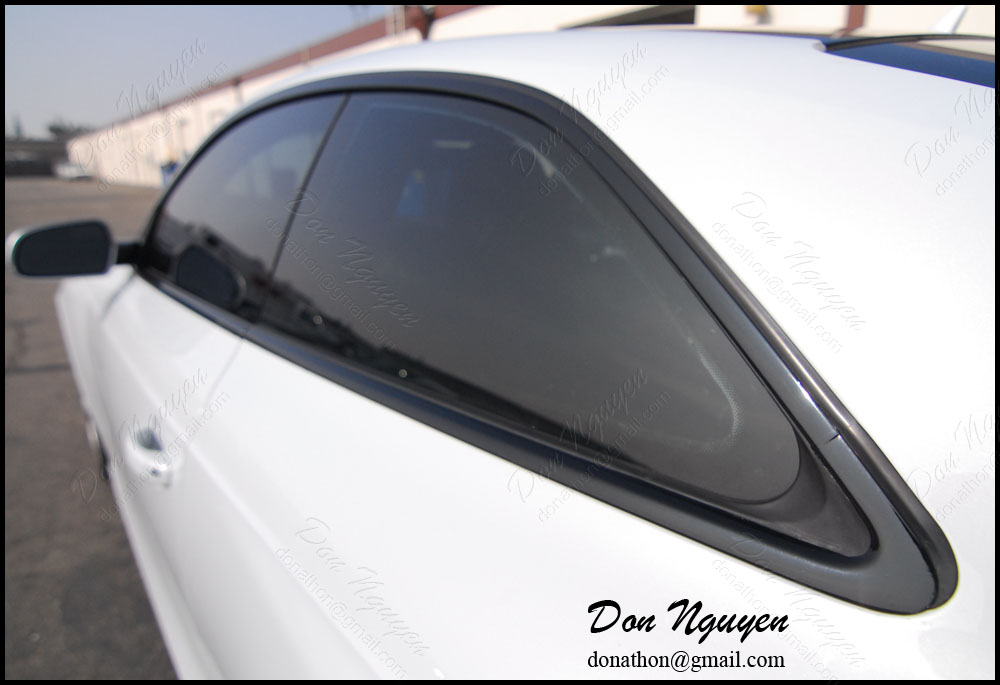
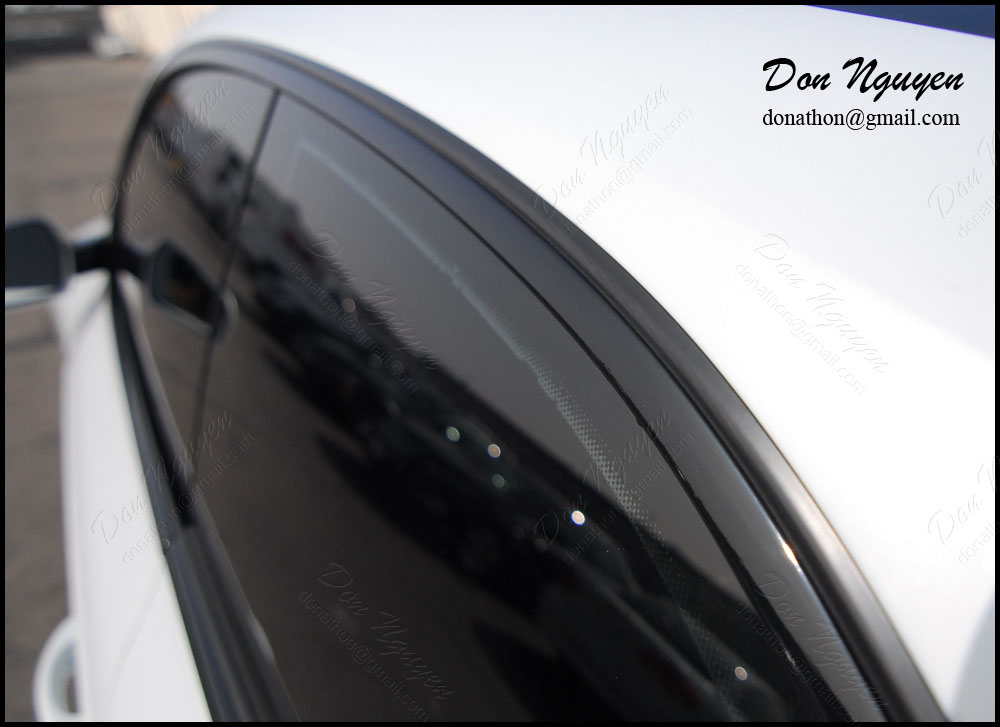
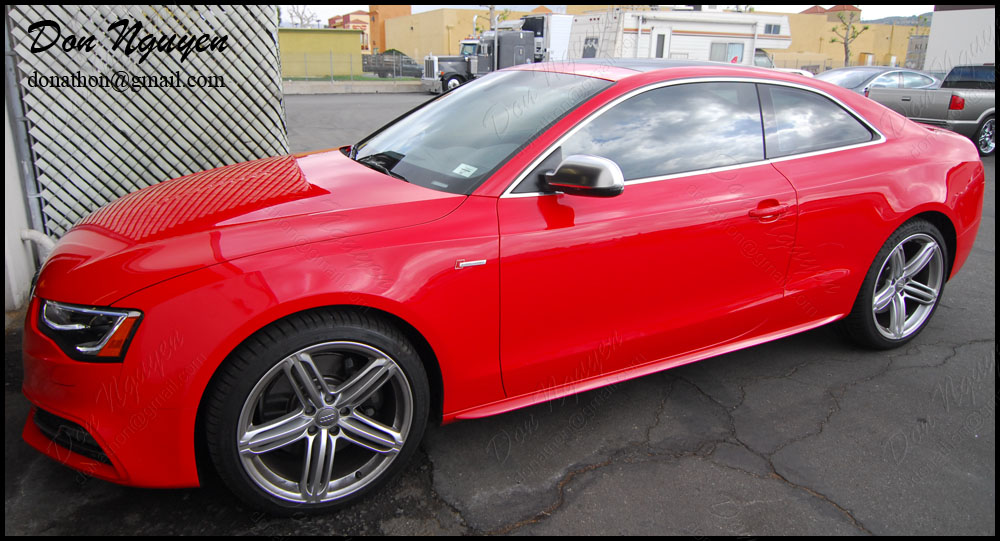
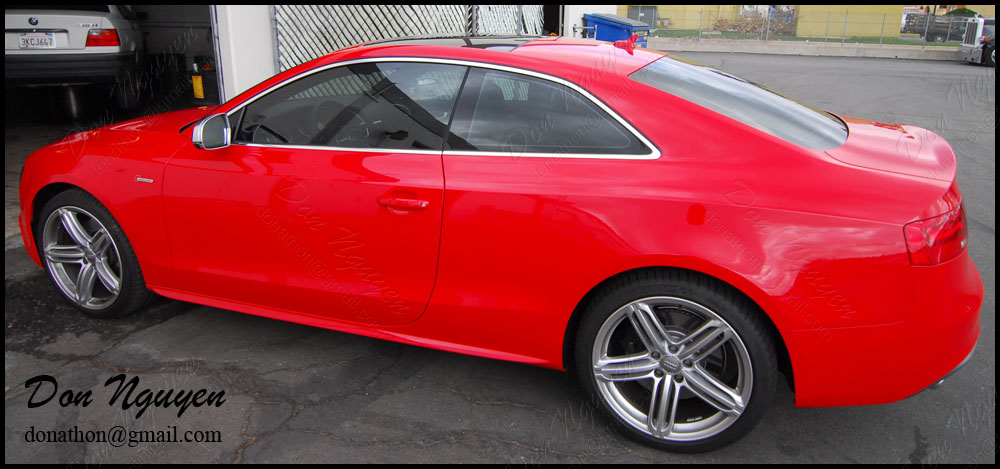
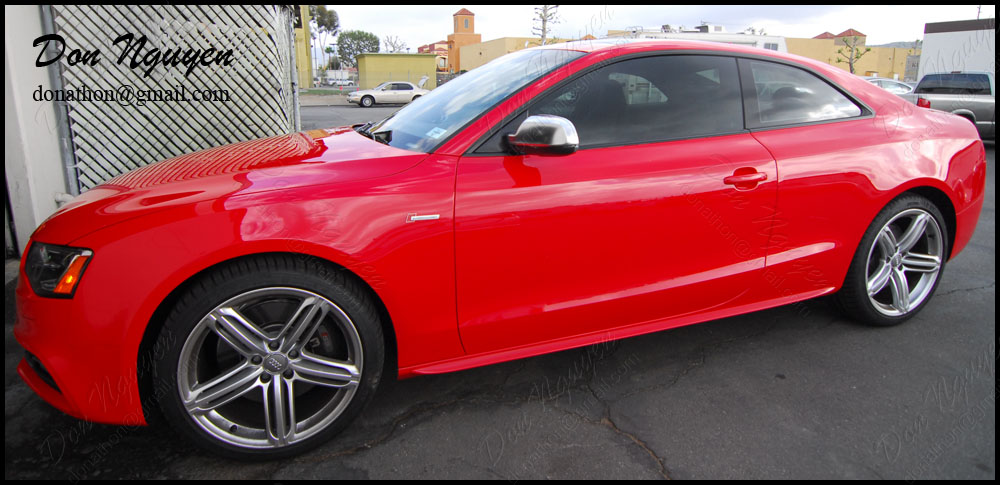
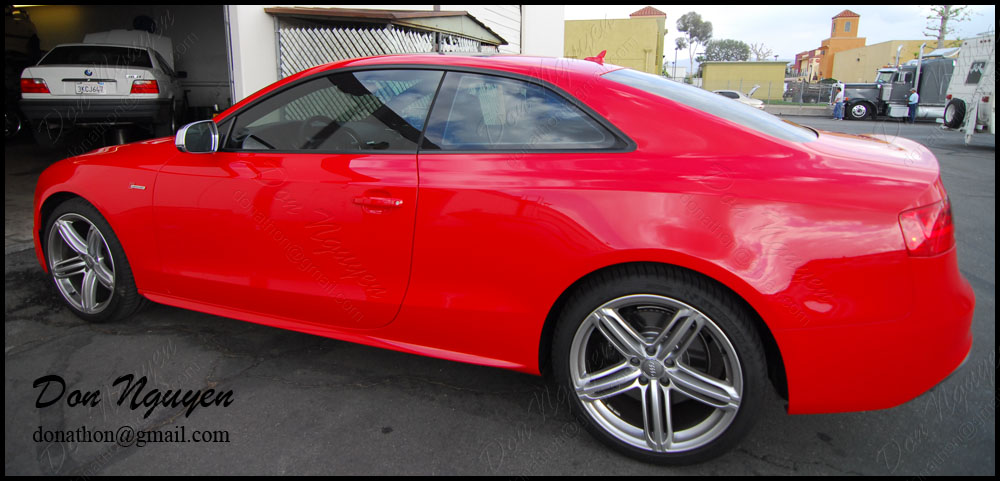
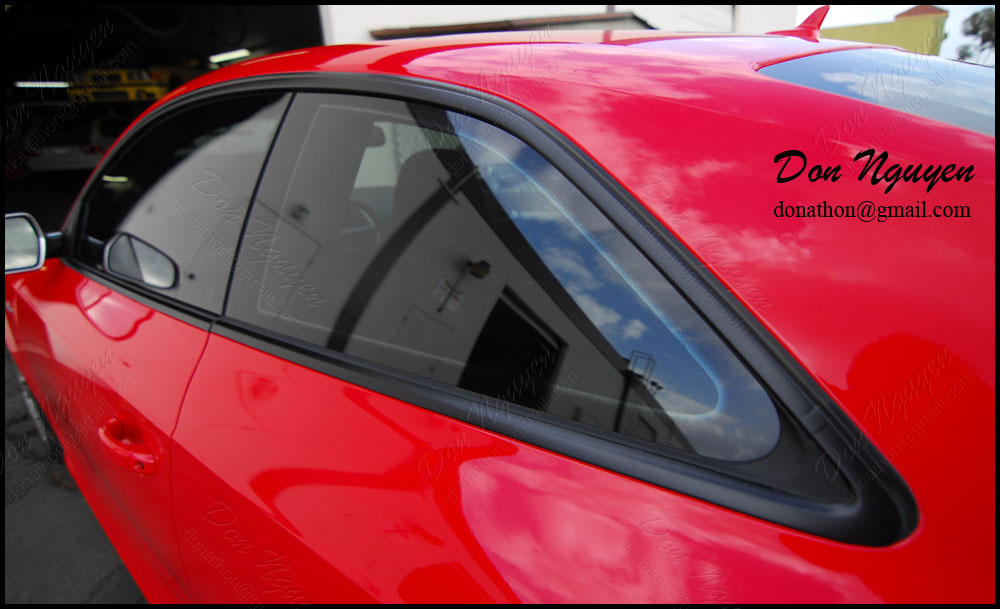
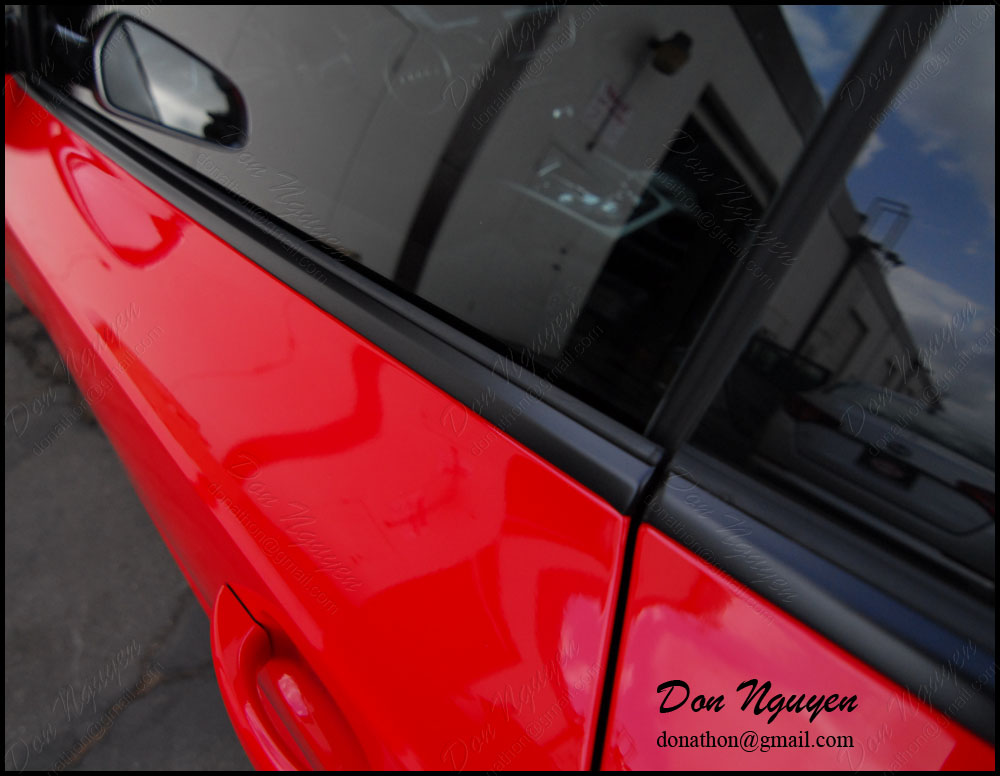
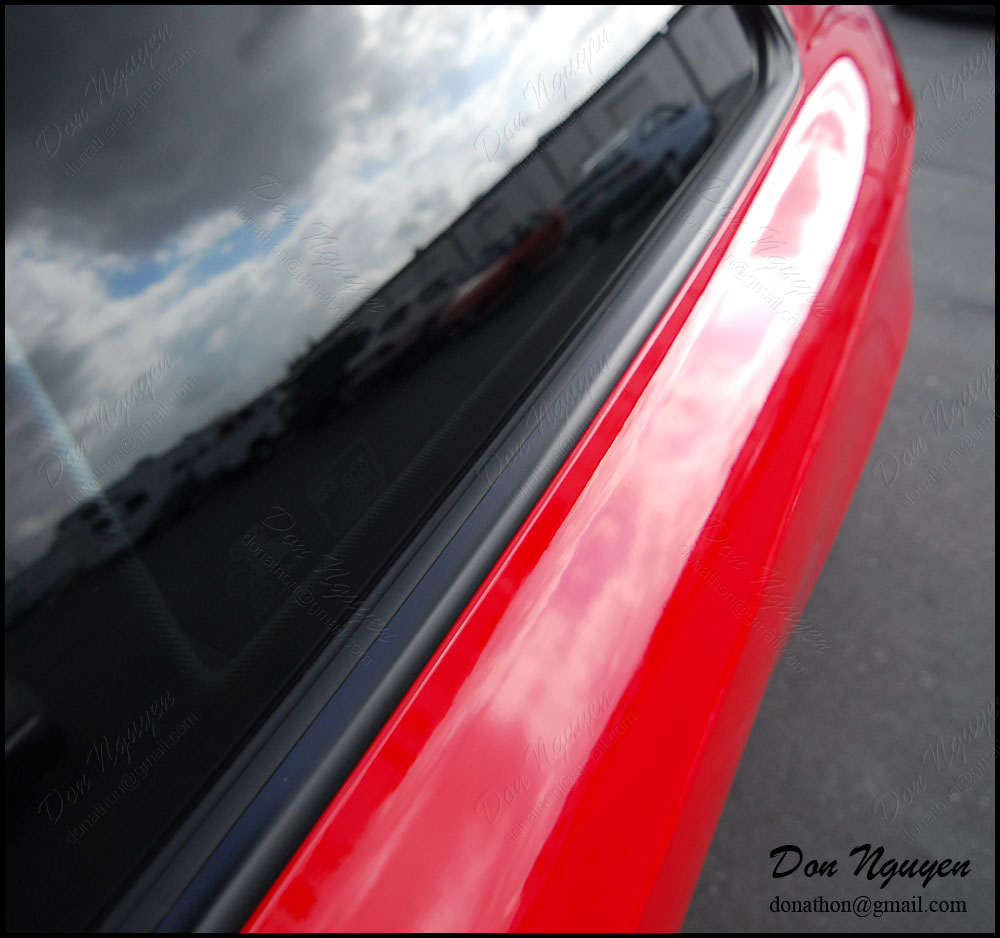
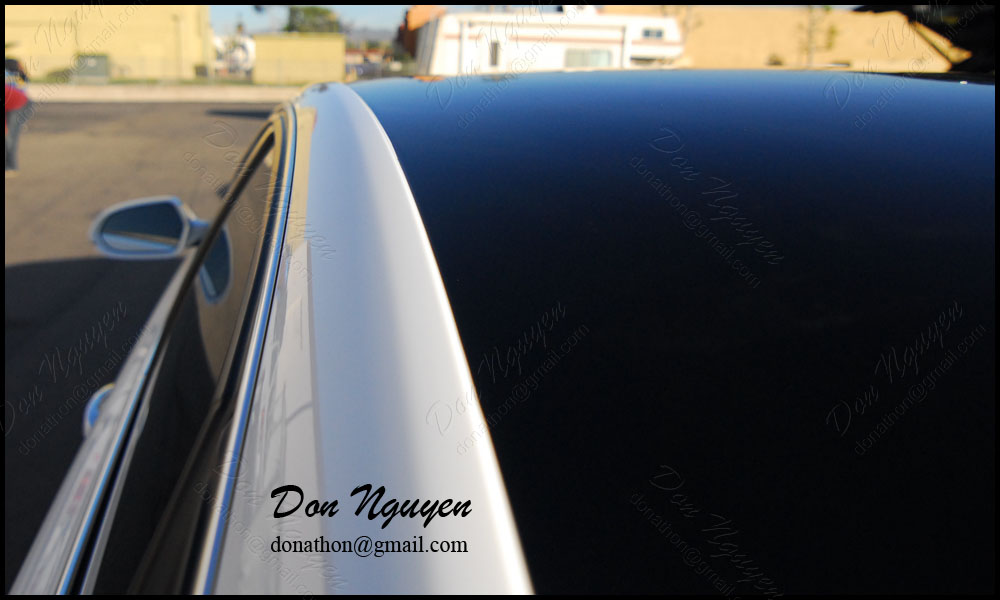
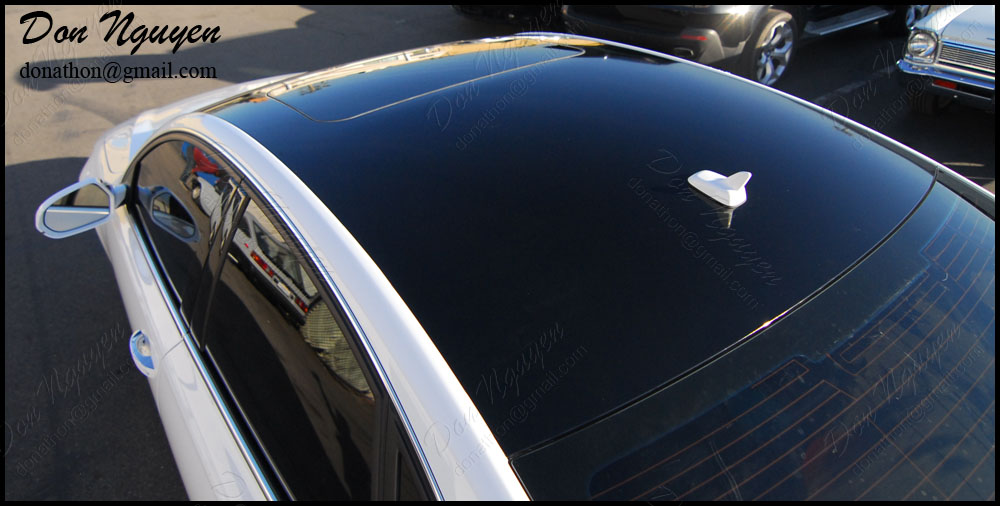
This is kind of a bigger picture post than usual, but I had multiple requests for more up close pictures and of certain areas that are pictured below. The owner of this white Audi RS5 had me vinyl wrap the roof and also black out the brushed aluminum/chrome window trim on his car with my gloss black vinyl material. The gloss black roof tied in quite nicely with the large sunroof of the car, to give it a full/complete panoramic roof look. Also, just blacking out the chrome around the windows also changed the look of the car quite a bit, even though the mirrors are still silver. The owner of this car drove out to me in Anaheim Hills/Orange County from Los Angeles to get the work done.
Before:
After:


-Don Nguyen
donathon@gmail.com
Before:
After:
-Don Nguyen
donathon@gmail.com
Thread Starter
Former Vendor of MBWorld
Joined: Mar 2008
Posts: 19,593
Likes: 30
From: Irvine, CA
Euros
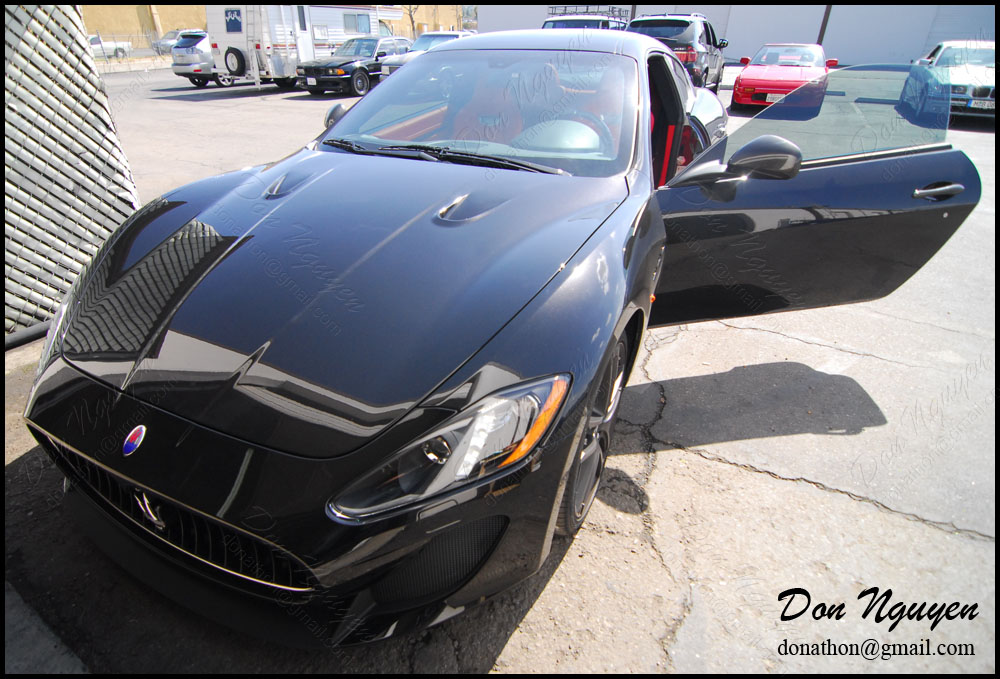
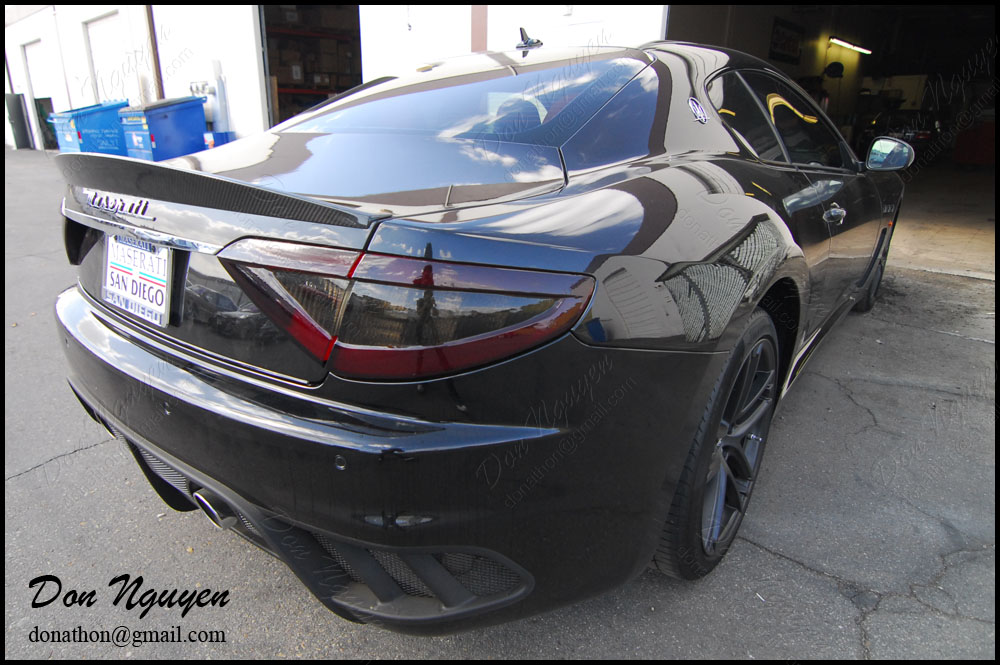
***Note - This is a darker shade that is a completely different and a lot darker shade than all of my other tinted tail light pictures, this is not the standard shade I use***
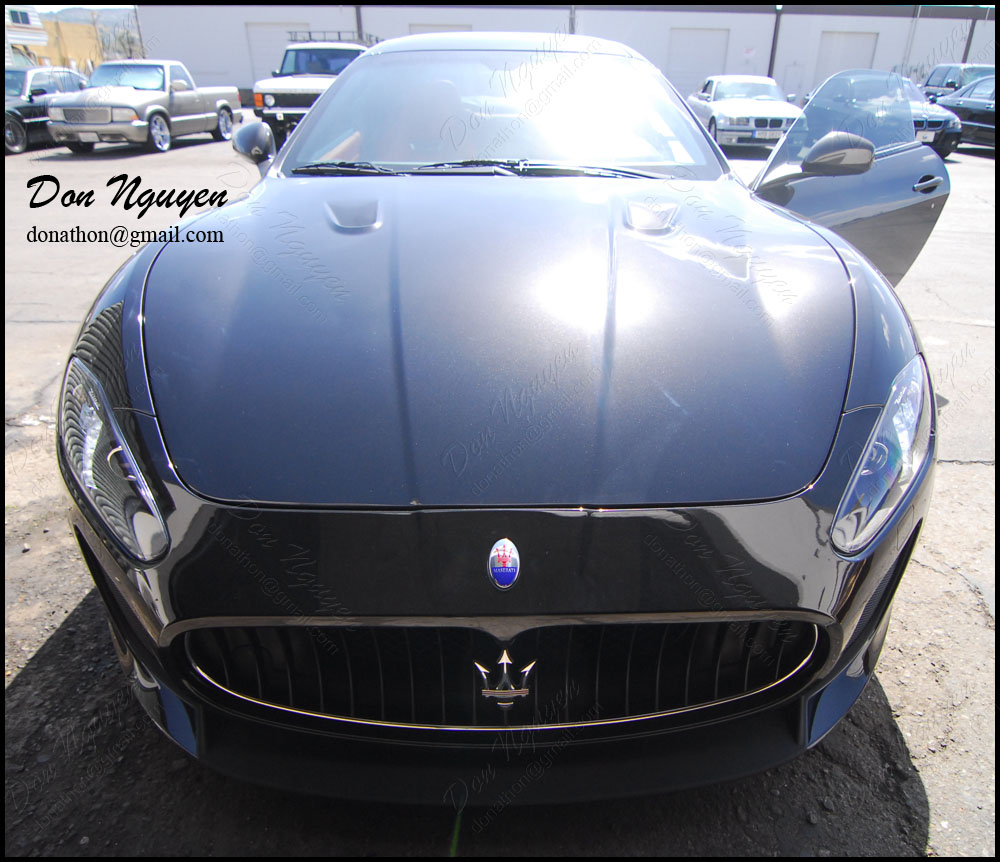
The owner of this black Maserati brought me his car to tint/smoke the headlights and tail lights of his car with a very dark vinyl film. He was basically going for the blacked out look. This is not a typical shade/darkness that I use, which is always a very light shade. The owner of this car was also in Orange County and drove out to me in Anaheim Hills to get the work done. Light out put is going to be definitely affected by going this dark, but if you're trying to achieve a completely blacked out or murdered out type of look, then this would be it.
Before:

During:

After:


-Don Nguyen
donathon@gmail.com
The owner of this black Maserati brought me his car to tint/smoke the headlights and tail lights of his car with a very dark vinyl film. He was basically going for the blacked out look. This is not a typical shade/darkness that I use, which is always a very light shade. The owner of this car was also in Orange County and drove out to me in Anaheim Hills to get the work done. Light out put is going to be definitely affected by going this dark, but if you're trying to achieve a completely blacked out or murdered out type of look, then this would be it.
Before:
During:
After:
-Don Nguyen
donathon@gmail.com
Thread Starter
Former Vendor of MBWorld
Joined: Mar 2008
Posts: 19,593
Likes: 30
From: Irvine, CA
Euros
The owner of this car previously had me black out the chrome around his window trim and rear trunk bar as well as lightly tint the tai lights. However he decided to come back to also have me wrap the rear trunk spoiler of his car in the 3M 1080 gloss carbon fiber vinyl material as well, to match the real carbon fiber diffuser he just had put on. Hopefully this will give you guys somewhat of an idea of how the gloss carbon fiber vinyl compares to real carbon fiber parts. The owner of this car drove out to my shop in Anaheim Hills/Orange County to have the work done. Note, not all spoilers are possible or practical to wrap due to its shapes/curves, but this one happen to be an exception.
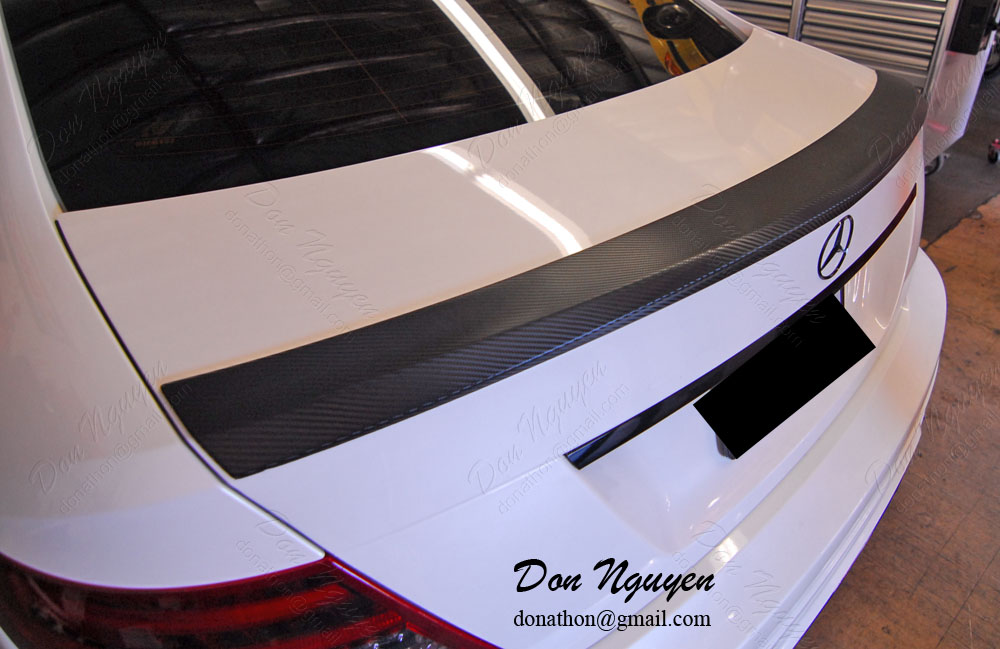

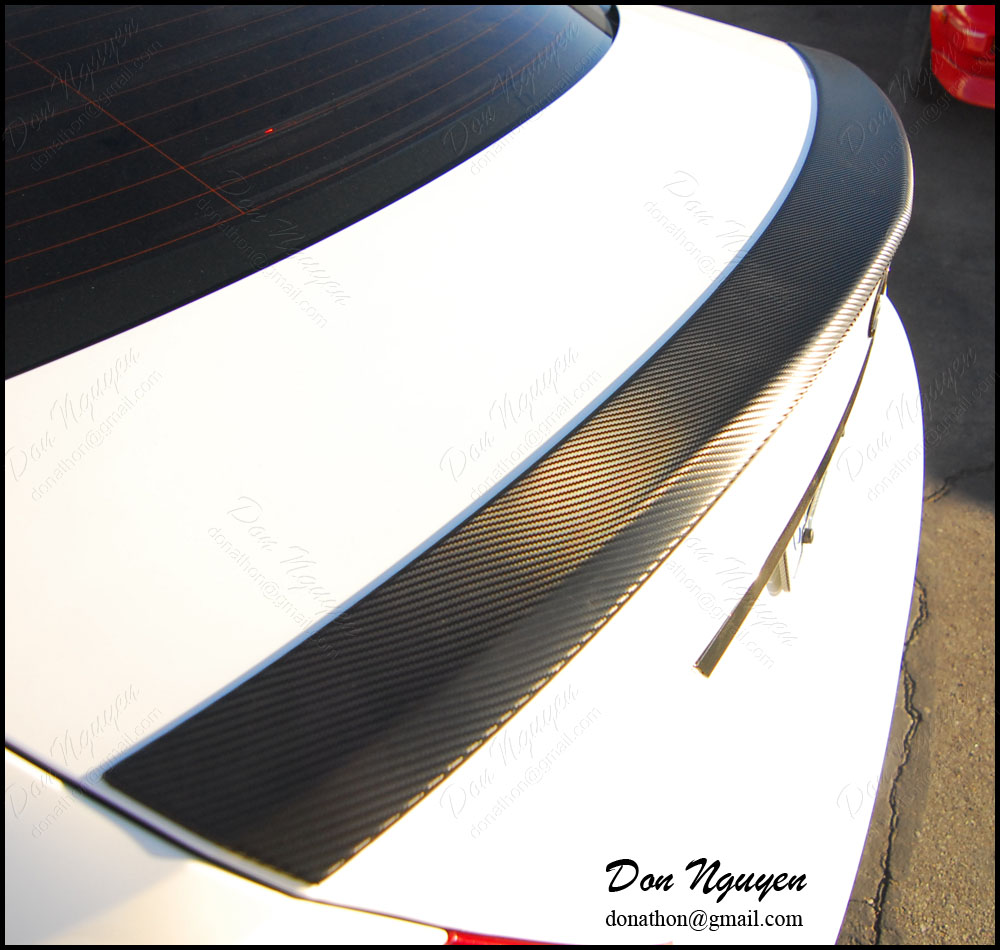
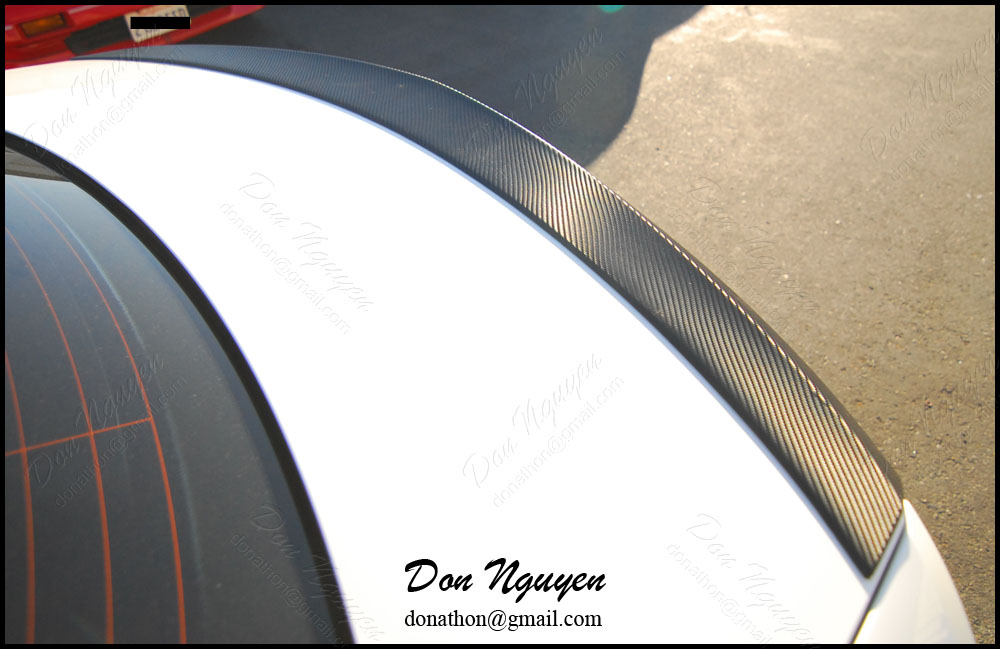
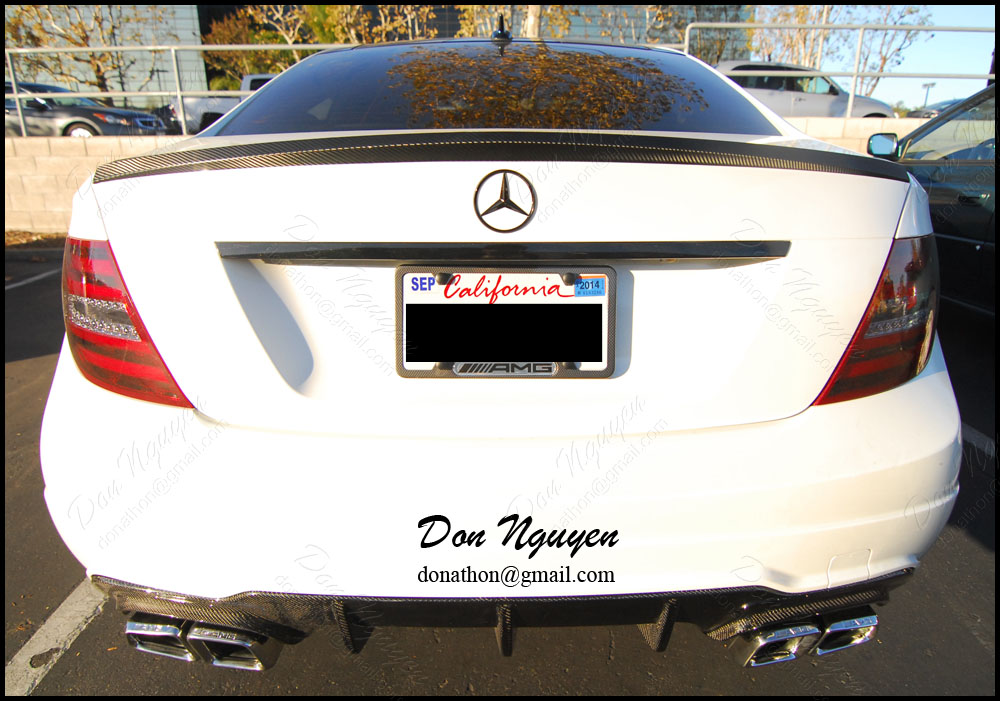
-Don Nguyen
donathon@gmail.com
-Don Nguyen
donathon@gmail.com
Thread Starter
Former Vendor of MBWorld
Joined: Mar 2008
Posts: 19,593
Likes: 30
From: Irvine, CA
Euros
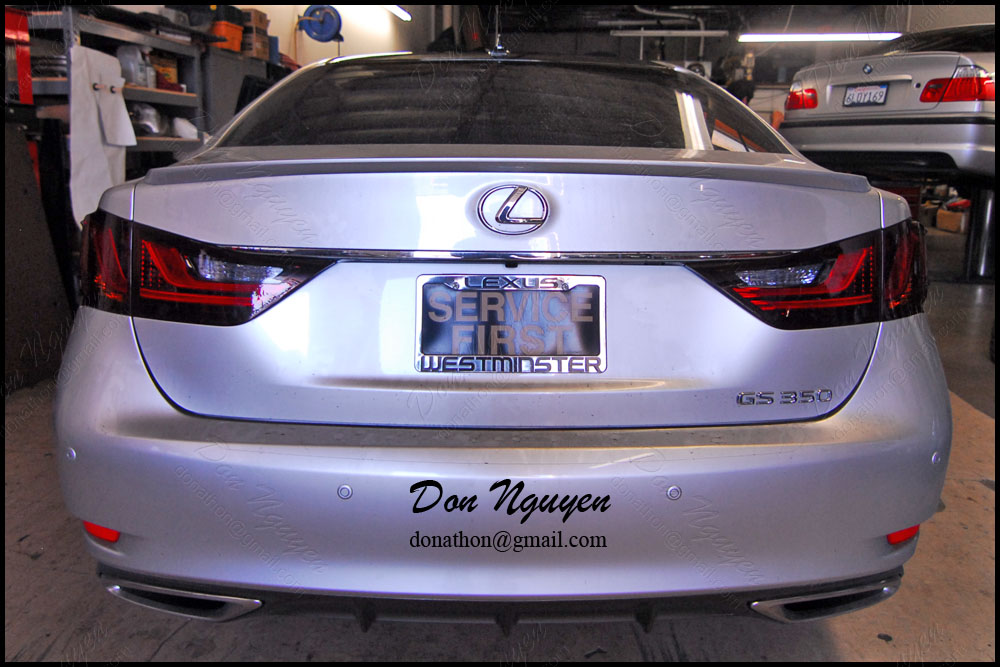
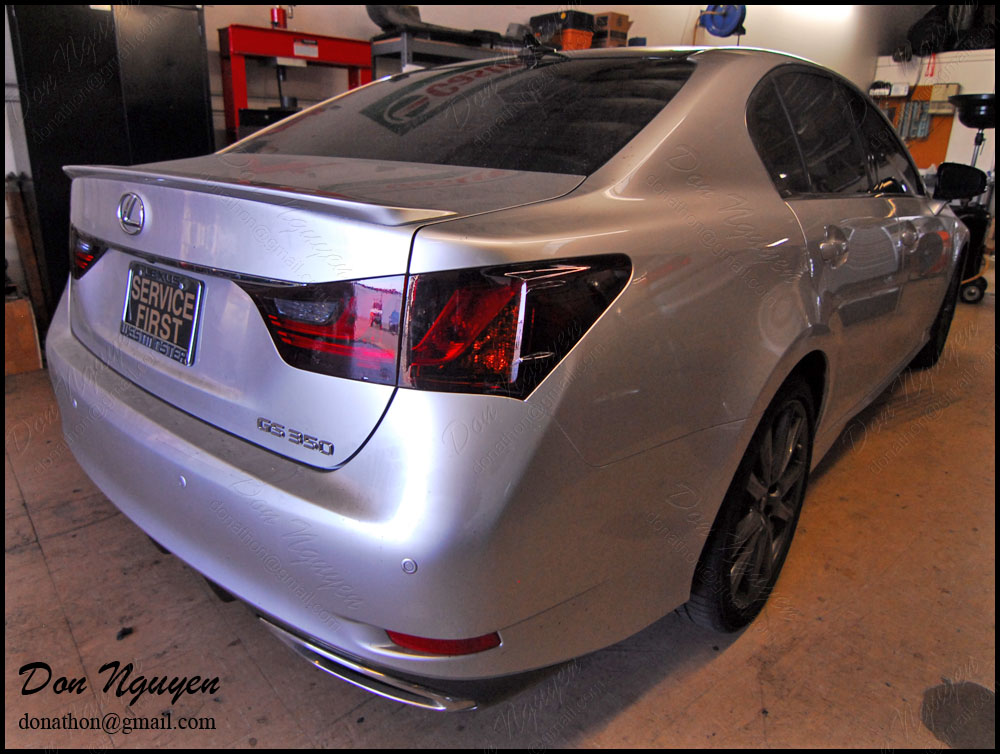
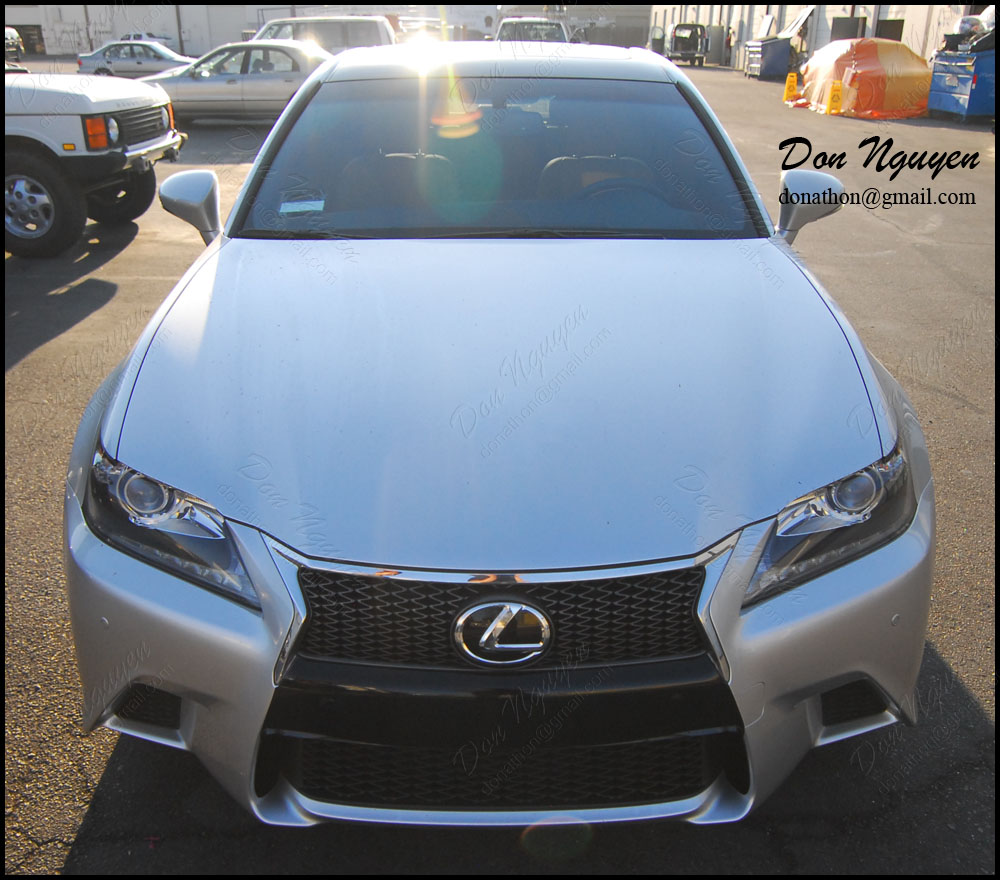
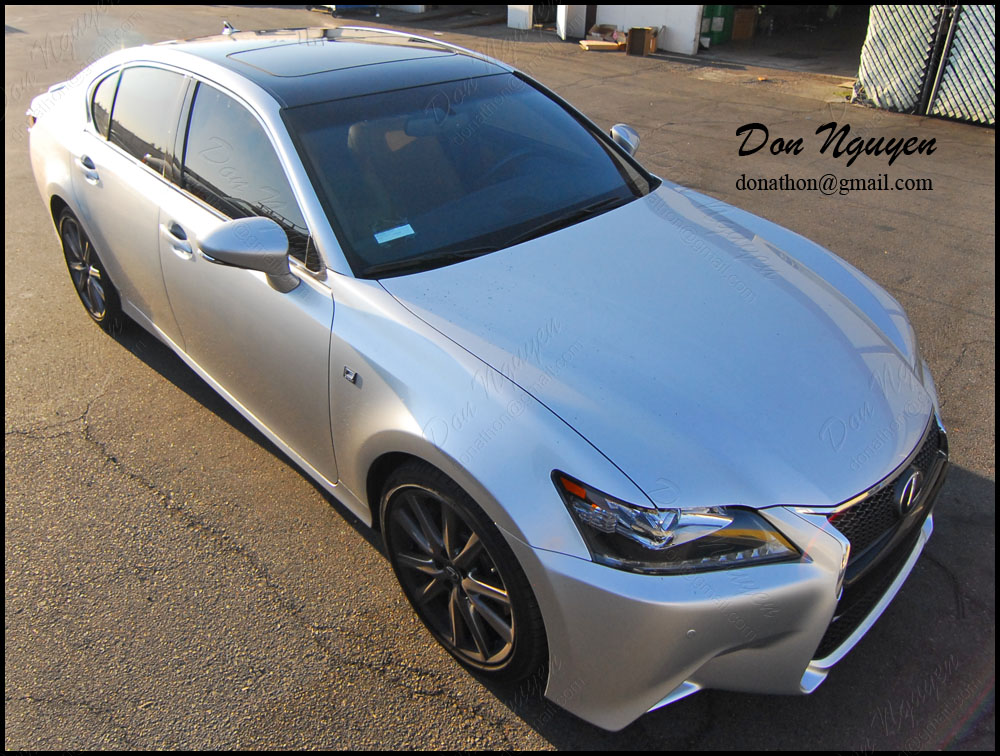
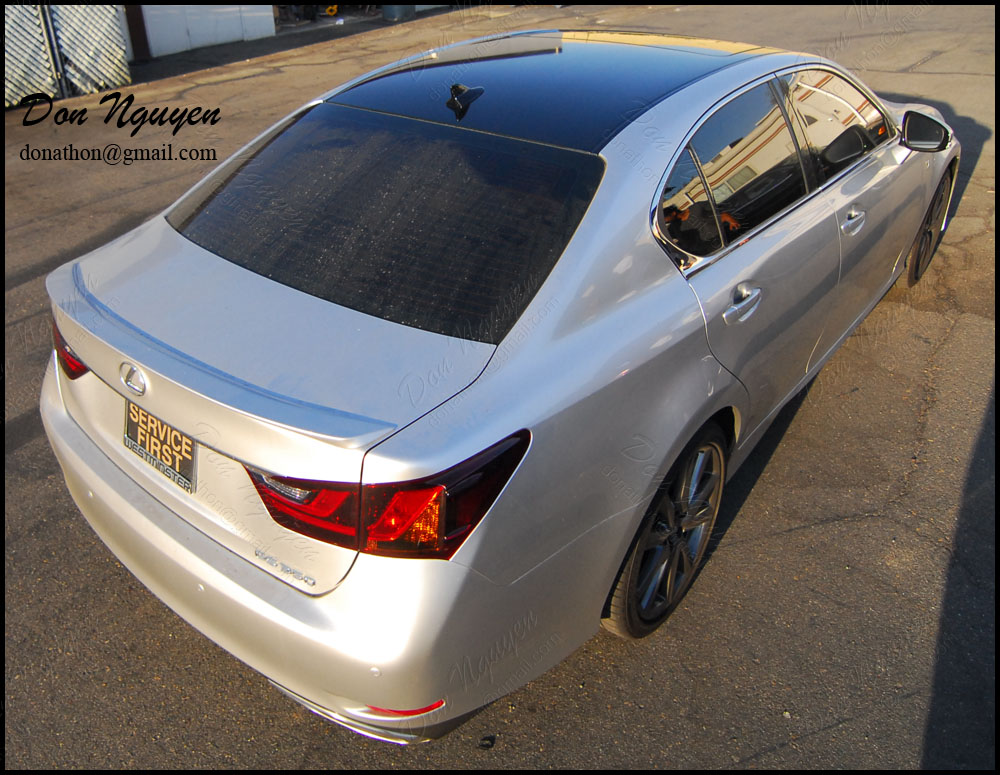
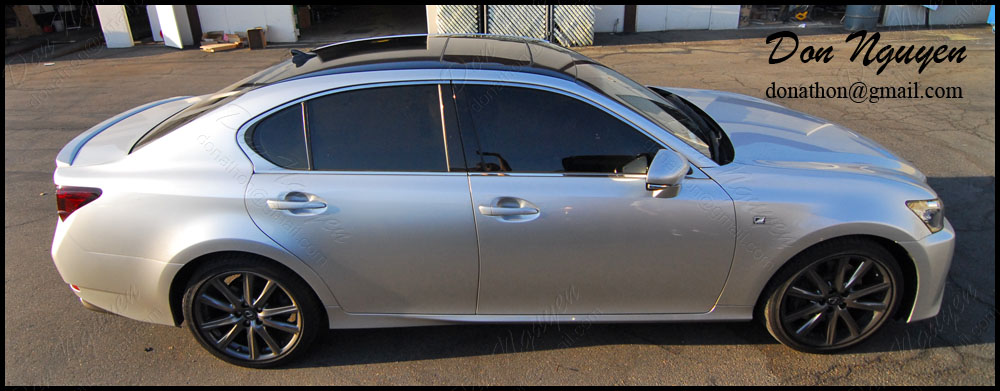
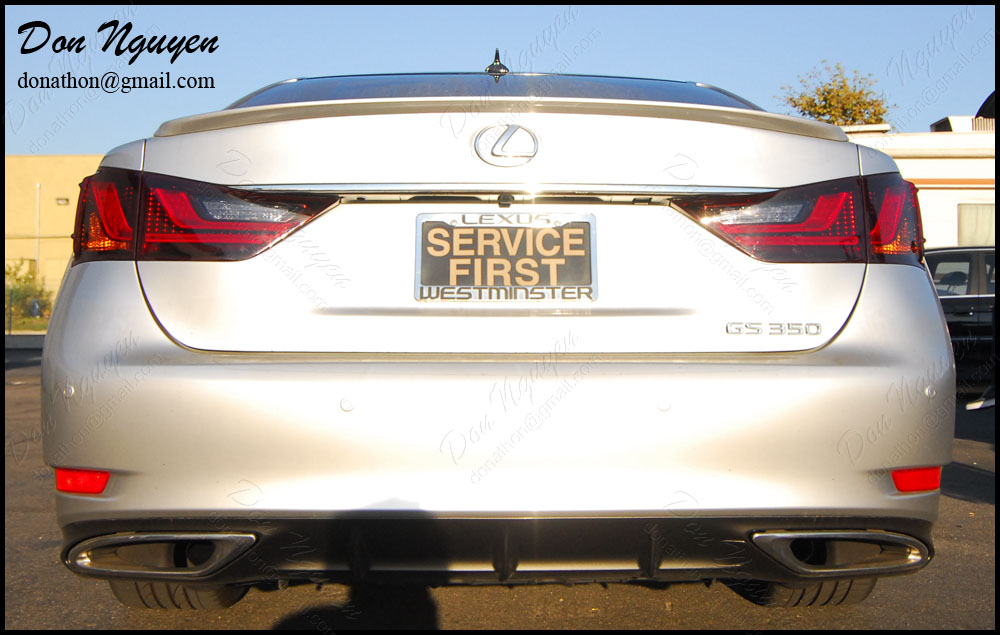
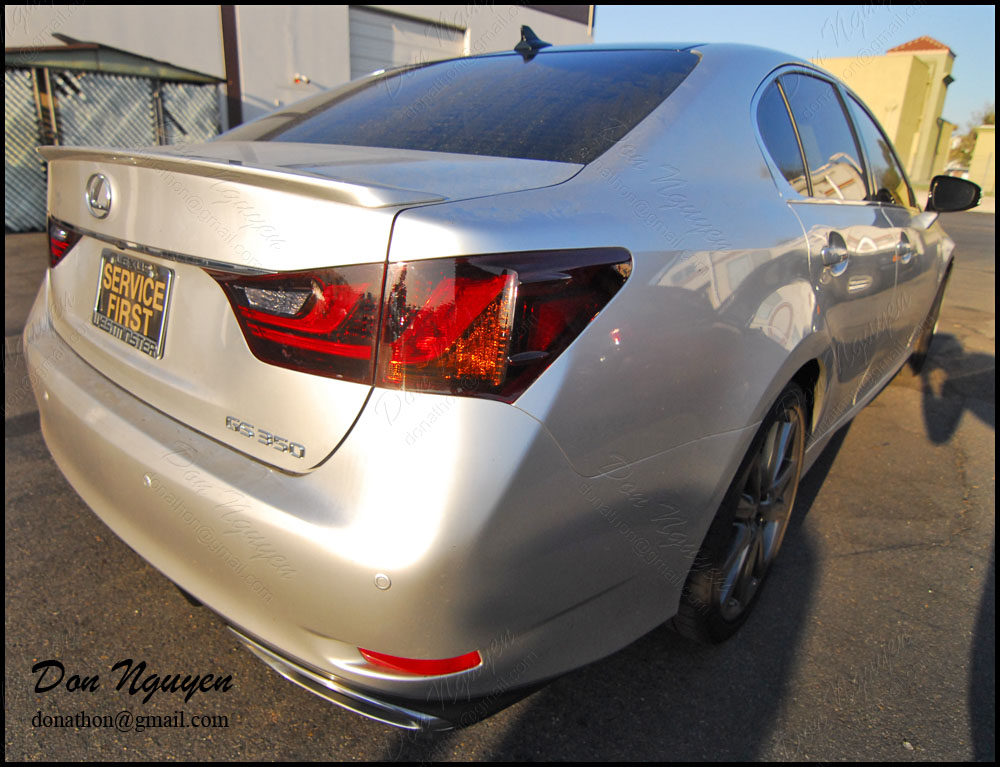
These aren�t the best pictures that I have taken, but I had someone request me to post some pictures of work that I�ve done on the new Lexus GS350. For this silver/grey GS350, I vinyl wrapped the roof in gloss black, lightly tinted/smoked the tail lights, and blacked out the center middle section of the front bumper. The owner of this car brought their car to me in Anaheim Hills/Orange County to have the work done. I think overall, the subtle changes to the car gave it a nice different/change of look without making it look too aftermarket or modified.
Before:
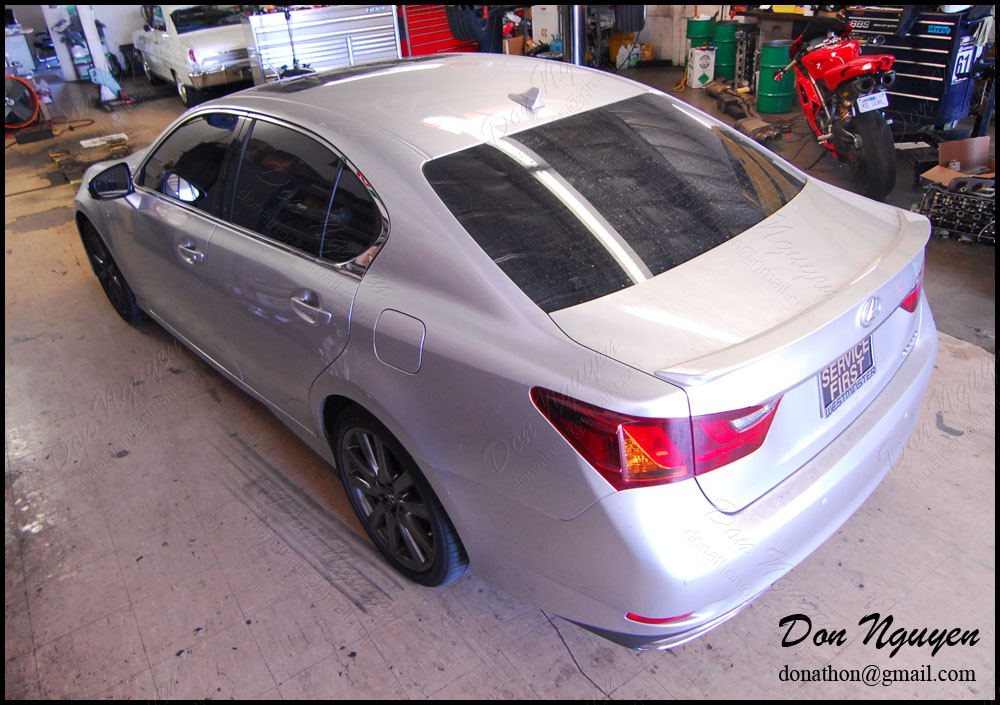
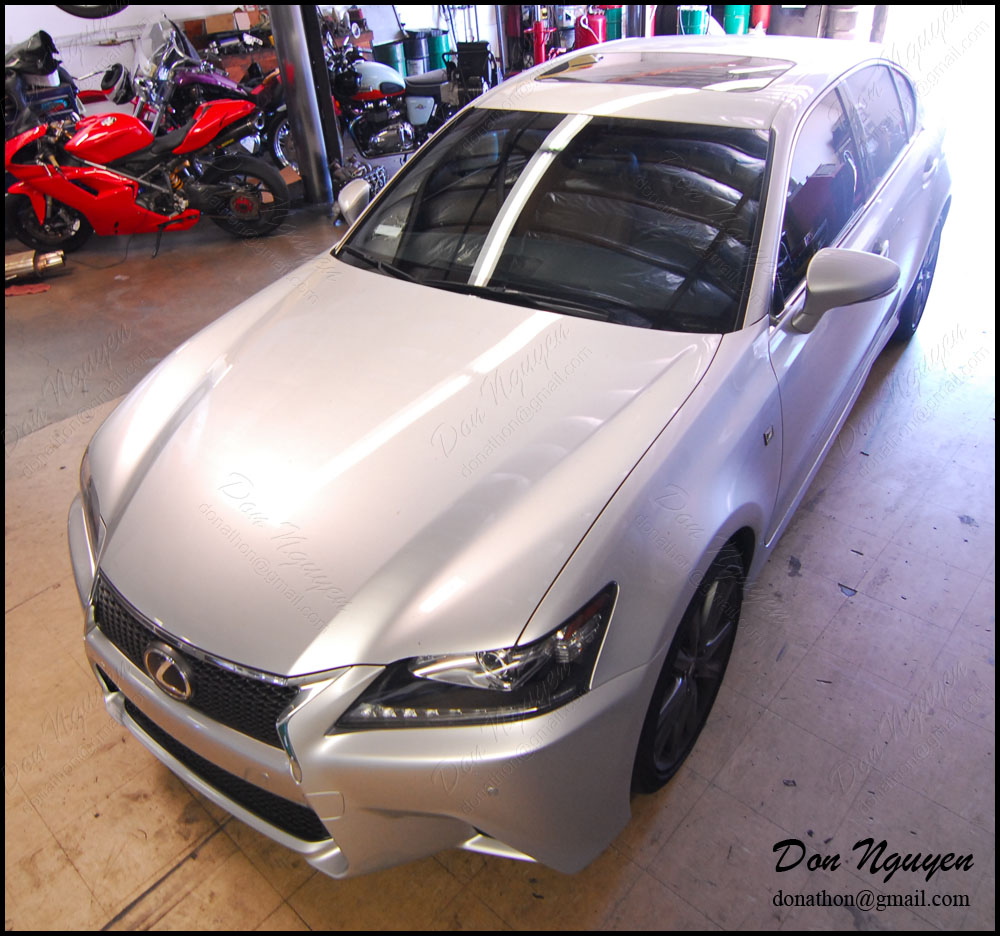
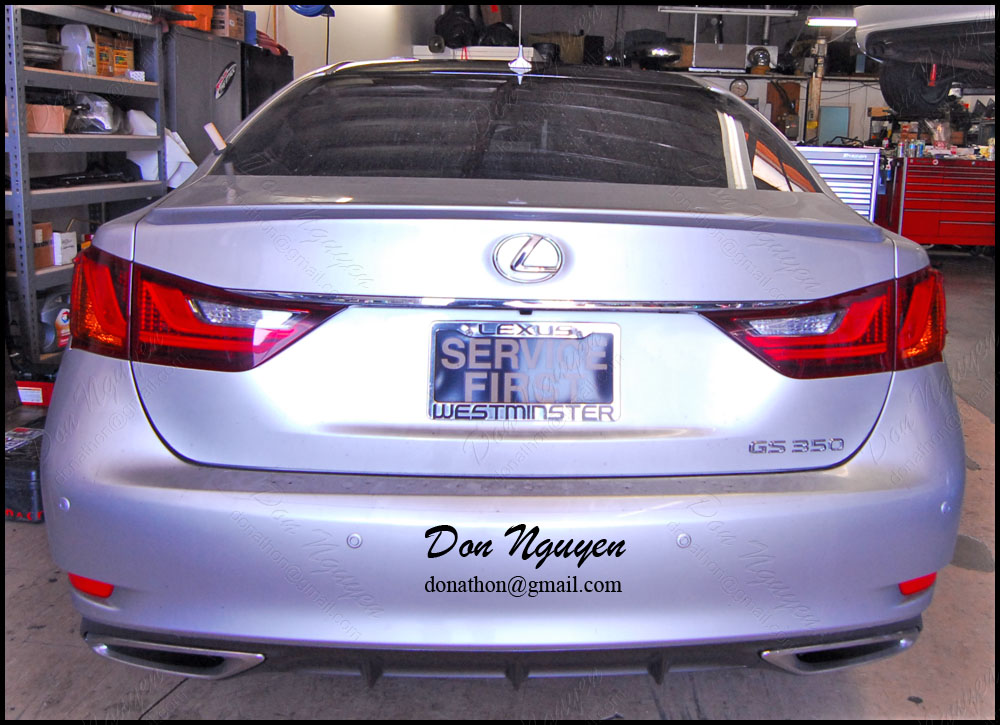
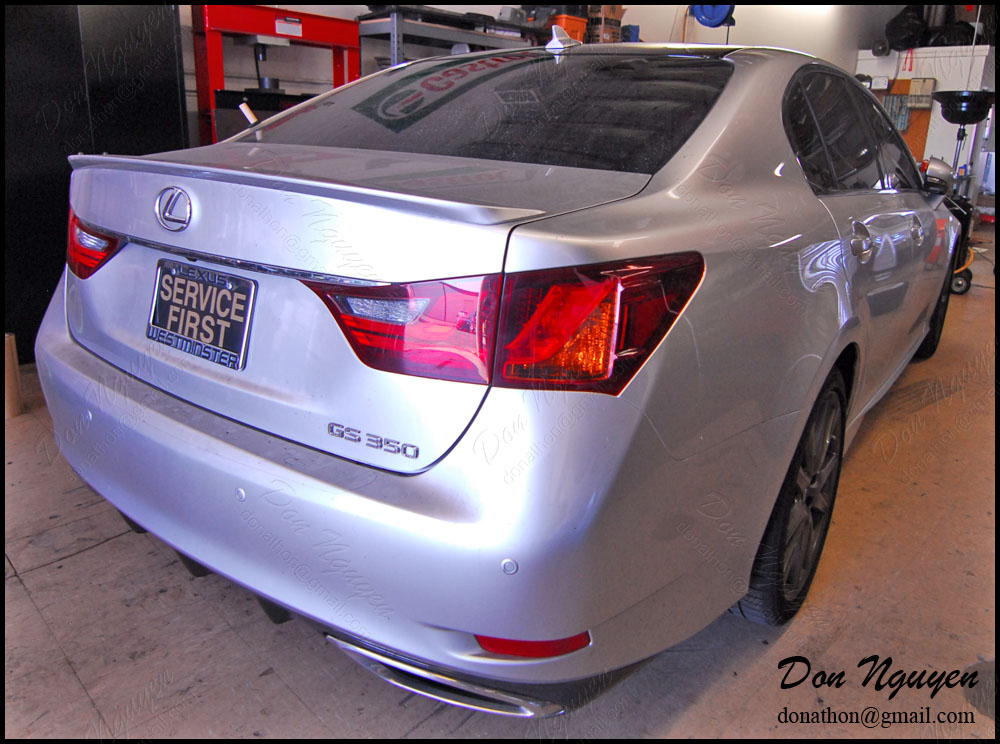
Driver/left side tinted/smoked - passenger ride side stock:
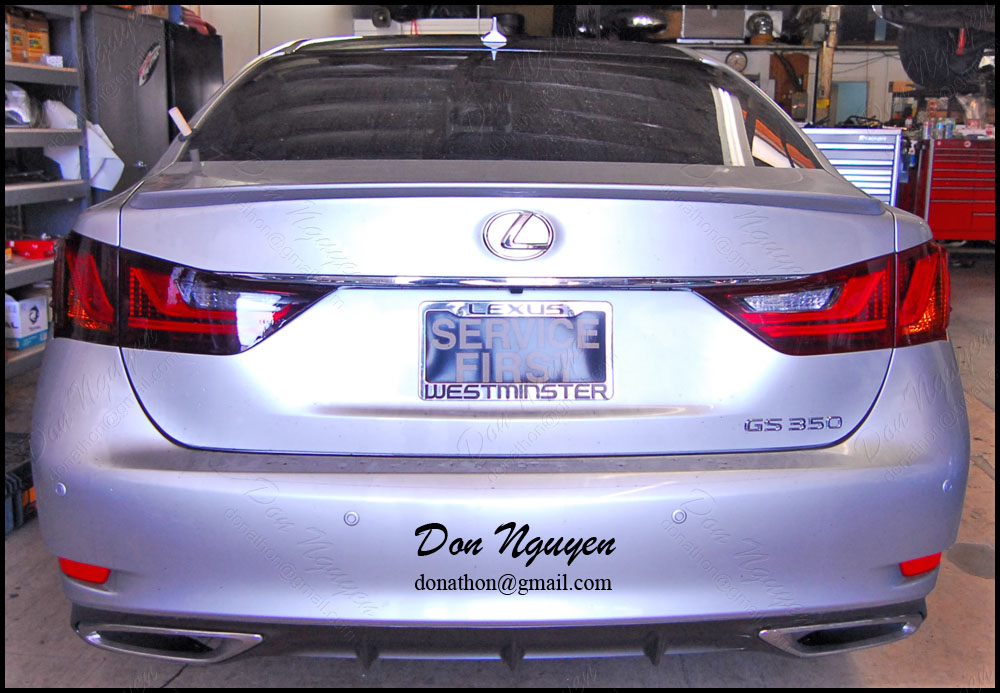
After:
-Don Nguyen
donathon@gmail.com
Before:
Driver/left side tinted/smoked - passenger ride side stock:
After:
-Don Nguyen
donathon@gmail.com
Thread Starter
Former Vendor of MBWorld
Joined: Mar 2008
Posts: 19,593
Likes: 30
From: Irvine, CA
Euros
The owner of this black BMW E60 550i sedan brought me his car because he was having issues with his factory original paint fading. I went over with him and options that were available for his car, and we decided on going with my gloss black vinyl to give him back that factory finish look. Although minor pits and such still showed through the material, overall, I think the results and pictures speak for themselves. It was a huge improvement over what the owner was dealing with before, as far as the condition of his roof was concerned. The owner of this car was also in Orange County and brought his car to me in Anaheim Hills to have the work done.
Before:

After:


-Don Nguyen
donathon@gmail.com
Before:
After:
-Don Nguyen
donathon@gmail.com
Thread Starter
Former Vendor of MBWorld
Joined: Mar 2008
Posts: 19,593
Likes: 30
From: Irvine, CA
Euros
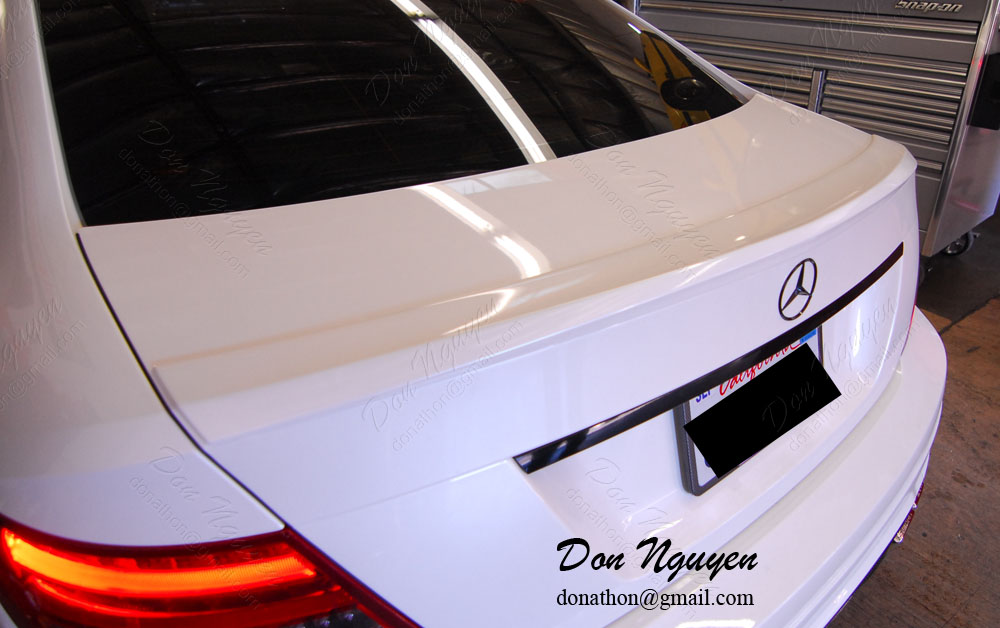
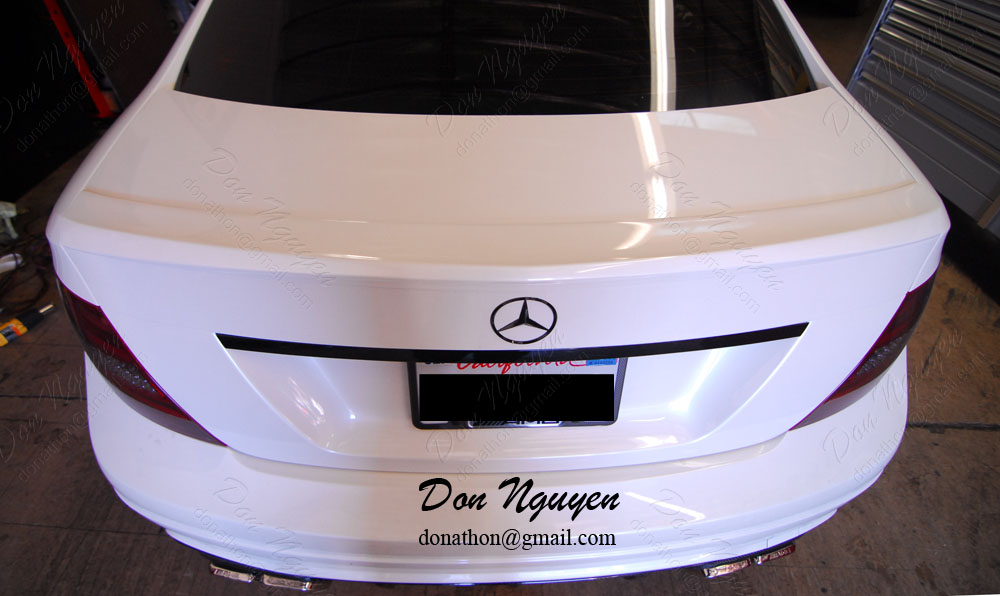
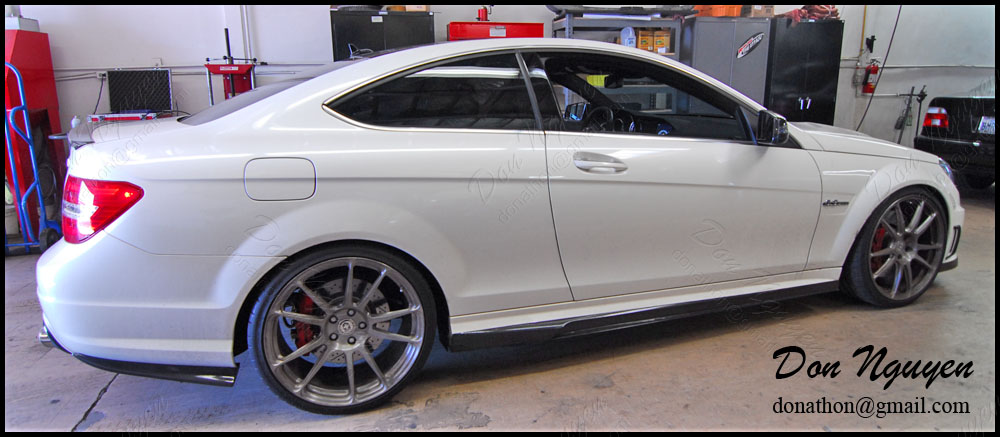
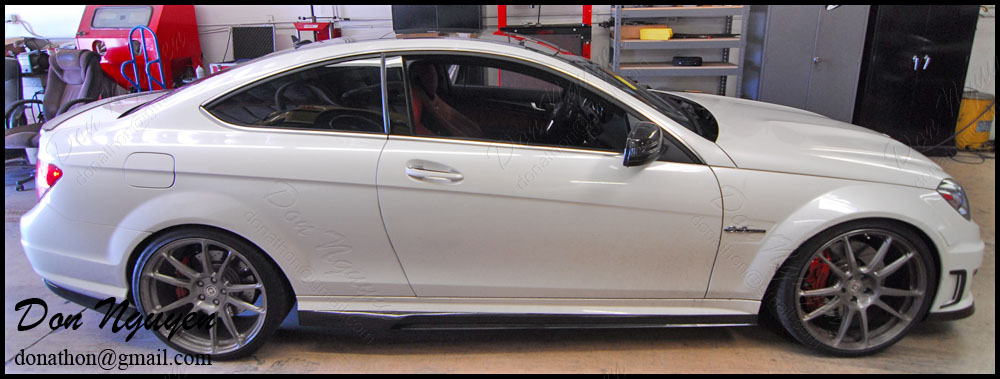
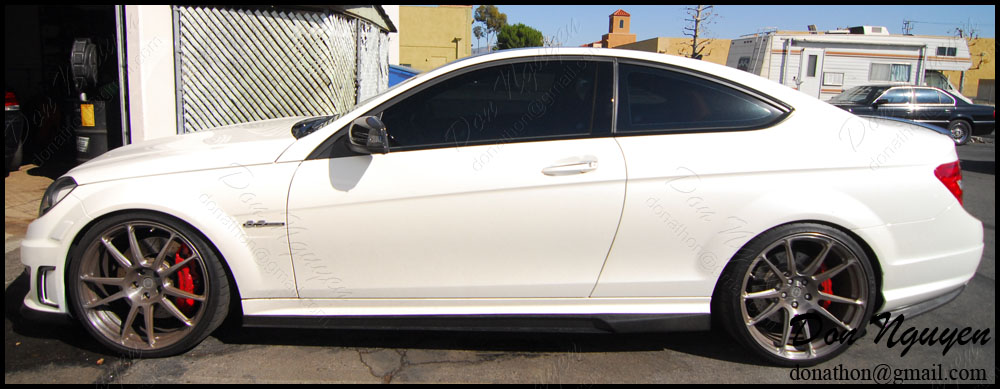
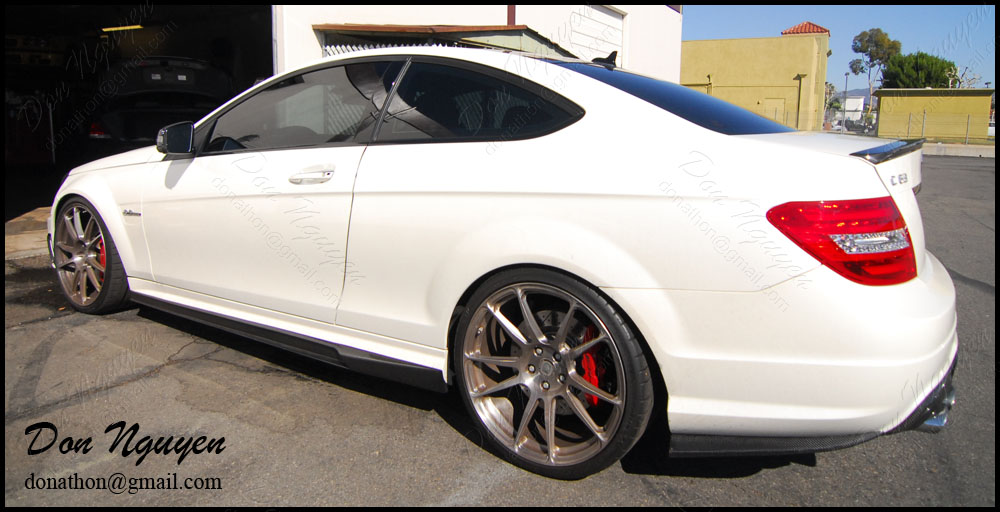
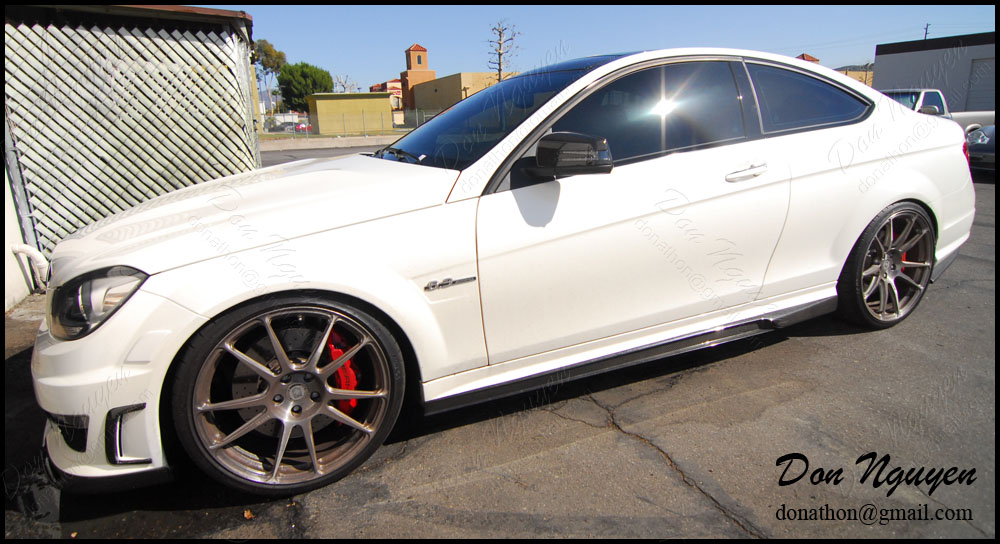
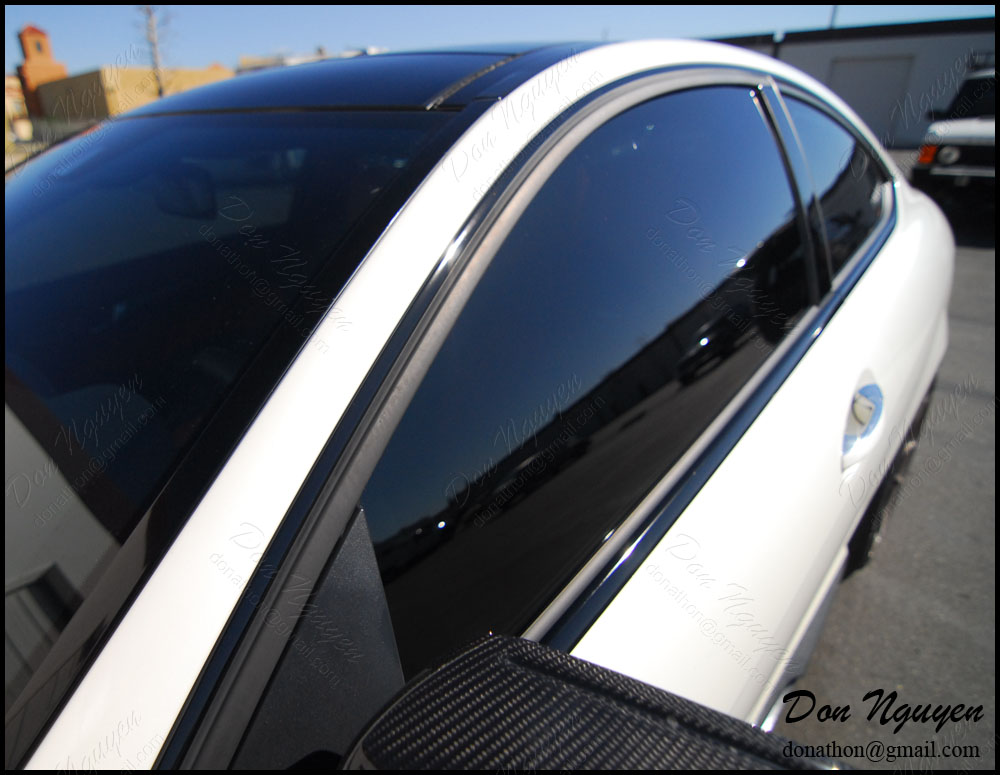
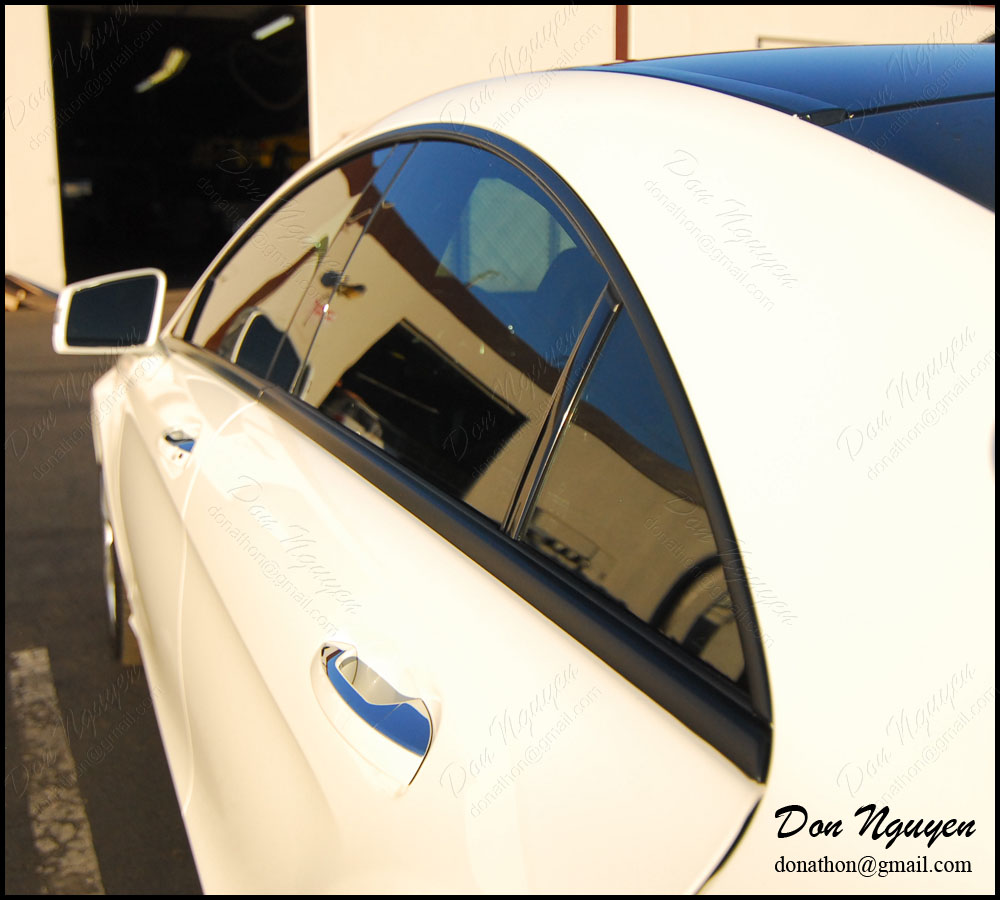
Had a request to post some pictures of a white car with gloss black vinyl applied on the trim. The owner of this white Mercedes Benz C63 coupe had me vinyl wrap the chrome/brushed aluminum trim on his car with my gloss black vinyl materials. The owner of this car was in Irvine and drove out to me in Anaheim Hills/Orange County to have the work done. The black trim definitely gave the coupe a much sportier look and complemented the rest of the car fairly well.
Before:

After:
-Don Nguyen
donathon@gmail.com
Before:
After:
-Don Nguyen
donathon@gmail.com
Thread Starter
Former Vendor of MBWorld
Joined: Mar 2008
Posts: 19,593
Likes: 30
From: Irvine, CA
Euros
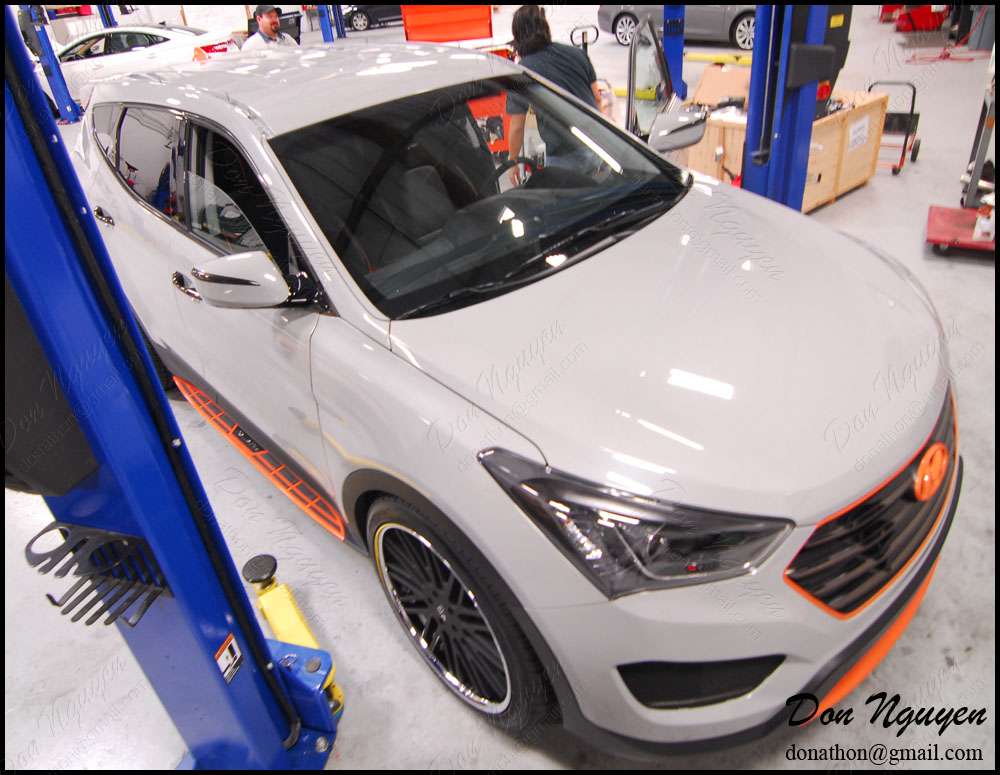
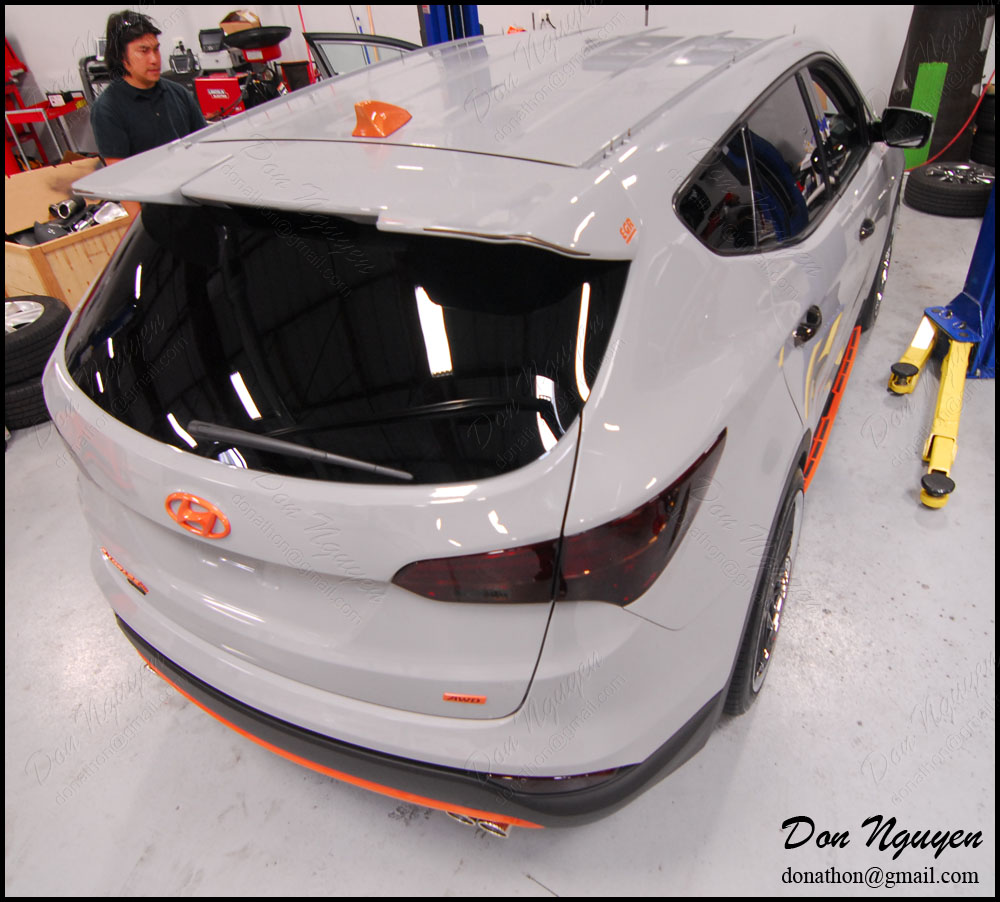
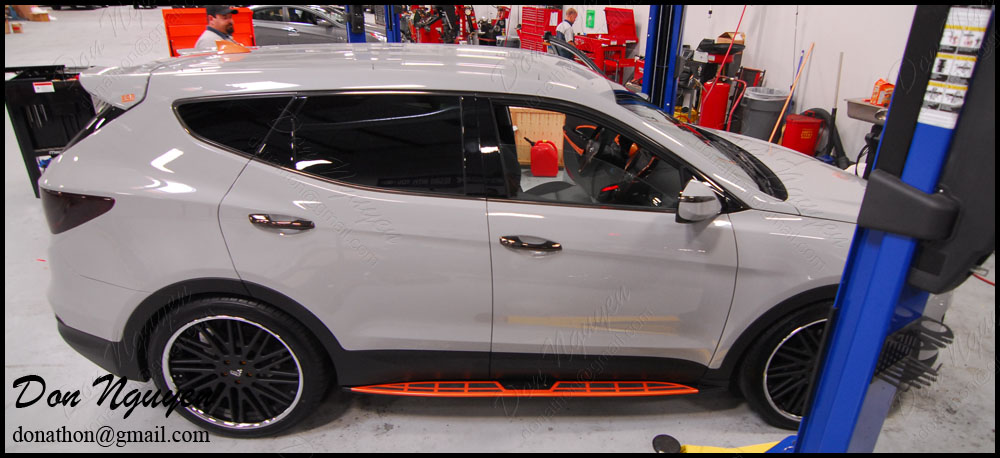
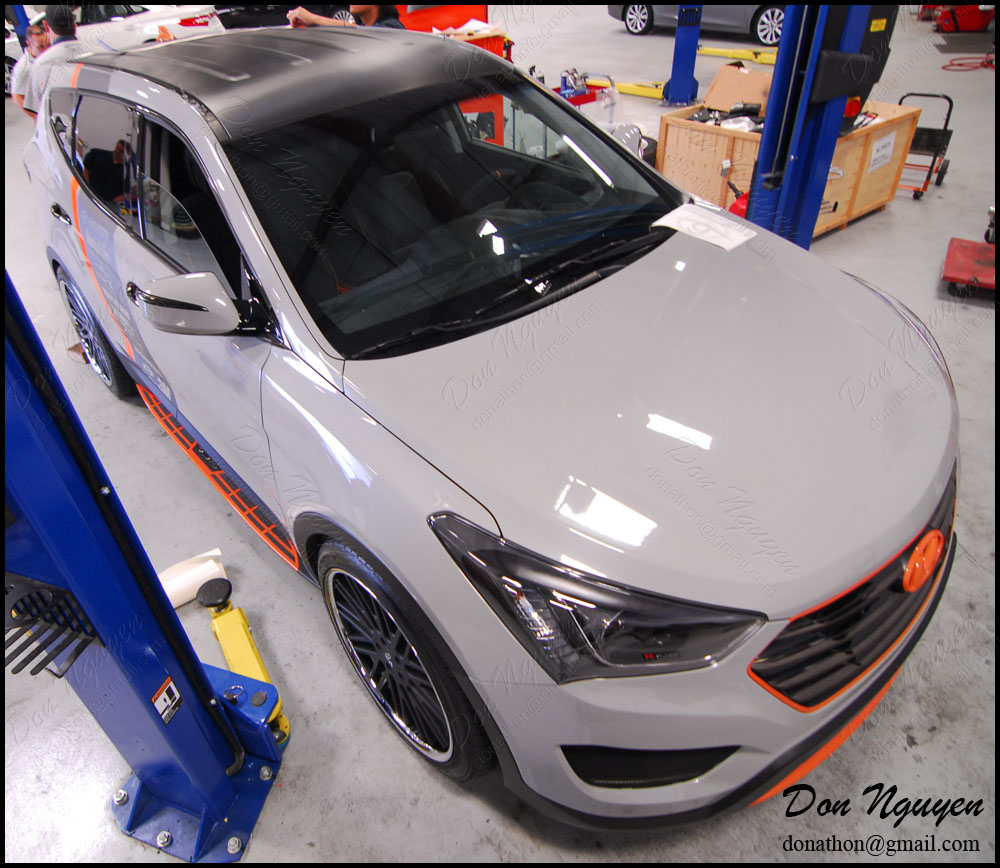
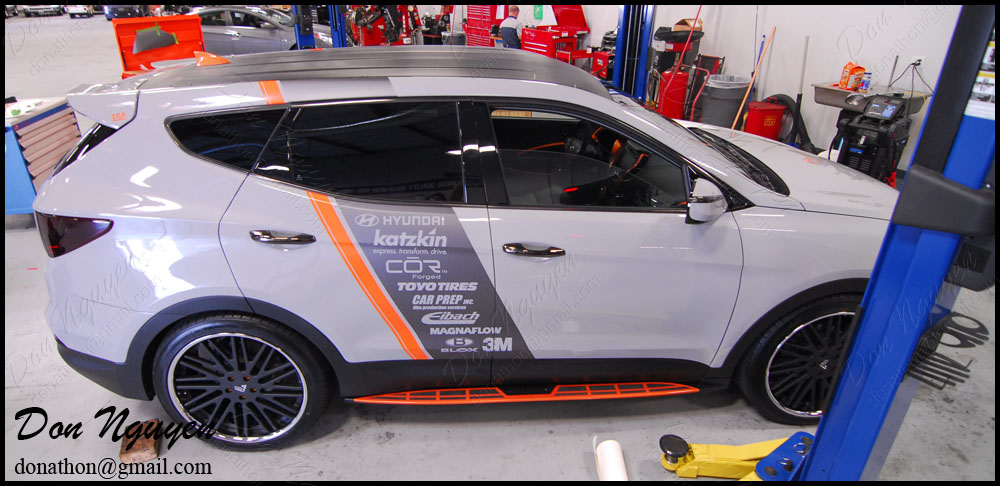
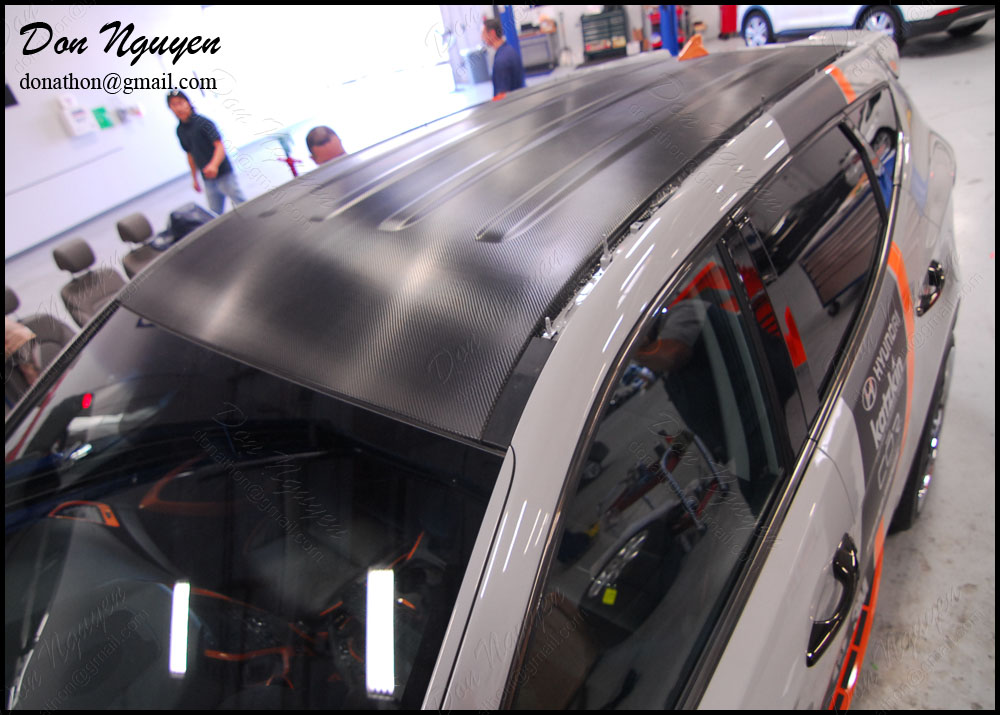
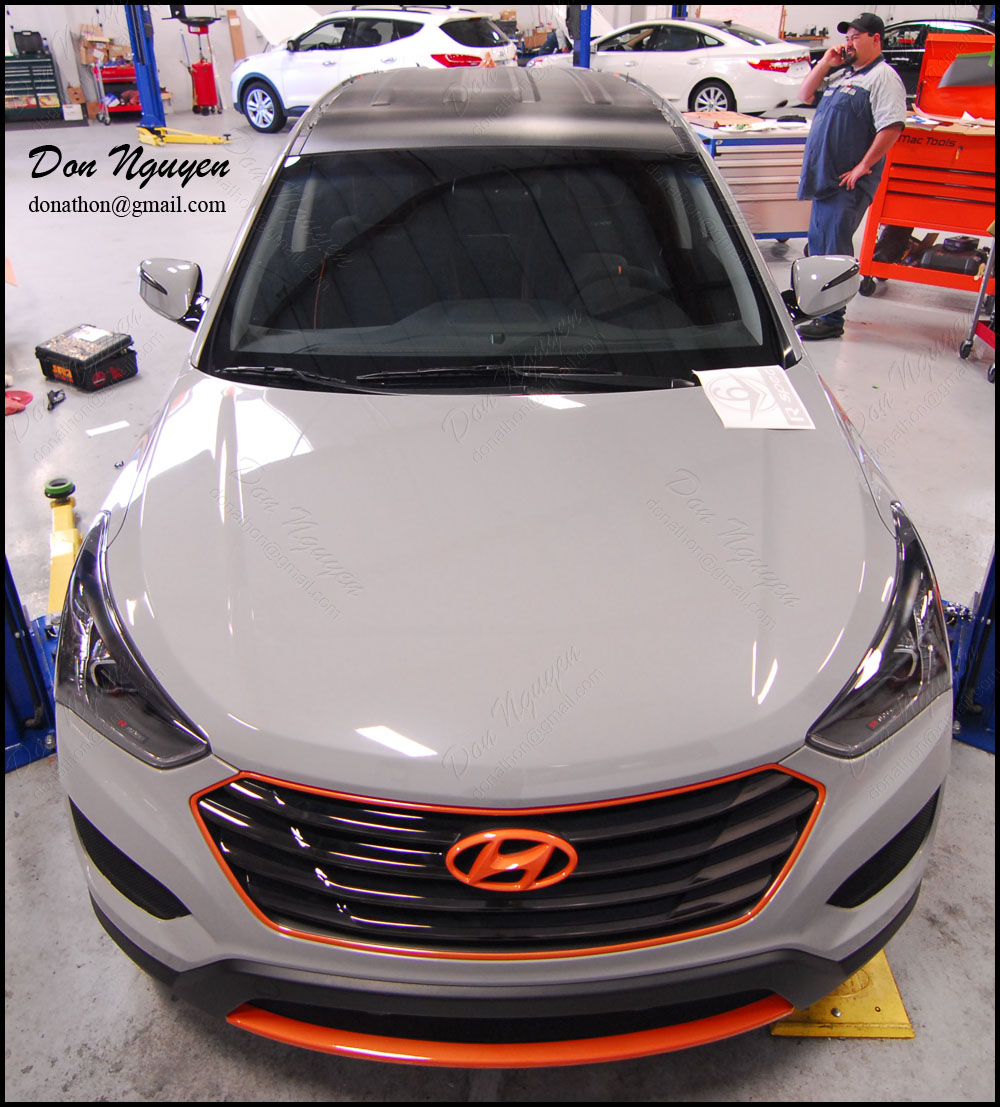
This is another car that I did for Hyundai for the most recent SEMA event. I had also done their Veloster that they had built for SEMA the year prior as well. This year they used their SUV the Santa Fe for the SEMA event. They had me come by their facilities to vinyl wrap the top of the SUV in the 3M 1080 gloss carbon fiber vinyl material. Not often that I do the roof of a SUV or such a large car in general. Obviously for this car, the carbon roof was chosen to make it stand out and go with the more aggressively modified look/theme of the car.
Before:
After:

-Don Nguyen
donathon@gmail.com
Before:
After:
-Don Nguyen
donathon@gmail.com
Thread Starter
Former Vendor of MBWorld
Joined: Mar 2008
Posts: 19,593
Likes: 30
From: Irvine, CA
Euros
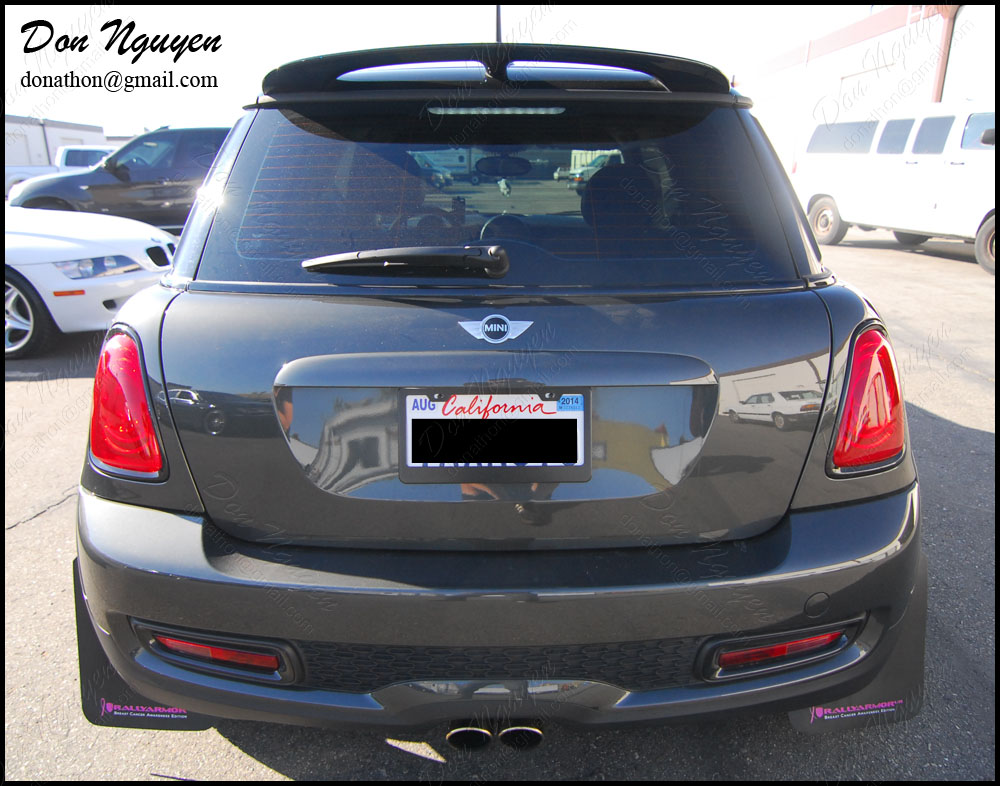
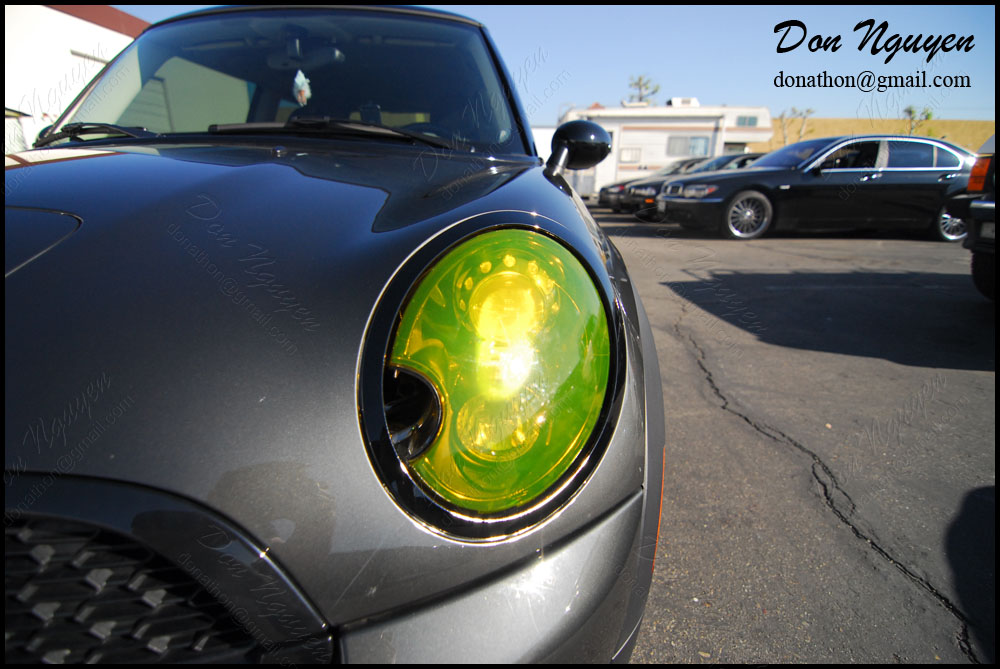
Not many people know that I use/have other colors of head/tail light film in addition to the normal tint/smoke films that most people typically have me use on their cars. The owner of this Mini Cooper brought his car by to have me tint his head lights yellow and his tail lights with red. I know the yellow headlights isn’t for everybody, but the owner of this Mini wanted to do something different, and it’s always possible to go back to stock/reversible with vinyl. The owner of this car drove out from Inland Empire to me in Anaheim hills/Orange county to have the work done.
Before:

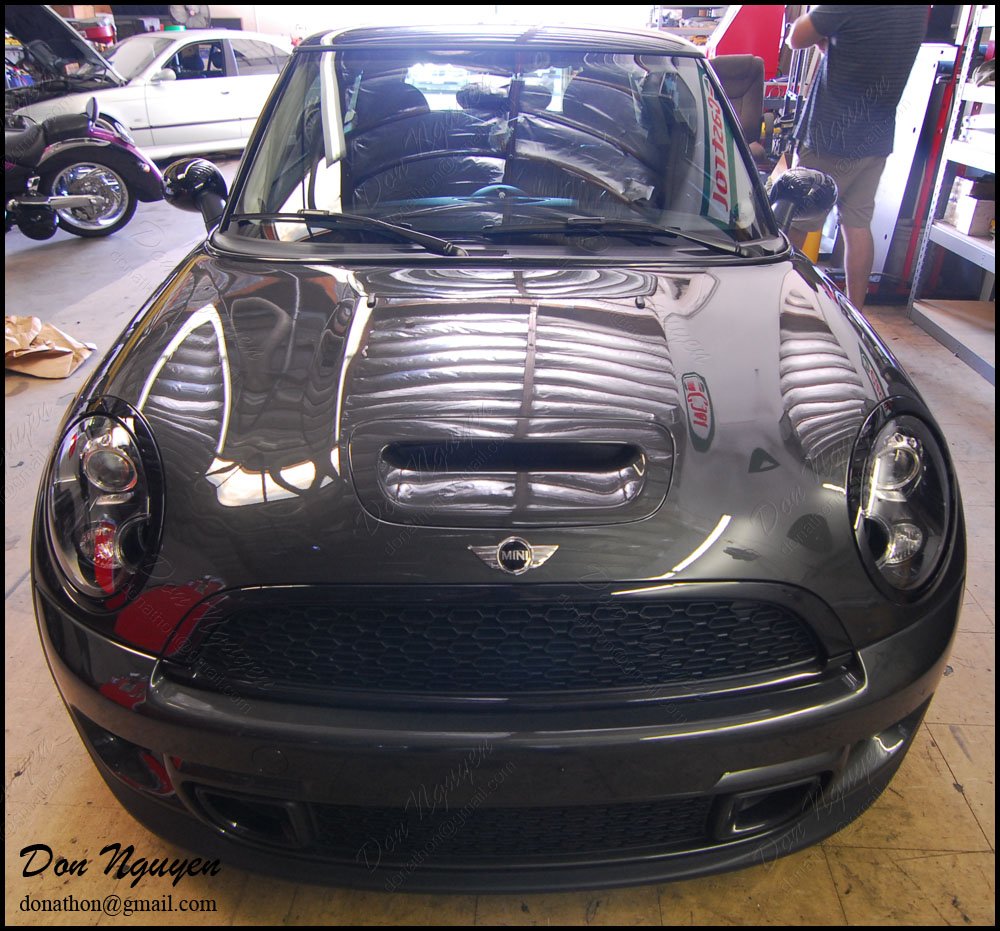
After (note the headlights are on in these pictures):


-Don Nguyen
donathon@gmail.com
Before:
After (note the headlights are on in these pictures):
-Don Nguyen
donathon@gmail.com
Thread Starter
Former Vendor of MBWorld
Joined: Mar 2008
Posts: 19,593
Likes: 30
From: Irvine, CA
Euros
The owner of this car drove from Los Angeles to me in Orange County/Anaheim Hills to have me do some vinyl work on his brand new white Mercedes Benz CLS 550. We went with gloss black for his roof, side roof rails, and center portion of the lower bumper. Then for the chrome side window trim, we went with matte black for those. Finally, for the tail lights, I used my transparent red vinyl to red out the clear/white portion of his tail lights to give it a single complete red appearance/color.
Before:


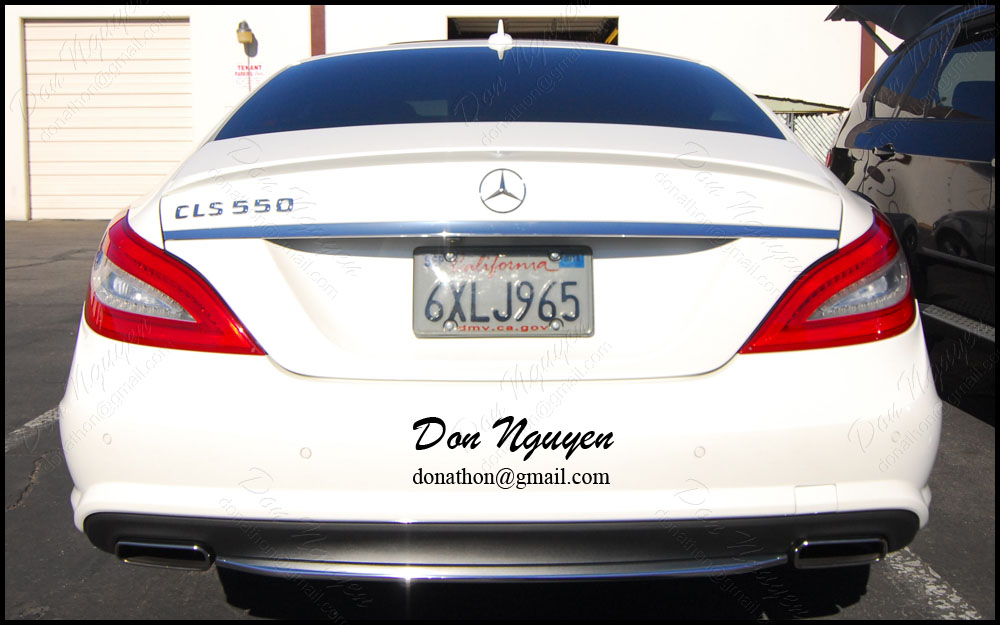
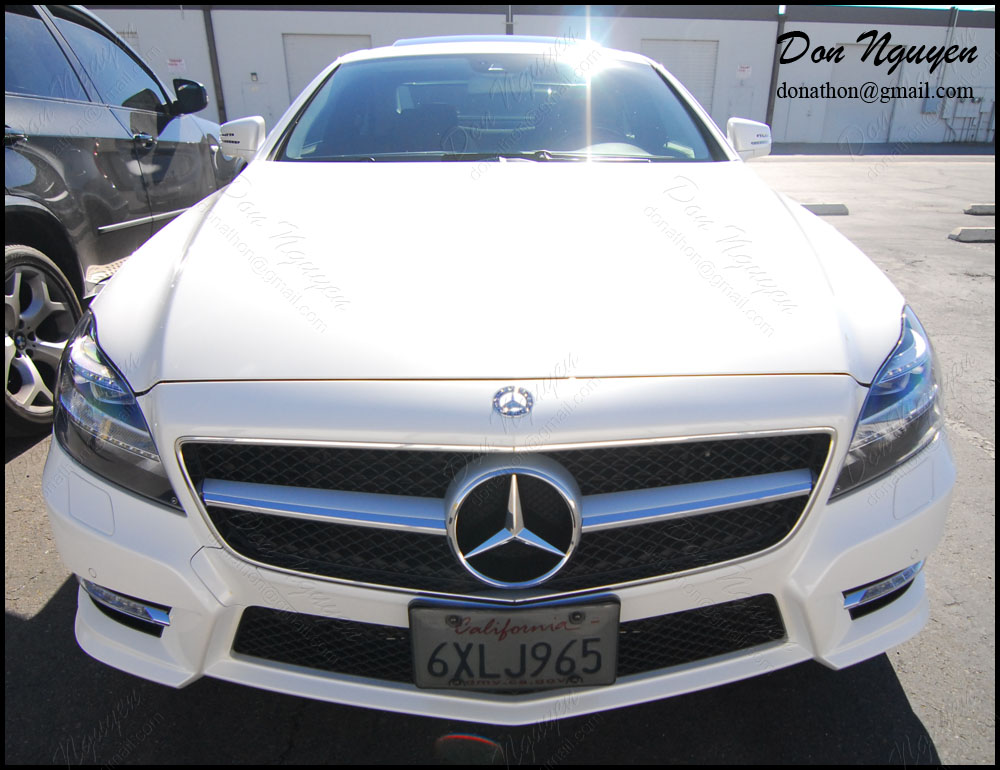
After:


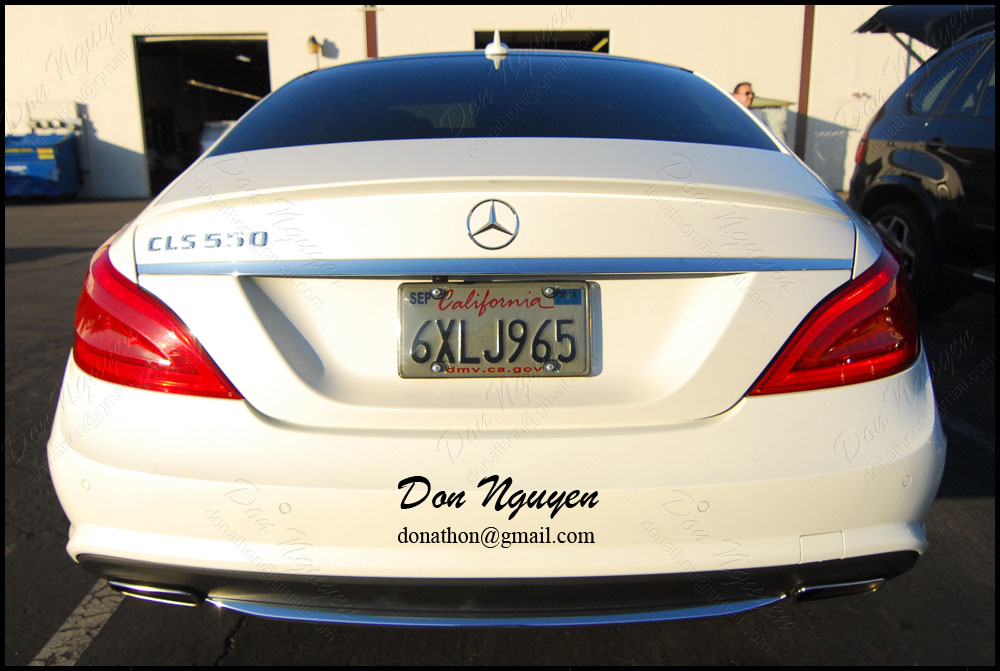
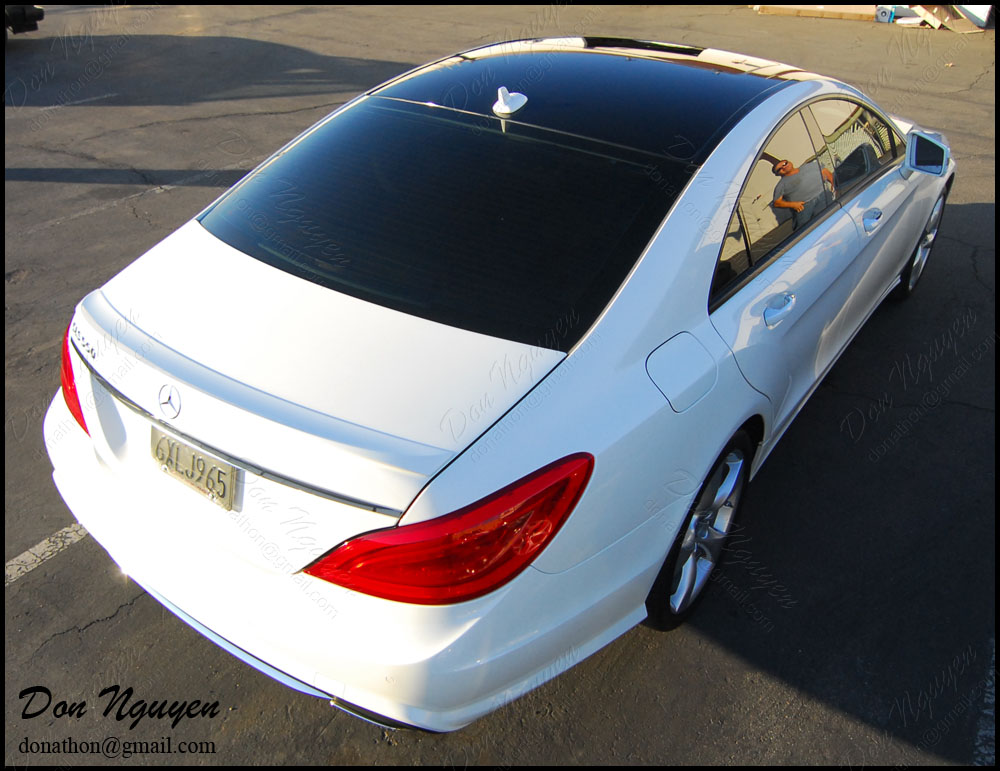

-Don Nguyen
donathon@gmail.com
Before:
After:
-Don Nguyen
donathon@gmail.com
Thread Starter
Former Vendor of MBWorld
Joined: Mar 2008
Posts: 19,593
Likes: 30
From: Irvine, CA
Euros
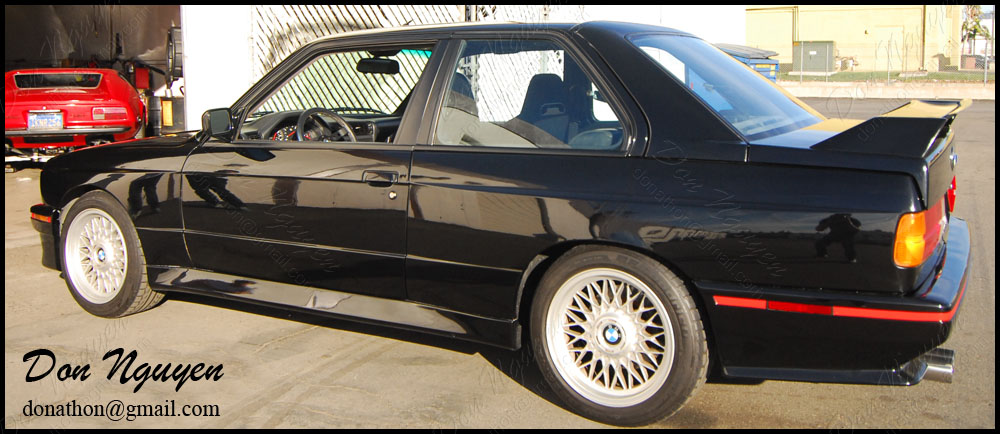
This specific car is not the typical case of a car coming in with chrome/brushed aluminum trim and wanting me to black out their trim with my vinyl materials. The owner of this BMW E30 M3 brought his car in to have me vinyl wrap the previously painted gloss black trim with my matte black vinyl. I know it may be a bit hard to tell, but if you look at the pictures side by side or back to back it may be easier to notice the differences between how matte black trim vs gloss black trim looks like on a car.
This is also good for those who have asked me in the past how well vinyl will cover up bumps/dents/etc. As you may see in some of the pictures, whoever did the paint job on the trim did not do that good of a job, which left the trim a bit lumpy/uneven. If you can’t see or make it out in the pictures, any imperfections that are underneath the vinyl will show through, as the material is fairly thin and basically takes on the shape of the surface/pieces that they are being applied on over.
Before:


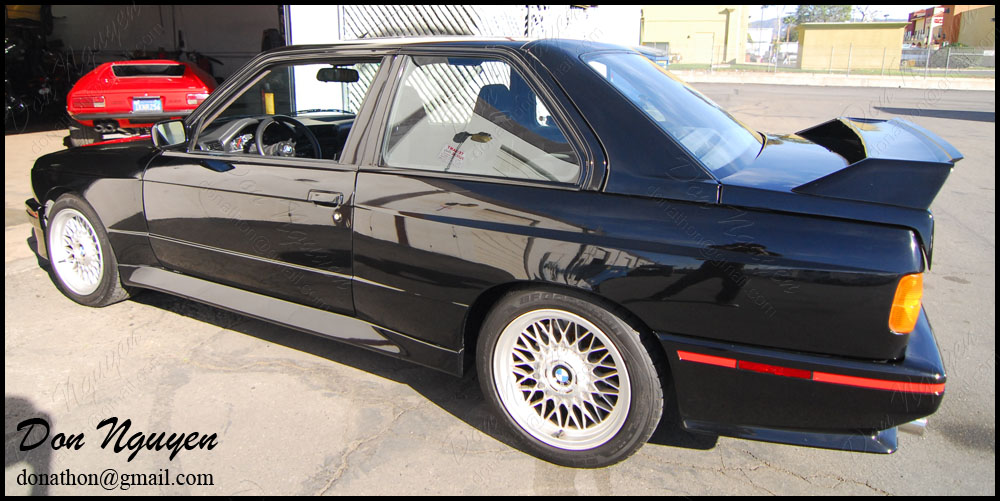
After:
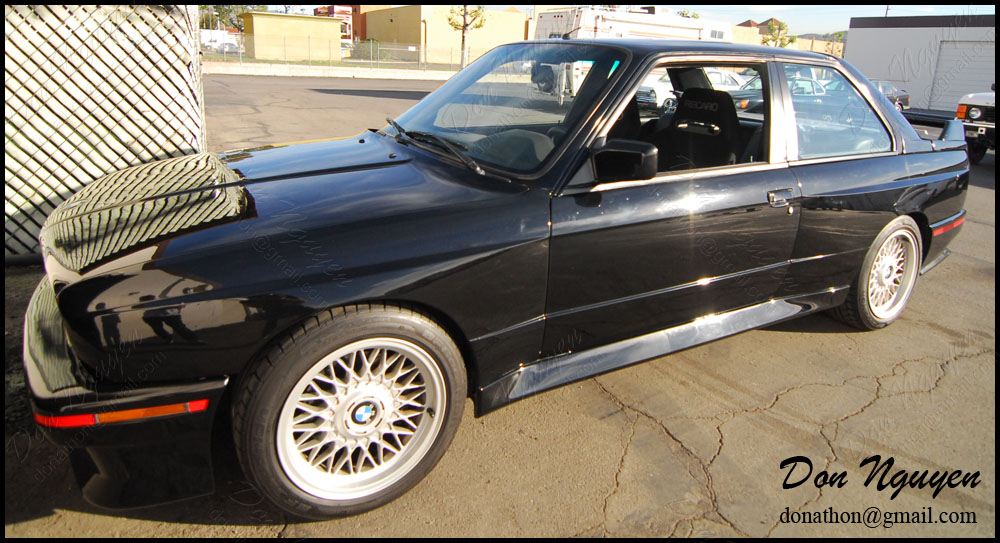


-Don Nguyen
donathon@gmail.com
This is also good for those who have asked me in the past how well vinyl will cover up bumps/dents/etc. As you may see in some of the pictures, whoever did the paint job on the trim did not do that good of a job, which left the trim a bit lumpy/uneven. If you can’t see or make it out in the pictures, any imperfections that are underneath the vinyl will show through, as the material is fairly thin and basically takes on the shape of the surface/pieces that they are being applied on over.
Before:
After:
-Don Nguyen
donathon@gmail.com
Thread Starter
Former Vendor of MBWorld
Joined: Mar 2008
Posts: 19,593
Likes: 30
From: Irvine, CA
Euros
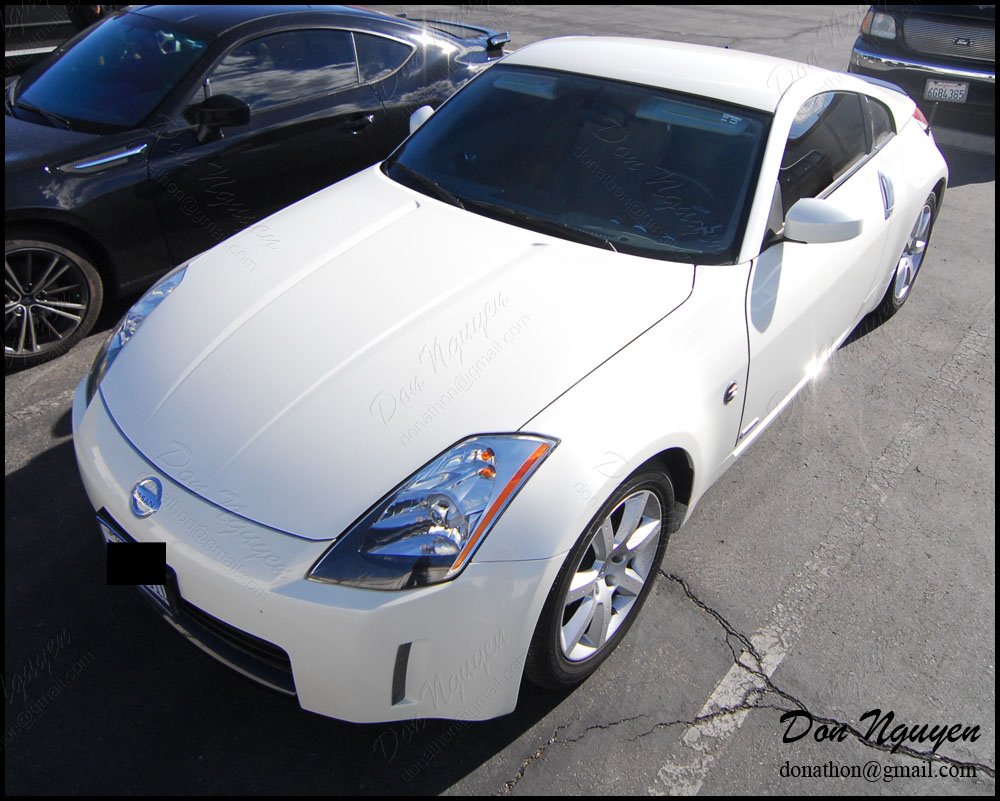
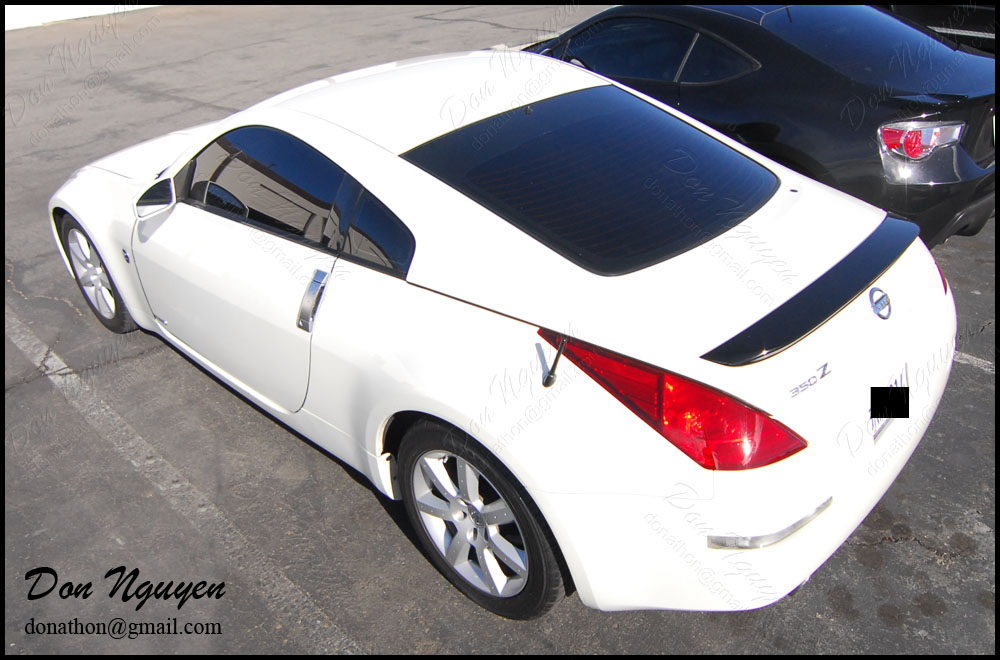
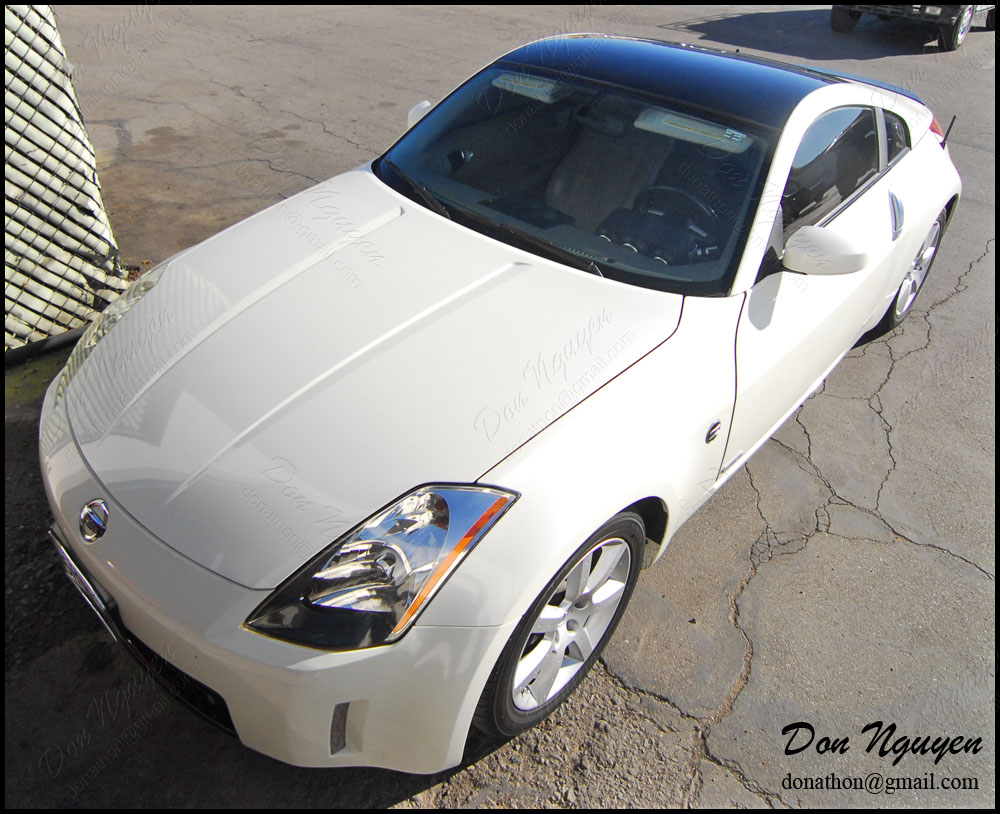
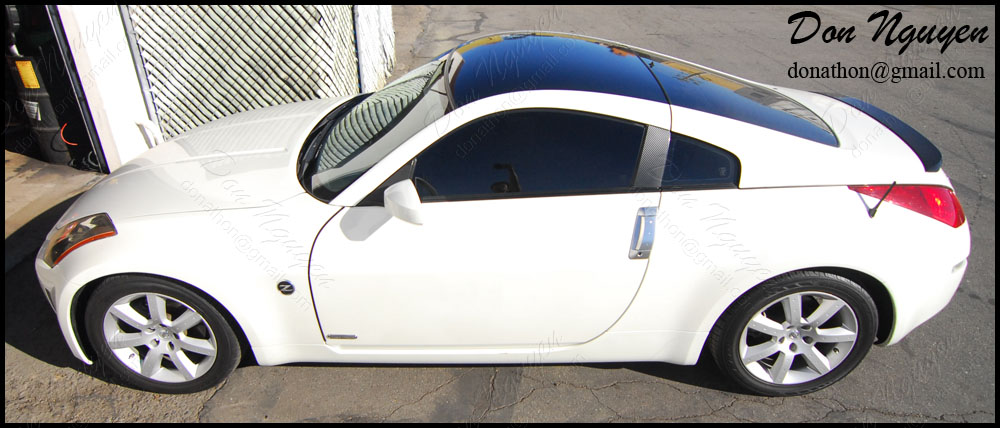
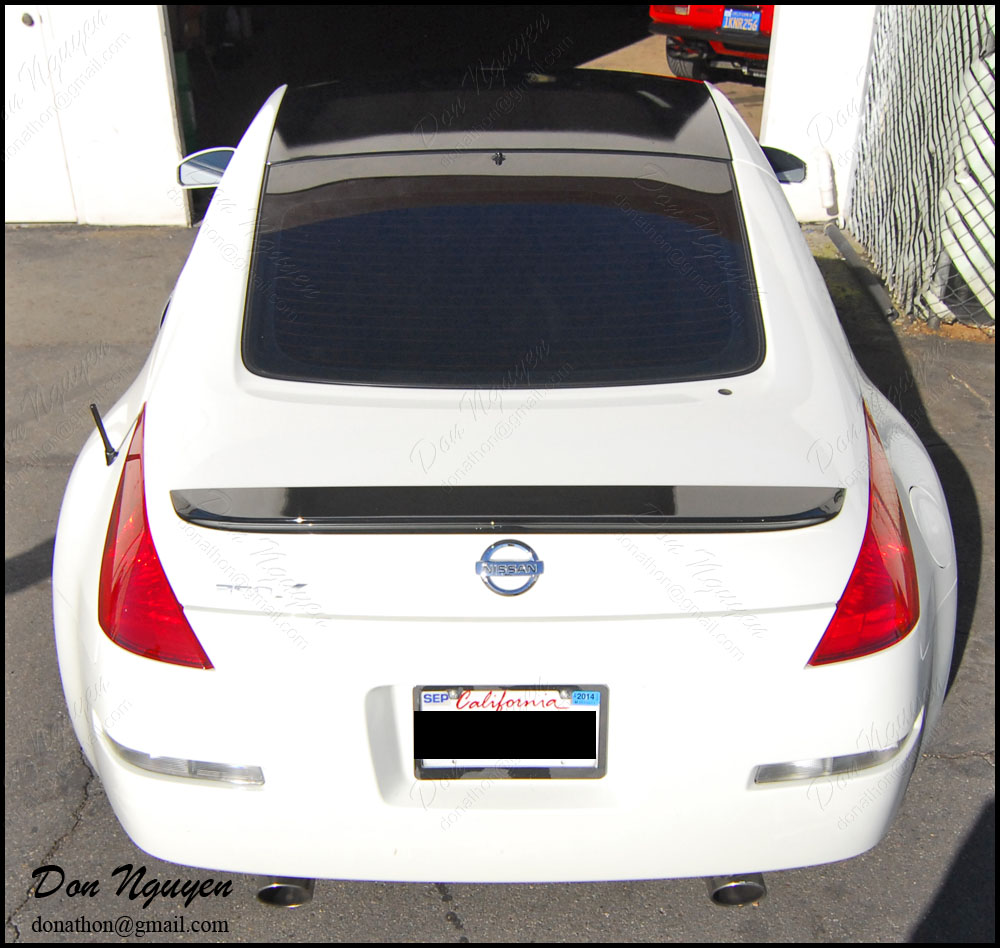
The owner of this white Nissan 350z brought me his car to have me vinyl wrap the roof of the car in my gloss black vinyl material. In addition to the roof, I also did his two side vertical pillars with the 3M dinoc matte carbon fiber vinyl material. I believe the owner of this car was from around Long beach and drove his car out to me in Anaheim Hills/Orange county to get the work done. The gloss black, especially on the 350zs or similar smaller two seater cars, the gloss black roof connects and continues the front and rear glass fairly nicely.
Before:
After:


-Don Nguyen
donathon@gmail.com
Before:
After:
-Don Nguyen
donathon@gmail.com
Thread Starter
Former Vendor of MBWorld
Joined: Mar 2008
Posts: 19,593
Likes: 30
From: Irvine, CA
Euros
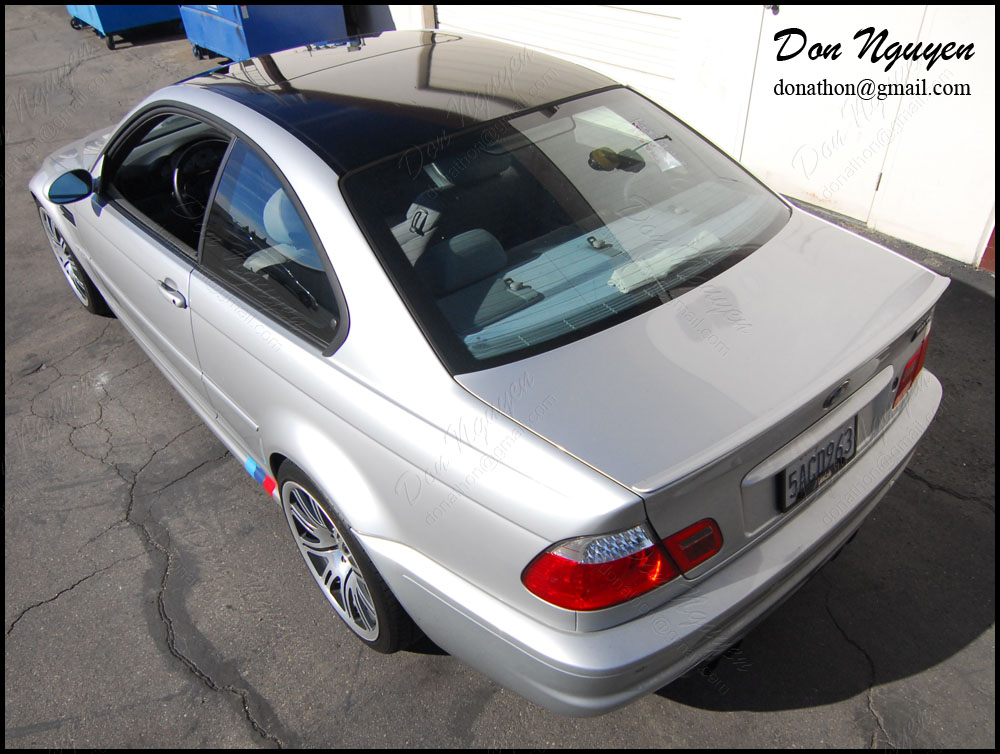
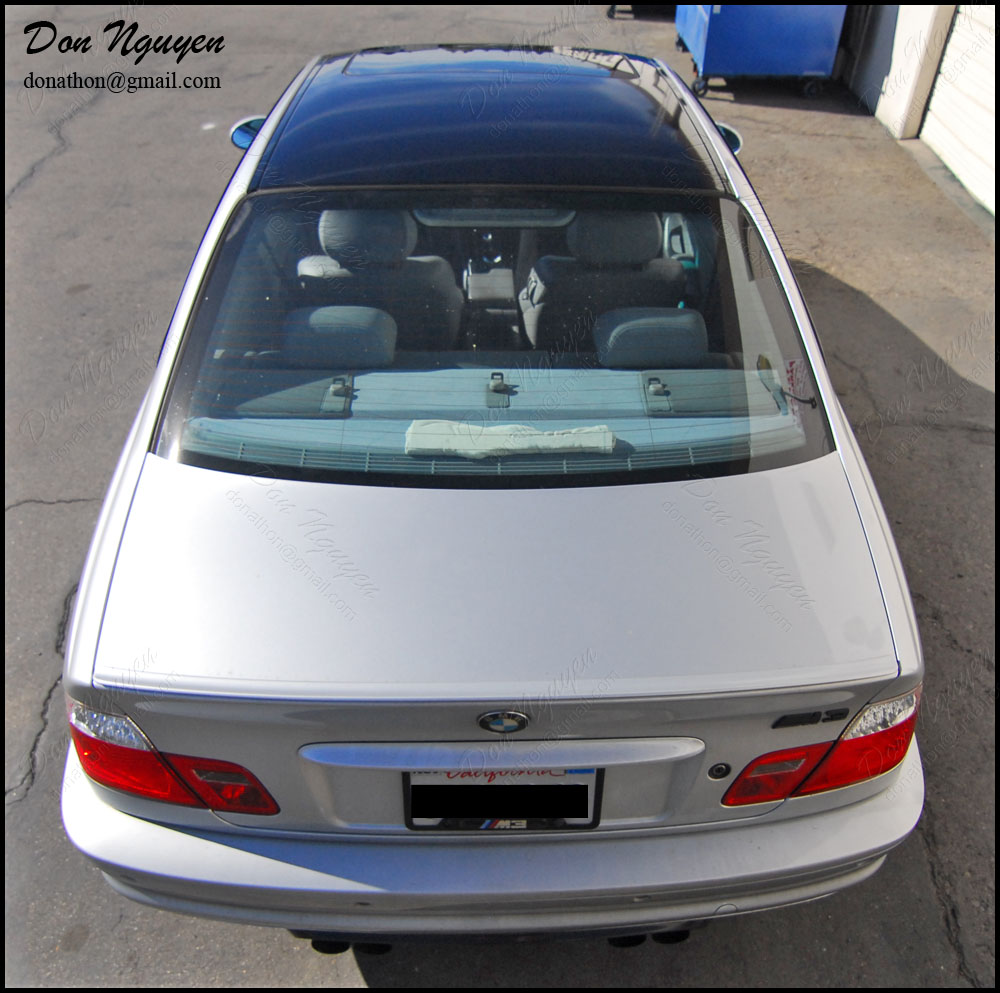
I feel like sometime the only cars I do are BMWs, then I go on a stretch not doing any BMWs for a while. Either way, the owner of this silver E46 BMW M3 brought his car in to have me vinyl wrap the roof of his car in my gloss black vinyl material. It was also a nice change of pace to have a non-white colored car come in for some vinyl work done. The owner of this car drove his car to my shop in Anaheim Hills/Orange County to have the work done. I think the gloss black roof on the silver really contrasts and compliments it fairly well.
Before:

After:


-Don Nguyen
donathon@gmail.com
Before:
After:
-Don Nguyen
donathon@gmail.com
Thread Starter
Former Vendor of MBWorld
Joined: Mar 2008
Posts: 19,593
Likes: 30
From: Irvine, CA
Euros
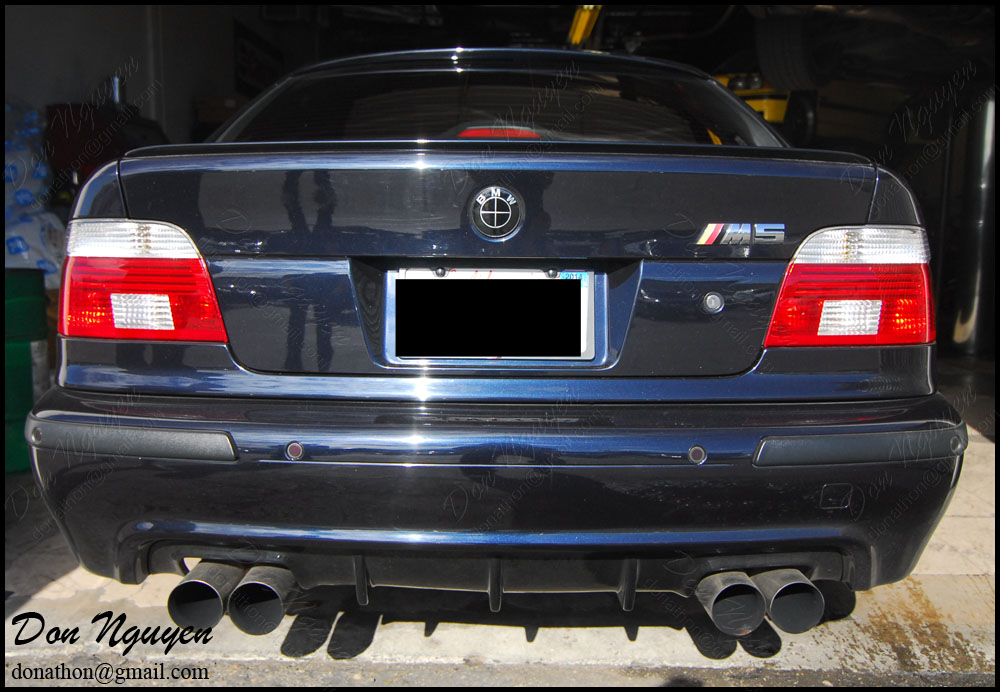
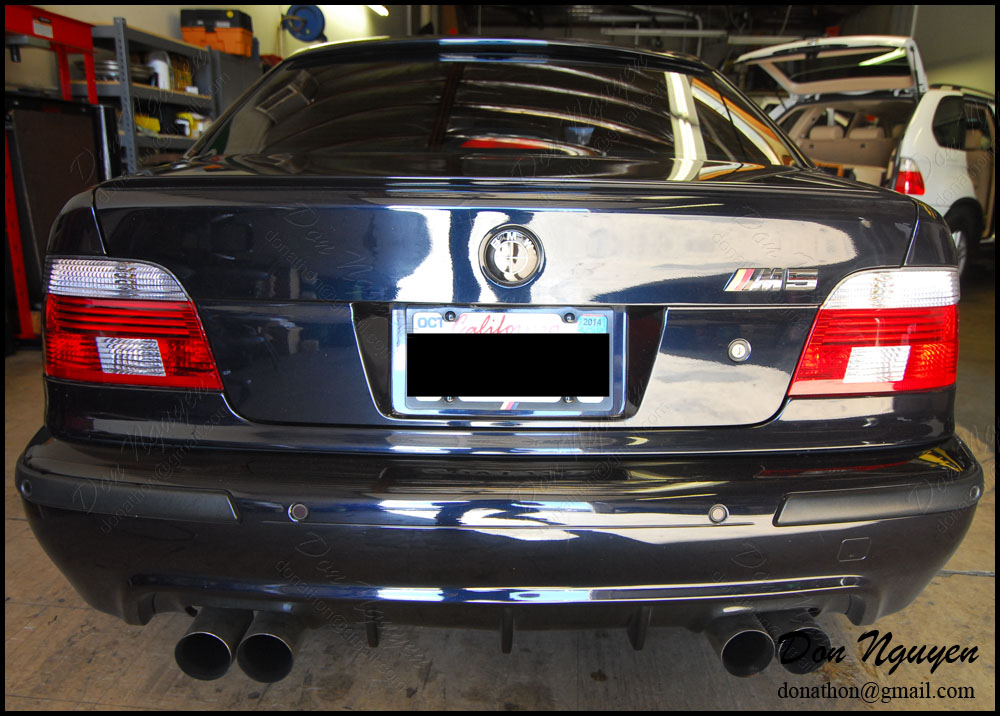
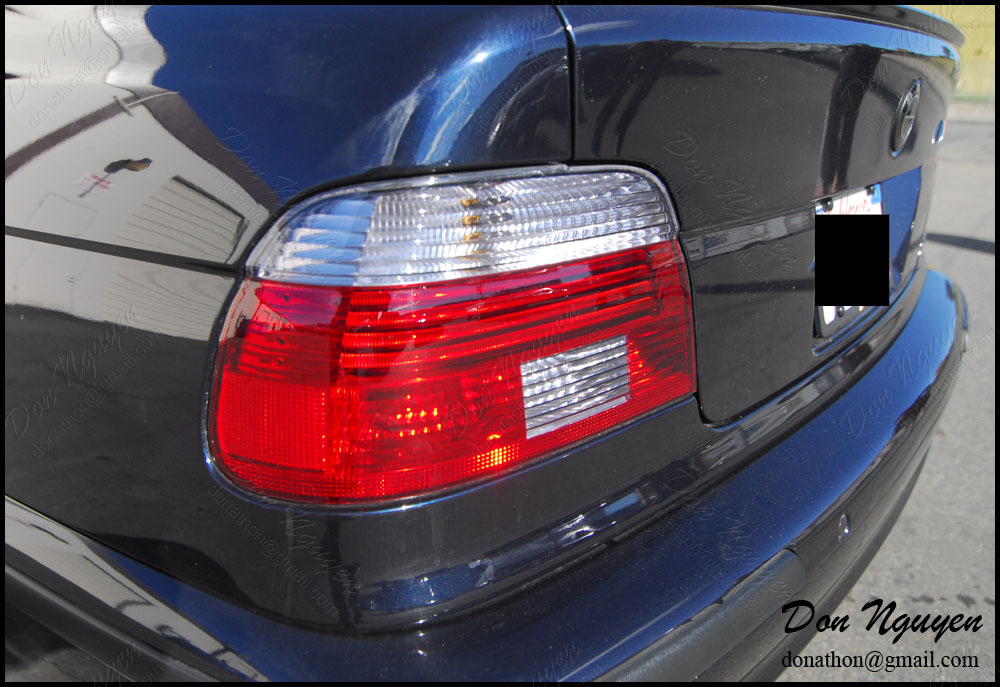
I always do enjoy having modified cars come by to have work done on their cars. The owner of this carbon black BMW E39 M5 came by to have me apply my light tint material to his whole tail light. This is the same material/shade that you see me using in all of my previous pictures of tinted tail lights. It may appear slightly lighter on this specific car, but that’s because on darker colored cars (IE black, dark grey, etc) the contrast between the tint shade and the car is not as big, so it’ll appear lighter than it does on lighter colored cars (IE white, silver, etc). He drove out to me in Anaheim Hills/Orange County to have the vinyl work done.
Before:

Left/driver side tinted - Right/passenger side stock:
After:


-Don Nguyen
donathon@gmail.com
Before:
Left/driver side tinted - Right/passenger side stock:
After:
-Don Nguyen
donathon@gmail.com
Thread Starter
Former Vendor of MBWorld
Joined: Mar 2008
Posts: 19,593
Likes: 30
From: Irvine, CA
Euros
I always take requests, if anyone is trying to look for a specific example of my vinyl work on a certain type of color or car. In this case, I had someone ask me if I could post pictures of blacked out window trim on a red colored car. The owner of this red Audi S5 had me black out his chrome/brushed aluminum window trim with my matte black vinyl material. I believe the owner of this car was from Los Angeles and drove out to me in Anaheim Hills/Orange County to have the work done. I think the matte black provides a nice contrast with the bright color of the car, but I think gloss black would have looked just equally as good in this case.
Before:

After:

Note: The bump that can be seen on the top rear quarter window trim piece is a factory bump/seam and not due to any installation reasons/issues.

-Don Nguyen
donathon@gmail.com
Before:
After:
Note: The bump that can be seen on the top rear quarter window trim piece is a factory bump/seam and not due to any installation reasons/issues.
-Don Nguyen
donathon@gmail.com
Thread Starter
Former Vendor of MBWorld
Joined: Mar 2008
Posts: 19,593
Likes: 30
From: Irvine, CA
Euros
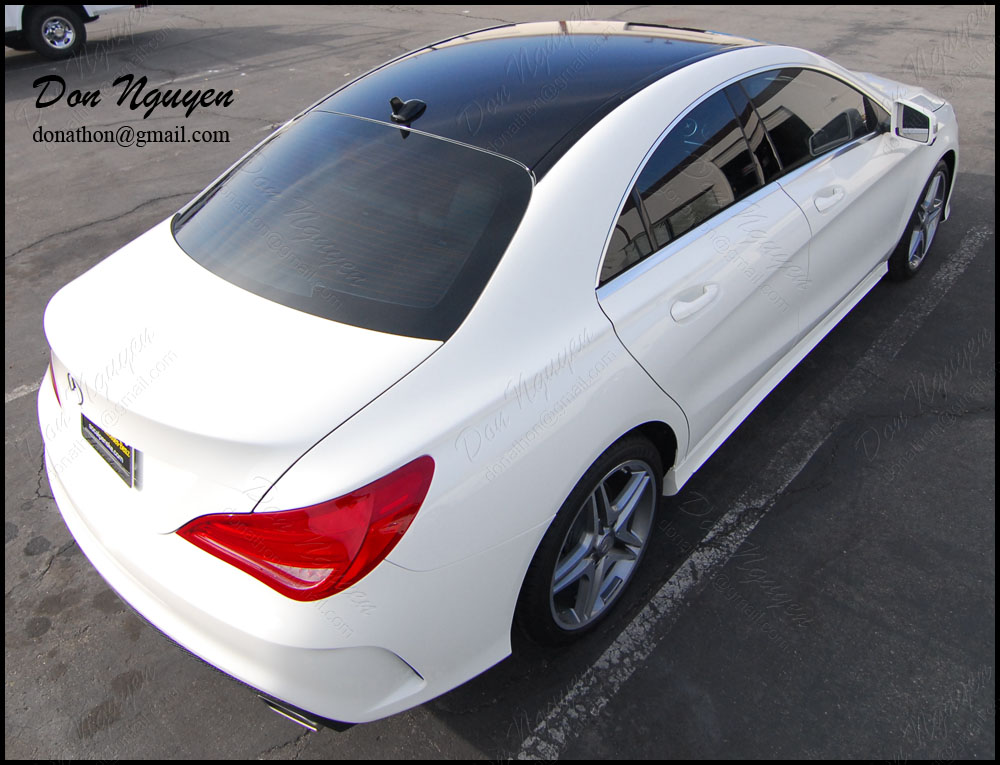
This picture set is a lot shorter than what I normally post, but I get a lot of requests for pictures of carbon fiber wrapped front lips. The owner of this white Mercedes CLA sedan came by to have me wrap the back 1/3rd of his roof in gloss black, to complete the panoramic look of his car. In addition to the roof, he also had me wrap the front lip of his car int he 3M 1080 gloss carbon fiber vinyl material. Due to the size of his front lip, I had to do it in three different pieces/sections. I decided to make two seam lines that lined up/matched two edges of the bumper’s lower grill. Unfortunately, due to how late it was when the owner of this car came, it became dark very quick and it was hard to photograph pictures of the car once it was done with the lighting that was available inside. The owner of this car drove to me in Orange county/Anaheim Hills from Los Angeles to have the work done.
Before:
After:
-Don Nguyen
donathon@gmail.com
Before:
After:
-Don Nguyen
donathon@gmail.com
Thread Starter
Former Vendor of MBWorld
Joined: Mar 2008
Posts: 19,593
Likes: 30
From: Irvine, CA
Euros
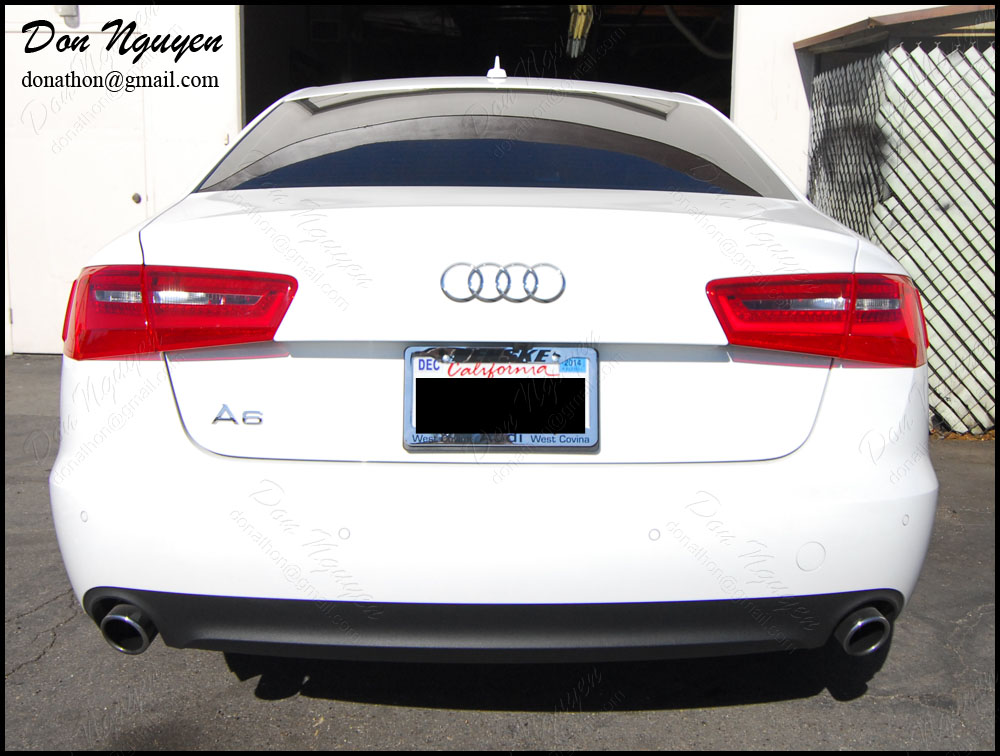
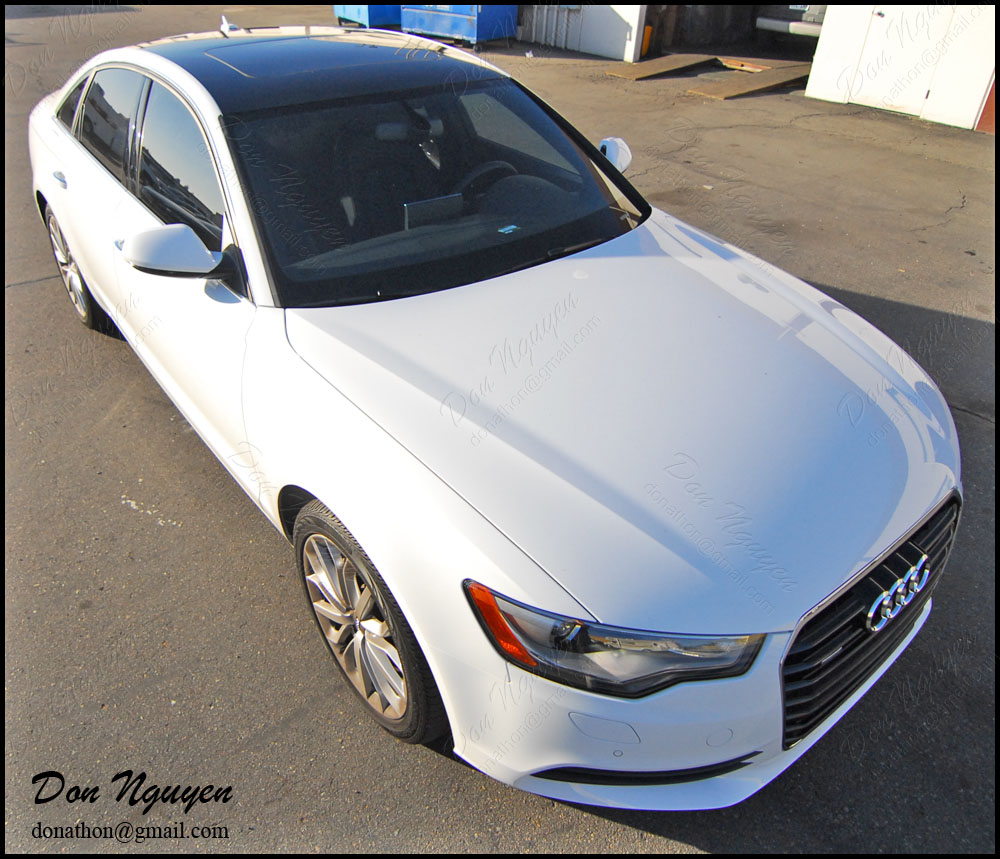
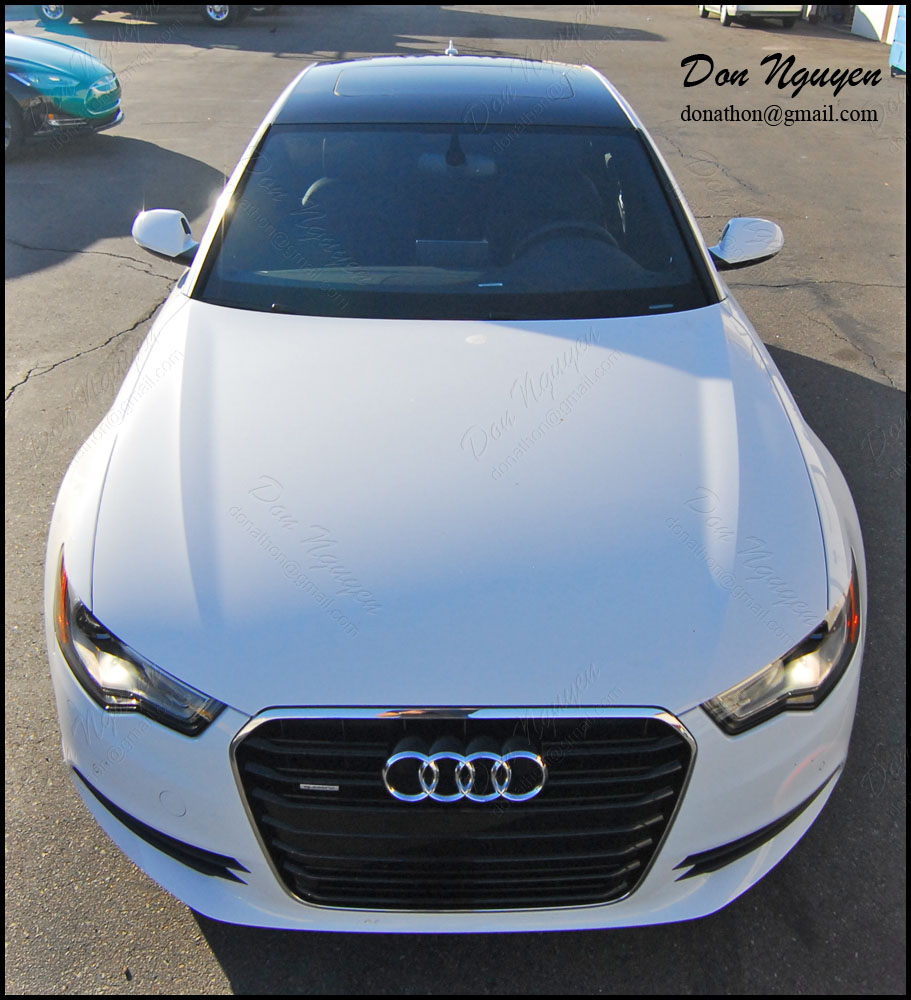
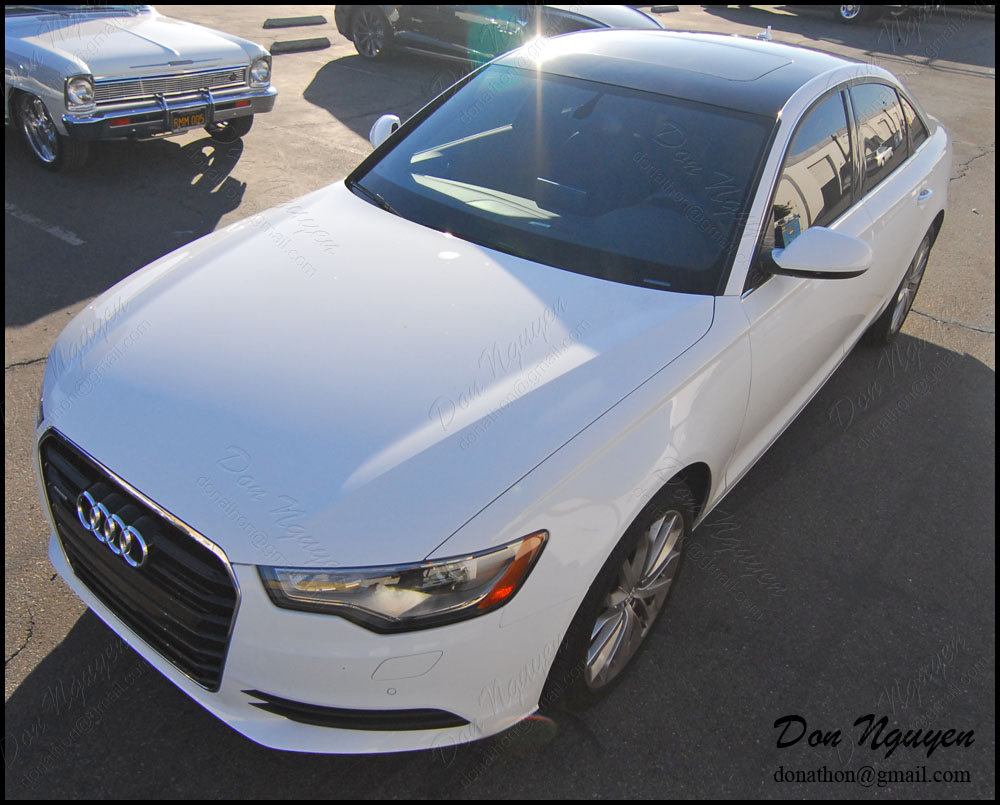
For this white Audi A6 sedan, I vinyl wrapped the roof in my gloss black vinyl material and also lightly smoked/tinted the tail lights of his car. I liked the way this turned out, because the changes with the gloss black roof and lightly tinted tails really gave the car a different look without making it look too modified. If you didn’t know or didn’t look very closely, most would probably have thought it came from the factory like this. The owner of this car brought his car out to me in Anaheim hills/Orange county to have the vinyl work done.
Before:


After:


-Don Nguyen
donathon@gmail.com
Before:
After:
-Don Nguyen
donathon@gmail.com
Thread Starter
Former Vendor of MBWorld
Joined: Mar 2008
Posts: 19,593
Likes: 30
From: Irvine, CA
Euros
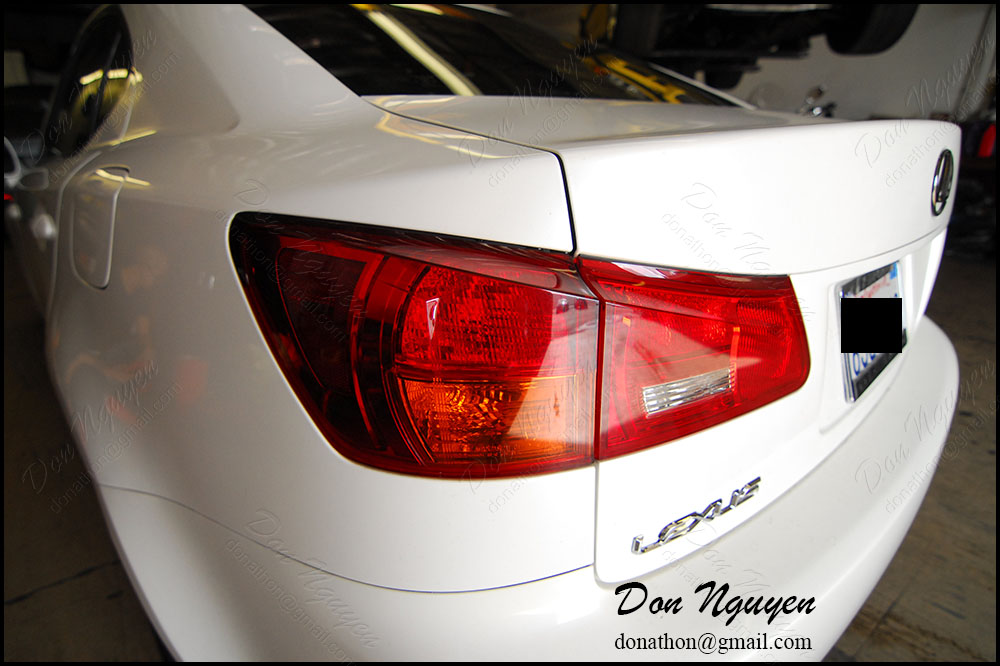
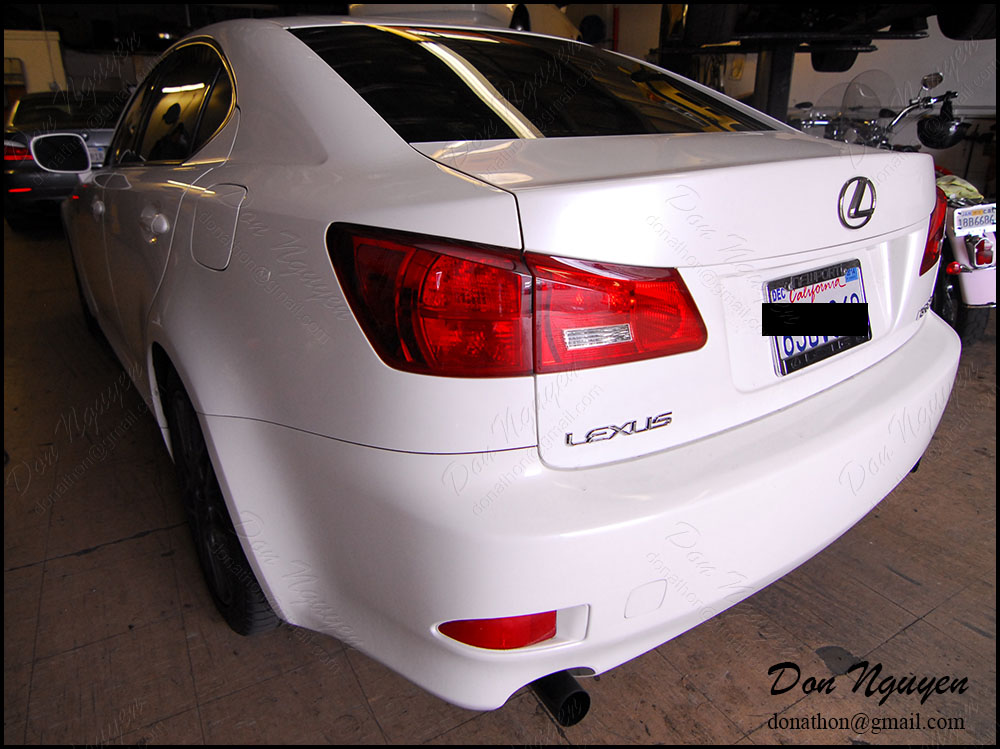
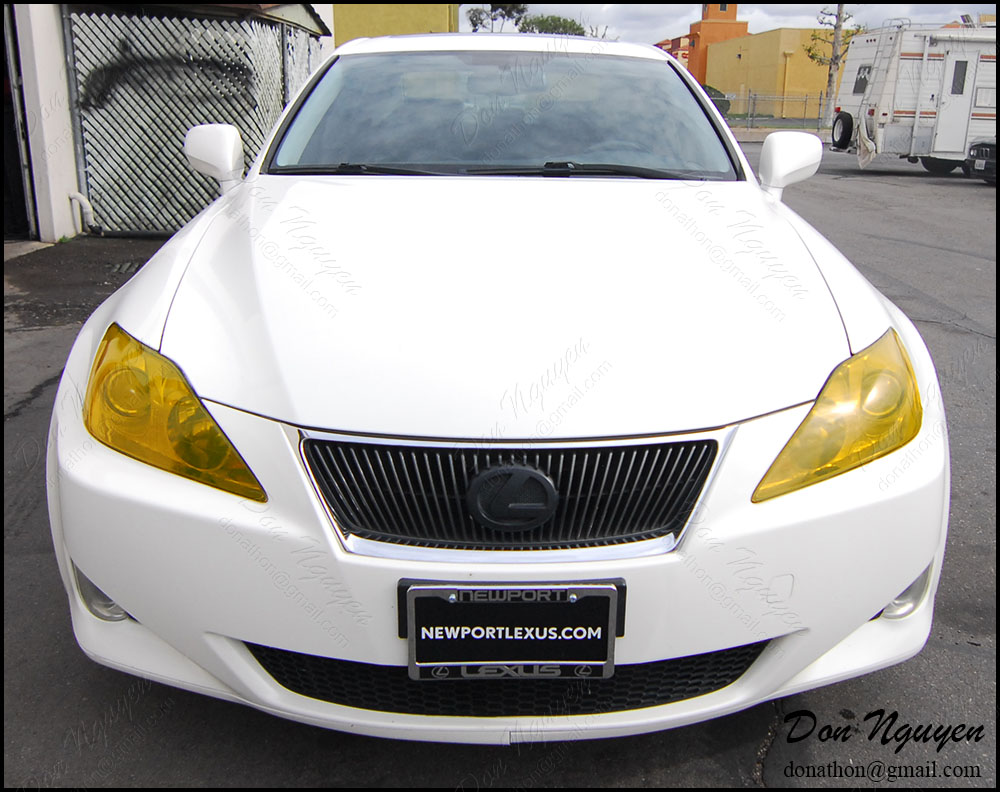
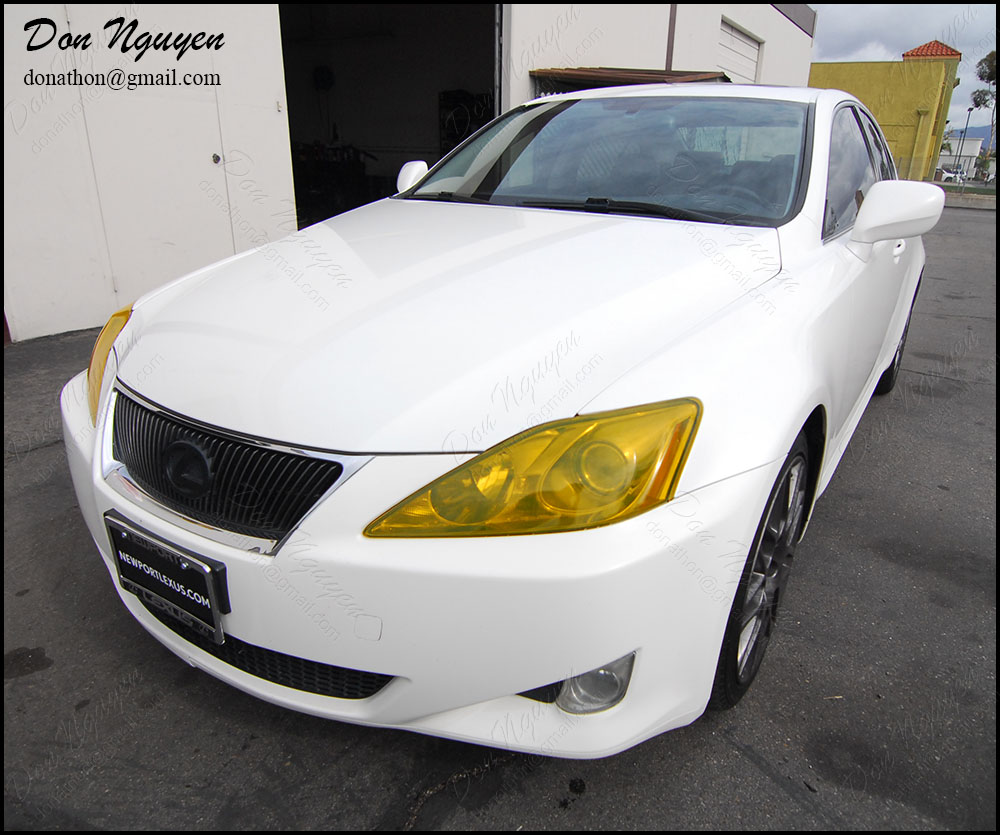
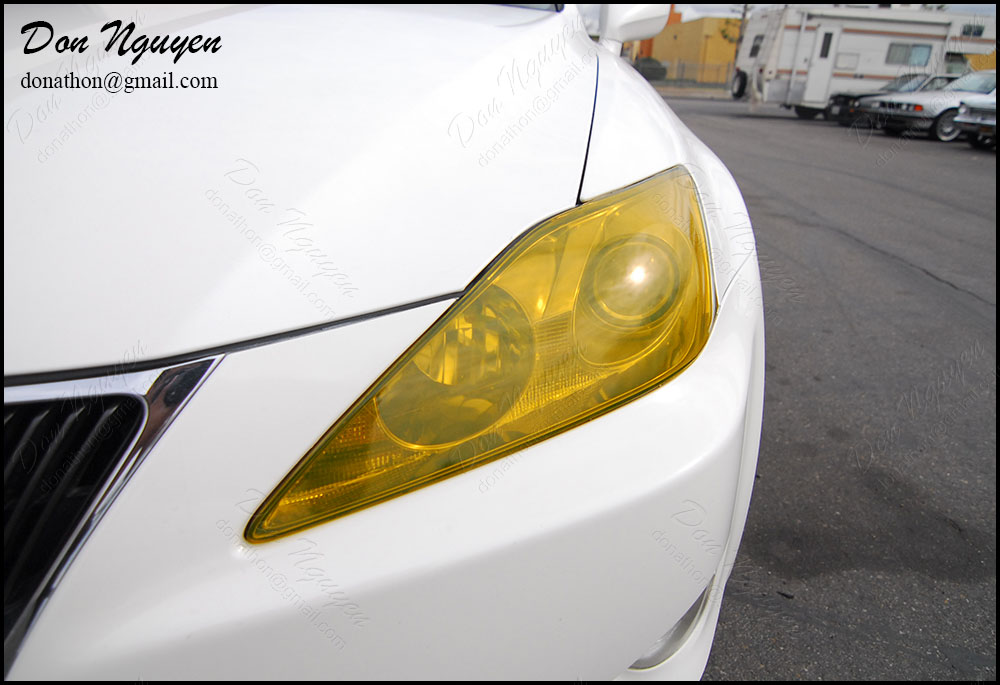
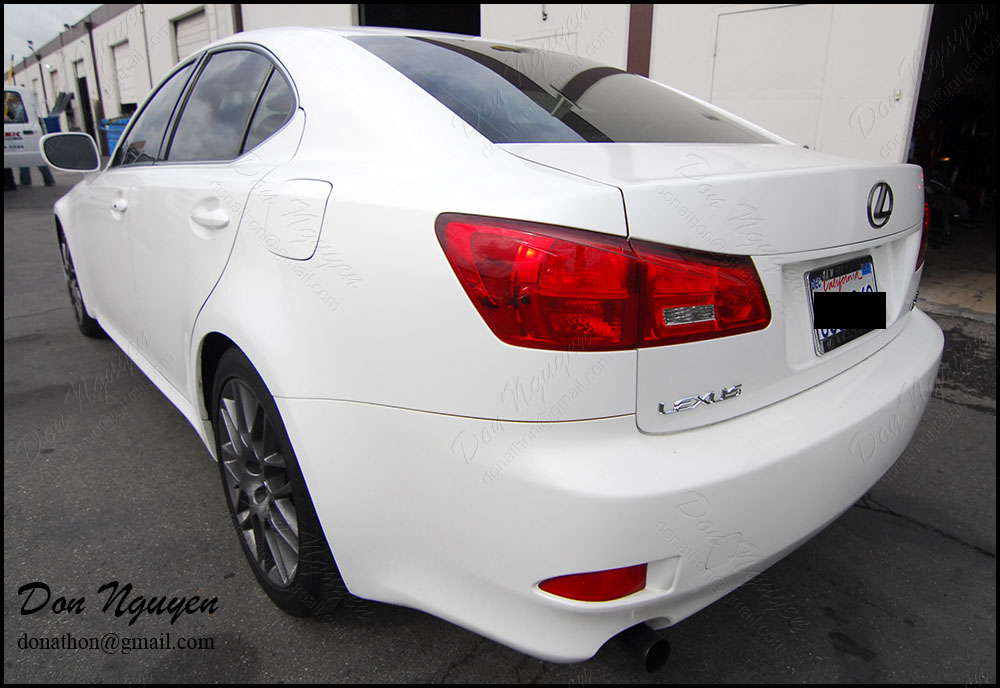
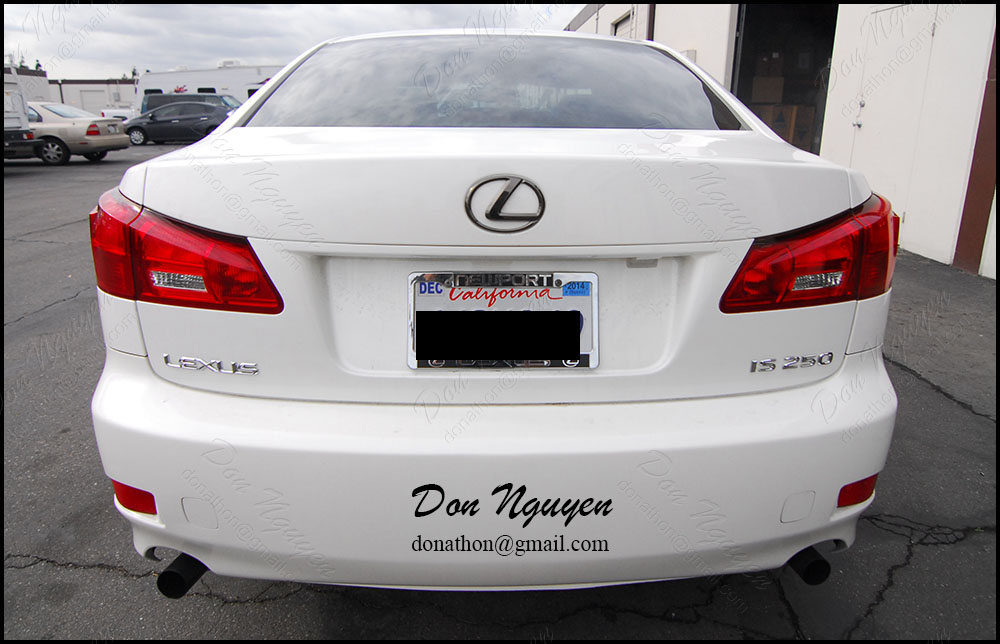
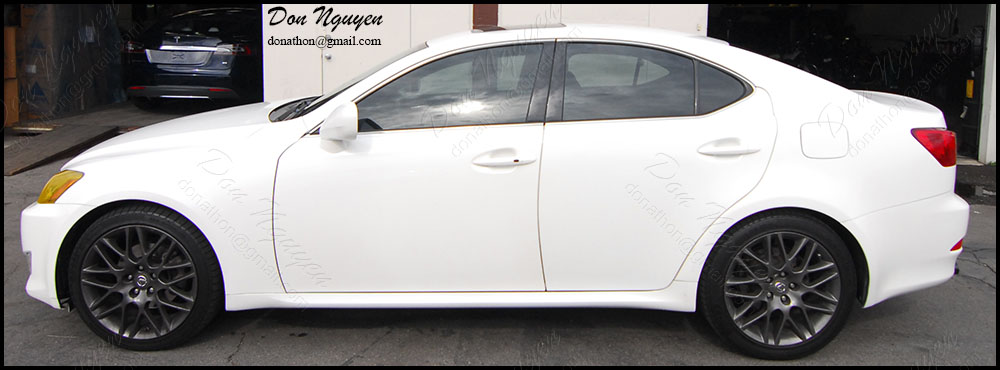
I know the before/after differences may not show up well in the pictures, but for those who own these cars and are familiar with it, I am sure you can see/notice the differences. The owner of this white Lexus IS250 brought in his car to have me apply a clear red transparent film over the orange amber portion of his tail lights. This gives the tail lights a nice consistent red tone/finish to the entire tail light, without having the random orange amber break up the tail light’s lines. In addition to the tails, I also applied a clear transparent yellow film to his head lights. I typically use the yellow for fog lights, but I have had quite a few requests for the yellow to be applied on head lights in the past and lately.
Before:
After:
-Don Nguyen
donathon@gmail.com
Before:
After:
-Don Nguyen
donathon@gmail.com


