Noisy Air Conditioner ?? Stepper Motor Replacement / Clicking & Hissing

 02-23-2016, 01:11 AM
#576
Junior Member

I might have missed it somewhere in this thread, but has anyone had the issue of hot (well, warmish) air blowing at the foot well and cold air blowing at the dash and windshield when the heater is on? I just bought the car and it's my first Benz so I'm hoping there's some magical trick I'm not aware of that will save me a lot of work. Honestly, these climate controls are not intuitive so I wouldn't be surprised if I'm just doing something wrong.
 02-23-2016, 08:01 AM
#577
Junior Member

Join Date: Jan 2016
Posts: 17
Likes: 0
Received 0 Likes
on
0 Posts
C320 4matic wagon
This could be caused by the fresh air vent designated by the blue thumb wheel between the center louvers on front dash. i think it is fresh air. Either shut it completely off or blend it in. I am discovering different things also. Good Luck
04-17-2016, 11:29 PM
#578

Clicking "again"
My C320 still drives great, but the HVAC is really driving me crazy. It is clicking again... for the third time.
Which actuator is the most likely suspect?
1) Clicking from somewhere right behind the instrument cluster and very little is blowing to the windshield. The clicking isn't loud and will go away after 2-3 mins... seems to go away sooner in warm weather. Would this be M2/6?
2) This one isn't clicking, but no air in the passenger side footwell. Would this be M2/11?
Are any of there easy to get to?
The first clicking happened some 7 years ago. It costed me >$1000 to fix. Second time happened about 5 years ago. I decided to do it myself and it took me 2 whole days. If I were to go through it again, I'll at least buy a bunch of control arms and replace every single one along the way.
04-17-2016, 11:45 PM
#579
MBWorld Fanatic!

 04-19-2016, 02:18 PM
#580
If it clicks at motor start and then goes away after about 10 times it's the footwell flaps. They cycle after each start up to clear the air in the cabin and continue cycling for a bit if they don't reach their limits....like when an arm is broken. It's really hard to tell by sound which motor/arm is the culprit even with the dash off because the noise transmits throughout the whole plastic HVAC ducting system. The only way I could tell was by pulling the plug on the motor and hearing it stop.
+1 Good idea and my recommendation as well. I finally gave up after 6 dash tear downs over a 12 year period and bought another car
+1 Good idea and my recommendation as well. I finally gave up after 6 dash tear downs over a 12 year period and bought another car
Thank you. Would the fact that there's very little to no air blowing to the driver side windshield (passenger side works fine) suggests a particular actuator is going bad?
I can afford to replace all the flaps, in the hope the motors themselves are good. Replacing all the motors are too expensive.
04-19-2016, 02:50 PM
#581
MBWorld Fanatic!
04-20-2016, 03:28 PM
#582
Just want to make sure I understand correctly.
- Is A2038300033 the actuator arm the motor clutch?
- Do all the actuator have A2038201642 and A2038300033?
- It looks like I can use A2038300032 to replace broken gear inside A2038201642. Is that correct?
- After further reading, I believe M2/8 is the bad one. Can I reach it without taking apart the whole upper dash?
- M2/11 controls the passenger side footwell. Is it right that I have to take apart the whole centre console to reach it?
04-20-2016, 03:53 PM
#583
MBWorld Fanatic!
No. The clutch is inside the motor and can't be replaced separately.
Not sure about the part numbers but every flap has an actuator (white plastic piece the motor turns) and a servo motor.
Can't relate to the part numbers
I didn't keep my diagnostic and part layout charts so I'm not sure. If M2/8 is one of the window defrost flaps yes you must remove the upper dash. You can reach the plug on the passenger side to disconnect it though with a
really long screwdriver.
Yes
Not sure about the part numbers but every flap has an actuator (white plastic piece the motor turns) and a servo motor.
really long screwdriver.
Yes
04-20-2016, 04:13 PM
#584
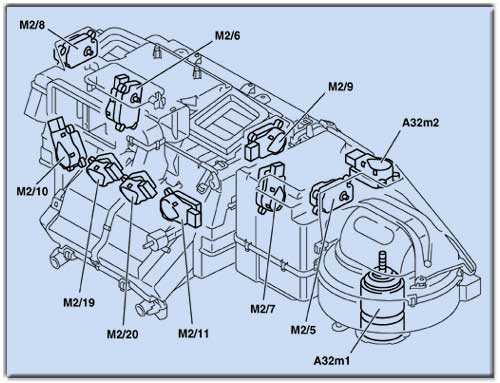
Thanks. M2/8 is the one at the upper left in the diagram. Do I need to remove the instrument cluster to reach it?
This is A2038300032: http://dc609.4shared.com/img/kI98qDb.../A2038300032-1. It looks like one can replace broken gears if you pop open the stepper motor box. Do you recall?
04-20-2016, 04:58 PM
#585
MBWorld Fanatic!
It's more difficult to maneuver inside the dash than you think, even with the dash removed. Very cramped. I never removed the top dash but I think that would help a lot with access to the actuators/flaps/motors up top. One good thing is the ducting that most everything is mounted on is plastic and you can bend it temporarily to get to things so don't be afraid to do so.

The following users liked this post:
MBruto (10-15-2016)
10-20-2016, 10:08 PM
#588
I finally got to remove the lower and upper dash. I fixed the passenger side footwell stepper motor (M2/11), and the drive side defrost motor (M2/8). Yes, I needed to remove the lower dash, upper dash and the frame. Good that I haven't put everything back together yet. While it has air going to the windshield in defrost mode, if the defrost mode isn't on, no air goes to the windshield. I.e., no air coming out if the air is directed to go up the windshield. If the air is directed to go to the top and footwell, air is only coming out from the footwell. What could be the problem? Fresh air motor? Fresh air/recirc motor, or blend air motor? Please help!
10-25-2016, 03:19 PM
#589
Newbie

 05-10-2017, 04:51 AM
#590
MBWorld Fanatic!
Join Date: Dec 2003
Location: Vancouver, BC, Canada
Posts: 3,047
Likes: 0
Received 197 Likes
on
188 Posts
2003 C230K Coupe Orion Blue
Just had the M2/16 (also known as M2/8 or the defroster motor) crap out on me. Managed to get it replaced after removing the upper dash. What an exercise this one was.  Motor is located behind the instrument cluster. The really maddening part is that the motor can be seen but not accessed with the cluster removed.
For the life of me, I could not remove the steel frame under the dash. Can someone shed some light on this? I read the W209 PDF but don't think the W203 has a bolt on the exterior of the car? Unless I'm looking in the wrong place. The problem I had was that the frame seemed to be attached to the heater box. I removed 3 10mm nuts (2 behind the radio and 1 by the blower), but the heater box still jiggled with the frame. I gave up and changed out M2/16 by using a T20 ratchet and screwdriver at an offset angle, trying not to strip the motor fasteners.
Just like my first dead actuator (M2/15), the problem was traced to a broken gear. I could hear the motor turn, but nothing happened as the other gears were spinning right in the gap in the damaged gear.
Does anyone know if the newer Behr actuators have more durable gears? It seems really dumb that these gears wear out so quickly. Almost wondering if I should just change out the other 4 as well, before something else breaks.
Motor is located behind the instrument cluster. The really maddening part is that the motor can be seen but not accessed with the cluster removed.For the life of me, I could not remove the steel frame under the dash. Can someone shed some light on this? I read the W209 PDF but don't think the W203 has a bolt on the exterior of the car? Unless I'm looking in the wrong place. The problem I had was that the frame seemed to be attached to the heater box. I removed 3 10mm nuts (2 behind the radio and 1 by the blower), but the heater box still jiggled with the frame. I gave up and changed out M2/16 by using a T20 ratchet and screwdriver at an offset angle, trying not to strip the motor fasteners.
Just like my first dead actuator (M2/15), the problem was traced to a broken gear. I could hear the motor turn, but nothing happened as the other gears were spinning right in the gap in the damaged gear.
Does anyone know if the newer Behr actuators have more durable gears? It seems really dumb that these gears wear out so quickly. Almost wondering if I should just change out the other 4 as well, before something else breaks.
Last edited by slammer111; 02-25-2021 at 05:31 AM.
05-10-2017, 11:33 AM
#591
MBWorld Fanatic!
Why? Shouldn't have to while replacing anything.
Yes! The replacement gears are sold in packs that contain all of them now.
Yes! The replacement gears are sold in packs that contain all of them now.
05-10-2017, 11:43 AM
#592
MBWorld Fanatic!
Join Date: Dec 2003
Location: Vancouver, BC, Canada
Posts: 3,047
Likes: 0
Received 197 Likes
on
188 Posts
2003 C230K Coupe Orion Blue
The frame is in the way for a couple of the motors, such as M2/8. The videos online show people removing the frame, which makes it much easier to get to most of the motors.
Are we talking about the same thing? I know there are new linkages out which my car had done under warranty, but how about the internal gears inside the actuators?
Are we talking about the same thing? I know there are new linkages out which my car had done under warranty, but how about the internal gears inside the actuators?
05-10-2017, 11:52 AM
#593
MBWorld Fanatic!
I was talking about the linkage and gear pack. You can't buy the internals of the stepper motors, just the whole motor. But if I had the upper dash off I would replace those motors that can only be accessed that way.
05-21-2017, 09:36 PM
#594
Yes, the frame is blocking access to two motors. I needed to remove the frame to get to them. To take off the frame, you need to remove the wiper assembly. Then you'll see a bolt kind of in the middle of the car, 8 inches of so below the wiper. Removing that will allow the frame to get off. Taking off the frame is easy, putting it back is difficult. You need three people... one to lift the frame and hold it to the proper height before the other person can bolt it in.
06-01-2017, 03:07 AM
#595
Member

Join Date: Jun 2008
Location: Arizona
Posts: 132
Likes: 0
Received 1 Like
on
1 Post
1999 Civic Hatchback, 2002 c240, 2003 CLK 500
Before I jump into this job, I live in Arizona, and though my feet might be warm, I would rather have air blowing at my face..
Right now I have a clk 500 w209 that only blows air to the footwell and the backseat of the car, and blows to the backseat very strong.
Is there a way to just close the footwell permanently and force the air up?
If not, which motors do you think I need to replace, both sides are the same, i hear NO CLICKING (like I used to in my w203 before the fix) the footwell's just stay open even if i direct air to the middle/top
thanks for any help or suggestions
 04-09-2018, 11:59 AM
#597
Newbie

Join Date: Sep 2012
Posts: 9
Likes: 0
Received 0 Likes
on
0 Posts
C220
No hot air
Hi guys
I�m wonder if you can help me on this...
I have a Mercedes CLC from 2008 and its basically the same CL203 or W203. I was driving on motorway and them there came very cold air.. increase the temperature and nothing...
I�m presume that a "flap" or a flap actuator just gone... there is any flap to control only the hot air? Because the cold air from air cond its okay and give cold air...
Or is something different like a valve?
Do you know the Code in Star by ODB to the error?
Thanks
04-20-2018, 01:07 AM
#598

Clk320, 1998
This is for the steady clicking noise in the 2001-2004 C230, C240, and C320 that comes on when starting the car or if you notice that you are not able to get the a/c to blow on the driver's feet or if it will not turn off when adjusted to do so. It can get stuck in either position.
If someone in the Dallas/Ft. Worth area would like me to do this to their car and wouldn't mind me taking their car apart and taking pictures of this process for the other people here, please contact me.
My disclaimer is as follows:
These are just my own personal instructions from my own personal experience. If you can not follow the instructions or do not under stand them, ask questions. If someone else wants to take pictures and send them to me as they are doing this procedure, I will gladly make this alot clearer to the rest of you. Also, I am not responsible for you tearing your dash up or breaking items during the removal or installation of this procedure. If you want to pay me to do this, I will gladly take some $$ in turn for my time and knowledge.
So anyways, here it goes..
Item needed:
(1) Footwell flap linkage kit with 2 linkage arms (will edit with the part# tomorrow)
*Note - 99% of the time you do NOT need the A/c stepper motor*
Tools you will need:
(1) flashlight of some kind
(1) 10mm socket (6 or 12pt)
(1) 3/8" ratchet
(1) 6-12" 3/8" extension
(1) T35 Torx socket (3/8")
(1) T20 torx screwdriver
(1) plastic wedge
(1) flat tip small pocket screwdriver (my most used tool)
1. Get in the driver's seat and turn off the car and the radio. I usually listen to the radio for a few minutes before removing it during the process.
2. Pop open the ashtray lid and empty the ashtray.
3. Use either the plastic wedge or your fingers to grab ahold of the front of the shifter surround trim and gently pull it up. Unplug the connectors from it and remove the shifter knob with it. (set all of this in the passenger seat so you won't misplace anything).
4. With the ashtray open, grab ahold of the front of the other trim piece around the shifter that goes from the ashtray to the cupholder. Pop this trim piece off and set it aside.
5. Next open the cupholder area and reach down inside it with either the small screwdriver or some small but long hook and remove the rubber insert where you would set a second cup/drink. (Most people seem to use this as a trashcan or coin holder). The easiest way is to pry it loose at the rear and reach down inside with your fingers and just pull the insert out.
6. There is a small tab on the cupholder that you need to pull slightly up on to pop it loose and then it just twists out and can be removed and set aside. After this, you will notice 2 small tabs at the front of this section that can be pried loose and you can fold the front half of the cupholder section back exposing (2) of the (4) 10mm screws/bolts you must remove.
7. Open the center console lower area and empty it. Next, remove the lower cloth section mat at the bottom of this area and it will expose the remaining (2) 10mm bolts you must remove.
*****Notice: if you have the rear A/C option, you will need to remove the covers for it and then unscrew the rear a/c blower using the T20 torx screwdriver. Next unplug it and set it aside and then remove the (2) exposed black 10mm bolts.
8. ****Notice - engage the parking brake for you and your vehicles safety. Now you should see the black tab at the right rear of the shifter base. Press it forward and pull the gear selector back into neutral or drive. If you have not engaged the parking brake, do so NOW. Grab the small flat tip screwdriver and gently pry the two exposed tabs on the ashtray and pull the assembly up and out of the way. Also, don't forget to unplug it and then set it aside.
9. There is a small black plastic hump shaped cover under where the ashtray sat. Use your fingers to pull them off and that will expose the T35 screws. Be very careful in this next step to not damage your interior. Using the T35 socket on your ratchet, set it to loosen and turn the screw approximately 90 degrees. Once you start feeling resistance, then you need to stop because that is far enough. If you continue to try to loosen these screws past this point, you will damage the center console. Using the flashlight again, you can look under the a/c controls and you will see or feel (2) screws. Using the T20 torx screwdriver, you should remove them. This will allow you to pop the center console loose and move it back and out of the way. You will not have it completely out of the way, just enough to maneuver around it.
10. Next, look into the center A/c vents on the dash above all the buttons above the radio. On the left side of those vents, you will see small plastic tabs. Using the small flat tipped screwdriver, GENTLY pry the lower tab on each side and why holding it away from its proper placement, rotate the vent up until it completely stops and exposes a thin open slit under the vent. Repeat for the other center vent. Using the flashlight, look under the vents and at each side you will see a small torx screw. Now using the T20 torx screwdriver, loosen both screws but DO NOT remove them. They should be held into place by the A/c vent assembly. However, if they do come completely out, just try to push them back into place or use a small magnet to remove them. Now pop the center A/c vents back into their normal positions. Again, using the small flat tip screwdriver, now GENTLY pry against the top tab pressing away from the side and rotate the vent completely down again exposing a small slit but not on the top side of the vent. Grab the flashlight again and look into this area. You will notice small tabs/slits on the top of the a/c vent assembly on the inside. Grab the small screwdriver again and GENTLY pry downwards on the small section closest to you and at the same time, start pulling the A/c vent assembly out of the dash. Sometimes you have to pull those tabs a bit further down than you would think. Also, if you have the illuminated thumb wheels for the vents, you will now have to unplug this one, but don't forget about it.
11. Again, grab the flashlight and now look under the remaining section of the wood trim around the Radio/Command. You should be able to see a small metal loop on either side. Use one of the screwdrivers to pop each one down but not completely out. Doing this, should release the remaining section of the wood trim around the radio. Unplug each connector, but again, mark or remember where each connector came from. There should be atleast 3 connectors depending on your options.
12. Grab a short stool or sit down on the drivers door sill plate. Take the T20 torx screwdriver and reach up under the bottom side of the dash on the drivers footwell area. You should be able to feel a total of (4) screws straight across. Remove them. Now pop down the plastic cover but do not remove it. This will expose the remaining (1) screw attached to the bottom of the dash. Remove it. Using the plastic wedge, pry off the side cover to the dash where the drivers door would meet the dash. There will be a few more screws, remove them. Take the gear shifter and place the vehicle back into PARK. Pull the E-brake handle out to release the brakes and you will find another screw under there but above the handle, remove it. There will be a small metal tab on the side of the Light switch, press it in and remove the light switch after unplugging it. This will expose anther (2) screws in the top of this opening. Pulling out the E-brake release handle again, you can pop the cable loose, but PLEASE take care in how this fits on. Now taking the small flat tipped screw driver or the special tool to remove the plastic ring around your Ignition switch, Carefully do so. Again, I take no responsibility for you scratching up your own interior.
13. Back to the radio area. Take the torx screwdriver and remove all remaining screws from around the radio and dash pieces in this opening. If you have followed the directions up to this point, you will have (9) screws remaining. Remove them all. At this point, you will be able to pop the lower dash section under the instrument cluster/steering column area down and out of the way.
14. Now open the glovebox and there will be a small section of dash remaining between the glovebox opening and the large opening where the radio used to be. You should be able to pry up one of the exposed edges by where the radio used to be and sharply but not too strongly, pop this section loose and away from the dash.
15. By doing this, you can now remove the vents on each side of the center console and set them aside. They are long black plastic air tubes. Now taking the flat tipped screwdriver (you may need a slightly larger/longer one), you can pop the two tabs that hold the black cage to the dash support. Remove it and set it aside.
16. Now if you are in a well lit area, you can see the A/c stepper motor now exposed behind the inner dash support/brace on the left side. Picture where the radio was and now look up and left of it and behind the brace. It is held in place with (3) small silver screws and has the broken linkage between it and the main A/c / heater case. Remove the screws and you should be able to maneuver it around and unplug it. Remove it and you will find that the linkage is either cracked where it connects to this stepper motor or will have fallen off already and shown you what was wrong.
17. After reinstalling everything, and getting everything back together, make sure you have no extra screws and that everything is functioning as normal. To normalize the A/c stepper motors, hold down the Recirc and Front windshield buttons for about 10 seconds or until they both start flashing back and forth. When they are done flashing and you have confirmed everything is working, you are done.
I have a few spare linkage arms at my work and really have no use for them. If I remember correctly, the kit for the 2 linkage arms is about $30. If you would like one, how about $8 each shipped inside the USA. I can also do this entire procedure in less than an hour if you need someone to take care of this for you and you live somewhere in the DFW or Houston area in Texas. Contact me if interested in either.
Also, I may have forgotten a few small details so I will continue to re-read this and go over it in my mind to make sure it is all there. If you have done this before or just notice that I missed something, please let me know.
**** Moderation Edit ****
krazzdav put together a PDF with the write up and all of the pics compiled with each other.....enjoy!!! Unfortunately had to split it up into 3 files to post here.
W203 Air Conditioner Stepper Motor Repair P1 of 3.pdf
W203 Air Conditioner Stepper Motor Repair P2 of 3.pdf
W203 Air Conditioner Stepper Motor Repair P3 of 3.pdf
I have a 1998 clk320 that doesn't blow defrost air. Would this repair be similar?
Thanks
05-01-2018, 09:52 PM
#599
Junior Member

Well since I had the entire dash apart anyway, I looked at this stepper motor issue. I haven't heard any clicking but I couldn't ever get cold air to my feet or barely. Well when I removed the stepper motor to the upper left, a piece of the linkage arm fell off. Oredered 2 more of those and when they get here I'll test the motors again for clicking.
I found some online from a local wrecker here for only $10 each used. That's pretty cheap. Thinking about replacing them both since they are so cheap but they used...tested and QCed but used. Is it worth it if they sound fine to replace them with used ones? Sounds kinda dumb yeah but who knows lol
I found some online from a local wrecker here for only $10 each used. That's pretty cheap. Thinking about replacing them both since they are so cheap but they used...tested and QCed but used. Is it worth it if they sound fine to replace them with used ones? Sounds kinda dumb yeah but who knows lol
05-01-2018, 10:23 PM
#600
MBWorld Fanatic!


