
W203 Door Lock Pogo Fix
 12-19-2008, 08:39 PM
#26
Senior Member
I had to do mine when i got the car, cost was $79.00 for the part and i $.99 for the steel rivets. I never touched the Airbag.
But it is a !!#$%^^ to get that thing out of the Speaker Hole. The old one i took the cover off to get it out of the door. Take a picture of how you get it out of the door or remember the exact orientation so you can get the new one in with out damaging it.
Like the post says above, not for the faint at heart.
 01-04-2009, 09:06 PM
#27
Junior Member

Join Date: Oct 2007
Posts: 35
Likes: 0
Received 0 Likes
on
0 Posts
2002 MBZ C320
Thanks so much for the info. I just did my C320's driver side door after 4 months of putting it off. That thing was hard to get out, but once you figure out the trick it its relativly easy to put it back in.. I would have never found the screw for the outside lock without this thread.
01-04-2009, 09:34 PM
#28
MBWorld Fanatic!
Join Date: Jun 2006
Location: Long Island, NY
Posts: 2,140
Likes: 0
Received 0 Likes
on
0 Posts
C3Twon AWD Jumpofffff
i've had this problem happen to my drivers side door when i first got the car and earlier last year for my front passenger door
PITA
PITA
01-04-2009, 11:22 PM
#29
Super Member
Join Date: Jun 2005
Location: So. Cal.
Posts: 651
Likes: 0
Received 5 Likes
on
5 Posts
'02 C320 Wagon, '78 308 GTS, '06 Highlander Hybrid
Thanks so much for the info. I just did my C320's driver side door after 4 months of putting it off. That thing was hard to get out, but once you figure out the trick it its relativly easy to put it back in.. I would have never found the screw for the outside lock without this thread.
p.s. if you do end up messing with the airbag please be very careful. These literally explode with some serious force. I'm a fireman and many rescue workers have been injured by these things going off unexpectedly.
07-29-2009, 05:29 AM
#30
Junior Member

Join Date: Sep 2005
Posts: 25
Likes: 0
Received 0 Likes
on
0 Posts
W203 C320 & C230k, E36/E46/E90 darksiders
I know this is a super old thread but it helped me out. So I thought I'd add in my 2 cents. I bought 6 steel rivets from MB as well as the actuator. But didn't need that many.
The screw / bolt pictured in this quote is a Torx 15 security bolt. You WILL need a T15 security driver to remove this. The hole is small so even if you have a bit, it won't work unless you have a T-handle or screw driver T15 security bit.
The screw / bolt pictured in this quote is a Torx 15 security bolt. You WILL need a T15 security driver to remove this. The hole is small so even if you have a bit, it won't work unless you have a T-handle or screw driver T15 security bit.
10-29-2009, 01:40 AM
#32
Member
Join Date: Aug 2004
Location: Garden Grove, CA
Posts: 178
Likes: 0
Received 1 Like
on
1 Post
06 Granite Grey c230
I know this is a super old thread but it helped me out. So I thought I'd add in my 2 cents. I bought 6 steel rivets from MB as well as the actuator. But didn't need that many.
The screw / bolt pictured in this quote is a Torx 15 security bolt. You WILL need a T15 security driver to remove this. The hole is small so even if you have a bit, it won't work unless you have a T-handle or screw driver T15 security bit.
The screw / bolt pictured in this quote is a Torx 15 security bolt. You WILL need a T15 security driver to remove this. The hole is small so even if you have a bit, it won't work unless you have a T-handle or screw driver T15 security bit.
i beleive its acutally t-20. i just did it with my pops 2 days ago.
10-29-2009, 12:02 PM
#34
Member
Join Date: Feb 2009
Location: Ireland, co. louth
Posts: 102
Likes: 0
Received 0 Likes
on
0 Posts
c200k
Check out www.euromerc.co.uk i found this site earlier on and has loads of cheap parts. If you's do order just remember its based in the uk so its r/h/d check it out
04-23-2010, 04:00 PM
#35
Senior Member

I had the pogo stick effect as well.
I took it to an indy shop to take care of this problem and at the same time replace the broken door handle. I was going to take care of door handle myself but kept putting it off (too lazy). This time I killed 2 birds with 1 stone.
total $270 ($80 labor)

I took it to an indy shop to take care of this problem and at the same time replace the broken door handle. I was going to take care of door handle myself but kept putting it off (too lazy). This time I killed 2 birds with 1 stone.
total $270 ($80 labor)
Last edited by Taiwanese; 04-23-2010 at 04:06 PM.
 04-23-2010, 06:35 PM
#38
Senior Member
04-23-2010, 06:37 PM
#39
Senior Member
04-23-2010, 11:10 PM
#40
MBWorld Fanatic!
Join Date: Mar 2007
Location: Houston, TX
Posts: 1,948
Likes: 0
Received 3 Likes
on
2 Posts
C32/C55 AMG
I know this is a super old thread but it helped me out. So I thought I'd add in my 2 cents. I bought 6 steel rivets from MB as well as the actuator. But didn't need that many.
The screw / bolt pictured in this quote is a Torx 15 security bolt. You WILL need a T15 security driver to remove this. The hole is small so even if you have a bit, it won't work unless you have a T-handle or screw driver T15 security bit.
The screw / bolt pictured in this quote is a Torx 15 security bolt. You WILL need a T15 security driver to remove this. The hole is small so even if you have a bit, it won't work unless you have a T-handle or screw driver T15 security bit.
Here's a link to my how to: https://mbworld.org/forums/c32-amg-c...l-removal.html
04-24-2010, 03:38 AM
#41
Member
Join Date: Mar 2009
Location: Redwood City, CA
Posts: 105
Likes: 0
Received 0 Likes
on
0 Posts
2003 C230K Sedan
I know these are old post, but I was wondering if some one could show me what the torx security sockets look like. I did the job myself, but I was not able to secure the handle in. I couldn't get an extension long enough to fit and the bit's would not fit in the area because of the surround.
Here's a link to my how to: https://mbworld.org/forums/c32-amg-c...l-removal.html
Here's a link to my how to: https://mbworld.org/forums/c32-amg-c...l-removal.html
 Uploaded with ImageShack.us[/IMG] the security bits sets shouldn't cost much or maybe a trip to sears for a set of the T-Handle http://www.sears.com/shc/s/p_10153_1...=torx+t+handle type might help you that PIA screw.
  Hope this helped you find the tool. GL!
Last edited by MbzC230K; 04-24-2010 at 03:56 AM.
10-02-2011, 12:22 PM
#42
Newbie

Join Date: May 2007
Location: Toronto, Canada
Posts: 3
Likes: 0
Received 0 Likes
on
0 Posts
2003 C230 coupe, 2006 C350 ss
A few additional steps/clarifications that I found the hard way while replacing the lock on a coupe (thanks to tango3d for the original instructions which I have modified below):
1. Pull off the tweeter cover on top of door panel near front of window, no need to disconnect wire, just let it hang down.
2. Pull off SRS badge and remove the spline screw behind it.
3. remove the door latch plastic cover (1 screw)
4. At the bottom of the door pull handle next to the armrest there is an oblong slot, insert a flat screwdriver and prise the top half off, it is just clipped in. there are 2 spline screws behind it, remove them.
5. Using a plastic wedge of some sort or just by hand and starting at the lower part of the door latch, prise off the lower half of the door panel there are 6 or 7 plastic clips which hold it on, (I did this by hand and without breaking any but it may be worth purchasing a few just in case)
6. Lower the window and while pulling the panel slightly towards you, use your other hand to pull the panel upwards from the top starting at the front end, (this is quite tight, but it will come up)
7. panel is now off, pull the plug from the window switch and disconnect the cable from the door handle by opening the handle slightly and pulling up on the hook, the cable can then be removed from the door panel insert.
8. Drill out the 3 pop rivets holding the air bag (do not disconnect the wiring). do not disconnect the airbag, let it hang down or tie it out of the way.
8a) remove the foam covering from the door. Reconnect the window switches and partially raise the the window until the screw that attaches the glass to the window regulator is visible thru the hole in the door panel (approx 2/3rd of the way down). Drill out the 2 pop rivets holding the lower rear window strut and 1 pop rivet at the top of the rear window strut
8b) disconnect the window glass from the rear window regulator by sliding the regulator backwards and tilting the window glass. Unhook the window regulator at the top near the upper pop rivet that was drilled out and move the regulator towards the bottom of the door.
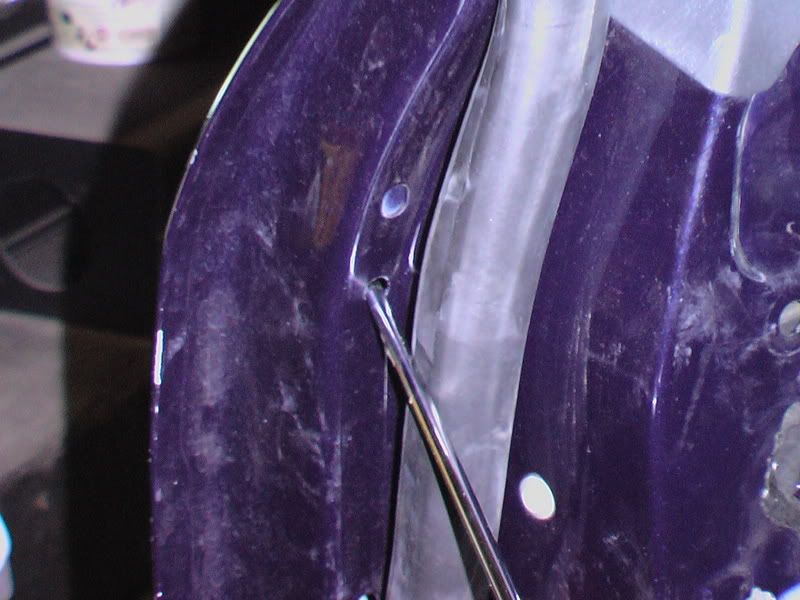
8c) raise the window, lifting the glass towards the rear while operating the window switch to raise the front.
9. Remove the 3 screws holding the door latch and disconnect the wire from the panel near the front of the door. ( I actually cut the wire and pulled it through the loops to keep the original cable ties in place, when I replaced it I just used new cable ties to attach it back to the original location.)
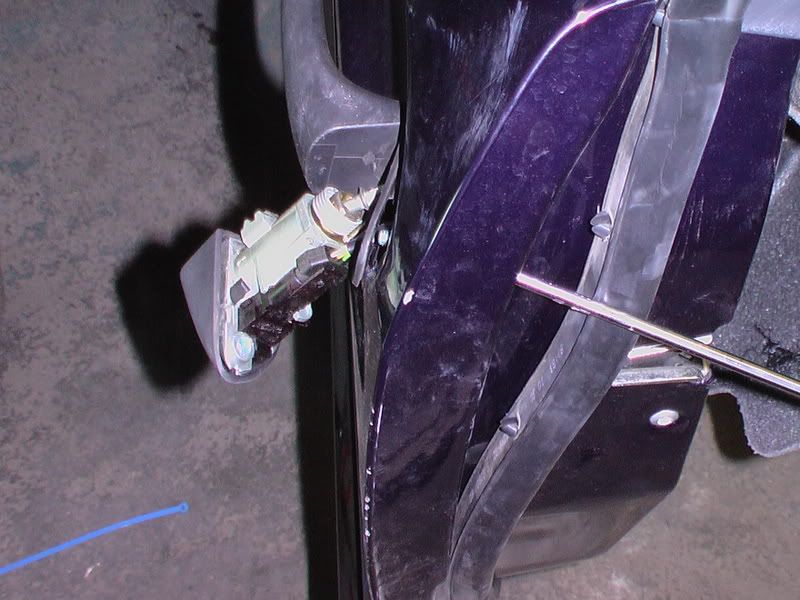
9a. remove the external key lock by removing the torx screw as shown in the posting by Chowbow.
10. You can now remove the locking mechanism by pulling it down and then towards the front by pushing back on the window strut. Remove the locking mechanism from the large hole forward of the speaker hole.
Reassembly is the reverse.
If testing the door lock prior to reassembly, the door closed switch on the door frame must be depressed for the door lock to operate.
1. Pull off the tweeter cover on top of door panel near front of window, no need to disconnect wire, just let it hang down.
2. Pull off SRS badge and remove the spline screw behind it.
3. remove the door latch plastic cover (1 screw)
4. At the bottom of the door pull handle next to the armrest there is an oblong slot, insert a flat screwdriver and prise the top half off, it is just clipped in. there are 2 spline screws behind it, remove them.
5. Using a plastic wedge of some sort or just by hand and starting at the lower part of the door latch, prise off the lower half of the door panel there are 6 or 7 plastic clips which hold it on, (I did this by hand and without breaking any but it may be worth purchasing a few just in case)
6. Lower the window and while pulling the panel slightly towards you, use your other hand to pull the panel upwards from the top starting at the front end, (this is quite tight, but it will come up)
7. panel is now off, pull the plug from the window switch and disconnect the cable from the door handle by opening the handle slightly and pulling up on the hook, the cable can then be removed from the door panel insert.
8. Drill out the 3 pop rivets holding the air bag (do not disconnect the wiring). do not disconnect the airbag, let it hang down or tie it out of the way.
8a) remove the foam covering from the door. Reconnect the window switches and partially raise the the window until the screw that attaches the glass to the window regulator is visible thru the hole in the door panel (approx 2/3rd of the way down). Drill out the 2 pop rivets holding the lower rear window strut and 1 pop rivet at the top of the rear window strut
8b) disconnect the window glass from the rear window regulator by sliding the regulator backwards and tilting the window glass. Unhook the window regulator at the top near the upper pop rivet that was drilled out and move the regulator towards the bottom of the door.
8c) raise the window, lifting the glass towards the rear while operating the window switch to raise the front.
9. Remove the 3 screws holding the door latch and disconnect the wire from the panel near the front of the door. ( I actually cut the wire and pulled it through the loops to keep the original cable ties in place, when I replaced it I just used new cable ties to attach it back to the original location.)
9a. remove the external key lock by removing the torx screw as shown in the posting by Chowbow.
10. You can now remove the locking mechanism by pulling it down and then towards the front by pushing back on the window strut. Remove the locking mechanism from the large hole forward of the speaker hole.
Reassembly is the reverse.
If testing the door lock prior to reassembly, the door closed switch on the door frame must be depressed for the door lock to operate.
Last edited by heathfieldvw; 10-02-2011 at 12:25 PM.
07-31-2012, 03:35 PM
#43
Member

Join Date: Apr 2009
Posts: 126
Likes: 0
Received 0 Likes
on
0 Posts
1990 500SL-2002 C230 Coupe-2012 c250 Sedan SOLD-2012 C63 Coupe
...
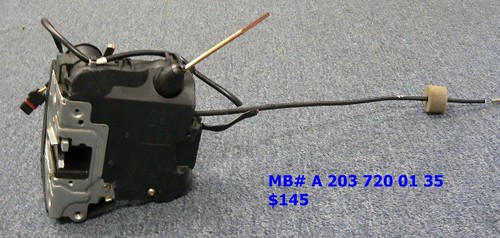
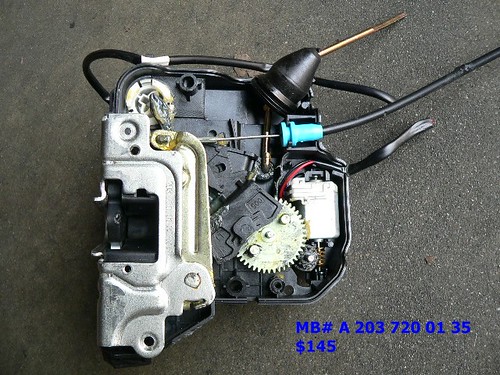
So you guys just replaced this? Or the whole lock assembly? Some people said it is all one unit, but I see two separate parts, the one directly below and the lock assembly below that.
http://www.mercedesparts.com/ShopByV...c230%40%40C230
http://www.parts.com/parts/2002/MERC...component=Lock
Ill check the rubber boot, but am thinking it is mechanical.
Already had the window regulator replaced on the same front passenger door of the coupe after the window was broken to steal the radio.
After the fix, I could hear the window bumping into something sometimes and am now wondering if it had anything to do with the lock doing the pogo now a few months later.
10-20-2013, 04:57 AM
#44
MBWorld Fanatic!
Join Date: Dec 2003
Location: Vancouver, BC, Canada
Posts: 3,127
Likes: 0
Received 211 Likes
on
202 Posts
2003 C230K Coupe Orion Blue
Can someone confirm the correct drill bit size as 5/32" (metric = 4mm) for removing the rivets? I'm going to DIY this repair.
Last edited by slammer111; 10-20-2013 at 04:59 AM.
11-10-2013, 10:04 PM
#45
MBWorld Fanatic!
Join Date: Dec 2003
Location: Vancouver, BC, Canada
Posts: 3,127
Likes: 0
Received 211 Likes
on
202 Posts
2003 C230K Coupe Orion Blue
Just performed this repair with another fellow MBW member. Probably one of the most painful repairs ever. It was my buddy's 2nd time (1st time being his own W203 a few years ago), and it still took us 4 solid hours of work.
These tips are for a coupe. Sedan doors are built differently - there's no speaker under the door latch, and it looks like you guys have more wiggle room as a result.
I bought my replacement springs from http://www.carrat-auto.eu/. Use code MBO1498 (that's a O, not a zero) to get a 25% discount. I paid 25 Euros or $37 CAD for 2 springs and a cheapo pair of locking tweezers (looks like scissors). Not the cheapest, but the springs seem to be of decent quality. Another guy on eBay (sancars123) sells kits as well. I don't work for either, but those were the 2 go-to places I found during my search.
You need 6 rivets per door. 3 for the 3 airbag, 3 for the rear window regulator. Removing the airbag doesn't free up any space (the door doesn't have a hole there), but unfortunately that's the only way you'll have access to the 1 rivet on the top of the window regulator.
Be careful and patient when removing the weather stripping - the clips are bit flimsy. Managed to break one. Thank goodness it wasn't at a critical location.
When reassembling, remember that after you put all the cables back, the grey foam insulation sheet goes in BEFORE you install the airbag. Guess who has to drill out his airbag again.
If you need to buy a rivet gun, get one with longer handles. Not sure if I'm just weak or something, but I ended up having to "squeeze" the handles by pinning one handle against the door with a piece of wood, and doing the "pushing" with my hip or knee - both my hands combined weren't strong enough. Those MB stainless steel rivets are a different beast. I was using a Stanley MR33C, which is 250mm (10") long. Try one of those 17" heavy duty rivet guns instead if you can.
Totally looking forward to when the passenger side fails. MB should've just done a recall if they know that EVERY SINGLE W203 DOOR is going to have this break??
The good news?
Spring (x2) kit = $37
Rivet gun, punch set, mini hammer = $30
Can of Coke = $1
Treating my buddy and myself to food afterwards = $20
Total: $88
Canadian dealer wanted $700 for this repair. I think I'm going to buy myself something nice.
These tips are for a coupe. Sedan doors are built differently - there's no speaker under the door latch, and it looks like you guys have more wiggle room as a result.
I bought my replacement springs from http://www.carrat-auto.eu/. Use code MBO1498 (that's a O, not a zero) to get a 25% discount. I paid 25 Euros or $37 CAD for 2 springs and a cheapo pair of locking tweezers (looks like scissors). Not the cheapest, but the springs seem to be of decent quality. Another guy on eBay (sancars123) sells kits as well. I don't work for either, but those were the 2 go-to places I found during my search.
You need 6 rivets per door. 3 for the 3 airbag, 3 for the rear window regulator. Removing the airbag doesn't free up any space (the door doesn't have a hole there), but unfortunately that's the only way you'll have access to the 1 rivet on the top of the window regulator.
Be careful and patient when removing the weather stripping - the clips are bit flimsy. Managed to break one.
Thank goodness it wasn't at a critical location.When reassembling, remember that after you put all the cables back, the grey foam insulation sheet goes in BEFORE you install the airbag. Guess who has to drill out his airbag again.
If you need to buy a rivet gun, get one with longer handles. Not sure if I'm just weak or something, but I ended up having to "squeeze" the handles by pinning one handle against the door with a piece of wood, and doing the "pushing" with my hip or knee - both my hands combined weren't strong enough. Those MB stainless steel rivets are a different beast.
I was using a Stanley MR33C, which is 250mm (10") long. Try one of those 17" heavy duty rivet guns instead if you can.Totally looking forward to when the passenger side fails. MB should've just done a recall if they know that EVERY SINGLE W203 DOOR is going to have this break??
The good news?
Spring (x2) kit = $37
Rivet gun, punch set, mini hammer = $30
Can of Coke = $1
Treating my buddy and myself to food afterwards = $20
Total: $88
Canadian dealer wanted $700 for this repair.
I think I'm going to buy myself something nice.
Last edited by slammer111; 06-18-2020 at 05:33 AM.
11-25-2013, 10:14 AM
#46
MBWorld Fanatic!
Join Date: Dec 2003
Location: Vancouver, BC, Canada
Posts: 3,127
Likes: 0
Received 211 Likes
on
202 Posts
2003 C230K Coupe Orion Blue
Looks like there's a cheaper place to buy the springs.
http://www.i6automotive.co.uk/mercedes-benz-parts/
http://www.i6automotive.co.uk/mercedes-benz-parts/
11-25-2013, 11:14 PM
#47
Super Moderator
About $32 for a set interesting. My car has the issue where a door lock just does not lock or unlock but if I hit the button and pull the handle a few times it will work. I figure it just needs the motor opened up and cleaned and regreased I wonder if the springs would help at all?
04-19-2015, 12:36 PM
#49
Newbie

Join Date: Sep 2012
Posts: 2
Likes: 0
Received 0 Likes
on
0 Posts
C180 Kompressor Coupe
A few additional steps/clarifications that I found the hard way while replacing the lock on a coupe (thanks to tango3d for the original instructions which I have modified below):
1. Pull off the tweeter cover on top of door panel near front of window, no need to disconnect wire, just let it hang down.
2. Pull off SRS badge and remove the spline screw behind it.
3. remove the door latch plastic cover (1 screw)
4. At the bottom of the door pull handle next to the armrest there is an oblong slot, insert a flat screwdriver and prise the top half off, it is just clipped in. there are 2 spline screws behind it, remove them.
5. Using a plastic wedge of some sort or just by hand and starting at the lower part of the door latch, prise off the lower half of the door panel there are 6 or 7 plastic clips which hold it on, (I did this by hand and without breaking any but it may be worth purchasing a few just in case)
6. Lower the window and while pulling the panel slightly towards you, use your other hand to pull the panel upwards from the top starting at the front end, (this is quite tight, but it will come up)
7. panel is now off, pull the plug from the window switch and disconnect the cable from the door handle by opening the handle slightly and pulling up on the hook, the cable can then be removed from the door panel insert.
8. Drill out the 3 pop rivets holding the air bag (do not disconnect the wiring). do not disconnect the airbag, let it hang down or tie it out of the way.
8a) remove the foam covering from the door. Reconnect the window switches and partially raise the the window until the screw that attaches the glass to the window regulator is visible thru the hole in the door panel (approx 2/3rd of the way down). Drill out the 2 pop rivets holding the lower rear window strut and 1 pop rivet at the top of the rear window strut
8b) disconnect the window glass from the rear window regulator by sliding the regulator backwards and tilting the window glass. Unhook the window regulator at the top near the upper pop rivet that was drilled out and move the regulator towards the bottom of the door.
8c) raise the window, lifting the glass towards the rear while operating the window switch to raise the front.
9. Remove the 3 screws holding the door latch and disconnect the wire from the panel near the front of the door. ( I actually cut the wire and pulled it through the loops to keep the original cable ties in place, when I replaced it I just used new cable ties to attach it back to the original location.)
9a. remove the external key lock by removing the torx screw as shown in the posting by Chowbow.
10. You can now remove the locking mechanism by pulling it down and then towards the front by pushing back on the window strut. Remove the locking mechanism from the large hole forward of the speaker hole.
Reassembly is the reverse.
If testing the door lock prior to reassembly, the door closed switch on the door frame must be depressed for the door lock to operate.
Just a quick note for those fixing this problem DIY:
The lock system may not work properly unless ALL devices in the door are connected properly to the controller.
During the door disassembly, the control wiring for the mirror was disconnected. When trying to test the new lock actuator, it would unlock properly (both by the dash button and the remote), but would not lock at all.
After several hours of troubleshooting, trying various things & doing lots of research, it was assumed that a trip to the dealer for diagnosis would be required.
After reassembling the door, it was tested one last time - and everything worked properly. After going step-by-step and reconstructing what had changed, it was found that disconnecting the power mirror connection to the controller in the front top side of the door, caused the power lock actuator to unlock-but-not-lock.
Go figure.
Hope this helps save someone a couple of hours of head scratching . . .
 was goin' nuts about this, finally it worked when everything was installed.
04-20-2015, 07:07 AM
was goin' nuts about this, finally it worked when everything was installed.
04-20-2015, 07:07 AM
#50
Senior Member

FYI for whoever does this...you don't have to drill out and remove the airbag or the window for the front of a sedan. Just have to drill out and replace the 2 rivets from the bottom of the window regulator bracket and you can squeeze the lock assembly out from there. You can also fish the wires for it out from behind the sound matting without removing anything else but the clips that hold it to the door.


