
 06-04-2015, 08:10 PM
Last edit by: IB Advertising
See related guides and technical advice from our community experts:
- Mercedes-Benz E-Class: How to Remove Door Panel to Replace Speakers
Step by step instructions for do-it-yourself repairs

W212 Door Panel Removal/Sound Deadened/Speakers Replaced
 03-23-2013, 01:49 PM
#1
Super Member
Thread Starter
W212 Door Panel Removal/Sound Deadened/Speakers Replaced
You guys know me, can never leave well enough alone, always doing something. Anyway been working on another project, thought I would share. Someone gave some instructions on door panel removal from this site and thanks to them but I want to add a few specifics to make those wanting to do this feel more confident in their endeavor. Also these Doors are the easiest I have ever removed.
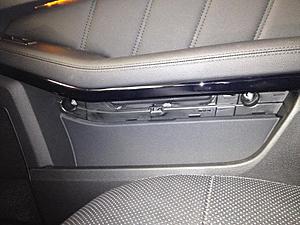
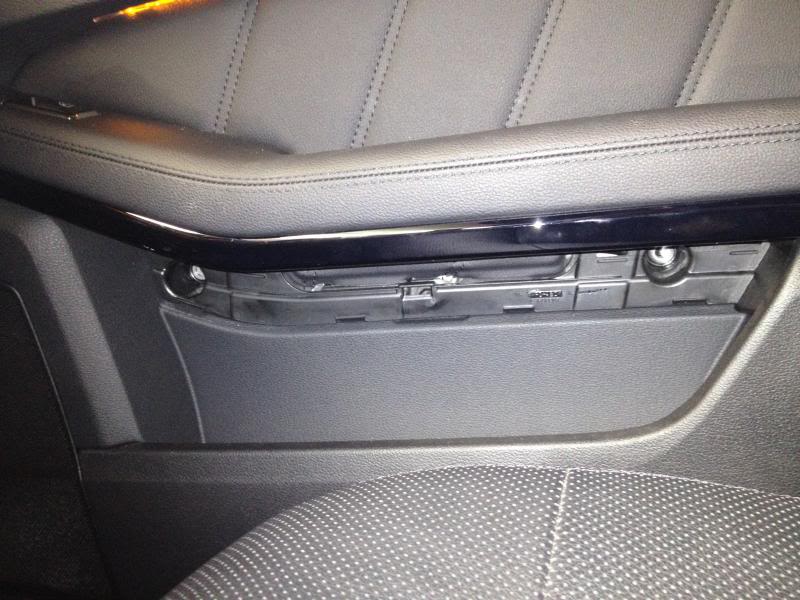
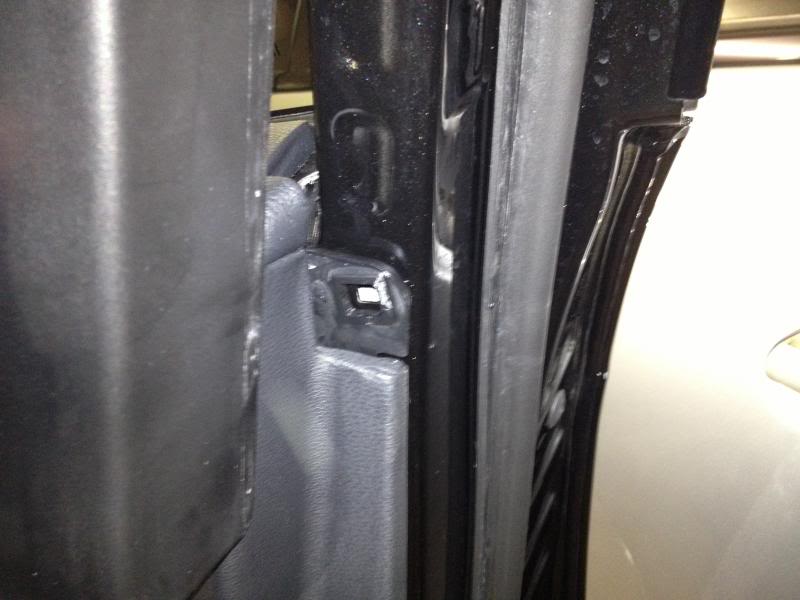
First pop the little cover over the main screws just right under the arm rest as seen in pic. Very simple with a small flat head screwdriver as the material around the cover will sink in easily, so no scratches possible. Use a T27 Hex Head to remove the screws.
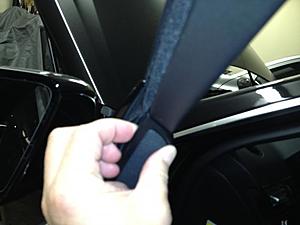
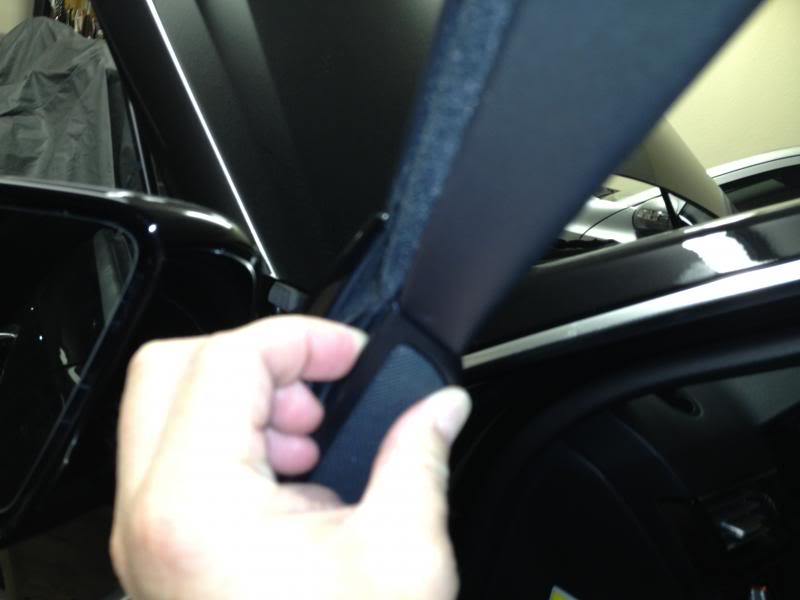
Next step is to remove the A-pillat tweeter housing. The very tip of the sail, you can pull out but you must pull away the rubber piece on the window side. Then grab and pull out. Should easily pop out from there.
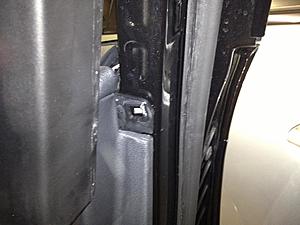
Now go around the door, you can use a pry tool or not. I didn't, it was easy just to pull each of the panel retainers free grabbing the edge of the door and working my way around. Okay, one tricky part. Behind the panel next to door lock(see pics below) is a square peg (fits in a square hole ) retainer. Once the panel is loose you can safely remove this slender piece out from along the window and panel trim. Just pull it away. This will expose the square peg. In the middle of the peg is a locking device. Use some needle nose pliers and just pull it out to release the lock and it slides right out.
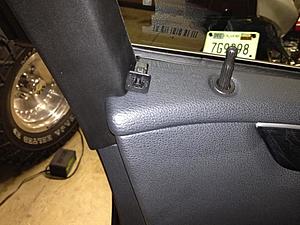
Heres a pic of the passenger doors square hole with lock removed. This is where to remove it at. Move the trim out of the way to expose it.
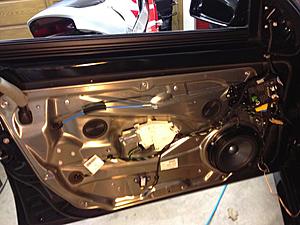
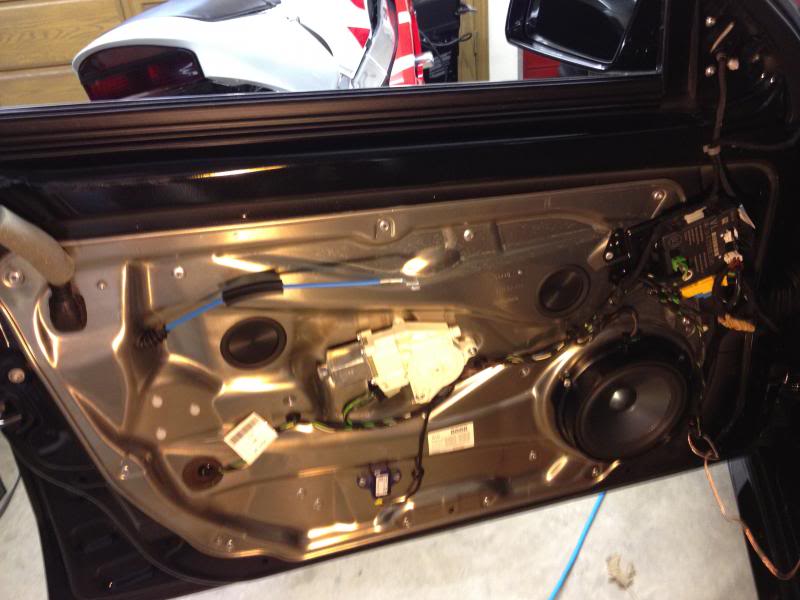
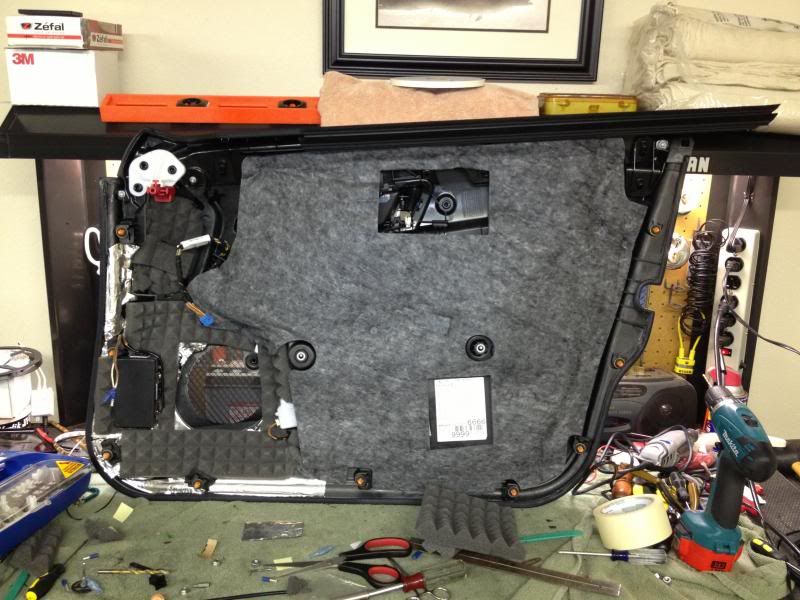
Heres what your inner panel will look like. Very solid built, notice no holes exposing inner to outer door. This aluminum is pretty thick and has a dampner ring inbetween it and the main door frame that it mounts to. This is where the build quality can be appreciated. I've taken off many a door panel and nothing built as simple yet sophisticated with attention to detail paid in respect to sound deadening. Every clip touching the panel has a foam cushion between it and the panel. Of course I took it a lot further. I didn't want to bore you all with the details but I felt padded the window module, stuffed area's with acoustic foam as well as deadened the plastic trim around the window.
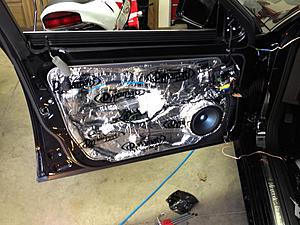
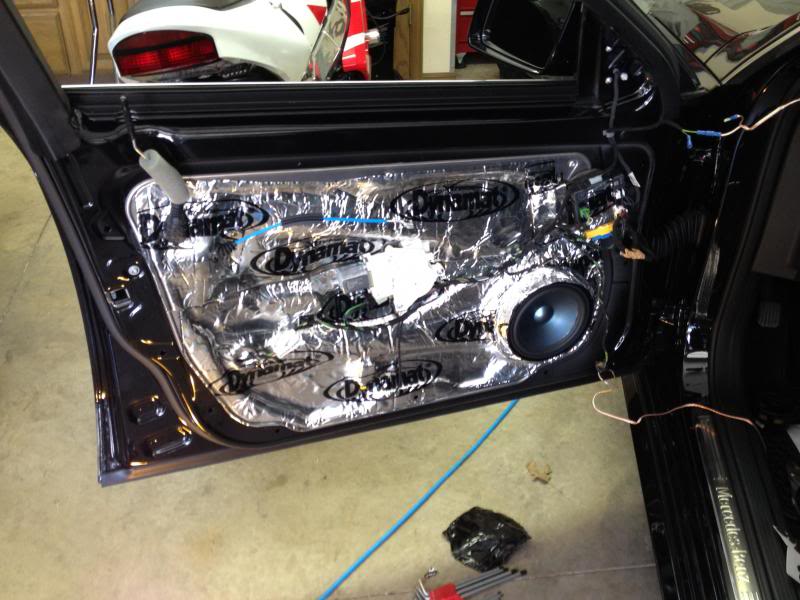
Same panel after Dynamat Extreme applied. Double layered around midbass driver.
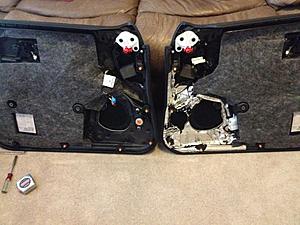
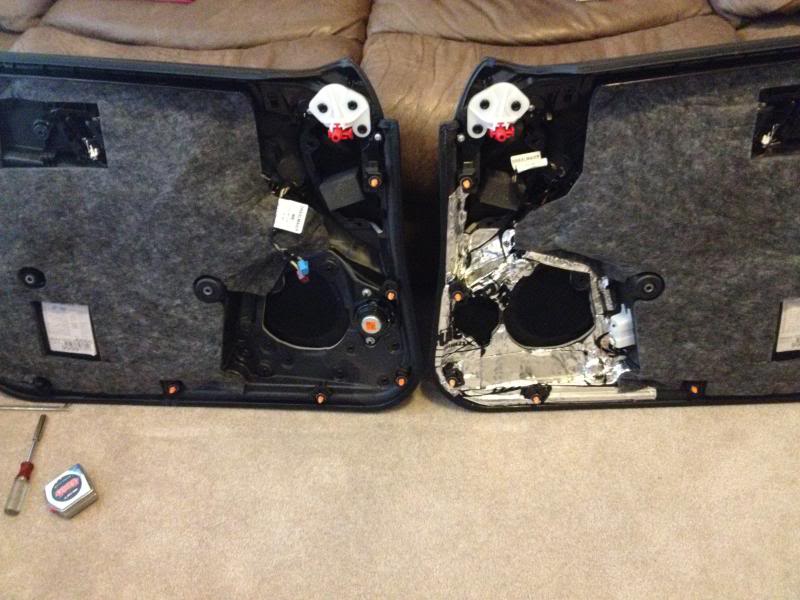
Inner panels. Dynamat Extreme apllied on the right.
I put these in the doors to replace the currect stock mids. These are the Cliff Designs CDT ES 02's. Unbelievable smooth sounding paper coned mid with upper range extension and small size. They do have to be sealed for best freq low end freq response but only require a few sq inches.
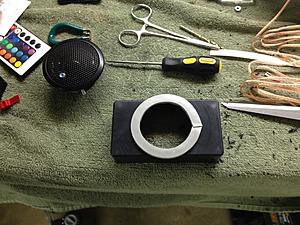
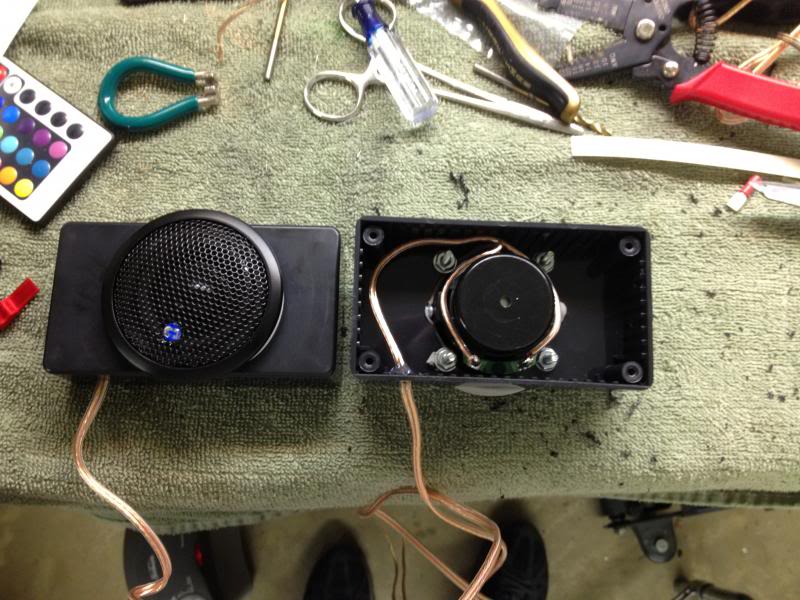
I used a "project box" with the size I needed and cut out mounting hole on one side. Poly filled it sealed it up then mounted it to stock location.

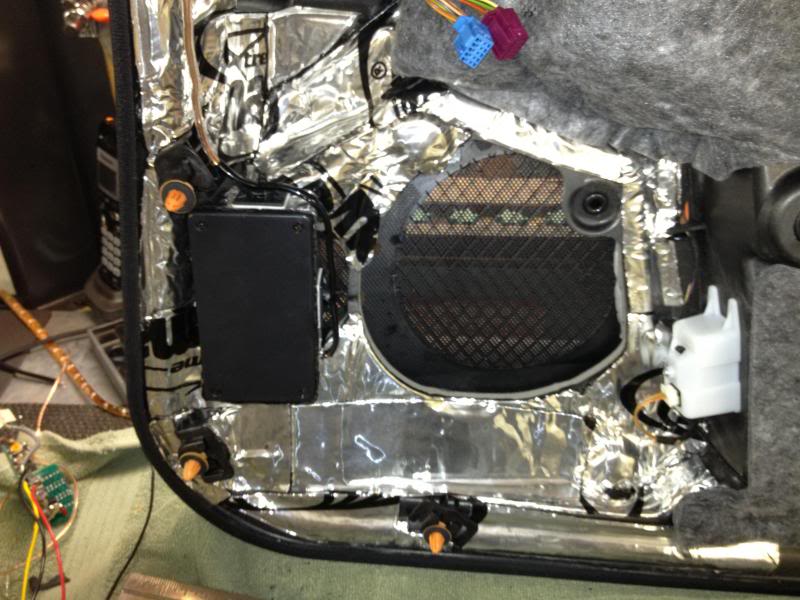
Here's the final product mounted in the stock mid location.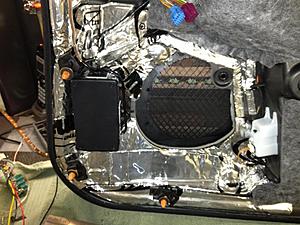
After all said and done, all I can say is Wow!!! This car is dead!!! I have some music with real heavy midbass and these panels would vibrate pretty good. I listened for an hour and had only one problem, that was the plastic trim around the window. I hit it up the middle of the pillar and now it is silent too. Sound deadening is pretty inexpensive and not too difficult to do yourself. Anyone needs any more details, feel free to hit me up.
First pop the little cover over the main screws just right under the arm rest as seen in pic. Very simple with a small flat head screwdriver as the material around the cover will sink in easily, so no scratches possible. Use a T27 Hex Head to remove the screws.
Next step is to remove the A-pillat tweeter housing. The very tip of the sail, you can pull out but you must pull away the rubber piece on the window side. Then grab and pull out. Should easily pop out from there.
Now go around the door, you can use a pry tool or not. I didn't, it was easy just to pull each of the panel retainers free grabbing the edge of the door and working my way around. Okay, one tricky part. Behind the panel next to door lock(see pics below) is a square peg (fits in a square hole
) retainer. Once the panel is loose you can safely remove this slender piece out from along the window and panel trim. Just pull it away. This will expose the square peg. In the middle of the peg is a locking device. Use some needle nose pliers and just pull it out to release the lock and it slides right out. 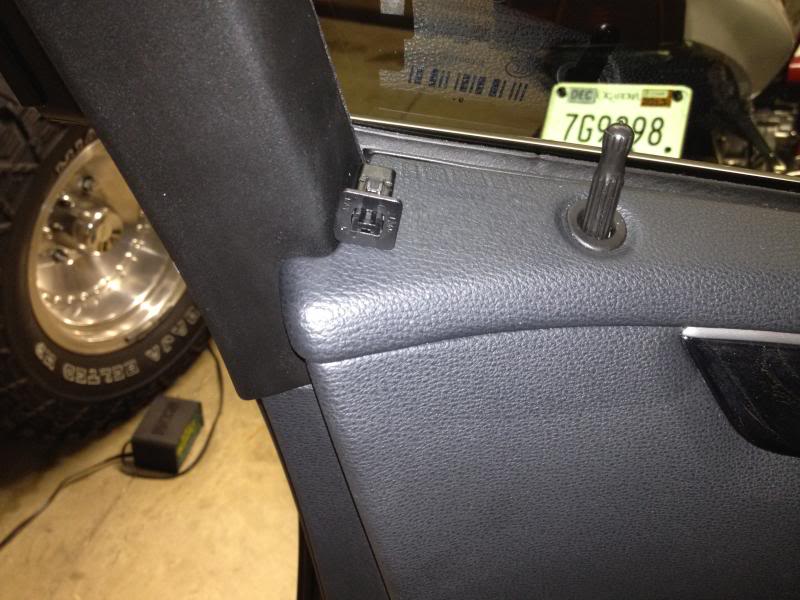
Heres a pic of the passenger doors square hole with lock removed. This is where to remove it at. Move the trim out of the way to expose it.
Heres what your inner panel will look like. Very solid built, notice no holes exposing inner to outer door. This aluminum is pretty thick and has a dampner ring inbetween it and the main door frame that it mounts to. This is where the build quality can be appreciated. I've taken off many a door panel and nothing built as simple yet sophisticated with attention to detail paid in respect to sound deadening. Every clip touching the panel has a foam cushion between it and the panel. Of course I took it a lot further. I didn't want to bore you all with the details but I felt padded the window module, stuffed area's with acoustic foam as well as deadened the plastic trim around the window.
Same panel after Dynamat Extreme applied. Double layered around midbass driver.
Inner panels. Dynamat Extreme apllied on the right.
I put these in the doors to replace the currect stock mids. These are the Cliff Designs CDT ES 02's. Unbelievable smooth sounding paper coned mid with upper range extension and small size. They do have to be sealed for best freq low end freq response but only require a few sq inches.
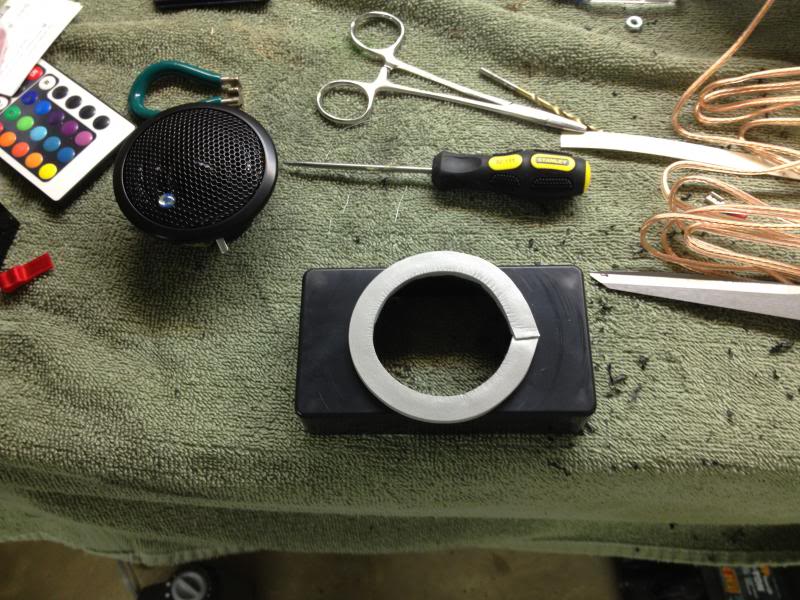
I used a "project box" with the size I needed and cut out mounting hole on one side. Poly filled it sealed it up then mounted it to stock location.
Here's the final product mounted in the stock mid location.
After all said and done, all I can say is Wow!!! This car is dead!!! I have some music with real heavy midbass and these panels would vibrate pretty good. I listened for an hour and had only one problem, that was the plastic trim around the window. I hit it up the middle of the pillar and now it is silent too. Sound deadening is pretty inexpensive and not too difficult to do yourself. Anyone needs any more details, feel free to hit me up.

The following users liked this post:
Mybad55 (06-27-2017)
03-23-2013, 02:00 PM
#2
MBWorld Fanatic!
Just as I saw your name on the user list, I anticipated you could post a cool blockbusting topic and my thoughts are confirmed now 
Thanks for your time and trouble
Thanks for your time and trouble

 !!! mercedes needs someone like you to work for them and our cars will be the best on earth! thanks a lot for the pics and write up
  03-24-2013, 08:13 AM
#5
MBWorld God!

Join Date: Jul 2010
Location: 39.515509, -111.549668
Posts: 30,567
Received 3,351 Likes
on
2,807 Posts
2012 CLS63
bad *** RNBRAD
03-26-2013, 02:12 PM
#7
Super Member
Thread Starter
Your welcome fellas, thanks for the comments!! Just want to help fellow enthusiasts looking to do the same or similar and hopefully make their experience easier.
Trending Topics
03-26-2013, 10:05 PM
#8
Super Member
Thread Starter
Small update. When putting the door panel back on, you will need to remove the rubber seal that is between the door panel and side window. When you remove the door panel it unfortunately stays attached to the door. You "must" remove it from the door and reattach it to the door panel when you put door panel back on. It has a channel groove and slides back on the door panel starting from the lock hole end and sliding forward. When you put the door panel on you will insert the top portion of the door panel (the seal) into the door first then it pops into place from there. Just plug your wires in first, hook up your latch cable and make sure lock pin hits the hole.
This is the top of the inner panel with the seal slid partially on.
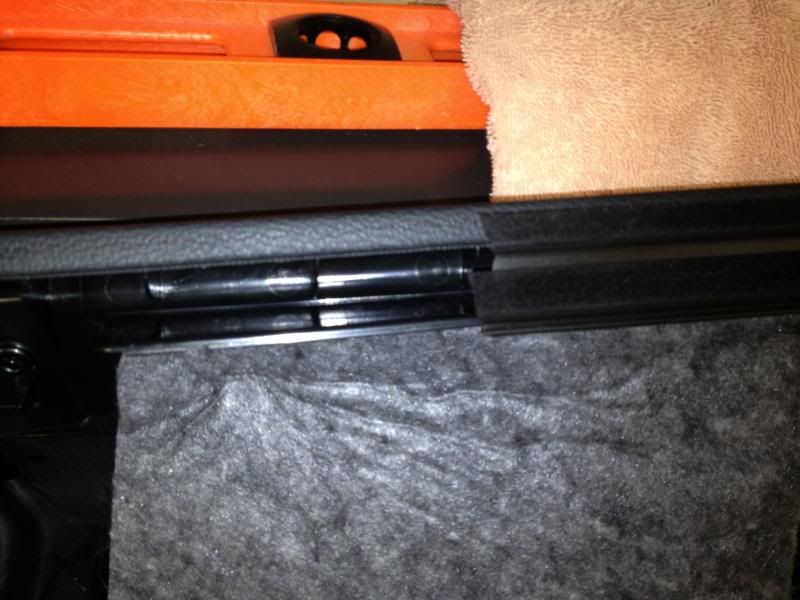
Here's a full picture. Notice the seal at the top of the panel slid partially on.
OMG Hype, your sig pic is sick!!!! Love the rims and the stance. I like the concave look on the rears. Nice job on the CLS!!!
This is the top of the inner panel with the seal slid partially on.
Here's a full picture. Notice the seal at the top of the panel slid partially on.
OMG Hype, your sig pic is sick!!!! Love the rims and the stance. I like the concave look on the rears. Nice job on the CLS!!!
Last edited by RNBRAD; 03-26-2013 at 10:09 PM.
The following users liked this post:
Mybad55 (06-27-2017)
03-30-2013, 10:55 AM
#9
Newbie
Join Date: Mar 2013
Posts: 6
Likes: 0
Received 0 Likes
on
0 Posts
E-Class
great post, found it really useful for removing the door panel, i do have one question though...do you have any tips on separating the door panel itself (there are 2 layers) i want to install a set of LED logo lights (shine down onto the floor) but i need access to the inside of the door panel most importantly near the existing light
thanks in advance
thanks in advance
03-30-2013, 06:27 PM
#10
Super Member
Thread Starter
great post, found it really useful for removing the door panel, i do have one question though...do you have any tips on separating the door panel itself (there are 2 layers) i want to install a set of LED logo lights (shine down onto the floor) but i need access to the inside of the door panel most importantly near the existing light
thanks in advance
thanks in advance
 03-31-2013, 12:21 PM
#12
Super Member

Door panel insulation question.
Aside from the audio improvement did you notice any change in the amount of road noise coming into the car? Always looking for more quiet inside.
03-31-2013, 01:36 PM
#13
Super Member
Thread Starter
Let me get back to you on that to give you a more accurate evaluation. I've only drove my car one time since all this was done. I did however notice is was quiter while driving but I didn't really focus on how much as compared to before. I was mainly focused on the audio. I'll try to focus on that next time and see if I can't evaluate it with something measurable.
03-31-2013, 06:52 PM
#14
Super Member
Car more quiet?
[QUOTE=RNBRAD;5597014]Let me get back to you on that to give you a more accurate evaluation. I've only drove my car one time since all this was done. I did however notice is was quiter while driving but I didn't really focus on how much as compared to before. I was mainly focused on the audio. I'll try to focus on that next time and see if I can't evaluate it with something measurable.[/QUOTE
Thanks;appreciate your future comments.
Thanks;appreciate your future comments.
 04-02-2013, 03:41 PM
#16
Super Member
Thread Starter
chrisv6- I'm surprised you're rear decklid doesn't rattle. Or did you fix that already?
04-02-2013, 11:13 PM
#17
Junior Member
Join Date: Mar 2007
Location: New England
Posts: 60
Likes: 0
Received 0 Likes
on
0 Posts
2015 ML250 Bluetec, 2014 GLK350
Yup. The shade roller is the culprit and it is usually defective (as per dealer's shop foreman). I took it in and they replaced the whole shade assembly. Had to wait a while until the part arrived but it appeared to fix the issue!
04-03-2013, 03:38 AM
#18

Said it before, and I'll say it again...love your hands on DIY style. One thing though, aren't the stock mids 2 ohms? I believe those CDT's are 4 ohm. If they match up power wise, I suppose the mids would be fine, but if they share a common channel with the tweeters (although you seemed to disagree with me on this point in another thread) the power to the tweeter will be decreased.
Looks like you used acoustic foam to seal reflecting waves between the speaker and door card. Is that working out well?
The midrange is the only speaker I feel that needs some taming down, and your thread has given me the motivation to finally get on it. Your square peg and weather seal tips get two big thumbs up. I can finally re-affix my door panel correctly.
Last edited by brauhaus313; 04-03-2013 at 03:41 AM.
04-03-2013, 03:46 AM
#19
http://www.harborfreight.com/heavy-d...tle-66422.html
04-03-2013, 06:52 PM
#20
Super Member
Thread Starter
Said it before, and I'll say it again...love your hands on DIY style. One thing though, aren't the stock mids 2 ohms? I believe those CDT's are 4 ohm. If they match up power wise, I suppose the mids would be fine, but if they share a common channel with the tweeters (although you seemed to disagree with me on this point in another thread) the power to the tweeter will be decreased.
Looks like you used acoustic foam to seal reflecting waves between the speaker and door card. Is that working out well?
The midrange is the only speaker I feel that needs some taming down, and your thread has given me the motivation to finally get on it. Your square peg and weather seal tips get two big thumbs up. I can finally re-affix my door panel correctly.
Looks like you used acoustic foam to seal reflecting waves between the speaker and door card. Is that working out well?
The midrange is the only speaker I feel that needs some taming down, and your thread has given me the motivation to finally get on it. Your square peg and weather seal tips get two big thumbs up. I can finally re-affix my door panel correctly.
The deadening was critical to overall sound quality. It's just dead!!! No resonance, or overhand, extra colour, nothing that I had before. It just has a solid presence you don't hear in a vehicle very often. It's a pretty dead door originally but it did have some noticeable resonances that needed taken care of. Glad you were able to get some use out of this thread.

 08-30-2013, 11:34 AM
#22
MBWorld God!
Join Date: Jul 2010
Location: 39.515509, -111.549668
Posts: 30,567
Received 3,351 Likes
on
2,807 Posts
2012 CLS63
he's a scientist of sound
11-27-2013, 05:51 AM
#23
Junior Member

Hey Brad...
Another awesome post by you, we appreciate it!!!
I did nearly the same project on my '06 Mustang GT Convertible butbut yanked the entire interior, dynamatted (2 full boxes of the extreme) and replaced all of the speakers (I had put in a Pioneer F90bt years before). Now I've moved to OH and the pony sits while I drive my 2013 E350 4matic.
When I yanked Ford's "Shaker 500" I found that the stock speakers were paper coned 25W MAX jokes made in China. The whole system added up to somewhere in the mid 200s, not 500 like they claimed.
Can you tell me what the stock speakers were/ratings/maker etc? I have the HK that comes with the P1 package and wonder if I should look at upgrading.
My only regret on the Mustang job I did was that I didn't do it sooner... won't make that error with my MB.
I just tried to add some shots from when I did the Mustang, it's not letting me right now... I'll try back in a bit.
Thanks man, and Happy Thanksgiving everyone!
03-06-2014, 11:02 PM
#24
Senior Member

Join Date: Aug 2008
Location: British Columbia
Posts: 436
Likes: 0
Received 2 Likes
on
2 Posts
2011 E350 4 Matic
Hi RNBRAD, I can't really tell from the picture, by removing the door panel does that also enable you to feed wires from the door into the cabin? I am planning to install an aftermarket blindspot system
03-07-2014, 01:15 AM
#25
Member
Join Date: Feb 2014
Location: Las Vegas, NV
Posts: 126
Likes: 0
Received 4 Likes
on
4 Posts
2011 E350 Sedan
If someone can post a parts diagram of that area you'll be able to see if it is a plug or open.


