Air filter exchange [M276 Engine]
 08-01-2017, 05:46 PM
#1
Super Member
Thread Starter
Air filter exchange [M276 Engine]
So here is a quick guide on how to do your basic air filter replacement for GLK350 M276 engine. Difficulty is easy, time spent about 20 minutes.
1.) You will need four tools:

2.)Open engine bonnet and remove the first cover with your hands.


3.)Remove Sensor with pry tool. an angled plastic pry tool works best for removal. Take great care as sensor is easy to damage! Video included for demonstration.


4.) Remove hose clamp. You will need the pliers, do not use screwdriver.


5.)Remove two E10 screws.

6.) Unlatch tab on air intake.

7.) Lift assembly upwards.

8.) Box is out and last step is removing three Torx25 screws on the side.


1.) You will need four tools:
2.)Open engine bonnet and remove the first cover with your hands.
3.)Remove Sensor with pry tool. an angled plastic pry tool works best for removal. Take great care as sensor is easy to damage! Video included for demonstration.
4.) Remove hose clamp. You will need the pliers, do not use screwdriver.
5.)Remove two E10 screws.
6.) Unlatch tab on air intake.
7.) Lift assembly upwards.
8.) Box is out and last step is removing three Torx25 screws on the side.


The following users liked this post:
JohnnyC (08-01-2017)
09-09-2017, 01:09 PM
#3
Junior Member

thanks and i have a question, if I broke the white latch on the sensor (i was able to put it back on), will that be bad? I still cannot remove the sensor out though but I was not pulling backward into it as you did i was only pulling up. I will try again in 2 days.
09-09-2017, 03:30 PM
#4
Super Member
Thread Starter
You don't have to worry, the sensor is easy to replace! You need to reorder 025-545-65-26 at your nearest dealer or ECStuning.
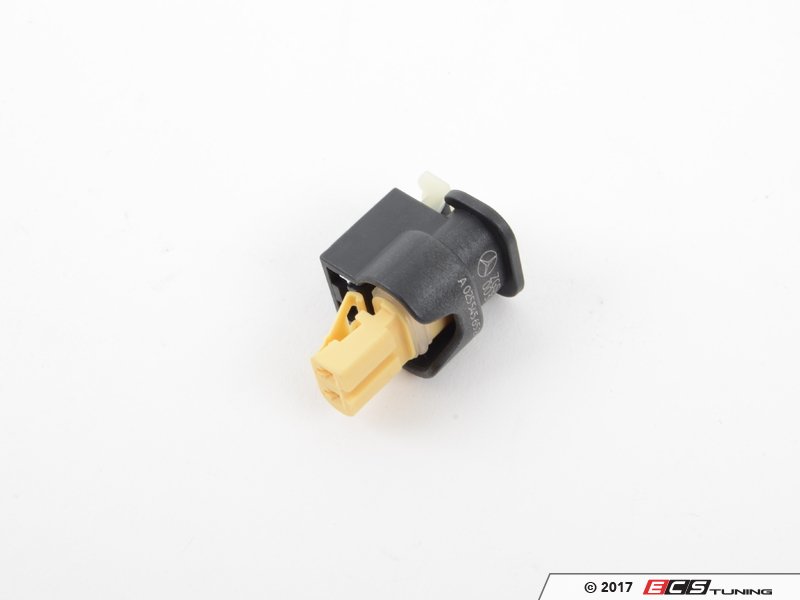
You will also need terminal release tools, you can substitute with pick tools if you don't possess them. A place mat to put underneath the work space in case you drop the sensor clutch housing.
Take precaution as to not damage the wires as after this there is NO MORE CHEAP DIYs, you will need to take apart many items to replace the wire harness which is very labor intensive and costly. Remember to replace wires in the same orientation.
Good luck


Last edited by JohnnyC; 09-09-2017 at 03:36 PM.
The following 2 users liked this post by JohnnyC:
Patrick Wu (07-26-2020),
Sarang (09-10-2017)
09-12-2017, 11:57 AM
#5
Junior Member

On our 2013 GLK350 all I had to do is remove the 3 bolts on top and the cover and filter come right out. Is this a different engine you are referring to than what I have ?
09-12-2017, 12:08 PM
#6
Junior Member
Very odd, I have a 276 engine in my E350 as with the GLK in this post so it is the same steps for us. Only thing I can think of is if your GLK350 is a diesel engine otherwise you should have a 276 engine also and follow the same as this post.
09-12-2017, 12:11 PM
#7
Junior Member
It's not diesel. You remove the top 3 screws, the cover hinges down so you can remove it then the air filter comes right out. I did this right after we bought it to check the condition of the air filter.
Trending Topics
09-12-2017, 12:29 PM
#8
Super Member
Thread Starter
Different manner, same end result I have all the tools to do both ways, I selected this way as it I can do it faster and inspect two additional things.
If you ever want to change spark plugs, removing the whole air intake housing is critical.
One detail I purposely didn't mention is that on my California version PZEV grey charcoal filter you can see an oil spot at the bottom. There was also a little oil in the rubber tube as well. This indicate at one point in time a technician overfilled the oil levels and recirculated oil into the boot. I was able to clean what was left.
I have all the tools to do both ways, I selected this way as it I can do it faster and inspect two additional things.If you ever want to change spark plugs, removing the whole air intake housing is critical.
One detail I purposely didn't mention is that on my California version PZEV grey charcoal filter you can see an oil spot at the bottom. There was also a little oil in the rubber tube as well. This indicate at one point in time a technician overfilled the oil levels and recirculated oil into the boot. I was able to clean what was left.
07-18-2018, 09:24 PM
#9

Easy Hack to make changing a M276 Engine Air Filter

M276 Torx 25 tool hack for filter box cover removal. 1) T25 Exchangeable Driver Bit 2) � Closed End Wrench 3) Duct Tape

A). Rip two strips of tape ⅛-�� x 6� B) Wrap 1 tape strip around the end closet to the bit end. C) Slide closed end of the �� wrench over the drive end ensuring the tape is built up enough to act as a stop. D) Apply the other tape strip around the drive end of the T25 bit ensuring the wrench is secured to the bit. E) Drink your favorite adult beverage knowing American ingenuity conquers German Engineering. Hoo Yah

T25 Bit, �� Wrench & Duct Tape make for a huge timesaver when changing a MB 2014 C350 (M276) Engine Air Filter
As we all know, there isn�t much content or many videos about a filter change on the M276 (single air filter). I want to share an easy hack that makes this a 15 minute job and doesn�t require removing the entire filter box.
The T25 Torx Screw closest to the passenger fire wall is to tight of a space to fit a torx wrench, socket Torx et al. I used my degree from the country boy school of figuring s**t out and came up with this hack that requires you to only remove the 3 T25 Torx Screws on top that secure the filter box cover. In addition, you only need to disconnect the plastic intake scoop from the grill cowling and the cover is off, and the filter can be changed while also being able to clean up the inside.
Hope Le this helps y�all
The following users liked this post:
DanMyers (10-13-2018)
 07-26-2020, 11:20 PM
#11

Probably irrelevant 3 years later, but in case anyone's interested how to remove the wire connector without the grey tab...I also broke off the grey tab  and to remove the connector you just have to push into where the grey tab was (there's a black tab behind where the grey tab was) and then you can pull the connector off.
and to remove the connector you just have to push into where the grey tab was (there's a black tab behind where the grey tab was) and then you can pull the connector off.
The following users liked this post:
ArmandinEastTN (08-15-2020)
07-26-2020, 11:23 PM
#12
OMG TYTYTYTYTYTY  how did you find this part...I broke the white tab off this connector and was freaking out thinking I just bought myself an expensive trip to the dealership. Then came across this post and now hopefully can replace the connector when the parts come next week. Will update if it works. Thanks again OP!
how did you find this part...I broke the white tab off this connector and was freaking out thinking I just bought myself an expensive trip to the dealership. Then came across this post and now hopefully can replace the connector when the parts come next week. Will update if it works. Thanks again OP!Last edited by Patrick Wu; 07-26-2020 at 11:27 PM.
The following users liked this post:
ArmandinEastTN (08-15-2020)
07-27-2020, 01:07 AM
#13
Super Member
Thread Starter
It is easy to replace the connector! All the connectors have the part numbers on them you just gotta know what you are looking for. let me know if you need more help.
The following users liked this post:
ArmandinEastTN (08-15-2020)


