
Intercooler Circuit Overflow Reservoir
 11-06-2014, 03:24 PM
#1
Senior Member
Thread Starter
Intercooler Circuit Overflow Reservoir
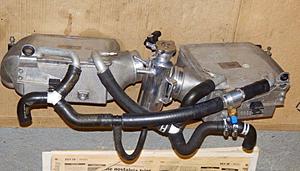
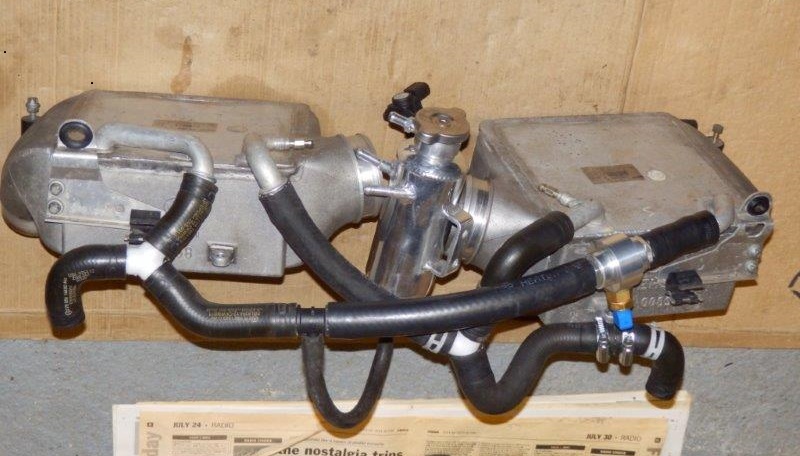
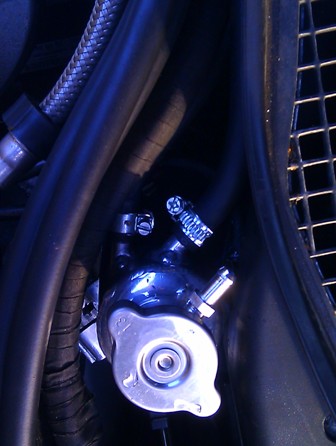
Howdy All, I wanted to share something that I have been working on for a while. A couple of months ago I had the intercooler vacuum filled at the dealer and I noticed a couple days later that while it was running (hot)a couple of drips were coming out of the intercooler overflow nipple when I had the hood open with the car running. I kept watching it for a couple days and after about a week it finally stopped but if you took the intercooler cap off it was about two to three inches low. After thinking about it I wanted to add an overflow just like the radiator circuit so when it heated and cooled (expanded and contracted) it had a place to draw coolant from to keep it full.
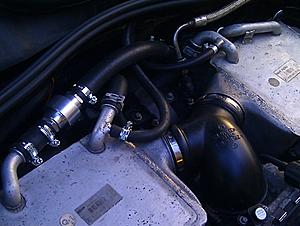
After purchasing several different sized reservoirs that did not fit like I wanted I came up with this final configuration. The only modification to the car is a small hole (notch) drilled in the cardboard feeling firewall behind the engine. The reservoir fits on a bracket I fabricated that fits near the brake reservoir. It ends up looking like a factory installation and can be taken off in about 30 seconds. The reservoir mounts on a bracket that slides under the hood weather strip so no holes are required.
The best news is that after a couple days of driving the intercooler circuit is 100% totally full with not even a bubble of air in it. I hope this will help stop the constant problems with getting all the air out of the intercooler circuit. This mod will not make any more power but it will keep the intercoolers in tip top shape and ready for action.
Check out the pictures below.
 11-07-2014, 07:26 AM
#3
Super Member
Nice i am thinking of doing a similar thing. I am relocating my starter battery in my R230 sl600 to the trunk which will give me the space for a larger reservoir for the intercooler circuit.
Could you give some additional info on the piping to add the reservoir.
Could you give some additional info on the piping to add the reservoir.
11-07-2014, 08:46 AM
#4

where did you get the reservoir and parts?
11-07-2014, 09:08 AM
#5
Senior Member
Thread Starter
This installation is just for the overflow and will not add more coolant volume to the curcuit internally. What I have found is that it is keeping the system totally full and may permanently get rid of the periodic require,net to vacuum bleed the intercooler circuit to get all the air out.
Biker,
I will look up all the parts. It is a 4 oz brake master cylinder reservoir. A 3/8 hose connects the intercooler overflow nipple to the reservoir that lays down in the channel bhind the cardboard (or what ever that black felt covered stuff is) firewall.
I made the bracket out of some sheet metal I had in the shop. If you bend it over it fits right under the weather strip so you don't have to drill anything out.


Trending Topics
11-07-2014, 11:31 AM
#8
Senior Member
Thread Starter
http://www.jegs.com/i/Wilwood/950/26...FTKCMgodCEIAsQ
I tried some bigger reservoirs but they just don't fit. You will have to make your own bracket. I just used some thin sheet metal that could be bent over the firewall lip for easy removal. The aerospace fasteners I used are sure not required but they look cool! I painted my first trial bracket once I got the fit I wanted. If I do it again I will powder coat it.
The hose provided in the above kit is the exact right length, what are the chances of that?
I recommend setting the height of the reservoir to just trickle into the intercooler neck. At first I had mine mounted to low. I put straight water in initially but after about a week it started turning blue in the reservoir so I know the coolant is getting sucked into and pushed out of the reservoir during the thermal cycles.
11-07-2014, 06:25 PM
#9
Very nice, sometimes the simplest things are overlooked when common sense isn't as common as you think. I've topped it a million times, what a great solution I will consider doing that thanks for sharing.
11-07-2014, 10:28 PM
#10
Senior Member
Thread Starter
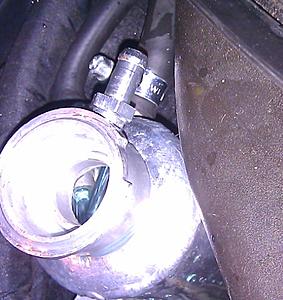
I need to get some of the factory style pinch hose clamps so it will totally look stock. If you do use worm gear clamps make sure to clock it right on the intercooler nipple or the the pressure cap won't totally unscrew..
11-10-2014, 06:54 PM
#11
MBWorld Fanatic!

On the V12TT, filling, bleeding and keeping the air OUT of the IC system is an absolute nightmare. Its a terrible cooling system. You really need a vacuum filler to do the job properly, and I'm not convinced teh Mercedes bleeder is up to it.
Anyway, I came to a similar conclusion earlier this year, and fitted a similar header tank to my car:
I removed the hard pipes and replaced them with hoses, so I could use Y-junctions instead of T-junctions, to minimise flow restriction. T junctions are bad for flow.
I screwed some bleed nipples into the fill ports, and used them as bleed ports, feeding to the top of the header tank / swirl tank.

I fitted the tank to a new bracket mounted to a stud on the LHS wheel arch, next to the heater inlet. The IC system fills through the bottom of the tank, and recirculates to the top:
With the pump running, there's quite a swirl inside - the coolant makes a 45 deg conical swirl/vortex. That flow is what comes through the 2mm holes in each bleed nipple on the top of the IC's.
The tank holds about half a litre.
I haven't connected the overflow outlet to anything.
The pressure cap is loaded to 15 psi, but I doubt it ever sees anything like that - it runs pretty cool.
Unfortunately, filling is still pretty slow because of the small fuel pipes I used.
Now, here's the problem for the OP. Try using your header to fill your IC system. I don't think it will work. You have your header connected to the IC over flow outlet. As long as the IC is containing its pressure normally, the header will never have any connection with the IC system. The pressure on the filler cap will kep them separated.
Sorry.
Nick
Anyway, I came to a similar conclusion earlier this year, and fitted a similar header tank to my car:
I removed the hard pipes and replaced them with hoses, so I could use Y-junctions instead of T-junctions, to minimise flow restriction. T junctions are bad for flow.

I screwed some bleed nipples into the fill ports, and used them as bleed ports, feeding to the top of the header tank / swirl tank.
I fitted the tank to a new bracket mounted to a stud on the LHS wheel arch, next to the heater inlet. The IC system fills through the bottom of the tank, and recirculates to the top:

With the pump running, there's quite a swirl inside - the coolant makes a 45 deg conical swirl/vortex. That flow is what comes through the 2mm holes in each bleed nipple on the top of the IC's.
The tank holds about half a litre.
I haven't connected the overflow outlet to anything.
The pressure cap is loaded to 15 psi, but I doubt it ever sees anything like that - it runs pretty cool.
Unfortunately, filling is still pretty slow because of the small fuel pipes I used.
Now, here's the problem for the OP. Try using your header to fill your IC system. I don't think it will work. You have your header connected to the IC over flow outlet. As long as the IC is containing its pressure normally, the header will never have any connection with the IC system. The pressure on the filler cap will kep them separated.
Sorry.
Nick
11-11-2014, 11:01 AM
#12
Senior Member
Thread Starter
Howdy Nick,
The system works exactly like the overflow for your radiator. As the intercooler system heats up liquid or air is forced out of the overflow, if there is not any liquid to replace what was displaced it makes air pockets in the system. That is the issue that lead me down this path. After a complete vacuum bleed you could watch drips of water trickle out the overflow nipple as the system got hot. After a bunch of cycles of pushing a small amount of the expanded volume out, it will eventually fill with air as the system cools. All of us can verify that because when you take the cap off the system it is never totally full after you have run it for a month or two. I only have a couple weeks on my system but I can say that every time I take the pressure cap off the intercooler circuit it is 100% totally full and will actually spill a little out. That has never happened to me before.
One other measure of performance I have used is that when I first hooked the system up I put totally clean water in the overflow reservoir. Now after a couple weeks of use it is blue just like the intercooler circuit so I know that fluid is transferring in and out of the reservoir.
I have been chasing bleeding problems for years now and this is the first time ever that I think I found a cure. Now I just need to figure out a way to keep the intercoolers from getting so hot!
If you have the ability, try one out on your header tank. If you can keep all the air out of it that will eliminate all the bubbles that form when the streams are mixing together in your header tank and will eliminate your need to vacuum bleed.
I don't have the 275 training document that I think you sent me long ago, but I remember a reference in there that Mercedes wanted to install a overflow on the intercooler system but they did not have the room. I will try to look that up tonight.
Thanks again for all you have done for our community!
11-11-2014, 10:25 PM
#13
Senior Member
Thread Starter
Howdy Nick,
Check out the NOTE on page 52 in the training document. It says that MB wanted to put in a ventilation reservoir but did not have the space. It goes on to say that the special special ventilation procedure is required due to not having the reservoir.
Since the initial installation I have had to top it off twice as the system filled to the top and got all the air out ( about 8 oz total) Since then it has remained totally full.
11-20-2014, 06:29 PM
#14
thanks for all the info and pictures. just did this exactly as you said. very happy.
the best


the best
11-21-2014, 09:56 PM
#16
Senior Member
Thread Starter
So great to hear that you were able to try it out. I have had to top mine off a couple of times but it seems to have stabilized so I know it is working. I did find out it seems to work better the higher you mount the reservoir.
Also make sure to inspect the intercooler radiator cap and make sure the upper seal is good. That seal is imperative so there is a vacuum when the system cools to draw coolant in from the reservoir. Long ago the dealer had replaced my cap due to a faulty seal.
Please send some pics of your install.
After six months or so of collecting data perhaps we can see if we finally figured out how to keep the system full and not have to keep bleeding it. Time will tell. The more data points the better!
11-22-2014, 05:03 AM
#17
MBWorld Fanatic!
BTW, I was very relieved this week to pass the emissions test of the annual UK MoT with my car. This was the first time it had been tested since I fitted the BMW X3 radiator in place of the stock intercooler HE. I'd been concerned that would restrict radiator cooling flow during the emissions test, and cause the engine to overheat.
It never ran too hot on the road, even in peak summer, but if it can't pass the MoT test, then its not a viable modification. I needn't have worried - it just breezed through. I'd been slightly worried about that for two years, ever since I thought of the idea of using a huge rad for an HE.
I also rebuilt both turbos during the summer due to smoking. If I didn't get that right, there's no chance I could have passed that test. I'm feeling more confident about everything now
However, after all that I failed the parking brake test
 A new set of brake shoes arrived literally a few minutes ago, so that's my job this morning....
Regards, Nick
Edit: Test passed this afternoon. I can now legally drive my V12TT on the road for the first time in 9 months. Much happier now. Yahooo!
Last edited by Welwynnick; 11-22-2014 at 11:25 AM.
11-22-2014, 08:54 PM
#18
Senior Member
Thread Starter
So glad you passed the test! I has to make you nervous not knowing if it will make it or not.
The intercooler cap has two seals, the first is the spring loaded pressure seal that sticks down into the filler neck; it provides the pressure limiting function to the system in case it builds too much pressure it will bleed out the neck past the seal and out the little hole that we connect the reservoir to. The second seal is in the very upper portion of the cap and it seals to the very top of the filler neck. This is the seal that closes off the system so all the pressure ends up going in and out of the reservoir tube. Once the fluid or air in the system is forced past the spring loaded seal it is pushed into the reservoir and the pressure is vented out the tiny hole in the reservoir cap. Once the car is off the system cools and a vacuum is created in the intercooler sytem and since the upper portion of the cap is totall sealed the only way it can equalize pressure is to draw coolant in from the external reservoir. Normally it would just suck in air from the open port causing the intercooler sytem to develop air pockets.
In short to answer your question the header tank (reservoir) connects to the tube right between the pressure seal and the upper seal that closes of the system.
11-22-2014, 09:04 PM
#19
Senior Member
Thread Starter
Perhaps this description will make more sense.
Cap Construction
Radiator caps are pretty simple in appearance, but looks can be deceiving. Each part of the cap performs a special function:
� Under the top of the cap is a spring disc diaphragm (and upper sealing gasket on closed system caps) that seals against the top of the radiator filler neck and provides friction to keep the cap from working loose.
� The big spring is what maintains pressure on the coolant. The spring holds the pressure valve and lower sealing gasket against the base of the radiator filler neck to raise the coolant's boiling temperature and to keep it from escaping. When the pressure rating of the spring is exceeded, the pressure valve opens venting coolant into the overflow reservoir.
� The lower sealing gasket is what keeps the coolant where it belongs. This gasket must be in excellent condition for the cap to seal tightly and do its job. If cracked, age-hardened or damaged, pressure and coolant can escape, allowing the engine to overheat.
� A vacuum valve in the bottom of the cap allows coolant to be siphoned back into the radiator when the engine cools down. This keeps the radiator full, which helps prevent overheating and the formation of steam pockets. On many domestic passenger car applications with pressure vent-type caps, the vacuum valve also vents pressure when the cooling system is under light load. This allows the cooling system to operate at atmospheric pressure until the expansion of coolant and the creation of pressure in the system closes the valve.
Two types of
Vacuum relief valves
To better understand the role of the vacuum relief valve, let’s look at the two basic types: the "normally closed" or "spring pressed" type, and the "open' or "weighted' type.
The normally closed type of vacuum relief valve is used in a "Constant pressure" type cap. With this design, the vacuum valve is held shut by a very light spring, creating a totally sealed system. When the engine is started and begins to warm up, coolant pressure starts to rise immediately because the closed vacuum valve prevents pressure from escaping as the coolant expands.
With caps that have the open variety of vacuum valve (called “pressure vent” caps), there's no spring to hold the vacuum valve shut, only a small calibrated weight. When the engine is first started and under light operating conditions, pressure can vent through the vacuum valve. This allows the cooling system to operate at atmospheric or minimum pressure, which reduces strain on the water pump seals, hoses, radiator, and heater core. As the engine starts to heat up, the escaping steam or coolant pushes the vacuum valve up and shut. This seals the system tight and makes the cap function like a constant pressure type of cap.
When the engine is turned off and cools down, vacuum inside the radiator allows the weighted vacuum valve to reopen. This type of vacuum valve design can also allow the water pump to pull additional coolant into the radiator if the cap is located near the radiator hose that connects to the water pump inlet.
 07-19-2015, 12:43 AM
#22
Senior Member
Thread Starter
For those of you that have done this mod I found out something interesting today. The factory inter cooling system radiator cap does not have the traditional filling valve like a traditional radiator cap. That little valve flap in the center of the cap allows the system to suck in from the reservoir when it cools. I installed a new 13 psi cap. FYI they are the same size as a Chevrolet cap.
I will post pictures shortly. It filled much easier now and I have zero air at all in the intercooler system. You take off the cap and water is totally to the top.
I will post pictures shortly. It filled much easier now and I have zero air at all in the intercooler system. You take off the cap and water is totally to the top.
07-19-2015, 08:29 AM
#23

Just seen this thread - this definitely is something I need to do if it solves or helps with reducing air in the system. Does the new reservoir tank be fully filled with coolant too? and does the system still need to be bleeded with a vacuum system Thanks
Edit: meant to say this forum is great! learning so much from you guys
Edit: meant to say this forum is great! learning so much from you guys
Last edited by kk100; 07-19-2015 at 09:54 AM.
07-19-2015, 07:07 PM
#24
Senior Member
Thread Starter
You do not need to vacuum bleed it once installed. But you will need to keep filling up the little reservoir with coolant until it is totally full. After driving for a week or so it will be totally full and you won't ever need to bleed again. It just needs several heat cycles to blow the air out and draw coolant in when the system cools off. Most radiator systems work the exact same way. I do recommend getting a new radiator cap that has a fill valve. I will post some pictures and part numbers tonight.
I checked it today and it was totally full to the top. Yea!
I checked it today and it was totally full to the top. Yea!
07-20-2015, 08:32 AM
#25
You do not need to vacuum bleed it once installed. But you will need to keep filling up the little reservoir with coolant until it is totally full. After driving for a week or so it will be totally full and you won't ever need to bleed again. It just needs several heat cycles to blow the air out and draw coolant in when the system cools off. Most radiator systems work the exact same way. I do recommend getting a new radiator cap that has a fill valve. I will post some pictures and part numbers tonight.
I checked it today and it was totally full to the top. Yea!
I checked it today and it was totally full to the top. Yea!


