'03 W163 full Audio hardware replacement
 11-17-2012, 10:29 PM
#1
Member
Thread Starter

Hi all,
By now you have heard or seen from others that it is entirely possible to change out your factory Mercedes installed sound system despite all attempts at making it nearly impossible! Especially with the introduction of the MCS system and the fiber optics. Of course you could, and many have, go to a pro audio installer shop and let them work their magic and then drive away with your new tunes blaring out the windows. But that would be too simple and a lot of us here like to do it our self�s, right?
To begin with, everywhere I looked, Crutchfield and virtually all audio equipment manufactures claimed that you had to install a single (1) DIN unit size head unit in all W163�s! Really strange to me as the MCS head unit is almost exactly the double (2) DIN dimensions. Well like many of you I wouldn�t take that as an answer and when I questioned the �experts� at Crutchfield, they said that extensive mod�s would be needed to do what I wanted to do. What I wanted to do was to change the head unit and the amp but use the factory BOSE speakers in my �03 ML350. The BOSE subwoofer would have to go as that is a joke, and I was going to add a 10� subwoofer of my own. Again, that wasn�t supposed to be possible unless you were a pro installer, which I am not! Now with all of these changes the CD changer in the back is going to be rendered useless. But who cares when you have USB, SD, a whole slue of I-devices and whatever else that you can add on now!
For starters double (2) DIN dimensions are 180mm X 100mm (7.086� X 3.937 �). The MCS unit measures 7 1/4� X 4 3/8�, with the hole being slightly larger all around. The reason I mention this, this is the size of the hole you are going to have to fill. The closer your new head unit is to this hole size, the easier your job is going to be. Not all manufactures �double DIN� are exactly double DIN! I chose the JVC KW-NT300 for my installation as it measures 7 3/16� X 3 15/16�. The mounting cage that came with the unit almost slid right into the empty hole without any modification. Almost! Once you have pulled out your MCS head unit you will notice that along the sides there are 2 slight groves in the side of the unit that I at first mistook for part of a heat sink. These are actually guide groves that assist in holding the unit firmly in place when installed. If you look in the now vacant hole you will see one on each side, protrusions or guide studs. You will have to remove/cut these off to get any aftermarket head unit to fit. Once you have done that, most anything will now fit in the head unit hole.
You will have by now pulled the center dash cover off, and you will have noticed that Mercedes built in a nice frame to support the head unit. In my case the included mounting cage for my head unit needed to be attached to the center dash plate itself. You don�t want to mount this �cage� to the frame work behind the dash cover as your head unit will then sit too far back in the dash. The only problem that I encountered was that to hold the cage to the center dash cover I had to fold some tabs out from the cage to secure it to the dash cover. This became a problem when I went to put the cover back into the dash as the aforementioned framework has roughly the same dimensions as the whole in the dash cover and with the tabs now folded out behind the cover, the cover would not fit flush. To solve this I notched out where the tabs where located on the frame work which allowed the cover to fit flush once again. (Mind you that the little mod�s that I made to this point will allow the original MCS unit to be reinstalled!) At this point my new JVC head unit would slide into it�s mount and latch tightly. Adding the included trim plate made it look like it had always been there. It fits perfectly in the dash�s recess for the MCS unit.
Now comes the fun part! Wiring! I have seen that people have used a �Metra 70-1784 Radio Wiring Harness for Audi 88-99/Volkswagen 80-Up� they got on Amazon, I didn�t use this as I never saw a straight on shot of the face of the connector to see what the pinning looks like on it and wasn�t sure it would fit the fiber MCS head units cable connector. It is possible that it will fit the wiring harness of the �03 to �05 model ML�s, but I have only heard of older models using this adapter. As a matter of fact, although I haven�t actually tested it myself yet, the fiber MCS head unit does have pinning on the back for the speakers or at least where the older ML�s call for the speakers to be connected just there are no wires pinned on the connector. Now does that mean there is actually an amp in MCS unit that isn�t used, I don�t know. I�ll have to test it sometime! OK, since I didn�t use the Metra adapter, I tied into the wiring without cutting off the connectors. I used �in-line splices�. These are little plastic and metal splices that you put over a wire you don�t want to cut but splice into, and stick in a wire that you are going to use as your tap. You press down on the in-line splice with a pair of pliers and this pushes the small piece of metal through the insulation of both wires making contact with both, now you have spliced into an existing wire without cutting anything. So from the existing connector cable for the MCS (the big one on the bottom next to the fuse, the top one goes to the CD changer) I got my battery constant power (RED) wire, switched/ignition power (PINK) and ground (BROWN). That�s pins 4, 7 and 8 respectively on the connector. This is all on the bottom part of the connector for a fiber MCS system the other half of this connector should have no wires pinned. You can also tap into your dash illumination on a (WHITE) wire from pin 6. At this point if you are planning on using the installed antenna you will need an adapter! But you will also need to jumper power to the antenna amplifier that is mounted in the back. Being that I didn�t see the need for this to be on all the time I jumpered the switched power (PINK) from pin 7 to the (RED) on pin 5 which the MCS used to power the antenna amp. Oddly enough the best price I found for the antenna adapter was from Crutchfield, Item# 12040VW12. If you need a back-up signal for a back-up camera, you can get that from the harness coming off of the front of the shifter assembly on a (GREY) wire from pin 10. There are 2 wires here that are grey, the other one is hot all the time on pin 9 and won�t do you much good unless you want the camera on all the time! If you need a speed input for your system, well I�m still working on that! If you have GPS, I stuck my antenna up under the dash, over more or less the instrument cluster. The top of the dash is just more plastic and doesn�t obstruct the antennas capability of receiving the GPS signals. I always get a good signal.
Now to the speakers. The BOSE amp is mounted on the firewall just to the left of and above the steering column, kind of above and behind the emergency brake pedal assembly. There is just one bolt holding it in place. The connector has all of the connections you will need for your amp outputs. You will find a good power here for your amp (RED) on pin 26 that is fed directly from fuse F-40 (30amp) and a good ground (BROWN) on pin 9. Now the speakers are as follows: left front - (BLUE)(GREEN) pins 13 and 21 with 13 being +, right front - (BLUE)(GREEN) pins 22 and 14 with 22 being +, left rear (PINK)(ORANGE) pins 23 and 15 with 23 +, right rear (PINK)(ORANGE) pins 25 and 17 with 25 being +. Now there are two more options for speakers, one is the rear speakers that are mounted close to the upper part of the back hatch (WHITE)(GREY) pins 24 and 16 with 16 being +. These speakers are connected together so in my opinion it would be best to tie into the rear speakers using say (PINK) pin 23 to the (GREY) pin 16 for the + and (ORANGE) pin 17 to (WHITE) pin 24. This way you will get all of the rear information to those 2 speakers and not just left or right. If you plan on using the factory subwoofer you will want to tap into (WHITE)(GREEN) on pins 11 and 19 with 19 being +. This connector is again located above and to the left of the steering column behind the emergency brake pedal assymly. I found through a little pulling here and there that there is a wire tie that is holding the cable in place roughly above the gas pedal, but if you cut this wire tie, one it will give you enough slack to get the cable down to where it�s a reasonable job to work on in stead of on your back under the dash dodging the brake pedal and other obstructions! And actually, there is enough slack that once I had my wiring done I managed to get the cable up behind the head unit in the dash.
So now we�ve got all of the wiring information to hook up a new system, my problem now was that I had ordered an amp that was, well let�s just say very large! 20� X 12�! When I got my 5 channel amp I was wondering where in the heck I was going to mount this mammoth! It was way to big to try and get back where the BOSE amp was, it was to big to fit under the seat where the BOSE subwoofer had been, to big to mount to the back of the 60% seat because of it�s contours and to big to mount on the side in the back. What I finally found was the covers mounted behind the back seats. The 60% one has a large enough surface for the monster amp to mount, all be it when installed, up side down since I decided I wanted to keep my cargo hauling capability so it had to go under the cover. The only issue is that with this �monster amp� and the seats up, the cover does not rest on the cargo floor area as normal but on the amp itself. When the seats are down the cover rest in the normal position on the floor, so loaded cargo does not press on the amp but rather the way it was designed to, on the cover/floor.
The last things I added were a USB plug on the center console in front of the shifter. This can be used to power a cell phone or USB stick for movies and music. The JVC unit allowed for one 4 port USB hub to be connected to its USB input, so the hub is installed behind the dash so that in the future I can add more ports if I find they might be useful. I also added the included microphone for the cell phone capabilities of the system. I wedged the microphone mounting bracket in behind the overhead console, and routed the wire along the headliner by pushing it in behind the headliner over to the A pillar and down behind the door seal until I got up under the dash.
At this point my back-up camera has not come in. I ordered one from Amazon that is listed as �Car Rear View Reverse Backup Waterproof CCD Camera for TOUAREG POLO PASSAT GOLF�. The dimensions are exactly the size of one of the license plate light lense covers, so this should fit right into where one of the license plate lights are. I will have to rout a wire from the camera, up the back hatch, down the body, and somehow find a way to the head unit! I�m thinking along the sides under the carpet by the doors. The camera will also require power, so switched power will also have to find it�s way to the camera. This should be an unobtrusive install that looks OEM, I hope anyway!
So now that your eyes are bleeding, that is how I replaced my Mercedes installed BOSE MCS no GPS, no Phone system in my 2003 ML350. As others have mentioned, I feel it was a wise decision to leave the BOSE speakers in place, they sound like completely different speakers with a good amp and good head unit driving them! Even before I hooked up the subwoofer the front door speakers put out more bass than the system did with the BOSE subwoofer hooked up! I must say that I am not a big BOSE fan, but I do respect them for making good products.
 One note on the BOSE speakers, they are rated at 2 ohm impedance. This is important to know when buying an amp or if you are planning on the head unit powering your BOSE speakers. Most car speakers are rated at 4, 6 or 8 ohms as are most car amps and head units. A 2 ohm load on most amps is like a short and will cause your new amp or head unit to blow up or in any case not last very long! Make sure if you plan on keeping your BOSE speakers that you check the load handling capabilities of your new amp/head unit.
I hope this may be of some interest or help to someone that is looking to modernize their �03 to �05 ML�s sound system. I would suspect that some of this might help on older ML�s as well. I would also like to thank Maj. Dundee on MBWorld for his input with wiring diagrams that I didn�t have.
By now you have heard or seen from others that it is entirely possible to change out your factory Mercedes installed sound system despite all attempts at making it nearly impossible! Especially with the introduction of the MCS system and the fiber optics. Of course you could, and many have, go to a pro audio installer shop and let them work their magic and then drive away with your new tunes blaring out the windows. But that would be too simple and a lot of us here like to do it our self�s, right?
To begin with, everywhere I looked, Crutchfield and virtually all audio equipment manufactures claimed that you had to install a single (1) DIN unit size head unit in all W163�s! Really strange to me as the MCS head unit is almost exactly the double (2) DIN dimensions. Well like many of you I wouldn�t take that as an answer and when I questioned the �experts� at Crutchfield, they said that extensive mod�s would be needed to do what I wanted to do. What I wanted to do was to change the head unit and the amp but use the factory BOSE speakers in my �03 ML350. The BOSE subwoofer would have to go as that is a joke, and I was going to add a 10� subwoofer of my own. Again, that wasn�t supposed to be possible unless you were a pro installer, which I am not! Now with all of these changes the CD changer in the back is going to be rendered useless. But who cares when you have USB, SD, a whole slue of I-devices and whatever else that you can add on now!
For starters double (2) DIN dimensions are 180mm X 100mm (7.086� X 3.937 �). The MCS unit measures 7 1/4� X 4 3/8�, with the hole being slightly larger all around. The reason I mention this, this is the size of the hole you are going to have to fill. The closer your new head unit is to this hole size, the easier your job is going to be. Not all manufactures �double DIN� are exactly double DIN! I chose the JVC KW-NT300 for my installation as it measures 7 3/16� X 3 15/16�. The mounting cage that came with the unit almost slid right into the empty hole without any modification. Almost! Once you have pulled out your MCS head unit you will notice that along the sides there are 2 slight groves in the side of the unit that I at first mistook for part of a heat sink. These are actually guide groves that assist in holding the unit firmly in place when installed. If you look in the now vacant hole you will see one on each side, protrusions or guide studs. You will have to remove/cut these off to get any aftermarket head unit to fit. Once you have done that, most anything will now fit in the head unit hole.
You will have by now pulled the center dash cover off, and you will have noticed that Mercedes built in a nice frame to support the head unit. In my case the included mounting cage for my head unit needed to be attached to the center dash plate itself. You don�t want to mount this �cage� to the frame work behind the dash cover as your head unit will then sit too far back in the dash. The only problem that I encountered was that to hold the cage to the center dash cover I had to fold some tabs out from the cage to secure it to the dash cover. This became a problem when I went to put the cover back into the dash as the aforementioned framework has roughly the same dimensions as the whole in the dash cover and with the tabs now folded out behind the cover, the cover would not fit flush. To solve this I notched out where the tabs where located on the frame work which allowed the cover to fit flush once again. (Mind you that the little mod�s that I made to this point will allow the original MCS unit to be reinstalled!) At this point my new JVC head unit would slide into it�s mount and latch tightly. Adding the included trim plate made it look like it had always been there. It fits perfectly in the dash�s recess for the MCS unit.
Now comes the fun part! Wiring! I have seen that people have used a �Metra 70-1784 Radio Wiring Harness for Audi 88-99/Volkswagen 80-Up� they got on Amazon, I didn�t use this as I never saw a straight on shot of the face of the connector to see what the pinning looks like on it and wasn�t sure it would fit the fiber MCS head units cable connector. It is possible that it will fit the wiring harness of the �03 to �05 model ML�s, but I have only heard of older models using this adapter. As a matter of fact, although I haven�t actually tested it myself yet, the fiber MCS head unit does have pinning on the back for the speakers or at least where the older ML�s call for the speakers to be connected just there are no wires pinned on the connector. Now does that mean there is actually an amp in MCS unit that isn�t used, I don�t know. I�ll have to test it sometime! OK, since I didn�t use the Metra adapter, I tied into the wiring without cutting off the connectors. I used �in-line splices�. These are little plastic and metal splices that you put over a wire you don�t want to cut but splice into, and stick in a wire that you are going to use as your tap. You press down on the in-line splice with a pair of pliers and this pushes the small piece of metal through the insulation of both wires making contact with both, now you have spliced into an existing wire without cutting anything. So from the existing connector cable for the MCS (the big one on the bottom next to the fuse, the top one goes to the CD changer) I got my battery constant power (RED) wire, switched/ignition power (PINK) and ground (BROWN). That�s pins 4, 7 and 8 respectively on the connector. This is all on the bottom part of the connector for a fiber MCS system the other half of this connector should have no wires pinned. You can also tap into your dash illumination on a (WHITE) wire from pin 6. At this point if you are planning on using the installed antenna you will need an adapter! But you will also need to jumper power to the antenna amplifier that is mounted in the back. Being that I didn�t see the need for this to be on all the time I jumpered the switched power (PINK) from pin 7 to the (RED) on pin 5 which the MCS used to power the antenna amp. Oddly enough the best price I found for the antenna adapter was from Crutchfield, Item# 12040VW12. If you need a back-up signal for a back-up camera, you can get that from the harness coming off of the front of the shifter assembly on a (GREY) wire from pin 10. There are 2 wires here that are grey, the other one is hot all the time on pin 9 and won�t do you much good unless you want the camera on all the time! If you need a speed input for your system, well I�m still working on that! If you have GPS, I stuck my antenna up under the dash, over more or less the instrument cluster. The top of the dash is just more plastic and doesn�t obstruct the antennas capability of receiving the GPS signals. I always get a good signal.
Now to the speakers. The BOSE amp is mounted on the firewall just to the left of and above the steering column, kind of above and behind the emergency brake pedal assembly. There is just one bolt holding it in place. The connector has all of the connections you will need for your amp outputs. You will find a good power here for your amp (RED) on pin 26 that is fed directly from fuse F-40 (30amp) and a good ground (BROWN) on pin 9. Now the speakers are as follows: left front - (BLUE)(GREEN) pins 13 and 21 with 13 being +, right front - (BLUE)(GREEN) pins 22 and 14 with 22 being +, left rear (PINK)(ORANGE) pins 23 and 15 with 23 +, right rear (PINK)(ORANGE) pins 25 and 17 with 25 being +. Now there are two more options for speakers, one is the rear speakers that are mounted close to the upper part of the back hatch (WHITE)(GREY) pins 24 and 16 with 16 being +. These speakers are connected together so in my opinion it would be best to tie into the rear speakers using say (PINK) pin 23 to the (GREY) pin 16 for the + and (ORANGE) pin 17 to (WHITE) pin 24. This way you will get all of the rear information to those 2 speakers and not just left or right. If you plan on using the factory subwoofer you will want to tap into (WHITE)(GREEN) on pins 11 and 19 with 19 being +. This connector is again located above and to the left of the steering column behind the emergency brake pedal assymly. I found through a little pulling here and there that there is a wire tie that is holding the cable in place roughly above the gas pedal, but if you cut this wire tie, one it will give you enough slack to get the cable down to where it�s a reasonable job to work on in stead of on your back under the dash dodging the brake pedal and other obstructions! And actually, there is enough slack that once I had my wiring done I managed to get the cable up behind the head unit in the dash.
So now we�ve got all of the wiring information to hook up a new system, my problem now was that I had ordered an amp that was, well let�s just say very large! 20� X 12�! When I got my 5 channel amp I was wondering where in the heck I was going to mount this mammoth! It was way to big to try and get back where the BOSE amp was, it was to big to fit under the seat where the BOSE subwoofer had been, to big to mount to the back of the 60% seat because of it�s contours and to big to mount on the side in the back. What I finally found was the covers mounted behind the back seats. The 60% one has a large enough surface for the monster amp to mount, all be it when installed, up side down since I decided I wanted to keep my cargo hauling capability so it had to go under the cover. The only issue is that with this �monster amp� and the seats up, the cover does not rest on the cargo floor area as normal but on the amp itself. When the seats are down the cover rest in the normal position on the floor, so loaded cargo does not press on the amp but rather the way it was designed to, on the cover/floor.
The last things I added were a USB plug on the center console in front of the shifter. This can be used to power a cell phone or USB stick for movies and music. The JVC unit allowed for one 4 port USB hub to be connected to its USB input, so the hub is installed behind the dash so that in the future I can add more ports if I find they might be useful. I also added the included microphone for the cell phone capabilities of the system. I wedged the microphone mounting bracket in behind the overhead console, and routed the wire along the headliner by pushing it in behind the headliner over to the A pillar and down behind the door seal until I got up under the dash.
At this point my back-up camera has not come in. I ordered one from Amazon that is listed as �Car Rear View Reverse Backup Waterproof CCD Camera for TOUAREG POLO PASSAT GOLF�. The dimensions are exactly the size of one of the license plate light lense covers, so this should fit right into where one of the license plate lights are. I will have to rout a wire from the camera, up the back hatch, down the body, and somehow find a way to the head unit! I�m thinking along the sides under the carpet by the doors. The camera will also require power, so switched power will also have to find it�s way to the camera. This should be an unobtrusive install that looks OEM, I hope anyway!
So now that your eyes are bleeding, that is how I replaced my Mercedes installed BOSE MCS no GPS, no Phone system in my 2003 ML350. As others have mentioned, I feel it was a wise decision to leave the BOSE speakers in place, they sound like completely different speakers with a good amp and good head unit driving them! Even before I hooked up the subwoofer the front door speakers put out more bass than the system did with the BOSE subwoofer hooked up! I must say that I am not a big BOSE fan, but I do respect them for making good products.
One note on the BOSE speakers, they are rated at 2 ohm impedance. This is important to know when buying an amp or if you are planning on the head unit powering your BOSE speakers. Most car speakers are rated at 4, 6 or 8 ohms as are most car amps and head units. A 2 ohm load on most amps is like a short and will cause your new amp or head unit to blow up or in any case not last very long! Make sure if you plan on keeping your BOSE speakers that you check the load handling capabilities of your new amp/head unit.I hope this may be of some interest or help to someone that is looking to modernize their �03 to �05 ML�s sound system. I would suspect that some of this might help on older ML�s as well. I would also like to thank Maj. Dundee on MBWorld for his input with wiring diagrams that I didn�t have.
Last edited by dfghhgfd; 11-22-2012 at 11:09 AM. Reason: spelling
 11-29-2012, 12:59 PM
#2
Member
Thread Starter
Helpful video
For those of you attempting a part of this change out or all of it, here is a little video from YouTube that might help a little. It's in Russian, but you will see what I want to point out for an aftermarket head unit install in the W163's.
If you remember above I said for the aftermarket head unit install there where some tabs/guide pins that you were going to need to cut off? OK, in this video you will see these tabs/guide pins. Once he has removed the dash cover, disconnected the 2 wires and lays the cover to the side, he points to 2 tabs that have white dots painted on them. These are the tabs that need to be cut off. Those will need to be cut off flush with the sides. They are plastic so it shouldn�t be too big a production. That will then give you the space you will need to fit most any double (2) DIN head unit into his slot.
Another good thing in this video is of course how to pull the dash center cover plate. Also, see how he disconnects 2 wires once he pulls the cover off? These will not allow the cover plate to move too far from the dash, so you need to disconnect them for this really to be of any help. If you plan on removing all of the wires from the cover plate, I would recommend that you mark at least one side of the outside 2 wire bundles if you have heated seats and power rear vent windows. You have one each for each side of these buttons and the connectors are the identical! Mark them so that your buttons work correctly latter.
In this video he lays the cover plate off to the side. If you like, you can set the emergency brake. Go to the shifter, and below the P-R-N-D indicator you will notice a little circular extension of this indentation. This is a spring loaded cover for the shifter release. Take a long screw driver push it down into this hole and this will allow you to release the shifter and move it back to N or D, making it more convenient in that you can now lay the dash cover plate straight back over the shifter and it will nicely fit over the shifter giving you a little better access to the wiring in the center dash.
One last note, nothing major! The wire bundles are wrapped with a black tape that is sort of fuzzy on one side. Remember that this tape has been in there for at least 7 years now depending on your model year. So, there will be a lot of sticky tape glue on the wire bundles! Once you have re-installed everything you will notice that this �sticky tape glue� has gotten all over your hands and anything that the wire bundles have came into contact with.
Good luck, and I hope this was helpful.
 12-04-2012, 08:50 PM
#4
Member
Thread Starter
Thanks smo0othride.
One other recommendation I have is that you get the or a 'plastic pry bar/piece'. This will come in handy removing many of the interior pieces that you do not want to damage with something like a screw driver.
One other recommendation I have is that you get the or a 'plastic pry bar/piece'. This will come in handy removing many of the interior pieces that you do not want to damage with something like a screw driver.
12-15-2012, 10:28 PM
#5
Member
Thread Starter
An addition to the install story!
OK, I finally got my back up camera installed. I found one that had a wire-less system solving the running wires to the front of the car issue. Unfortunately I never found a camera that was listed as being for the W163’s. The camera was designed for Volkswagens. It was designed to put in place of one of the license plate lights. The outside dimensions were the same as the ML‘s, but then when I pulled the license plate light out, well lets just say that it isn’t exactly the same! I had to do some modifying! After a little cutting and manufacturing I finally got it in and it works great.
Being that my camera is wire-less I needed to find switched power in the rear hatch area to power the camera and transmitter. Actually, no matter what kind of camera you use, you will need power for the camera. Well, in my case that was easy! The AM/FM antenna amplifier is in the rear hatch and I powered it from the switched power since it no longer received it’s power from the now removed MCS, so I tapped into that. That will be on a (Red) wire on a connector by itself. You will recognize the antenna amplifier because it is the only thing that has an antenna type connector on it! This is a great option if you are installing a camera that you can access at anytime, this will be energized when ever the car is powered on. This will allow you to select the camera while you are driving if your head unit is so equipped. Handy to check your trailer while driving down the road.
Now, in the original article I mentioned that I had tied into the shifter for the reverse signal to switch the camera on. That didn’t actually work. Should have, but didn’t. On further review I noticed that there is actually a reverse signal sent to the MCS on the connector that is supposed to come from the CD changer PE 82.60-2000 on pin #3 (Grey). There you will find a good reverse signal.
Another find was that there is also a ‘speed’ signal sent to the MCS on PE 82.00-2700 pin #1 (Blue). This is the signal for the speed sensitive volume control. Now this may work on some, but this doesn’t seem to work to well on my JVC head unit. There was definitely a signal that was speed related on this wire, but it wasn’t something that the JVC was looking for. I connected it and the input threw the GPS way off! I drove about a quarter mile and the GPS should about 3 miles! Needless to say I disconnected that wire! I need to research to see if the GPS head unit is capable of learning the speed signal.
Lastly the GPS antenna connector that is in the factory wiring harness is the same as what came with my JVC head units GPS antenna. Even though my MCS was without GPS, the antenna and wiring was in place, so you should be able to use the factory installed antenna and wont have to find a place to install your new GPS antenna.
Again, I hope this informative and helps someone out there.
Last edited by dfghhgfd; 12-15-2012 at 10:31 PM.
09-29-2014, 02:50 PM
#6
thank you for the detail above, used it to do mine and here are some added info
ML350 2003:
without Bose upgrade (if it says Bose anywhere on your audio, you have Bose)
Connector: (pin#-you fill see it once looking at face of connector that goes into the radio)
Power (my part#202-545-36-26 SIDE A) � this one is comprised of 2 plugs with side A and B
Pin#: Color: Description:
4 Red (thick) Constant power supply +
7 Pink Ignition on power supply +
6 White illumination +
5 Red (thin) power supply to power antenna +
Speakers (my part#202-545-36-26 SIDE B) � this one is comprised of 2 plugs with side A and B
This wiring is for without Bose amplifier:
Pin: Description:
7(+) & 8 (-) Rear Left Speaker
5(+) & 6 (-) Front Left Speaker
3(+) & 4 (-) Front Right Speaker
1(+) & 2 (-) Rear Right Speaker
This wiring is for Bose amplifier (near the parking brake):
on the amplifier plug:
Pin: Color: Description:
23(+) & 15 (-) Pink/orange Rear Left Speaker
13(+) & 21 (-) Blue/Green Front Left Speaker
22(+) & 14 (-) Blue/Green Front Right Speaker
25(+) & 17 (-) Pink/orange Rear Right Speaker
16(+) & 24 (-) White/Gray Rear Middle Speaker
19(+) & 11 (-) White/Green Sub-woofer
To know resistance of a speaker, connect multimeter in ohm settings to (+) and (-) of a speaker
Rear view Camera:
�cd changer� plug (my part#202-545-37-28) connects into the stereo
Pin#: Color: Description:
3 Gray gives (+) once car is in reverse shifter setting.
10-10-2014, 12:57 PM
#7
Junior Member

Join Date: Jul 2014
Location: Los Angeles, CA
Posts: 63
Likes: 0
Received 0 Likes
on
0 Posts
2001 ml320, 2002 c240
2001 W163 ML320 HU/audio replacement
Great post and tutorial!
Given that this article was geared towards the '03 model, is it practically the same install on a 2001 ML320? Mine is also equipped with the MCS bose system with the changer in the back, but without the NAV. I'm pretty sure it's FO as well based on the threads that I've read. I'd like to replace the head unit only and keep the amp, speakers and subwoofer. I'm pretty satisfied with them. I'd like to be able to connect my iphone and play music from it and talk via blue connection. Plus, add the backup camera depending on the HU.
Your feedbacks are highly appreciated. Thanks.
Trending Topics
10-10-2014, 10:53 PM
#8
Great post and tutorial!
Given that this article was geared towards the '03 model, is it practically the same install on a 2001 ML320? Mine is also equipped with the MCS bose system with the changer in the back, but without the NAV. I'm pretty sure it's FO as well based on the threads that I've read. I'd like to replace the head unit only and keep the amp, speakers and subwoofer. I'm pretty satisfied with them. I'd like to be able to connect my iphone and play music from it and talk via blue connection. Plus, add the backup camera depending on the HU.
Your feedbacks are highly appreciated. Thanks.
Given that this article was geared towards the '03 model, is it practically the same install on a 2001 ML320? Mine is also equipped with the MCS bose system with the changer in the back, but without the NAV. I'm pretty sure it's FO as well based on the threads that I've read. I'd like to replace the head unit only and keep the amp, speakers and subwoofer. I'm pretty satisfied with them. I'd like to be able to connect my iphone and play music from it and talk via blue connection. Plus, add the backup camera depending on the HU.
Your feedbacks are highly appreciated. Thanks.
- audio signal from MCS to amp is via FO...unless you can find an aftermarket HU that sends audio via FO, might as well toss this idea away.
- Bose speakers and sub are 2-ohm impedance. Most HUs are 4-ohm. This means if you like loud volumes, you'd risk frying the speakers and/or HU. Although many ppl have kept their stock Bose and have enjoyed it (at moderate volumes).
- Unless your HU's internal amp is a 5-channel (most likely not), you'd need either a separate amp + sub or a powered sub.
- The HU's internal amp may/may not be adequate to your liking, therefore, you may/may not consider having an aftermarket amp.
- The additional features that you'd like (BT, camera, etc...) that obviously depends on the brand/model of the HU of your choice.
 10-12-2014, 12:59 AM
#9
Junior Member
Join Date: Jul 2014
Location: Los Angeles, CA
Posts: 63
Likes: 0
Received 0 Likes
on
0 Posts
2001 ml320, 2002 c240
Thanks CGL1! I was a little confused with the other threads where only the HU were replaced. I also ran across this: one of your reply from another thread.
"I replace the entire system: aftermarket HU, amp, Focal speakers and slim profile powered sub. Never looked back since."
If I look for another HU, a new amp that can handle 2ohms for the Bose speakers and a powered sub, I should be fine. In your install, did you use the existing wiring to connect the new amp to the speakers? Would you be able to tell me where you made the connection if you did.
Another option mentioned was to get a 5-channel amp that can handle 2ohms so the existing sub can still be used. So the only thing bypassed is the Bose amp.
Thanks again for your time.
10-13-2014, 01:45 AM
#10
Thanks CGL1! I was a little confused with the other threads where only the HU were replaced. I also ran across this: one of your reply from another thread.
"I replace the entire system: aftermarket HU, amp, Focal speakers and slim profile powered sub. Never looked back since."
If I look for another HU, a new amp that can handle 2ohms for the Bose speakers and a powered sub, I should be fine. In your install, did you use the existing wiring to connect the new amp to the speakers? Would you be able to tell me where you made the connection if you did.
Another option mentioned was to get a 5-channel amp that can handle 2ohms so the existing sub can still be used. So the only thing bypassed is the Bose amp.
Thanks again for your time.
"I replace the entire system: aftermarket HU, amp, Focal speakers and slim profile powered sub. Never looked back since."
If I look for another HU, a new amp that can handle 2ohms for the Bose speakers and a powered sub, I should be fine. In your install, did you use the existing wiring to connect the new amp to the speakers? Would you be able to tell me where you made the connection if you did.
Another option mentioned was to get a 5-channel amp that can handle 2ohms so the existing sub can still be used. So the only thing bypassed is the Bose amp.
Thanks again for your time.
The copper speaker wires that goes straight to the speakers are from the Bose amp, which is up above the driver's brake pedal, towards the door side and behind the white insulation. I bought a Rockford Fosgate mini amp so that it can fit in the spot where the Bose amp used to live. I installed the low-profile powered sub underneath the passenger seat.
If you planned on a 5-channel amp, then you'd be looking at a different placement (amp too big to go where the Bose amp lived). Then, run your audio signal to 5-channel amp, then back to where the Bose amp lived, so you can connect to the speaker wires (in a big plug that plugs into the Bose amp).
I have attached a link to the same Rockford Fosgate mini amp as mine and it handles both 4ohm and 2ohm (my mini amp can only do 4ohm). This way, when you are ready to or if you'd like to upgrade the speakers then you wouldn't have to worry about having to get a different amp.
http://www.sonicelectronix.com/item_...-PBR300X2.html
10-13-2014, 12:53 PM
#11
Junior Member
Join Date: Jul 2014
Location: Los Angeles, CA
Posts: 63
Likes: 0
Received 0 Likes
on
0 Posts
2001 ml320, 2002 c240
As always CGL1, thanks a LOT. Much appreciated. I'll look into that amp and will keep you posted. It's kinda long term project for me so I will get going on this. Thanks again
07-09-2018, 05:22 PM
#12

Install kit you got
Thanks for this writeup,
Where did you get your install kit? That looks like it was made for the ML. I bought one but does not look good and then I saw yours. Thanks.
Where did you get your install kit? That looks like it was made for the ML. I bought one but does not look good and then I saw yours. Thanks.
Hi all,
By now you have heard or seen from others that it is entirely possible to change out your factory Mercedes installed sound system despite all attempts at making it nearly impossible! Especially with the introduction of the MCS system and the fiber optics. Of course you could, and many have, go to a pro audio installer shop and let them work their magic and then drive away with your new tunes blaring out the windows. But that would be too simple and a lot of us here like to do it our self�s, right?
To begin with, everywhere I looked, Crutchfield and virtually all audio equipment manufactures claimed that you had to install a single (1) DIN unit size head unit in all W163�s! Really strange to me as the MCS head unit is almost exactly the double (2) DIN dimensions. Well like many of you I wouldn�t take that as an answer and when I questioned the �experts� at Crutchfield, they said that extensive mod�s would be needed to do what I wanted to do. What I wanted to do was to change the head unit and the amp but use the factory BOSE speakers in my �03 ML350. The BOSE subwoofer would have to go as that is a joke, and I was going to add a 10� subwoofer of my own. Again, that wasn�t supposed to be possible unless you were a pro installer, which I am not! Now with all of these changes the CD changer in the back is going to be rendered useless. But who cares when you have USB, SD, a whole slue of I-devices and whatever else that you can add on now!
For starters double (2) DIN dimensions are 180mm X 100mm (7.086� X 3.937 �). The MCS unit measures 7 1/4� X 4 3/8�, with the hole being slightly larger all around. The reason I mention this, this is the size of the hole you are going to have to fill. The closer your new head unit is to this hole size, the easier your job is going to be. Not all manufactures �double DIN� are exactly double DIN! I chose the JVC KW-NT300 for my installation as it measures 7 3/16� X 3 15/16�. The mounting cage that came with the unit almost slid right into the empty hole without any modification. Almost! Once you have pulled out your MCS head unit you will notice that along the sides there are 2 slight groves in the side of the unit that I at first mistook for part of a heat sink. These are actually guide groves that assist in holding the unit firmly in place when installed. If you look in the now vacant hole you will see one on each side, protrusions or guide studs. You will have to remove/cut these off to get any aftermarket head unit to fit. Once you have done that, most anything will now fit in the head unit hole.
You will have by now pulled the center dash cover off, and you will have noticed that Mercedes built in a nice frame to support the head unit. In my case the included mounting cage for my head unit needed to be attached to the center dash plate itself. You don�t want to mount this �cage� to the frame work behind the dash cover as your head unit will then sit too far back in the dash. The only problem that I encountered was that to hold the cage to the center dash cover I had to fold some tabs out from the cage to secure it to the dash cover. This became a problem when I went to put the cover back into the dash as the aforementioned framework has roughly the same dimensions as the whole in the dash cover and with the tabs now folded out behind the cover, the cover would not fit flush. To solve this I notched out where the tabs where located on the frame work which allowed the cover to fit flush once again. (Mind you that the little mod�s that I made to this point will allow the original MCS unit to be reinstalled!) At this point my new JVC head unit would slide into it�s mount and latch tightly. Adding the included trim plate made it look like it had always been there. It fits perfectly in the dash�s recess for the MCS unit.
Now comes the fun part! Wiring! I have seen that people have used a �Metra 70-1784 Radio Wiring Harness for Audi 88-99/Volkswagen 80-Up� they got on Amazon, I didn�t use this as I never saw a straight on shot of the face of the connector to see what the pinning looks like on it and wasn�t sure it would fit the fiber MCS head units cable connector. It is possible that it will fit the wiring harness of the �03 to �05 model ML�s, but I have only heard of older models using this adapter. As a matter of fact, although I haven�t actually tested it myself yet, the fiber MCS head unit does have pinning on the back for the speakers or at least where the older ML�s call for the speakers to be connected just there are no wires pinned on the connector. Now does that mean there is actually an amp in MCS unit that isn�t used, I don�t know. I�ll have to test it sometime! OK, since I didn�t use the Metra adapter, I tied into the wiring without cutting off the connectors. I used �in-line splices�. These are little plastic and metal splices that you put over a wire you don�t want to cut but splice into, and stick in a wire that you are going to use as your tap. You press down on the in-line splice with a pair of pliers and this pushes the small piece of metal through the insulation of both wires making contact with both, now you have spliced into an existing wire without cutting anything. So from the existing connector cable for the MCS (the big one on the bottom next to the fuse, the top one goes to the CD changer) I got my battery constant power (RED) wire, switched/ignition power (PINK) and ground (BROWN). That�s pins 4, 7 and 8 respectively on the connector. This is all on the bottom part of the connector for a fiber MCS system the other half of this connector should have no wires pinned. You can also tap into your dash illumination on a (WHITE) wire from pin 6. At this point if you are planning on using the installed antenna you will need an adapter! But you will also need to jumper power to the antenna amplifier that is mounted in the back. Being that I didn�t see the need for this to be on all the time I jumpered the switched power (PINK) from pin 7 to the (RED) on pin 5 which the MCS used to power the antenna amp. Oddly enough the best price I found for the antenna adapter was from Crutchfield, Item# 12040VW12. If you need a back-up signal for a back-up camera, you can get that from the harness coming off of the front of the shifter assembly on a (GREY) wire from pin 10. There are 2 wires here that are grey, the other one is hot all the time on pin 9 and won�t do you much good unless you want the camera on all the time! If you need a speed input for your system, well I�m still working on that! If you have GPS, I stuck my antenna up under the dash, over more or less the instrument cluster. The top of the dash is just more plastic and doesn�t obstruct the antennas capability of receiving the GPS signals. I always get a good signal.
Now to the speakers. The BOSE amp is mounted on the firewall just to the left of and above the steering column, kind of above and behind the emergency brake pedal assembly. There is just one bolt holding it in place. The connector has all of the connections you will need for your amp outputs. You will find a good power here for your amp (RED) on pin 26 that is fed directly from fuse F-40 (30amp) and a good ground (BROWN) on pin 9. Now the speakers are as follows: left front - (BLUE)(GREEN) pins 13 and 21 with 13 being +, right front - (BLUE)(GREEN) pins 22 and 14 with 22 being +, left rear (PINK)(ORANGE) pins 23 and 15 with 23 +, right rear (PINK)(ORANGE) pins 25 and 17 with 25 being +. Now there are two more options for speakers, one is the rear speakers that are mounted close to the upper part of the back hatch (WHITE)(GREY) pins 24 and 16 with 16 being +. These speakers are connected together so in my opinion it would be best to tie into the rear speakers using say (PINK) pin 23 to the (GREY) pin 16 for the + and (ORANGE) pin 17 to (WHITE) pin 24. This way you will get all of the rear information to those 2 speakers and not just left or right. If you plan on using the factory subwoofer you will want to tap into (WHITE)(GREEN) on pins 11 and 19 with 19 being +. This connector is again located above and to the left of the steering column behind the emergency brake pedal assymly. I found through a little pulling here and there that there is a wire tie that is holding the cable in place roughly above the gas pedal, but if you cut this wire tie, one it will give you enough slack to get the cable down to where it�s a reasonable job to work on in stead of on your back under the dash dodging the brake pedal and other obstructions! And actually, there is enough slack that once I had my wiring done I managed to get the cable up behind the head unit in the dash.
So now we�ve got all of the wiring information to hook up a new system, my problem now was that I had ordered an amp that was, well let�s just say very large! 20� X 12�! When I got my 5 channel amp I was wondering where in the heck I was going to mount this mammoth! It was way to big to try and get back where the BOSE amp was, it was to big to fit under the seat where the BOSE subwoofer had been, to big to mount to the back of the 60% seat because of it�s contours and to big to mount on the side in the back. What I finally found was the covers mounted behind the back seats. The 60% one has a large enough surface for the monster amp to mount, all be it when installed, up side down since I decided I wanted to keep my cargo hauling capability so it had to go under the cover. The only issue is that with this �monster amp� and the seats up, the cover does not rest on the cargo floor area as normal but on the amp itself. When the seats are down the cover rest in the normal position on the floor, so loaded cargo does not press on the amp but rather the way it was designed to, on the cover/floor.
The last things I added were a USB plug on the center console in front of the shifter. This can be used to power a cell phone or USB stick for movies and music. The JVC unit allowed for one 4 port USB hub to be connected to its USB input, so the hub is installed behind the dash so that in the future I can add more ports if I find they might be useful. I also added the included microphone for the cell phone capabilities of the system. I wedged the microphone mounting bracket in behind the overhead console, and routed the wire along the headliner by pushing it in behind the headliner over to the A pillar and down behind the door seal until I got up under the dash.
At this point my back-up camera has not come in. I ordered one from Amazon that is listed as �Car Rear View Reverse Backup Waterproof CCD Camera for TOUAREG POLO PASSAT GOLF�. The dimensions are exactly the size of one of the license plate light lense covers, so this should fit right into where one of the license plate lights are. I will have to rout a wire from the camera, up the back hatch, down the body, and somehow find a way to the head unit! I�m thinking along the sides under the carpet by the doors. The camera will also require power, so switched power will also have to find it�s way to the camera. This should be an unobtrusive install that looks OEM, I hope anyway!
So now that your eyes are bleeding, that is how I replaced my Mercedes installed BOSE MCS no GPS, no Phone system in my 2003 ML350. As others have mentioned, I feel it was a wise decision to leave the BOSE speakers in place, they sound like completely different speakers with a good amp and good head unit driving them! Even before I hooked up the subwoofer the front door speakers put out more bass than the system did with the BOSE subwoofer hooked up! I must say that I am not a big BOSE fan, but I do respect them for making good products.
One note on the BOSE speakers, they are rated at 2 ohm impedance. This is important to know when buying an amp or if you are planning on the head unit powering your BOSE speakers. Most car speakers are rated at 4, 6 or 8 ohms as are most car amps and head units. A 2 ohm load on most amps is like a short and will cause your new amp or head unit to blow up or in any case not last very long! Make sure if you plan on keeping your BOSE speakers that you check the load handling capabilities of your new amp/head unit.
I hope this may be of some interest or help to someone that is looking to modernize their �03 to �05 ML�s sound system. I would suspect that some of this might help on older ML�s as well. I would also like to thank Maj. Dundee on MBWorld for his input with wiring diagrams that I didn�t have.
By now you have heard or seen from others that it is entirely possible to change out your factory Mercedes installed sound system despite all attempts at making it nearly impossible! Especially with the introduction of the MCS system and the fiber optics. Of course you could, and many have, go to a pro audio installer shop and let them work their magic and then drive away with your new tunes blaring out the windows. But that would be too simple and a lot of us here like to do it our self�s, right?
To begin with, everywhere I looked, Crutchfield and virtually all audio equipment manufactures claimed that you had to install a single (1) DIN unit size head unit in all W163�s! Really strange to me as the MCS head unit is almost exactly the double (2) DIN dimensions. Well like many of you I wouldn�t take that as an answer and when I questioned the �experts� at Crutchfield, they said that extensive mod�s would be needed to do what I wanted to do. What I wanted to do was to change the head unit and the amp but use the factory BOSE speakers in my �03 ML350. The BOSE subwoofer would have to go as that is a joke, and I was going to add a 10� subwoofer of my own. Again, that wasn�t supposed to be possible unless you were a pro installer, which I am not! Now with all of these changes the CD changer in the back is going to be rendered useless. But who cares when you have USB, SD, a whole slue of I-devices and whatever else that you can add on now!
For starters double (2) DIN dimensions are 180mm X 100mm (7.086� X 3.937 �). The MCS unit measures 7 1/4� X 4 3/8�, with the hole being slightly larger all around. The reason I mention this, this is the size of the hole you are going to have to fill. The closer your new head unit is to this hole size, the easier your job is going to be. Not all manufactures �double DIN� are exactly double DIN! I chose the JVC KW-NT300 for my installation as it measures 7 3/16� X 3 15/16�. The mounting cage that came with the unit almost slid right into the empty hole without any modification. Almost! Once you have pulled out your MCS head unit you will notice that along the sides there are 2 slight groves in the side of the unit that I at first mistook for part of a heat sink. These are actually guide groves that assist in holding the unit firmly in place when installed. If you look in the now vacant hole you will see one on each side, protrusions or guide studs. You will have to remove/cut these off to get any aftermarket head unit to fit. Once you have done that, most anything will now fit in the head unit hole.
You will have by now pulled the center dash cover off, and you will have noticed that Mercedes built in a nice frame to support the head unit. In my case the included mounting cage for my head unit needed to be attached to the center dash plate itself. You don�t want to mount this �cage� to the frame work behind the dash cover as your head unit will then sit too far back in the dash. The only problem that I encountered was that to hold the cage to the center dash cover I had to fold some tabs out from the cage to secure it to the dash cover. This became a problem when I went to put the cover back into the dash as the aforementioned framework has roughly the same dimensions as the whole in the dash cover and with the tabs now folded out behind the cover, the cover would not fit flush. To solve this I notched out where the tabs where located on the frame work which allowed the cover to fit flush once again. (Mind you that the little mod�s that I made to this point will allow the original MCS unit to be reinstalled!) At this point my new JVC head unit would slide into it�s mount and latch tightly. Adding the included trim plate made it look like it had always been there. It fits perfectly in the dash�s recess for the MCS unit.
Now comes the fun part! Wiring! I have seen that people have used a �Metra 70-1784 Radio Wiring Harness for Audi 88-99/Volkswagen 80-Up� they got on Amazon, I didn�t use this as I never saw a straight on shot of the face of the connector to see what the pinning looks like on it and wasn�t sure it would fit the fiber MCS head units cable connector. It is possible that it will fit the wiring harness of the �03 to �05 model ML�s, but I have only heard of older models using this adapter. As a matter of fact, although I haven�t actually tested it myself yet, the fiber MCS head unit does have pinning on the back for the speakers or at least where the older ML�s call for the speakers to be connected just there are no wires pinned on the connector. Now does that mean there is actually an amp in MCS unit that isn�t used, I don�t know. I�ll have to test it sometime! OK, since I didn�t use the Metra adapter, I tied into the wiring without cutting off the connectors. I used �in-line splices�. These are little plastic and metal splices that you put over a wire you don�t want to cut but splice into, and stick in a wire that you are going to use as your tap. You press down on the in-line splice with a pair of pliers and this pushes the small piece of metal through the insulation of both wires making contact with both, now you have spliced into an existing wire without cutting anything. So from the existing connector cable for the MCS (the big one on the bottom next to the fuse, the top one goes to the CD changer) I got my battery constant power (RED) wire, switched/ignition power (PINK) and ground (BROWN). That�s pins 4, 7 and 8 respectively on the connector. This is all on the bottom part of the connector for a fiber MCS system the other half of this connector should have no wires pinned. You can also tap into your dash illumination on a (WHITE) wire from pin 6. At this point if you are planning on using the installed antenna you will need an adapter! But you will also need to jumper power to the antenna amplifier that is mounted in the back. Being that I didn�t see the need for this to be on all the time I jumpered the switched power (PINK) from pin 7 to the (RED) on pin 5 which the MCS used to power the antenna amp. Oddly enough the best price I found for the antenna adapter was from Crutchfield, Item# 12040VW12. If you need a back-up signal for a back-up camera, you can get that from the harness coming off of the front of the shifter assembly on a (GREY) wire from pin 10. There are 2 wires here that are grey, the other one is hot all the time on pin 9 and won�t do you much good unless you want the camera on all the time! If you need a speed input for your system, well I�m still working on that! If you have GPS, I stuck my antenna up under the dash, over more or less the instrument cluster. The top of the dash is just more plastic and doesn�t obstruct the antennas capability of receiving the GPS signals. I always get a good signal.
Now to the speakers. The BOSE amp is mounted on the firewall just to the left of and above the steering column, kind of above and behind the emergency brake pedal assembly. There is just one bolt holding it in place. The connector has all of the connections you will need for your amp outputs. You will find a good power here for your amp (RED) on pin 26 that is fed directly from fuse F-40 (30amp) and a good ground (BROWN) on pin 9. Now the speakers are as follows: left front - (BLUE)(GREEN) pins 13 and 21 with 13 being +, right front - (BLUE)(GREEN) pins 22 and 14 with 22 being +, left rear (PINK)(ORANGE) pins 23 and 15 with 23 +, right rear (PINK)(ORANGE) pins 25 and 17 with 25 being +. Now there are two more options for speakers, one is the rear speakers that are mounted close to the upper part of the back hatch (WHITE)(GREY) pins 24 and 16 with 16 being +. These speakers are connected together so in my opinion it would be best to tie into the rear speakers using say (PINK) pin 23 to the (GREY) pin 16 for the + and (ORANGE) pin 17 to (WHITE) pin 24. This way you will get all of the rear information to those 2 speakers and not just left or right. If you plan on using the factory subwoofer you will want to tap into (WHITE)(GREEN) on pins 11 and 19 with 19 being +. This connector is again located above and to the left of the steering column behind the emergency brake pedal assymly. I found through a little pulling here and there that there is a wire tie that is holding the cable in place roughly above the gas pedal, but if you cut this wire tie, one it will give you enough slack to get the cable down to where it�s a reasonable job to work on in stead of on your back under the dash dodging the brake pedal and other obstructions! And actually, there is enough slack that once I had my wiring done I managed to get the cable up behind the head unit in the dash.
So now we�ve got all of the wiring information to hook up a new system, my problem now was that I had ordered an amp that was, well let�s just say very large! 20� X 12�! When I got my 5 channel amp I was wondering where in the heck I was going to mount this mammoth! It was way to big to try and get back where the BOSE amp was, it was to big to fit under the seat where the BOSE subwoofer had been, to big to mount to the back of the 60% seat because of it�s contours and to big to mount on the side in the back. What I finally found was the covers mounted behind the back seats. The 60% one has a large enough surface for the monster amp to mount, all be it when installed, up side down since I decided I wanted to keep my cargo hauling capability so it had to go under the cover. The only issue is that with this �monster amp� and the seats up, the cover does not rest on the cargo floor area as normal but on the amp itself. When the seats are down the cover rest in the normal position on the floor, so loaded cargo does not press on the amp but rather the way it was designed to, on the cover/floor.
The last things I added were a USB plug on the center console in front of the shifter. This can be used to power a cell phone or USB stick for movies and music. The JVC unit allowed for one 4 port USB hub to be connected to its USB input, so the hub is installed behind the dash so that in the future I can add more ports if I find they might be useful. I also added the included microphone for the cell phone capabilities of the system. I wedged the microphone mounting bracket in behind the overhead console, and routed the wire along the headliner by pushing it in behind the headliner over to the A pillar and down behind the door seal until I got up under the dash.
At this point my back-up camera has not come in. I ordered one from Amazon that is listed as �Car Rear View Reverse Backup Waterproof CCD Camera for TOUAREG POLO PASSAT GOLF�. The dimensions are exactly the size of one of the license plate light lense covers, so this should fit right into where one of the license plate lights are. I will have to rout a wire from the camera, up the back hatch, down the body, and somehow find a way to the head unit! I�m thinking along the sides under the carpet by the doors. The camera will also require power, so switched power will also have to find it�s way to the camera. This should be an unobtrusive install that looks OEM, I hope anyway!
So now that your eyes are bleeding, that is how I replaced my Mercedes installed BOSE MCS no GPS, no Phone system in my 2003 ML350. As others have mentioned, I feel it was a wise decision to leave the BOSE speakers in place, they sound like completely different speakers with a good amp and good head unit driving them! Even before I hooked up the subwoofer the front door speakers put out more bass than the system did with the BOSE subwoofer hooked up! I must say that I am not a big BOSE fan, but I do respect them for making good products.
One note on the BOSE speakers, they are rated at 2 ohm impedance. This is important to know when buying an amp or if you are planning on the head unit powering your BOSE speakers. Most car speakers are rated at 4, 6 or 8 ohms as are most car amps and head units. A 2 ohm load on most amps is like a short and will cause your new amp or head unit to blow up or in any case not last very long! Make sure if you plan on keeping your BOSE speakers that you check the load handling capabilities of your new amp/head unit.I hope this may be of some interest or help to someone that is looking to modernize their �03 to �05 ML�s sound system. I would suspect that some of this might help on older ML�s as well. I would also like to thank Maj. Dundee on MBWorld for his input with wiring diagrams that I didn�t have.
07-09-2018, 07:08 PM
#13
Member
Thread Starter
dennisspeaksI don't remember where I bought the adapter, it's been a few years. It wasn't on Amazon, I checked my past orders. It might have been Crutchfield. There was just a small bezel that went around the head unit and the metal cage that slid in the dash. The opening is a standard 2 din opening so it shouldn't be that hard to find something or even something that comes with the head unit. It might have been what came with the JVC unit itself. Sorry I don't remember.
07-09-2018, 08:16 PM
#14
Install kit you got
Thanks, I looked at crutchfield and the one they recommended but it has no picture., the one I have will work for the moment, just don't look as clean as yours. Now to figure out why the kenwood double din unit automatically goes to the startup stage when I turn the key on. When I take it off demo mode it turns on and off and retains the settings but when I turn the suv off it goes back to setup, I must be missing a wire somewhere?
dennisspeaksI don't remember where I bought the adapter, it's been a few years. It wasn't on Amazon, I checked my past orders. It might have been Crutchfield. There was just a small bezel that went around the head unit and the metal cage that slid in the dash. The opening is a standard 2 din opening so it shouldn't be that hard to find something or even something that comes with the head unit. It might have been what came with the JVC unit itself. Sorry I don't remember.
07-10-2018, 06:17 PM
#16
Member
Thread Starter
07-10-2018, 06:29 PM
#17
Member
Thread Starter
dennisspeaks, I remember now that Crutchfield says that only a 1 Din head unit fits in the 163's! That as you can see is not true. There are those guide tabs that the factory system uses that keeps a standard 2 Din unit from fitting in the opening. Once the tabs are removed then the opening is a standard 2 Din opening.
I now have a 164, and they need an adaptor plate facia, although the hole is 2 Din the facia is much larger. I found a Chinese company that has a basic head unit that they then build into many different chassis to fit all kinds of different dashes. Once installed you don't need any kind of adaptor facia. Seicane is the company if you are interested.
I now have a 164, and they need an adaptor plate facia, although the hole is 2 Din the facia is much larger. I found a Chinese company that has a basic head unit that they then build into many different chassis to fit all kinds of different dashes. Once installed you don't need any kind of adaptor facia. Seicane is the company if you are interested.
07-10-2018, 07:17 PM
#18
Super Member
Hi dfghhgfd,
So you would recommend the JVC and the 5 channel amp that were installed in 2012? Do they still make them?
Thanks in advance.
So you would recommend the JVC and the 5 channel amp that were installed in 2012? Do they still make them?
Thanks in advance.
07-11-2018, 07:47 PM
#19
Member
Thread Starter
The JVC I believe is no longer available. I picked that unit because at the time it first fit my budget and had the best set of options that I felt I wanted at the time for the money. Currently in my w164 I now have an android based head unit. Those were not available in 2012. One of the things that I like about the android based systems is that you can load different GPS apps, or any apps for that matter like TORX that gives you car engine information. Several of the GPS apps are free and are more accurate and updated more often than you would find in any conventional head unit. On the other hand, a conventional head unit like the JVC tend to have a lot of audio adjustments to enhance your listening experience in your vehicle as that is what they are designed for. Android or Apple head units are device systems like cellphones or tablets, that aren't specifically for vehicles, although there is Android and Apple for cars now, but still not quite the same. There are a lot of new options whether you get a traditional head unit or you go an android or apple based system. The old GPS was just that, but the newer ones have things like live traffic updates overlaid on your GPS screen. I would suggest looking around at what's out there, does anything have the aesthetic look that fits your style. What are the features that are a must have for you, and of course, what's your budget? Most name brands will be good. What I did is look at Crutchfield for example to see what the different companies were offering. Crutchfield has a rather nice selection of different name brad units to look at. I then looked at YouTube for comparisons, and as I started getting specific models in mind like the JVC, I started looking for videos of people using them and them giving their thoughts on how they were in the real world. I will say this, sometimes you need to take what people are saying mostly bad with a grain of salt. Listen to what they are saying because sometimes their comments negative many times are because they don't fully understand the capabilities of the system and they are expecting a $200 unit to be able to do what a $900 unit can do!
I'm not sure about the amp, but I would get a smaller one today. Not power but physical size. I didn't pay attention to the size when I ordered it online and had to get creative as to where to put that monster. The reason I recommend a 5 channel amp, is that you only need the one amp to power the 4 door speakers and a sub woofer. It just makes life a lot easier. Plus most 5 channel amps have built in cross overs to help make the system work better and in the end sound better.
I'm not sure about the amp, but I would get a smaller one today. Not power but physical size. I didn't pay attention to the size when I ordered it online and had to get creative as to where to put that monster. The reason I recommend a 5 channel amp, is that you only need the one amp to power the 4 door speakers and a sub woofer. It just makes life a lot easier. Plus most 5 channel amps have built in cross overs to help make the system work better and in the end sound better.
07-13-2018, 11:15 PM
#20
Thanks for the info. Amazing how these things have come down in price. I still have the Clarion 925vd that sold for over 2g's when they came out many years ago, but I wanted a tv so I bought it, now you can get just about anything for under a grand, I only paid $175 for the kenwood double din unit I just installed. I will look into Seicane.
dennisspeaks, I remember now that Crutchfield says that only a 1 Din head unit fits in the 163's! That as you can see is not true. There are those guide tabs that the factory system uses that keeps a standard 2 Din unit from fitting in the opening. Once the tabs are removed then the opening is a standard 2 Din opening.
I now have a 164, and they need an adaptor plate facia, although the hole is 2 Din the facia is much larger. I found a Chinese company that has a basic head unit that they then build into many different chassis to fit all kinds of different dashes. Once installed you don't need any kind of adaptor facia. Seicane is the company if you are interested.
I now have a 164, and they need an adaptor plate facia, although the hole is 2 Din the facia is much larger. I found a Chinese company that has a basic head unit that they then build into many different chassis to fit all kinds of different dashes. Once installed you don't need any kind of adaptor facia. Seicane is the company if you are interested.
07-18-2018, 02:50 PM
#21
Super Member
Hi dfghhgfd,
Where do you find the wires to the speakers? I'm missing something here.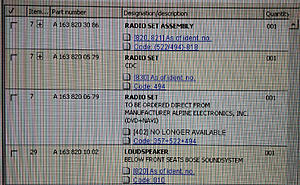
I pulled up EPC for the Bose system and I see the Bose bass speaker under the driver seat but no amp.
Where do you find the wires to the speakers? I'm missing something here.

I pulled up EPC for the Bose system and I see the Bose bass speaker under the driver seat but no amp.
07-18-2018, 02:55 PM
#22
Super Member
Nevermind. I found it 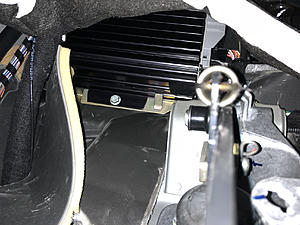
Now trying to figure out how to remove the plug...
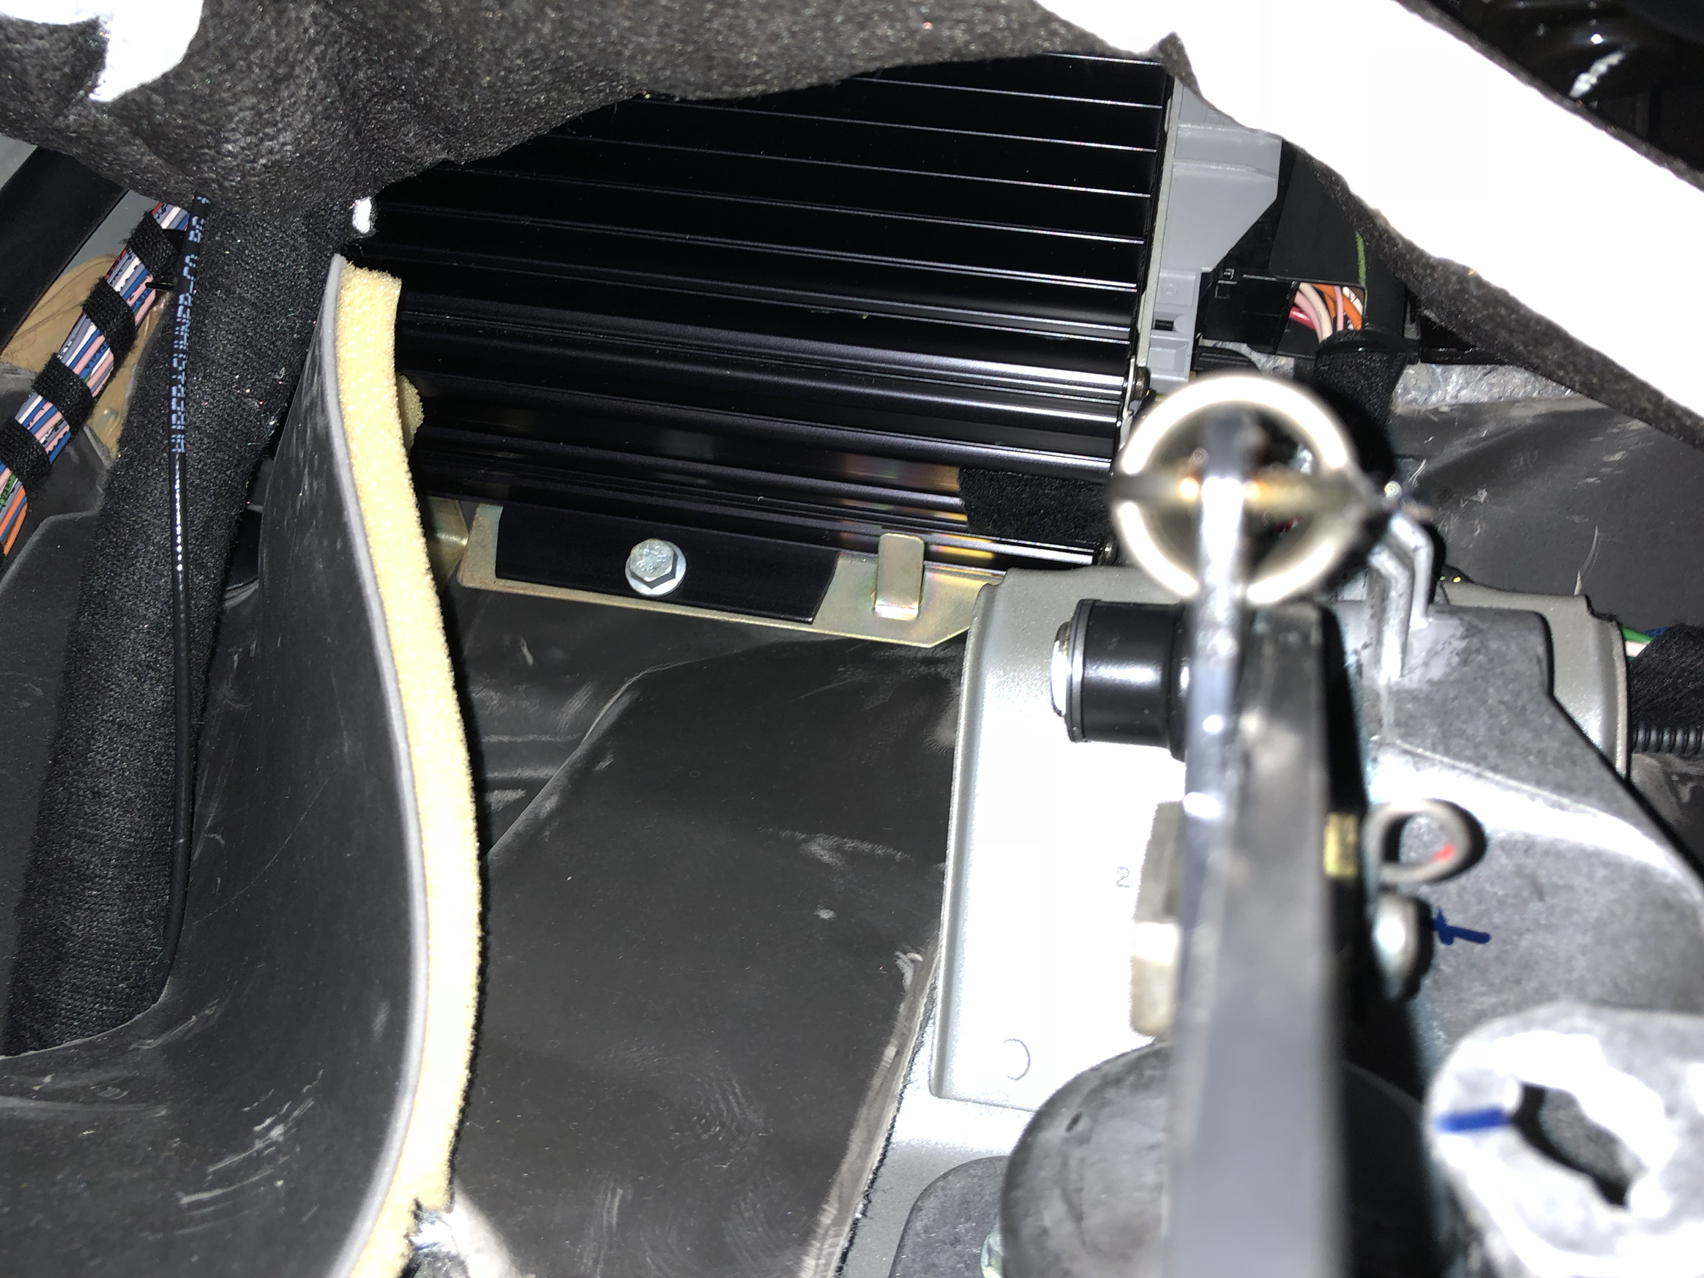
Now trying to figure out how to remove the plug...
Last edited by DrDoe; 07-18-2018 at 03:41 PM.
07-18-2018, 08:08 PM
#23
Member
Thread Starter
Sorry, I don't remember exactly. On the w164's they have a little handle that sort of twists out that back forming a handle of sorts that pushes the connector out. After I pulled the amp, I wired the amp output into the wires going to the speakers. I tried finding a connector that would plug into the cars wiring harness, but the only thing I could come up with is finding a bad amp and pulling the connector out of it. But then the problem is try finding a bad amp! And if you do, is it worth the price?
07-19-2018, 10:31 AM
#24
Super Member
Hi dfghhgfd,
I want to thank you for your post and your help with this project. I wouldn't have the courage for it if you weren't around.
The main challenge for me was the Bose amp. Once I realized that it had to go then everything becomes straight forward.
I ended up getting the Dual DV695MB for head unit, 40-VW12 for antenna adapter, Metra 70-1786 for wiring harness. The Metra was un-necessary and I didn't have to get a Scosche dash kit as the Dual comes with one. I also didn't get an amplifier as the sounds seem to be fine for me without one.

Now onto the W164 radio...
I want to thank you for your post and your help with this project. I wouldn't have the courage for it if you weren't around.
The main challenge for me was the Bose amp. Once I realized that it had to go then everything becomes straight forward.
I ended up getting the Dual DV695MB for head unit, 40-VW12 for antenna adapter, Metra 70-1786 for wiring harness. The Metra was un-necessary and I didn't have to get a Scosche dash kit as the Dual comes with one. I also didn't get an amplifier as the sounds seem to be fine for me without one.
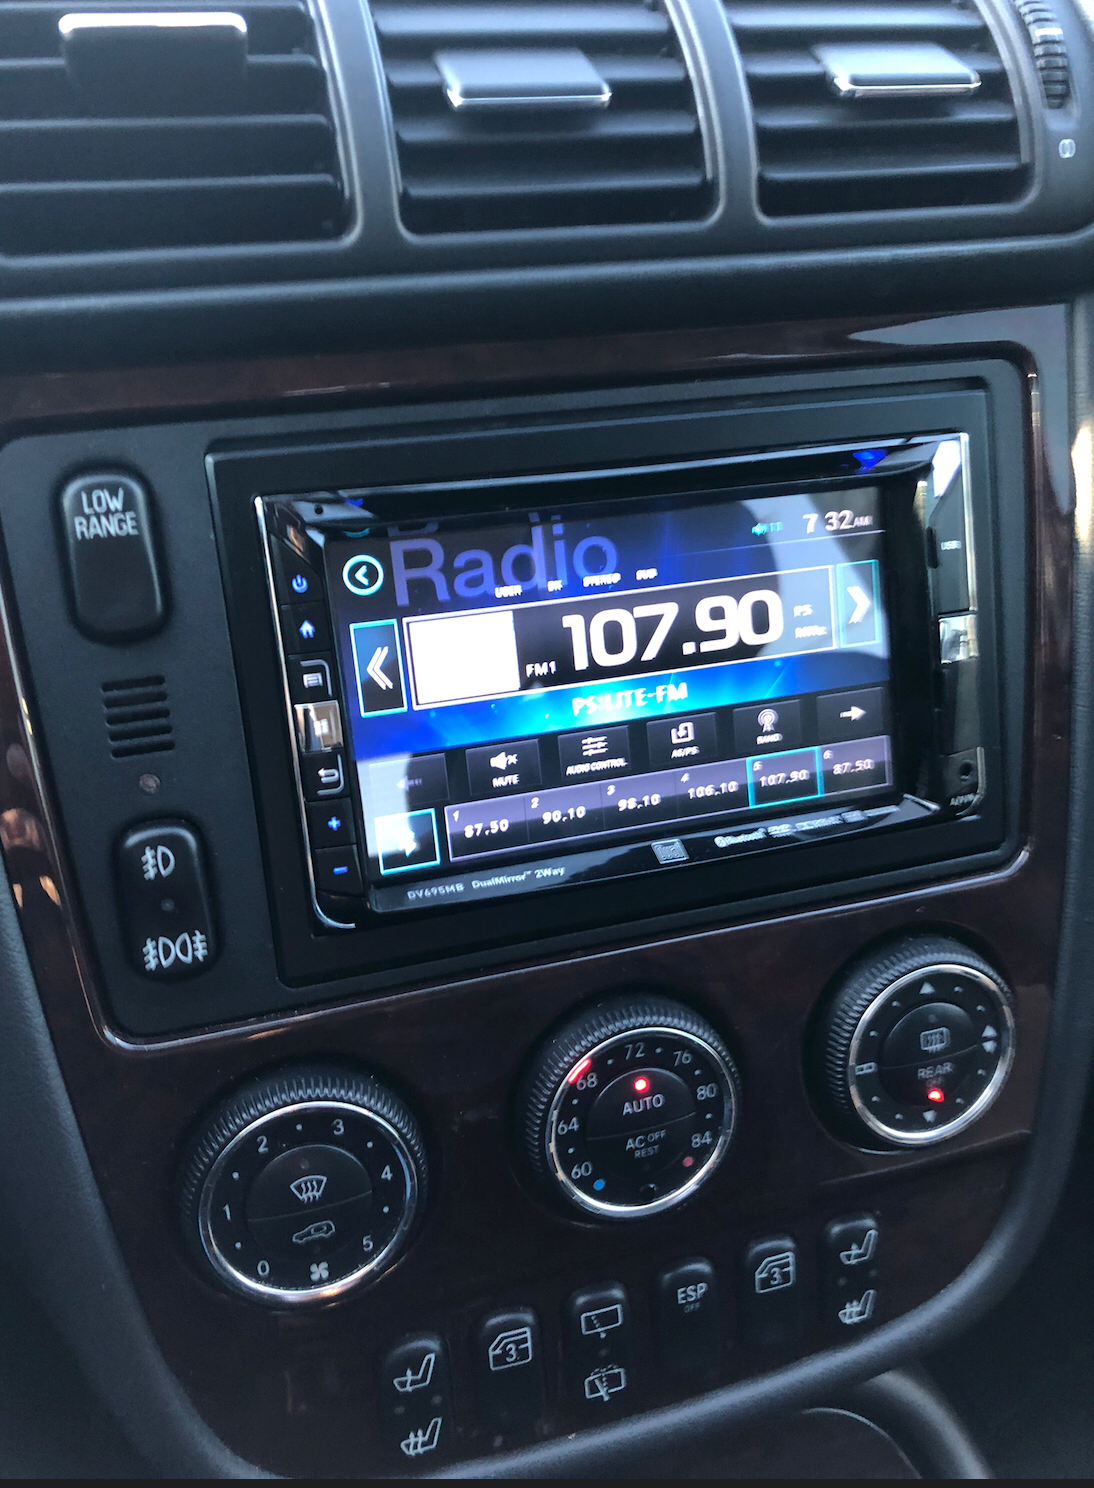
Now onto the W164 radio...
07-19-2018, 12:07 PM
#25
Member
Thread Starter
DrDoelooks good!
It wasn't till is found an obscure Russian YouTube video about cutting off the guide tabs that I wouldn't have done the change either. In all my searches I could only find completed installs but nothing explaining some of the issues.
I wanted a little more power and a larger subwoofer. My under seat sub was starting to come apart due to age. Unfortunately I didn't pay attention to the size of the amp I ordered. I had planned on installing it in the original factory location. But from the pictures you can tell there was no way that was going to happen! I must say that I was impressed with the BOSE speakers once I had an amp that could actually power them and the 10"" subwoofer.


