
••• Project Stock to Awe •••

 05-17-2010, 08:41 AM
#376
Junior Member

Join Date: Jun 2007
Posts: 35
Likes: 0
Received 0 Likes
on
0 Posts
As a lurker of this board who has been trying to research w211 E55's before I picked one up I have to say that this thread has been absolutely amazing. I come from a background where I do absolutely all of the work and leave virtually not a nut or bolt untouched on the car so seeing someone dig into these setups as much as Finny has is absolutely great. My last car I simply sold off after owning it for 10 years, but it began as a 15 second 1/4m capable car and wound up being a 9 second capable setup years later with a logged 0-60 of 2.12seconds while at the track. I keep seeing so many threads where folks just simply ask "how much hp will this add" but this has been the first real thread where I feel the creator has a solid background and is approaching it in the right way. Your work mirrors exactly what I've done in the past, and somewhat reminds me of the route that I would have taken. Fantastic job.
With that said I am curious what you did inside the trans, did you simply replace the oem frictions and nothing more? Did you modify line pressures in the TCU or valve body? Id like to hear more about what you've done with the torque converter, OEM lockup clutches always seem to be a PITA when placed on a high powered street car, I know my last billet torque converter had a set killed within 50 miles just due them dragging under high power caused by a slight fluid pressure differential across them.
I have been slowly putting together an archive picture gallery of all the E55 OEM components and internals and this thread has been fantastic, great job all around.
 05-22-2010, 03:14 AM
#377
MBWorld Fanatic!
Join Date: Dec 2007
Location: Sin City
Posts: 1,863
Likes: 0
Received 4 Likes
on
3 Posts
2005 E55 AMG - - 2005 SL55 AMG - - - - - - 2006 SLK55 AMG - - - - - - 2013 Ducati Diavel AMG -
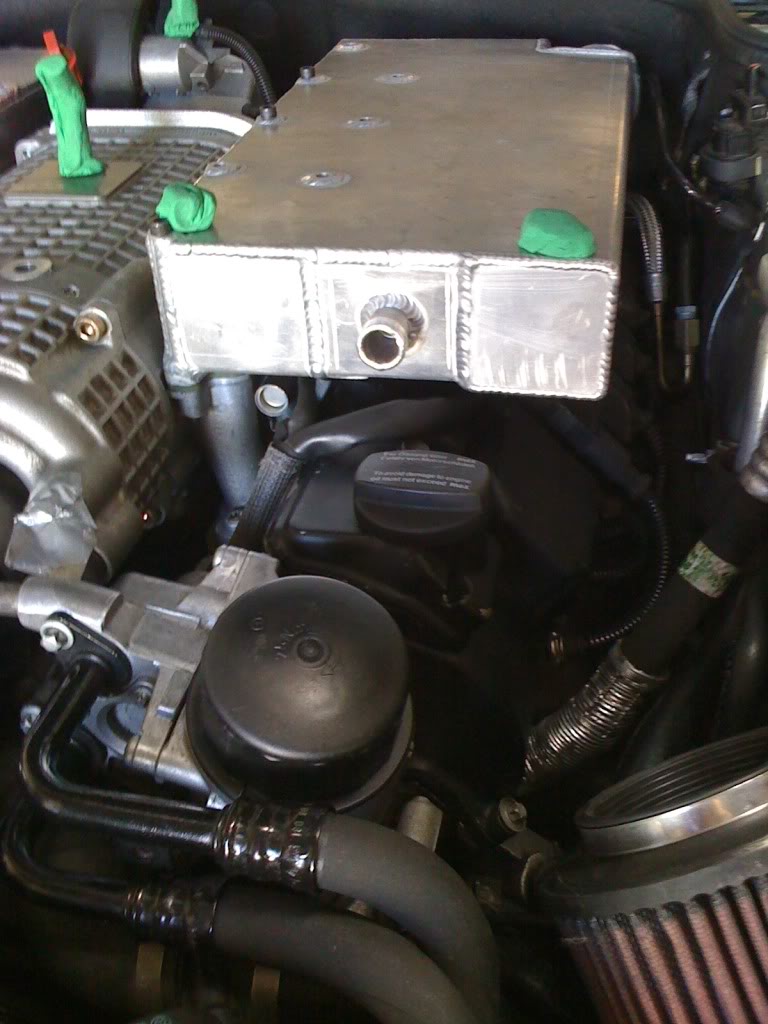
Any progress on those top mounted coolers? Hehehe!!

My top mounted coolers have been built but not tested as of yet.
")
My new hurdle is to see if I can increase the boost by changing those helical gears on the front of the supercharger; specifically the one on the right that is interchangeable and the gear behind the clutch that is pinned but has room around the case for improvement. I'm thinking I should be able to save some HP and added stress to the crank if I increase the boost by changing the S/C gears and retain my stock crank pulley, compared to using those massive aftermarket crank pulleys.

 08-25-2010, 09:17 AM
#380
Super Member
Thread Starter
Yes, all working well.
No, just sitting there… Ready to mass fabricate, prototype fits like factory. The last couple of years have been busy and this has not been one of my priorities.
Any figs?
No point really as using 170 to 180 pulley will run the s/c at maximin efficiency. Bare in mind that the stock cooler is highly restrictive so with your new overhead coolers installed you will automatically gain boost and improved flow.
Regardless of which type of gear system you use, the s/c will still absorb the same parasitic HP to operate. I'm using a larger pulley without any dramas.
No, just sitting there… Ready to mass fabricate, prototype fits like factory. The last couple of years have been busy and this has not been one of my priorities.
Any figs?
My new hurdle is to see if I can increase the boost by changing those helical gears on the front of the supercharger; specifically the one on the right that is interchangeable and the gear behind the clutch that is pinned but has room around the case for improvement. I'm thinking I should be able to save some HP and added stress to the crank if I increase the boost by changing the S/C gears and retain my stock crank pulley, compared to using those massive aftermarket crank pulleys.
Regardless of which type of gear system you use, the s/c will still absorb the same parasitic HP to operate. I'm using a larger pulley without any dramas.
08-26-2010, 01:29 AM
#382
MBWorld Fanatic!
Join Date: Dec 2007
Location: Sin City
Posts: 1,863
Likes: 0
Received 4 Likes
on
3 Posts
2005 E55 AMG - - 2005 SL55 AMG - - - - - - 2006 SLK55 AMG - - - - - - 2013 Ducati Diavel AMG -
Yes, all working well.
No, just sitting there… Ready to mass fabricate, prototype fits like factory. The last couple of years have been busy and this has not been one of my priorities.
Any figs?
No point really as using 170 to 180 pulley will run the s/c at maximin efficiency. Bare in mind that the stock cooler is highly restrictive so with your new overhead coolers installed you will automatically gain boost and improved flow.
Regardless of which type of gear system you use, the s/c will still absorb the same parasitic HP to operate. I'm using a larger pulley without any dramas.
No, just sitting there… Ready to mass fabricate, prototype fits like factory. The last couple of years have been busy and this has not been one of my priorities.
Any figs?
No point really as using 170 to 180 pulley will run the s/c at maximin efficiency. Bare in mind that the stock cooler is highly restrictive so with your new overhead coolers installed you will automatically gain boost and improved flow.
Regardless of which type of gear system you use, the s/c will still absorb the same parasitic HP to operate. I'm using a larger pulley without any dramas.

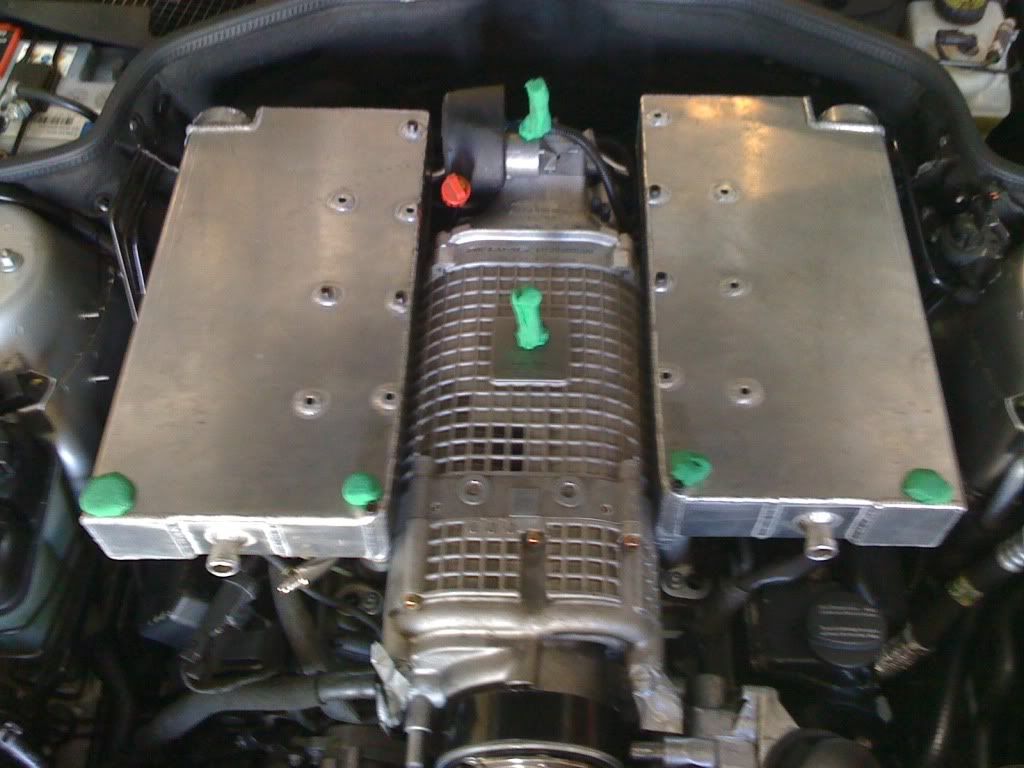
No figures yet on my coolers. These are what they look like without the finish. I had Vadim build them last year, but I haven’t tested them because of engine set-backs. Evosport will test them shortly and modifiy them in the areas that show restricted flow. I'll send you the data once I have it so we can compare.


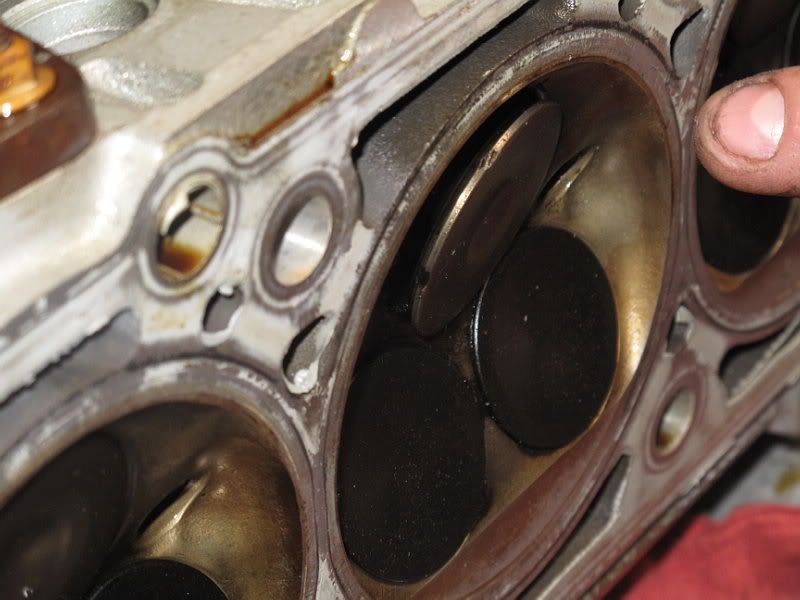
I brought my car to Evosport to have them complete my build and find out why one cylinder lost compression. They found that the reason one cylinder lost compression was because the valves floated and one exhaust valve hit a piston. I have the VRP/PTE cams, Ferrea oversized valves, and titanium retainers but with stock valve springs. Victor never had the valve springs upgraded and the pistons were not fly-cut to prevent damage from the tight clearance.
My custom Ferrea oversized exhaust valve that was damaged.
1077386.jpg?t=1277559134
Thanks for your input!
I decided not to mess with the S/C gears and just go with Evosport’s new 178mm crank pulley. Also, since I need to disassemble the bottom end again for inspection and to replace my pistons I decided to upgrade the bottom and build a stroker. I plan to go with a stroked 4349 crank (6.2L 383cu in), Pauter 6AL4V Titanium rods, and pistons with the stock piston profile and dish volume, but compression increased to 9.5:1. We'll see what happens..
Last edited by Havoc; 08-26-2010 at 01:54 AM.
09-09-2010, 12:21 AM
#383
Junior Member

Join Date: Apr 2010
Posts: 18
Likes: 0
Received 0 Likes
on
0 Posts
w211 e55
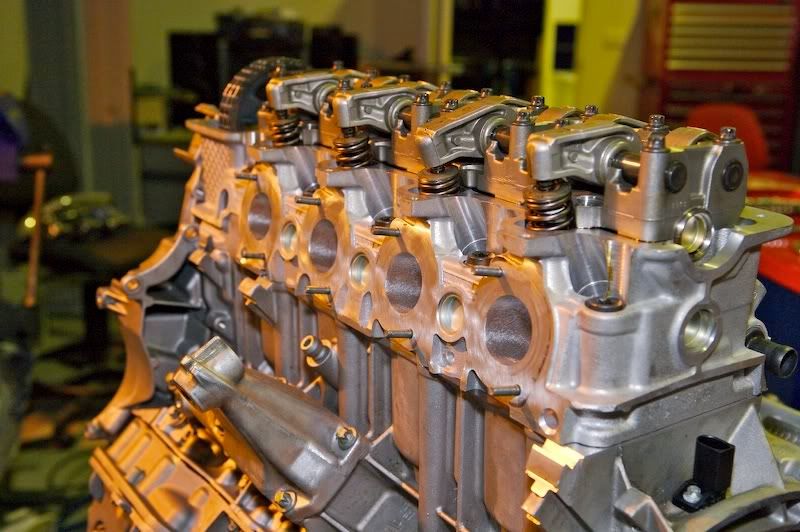
After the timing setting was done the rocker covers
Remember theses are original high quality Finny products available exclusively through VRP only. Beware! any others are cheep inferior clones !!!
I did all the R&D myself using my Guinea Pig 55 so I know these kits work perfect!
Anyway check out the mock up photos as I haven't installed the accessories items yet. These are just to show you what it looks like now.
Exhaust studs installed.
Finally rocker covers bolted on!
Plugs and coils mounted.
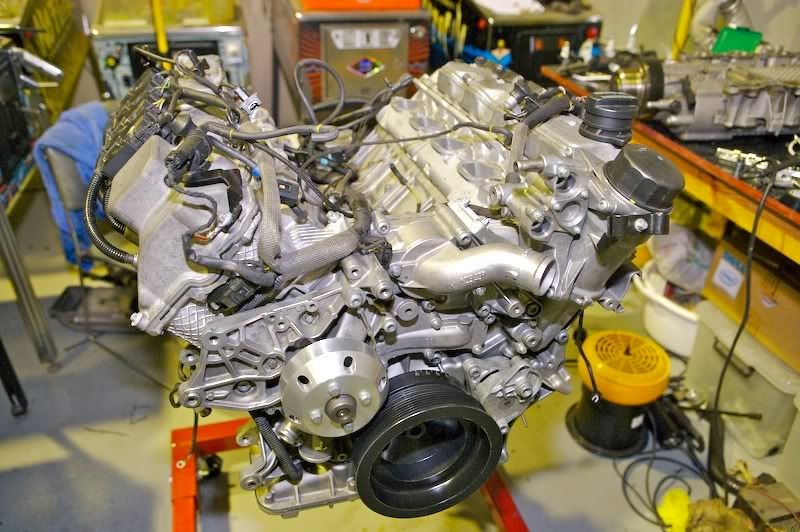
Engine harness added.
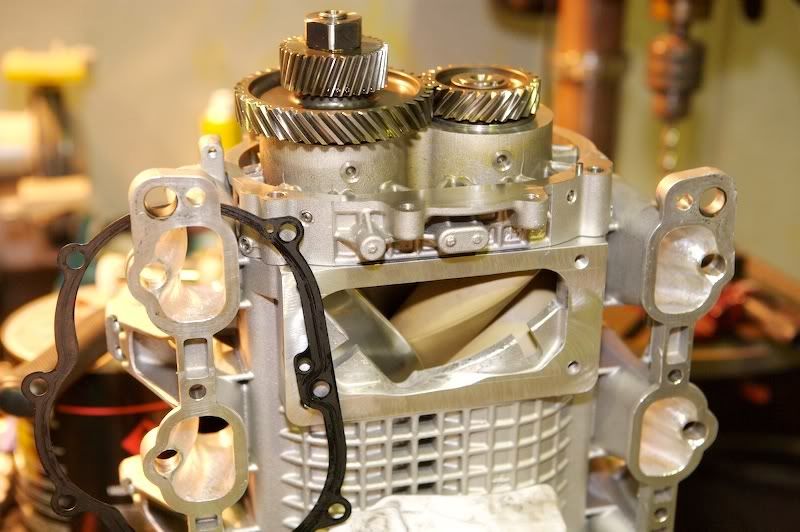
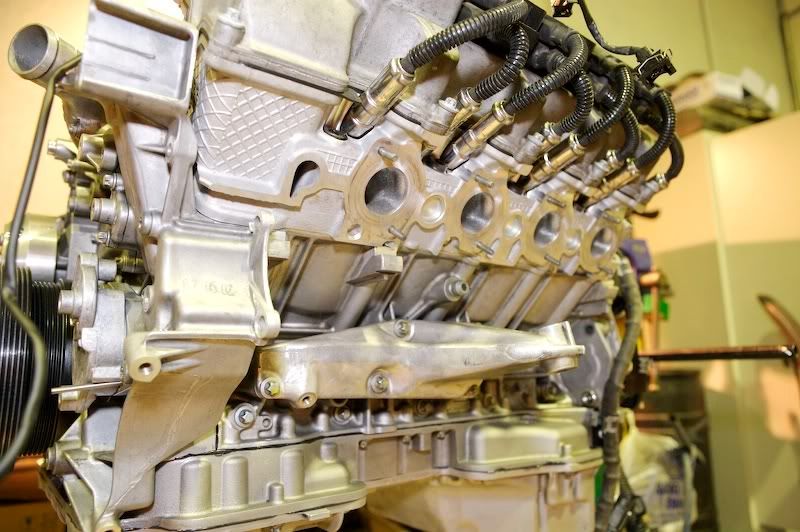
Rotor and Gear assembly slotted into clean ported case.
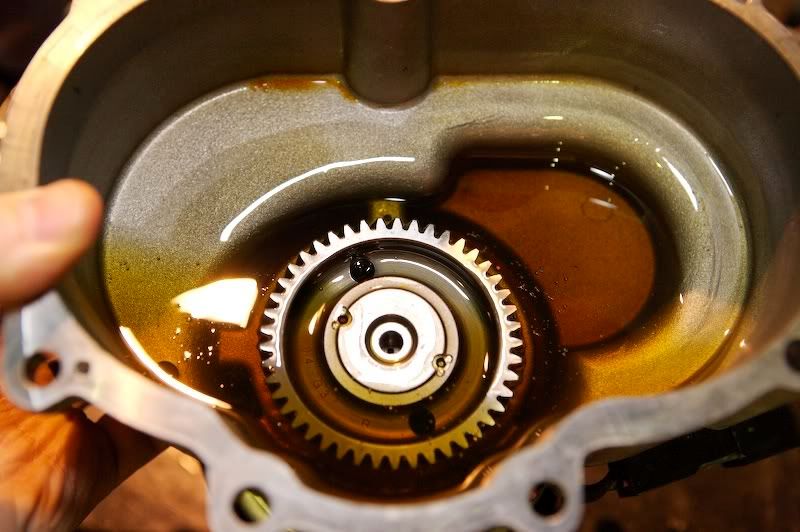
Some fully synthetic gear oil for the helicals.
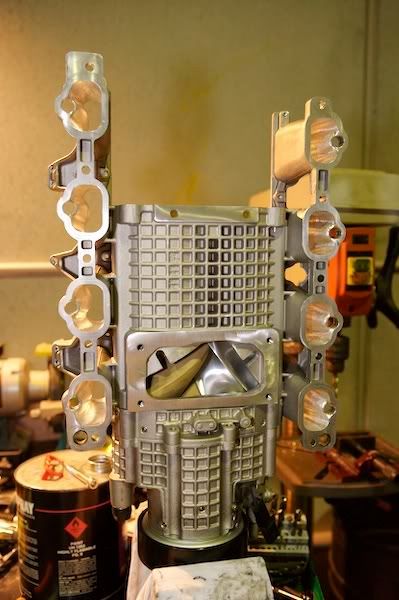
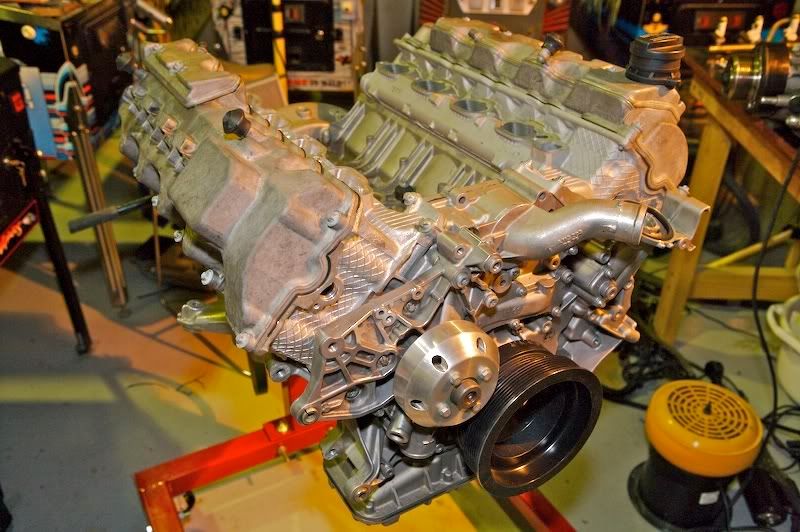
Front section complete.
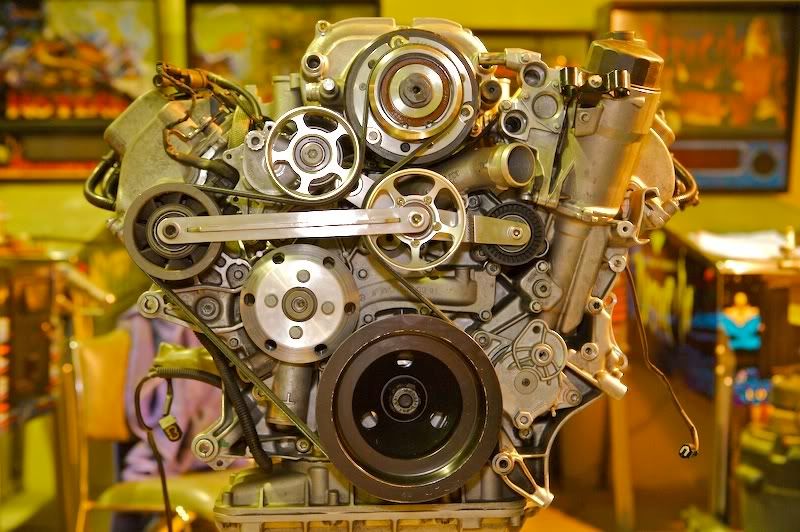
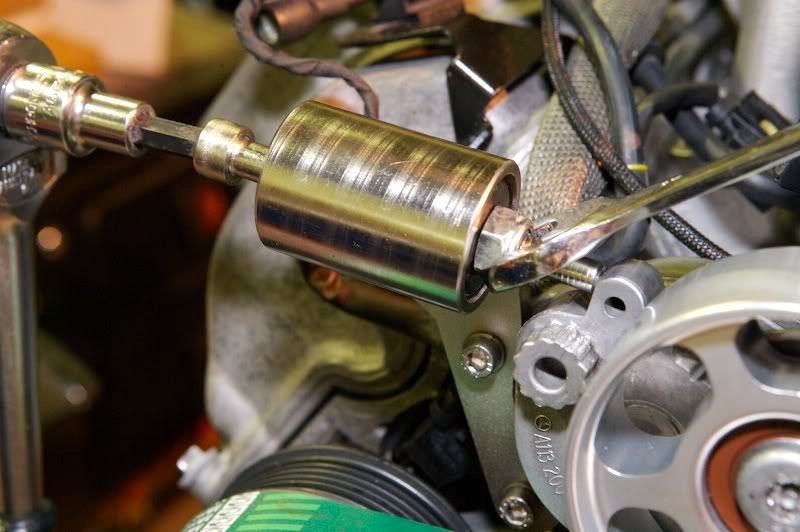
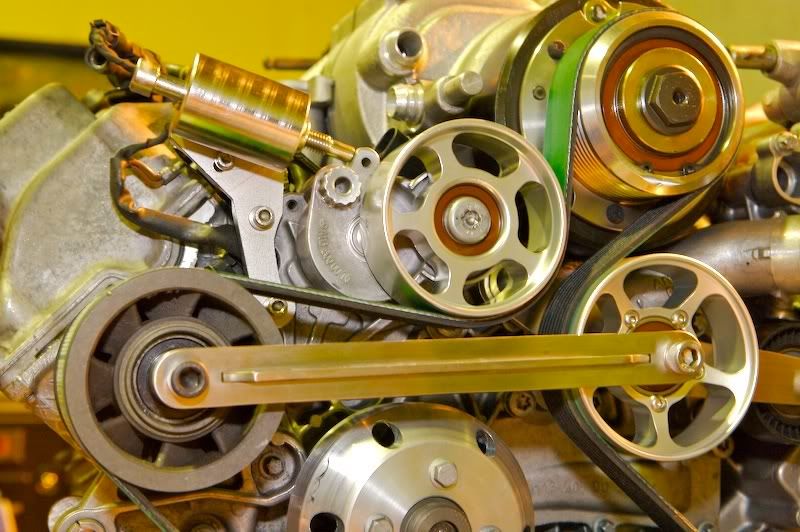
Overview of the pulley wrap kit. Notice the original belt path has been altered by the extra pulley and the larger idler pulley which increases the belt contact area on both the S/C and balancer.
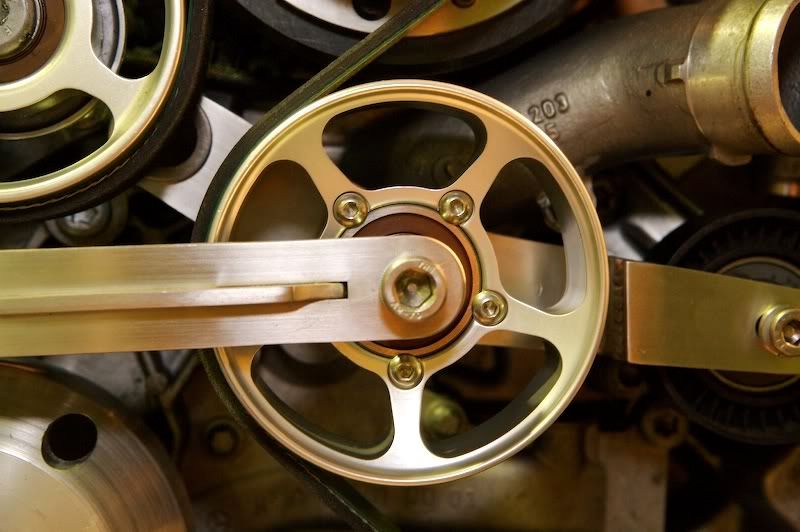
This diverter pulley is mounted firmly by two stainless steel brackets which are pulled to the right under load. The Billetflow pulley is around the wrong way but I wanted to show the small hex screws which mount the high speed bearing which prevents spinning in the wheel case. I'll flip it back later.
I increased the width of the idler bering to cope with the extra pressure added. A high tensile bolt is also used to strengthen the assembly.
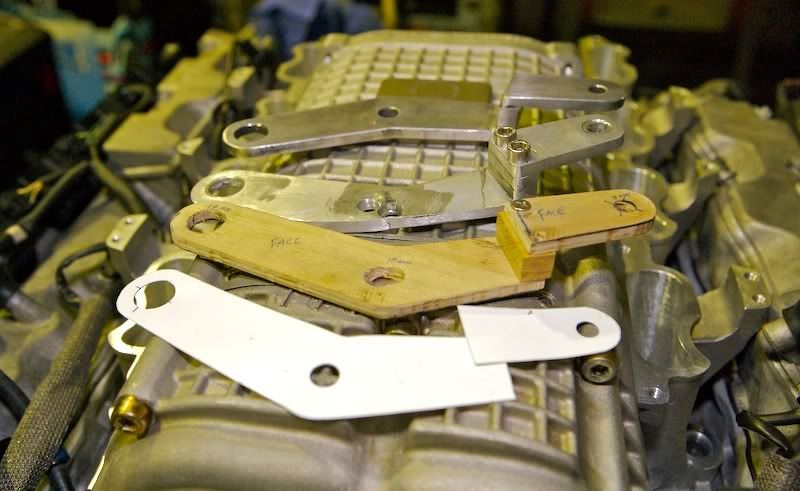
Evolution... Yes one of those are wood!
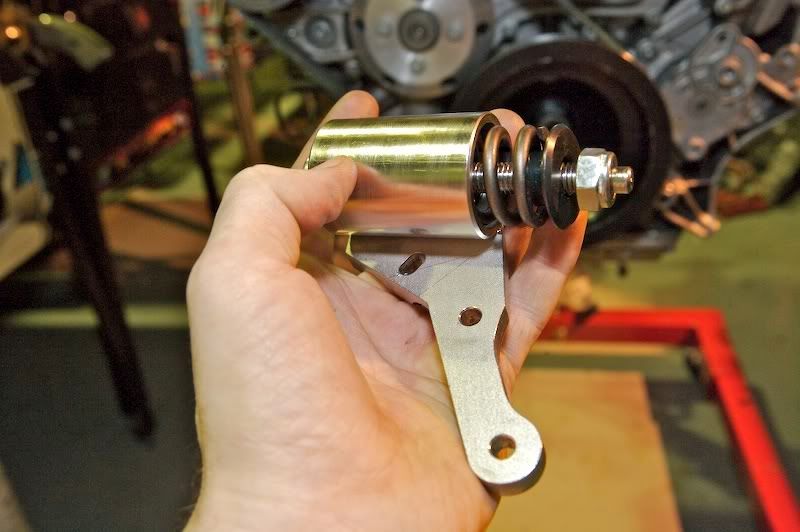
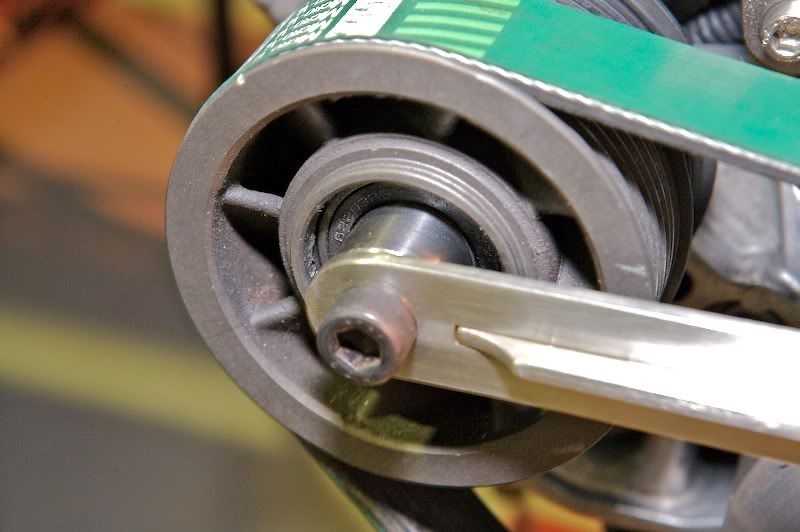
Next up is the Auxiliary tensioner device which uses a valve spring to apply extra tension to the stock idler.
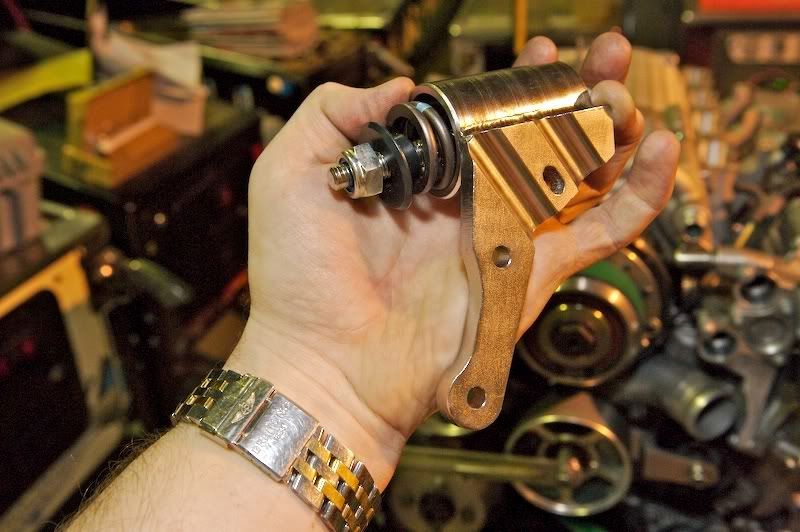
Rear of above. This replaces the stock bracket that is used to secure the hard cooling lines to the intercooler.
I had the rear machined to match the stock bracket and also to use the stock top clamp.
Once bolted in last it's easy to adjust with simple tools.
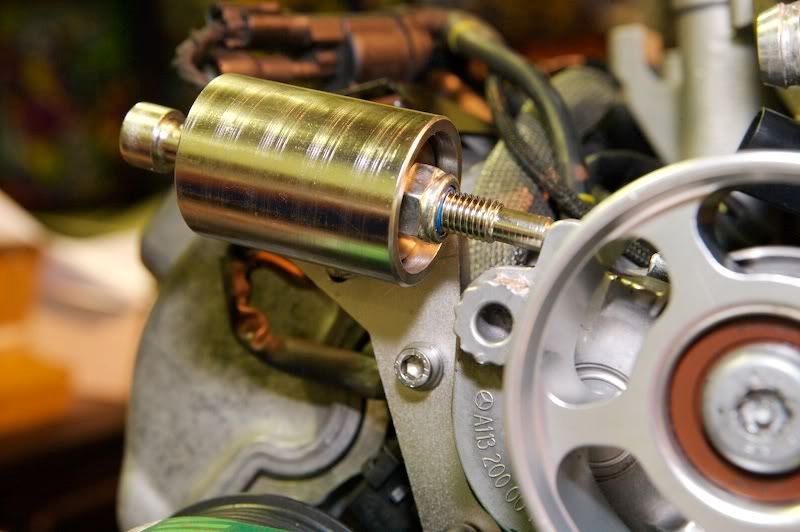
A little extra pressure added which allows the stock system to move freely.
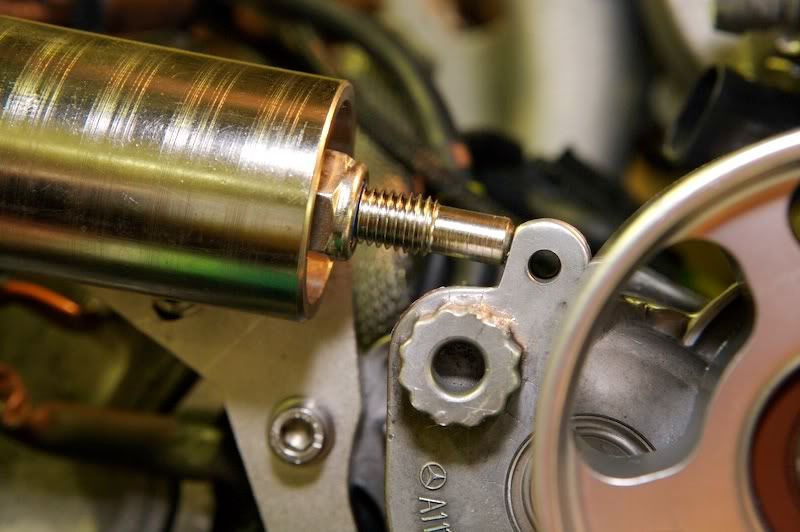
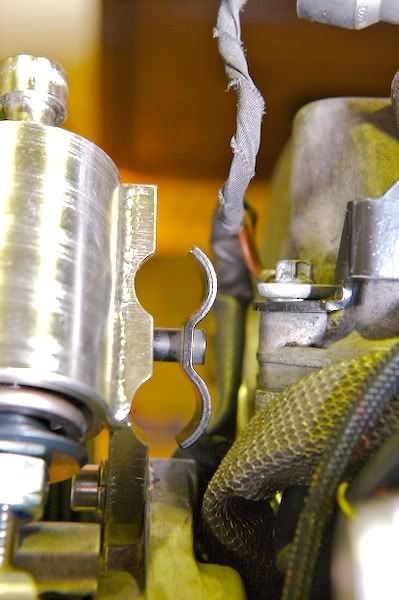
I ground a flat spot on the cast idler to accommodate contact with tensioner pin.
More soon...
Remember theses are original high quality Finny products available exclusively through VRP only. Beware! any others are cheep inferior clones !!!
I did all the R&D myself using my Guinea Pig 55 so I know these kits work perfect!
Anyway check out the mock up photos as I haven't installed the accessories items yet. These are just to show you what it looks like now.
Exhaust studs installed.
Finally rocker covers bolted on!
Plugs and coils mounted.
Engine harness added.
Rotor and Gear assembly slotted into clean ported case.
Some fully synthetic gear oil for the helicals.
Front section complete.
Overview of the pulley wrap kit. Notice the original belt path has been altered by the extra pulley and the larger idler pulley which increases the belt contact area on both the S/C and balancer.
This diverter pulley is mounted firmly by two stainless steel brackets which are pulled to the right under load. The Billetflow pulley is around the wrong way but I wanted to show the small hex screws which mount the high speed bearing which prevents spinning in the wheel case. I'll flip it back later.
I increased the width of the idler bering to cope with the extra pressure added. A high tensile bolt is also used to strengthen the assembly.
Evolution... Yes one of those are wood!
Next up is the Auxiliary tensioner device which uses a valve spring to apply extra tension to the stock idler.
Rear of above. This replaces the stock bracket that is used to secure the hard cooling lines to the intercooler.
I had the rear machined to match the stock bracket and also to use the stock top clamp.
Once bolted in last it's easy to adjust with simple tools.
A little extra pressure added which allows the stock system to move freely.
I ground a flat spot on the cast idler to accommodate contact with tensioner pin.
More soon...
Thanks
 09-27-2010, 08:01 AM
#384
MBWorld Fanatic!
Finny why did you hack up the SLR coolers like that ? Seems like the Sulayem E55 & SLK SLR's did not need to?
09-28-2010, 04:31 AM
#387
MBWorld Fanatic!

 09-13-2011, 01:56 AM
#389
MBWorld Fanatic!
Join Date: Mar 2007
Location: Houston, TX
Posts: 1,948
Likes: 0
Received 3 Likes
on
2 Posts
C32/C55 AMG
I think it's the AMG modding curse. Every time someone starts a big project, bad things happen. I remember reading in this thread that his car was stolen and then he had issues with vadim. I don't recall what happened after that.
09-13-2011, 12:46 PM
#391
MBWorld Fanatic!
Jesus I never saw this build before. Looks THOROUGH, I hope he finished it. I always love when projects go from stock-awe. I never get the idea of progressive building and doing things step by step and modding little by little. For me it's plan the project and the power you want, overkill the strengthening so the engine is less likely to break, buy all the parts at once and build at once. That's how I did it with my now gone E46 M3 and that's the only way to do it. I myself will be building up my E55 when I have a plan and a big budget. Now I'm not trying to insult anyone here by saying this but building your engine slowly as in adding a pulley then a tune then months later some headers then years later an LSD is kind of depressing.
09-13-2011, 12:49 PM
#392
MBWorld Fanatic!
As for the ripping the motor apart, that's the only way to ensure a clean build, it's like renovating a home or building a new one, sure, the renovation may go well but the new one is always better. The best thing to do is pull out the engine and tranny, get all the performance parts and everything, make sure to label all the parts as not to lose or misplace any, build the engine and when you're done it should look like a new crate motor. I HATE dirty and sloppy builds, then people wonder why things broke when they decided to DIY and take risks by not using built internals and such.
 09-13-2011, 12:55 PM
#394
MBWorld Fanatic!
Join Date: Oct 2009
Location: Southern California
Posts: 2,825
Likes: 0
Received 16 Likes
on
11 Posts
E55 w/ goods, Z32 Project underway
As for the ripping the motor apart, that's the only way to ensure a clean build, it's like renovating a home or building a new one, sure, the renovation may go well but the new one is always better. The best thing to do is pull out the engine and tranny, get all the performance parts and everything, make sure to label all the parts as not to lose or misplace any, build the engine and when you're done it should look like a new crate motor. I HATE dirty and sloppy builds, then people wonder why things broke when they decided to DIY and take risks by not using built internals and such.
 Every single part inspected and methodically put together.
 Most often people are budget limited, or fool themselves into believing that 'this mod' is all they want, and we know how that goes.
I'm going to rip my motor apart in a few months (just to do it), and put it together right. Think $15k should cover what I am looking to achieve. Just get it out of the way in one big bang so so speak. It is nice to see people like Finny ,Shardul, etc here paving the way so that we do not repeat their mistakes and capitalize on their successes.
09-13-2011, 09:53 PM
#395
MBWorld Fanatic!
Everyone appreciates the Guinea Pig...but not everyone is willing to be one. So for that reason I salute all the risk takers here who get things wrong and help us learn from their mistakes
 02-10-2013, 08:56 PM
#397
Super Member
Join Date: Nov 2012
Location: Germany
Posts: 698
Received 16 Likes
on
13 Posts
C215 CL55 AMG, W124 500E, W210 E430, W124 300E
Glad to hear all is working well.
No figures yet on my coolers. These are what they look like without the finish. I had Vadim build them last year, but I haven’t tested them because of engine set-backs. Evosport will test them shortly and modifiy them in the areas that show restricted flow. I'll send you the data once I have it so we can compare.

I brought my car to Evosport to have them complete my build and find out why one cylinder lost compression. They found that the reason one cylinder lost compression was because the valves floated and one exhaust valve hit a piston. I have the VRP/PTE cams, Ferrea oversized valves, and titanium retainers but with stock valve springs. Victor never had the valve springs upgraded and the pistons were not fly-cut to prevent damage from the tight clearance.
My custom Ferrea oversized exhaust valve that was damaged.
Thanks for your input!
I decided not to mess with the S/C gears and just go with Evosport’s new 178mm crank pulley. Also, since I need to disassemble the bottom end again for inspection and to replace my pistons I decided to upgrade the bottom and build a stroker. I plan to go with a stroked 4349 crank (6.2L 383cu in), Pauter 6AL4V Titanium rods, and pistons with the stock piston profile and dish volume, but compression increased to 9.5:1. We'll see what happens..
No figures yet on my coolers. These are what they look like without the finish. I had Vadim build them last year, but I haven’t tested them because of engine set-backs. Evosport will test them shortly and modifiy them in the areas that show restricted flow. I'll send you the data once I have it so we can compare.
I brought my car to Evosport to have them complete my build and find out why one cylinder lost compression. They found that the reason one cylinder lost compression was because the valves floated and one exhaust valve hit a piston. I have the VRP/PTE cams, Ferrea oversized valves, and titanium retainers but with stock valve springs. Victor never had the valve springs upgraded and the pistons were not fly-cut to prevent damage from the tight clearance.
My custom Ferrea oversized exhaust valve that was damaged.
Thanks for your input!
I decided not to mess with the S/C gears and just go with Evosport’s new 178mm crank pulley. Also, since I need to disassemble the bottom end again for inspection and to replace my pistons I decided to upgrade the bottom and build a stroker. I plan to go with a stroked 4349 crank (6.2L 383cu in), Pauter 6AL4V Titanium rods, and pistons with the stock piston profile and dish volume, but compression increased to 9.5:1. We'll see what happens..
any news about your intercooler setup? Is is good/better than stock?
 02-11-2013, 06:24 AM
#399
Super Member
Join Date: Oct 2009
Location: Saudi Arabia - Qatif
Posts: 661
Likes: 0
Received 3 Likes
on
3 Posts
Brabus K8 E55 05
The post is somewhere in the forum, if you search for it you will find it.


