
DIY S/C Clutch Install
 08-27-2007, 02:55 PM
#1
Senior Member
Thread Starter
DIY S/C Clutch Install
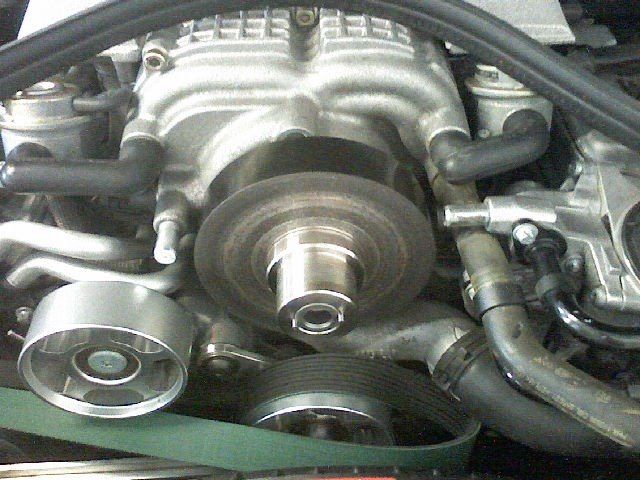
My s/c clutch had the same symptoms as all the others that have been replaced - particularly the rough engagement - so I replaced mine yesterday. The difference between the old one and new one is very noticeable. MUCH smoother engagement and no chirp. The stock clutch/pulley was way out of spec too so that might have had something to do with it. Installation time was less than 45min. from the time the car was up on ramps to backing out of the garage. Sorry for the picture phone quality.
Old one off...
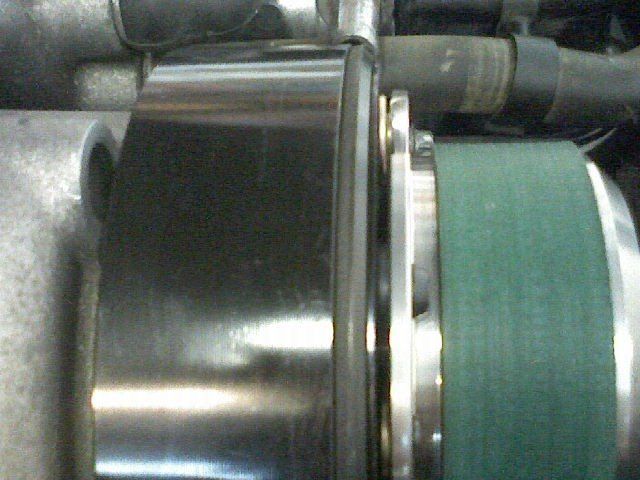
Comparison of the two...

New one installed...

Shim to spec. I used the low end of the spec.
Done.

Old one off...
Comparison of the two...
New one installed...
Shim to spec. I used the low end of the spec.
Done.
Last edited by BrianS; 04-08-2015 at 11:44 AM. Reason: Links to pics.

 08-27-2007, 07:46 PM
#4
MBWorld Fanatic!

My s/c clutch had the same symptoms as all the others that have been replaced - particularly the rough engagement - so I replaced mine yesterday. The difference between the old one and new one is very noticeable. MUCH smoother engagement and no chirp. The stock clutch/pulley was way out of spec too so that might have had something to do with it. Installation time was less than 45min. from the time the car was up on ramps to backing out of the garage. Sorry for the picture phone quality.
Old one off...

Comparison of the two...

New one installed...

Shim to spec. I used the low end of the spec.

Done.

Old one off...
Comparison of the two...
New one installed...
Shim to spec. I used the low end of the spec.
Done.

Can't really tell a difference externally but I guess the internals are obviously different correct?

 08-27-2007, 09:25 PM
#7
Senior Member
Thread Starter
Yes, the bearing is included and already pressed into place. The part number is 1130900044. It cost $758 through places like mercedespartssuperstore.com or about $900 at the dealer. I bought mine from a board member and the kit includes a new clutch/pulley, center bolt, three shims, and a center bolt washer.
Trending Topics
08-27-2007, 09:40 PM
#8
Senior Member
Thread Starter
The main difference seems to be with the friction material on back face of the clutch surface. Other than that, I think it's basically the same. The spring tension might be a different too but that's just a guess.
08-27-2007, 10:15 PM
#9
MBWorld Fanatic!
keep us updated after you get some miles on it. i'd like to know if this is a permanent cure for the chirp. i've heard it is but i've also heard the chirp eventually comes back (just not as bad).
08-28-2007, 07:09 AM
#10
MBWorld Fanatic!

Join Date: Jan 2002
Location: Carefree az usa
Posts: 1,085
Likes: 0
Received 22 Likes
on
18 Posts
2020 S560,14 ml350, 03 sl55, silver, pano, slr cams, evo headers, lsd, 2019 s63 cab.
Brian- 45 minutes, you are not wasting any time. nice job. hope to meet you soon. steve
08-28-2007, 07:53 AM
#11
MBWorld Fanatic!
 ?
08-28-2007, 10:03 AM
?
08-28-2007, 10:03 AM
#12
Senior Member
Thread Starter
I'm not sure if I notice anything because I installed phenolic spacers and an 80mm throttle body at the same time. It was more for preventative measure when I get the larger pulley and ECU tune.
My Evo headers will be here tomorrow and I'll be installing them over the weekend. I'll do another DIY segment on those too.
My Evo headers will be here tomorrow and I'll be installing them over the weekend. I'll do another DIY segment on those too.
01-30-2008, 03:34 AM
#13
Newbie

Join Date: Sep 2007
Posts: 7
Likes: 0
Received 0 Likes
on
0 Posts
2003 SL55
ive been reading this thread and many others. im currently in this same situation of removing the pulley and replacing it. after about 3 hours of trying, i have to ask. how do u remove the bolt in the front without having the clutch in the back spin. also, i think since my air compressor is only 100psi that doesnt help either. but, just wondering how you got the thing to stop spinning to remove the bolt. Thx
01-30-2008, 07:33 AM
#14
MBWorld Fanatic!
ive been reading this thread and many others. im currently in this same situation of removing the pulley and replacing it. after about 3 hours of trying, i have to ask. how do u remove the bolt in the front without having the clutch in the back spin. also, i think since my air compressor is only 100psi that doesnt help either. but, just wondering how you got the thing to stop spinning to remove the bolt. Thx
I personally would not want to use an impact wrench on the SC is it would really beat on the impellers and gears (even if it doesn't hurt them).
01-30-2008, 09:52 AM
#16
Member

Join Date: Sep 2007
Posts: 84
Likes: 0
Received 0 Likes
on
0 Posts
Audi S4
You're the man! I wish more guys on this site did DIY writeups like you. I own a B5 S4 and anything you could possibly do on that car is written out on Audiworld. That's one of the reasons I got the car. It's nice to have some guidance when doing DIY stuff. I'm hoping as more E55s come off warranty that more guys do their own work. I don't trust people to work on my car. The only downside to doing your own work on the E55 is the parts are so damn expensive (insanely so) and I haven't seen any diagnosis software similar to STAR (in the Audi world we have Rosstech's Vag-com).
01-30-2008, 03:48 PM
#17
Senior Member
Thread Starter
I thought the exact same thing until I was fighting a losing battle with my strap wrench so it had to come with good 'ol air power. I haven't had any problems at all after the replacement. I would have been nice if there were holes drilled into the black ring so a large C shaped tool could hold it still while loosening the bolt.
01-30-2008, 04:16 PM
#18
Member
Join Date: Sep 2007
Posts: 84
Likes: 0
Received 0 Likes
on
0 Posts
Audi S4
I thought the exact same thing until I was fighting a losing battle with my strap wrench so it had to come with good 'ol air power. I haven't had any problems at all after the replacement. I would have been nice if there were holes drilled into the black ring so a large C shaped tool could hold it still while loosening the bolt.
Where'd you get the shop manual for the E55? How expensive?
01-30-2008, 09:35 PM
#19
Senior Member
Thread Starter
I think it was about $100 but I've saved over 10x that by using it.
http://www.startekinfo.com/StarTek/o...stedDocId=9124
02-06-2009, 10:33 AM
#20
Newbie

Join Date: Nov 2008
Location: Maryland
Posts: 13
Likes: 0
Received 0 Likes
on
0 Posts
2003 E55, 2005 ML350, 1995 C220, 1996 C220, 1997 BMW 528i, 2003 SL55, 2000 Honda CRV, 2010 Honda CRV
Oh boy, thanks to you guys I found this thread and your wisdom! My clutch pack is giving. '03 with 113000 just virgin miles. FYI, parts.com, 1130900044 is now $563.50! At mercedespartssuperstore.com, lower at $672.40. Happy flying!
02-06-2009, 10:43 AM
#21
Super Member

I think it was about $100 but I've saved over 10x that by using it.
http://www.startekinfo.com/StarTek/o...stedDocId=9124
http://www.startekinfo.com/StarTek/o...stedDocId=9124
 02-06-2009, 05:29 PM
#23
Senior Member
Thread Starter
Do you think its the same as this one: http://cgi.ebay.com/ebaymotors/ws/eB...m=280309879683 ?
02-27-2009, 01:19 PM
#25
MBWorld Fanatic!
MUST READ supercharger clutch pulley SL55 E55
For those that don't have BenzWorld accounts:
This writeup is to fix the supercharger pulley bearing.
If you hear god awful noises coming from the supercharger pulley which sound like grininding your bearing is going out.(dont confuse this with the supercharger squeak).
Replacing the bearing will probably not fix the supercharger squeak, but for some reason when i replaced the bearing on mine the squeak stopped. but this is only day 1.
Last week the bearing inside my supercharger pulley went bad making all kinds of noises. I have a 2003 sl55, but this writeup applies to all amg 55 compressor engines. I called up the dealership here in houston and as just for the bearing itself. Dealership said i have to purchase the whole supercharger pulley assembly they do not sell the bearing. I politely hung up the phone. If you open your hood and take off the engine cover you can clearly see the bearing held by a lock ring inside th supercharger pulley.
I am fortunate to have access to the oem bearing that mercedes uses on these pulleys. they are made by nachi. You may be able to order them at bearing supply shops cost any where from $50 to $75 for the bearing. I can get them for $65 but it take about a week for them to come in.
Tools needed
1. Torch
2. strap wrench
3. 15/16 socket and breaker bar
4. bench vise
5. 26mm socket (i think thats the size)
6. rubber mallet
7. keep old bearing you will need it to install the new on.
Step one
Open hood lol
Step two
pull off engine cover
step 3
Remove outer drive belt
step 4
Fire up the torch and heat the supercharger pulley bolt.
The bolt has loctite the heat will melt the loctite to make bolt removal easier.
be very careful with the torch in the engine bay area. target just the bolt heat for 30-45 secs. Keep fire exsingusher on standby just in case.
step 5
use strap wrench and 15/16 socket to undo supercharger pulley bolt.
remember righty tighty lefty lucy.
step 6
remove supercharger pulley
step 7
Remove the snap ring with some pliers at the from of the pulley.
Step 8
place pulley between bench vise, (grooves facing down, backplate facing your face)
vise does not have to be tightened to much just enought to hold in place for the beating you about to give it. MAKE SURE PULLEY IS RESTING ON THE SHINY SILVER PART NOT THE DARK METAL PART AS THE DARK METAL PART HOLDS TENSION)
step 9
place 26mm socket inside pulley and hammer out the bearing with a mallet.
step 10
clean the inside of the pulley
step 11
rub inside with a light film of grease
step 12
place new bearing inside then put a towel on top then put old bearing on top of that and hammer in the new bearing half way. take the old bearing off, then continue hammering in with the towel on top till the bearing is seated.
step 13
put snap ring back in
step 14
install pulley back into supercharger
step 15
put loctite on supercharger bolt thread then bolt on.
40lb torq or 60 nm
step16
put cover on the close hood.
step 17
go grab a drink and a snack
wait 30min for loctite to set
step 18
crank the benz up
mission accomplished
takes only 30 min at most
ill upload some pictures soon
This is similar to the c32 bearing installion except the bearing come through the front of the pulley.
Any question's just post
If you need the nachi bearing just send me a message
Last edited by bobgodd; 02-27-2009 at 01:21 PM.
The following users liked this post:
jblack1340 (04-11-2018)


