


I can't stand the wear on my headlights..
Super Member
Joined: Apr 2011
Posts: 902
Likes: 3
From: Arizona
W211
if you have rock pits in your head lamps go with a lower grit than 1000 because you will be sanding forever to get them out... if its bad i would start as low as 400
if you have a compressor and an orbital sander wont take you but 15 minutes if that to do them, by hand maybe half hour 45 minutes.
i had the same pitting you are talking about and i did mine

if you have a compressor and an orbital sander wont take you but 15 minutes if that to do them, by hand maybe half hour 45 minutes.
i had the same pitting you are talking about and i did mine

Member
Joined: Dec 2008
Posts: 91
Likes: 0
From: Florida
E55
My brother owns a body shop and restores the headlights on several of my cars already. Here is what you need to do. Wet sand as everybody has said and get the lights clear coated so that it will not haze again. If you don't get it clear coated, over time it will just haze/cloud up again. The deeper the rock chips/pits, the more sanding you will have to do. I will post up my before and after when my car is done. Good luck!
Out Of Control!!
Joined: Dec 2004
Posts: 14,212
Likes: 9
From: Boston, MA
00 MB ML55, 91 Toyota Supra Turbo(sold), 06 E500(gone), 03 BMW M3
Duey at DT light innovations is pretty good at restoring headlights. He did some headlights for Kaizen. Or if you want I cant hit them with my porter cable. Then have Phil clear coat them and add a clear bra, they wont ever have an issue again

Senior Member

Joined: Mar 2011
Posts: 363
Likes: 2
Honda Metropolitan
Important thing is that you sand away the oxidized/pitted layer prior to moving to a finer grit then finally buff to shine. If you are going to shoot clear over the lens be sure that you are using urethane with UV protection. Best of luck to what ever path you choose.
Super Member
Joined: Apr 2009
Posts: 619
Likes: 0
From: Houston, Tx
'07 e63 AMG, '06 e320 CDI, '07 ML350 4Matic, '18 Gls450, '12 cls550
dima, i see exactly how you feel, did this to my CDI a week ago..mine were twice as bad as yours considering it was just an '06 but they came out looking right IMO used 3M
Member
Joined: Sep 2009
Posts: 199
Likes: 0
Mercedes
It is very important that you sand them first. Do not just buff them. If you just buff them, you will need to buff so hard that you risk melting the lens and damaging it from the heat generated from the pad.
Like me and the others have said, start out with a low grit like 600 and sand until all oxidation or scratches are gone, and then work your way up to 1500 or 2000. Then buff. Sounds like it would not work, but it works awesome.
If you are not comfortable doing this, take it to a bodyshop or competent detail center that does wetsanding/buffing. They will probably not charge much. Going through the hassel of removing the headlamps then baking them to remove/swap lenses is totally more work.
It takes me about 30-45 minutes to do a set of heavily oxided lenses using my DA and buffer. And they always come out like brand new, no matter how bad they were.

Thread Starter
MBWorld Fanatic!
Joined: Aug 2010
Posts: 2,183
Likes: 12
From: MA
E63S
Once again, your feedback is much appreciated, thanks guys.
I have high expectations from this 3m kit now. I'd buy the stuff separately but want to follow kit directions as its my first try and not go too crazy with it. If that doesn't work expect PM's
210e55: love the avatar ))
Gotta deal with these as is for another month or so until weather gets warmer.
I have high expectations from this 3m kit now. I'd buy the stuff separately but want to follow kit directions as its my first try and not go too crazy with it. If that doesn't work expect PM's
210e55: love the avatar ))
Gotta deal with these as is for another month or so until weather gets warmer.
MB World Stories
The Best of Mercedes & AMG

Manual Mercedes? 6 Times Sindelfingen Let Drivers Have All The Fun
Verdad Gallardo
Mercedes SLR McLaren 722 S Is Extremely Rare Example Modified by McLaren
Verdad Gallardo
8 Classic Boxy Mercedes Designs That Have Aged Like Fine Wine
Verdad Gallardo
Flawlessly Restored Mercedes 190E Evo II Heads to Auction
Verdad Gallardo
Electric Mercedes C-Class Unveiled: 11 Things You Need to Know
Verdad Gallardo
Mercedes EQS Gets A Major Update: Everything You Need to Know
Verdad Gallardo
5 Underrated Mercedes-Benz Models That Don't Get the Love They Deserve
Verdad Gallardo
Mercedes 300D Has Pushed Well Past 1 Million Miles and It Ain't Stopping
Verdad Gallardo
10 Most Reliable Mercedes-Benz Models You Can Buy Used
Verdad GallardoMBWorld Fanatic!
Joined: Nov 2005
Posts: 5,692
Likes: 5
none
I had this done to my beater..took an hour and the results were superb
Note drivers side (finished) vs passenger side (oxidized)
Dont get any of those kits...they are no good, just the stuff above
Senior Member
Joined: Mar 2011
Posts: 363
Likes: 2
Honda Metropolitan
Any reasons why you claim the 3m kit is junk when it is the same method as yours minus the clear film method. Doesn't make any sense?

Junior Member
Joined: Jul 2011
Posts: 43
Likes: 0
2007 Jeep SRT-8
+1. If you do decide to do the clear paint protection film, make sure you get one with uv blockers in it, otherwise there is no point to doing it. Some companies do not have uv protection in them because it will cause a paint fade line if the film is ever peeled off down the road. I know 3M and Venture Shield for sure do not have UV protection.
All clearcoat paint should have some UV protection, though.
All clearcoat paint should have some UV protection, though.

Newbie
Joined: Mar 2012
Posts: 1
Likes: 0
Ford
Headlight Cleaners & Plastic Lens Restorers:Too many to choose from!
With all of the different headlight cleaners, restorers, polishers, plastic lens restorers, what have you, it�s become pretty hard to see what is what. From homemade remedies, to scientific breakthroughs, hundreds of websites etc. it�s another conundrum as to what to choose. I go through this when I�m buying chips & beer; I shouldn�t have to scour the earth to scour my headlights! Back in my day, a headlight was made of quality glass, & now everything is either fiberglass or plastic! Anyway, I�ve went to WalMart, & saw that their Turtle Wax headlight / lens restorer was the cheapest at $5.97. Now Turtle Wax is pretty reputable for wax, and Walmart is reknowned for low prices. That being said, I tried it and it seemed to work OK. Wax on, Wax off. And then at AutoZone, they have a Brand called Symtech for $449.00. (Hey! They even throw in the bucket & sponges!) I didn�t try it, as my wallet was a bit thin from Christmas. Then you have the �As seen on TV� called FastBrite which has a 2 oz bottle & a sponge and another 2 oz bottle of sealer-kinda thingy. It sells for $14.99 $21.87 It seems OK, but I don�t like a step-by step process. I did find a newcomer on the scene, which has the same claims, and has a different style and the price is nice too. Uncle Pooter�s Headlight Sauce. They have a brown bottle, and also a brown 3 oz jug, which is pretty unique, and have a wipe-on, wipe off method, which seems to do pretty well, on plastic headlights for the $6.75 you pay. I�ve ordered two of those, and I am OK with the results. I guess the rest is up to your own personal preference. Just like buying chips & beer! Some like domestic, some like import! So until they bring back glass for headlights, I guess it�s another thing we�ll have to be choosing from now on.

Newbie
Joined: Oct 2008
Posts: 4
Likes: 0
'17 E300 2.0T AMG Packg W213
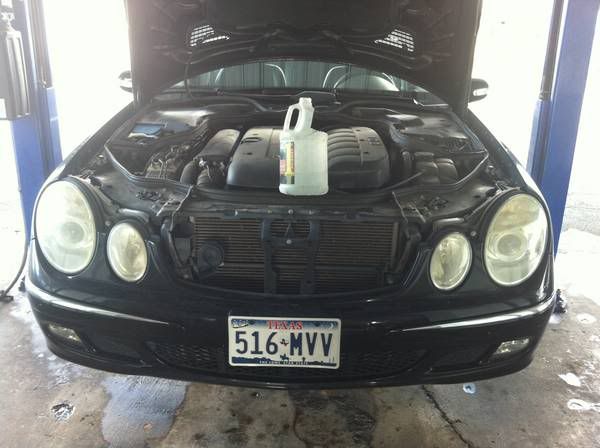
If this is any help to anybody, i want to share what i did.
I had my headlights pretty fogged like you can see in the pics below. I didn't know which restoration kit to use, and I had read that the original lights have a UV coat. So i didn't know if to go with the 3M kit, or with the Dupli Color with UV coat, so I decided to use both; one in the right side and one in the left side. See the results in my next post.
I had my headlights pretty fogged like you can see in the pics below. I didn't know which restoration kit to use, and I had read that the original lights have a UV coat. So i didn't know if to go with the 3M kit, or with the Dupli Color with UV coat, so I decided to use both; one in the right side and one in the left side. See the results in my next post.
Newbie
Joined: Oct 2008
Posts: 4
Likes: 0
'17 E300 2.0T AMG Packg W213
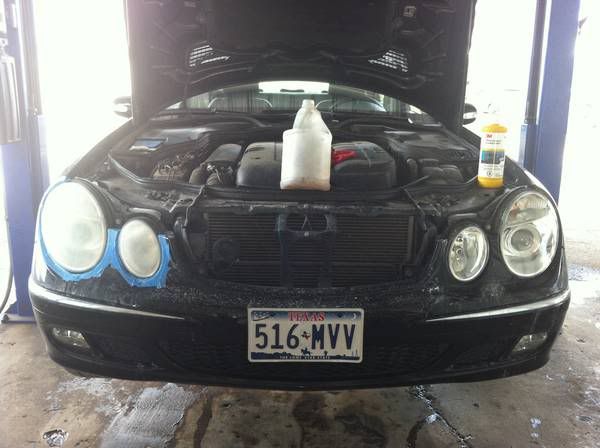
So, this is how the 3M kit and the dupli-color leave your lights...
The left side (shinier) was done with the 3M. I think it looks pretty good. My only concern is how long they will last like that without any UV coat. I will report back in a year with pictures after a hot Texas summer sun.
Note: I used up most of the sandpaper that came with the kit on just one side. I had to go out and buy more to finish the job. I cut the sheets in round pieces and glued them with spray glue to the used pieces so i could use the velcro in the back.
The right side (more opaque) was with the Dupli-Color kit. Not as shiny as the 3M, but let's wait to see which ones withstands the sun better.
Bits of advice:
- DO NOT USE DUCT TAPE TO MASK AROUND THE LIGHTS. It leaves some glue behind.
- Do not use any strong solvents (like Goo-Gone) to clean you lights as they will mess them up. Soap water should be enough. (The original fading won't go away with any solvents anyway).
After doing some more research, this is what 3M says about UV coatings in this link (http://multimedia.3m.com/mws/mediawe...Vs6E666666--):
"Does 3M offer a UV coating with the kit?
No, we have found coatings can have several limitations and negative effects on the headlight
lenses. In many cases the coating does not bond well to the lens and begins peeling or chipping
off after a only few months. The coatings can haze the lens or mask the final clarity of the lens.
Many of the coating will actually degrade under UV faster than the polycarbonate lens material
itself."
(There is some other useful info in the link)
For aftercare 3M recommends using 3M - 39010 - Lens Polish and Protector every 3 months.
Last edited by eliris; Jan 16, 2013 at 09:16 PM.
MBWorld Fanatic!


Joined: Sep 2008
Posts: 3,076
Likes: 28
From: Seattle, WA
99 ML430, 01 CLK55, 07 R63, 15 E63 Wagon
Just out of curiosity, you said the 07 headlights don't fit on your car. Why is that exactly? The headlight shape is the same... are the mounting points different?


