
4000lb Sideways

 05-10-2017, 04:07 PM
#51
Super Member
Thread Starter
Awesome! I'll order one as soon as they're back in stock and start playing around. In the meantime, here's some homework for you. ;-) Figure out the code for the intercooler pump. I assume it's on the CAN bus because you can turn it on and off using STAR. It would be way cool if we could turn that thing on using a button inside the car without having to cut up the factory harness in any way.
Currently I only have my CBT wired into CANBUS B (interior), to tinker with the pump you would also have to wire it into CANBUS C (chassis/motor). CBT actually supports three buses at the same time, so this is very doable.
A project for the future, for sure.
 05-10-2017, 08:05 PM
#52
Super Member
Thread Starter
The steering wheel is off.
Nobody makes hub adapters to I will have to do the FCP Euro Motorsports team did with their C300: hack off the rest of the steering wheel and use the aluminum center as a foundation to build my own spacer.

This guy will have to stick around:
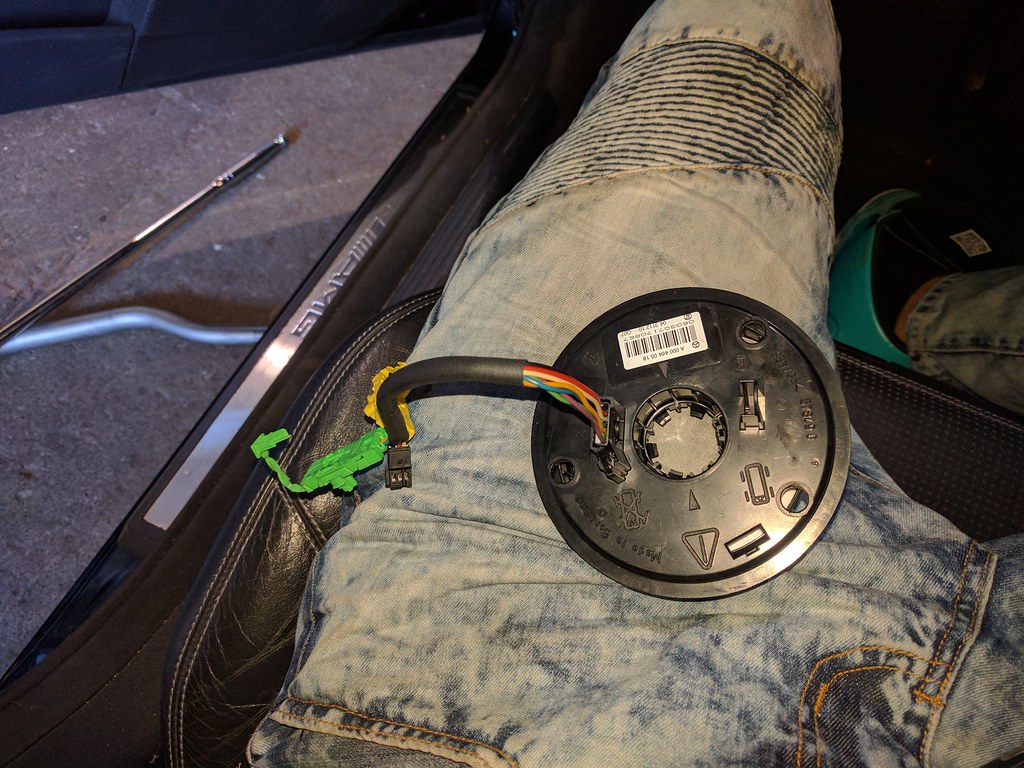
The main harness you see will be cut and terminated (it does not unplug, it is perma-soldered to the ribbon inside of the assembly). The reason this has to remain is two-fold. One is: it is a convenient existing route for the transmission shift buttons, two is this:
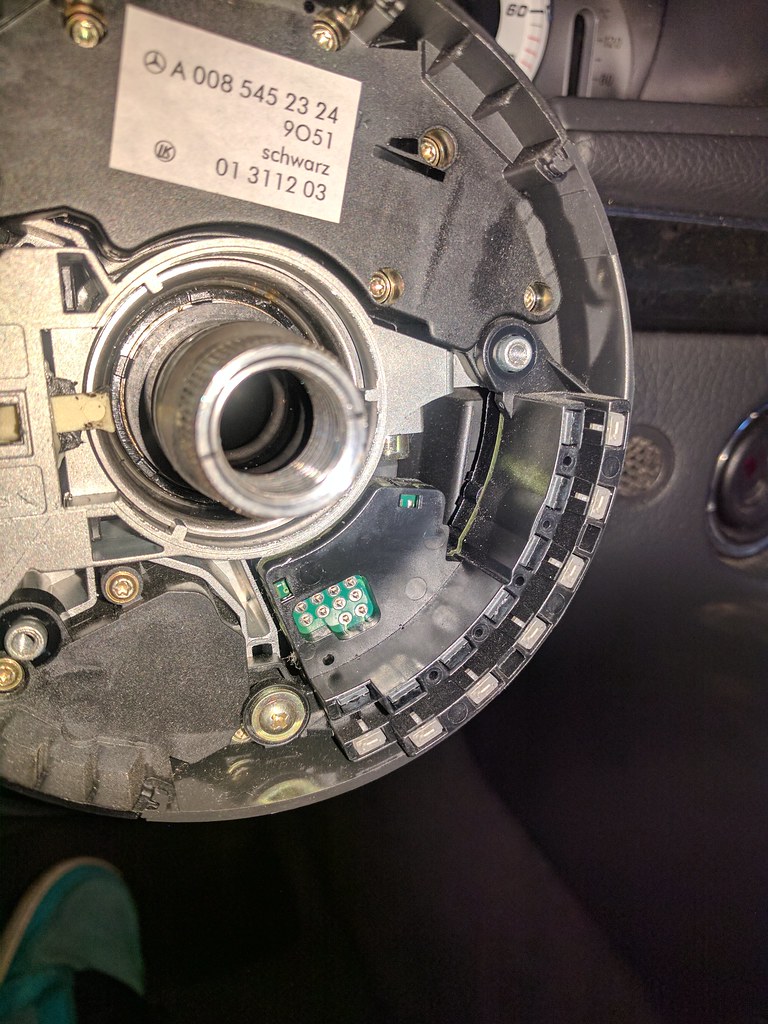
The bottom right corner there is (i am guessing) how the car keeps track of the steering angle, be it for ESP or what have you.
In terms of the shifter buttons, these are interesting. Each button has only two contacts (expected), but the complete mini harness for both buttons has only two terminals as well. This wouldn't be so weird because the steering wheel buttons on the front send the data via CANBUS B, however, this is a separate circuit entirely.
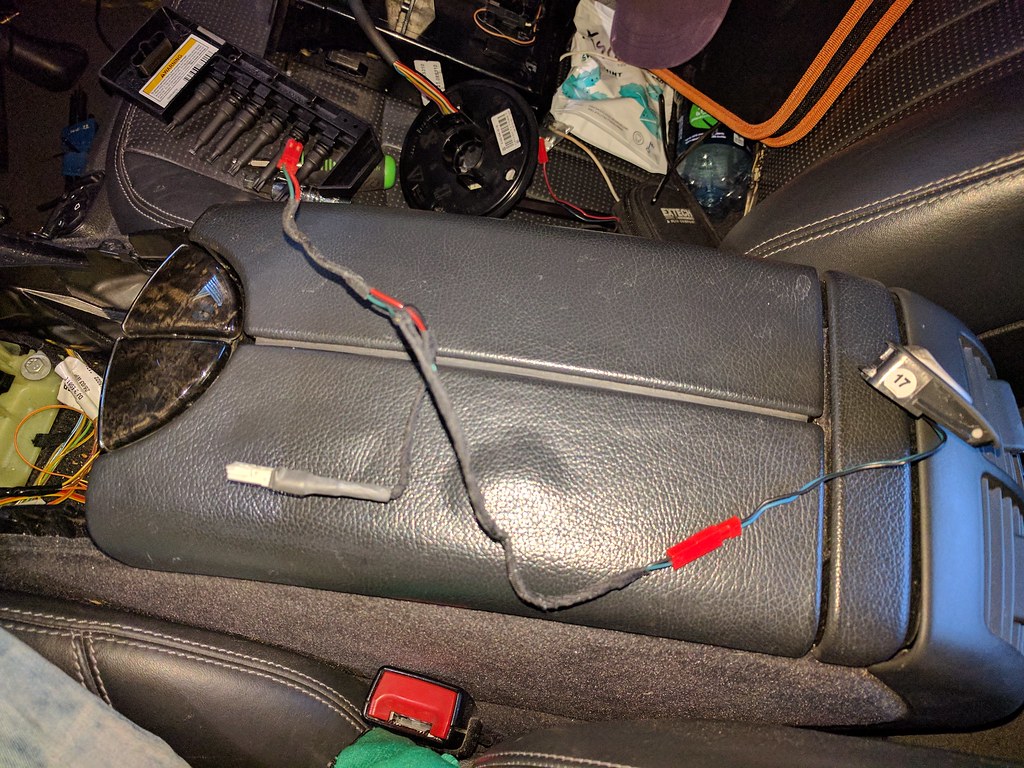
The plan now is to try and use factory shift buttons on a Momo Prototipo (already ordered) along with the factory mini-harness. The original plan was to use custom momentary switches on an RJ9-coil cord bypassing the steering column.
And finally, this guy came in for some R&D and test+fit:
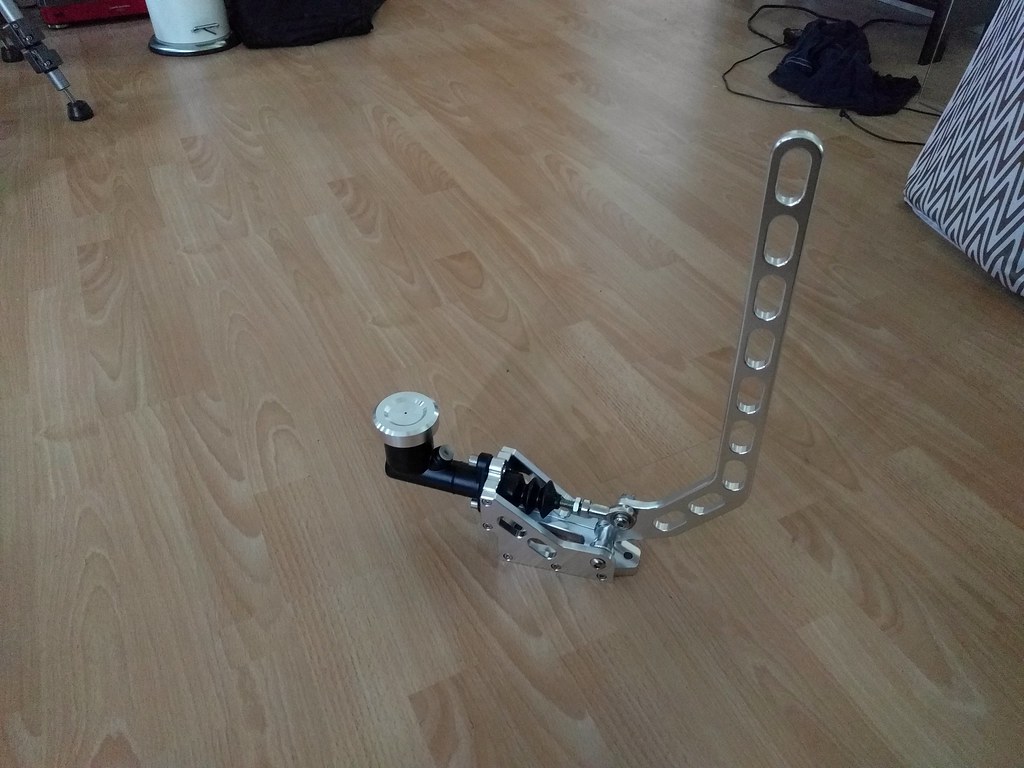
it takes apart nicely and will be widened and modified to accommodate two Wilwood reservoirs, so we can preserve the factory ESP/ABS function instead of the usual drifter T-junction for rear brake lines.
That and the rear brakes are massive. We will need the hydraulic volume displacement of a dual setup to do it efficiently.
Nobody makes hub adapters to I will have to do the FCP Euro Motorsports team did with their C300: hack off the rest of the steering wheel and use the aluminum center as a foundation to build my own spacer.
This guy will have to stick around:
The main harness you see will be cut and terminated (it does not unplug, it is perma-soldered to the ribbon inside of the assembly). The reason this has to remain is two-fold. One is: it is a convenient existing route for the transmission shift buttons, two is this:
The bottom right corner there is (i am guessing) how the car keeps track of the steering angle, be it for ESP or what have you.
In terms of the shifter buttons, these are interesting. Each button has only two contacts (expected), but the complete mini harness for both buttons has only two terminals as well. This wouldn't be so weird because the steering wheel buttons on the front send the data via CANBUS B, however, this is a separate circuit entirely.
The plan now is to try and use factory shift buttons on a Momo Prototipo (already ordered) along with the factory mini-harness. The original plan was to use custom momentary switches on an RJ9-coil cord bypassing the steering column.
And finally, this guy came in for some R&D and test+fit:
it takes apart nicely and will be widened and modified to accommodate two Wilwood reservoirs, so we can preserve the factory ESP/ABS function instead of the usual drifter T-junction for rear brake lines.
That and the rear brakes are massive. We will need the hydraulic volume displacement of a dual setup to do it efficiently.
 05-10-2017, 11:54 PM
#54
Super Member
Thread Starter
Can someone help me out figure out what the pump next the audio amplifier is used for? Behind the trunk trim on the left is the said pump and on the opposite side (on the right) is a large shiny air tank.
The suspension pump is front left, behind the bumper and since the doors in this generation Mercedes aren't pneumatically actuated, I'm at a bit of a loss.
The suspension pump is front left, behind the bumper and since the doors in this generation Mercedes aren't pneumatically actuated, I'm at a bit of a loss.
05-11-2017, 01:21 AM
#55
MBWorld Fanatic!
I don't remember seeing a pump on the left side of my trunk. Got any pictures? Pretty sure the silver air tank on the right side is for the airmatic system.
05-11-2017, 01:26 AM
#56
Super Member
Thread Starter
https://www.youtube.com/watch?v=EtTI_FY4YnY&t=19s
CAN connections to steering wheel buttons are pre-set and function. You can pair your phone with bluetooth and make calls etc
Pretty sweet for $300 and I am an audiophile. Its a droid so I have torque hooked up and it displays gauges for IAT/RPM/Boost which is nice also and makes logging pretty easy as well and pairs nice data sets to go with Zeitronix =D
I threw in all my old gear from another build
JL 300/4
JL 500/1
JL 12w6 v2 in trunk
Droid HU
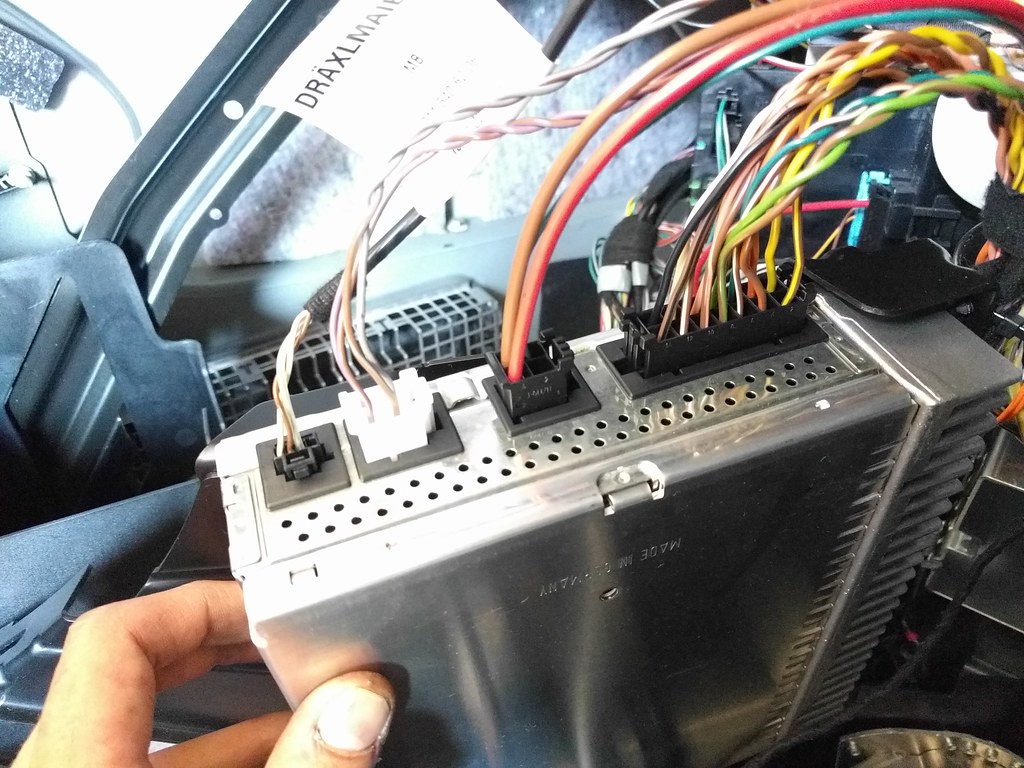
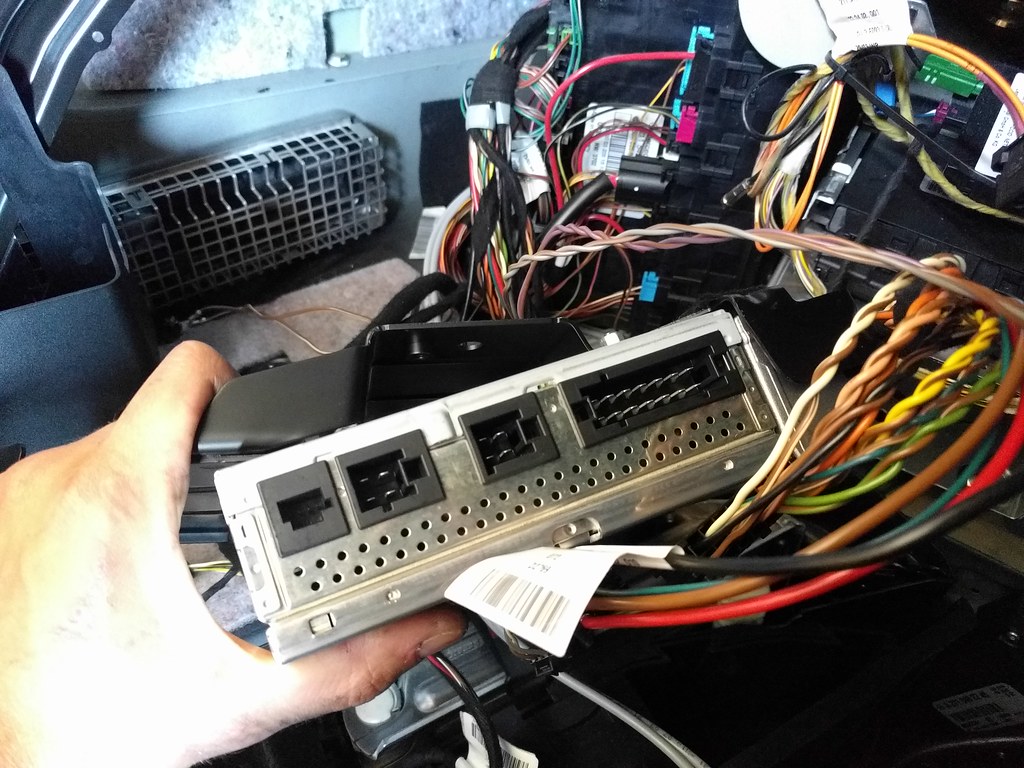
I reviewed the original thread and I looked at eBay listings and I see that my connections don't match the ones found on other W211s. Look at my photo of the back of the headunit again, the only hookup is the three power leads (ground, ACC, VDC) and two fibreoptics IOs.
Am I correct that I will still be able to install this unit, but I will need the 6m cable running to the back of the car where the connectors will be available near the factory amp?
EDIT:
This is what I'm thinking:
Android headunit: http://www.ebay.com/itm/Android-5-1-...BZDC9~&vxp=mtr
Cable that I see available: http://www.ebay.com/itm/Car-Stereo-W...cAAOSwKtVWwDOw
Last edited by jumph4x; 05-11-2017 at 02:05 AM.
05-11-2017, 05:22 AM
#57
Super Member
Thread Starter
Setup my Arduino development environment here, after struggling with the custom hardware package on Ubuntu, it worked right away on Windows. I guess this will be the one software project I work on in Windows 10. There really is a first time for everything!
It compiles and everything is happy, but the stock program is already using 72% of the program memory. Considering I don't have concrete plans for it yet, this will probably be plenty of room for whatever I end up doing.
This is build 0.7.1, which the official desktop app doesn't even know about yet (it hasn't been re-released since the latest pull request got merged for the Arduino code).
The following users liked this post:
jumph4x (05-11-2017)
05-11-2017, 08:24 AM
#59

Can someone help me out figure out what the pump next the audio amplifier is used for? Behind the trunk trim on the left is the said pump and on the opposite side (on the right) is a large shiny air tank.
The suspension pump is front left, behind the bumper and since the doors in this generation Mercedes aren't pneumatically actuated, I'm at a bit of a loss.
The suspension pump is front left, behind the bumper and since the doors in this generation Mercedes aren't pneumatically actuated, I'm at a bit of a loss.
05-11-2017, 08:37 AM
#61
That headunit looks like the ticket for me. I'd love to go that route, but help me understand something:
I reviewed the original thread and I looked at eBay listings and I see that my connections don't match the ones found on other W211s. Look at my photo of the back of the headunit again, the only hookup is the three power leads (ground, ACC, VDC) and two fibreoptics IOs.
Am I correct that I will still be able to install this unit, but I will need the 6m cable running to the back of the car where the connectors will be available near the factory amp?
EDIT:
This is what I'm thinking:
Android headunit: http://www.ebay.com/itm/Android-5-1-...BZDC9~&vxp=mtr
Cable that I see available: http://www.ebay.com/itm/Car-Stereo-W...cAAOSwKtVWwDOw
You only need 6m cable if you plan on using the factory amp. You would need to just ditch the wiring on the back of the head unit... its worthless, just zip tie it up out of the way. You need the usual, 12v constant, 12v switched off ciggy, ground. Rest is pretty easy. There is a plug that connects to the speaker connector and has pig tail to go to your aftermarket amp speaker out.
If you use the factory amp get the 6m cable and the factory Fiber Connection box from what I read. I had gear to install so I said screw that and went another way. I suggest you get a used 300/4 or something along the lines of 75w rms/ch. I can only turn the gain about 1/3 of the way up on the amp and then the speakers get to their limit. You will need a small amp to power the factory sub if you want a little knock 150rms is all if could take in my opinion.
I just took a piece of silicone vacuum tubing to connect the fiber circuit off the back of the HU. I could not get anything off the connection on the back of my head unit in ways of power,ground and 12v switched.
Hope that helps. There are about 15 makers of these units, get one with a solid warranty and some decent specs, most use the same android base MCU and RAM may differ 1Gb/2Gb
Hope this helps, hit me up with questions if ya like i dont mind
Last edited by BoostedAero; 05-11-2017 at 08:42 AM.
05-11-2017, 01:00 PM
#62
MBWorld Fanatic!
Setup my Arduino development environment here, after struggling with the custom hardware package on Ubuntu, it worked right away on Windows. I guess this will be the one software project I work on in Windows 10. There really is a first time for everything!
It compiles and everything is happy, but the stock program is already using 72% of the program memory. Considering I don't have concrete plans for it yet, this will probably be plenty of room for whatever I end up doing.
This is build 0.7.1, which the official desktop app doesn't even know about yet (it hasn't been re-released since the latest pull request got merged for the Arduino code).
It compiles and everything is happy, but the stock program is already using 72% of the program memory. Considering I don't have concrete plans for it yet, this will probably be plenty of room for whatever I end up doing.
This is build 0.7.1, which the official desktop app doesn't even know about yet (it hasn't been re-released since the latest pull request got merged for the Arduino code).
05-11-2017, 03:44 PM
#63
Super Member
Thread Starter
Nope. Looks perfectly fine though.
Last edited by jumph4x; 05-11-2017 at 03:47 PM.
05-11-2017, 03:48 PM
#64
Super Member
Thread Starter
You only need 6m cable if you plan on using the factory amp. You would need to just ditch the wiring on the back of the head unit... its worthless, just zip tie it up out of the way. You need the usual, 12v constant, 12v switched off ciggy, ground. Rest is pretty easy. There is a plug that connects to the speaker connector and has pig tail to go to your aftermarket amp speaker out.
If you use the factory amp get the 6m cable and the factory Fiber Connection box from what I read. I had gear to install so I said screw that and went another way. I suggest you get a used 300/4 or something along the lines of 75w rms/ch. I can only turn the gain about 1/3 of the way up on the amp and then the speakers get to their limit. You will need a small amp to power the factory sub if you want a little knock 150rms is all if could take in my opinion.
I just took a piece of silicone vacuum tubing to connect the fiber circuit off the back of the HU. I could not get anything off the connection on the back of my head unit in ways of power,ground and 12v switched.
Hope that helps. There are about 15 makers of these units, get one with a solid warranty and some decent specs, most use the same android base MCU and RAM may differ 1Gb/2Gb
Hope this helps, hit me up with questions if ya like i dont mind

No way am I using the factory unit.
05-11-2017, 03:52 PM
#65
MBWorld Fanatic!
05-11-2017, 03:56 PM
#66
Super Member
Thread Starter
In that case, go ahead and join the club over at https://mbworld.org/forums/audio-ele...b-hacking.html
05-11-2017, 08:46 PM
#67
Super Member
Thread Starter
05-12-2017, 11:18 PM
#68
Super Member
Thread Starter
Got the center console out, got the gear selector out. Pics soon.
The Keyless-Go button will be easy to rewire, the wires and connector are easy to access. Same for the linkage to detect gear changes at the shifter post. I don't think I will need to tap into these, but if anyone does - it's pretty straight forward.
Shifter will stay off while I cut the carpet and plan some plumbing routing.
 05-15-2017, 08:46 PM
#70
Super Member
Thread Starter
Looks like I have the HK setup with a million speakers in this car, took some photos for eBay vendors to make sure I'm buying the right stuff for this car.
The folklore and hilarity of the factory amp placement did not disappoint. I was laughing while desperately trying to under the last bolt, it's pretty extreme.
When getting the shifter assembly out, there will be mechanical linkage at the bottom of it with a circlip holding it together. When the entire unit is out, note that the black and white plastic assembly pieces are glued together.
If you take a sharp blade and gently but firmly wedge the blade and inflect it, the pieces will eventually separate cleanly:
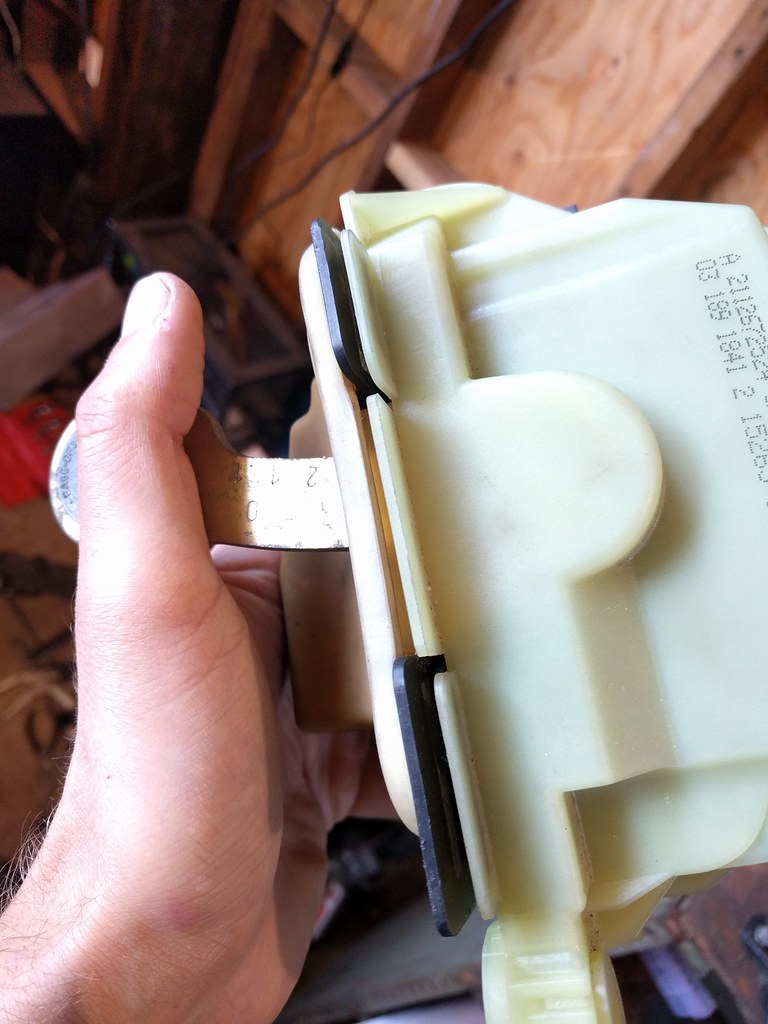
Here you can see the Keyless Go wire running through the inside of the shifter rod and the connector that is very simply to tap into, great news:

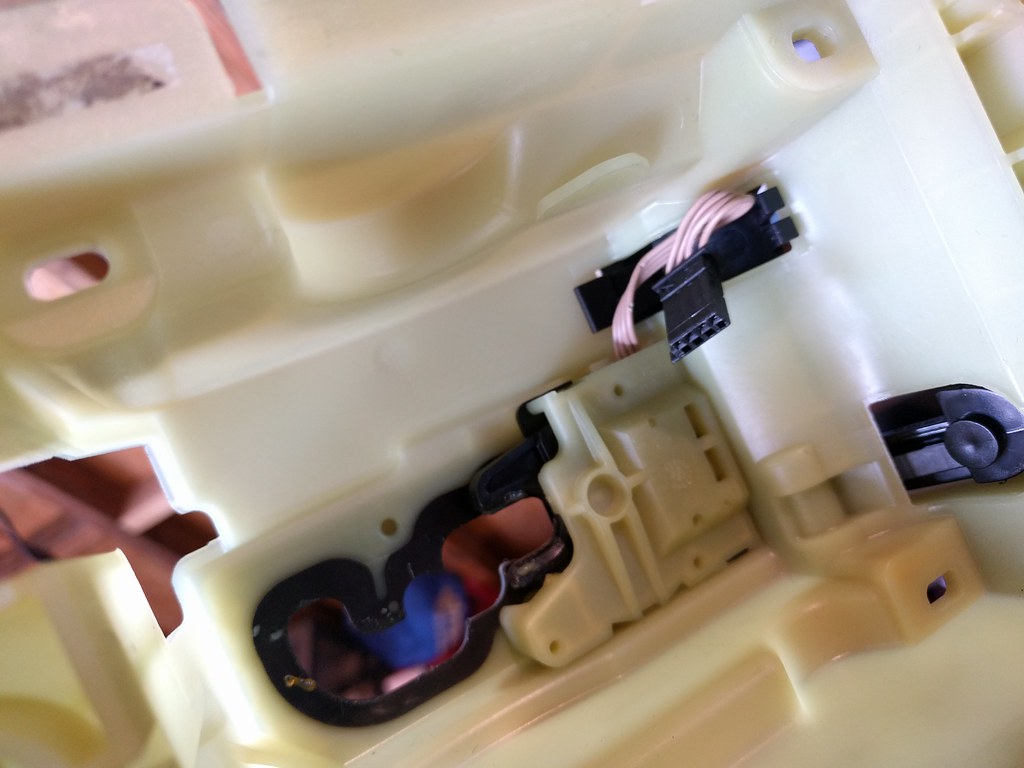
Secured to the top of the white cover is the tip-sensor for changing gears. If you didn't have factory buttons but wanted to retrofit, what I would recommend is tapping into these guys, running a wire to the steering wheel dash and then making a race-style RJ9 coil cord to the wheel. Would look awkward on the factory wheels, but I bet it would look great with an aftermarket wheel.
The assembly will stay out while I jack the car back up and start measuring and planning plumbing of brake line.
The folklore and hilarity of the factory amp placement did not disappoint. I was laughing while desperately trying to under the last bolt, it's pretty extreme.
When getting the shifter assembly out, there will be mechanical linkage at the bottom of it with a circlip holding it together. When the entire unit is out, note that the black and white plastic assembly pieces are glued together.
If you take a sharp blade and gently but firmly wedge the blade and inflect it, the pieces will eventually separate cleanly:
Here you can see the Keyless Go wire running through the inside of the shifter rod and the connector that is very simply to tap into, great news:
Secured to the top of the white cover is the tip-sensor for changing gears. If you didn't have factory buttons but wanted to retrofit, what I would recommend is tapping into these guys, running a wire to the steering wheel dash and then making a race-style RJ9 coil cord to the wheel. Would look awkward on the factory wheels, but I bet it would look great with an aftermarket wheel.
The assembly will stay out while I jack the car back up and start measuring and planning plumbing of brake line.
05-16-2017, 12:18 AM
#71
Super Member
Thread Starter
So, since I have the Harman Kardon speakers, I would like to keep the subwoofer and the two rear parcel speakers.
Last edited by jumph4x; 05-16-2017 at 04:50 AM.
05-16-2017, 07:27 AM
#73
Super Member
Appreciate the pictures. Do you have the power trunk option? If so, while you're in there, check the wires for insulation breaks and fraying copper, common problem. Cheers
05-16-2017, 12:51 PM
#74
Super Member
Thread Starter
Everything I could see without close examination looked good.


