Head removal on CLS63 M156 engine – FYI/DYI

 03-27-2017, 09:20 AM
#28
Junior Member
 03-28-2017, 02:35 PM
#30
Junior Member
Thread Starter

Join Date: Mar 2017
Posts: 28
Likes: 0
Received 2 Likes
on
2 Posts
CLS63, SL65, GLK350, 360CS, MCS GP2 clone
This pics show the upper pins still in place - they look like a couple threaded hole on the face of the head.
https://mbworld.org/forums/attachmen...scn35401-1.jpg
The following users liked this post:
e63_in_dfw (12-20-2018)
03-28-2017, 02:41 PM
#31
Junior Member
Thread Starter
Join Date: Mar 2017
Posts: 28
Likes: 0
Received 2 Likes
on
2 Posts
CLS63, SL65, GLK350, 360CS, MCS GP2 clone
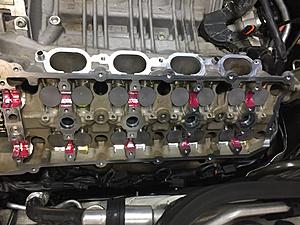
Ok Home stretch!
New buckets installed
Camshafts are installed so they have the least amount of load. Caps are tightened progressively to 10NM. Then you can rotate them to allow front and rear locking tool to be in place, I had to “make” my own narrow wrench to fit the cam.

Check paint reference marks and confirm that you are not messing by switching cams and sides. Now you can put the phaser on to each cam and hand tighten with new bolts. Then install the indexing tool – it is designed to be foolproof (only one way the phasers will fit) to assure that the front section of the phaser is at the correct angle in relation to the cam before it is tightened up.
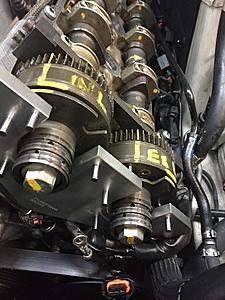
Tighten the phaser bolts – 45NM plus 90 degrees, then move on the other head...packaging pile!
 03-28-2017, 02:43 PM
#32
Junior Member
Thread Starter
Join Date: Mar 2017
Posts: 28
Likes: 0
Received 2 Likes
on
2 Posts
CLS63, SL65, GLK350, 360CS, MCS GP2 clone
Voila! This is the meat of the process. The rest of the reassembly is straightforward so I didn’t document, some torques values; exhaust manifold and down pipe are 20NM. Intake manifold – use new aluminum bolts, follow WIS sequence and torque to 10NM, 90 degrees and 10 degrees. Cam covers are 8.5NM follow WIS sequences and cam front covers are 10NM.
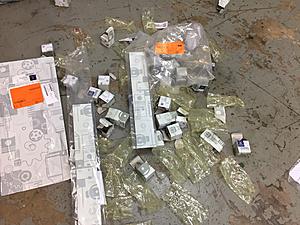
Pics of the parts replaced!
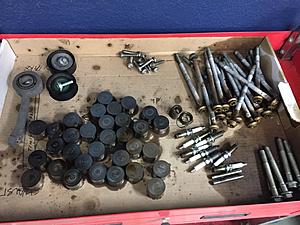
Pics of the parts replaced!
 03-28-2017, 02:49 PM
#33
Junior Member
Thread Starter
Join Date: Mar 2017
Posts: 28
Likes: 0
Received 2 Likes
on
2 Posts
CLS63, SL65, GLK350, 360CS, MCS GP2 clone
Wrap up comments
After adding all the fluids, checking all the bolts (I usually mark each torqued bolt with a yellow dot in case I am pulled away from the project, that way I can confirm I haven’t overlooked anything), and checking and double checking all the connectors. I turned the ignition key and the car started right up with no weird noises. I let it idle and checked for leaks using flashlight. After a couple of minutes, some smoke started in the engine bay as the oil burnt off the cats. Stopped the engine and recheck fluid levels - all good. In my case, the typical ticking noise from the cams on start up is gone and the engine runs very smoothly. Only negative was a CEL that happened after a short drive. Code was the P0113 which I sort of expected as I had damaged the clip of the Temp sensor in the intake and couldn’t get it to stay on properly. $11 and 5 minutes later, the code was resolved and my wife is happy to have her car back.
In sum, while I didn’t find much documentation on the Internet about the process, and in fact there were far more comments about the complexity of the process, I feel that; with basic tools, the timing tools, WIS and a little patience, the job very approachable. There is nothing special about setting the timing – just follow the process which is in fact foolproof thanks to the timing lock and indexing tools. Assemble and tighten. Coming off a timing chain replacement on my Ferrari V12 I may sound blasé, but anyone that has worked on engines should have no problems.
In sum, while I didn’t find much documentation on the Internet about the process, and in fact there were far more comments about the complexity of the process, I feel that; with basic tools, the timing tools, WIS and a little patience, the job very approachable. There is nothing special about setting the timing – just follow the process which is in fact foolproof thanks to the timing lock and indexing tools. Assemble and tighten. Coming off a timing chain replacement on my Ferrari V12 I may sound blasé, but anyone that has worked on engines should have no problems.
03-29-2017, 07:53 AM
#35
Junior Member
My son is thinking we have to take the engine completely out because a SOC engine is harder to work on than a DOC without removing it.
03-29-2017, 10:15 AM
#37
Junior Member
Thread Starter
Join Date: Mar 2017
Posts: 28
Likes: 0
Received 2 Likes
on
2 Posts
CLS63, SL65, GLK350, 360CS, MCS GP2 clone
Only comment I will make is that it is always to work on an engine when it is out, however; taking out the engine is quite an undertaking. I can only speak for the CL63 M156 as I have not worked extensively on the SC engine (only replaced ABC pump on my CL55) but pulling the engine for the job that I undertook above would have been a complete waste of time and energy.
03-29-2017, 07:59 PM
#38
When your into heads removal, about all that's left to remove engine is mounts, some coolant hoses and wires, tc bolts, and flywheel or transmission housing bolts, and lifting it out. And for all the ease to do everthing from cleaning to installing form in place gasket gooed parts. And the lack of back strain and bent over head aches, on these cars engine out is the best option.
03-30-2017, 12:43 AM
#39
Junior Member
Thread Starter
Join Date: Mar 2017
Posts: 28
Likes: 0
Received 2 Likes
on
2 Posts
CLS63, SL65, GLK350, 360CS, MCS GP2 clone
When your into heads removal, about all that's left to remove engine is mounts, some coolant hoses and wires, tc bolts, and flywheel or transmission housing bolts, and lifting it out. And for all the ease to do everthing from cleaning to installing form in place gasket gooed parts. And the lack of back strain and bent over head aches, on these cars engine out is the best option.
Please make sure you document and share the process.
Last edited by 360CS; 03-30-2017 at 12:45 AM.
04-02-2018, 03:27 PM
#40

Hi there fellow DIY'rs!!! I'm in the process of taking out both Heads to have them rebuilt.
Prior to this I replaced the front end ( F1 Fabrications Upper Camber Correcting Control Arms, Torque Arms, Air Spring Arms, Refurbished "Rebuild Master Tech" front AirSpring Struts & my RMT remand Intake which turned out beautiful, Racing Brake Rotors & Brake Pads).
My question pertains to driver side Head Removal. How did you disconnect the Air Hat Metal Tube connected underneath the front side of the Head as there's no room to fit an extension in there due to the Power Steering Pump (PSP) blocking access? Did you get in from the side with a stubby wrench w/8ml Torx socket? Further, you can clearly see in one of your pics the bracket which attaches to the PSP looking down the driver side without the Head and Header. Right next to the end of the bracket is the A/C Hose. On my E63 this hose directly blocks access the the bolt on the bracket attaching to the PSP?? I guess I'll have to disconnect that from the block but was hoping to avoid breaking the A/C line?? Of course I'll try to "move" it, but it's so on top of that bolt I'm doubtful. In addition, isn't there a second bolt even further inboard of the bracket closer to the block securing the PSP on the backside? Does loosening the A/C (leaving the lines connected) give better access?? I'm thinking so!!! There is definitely much more involved to remove the heads in-situ than I initially thought!!! I was also hoping to remove the heads without having to remove the Headers first as there appears to be enough room to do so. It seems a bit much to have to do all this to just to remove that metal Air Hat Emmissions tube from the front bottom of the Head! Jeez!!!
Last edited by E63007; 04-02-2018 at 03:36 PM.
04-19-2018, 07:32 PM
#41
I like the "easy to work on" comment. I can think of many other engines that are way easier to work on. And thinking about it a bit, I'm surprised Mercedes isn't embarrassed at the cheapness of their more modern engine designs. The use of aluminum is synonymous with the word cheap. And especially in cylinder block and cylinders, its surprising they get the miles they do from them. I can understand a weight savings, but as we all know there are cars lighter than MB and even ones that had full iron engines. I sorry but they made a lot of mistakes on the newer engines in their cars now.
04-23-2018, 01:53 PM
#42
Air Hat removal resolved!!!
I was able to reach down from driver side fender below the front of the exhaust header and feel the torx head T30 screw which secures the Air Hat connection to the head. However, it required me to use a 1/4" X 6" ratchet extension to fit through the gap between the Power Steering Pump and Timing Case first by itself with no rachet end connected. I also had a 1/4 swivel extension on the torx end as the 6" extension comes in from that gap at an angle. Then I held the 1/4 extension and ratchet in my left hand while attaching the Torx Head T30 to the swivel to it with my right hand. Once that was done, feel the placement of the torx to fit in the screw. In my case, I had to buy 1/4 Torx in addition to the extension as there is no room under there to attach a 1/4" to 3/8 adapter additionally. In fact, I unscrewed the screw as much as I could until the swivel butted up to the Power Steering Pump. I then had to "tighten" the screw in order to remove the torx from the screw, remove the extension from the swivel and T30, remove the swivel and t30 in order to manually unscrew the torx Screw. Collect the screw and store it away, then the air hat tube can be moved Clockwise-counterclockwise in order to remove the Head Pin which that tube blocks while remaining attached to the Head.
Hope this helps those of you scratching your heads like I was when I got to this step. Another head scratcher for me I know will come is how to install the head while the timing chain gear remains in-Situ between the chain guides!!! I'm thinking of tying a nylon rope through the gear and have a helper feed it up through the head I am holding above thus extending the chain with the gear up through the head before dropping the head onto the block. It's a tight fit pulling the head off whilst the gear is on the chain, so without a helper doing what I'm outlining above I can only imagine the difficulty of trying to line that up without a helper!!!! Yikes!
Hope this helps those of you scratching your heads like I was when I got to this step. Another head scratcher for me I know will come is how to install the head while the timing chain gear remains in-Situ between the chain guides!!! I'm thinking of tying a nylon rope through the gear and have a helper feed it up through the head I am holding above thus extending the chain with the gear up through the head before dropping the head onto the block. It's a tight fit pulling the head off whilst the gear is on the chain, so without a helper doing what I'm outlining above I can only imagine the difficulty of trying to line that up without a helper!!!! Yikes!
Last edited by E63007; 11-04-2018 at 01:12 AM.
06-13-2018, 03:07 AM
#43
Newbie

Join Date: Aug 2016
Posts: 11
Likes: 0
Received 0 Likes
on
0 Posts
2007 cls 63 AMG
One question, ihave a leak in the front cam cover and planning on changing the seal. do i need to time the wngine and lock the cams in place or i can just remove it like removing the valve covers.
thank you
thank you
06-14-2018, 09:20 AM
#44
Hello there!
As far as the front valve/cam cover is concerned, they come off after you take off the valve cover. Be sure to use a tiny flat head screwdriver to gently pry the harness clips locking to the solenoids in order to release them as pinching them as originally intended likely would break the 10+ year old brittle plastic clips. I used jetlube silicone dielectric grease with one of those dental floss toothpick thingy's to put little dabs of the grease on the electrical connections as well as the surface of the orange rubber sleeves. And NO, you don't have to remove the Cam Timing disc's, if that was a concern as they are mounted to the cam via the Cam Bolt with 45nm + 90* so you won't effect any timing by taking them off. Just be sure to remove the ground wires and the harness clips on each side. Then after taking out those 5 torx bolts, gently remove the front valve/cam cover making sure NOT to cause any of those 3 rings located on each Timing Wheel towards the Cam Bolt to pop off their respective channels. If so, simply pinch it or use a tiny screwdriver or other to place them correctly in their channels and lube them up with some motor oil before gently installing the cover back onto the two guide pins that doubly serve to "lock" the position of the Cam Timing Tool.
As for my previous reply above, installing the head was fairly straightforward. There are two locating studs that protrude from the block on the Intake side of the block you should aim for. But make sure your looking through the front also to line things up. Also make sure the Cam Gear/Timing chain is clear before you set the bottom part of the head down. I noticed this to be more of an issue on the passenger side. After you know you've lined the head on those studs, you'll feel that, don't drop the bottom yet. I released my left hand while holding up the head with right in order to position the left under the head to apply pressure to keep the Exhaust side up, then with my right reached down to clear the timing chain guide. Having a partner here would have been a good call, but not absolutely necessary. Maybe using a shoelace to tie up the timing chain guides as the Cam Gear obviously splits the guides would have been a good workaround in retrospect. You can clearly see where the guides will be in the way. Just be aware if it beforehand.
Last edited by E63007; 11-04-2018 at 01:15 AM.
08-18-2018, 11:05 PM
#45
Hello there fellow DIY'rs!!!
It's now June and I'm just getting around to installing the Intake Manifold after having sent out the Heads to be rebuilt. It turned out that 8 of 16 Intake Valves were bent!! Unbelievably, this was most likely due to both Cam Adjusters having been taken apart with the inner sprocket being installed upside down! I noticed this upon installing the Cams. This caused the Cam Adjusters to NOT mate with the end of the Camshaft because with the inner sprocket of the CA installed upside down makes the depression deeper such that the inner race of the CA was butting up against the timing guide and somewhat supported from below by the Cam Gear!! This caused for the end of the Cam to wobble on the inside and created a slot inside the edge of the race as a result of the countless miles that were driven on the car before I purchased it!! Not to mention it also internally makes any input of oil from the solenoid side irrelevant due to the Oil channel on that sprocket being upside down. Nonetheless, It's no wonder my timing was way off when I dismantled everything!
As for using RTV on the Intake Manifold gaskets, no I'm using new gaskets which should be all I need. I didn't cut any corners and also replaced the Headbolts, added Shorty Headers, SLS Buckets, new diamond washers and bolts for the Cam Adjusters, new front suspension complete with newly refurbished Airmatic Struts, lower Control Arms, F1 Fab Upper Control Arms to correct Camber, Racing Brake front Rotors, New Power Steering Pump and had the High Pressure Hose rebuilt. I might mention I also sent out my IM to be refurbished by RMT and they did a great job. I started down this road because after my purchase of the car I experienced 1200 rpm idle. It turned out that the Intake Plenum which the TB's mount to were deteriorated with visible holes especially in the channel where the cables run to the TB's. I'm days away from finally starting her up for the first time since December!!!
08-18-2018, 11:15 PM
#46
Hey fellow DIY'rs!!!
I've been working on and off on my 2007 E63 literally since the day I bought i as mentioned abovet!!! And let me say this post was one of the most useful DIY's I used in my rebuild. I just went a bit further and had both Heads rebuilt while I was at it. And lucky I did because 8 of 16 Intake Valves were bent due two both passenger Cam Adjusters being installed with the internal gear being upside down causing the face of the Cam Not being able to reach the face of the inner race of the CA. In short I also had the Intake Manifold rebuilt and installed reman'd front Air Struts. I installed new front torque Arms and Adjustable Upper Control Arms, New P/S Pump and Reservior, Racing Brake Rotors and Pads, Bled the brakes, two new Ignition Coils, new Sparks, filters, VRP Shorty Headers, SLS Valve Tappets, etc. I finally got it off the jack stands, adjusted the height/stance settings and programmed them in since I had the replace a front ride height sensor, and then, perhaps a little too enthusiastically trying starting her up. Since I replaced bunch of sensors (including the Crank Position Sensor), I did a few resets of the STAR after testing various "actuations" and troubleshooting the "Quick" Scan" faults that appeared such as the "GFi? 9.7 Engine" (IIRC). I went through bunch of the menus regarding Adaptations etc, (such as the the second test for the CPS and the Camshaft Timing Adaptation) but those required me to take it from idle up to 3000rpm or higher. Other "tests" include the fuel pump, but that requires the car to be idling already. Of course there is the "Cold Start" Test, but that just tells you various vitals like coolant temp, oil temp, etc. NOT Fuel Pressure nor spark and also requires it to be running.
So I went ahead gave it go and it seemingly started right up with high idle but then started to get really grumbly and low idle and stayed there. In the back of my mind I inherently thought it may be a lack of fuel pressure, since it has been sitting idle for 9 months since December 2017', but my worries got the best of me and before it grumbled too much more I turned the key off! I pulled up the "quick test" in STAR and clicked on the "f" in GFi 9.7 Engine?? Then selected fault codes and waited, as DAS was reading them all then the barrage of faults were presented, 6 of 8 misfires resulting from either faulty injectors (I had all my injectors professionally tested with readouts of the performance of each-so I can confidently say that's most likely not the issue), or STAR suggested it may be compression-but even with whacked out timing before I took her apart, she ran fairly well, with the exception of the rediculously high idle (1200rpm).
So being that I also had the Intake rebuilt, I went through the menus to test the throttles max openings (each of these test require you to switch off the ignition for ten seconds before re-engaging in order for STAR to clear and reset. Several other adaptation tests, as I mentioned, require a running engine, so until I get there, I cannot adapt the Camshafts Positions, the CPS, Test the Fuel Pump by turning them off individually (I was able to determine that each of them were operating within the appropriate voltage values given in those tests). One of the menus even confirmed that my CA's were set at 0 degrees and something like 80 maybe 180, not sure, but it's cool to see both set 0 and the other two set at exactly the same value. Of course I used the proper Cam Locking tools, but it's cool to see in STAR regardless!
Has anyone else had a rough 1st Start after the months offline doing a rebuild??? If so, some reassurance would be greatly appreciated. It's not like I'm a newbie either having rebuilt my other cars (SAAB Areo-Jeep Grand Cherokee) but neither of those have what equates to being a $20-40+k Engine if all goes wrong!!!!
08-20-2018, 12:46 PM
#47
Junior Member

I haven't rebuilt a MB engine with this kind of engine management system so I'm just adding some ideas.
You think the grumbling sound may have been cylinder 6/8 as STAR diagnosis it as doing (misfire or injector)?
Maybe you can confirm this by starting the car and using a laser heat detector to see if the exhaust temp is lower on those cylinders? I suppose it would be subjective to how much of a misfire you're experiencing. But if you can confirm, then leak down test, if that shows nothing maybe it is the injector. Can you switch the injector and see if the problem moves?
I have a GMC Yukon we were chasing misfires, pretty much driving us nuts in diagnosis. Finally, almost as a last resort, we changed out spark plugs and the problem was solved. That may be something to consider also. Not sure why a plug would be bad (assuming the gap is ok) but something to consider.
11-15-2018, 10:37 AM
#48
Newbie

Join Date: Nov 2018
Posts: 3
Likes: 0
Received 0 Likes
on
0 Posts
2011 W204 C63 AMG P31 Perf Pack
Guys, I need help big time...
I will be posting pictures once I log on with my mobile. For efficiency sake, I will be typing my comment here:
Been trouble shooting my benz for some time here; 2011 c63 AMG w204 p31.
Been rough idling, was drivable, but would stall... decided to take a look after running some fuel cleaner without help.
Car was also whining near where the fuel pressure sensor is (driver side front - cylinder 5 I believe).
What have I done thus far: Changed spark plugs, changed PCV stem, changed map sensor, changed fuel pressure sensor (on fuel rail), cleaned injectors and put on new o rings and lubricated, put on new intake manifold gaskets and cleaned out the whole intake manifold. Cleaned the throttle bodies, changed the gas tank cap, changed 2 ignition coils, changed oil.
What I noticed: First of all, super ****ty but I had 3 bolts stripped on my ignition coils... I had to use a grinder to make a flathead screw fit and take them off. Was a ***** but I got it done and replaced. I have snapped 1 of my new intake manifold screws and it is logged in my intake manifold, I felt that 1/10 was okay but i did not do a helicoil or drill/pin out that screw (open to suggestions but I didn't want to fudge anything).
I noticed that 2/8 injectors had a broken plastic piece underneath the lower O-ring... WILL THIS CAUSE MY ISSUES?
Lastly, it looks like 2 of my valve air inlets "buckets" (I think that is what they are they are the things connected in the intake inlets on the screw end) seem to be open even when engine are open and the rest are closed. I AM NOT SURE HOW THESE ARE SUPPOSED TO BE OR IF THIS IS MY ISSUE.
Okay so i did all of the changes listed below, and i lost many of my engine codes but now i am getting an error about P2540 " P2540 Low Pressure Fuel System Sensor Circuit Range/Performance" and then a code saying random misfires. Before this fix, I was getting the p2540, lean and rich bank 1 and 2, misfire on cylinder 5, and a short circuit or falt in circuit in injectors, and many more... Anywho, car sounds better at a start but will not go past around 1.5k at RPM. ANY HELPWOULD BE GREATLY APPRECIATED. I'll find some pics on my phone and post.
Read more at: https://www.obd-codes.com/p2540
11-15-2018, 10:44 AM
#49
Newbie
Join Date: Nov 2018
Posts: 3
Likes: 0
Received 0 Likes
on
0 Posts
2011 W204 C63 AMG P31 Perf Pack
Reply to post do I need new buckets and head bolts or is it worse!

Stripped coil

Clean with new o rings

Forked baskets and dirty engine compartment


Cleaning injectors... note, look at broken injectors have a look at under bottom o rings
 11-22-2018, 10:07 AM
#50
Last week, after taking a long trip leaving the car in the garage, I put it back up on stands and drained the oil and noticed it was black and smelled of fuel?!?!. As mentioned above, I only ran it for 30-40 secs before I shut her off due to it grumbling with the idle going lower sounding absolutely horrible! Bear in mind too that I had put fresh Oil in her after having taken the Heads off to be rebuilt. So I thought it would be a good ideas to remove the pan. I had already kicked myself in _ _ _ due to my having noticed a small leak after filling her up with fresh oil, but alas it has been sitting in the engine for a couple months after that "first start" mishap. So I removed the pan and lo and behold there was aweful sludge in the pan as the oil drain hole sits about an inch above the bottom of that pan. So it's evident that the fresh Oil I had put in was immediately contaminated upon that first startup.
I have to say when I had removed the Valve Covers, I was scratching my head to see black oil in and around the valves. It should have been clean, but no, not with that much sludge left over in the pan after a fresh renew of oil!! What I can't really explain is the strong smell of fuel even thought it was fuel from a open injector that initially caused hydrolock upon first shut down. I have deduced the chambers had to have been filled with fuel after shut down because the engine did run for about 40 seconds, it even reved up to about 1500 as it normally should before falling down to 550 or so. After that however, it started to fall lower and grumble. That is when I gave it a little gas but after it proceeded to sound worse so I shut it down. This is when I tried to restart, but it was no go. I determined that something was holding it up and it turned out chambers 7&8 were filled with fuel as it spilled out after removing the spark plugs whilst turning over the Crank manually by hand. How on earth would fuel end up contaminating the Oil though unless it bled down the sides of the pistons??? Hoi Fey!!!!
I have to say when I had removed the Valve Covers, I was scratching my head to see black oil in and around the valves. It should have been clean, but no, not with that much sludge left over in the pan after a fresh renew of oil!! What I can't really explain is the strong smell of fuel even thought it was fuel from a open injector that initially caused hydrolock upon first shut down. I have deduced the chambers had to have been filled with fuel after shut down because the engine did run for about 40 seconds, it even reved up to about 1500 as it normally should before falling down to 550 or so. After that however, it started to fall lower and grumble. That is when I gave it a little gas but after it proceeded to sound worse so I shut it down. This is when I tried to restart, but it was no go. I determined that something was holding it up and it turned out chambers 7&8 were filled with fuel as it spilled out after removing the spark plugs whilst turning over the Crank manually by hand. How on earth would fuel end up contaminating the Oil though unless it bled down the sides of the pistons??? Hoi Fey!!!!


