Mercedes-Benz E-Class and E-Class AMG: Why Does My Car Hesitate?
There are a number of systems that can cause your Mercedes-Benz E-Class to hesitate. They range from the intake, fuel and ignition to the transmission. The best way to troubleshoot this hesitation is to check what you know and start with the easiest components first.
This article applies to the Mercedes-Benz E-Class and E-Class AMG (2002-2009).
When performing troubleshooting on a vehicle, it's important to make sure your check or test has been done accurately and completely. This ensures you will not back track when checking other systems. Your troubleshooting will be limited to the test equipment you have as well as access to the correct specifications of a part. Equipment like scan tools, engine pressure gauges, and fuel and spark testers will give you definitive results during testing. Make sure to always check for check engine lights as these will point you in the right direction.

Materials Needed
- Digital volt ohm meter (DVOM)
- Basic set of hand tools (sockets, pliers, screwdrivers, ratchets, etc.)
- Spray bottle filled with soapy water
- Propane
- Injector noid-light set
- Spark tester
- Compression tester
- Fuel pressure tester
- Mass Air Flow sensor cleaner
- Automotive technicians stethoscope
- Line clamp pliers
Step 1 – Perform a visual inspection
When performing a visual check, think about when the hesitation occurs. An understanding of what systems are being used at certain times will guide you where to look more closely. For example, if your vehicle hesitates when trying to go W.O.T. (wide open throttle), a restriction in the intake system may be the cause. This is usually accompanied by a "whoosh" sound coming from the intake. You can replicate the sound by having a friend fluctuate the RPMs while you listen/look for the cause of the hesitation.
- Remove any engine covers.
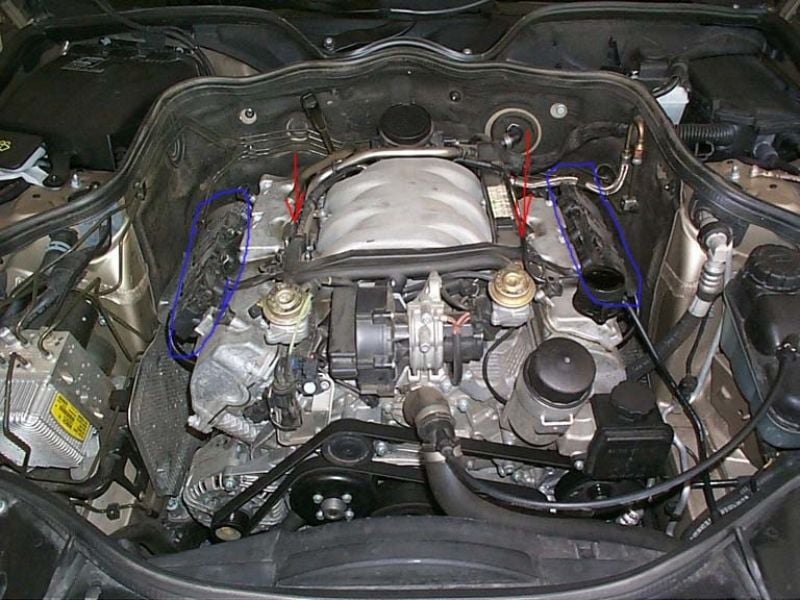
- Carefully inspect the intake, fuel, vacuum, spark, and exhaust systems for any leaks, odd noises, and loose components. This includes electrical wiring and connectors.
- Have a friend actuate the throttle from inside the cabin while you listen. As the RPMs raise and lower, listen for any stumbles, hesitations, or odd noises. Try to replicate the original hesitation while you view the engine.
- Spray all vacuum lines/air intake pipes and components of the ignition system with soapy water. Bubbles will form where there is a leak, and if viewed in a dark area, a spark may be seen near a coil pack indicating it is faulty. Propane can also be used to check for a vacuum leak as engine RPMs will increase if it finds its way into the engine.
- Propane can also be used to check that all spark plugs are contributing. Simply inject some propane into the intake at idle and listen for a smooth, evenly-running engine indicating the ignition system is operating correctly. Note that engine RPMs will rise without throttle input during this test.
Step 2 – Clean the MAF sensor
Over time, the MAF (Mass Air Flow) sensor becomes covered in dirt until it is no longer able to read the air coming into the engine correctly.
- Access to the MAF is relatively easy.
- At most parts, you can purchase a bottle of MAF cleaner that sprays directly onto the sensor.
- You can find the MAF sensor in two different locations depending on your model.
To gain access to the MAF sensor, simply remove the engine cover and unclip the hose leading to the MAF sensor. There may be a clamp that will need to be loosened first on the intake pipe. Spray a generous amount of cleaner onto the sensor. You will see it inside the housing when looking through the screen.
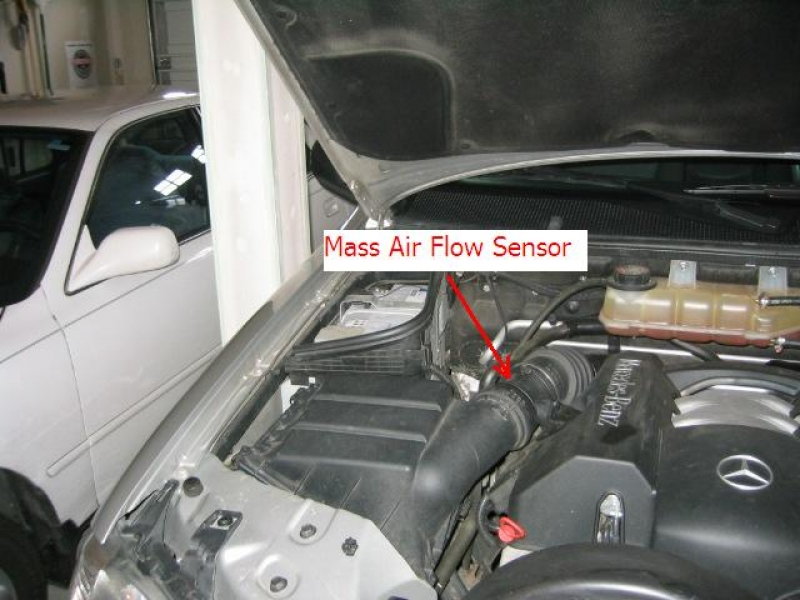
Figure 2. The MAF sensor on this W211 is positioned directly after the air filter box. 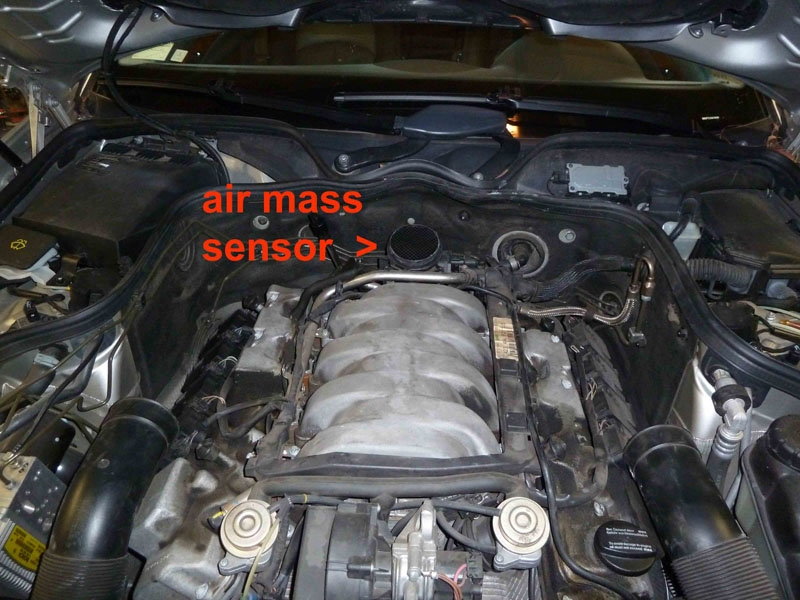
Figure 3. The MAF sensor on this W211 is located at the back of the engine, near the firewall. 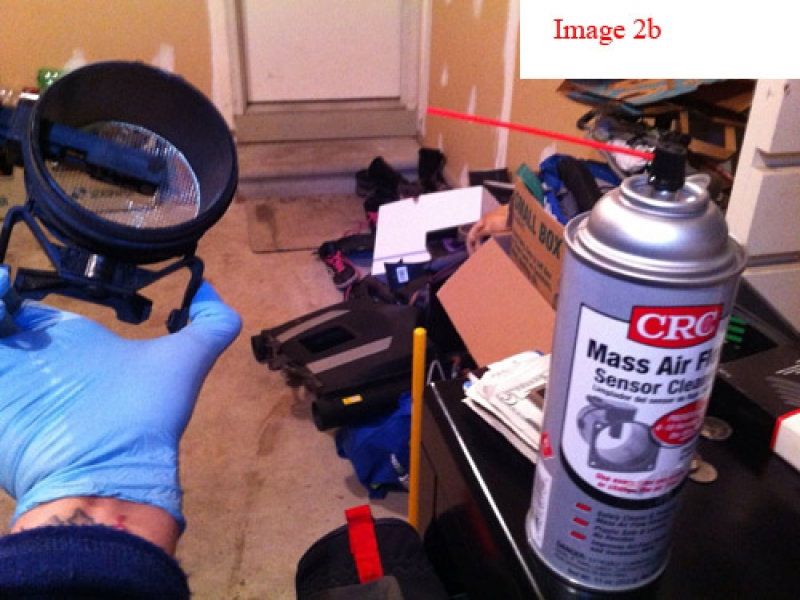
Figure 4. MAF sensor being cleaned.
Step 3 – Test the ignition system
The simplest method to test the ignition system, other than with a scan tool, is to use a spark tester.
- Simply remove a coil pack from the engine and insert the spark tester into the coil pack. Make sure the clip of the spark tester is on a grounded section of the engine (a metal bracket attached to the block, for example).
- Start the engine and see if spark is present.
- If no spark is present, swap coils from another cylinder. If there is still no spark on that cylinder, then there is a problem with the connector, wiring, or computer.
Pro Tip
You can have spark at the coil, and still have a faulty spark plug. If the spark plugs are easy to remove, do so now and check them for cracks and/or contamination/wear. Ensure the spark plug gap is within specifications.
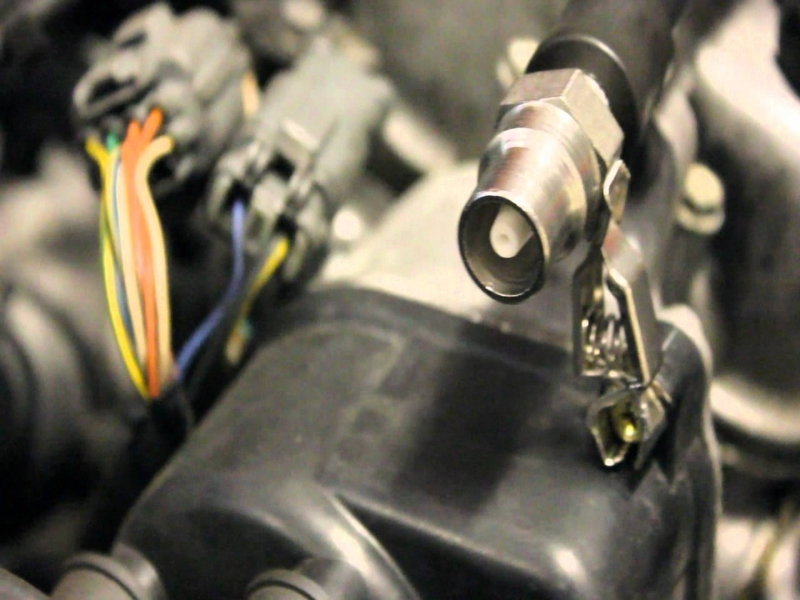
Figure 5. A spark plug tester has been installed into a plug wire. 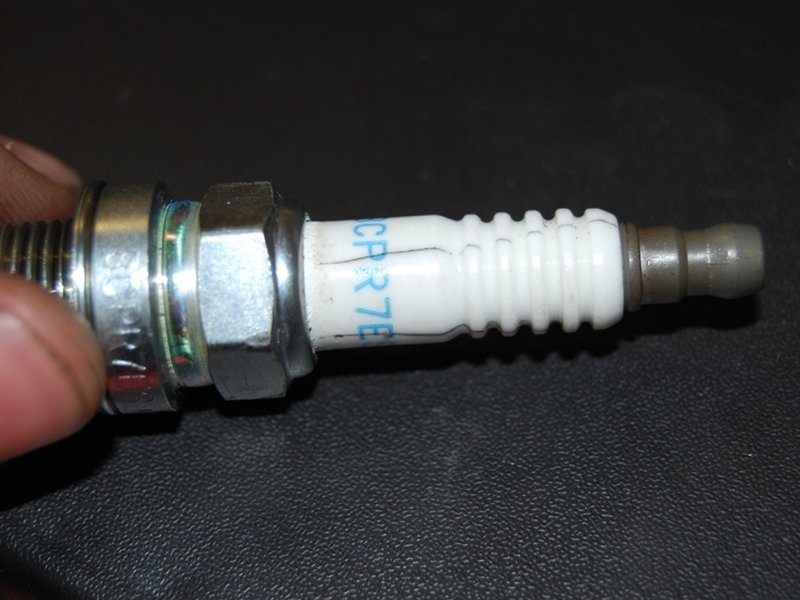
Figure 6. You can see the cracks on this spark plug.
Step 4 – Test the fuel system
Determine whether the fuel pump, injectors, and/or the fuel pressure regulator are inoperative.
It may be easier for you to first test the engine's compression if access to the fuel injectors requires removal of the intake manifold.
- Start by disconnecting the fuel injector connectors and inserting the correct noid light into it. Start the vehicle and see if the noid light flashes. If it does, the fuel injector circuit is functioning correctly.
- Now test the fuel injectors themselves. Using your automotive stethoscope, place the end against the body of the injector. If the injector is firing (not binded), you will hear and feel a click occurring.
Note
Before testing fuel pressure, If the fuel filter had not been replaced recently, do so as it may be acting as a restriction.
To test the fuel system pressure:
- First release the pressure from the system.
- Remove the yellow fuel pump fuse. The fuse/relay box is located at the left side of the trunk next to the CD changer.
- Start the car and let it run until the engine dies.
- Now locate the fuel system pressure test port and remove the plastic cap.
- Install your fuel system pressure tester.
- Re-install the fuse and turn the key to the 'on' position (not crank). Then, crank the engine and record the reading on the gauge. The pressure on the gauge should read between 35 psi and 45 psi. Turn the engine off and watch the gauge over a period of 30 minutes to see if pressure is holding in the system. If pressure bleeds off lower than about 25 psi, then the fuel pump/regulator assembly is leaking and will need to be replaced.
If the system does not build any pressure, there may also be an electrical problem with the fuel pump circuit. Use your DVOM to test the fuel pump fuse and relay for 12 volts at the fuse/relay box. If power is available at both locations and the fuse and relay test okay, begin checking the connector near the fuel pump.
- Begin testing by removing the rear seats. There are plastic clips that you must push at the front of the seat to remove them. Then, remove the carpet below the seats by pulling up. You will hear a pop as the plastic clips at the corners of the carpet separate.
- You will see two covers held in place by six 8mm fasteners. Remove the fasteners to the cover on the driver's side and lift it up.
- You will now have access to the fuel pump connector.
- To test: set your DVOM to read DC Volts. Connect the red lead to the power wire (usually red, but a wiring diagram will be helpful). Connect the black lead to a known good ground (anything metal in the car connected to the chassis). If there is 12 volts present, you have power going to your fuel pump.
- Now test the ground circuit for the fuel pump. Keep the red lead on the power wire and move the black lead to the brown wire. Once again, the ground wire may not be brown, so access to the wiring diagram is needed. If 12 volts is present, the ground circuit is functional. If not, there is a short somewhere inside the ground circuit.
- Replace the fuel pump if there is both power and ground available.
Click to enlarge the figures below:
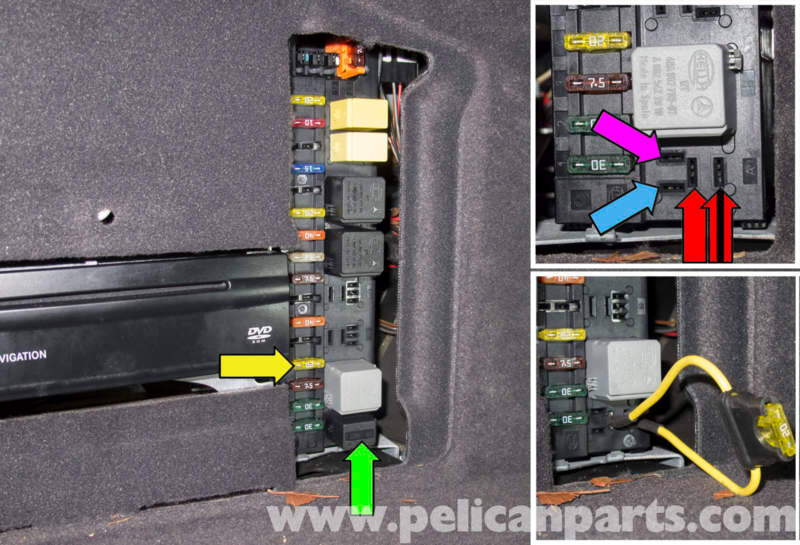
Figure 7. The fuel pump fuse/relay box. The relay is indicated by the green arrow; the fuse by the yellow. 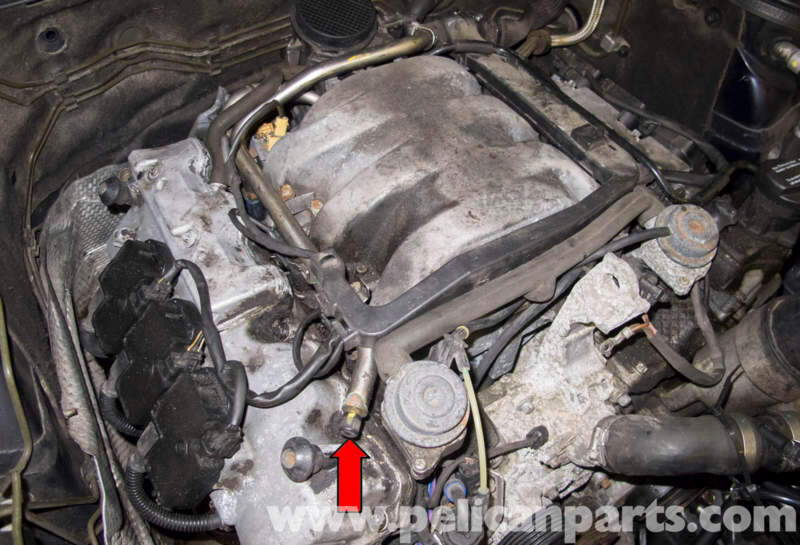
Figure 8. The fuel pressure test port. 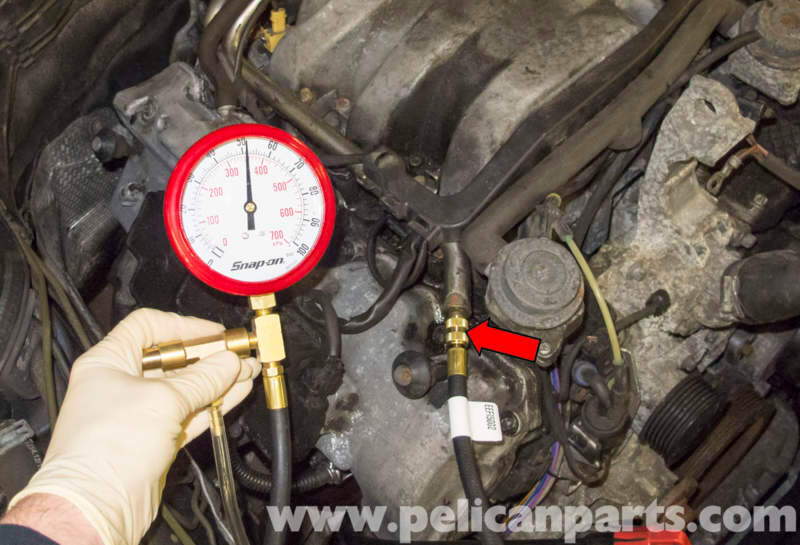
Figure 9. The fuel pressure gauge has been connected. 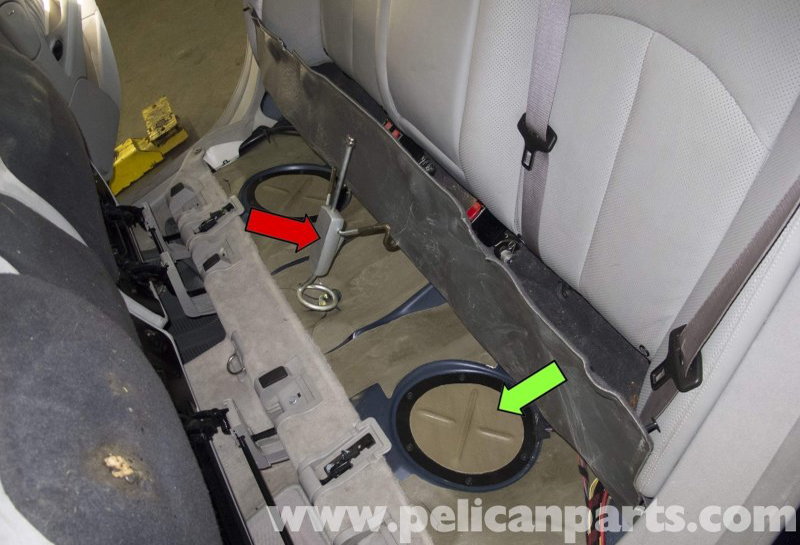
Figure 10. The green arrow indicates the cover that must be removed to gain access to the fuel pump connector. 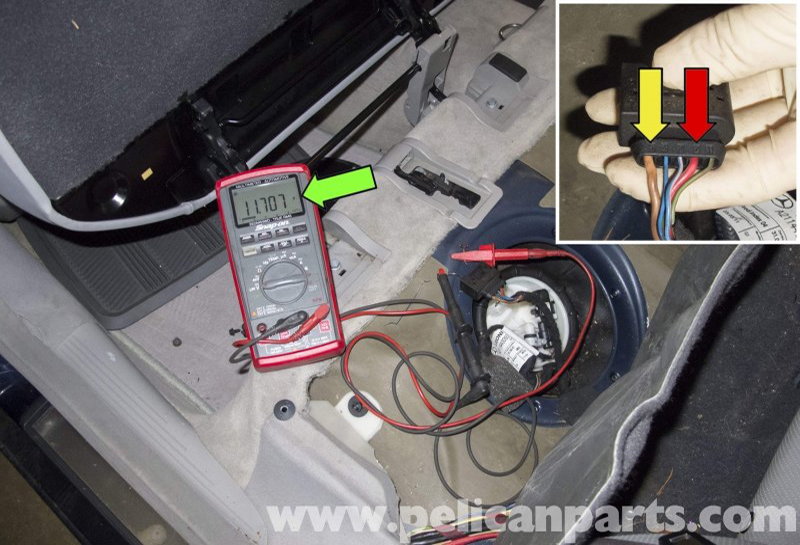
Figure 11. Using a DVOM to test for power and ground at the fuel pump connector.
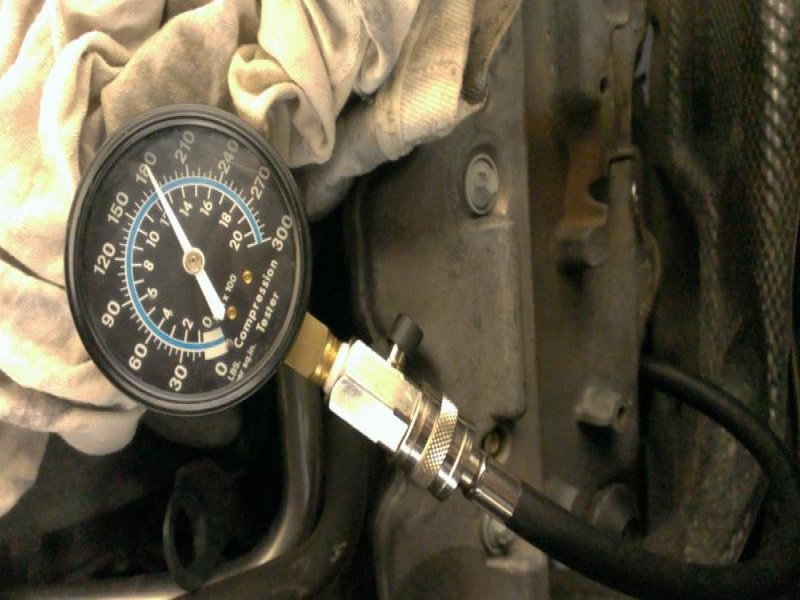
Step 5 – Perform a compression test
Low compression in a cylinder may lead to a hesitation/misfire.
To perform a compression test:
- Remove the fuel pump fuse and bleed off the system pressure as stated in Step 4.
- Now remove a spark plug and install the compression tester into the port.
- Crank the engine for four revolutions with the throttle held open. Record the reading on the compression tester.
- Do this for every cylinder and compare the results. All cylinders should be within 20% of each other.
If you have a compression problem, you can determine if the piston rings are the cause by injecting a small amount of oil into the cylinder through the spark plug tube. If compression increases, you have a piston ring sealing problem on that cylinder.
You may also have a problem associated with the exhaust system. This may be due to a restriction in the exhaust. The 02 sensors may also be reading incorrectly, causing rich and lean fuel conditions.
It is best to take the vehicle to a reputable garage to perform further diagnosis at this point. Access to more testing equipment and expensive scanners will be needed to properly diagnose these issues.
Pro Tip
During the diagnostic process, take note of the tests you've performed and their results. Note anything that did not appear normal to you. This will be helpful to the technician working on your vehicle if you decide to take it to a garage.
Related Discussion and Sites
- W211 Fuel Pump Testing - Pelicanparts.com
- W211 MAF Sensor Replacement - Pelicanparts.com
- W209 Car Hesitates - MBWorld.org