Mercedes-Benz E-Class: How to Replace Cabin Air Filter
A cabin air filter serves one purpose: keeping the air inside the car breathable. When it gets clogged, even the most comfortable Mercedes-Benz E-Class will have you sneezing up a storm. Learn how to replace the cabin air filter in your E-Class here.
This article applies to the Mercedes-Benz E-Class (2010-present).
The inside of a Mercedes should always be clean. Unfortunately, over time outside debris can become easily acquainted with the cabin air filter and have you sneezing through every other stoplight. A standard Mercedes-Benz E-Class cabin air filter is supposed to be changed or inspected every 20,000 miles. The replacement process is harder than other automakers; however, it is still fairly simple to replace and can be done in your garage at 1/5 the cost of your closest dealership.

Materials Needed
- Flat head screwdriver
- T20 Torx set
- New cabin air filter
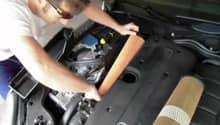
Step 1 – Remove the dash panel
Open the passenger side door and push the seat back as far as possible. The location of the filter is behind the upper panel of the lower passenger foot-well. Proceed on to the following instructions.
- Locate the dashboard panel underneath the passenger side of the car.
- Use the T20 Torx set to remove the three bolts from the panel.
Once the bolts are removed, slowly pull the trim panel out. Be careful, as there are still two connectors attached to the panel.

Step 2 – Remove the foot-well panel
The dash panel piece actually flows from the top of the dash down to underneath the carpet. Before it can be completely removed, the carpet will need to be pulled back just enough to let it slide out.
- Pull back the carpet.
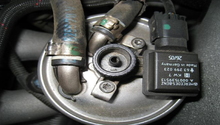
- Disconnect the plug for the foot-well light and twist out the other sensor.
- Remove the entire dash panel.

Figure 2. Pull back the carpet. 
Figure 3. Twist off the first sensor. 
Figure 4. Disconnect the foot-well bulb.
Step 3 – Remove the old filter
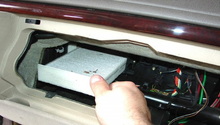
The old filter has a large white handle attached to it. The handle also acts as a bracket and keeps it locked in place.
- Lay on your back and scoot underneath the passenger side dashboard.
- Focus on the white 'I' shaped bracket.
- Slide the bracket out.
- Use a screwdriver to release the tabs holding the filter in place.
- Remove the old filter.

Figure 5. The white cabin filter bracket. 
Figure 6. Release the filter tabs. 
Figure 7. Remove the filter.
Step 4 – Install the new filter
Take the new filter and slide it in place. This part can be difficult sometimes, as it will take some force to push the filter back into its housing. Once the filter clips in place, complete the following instructions.
- Lock the cabin bracket back in place.
- Reconnect the foot-well bulb and sensor.
- Re-install the lower dashboard panel.
- Lay the carpet back in place.
- Tighten the Torx bolts on the lower dash panel.

Related Discussions
- DIY: Mercedes e550 Cabin Filter - MBWorld.com
- How to Replace Cabin Air Filter - W212 - MBWorld.com