Mercedes-Benz E-Class: How to Replace Glove Compartment
Whether you need to repair the wire connectors behind your E-Class' glove box compartment or you need to replace the glove box completely, here are the steps to do so.
This article applies to the Mercedes-Benz E-Class w212 (2009-Present).
If the glove compartment in your Mercedes-Benz becomes cracked or damaged from everyday wear and tear, you can replace it yourself with just a few basic tools. Paying for the service cost at the dealership or certified Mercedes-Benz dealership would be a hefty price to pay, so replace the glove box yourself to save some money and time. Before starting this removal and installation process, you might want to empty your glove box of all its contents, such as proof of insurance, the owner's manual, and delicate personal items. Once this is done, follow the steps below to complete this DIY task.

Materials Needed
- Trim removal tool
- Phillips screwdriver
Step 1 – Lower the glove box
- Use a trim removal tool to pry out the side dashboard cover.
- Pry out the trim piece above the glove box lid.
- Remove the two screws underneath the glove box compartment.
- Remove two additional screws above the glove box compartment.
- Undo the clip on the top right corner of the glove box.
- From inside the side dashboard, remove the screw behind the clip.
- Lower the glove box to access the wire harness connectors.
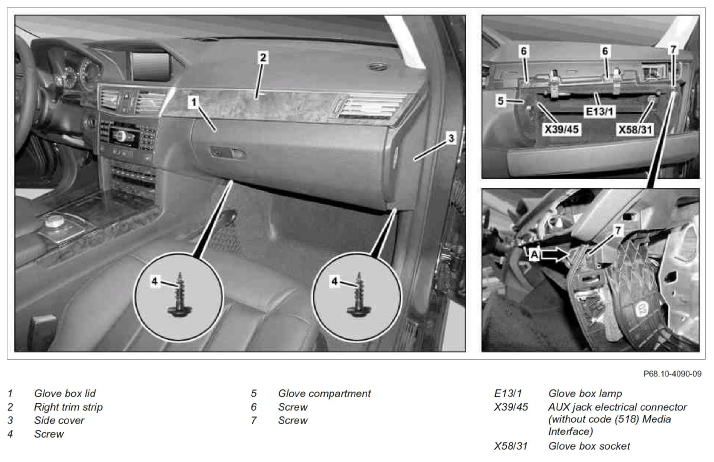
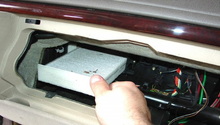
Step 2 – Remove the glove box
- Support the glove box as your disconnect the wire harnesses.
- Disconnect the auxiliary connector (X39/45) from behind the glove box.
- Disconnect the glove box lamp (E13/1) wire harness.
- Disconnect the glove box socket (X558/3-1) wire harness.
- Remove the glove box and set it aside.
Step 3 – Install the new glove box
- Install the new glove box in reverse order to the steps above.
- Hold up the glove box and reconnect the wire harnesses.
- Place the glove box into the dashboard. Make sure you hear the clip lock into place.
- Fasten the screw behind the clip.
- Fasten the two screws above and below the glove box.
- Re-install the trim piece and side cover.
Related Discussion and Site
- Glove Box Door - MBWorld.org
- W212 Remove / Install Glove Box Compartment - Workshop-Manuals.com