*DIY: Cheap (but not easy) Secondary Air Injection Pump Fix*
 03-14-2009, 04:25 AM
#1
Super Member
Thread Starter
*DIY: Cheap (but not easy) Secondary Air Injection Pump Fix*
[Warning: this is an excessively long and boring thread with multiple posts. Apologies in advance!]
History:
2002 C32 AMG with 79,340 miles and no significant performance modifications.
The car was brought to the dealership for the infamous Secondary air injection campaign in 2006. The notorious relay was replaced; however, the existing air pump was left in place.
Differential Diagnosis:
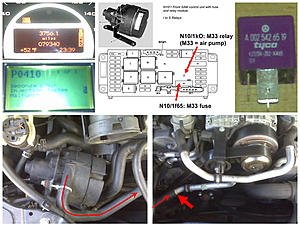
P0410 error code (check engine lamp).
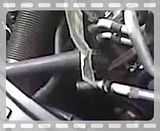
No air flow from the secondary air injection pump upon cold startup (see video clip).
Secondary air injection relay (N10/1kO) function: Fail. Power was going to the pump when it shouldn�t have. Removal of the plastic casing from the relay revealed the contacts were stuck.
Secondary air injection pump fuse (N10/1f65): O.K.
After disassembling the stock/ OE AMG air pump motor:
The carbon brushes were NOT worn down badly. This is not surprising in light of the fact that the pump is only active for 40 seconds upon cold start-up.
The brush rails/guides were distorted due to melting of the plastic.
The commutator was scored and likely damaged due to the brushes making abnormal contact.
Diagnosis:
Failure of the �new and improved� secondary air injection pump relay (relay contacts stuck).
Failure of the motor due to excess heat as a result of the faulty relay.
The motor assembly housing design was flawed.
How to verify a faulty pump as the source of error code P0410:
Refer to the image below these instructions and the video clip:
Rationale for this DIY:
Unfortunately MB-USA conveniently decided to not honor replacing the pump under their 8 yr / 80,000 mile emissions warranty. It really irks me to see an emissions component on this fine car continue to fail without any recourse from MB-USA.
Do we really need this emissions system component? The answer is YES (and NO).
If you want to pass emissions inspections each year, you need a functional secondary air pump to oxygenate the catalytic converters.
As you already know, the emissions from our cars are not bad at all, and to be honest, you need your secondary air pump for one day out of the year in Georgia so that you can pass emissions. In fact, I probably release more pollutants into the environment in the form of one day�s flatulence than my car does in an entire year.
Of course, not having an annoying check engine lamp is good enough reason for having a functional air pump also!
So�. I decided to see if I could use a non-AMG pump in some way for our application. If you continue to read on into this DIY, you�ll quickly see that the fabrication of this �hybrid� pump is pretty involved and arguably not worth the effort.
This DIY only serves to prove that it can be done cheaply, and the DIY is fun!
The DIY cost me approximately $70 (including the price of the used pump). Admittedly, to figure out how to modify, transplant, and assemble all the parts took me all evening and into the wee hours. However, having sorted out the issues, I could easily repeat the DIY in about 2 hours.
A new C32 AMG secondary air pump (000 140 42 85) is upwards of $350 (if you stay away from the dealership).
Fortunately, there are a plethora of non-AMG secondary air pumps for sale on e-bay and other sources. The non-AMG pump (000 140 37 85) that I used for this DIY is used in many MB models (including the regular C-class). On a side note, it is very interesting that emissions pumps for most other cars (including BMW) are much, much cheaper.
Unfortunately, the non-AMG pump is an entirely different pump. Anatomically, just about everything about the non-AMG pump is different than the C32 OE pump (000 140 42 85) and they are sufficiently different to the point that the non-AMG pump is NOT useable given the space constraints and mounting brackets in the C32 engine bay.
Options:
A) You can replace your pump with a new OE AMG pump. For what it is, this pump is very expensive.
B) You can attempt to recondition the OE AMG pump if your pump motor has a simple case of worn carbon brushes. This is definitely a doable job if you can source the brushes (K45) and have the appropriate tools. Luckily, the non-AMG pump uses the same brushes! Unfortunately, I have not been able to source the carbon brushes from any of the major carbon brush manufacturers / distributors and Bosch doesn�t want anything to do with it either!
C) You can send your pump out to various companies to remanufacture the pump. The downside is that there is downtime!
D) You can attempt to fit the non-AMG pump into the AMG engine bay by fabricating mounting brackets de novo. The next option takes less time and is more fun!
E) If your stock motor is fried (like mine) you need to replace the motor. I transplanted the motor from the non-AMG pump into the AMG pump. This is the main subject of the DIY.
This DIY is broken down into 4 sections. These separate sections are of use depending on what DIY route you take (i.e. carbon brush replacement vs. entire pump motor transplant).
Part I: Removal of the AMG pump from the engine bay.
Part II: Disassembly of the AMG pump and motor.
Part III: Differences between the AMG- and non-AMG pumps.
Part IV: Transplantation of the non-AMG motor into the �hybrid� housing.
Parts and materials:
Non-AMG pump (MB part # 000 140 37 85; Bosch part # 0 580 000 011).
If required: Brushes for reconditioning the OE AMG air pump: K45 (source from another pump).
If required: Secondary air pump relay (N10/1kO; Part # 002 542 65 19 05; $23).
Plastic welder: Autozone (~$4).
6 thin washers (~$1). I used generic ~9 mm / 4 mm outer / inner diameter, and ~1mm thick washers.
Loctite for securing nut to the motor shaft.
Compressed air (to clean pump motor interior, brush guides, and commutator).
Required: Many beverages and the absence of your significant other so you can use the kitchen counter.
Tools:
Multimeter
Torque wrench
Curved and straight hooks (to use for prying)
E10 and T-20 Torx
10 mm and 13 mm sockets and open-ended wrenches
Socket wrench extender (to remove pump + bracket)
Slotted screwdriver
Power drill and 12 mm bit
Dremel with grinders and cutting plates
Long-nosed pliers / hemostat
Snips for cutting hard plastic
Hacksaw
Caliper or ruler to measure cuts
Soldering iron + flux + solder
[Disclaimer: I am not responsible if you burn, cut, or sever limbs, electrocute, or otherwise maim yourself (or your car) while doing anything described in this writeup!]
History:
2002 C32 AMG with 79,340 miles and no significant performance modifications.
The car was brought to the dealership for the infamous Secondary air injection campaign in 2006. The notorious relay was replaced; however, the existing air pump was left in place.
Differential Diagnosis:
P0410 error code (check engine lamp).
No air flow from the secondary air injection pump upon cold startup (see video clip).
Secondary air injection relay (N10/1kO) function: Fail. Power was going to the pump when it shouldn�t have. Removal of the plastic casing from the relay revealed the contacts were stuck.
Secondary air injection pump fuse (N10/1f65): O.K.
After disassembling the stock/ OE AMG air pump motor:
The carbon brushes were NOT worn down badly. This is not surprising in light of the fact that the pump is only active for 40 seconds upon cold start-up.
The brush rails/guides were distorted due to melting of the plastic.
The commutator was scored and likely damaged due to the brushes making abnormal contact.
Diagnosis:
Failure of the �new and improved� secondary air injection pump relay (relay contacts stuck).
Failure of the motor due to excess heat as a result of the faulty relay.
The motor assembly housing design was flawed.
How to verify a faulty pump as the source of error code P0410:
Refer to the image below these instructions and the video clip:
- Upon getting a dreaded check engine light, scan the system and read the code.
- To check for other obvious components of the secondary air injection system, check the air pump relay (N10/1kO) and the air pump fuse (N10/1f65) in the front SAM.
- Evaluating the integrity of the fuse is easy; however, the relay function is difficult to determine unless you have a functional pump unit to test it on or use a multimeter to check for power supply when through the connector when the pump is not supposed to be running. I used both methods.
- In any case, the air pump relay has purple plastic casing and the part number is 002 542 65 19.
- To determine if the pump is functioning, make sure your engine is cool.
- Follow the pump air outlet hose (curved red arrow) and disconnect it where it joins the aluminum tube (short red arrow).
- Start the car and quickly go to the disconnected tube. It should be blowing air for 40 seconds and then shut off. See the video (below) showing no air flow emanating from my air pump upon cold start-up of the motor.
- If you have a new relay, replace the existing one with the new one and test again when the engine is cold.
- If the pump still doesn�t work, it has likely failed.

Rationale for this DIY:
Unfortunately MB-USA conveniently decided to not honor replacing the pump under their 8 yr / 80,000 mile emissions warranty. It really irks me to see an emissions component on this fine car continue to fail without any recourse from MB-USA.
Do we really need this emissions system component? The answer is YES (and NO).
If you want to pass emissions inspections each year, you need a functional secondary air pump to oxygenate the catalytic converters.
As you already know, the emissions from our cars are not bad at all, and to be honest, you need your secondary air pump for one day out of the year in Georgia so that you can pass emissions. In fact, I probably release more pollutants into the environment in the form of one day�s flatulence than my car does in an entire year.
Of course, not having an annoying check engine lamp is good enough reason for having a functional air pump also!
So�. I decided to see if I could use a non-AMG pump in some way for our application. If you continue to read on into this DIY, you�ll quickly see that the fabrication of this �hybrid� pump is pretty involved and arguably not worth the effort.
This DIY only serves to prove that it can be done cheaply, and the DIY is fun!
The DIY cost me approximately $70 (including the price of the used pump). Admittedly, to figure out how to modify, transplant, and assemble all the parts took me all evening and into the wee hours. However, having sorted out the issues, I could easily repeat the DIY in about 2 hours.
A new C32 AMG secondary air pump (000 140 42 85) is upwards of $350 (if you stay away from the dealership).
Fortunately, there are a plethora of non-AMG secondary air pumps for sale on e-bay and other sources. The non-AMG pump (000 140 37 85) that I used for this DIY is used in many MB models (including the regular C-class). On a side note, it is very interesting that emissions pumps for most other cars (including BMW) are much, much cheaper.
Unfortunately, the non-AMG pump is an entirely different pump. Anatomically, just about everything about the non-AMG pump is different than the C32 OE pump (000 140 42 85) and they are sufficiently different to the point that the non-AMG pump is NOT useable given the space constraints and mounting brackets in the C32 engine bay.
Options:
A) You can replace your pump with a new OE AMG pump. For what it is, this pump is very expensive.
B) You can attempt to recondition the OE AMG pump if your pump motor has a simple case of worn carbon brushes. This is definitely a doable job if you can source the brushes (K45) and have the appropriate tools. Luckily, the non-AMG pump uses the same brushes! Unfortunately, I have not been able to source the carbon brushes from any of the major carbon brush manufacturers / distributors and Bosch doesn�t want anything to do with it either!
C) You can send your pump out to various companies to remanufacture the pump. The downside is that there is downtime!
D) You can attempt to fit the non-AMG pump into the AMG engine bay by fabricating mounting brackets de novo. The next option takes less time and is more fun!
E) If your stock motor is fried (like mine) you need to replace the motor. I transplanted the motor from the non-AMG pump into the AMG pump. This is the main subject of the DIY.
This DIY is broken down into 4 sections. These separate sections are of use depending on what DIY route you take (i.e. carbon brush replacement vs. entire pump motor transplant).
Part I: Removal of the AMG pump from the engine bay.
Part II: Disassembly of the AMG pump and motor.
Part III: Differences between the AMG- and non-AMG pumps.
Part IV: Transplantation of the non-AMG motor into the �hybrid� housing.
Parts and materials:
Non-AMG pump (MB part # 000 140 37 85; Bosch part # 0 580 000 011).
If required: Brushes for reconditioning the OE AMG air pump: K45 (source from another pump).
If required: Secondary air pump relay (N10/1kO; Part # 002 542 65 19 05; $23).
Plastic welder: Autozone (~$4).
6 thin washers (~$1). I used generic ~9 mm / 4 mm outer / inner diameter, and ~1mm thick washers.
Loctite for securing nut to the motor shaft.
Compressed air (to clean pump motor interior, brush guides, and commutator).
Required: Many beverages and the absence of your significant other so you can use the kitchen counter.
Tools:
Multimeter
Torque wrench
Curved and straight hooks (to use for prying)
E10 and T-20 Torx
10 mm and 13 mm sockets and open-ended wrenches
Socket wrench extender (to remove pump + bracket)
Slotted screwdriver
Power drill and 12 mm bit
Dremel with grinders and cutting plates
Long-nosed pliers / hemostat
Snips for cutting hard plastic
Hacksaw
Caliper or ruler to measure cuts
Soldering iron + flux + solder
[Disclaimer: I am not responsible if you burn, cut, or sever limbs, electrocute, or otherwise maim yourself (or your car) while doing anything described in this writeup!]
 03-14-2009, 04:26 AM
#2
Super Member
Thread Starter
Part I: Removal of the AMG pump from the engine bay
Part I: Removal of the AMG pump from the engine bay.
Refer to the corresponding labeled figures / photos with red arrows / circles / boxes:
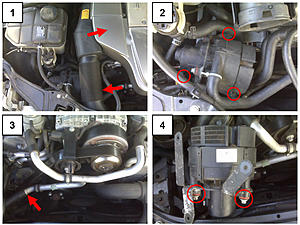
1. Remove the engine cover and remove the passenger side air intake duct to the baffle to make things easier to access. Also unplug the air pump electrical connector by pressing in on the tabs of the connector and pulling away from the pump (towards the passenger side of the engine bay).
2. Remove the 10 mm nuts holding the pump + bracket down to the frame. Use a socket extender to make this easy and take care not to drop the nuts - a telescopic magnet may be your friend here!!
3. Remove the hose going from the pump output to the valves.
4. Remove the OE pump from the engine bay along with the mounting bracket. Now, take the mounting bracket off � it is important to take this bracket out with the pump because you�ll need it later for orientating the transplanted pump such that the electrical connection is facing upwards in the engine bay. Use E10 torx to remove the three torx heads (2 are shown in the photo).
Refer to the corresponding labeled figures / photos with red arrows / circles / boxes:
1. Remove the engine cover and remove the passenger side air intake duct to the baffle to make things easier to access. Also unplug the air pump electrical connector by pressing in on the tabs of the connector and pulling away from the pump (towards the passenger side of the engine bay).
2. Remove the 10 mm nuts holding the pump + bracket down to the frame. Use a socket extender to make this easy and take care not to drop the nuts - a telescopic magnet may be your friend here!!
3. Remove the hose going from the pump output to the valves.
4. Remove the OE pump from the engine bay along with the mounting bracket. Now, take the mounting bracket off � it is important to take this bracket out with the pump because you�ll need it later for orientating the transplanted pump such that the electrical connection is facing upwards in the engine bay. Use E10 torx to remove the three torx heads (2 are shown in the photo).
 03-14-2009, 04:27 AM
#3
Super Member
Thread Starter
Part II: Disassembly of the AMG pump and motor
Part II: Disassembly of the AMG pump and motor.
Refer to the corresponding labeled figures / photos with red arrows / circles / boxes:
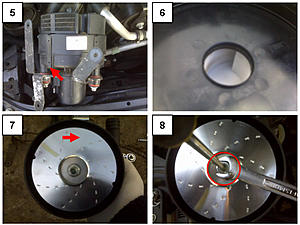
5. Now you need to get to the business end of the pump and remove the motor.
Remove the clamps that retain the filter to the housing by prying gently on the top with a slotted screwdriver. Put your finger on the clamps to make sure they don�t spring off into oblivion!
6. You can now pull off the bottom air filter assembly. Look down into the filter to ensure it isn�t clogged � you may want to clean it.
7. On the other half of the pump, you will see the first metal impeller plate held onto the motor shaft with a 13 mm nut and a slot on the top of the rotor.
8. Remove the nut using an open-ended wrench and slotted screwdriver to stop the rotor from turning. Slide the top impeller off with its spacer.
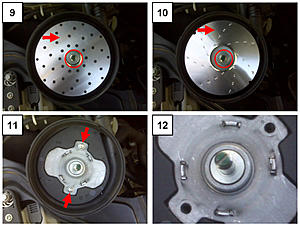
9. Now you want to remove the next plate (attached to plastic side housing).
10. Now remove the long spacer on the motor shaft and the second / bottom impeller.
11. Now you are down to where the motor is secured to the housing by the metal plate. Remove the T20 torx screws.
12. The plate is �wedged� into the recess of the housing and so you will need to pry the plate up evenly. Use curved picks to dig in and pull up (again, evenly) so that you don�t damage the bearing or motor shaft.
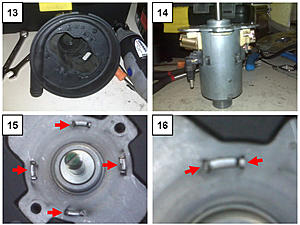
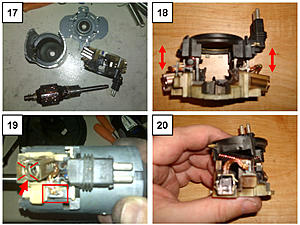
13. The motor (still attached to the plate) should now slide out relatively easy.
14. The complete motor looks like this with the bottom corresponding to the side nearest the passenger side of the engine bay.
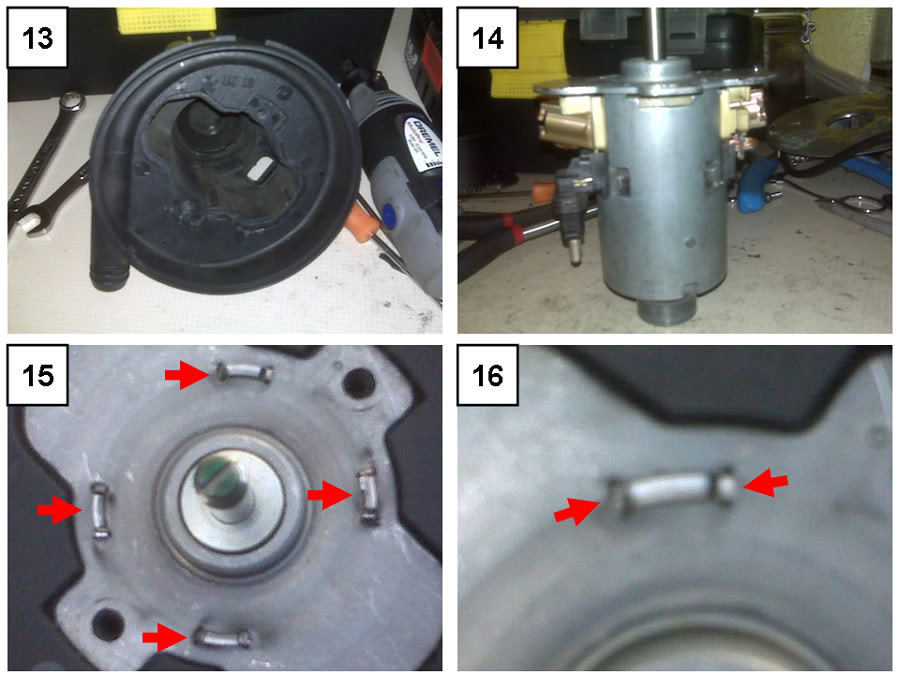
15. Depending on whether you want to clean out the motor and remove carbon from the commutator and other parts (recommended), you may want to do more surgery to the assembly. As depicted by the arrows, there are 4 tabs that hold the plate to the rest of the motor.
16. If you look closely at each tab, you can see that it has been crimped at the edges to ensure that the plate doesn�t come upwards. Carefully use a pair of pliers or fine vise-grip to push in the crimped edges. I also needed to grind a little off the sides of the tabs using a Dremel. When done properly on all 4 tabs, the plate (with attached bearing) will slide upwards and off the shaft. Gently pry the plate off the metal motor housing so that you don�t damage the bearing or deform the motor shaft.
17. Disassemble the motor assembly into its individual components. Use compressed air and a gentle brush to remove carbon deposits. I used a sweet little brush that I found near my fiance�s make-up bag.
18. The plastic piece that houses the brushes can be slid apart slightly to make extraction of the brushes a little easier. In addition, it makes it a little easier to clean the assembly.
19. The carbon brushes can be removed by using pliers to push out the 4 small tabs highlighted by the red lines. Be careful to not allow the spring to fly out and disappear! Disconnect the wire by prying open the two metal bars securing it (red box). You will need fine pliers and most likely a pick to pry it open in order to use the pliers.
20. From the side view, you can see how the carbon brushes will slide out. First, feed the wire back into the slot at the top of the brush rail, and feed it out the rear of the guide. Use the wire to pull the brushes out.
Replace the brushes with K45 brushes � these are the same as found in the non-AMG pump.
Install everything back in the correct order by doing the above steps in reverse.
Note 1: If you are installing new brushes, then the appropriate bedding and shaping procedure needs to be followed for carbon brushes. In addition, the commutator should be conditioned with a special honing stone. Here�s a good link to consider for this job.
Note 2: If you removed the top metal plate, then you need to secure it again! This is a pain in the butt as you need to find a way to crimp the tabs back (not easy).
After that, replace all the remaining parts in the reverse order. When tightening the final bolt before putting the clamped air filter assembly on, use some Locktite to make sure it doesn�t come loose.
Put the pump back on its bracket and reinstall.
Replace the electrical connector and start the car.
Check for air flow by putting your hand or paper near the pump outlet.
Make sure the pump disengages after 40 seconds (test relay function).
If it�s working, reconnect the air hose, clear your P0410 error codes and you�re done!
Refer to the corresponding labeled figures / photos with red arrows / circles / boxes:
5. Now you need to get to the business end of the pump and remove the motor.
Remove the clamps that retain the filter to the housing by prying gently on the top with a slotted screwdriver. Put your finger on the clamps to make sure they don�t spring off into oblivion!
6. You can now pull off the bottom air filter assembly. Look down into the filter to ensure it isn�t clogged � you may want to clean it.
7. On the other half of the pump, you will see the first metal impeller plate held onto the motor shaft with a 13 mm nut and a slot on the top of the rotor.
8. Remove the nut using an open-ended wrench and slotted screwdriver to stop the rotor from turning. Slide the top impeller off with its spacer.

9. Now you want to remove the next plate (attached to plastic side housing).
10. Now remove the long spacer on the motor shaft and the second / bottom impeller.
11. Now you are down to where the motor is secured to the housing by the metal plate. Remove the T20 torx screws.
12. The plate is �wedged� into the recess of the housing and so you will need to pry the plate up evenly. Use curved picks to dig in and pull up (again, evenly) so that you don�t damage the bearing or motor shaft.

13. The motor (still attached to the plate) should now slide out relatively easy.
14. The complete motor looks like this with the bottom corresponding to the side nearest the passenger side of the engine bay.
15. Depending on whether you want to clean out the motor and remove carbon from the commutator and other parts (recommended), you may want to do more surgery to the assembly. As depicted by the arrows, there are 4 tabs that hold the plate to the rest of the motor.
16. If you look closely at each tab, you can see that it has been crimped at the edges to ensure that the plate doesn�t come upwards. Carefully use a pair of pliers or fine vise-grip to push in the crimped edges. I also needed to grind a little off the sides of the tabs using a Dremel. When done properly on all 4 tabs, the plate (with attached bearing) will slide upwards and off the shaft. Gently pry the plate off the metal motor housing so that you don�t damage the bearing or deform the motor shaft.
17. Disassemble the motor assembly into its individual components. Use compressed air and a gentle brush to remove carbon deposits. I used a sweet little brush that I found near my fiance�s make-up bag.
18. The plastic piece that houses the brushes can be slid apart slightly to make extraction of the brushes a little easier. In addition, it makes it a little easier to clean the assembly.
19. The carbon brushes can be removed by using pliers to push out the 4 small tabs highlighted by the red lines. Be careful to not allow the spring to fly out and disappear! Disconnect the wire by prying open the two metal bars securing it (red box). You will need fine pliers and most likely a pick to pry it open in order to use the pliers.
20. From the side view, you can see how the carbon brushes will slide out. First, feed the wire back into the slot at the top of the brush rail, and feed it out the rear of the guide. Use the wire to pull the brushes out.

Replace the brushes with K45 brushes � these are the same as found in the non-AMG pump.
Install everything back in the correct order by doing the above steps in reverse.
Note 1: If you are installing new brushes, then the appropriate bedding and shaping procedure needs to be followed for carbon brushes. In addition, the commutator should be conditioned with a special honing stone. Here�s a good link to consider for this job.
Note 2: If you removed the top metal plate, then you need to secure it again! This is a pain in the butt as you need to find a way to crimp the tabs back (not easy).
After that, replace all the remaining parts in the reverse order. When tightening the final bolt before putting the clamped air filter assembly on, use some Locktite to make sure it doesn�t come loose.
Put the pump back on its bracket and reinstall.
Replace the electrical connector and start the car.
Check for air flow by putting your hand or paper near the pump outlet.
Make sure the pump disengages after 40 seconds (test relay function).
If it�s working, reconnect the air hose, clear your P0410 error codes and you�re done!
03-14-2009, 04:27 AM
#4
Super Member
Thread Starter
Part III: Differences between the AMG- and non-AMG pumps
Part III: Differences between the AMG- and non-AMG pumps.
Refer to the corresponding labeled figures / photos with red arrows / circles / boxes:
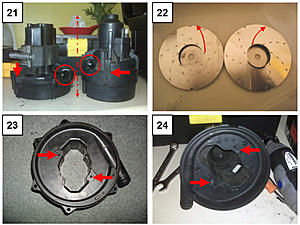
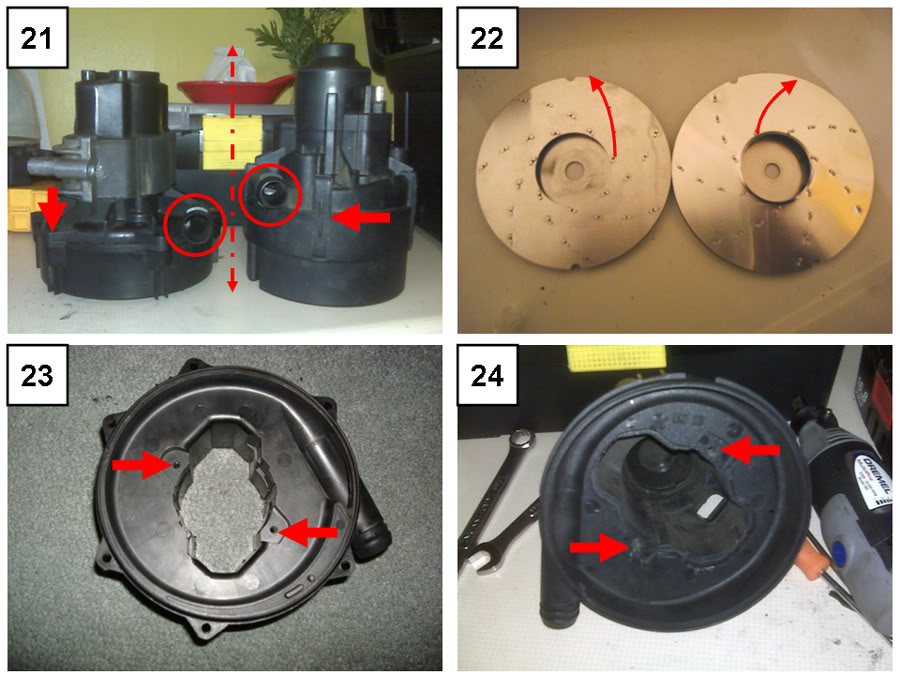
21. Here are the two pumps side by side (non-AMG pump on the left and AMG pump on the right). The hatched line shows the height differences between the two pumps. The arrows show differences in how the air filter assemblies are different. In the AMG pump, clamps are used. In the non-AMG pump, torx screws are used. Importantly, the circles show the air outlet nozzles. Note that they flow in opposite directions!
22. The curved red arrows show the differences in the impeller blades. Importantly, they push air in opposite directions!
23. Shows the recess and the diagonal position of the torx screw holes used to secure the non-AMG motor.
24. Here we see how the torx screws are orienated 90 degrees to the plate in the case of the AMG pump.
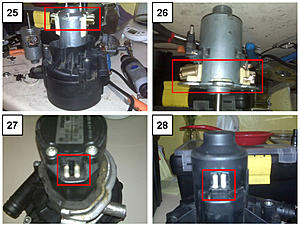
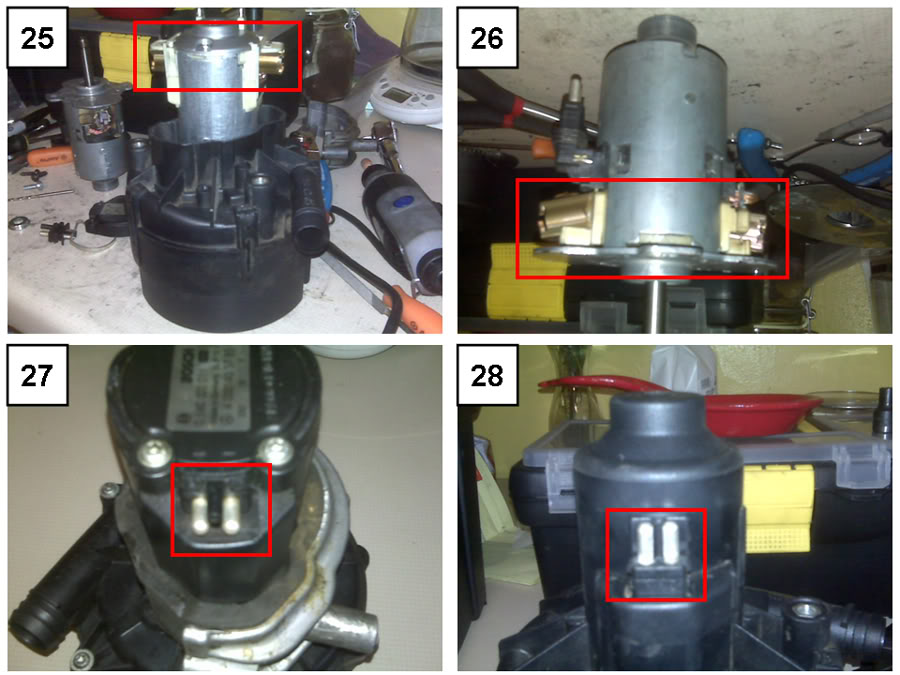
25. The red box shows how the brushes on the non-AMG motor are located at the top of the motor.
26. In contrast, the red box shows how the brushes are at the bottom of the AMG motor.
27. The electrical connector points away from the top of the non-AMG pump.
28. The electrical connector points upwards and half-way along the side of the AMG pump.
29. The center holes of the impellers from the non-AMG pump are wide to accommodate its wider motor shaft.
30. In comparison, the center holes of the impellers from the AMG pump are not as wide. This reflects the smaller diameter shaft on the AMG motor.
31. The non-AMG impellers are only about 6 mm thick.
32. The AMG impellers are significantly wider (~10 mm thick). This is important.

In summary, there are so many differences between these two pumps that it is easy to see why we can�t just easily substitute one for the other.
So�..
You want to proceed with transplanting the non-AMG motor into the AMG housing?
Proceed to Part IV...
Refer to the corresponding labeled figures / photos with red arrows / circles / boxes:
21. Here are the two pumps side by side (non-AMG pump on the left and AMG pump on the right). The hatched line shows the height differences between the two pumps. The arrows show differences in how the air filter assemblies are different. In the AMG pump, clamps are used. In the non-AMG pump, torx screws are used. Importantly, the circles show the air outlet nozzles. Note that they flow in opposite directions!
22. The curved red arrows show the differences in the impeller blades. Importantly, they push air in opposite directions!
23. Shows the recess and the diagonal position of the torx screw holes used to secure the non-AMG motor.
24. Here we see how the torx screws are orienated 90 degrees to the plate in the case of the AMG pump.
25. The red box shows how the brushes on the non-AMG motor are located at the top of the motor.
26. In contrast, the red box shows how the brushes are at the bottom of the AMG motor.
27. The electrical connector points away from the top of the non-AMG pump.
28. The electrical connector points upwards and half-way along the side of the AMG pump.
29. The center holes of the impellers from the non-AMG pump are wide to accommodate its wider motor shaft.
30. In comparison, the center holes of the impellers from the AMG pump are not as wide. This reflects the smaller diameter shaft on the AMG motor.
31. The non-AMG impellers are only about 6 mm thick.
32. The AMG impellers are significantly wider (~10 mm thick). This is important.

In summary, there are so many differences between these two pumps that it is easy to see why we can�t just easily substitute one for the other.
So�..
You want to proceed with transplanting the non-AMG motor into the AMG housing?
Proceed to Part IV...
03-14-2009, 04:28 AM
#5
Super Member
Thread Starter
Part IV: Transplantation of the non-AMG motor into the �hybrid� housing
Part IV: Transplantation of the non-AMG motor into the �hybrid� housing.
What can you do when the plastic assembly is melted beyond repair and the brush assemblies are mangled? This is the more likely scenario since these smog pumps don�t see the type of use that is normally associated with carbon brush wear.
This is where fabrication of a �hybrid� pump comes in play. Clearly the AMG motor needs to be removed and replaced with the non-AMG motor. The two motors are, however, completely different (as seen in Part III) so many modifications need to be done in order to transplant the non-AMG motor into the AMG housing.
Refer to the corresponding labeled figures / photos with red arrows / circles / boxes:
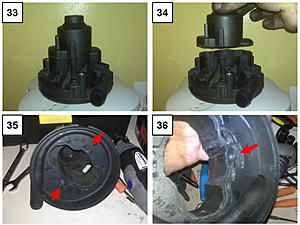
33. You have already removed the motor from the AMG pump (Part II). The non-AMG motor will not fit into this housing so it needs to be modified.
34. I cut off approximately 59 mm (measuring from the top) of the AMG plastic housing using a hacksaw. I made sure that I had a good even cut all the way around. Save the bottom part!
35. Then I took the bottom half of the housing and worked on that. The arrows point to where the outer edge of the tab needs to be filed a little to accommodate the new motor easily.
36. As you look into the housing from where the motor sits, you will see 4 protruding ridges (about 2 mm thick) running the length of the inside. Grind or file these down.
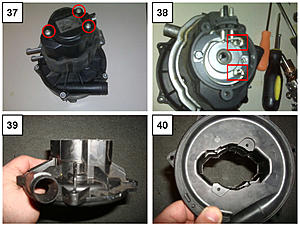
37. Now to removing the non-AMG motor! Unfortunately, it cannot be unscrewed from below and slid out of the plastic housing. First, you must unscrew the T20 torx screws (3 of them) to remove the top cover.
38. The electrical connection of the motor is now exposed. You will need to remove the connectors using a soldering iron. Carefully pull up on the electrodes as you free them. The black connector and the electrodes will slide upwards.
In contrast to the AMG motor, you will see a slot on the motor shaft from the top. You must use a slotted screwdriver to secure this while you remove the bottom nut from the motor shaft with an open-ended wrench (turn clockwise to open).
Remove all the impellers, spacers, and washers. Now the non-AMG motor is easy to remove. Unscrew the T20 torx screws (2 of them) securing the motor to the plastic housing and slide the motor out.
[Note: If you purchased the pump used, it would be wise to pull the motor apart (similar to above) and to at least check the brushes for excessive wear.]
39. By now, you�ve seen the two motors and you realize they are completely different and neither one will fit in its counterpart�s housing! Take the non-AMG housing and using a hacksaw, cut off the top of the housing so that about 59 mm (measuring from the bottom) remains. It is important for this part to be correct because it needs to articulate with the AMG housing and it also needs to allow proper fitment of the non-AMG electrical connector. Retain the top part of the non-AMG housing!
40. This photo again shows how different the non-AMG motor is secured to the housing.
Photos not shown: The metal wall of the non-AMG motor has two circular metal tabs protruding about 2 mm. Grind these down using a Dremel with a carbide tip. In addition, bore out the center holes of the AMG pump impellers to 12 mm so that they fit over the wider motor shaft.
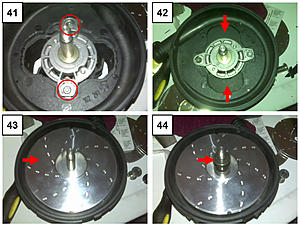
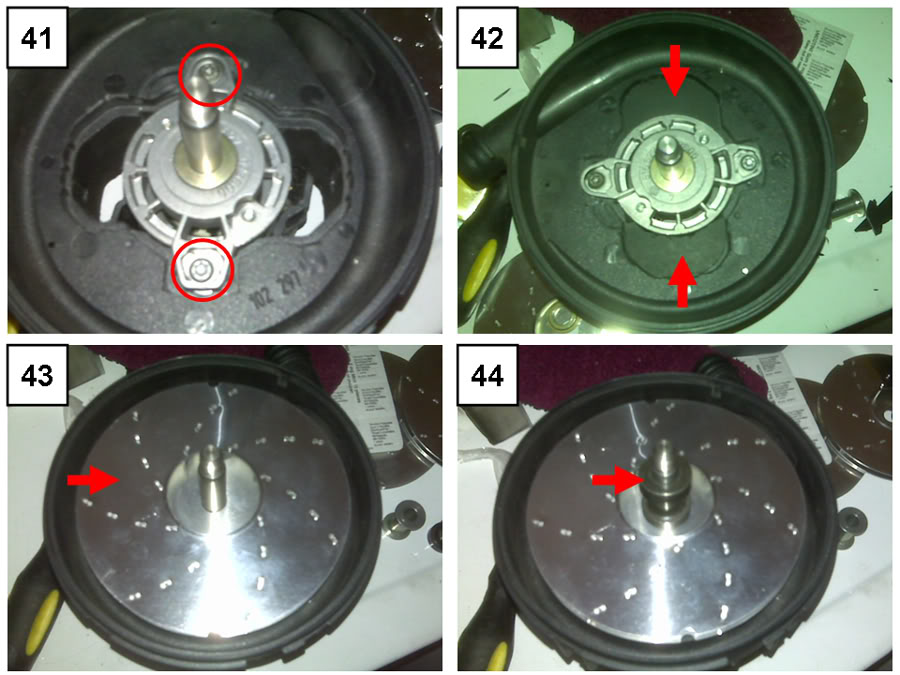
41. Insert the non-AMG motor into the bottom AMG housing and secure it to the housing using the existing T20 torx screw holes. However, use the 3 thin washers (listed in parts) each side to raise the pump up from the bottom of the recess about 4 mm. You want to secure the motor to the housing in such a way that the electrical connector is going to point upwards in the engine bay so keep this in mind! Also place the first spacer over the motor shaft.
42. Now we need to restrict the space between the motor and housing (i.e. the non-AMG motor doesn�t have a metal plate on top like the AMG motor). I used hard plastic and cut it down to size so that it fit the space on either side. I�m not sure if this is absolutely necessary; however, I can�t imagine the air flow dynamics would be optimal if air is allowed to go up through the housing on either side freely.
43. Insert the bottom AMG impeller with the widened center hole over the motor shaft.
44. Insert the tall spacer on top of the bottom impeller.
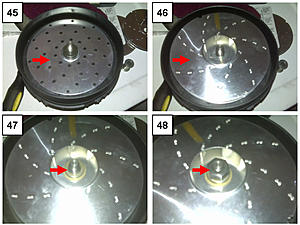
45. Insert the next plate over the shaft and tall spacer. The plastic sides of this plate should fit snugly into the rest of the plastic housing.
46. Insert the top AMG impeller with the widened center hole.
47. Insert the last spacer.
48. Secure all impellers onto the shaft using the nut. Use a slotted screwdriver in the slot at the other end of the shaft to stop rotation while you tighten this nut down. Use Loctite to ensure it remains fastened!
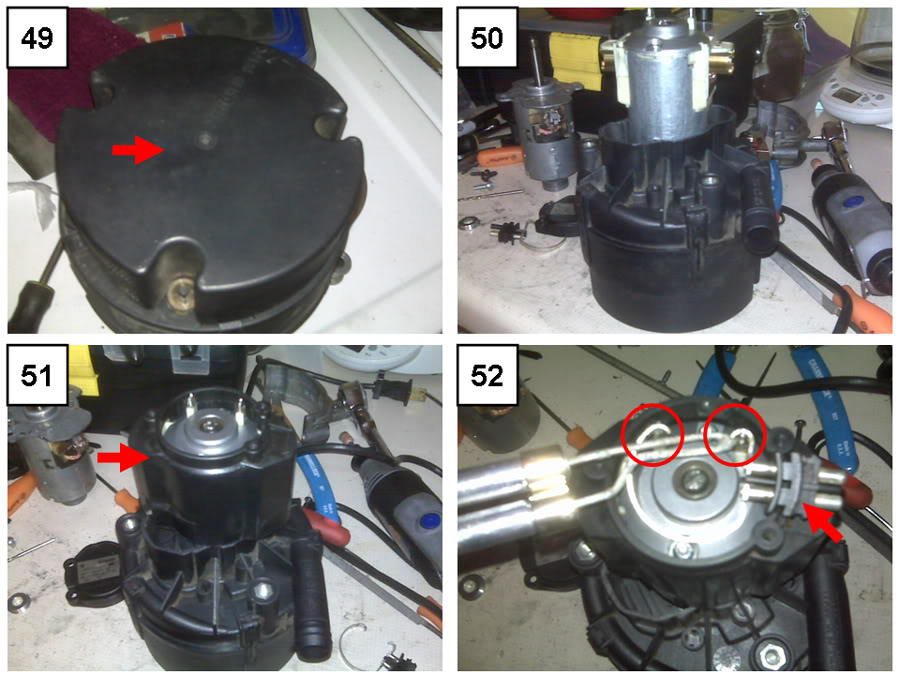
49. Install the air filter assembly onto the end of the pump and secure using the metal clasps.
50. Now the hybrid pump looks like this. No top yet!
51. Take the top that you cut off the non-AMG housing and place it over the top of the motor. You can see that it doesn�t align perfectly with the bottom part � no problem when you have plastic welder!
52. Re-solder the non-AMG electrical connector in such a way that the pins are pointing up when you install the pump in the car. If it is pointing downwards, that�ll be a big pain in the butt in terms of the connection.
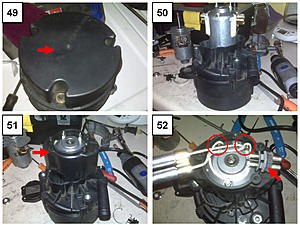
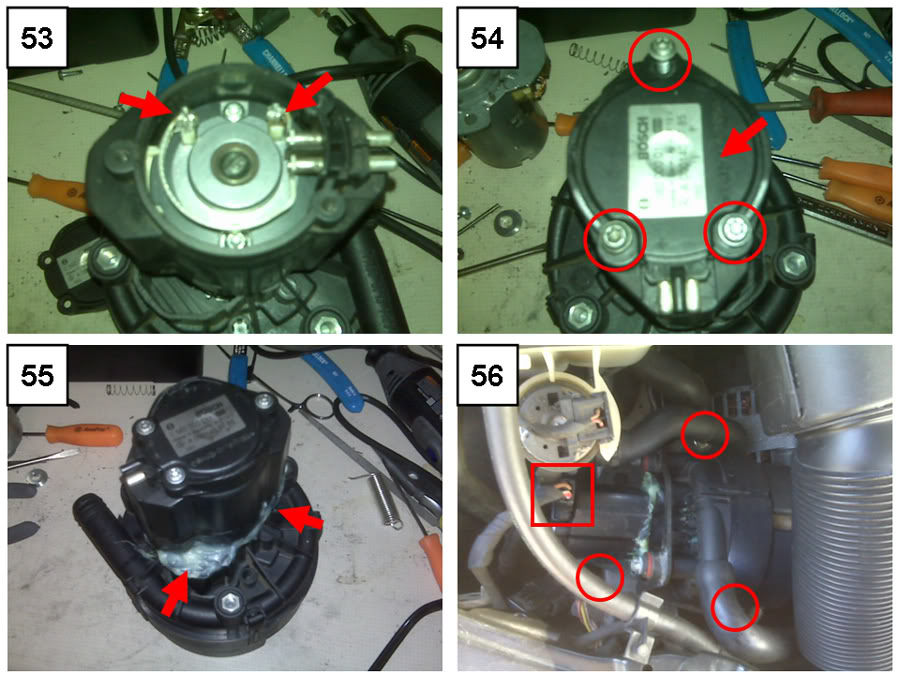
53. The re-soldered piece should look like this. Check your soldering skills using a multimeter.
54. Seal off the top using the black plastic plate with the T20 torx screws.
55. Now we need to join the non-AMG top to the AMG bottom using plastic welder and a few pieces of plastic that are cut to size (to account for the difference in shape and the fact that the 2 pieces are geometrically dissimilar).
Apply the plastic welder liberally (for the entire job, I used about half a tube of this stuff) so that the plastic housing is completely sealed from the environment. It�s not the prettiest sight in the world, but it�s sealed! Allow to set for about 30 minutes.
56. The hybrid pump is now complete and all you have to do is replace the stock mounting bracket (torque to 8 Nm) and put it back into its ascribed space in the engine bay (torque the 10 mm nuts to 4 Nm). Again, if you planned it correctly, the electrical connector is now pointing upwards (which makes it easier to install / remove) and the air output nozzle should be pointing towards the front of the car (like the AMG pump). Because the end of the non-AMG motor is longer, it will be a slightly tighter fit in the existing space; however, it fits just fine. Reconnect the rubber tubing and test out your pump (as described above)!

Short video clip of the hybrid pump in action:
(Note: the pump appears to be very loud � this is mostly due to the sound of air blowing out the open end of the tube. Apologies for the night-time video � not the clearest!)

Important points about this hybrid pump:
A) Due to the modifications to the housing, it is going to have different resonance and sound properties. This hybrid is louder to the point that you can hear it clearly in the cabin and you can hear it shut off after 40 seconds.
B) The air flow in this hybrid appears to be significantly more than the AMG pump. I say this based on how my stock pump used to flow; however, it may not have been flowing correctly due to its condition. In any case, I reduced the flow of air going to my valves by fitting a hose �Y� junction just before where the rubber air hose meets the aluminum tube. Be careful with your positioning of the open �Y� outlet!
What can you do when the plastic assembly is melted beyond repair and the brush assemblies are mangled? This is the more likely scenario since these smog pumps don�t see the type of use that is normally associated with carbon brush wear.
This is where fabrication of a �hybrid� pump comes in play. Clearly the AMG motor needs to be removed and replaced with the non-AMG motor. The two motors are, however, completely different (as seen in Part III) so many modifications need to be done in order to transplant the non-AMG motor into the AMG housing.
Refer to the corresponding labeled figures / photos with red arrows / circles / boxes:
33. You have already removed the motor from the AMG pump (Part II). The non-AMG motor will not fit into this housing so it needs to be modified.
34. I cut off approximately 59 mm (measuring from the top) of the AMG plastic housing using a hacksaw. I made sure that I had a good even cut all the way around. Save the bottom part!
35. Then I took the bottom half of the housing and worked on that. The arrows point to where the outer edge of the tab needs to be filed a little to accommodate the new motor easily.
36. As you look into the housing from where the motor sits, you will see 4 protruding ridges (about 2 mm thick) running the length of the inside. Grind or file these down.

37. Now to removing the non-AMG motor! Unfortunately, it cannot be unscrewed from below and slid out of the plastic housing. First, you must unscrew the T20 torx screws (3 of them) to remove the top cover.
38. The electrical connection of the motor is now exposed. You will need to remove the connectors using a soldering iron. Carefully pull up on the electrodes as you free them. The black connector and the electrodes will slide upwards.
In contrast to the AMG motor, you will see a slot on the motor shaft from the top. You must use a slotted screwdriver to secure this while you remove the bottom nut from the motor shaft with an open-ended wrench (turn clockwise to open).
Remove all the impellers, spacers, and washers. Now the non-AMG motor is easy to remove. Unscrew the T20 torx screws (2 of them) securing the motor to the plastic housing and slide the motor out.
[Note: If you purchased the pump used, it would be wise to pull the motor apart (similar to above) and to at least check the brushes for excessive wear.]
39. By now, you�ve seen the two motors and you realize they are completely different and neither one will fit in its counterpart�s housing! Take the non-AMG housing and using a hacksaw, cut off the top of the housing so that about 59 mm (measuring from the bottom) remains. It is important for this part to be correct because it needs to articulate with the AMG housing and it also needs to allow proper fitment of the non-AMG electrical connector. Retain the top part of the non-AMG housing!
40. This photo again shows how different the non-AMG motor is secured to the housing.
Photos not shown: The metal wall of the non-AMG motor has two circular metal tabs protruding about 2 mm. Grind these down using a Dremel with a carbide tip. In addition, bore out the center holes of the AMG pump impellers to 12 mm so that they fit over the wider motor shaft.

41. Insert the non-AMG motor into the bottom AMG housing and secure it to the housing using the existing T20 torx screw holes. However, use the 3 thin washers (listed in parts) each side to raise the pump up from the bottom of the recess about 4 mm. You want to secure the motor to the housing in such a way that the electrical connector is going to point upwards in the engine bay so keep this in mind! Also place the first spacer over the motor shaft.
42. Now we need to restrict the space between the motor and housing (i.e. the non-AMG motor doesn�t have a metal plate on top like the AMG motor). I used hard plastic and cut it down to size so that it fit the space on either side. I�m not sure if this is absolutely necessary; however, I can�t imagine the air flow dynamics would be optimal if air is allowed to go up through the housing on either side freely.
43. Insert the bottom AMG impeller with the widened center hole over the motor shaft.
44. Insert the tall spacer on top of the bottom impeller.
45. Insert the next plate over the shaft and tall spacer. The plastic sides of this plate should fit snugly into the rest of the plastic housing.
46. Insert the top AMG impeller with the widened center hole.
47. Insert the last spacer.
48. Secure all impellers onto the shaft using the nut. Use a slotted screwdriver in the slot at the other end of the shaft to stop rotation while you tighten this nut down. Use Loctite to ensure it remains fastened!

49. Install the air filter assembly onto the end of the pump and secure using the metal clasps.
50. Now the hybrid pump looks like this. No top yet!
51. Take the top that you cut off the non-AMG housing and place it over the top of the motor. You can see that it doesn�t align perfectly with the bottom part � no problem when you have plastic welder!
52. Re-solder the non-AMG electrical connector in such a way that the pins are pointing up when you install the pump in the car. If it is pointing downwards, that�ll be a big pain in the butt in terms of the connection.
53. The re-soldered piece should look like this. Check your soldering skills using a multimeter.
54. Seal off the top using the black plastic plate with the T20 torx screws.
55. Now we need to join the non-AMG top to the AMG bottom using plastic welder and a few pieces of plastic that are cut to size (to account for the difference in shape and the fact that the 2 pieces are geometrically dissimilar).
Apply the plastic welder liberally (for the entire job, I used about half a tube of this stuff) so that the plastic housing is completely sealed from the environment. It�s not the prettiest sight in the world, but it�s sealed! Allow to set for about 30 minutes.
56. The hybrid pump is now complete and all you have to do is replace the stock mounting bracket (torque to 8 Nm) and put it back into its ascribed space in the engine bay (torque the 10 mm nuts to 4 Nm). Again, if you planned it correctly, the electrical connector is now pointing upwards (which makes it easier to install / remove) and the air output nozzle should be pointing towards the front of the car (like the AMG pump). Because the end of the non-AMG motor is longer, it will be a slightly tighter fit in the existing space; however, it fits just fine. Reconnect the rubber tubing and test out your pump (as described above)!
Short video clip of the hybrid pump in action:
(Note: the pump appears to be very loud � this is mostly due to the sound of air blowing out the open end of the tube. Apologies for the night-time video � not the clearest!)
Important points about this hybrid pump:
A) Due to the modifications to the housing, it is going to have different resonance and sound properties. This hybrid is louder to the point that you can hear it clearly in the cabin and you can hear it shut off after 40 seconds.
B) The air flow in this hybrid appears to be significantly more than the AMG pump. I say this based on how my stock pump used to flow; however, it may not have been flowing correctly due to its condition. In any case, I reduced the flow of air going to my valves by fitting a hose �Y� junction just before where the rubber air hose meets the aluminum tube. Be careful with your positioning of the open �Y� outlet!
Trending Topics
03-14-2009, 08:04 AM
#8
Super Member

Join Date: Mar 2007
Location: Bay Area
Posts: 946
Likes: 0
Received 1 Like
on
1 Post
03 C32 gone, 06 CLS55, 16 Tesla X
Much much thank for this excellent DYI. I had replaced my seat motors' brushes in the same way and save $$$$
One complaint though, Mercedes stealers will sue you cause' you steal the job from them
I had replaced my seat motors' brushes in the same way and save $$$$ One complaint though, Mercedes stealers will sue you cause' you steal the job from them

 03-14-2009, 10:22 AM
#10
Super Moderator Alumni
Geez, boohoo, you are some sort of evil genius or something. That is the longest write up I've seen to date. How much did you save again? About $280?
 03-14-2009, 07:42 PM
#15
Super Moderator
Another outstanding DIY post from boohooramblers. Who�d have thunk it? =) Since most of us have � or will in the foreseeable future � experienced every conceivable malady with our C32�s, I�ve bookmarked this one, too.
I fear no bolt. Be that as it may, contemplating fiddling with the new-fangled electronic equipment on our cars makes some cower and awaken in a cold sweat. May I ring you if my retrofit goes awry?
I fear no bolt. Be that as it may, contemplating fiddling with the new-fangled electronic equipment on our cars makes some cower and awaken in a cold sweat. May I ring you if my retrofit goes awry?


 BoohooRambler
 06-30-2009, 02:08 AM
#20
MBWorld Fanatic!
Join Date: Dec 2007
Location: Corona, CA
Posts: 5,034
Likes: 0
Received 6 Likes
on
6 Posts
03 g35 coupe...........02 c32 Sold
i replaced the relay on this and it stopped my pump from running on after the car is off. i bought $60 at the dealership but i think you can get it for $30 online somewhere.
06-30-2009, 02:11 AM
#21
Super Member

Join Date: May 2007
Location: Oakland, California
Posts: 636
Likes: 0
Received 0 Likes
on
0 Posts
07 E550, 02 C32, 91 300E
Ok, I'm still under the mercedes extended warranty, so I'll try to get them to cover it. Hopefully will get a new pump out of it. Crossing my fingers.
06-30-2009, 10:03 AM
#23
Super Member
Thread Starter


