
DIY: Installing a new Changeover/Heater Control Valve

 08-05-2013, 04:45 PM
#176
Newbie
Join Date: Jul 2013
Posts: 5
Likes: 0
Received 0 Likes
on
0 Posts
w211 / 2005 ,E 36 325i tunned /1995
try to see if electric pump is working,Turn the Heat on (both sides) Engine Off, the hud open,and press Rest button (w211),go in the front of the car ,in the right side near air filter you must Hear a litlle noise like electric engine,that's mean your electric pump for heat is working! If is working ,and you dont have heat (after you warm the engine!) on this sunny days ,maybe your dual-valve is blocked in close position and the hot water can't make his circuit
 08-05-2013, 05:01 PM
#177
Newbie
Join Date: Jul 2013
Posts: 5
Likes: 0
Received 0 Likes
on
0 Posts
w211 / 2005 ,E 36 325i tunned /1995
Regarding my problem ( On the left side front/back),not so Cold like in the right side,i check the dual-valve and its seem to work proprely.No hot air on the left side with the engine at 90degrees Celsius, at the fun only (clima off) it blows the air at the same temperature (both sides) like the enviorement temp. Could need some freon?! Any Ideas?!?

 09-27-2013, 06:48 PM
#181
Member

Hello on my 2006 e320 CDI at 80 outside when I press the auto on the climate control set at 68 the system will blow hot air for about 1 to 2 minutes from the vents under the dash and the side vents then will cool and everything is fine but if I turn off the car for 5 or 10 minutes the same hot air routine then all is well.I put my gauges on the freon and got 30 psi low side 200 high side seems about normal is it the change over valve and does the CDI have the same setup thank you Don
-Bill
09-28-2013, 03:12 PM
#182
Member

Join Date: May 2006
Location: vancouver
Posts: 90
Likes: 0
Received 0 Likes
on
0 Posts
CLK55
Im in Vancouver BC Canada, getting cold here, noticed car got no heat, bought a $68 part from MB dealer and 2 mechanic friend helped out, got it done in 40 minutes. Thanks to this post!
12-24-2013, 05:05 PM
#186
Junior Member

Join Date: Jul 2012
Posts: 25
Likes: 0
Received 0 Likes
on
0 Posts
Mercedes E329 / 4 drs
Just finished R/R the heater valve and I can say that the "post" decribling the procedure was very helpful and appreciated. A shop wanted $350 and the rip-a- dealer $650. The part with the snap on pins cost $42. I was looking for the "pins" as a separate item and no one had them and they cost $6 per ea, snap on pin. So I opened the box and was glad that they were included with valve.
Manuel R
Manuel R
12-28-2013, 10:09 PM
#187
Newbie

Join Date: Dec 2013
Posts: 1
Likes: 0
Received 0 Likes
on
0 Posts
w211 270 cdi
Thank you for a great thread,
Had the hot air in the back problem every now and again, and after google, registered here on mbworld (my first mb bought 4 months ago)
Replaced the heater control valve om my right hand drive w211 270 cdi yesterday paid 60 usd for the part and found it tucked in below the master brake cylinder. So decided to remove the fuse box (my cars fuse box is situated on the right hand side as the layout is pritty much an inverse of the left hand drive model) Was a 4hour job but ssuccess is always sweet as for the small hands oh how I wish I was double jointed some times.
Regards
Hennie
01-01-2014, 05:44 PM
#188
Junior Member

Excellent write up!
I have to do this on my 2006 S500 -- anyone know if the procedure is the same?
The part is considerably more expensive.
Thanks,
Boris
I have to do this on my 2006 S500 -- anyone know if the procedure is the same?
The part is considerably more expensive.
Thanks,
Boris
01-03-2014, 08:27 PM
#189

Didn't fix my issue, any issues
This is an excellent write-up. Replaced the valve in less than hour but unfortunately it didn't fix my problem. The car had been disconnected for several days from the primary battery. Reconnected and at first the back blew hot (when set to cold) and the from was set on cold and felt like the right temp. Later, front and back both blow cold (with temp at HI for front and rear) but no hot.
Is there something I lost with the battery being disconnected? The little secondary battery was never disconnected.
Is there something I lost with the battery being disconnected? The little secondary battery was never disconnected.
01-07-2014, 04:15 PM
#190
It works now. It might might be that I didn't allow for enough time to do a system reset or ???. Both times the car was at operating temp for several minutes. Just in case it makes a difference...the last time I went out to pull the the codes from the HVAC menu. I was pulling the codes before I started and after I started the car, while pulling the codes "after start" the heater started working.
FYI, I posted my codes here of pre and post start:
https://mbworld.org/forums/e-class-w...ml#post5895131
FYI, I posted my codes here of pre and post start:
https://mbworld.org/forums/e-class-w...ml#post5895131
01-31-2014, 03:14 PM
#191
Junior Member

Join Date: Sep 2009
Location: Northern VA
Posts: 24
Likes: 0
Received 0 Likes
on
0 Posts
2006 E350 & 2011 ML350
Thank you for very intuitive instruction.
I have had no heat from few weeks ago and found this DIY instruction and tackled it and just finished the job within 2 hours. Broke 2 clips (not the 4 screws but one of those 6 clips that intacted the plastic cover to metal) and ordered them. Once I got them, it will be done. Never felt so good on those heat in 30 degrees. Thanks again.
I have had no heat from few weeks ago and found this DIY instruction and tackled it and just finished the job within 2 hours. Broke 2 clips (not the 4 screws but one of those 6 clips that intacted the plastic cover to metal) and ordered them. Once I got them, it will be done. Never felt so good on those heat in 30 degrees. Thanks again.
Last edited by piusthedrgolf; 01-31-2014 at 03:45 PM.
05-05-2014, 10:50 AM
#192

Another success story. Thank you so much for the write up, i just replaced the part in my e55 yesterday, took less than 2 hours in total. I was getting the hot air in the back while cold in the front, seems to be fixed now.
To OP, I owe you at least a beer if you are ever in NYC.
To OP, I owe you at least a beer if you are ever in NYC.
05-14-2014, 04:41 PM
#193
Member

Join Date: Feb 2014
Posts: 91
Likes: 0
Received 0 Likes
on
0 Posts
'05 E55
Excellent write up! This job was a royal pain in the a$$ though. All the chincy plastic pieces - I was afraid I would break them! The big black cover positioning clips were the biggest PITA; I was sure I would break something so that took a while until I said F-it and popped one loose. Second hardest thing was to remove the single hose coming through the front firewall. After 10 years it didn't want to come out. I ended up breaking a tab off of the bad part to see if that would help and it did come out finally. It was 90 degrees out and humid as hell, and toward the end the mosquitos started swarming me.  Directions were pretty straight forward though. Don't do like I did and forget to hook up the electrical connection for the wipers before you bolt them back on!! Luckily I caught it before the black cover went back on or I really would have been pissed! Glad that ***** is done!!!!
Directions were pretty straight forward though. Don't do like I did and forget to hook up the electrical connection for the wipers before you bolt them back on!! Luckily I caught it before the black cover went back on or I really would have been pissed! Glad that ***** is done!!!!
05-24-2014, 08:11 PM
#194
Newbie

Join Date: Jun 2012
Posts: 1
Likes: 0
Received 0 Likes
on
0 Posts
2005 MB E320 4-Matic
Hello all. In my 2005 MB E320 4-Matic, my heater was also working abnormally. I did buy the new HVAC heater control valve and replaced it per the instructions. I still have the same problem my heat works but after I increase the temp to 80 or higher. Until 78 degrees it throws air at normal room temp. Any ideas?
Thanks for any help I can get.
Thanks for any help I can get.
06-01-2014, 01:22 PM
#195
MBWorld Fanatic!

Thanks a lot for the write up.
It worked and now it seems working fine.
Things to note for someone who will be going through this in future.
The wiper assembly needs to come off and during that I dropped a socket and the wiper screw in the engine cabin and is now lost forever.
The plastic trim will take some time to come off and to get it back on. You will need patience.
To be honest it did not take me 3 hours. Probably less than 2 hours and even then most of the time was spent trying to take the plastic trim off and on lol
OP- massive thanks again bro
07-04-2014, 01:03 AM
#196
Newbie

Join Date: Mar 2014
Posts: 1
Likes: 0
Received 0 Likes
on
0 Posts
AMG CL 55
Great DIY instructions Ryda!
I opened up the section where the DC Servo resides, very surprised with such poor design, implemented by Mercedes Benz.
The little servo motor's shaft engages with a plastic gear that ultimately moves the 2 inlets common valve, when the valve reaches its endpoint, it stops causing the gear to stop. There is no closed loop feedback circuit on this servo therefore the servo motor will still try to spin although the Valve has reached its endpoint. Now we would have a battle between plastic gear and servo motor, whomever is stronger will win, meaning either the gears will be broken or the servo will heat-up and burn. Most likely the servo heats up and burns, since the gear is made of rigid PVC. Not sure if there is any fuse assigned to protect servo from over-current. If there is, it should be a 3 A fuse. A 5A fuse is no good.
Would be great to find out if there was a factory recall on this!
Again thanks for such organized posting and cheers to people who take extra miles to share their knowledge and information.
07-10-2014, 12:44 PM
#197

Job done on my 2003 E500 as per instructions and A/C restored to rear seats. Thank you!
I did remove the wiper mechanism. The job took a leisurely 2 hours. I broke and had to replace two of the plastic clips. I would suggest a little bit of Vaseline on the front connector to help it slide through the o ring on re-connection.
I did remove the wiper mechanism. The job took a leisurely 2 hours. I broke and had to replace two of the plastic clips. I would suggest a little bit of Vaseline on the front connector to help it slide through the o ring on re-connection.
Last edited by colink; 07-10-2014 at 12:47 PM.
07-31-2014, 01:18 PM
#198
Junior Member
Join Date: Jul 2014
Posts: 22
Likes: 0
Received 0 Likes
on
0 Posts
s500
Okay, last weekend was frickin hot in So-Cali reaching 90+ and that’s when I first started to experience extremely hot air blowing out from the rear vents (B-pillar and from center console). My front a/c vents were working fine, but the hot air being blown to the rear passenger area was unbearable. I remember seeing several threads of people experiencing the same problem and since my car is no longer under warranty, I decided to tackle the job myself. Thanks to Konigstiger, found the culprit to be with the changeover valve. https://mbworld.org/forums/showpost....49&postcount=2
So here I go, on with another DIY.
Tools required:
Flatnose screwdriver
Needle nose pliers
An extended angle needle nose pliers
Ratchet
13MM socket
T25 Torx wrench or screwdriver
Wire coat hanger
Parts needed:
New changeover valve (part #A211 832 05 84). This is probably a revised valve w/ a new design since my faulty valve has the part #A211 832 00 84.
Here is what the changeover valve looks like. (old valve unit)


1st, remove the outer weather-stripping
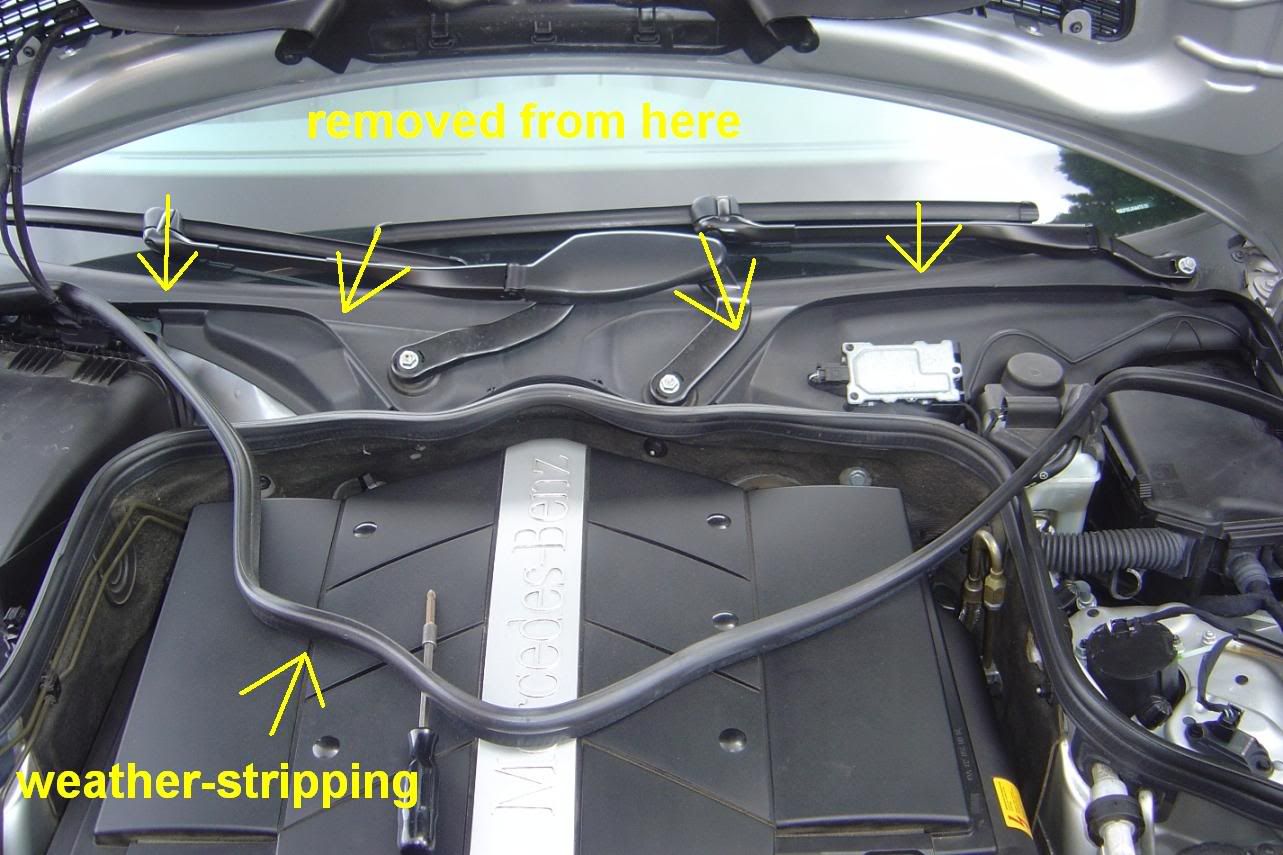
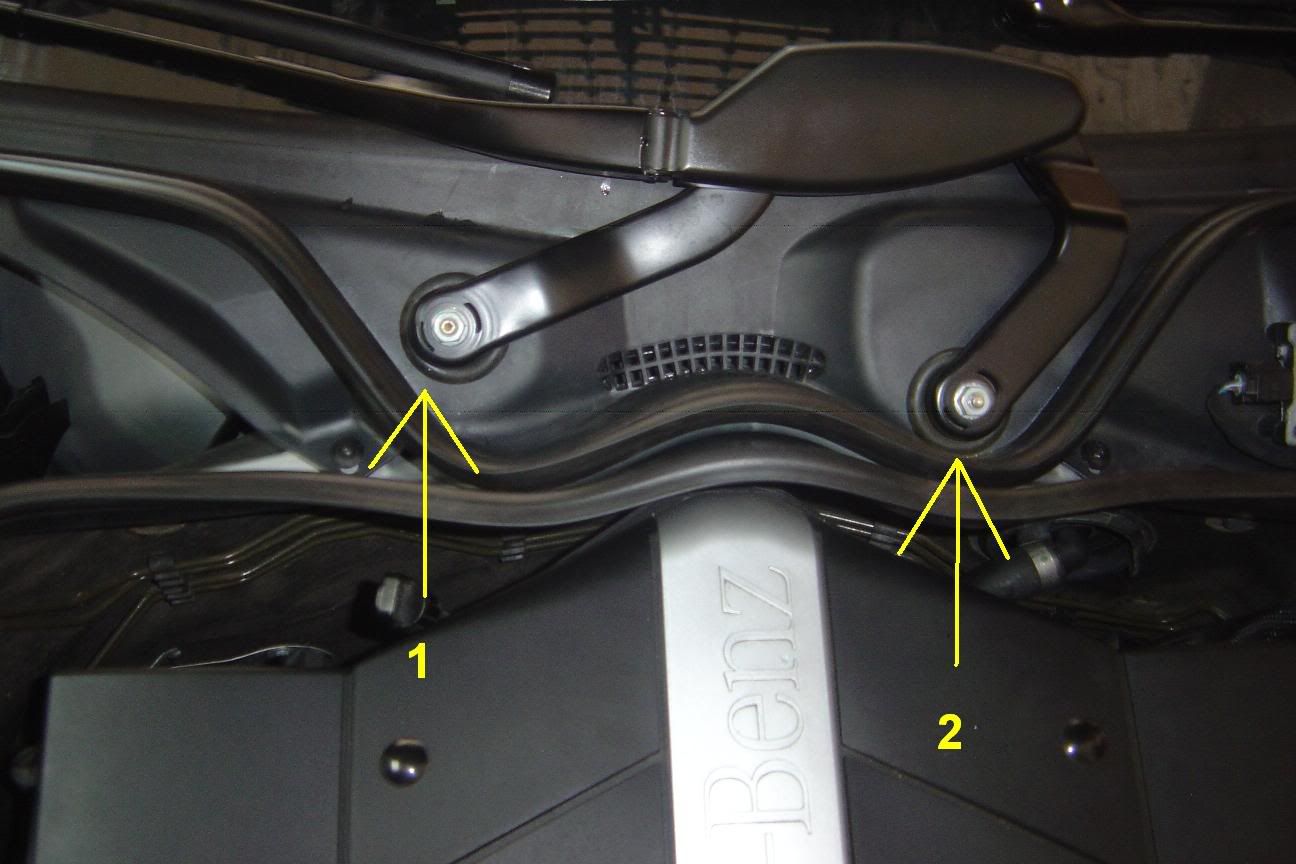
2nd, you’ll need to remove both wiper arm assembly with a ratchet and a 13mm socket. Here are the 3 nuts you’ll need to remove.
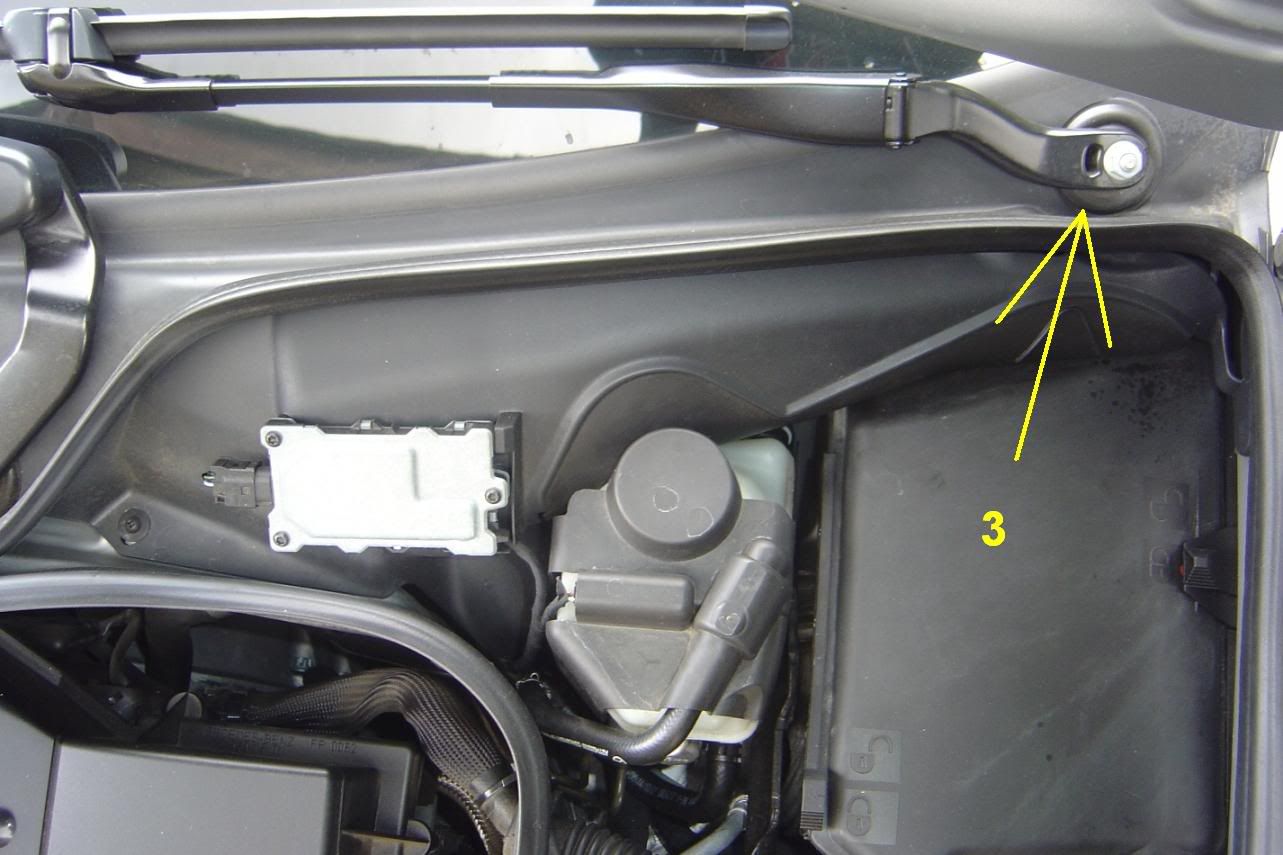
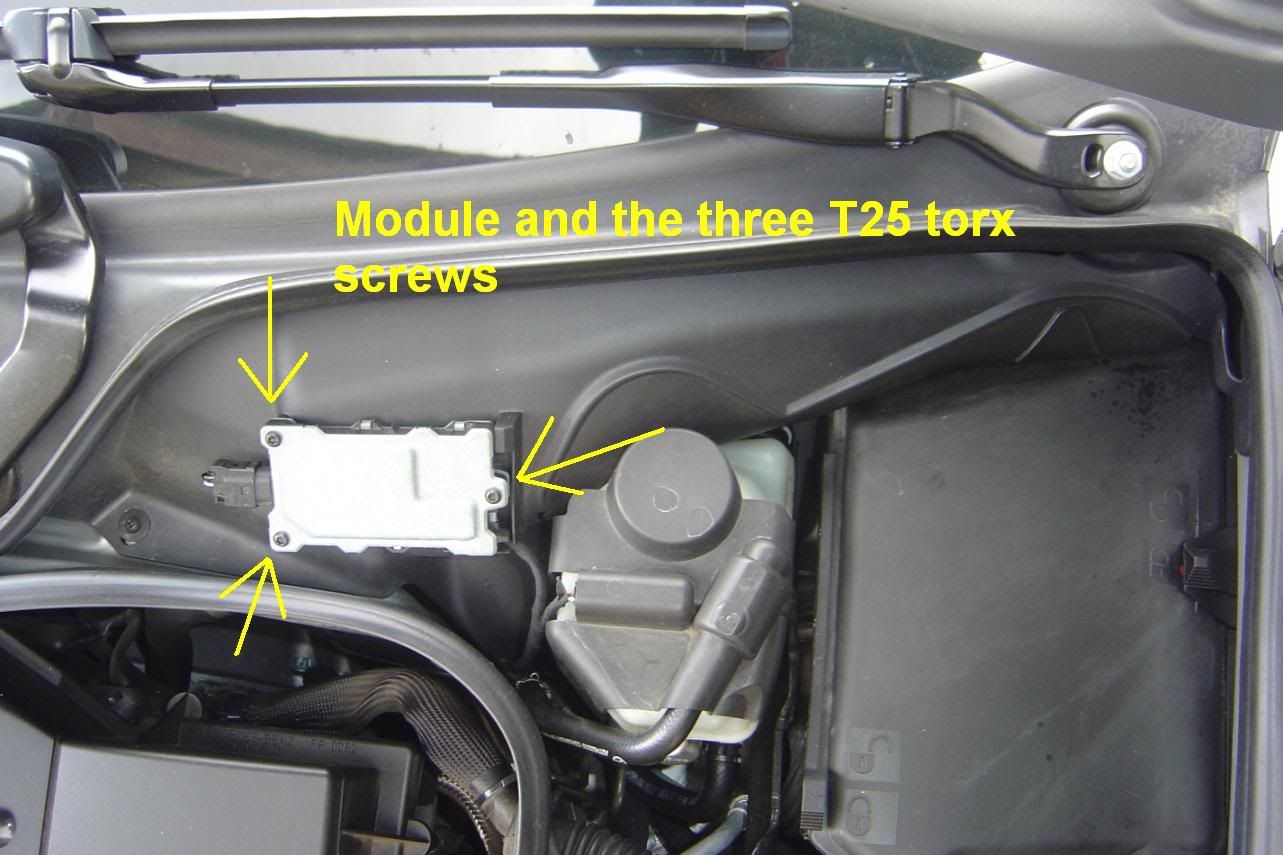
Next remove this module on the driver’s side. I’m not sure what it exactly does, but you’ll need to unscrew it from the plastic trim panel. Using the T25 Torx screwdriver or wrench, remove the 3 screws and set the module aside. You don’t even need to disconnect it.
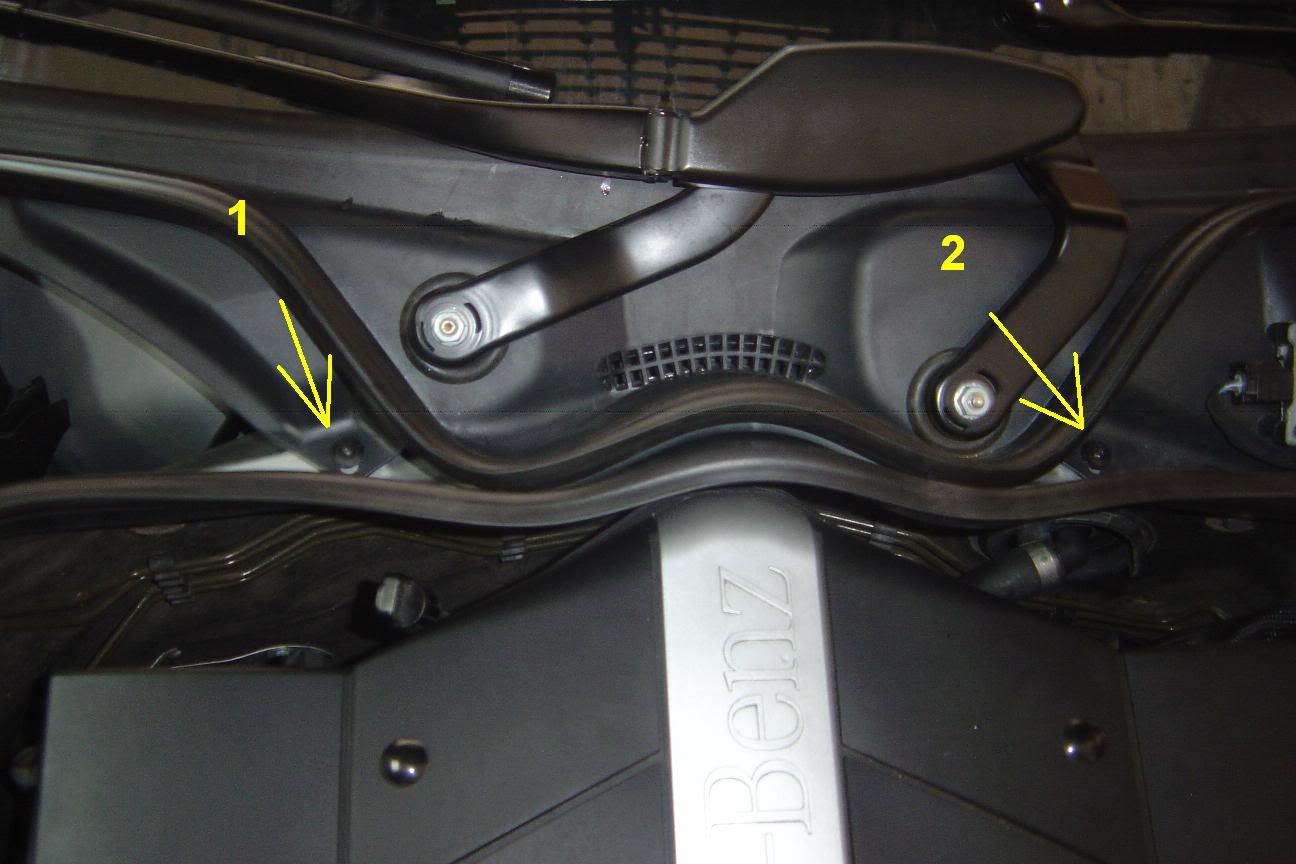
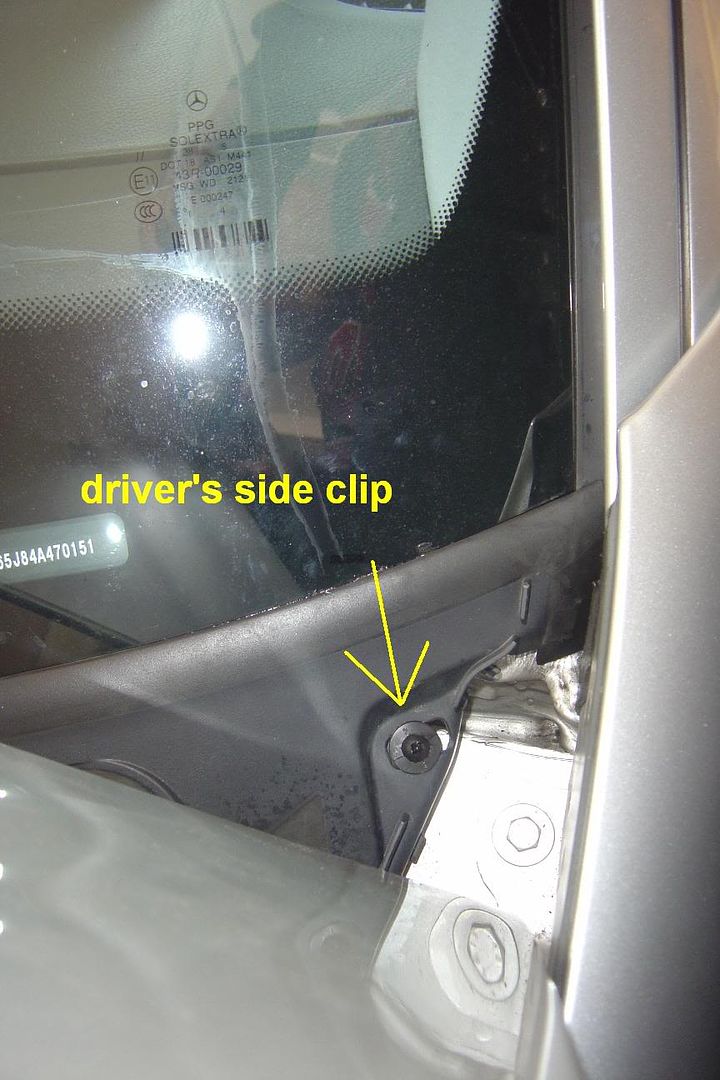
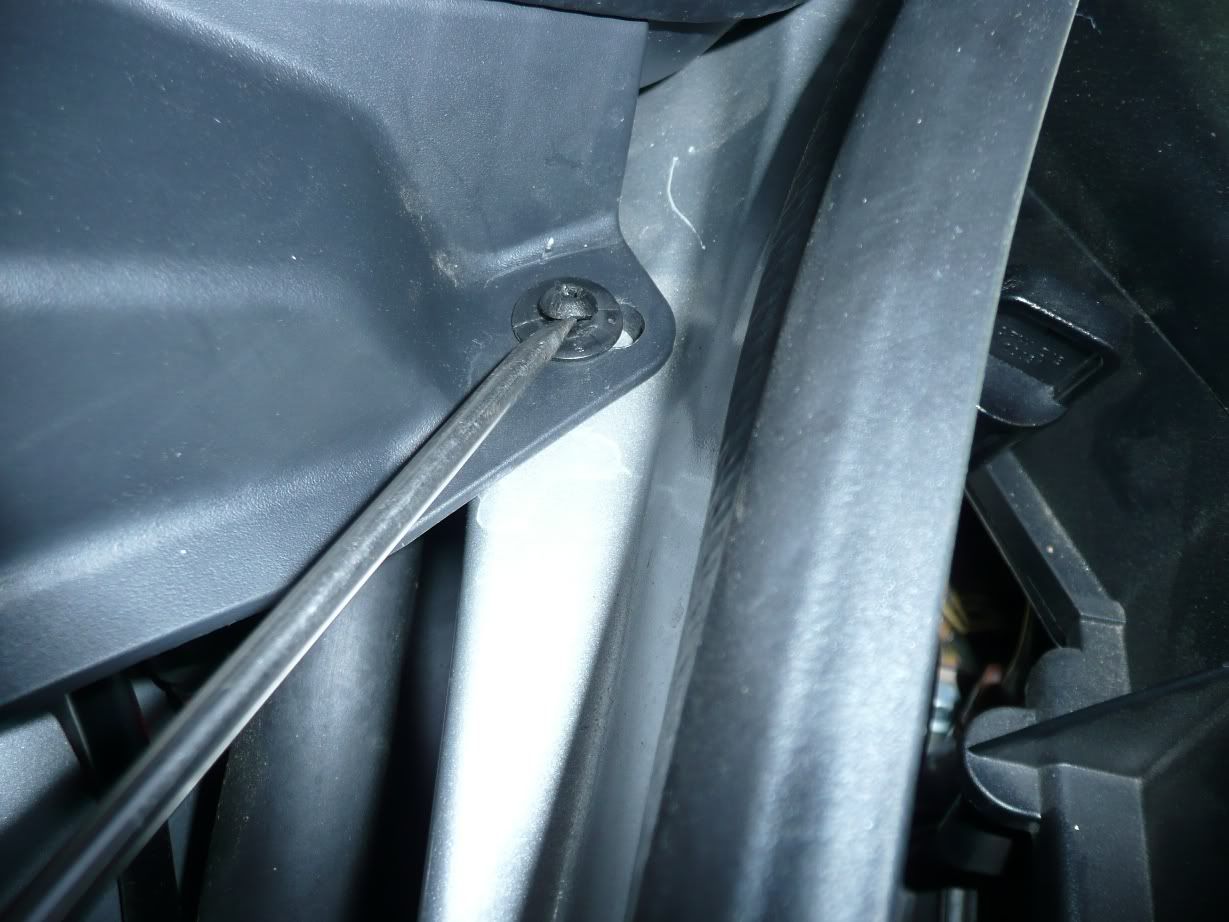
Now you’ll need to remove plastic trim panel that sits at the bottom of the windshield. It is secured down with 4 plastic clips. (they look like philip plastic screws). To remove these clips you gently slide a thin flathead screwdriver under the head of the clip and pry it up high enough so that you could use the needle nose pliers to pull on the shaft. Do not remove the shaft, just pull it out Ľ of an inch or less then remove the clip.
Location of plastic clips

Prying the shaft
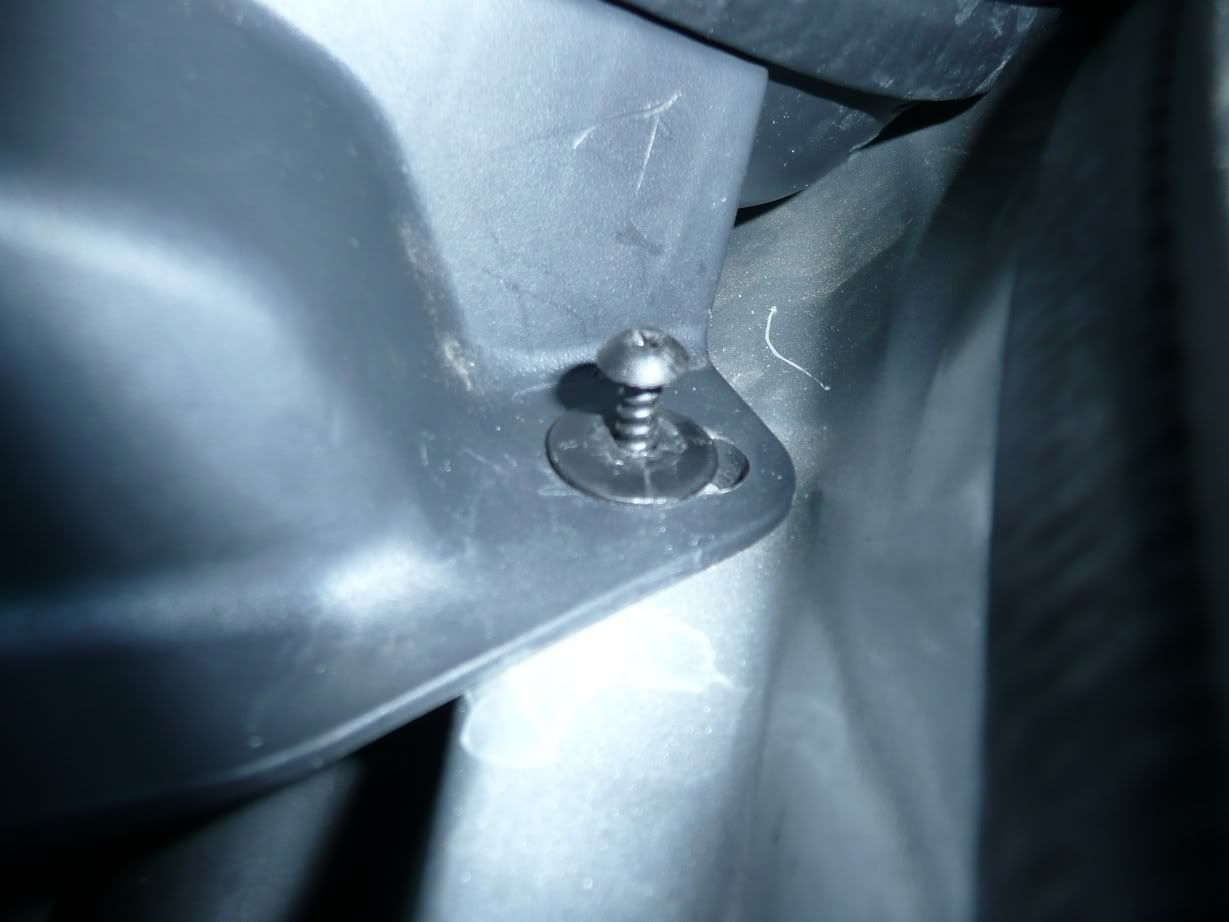
Shaft extended out
Clip finally removed

At the bottom of the plastic trim panel is a big rubber hose that you’ll need to disconnect. On the passenger side, you’ll need to unhook the 2 electrical wires from the hanger. Now you could remove the plastic trim panel.
When you remove the plastic trim, you’ll see more wiper arm linkages as seen in the pic.
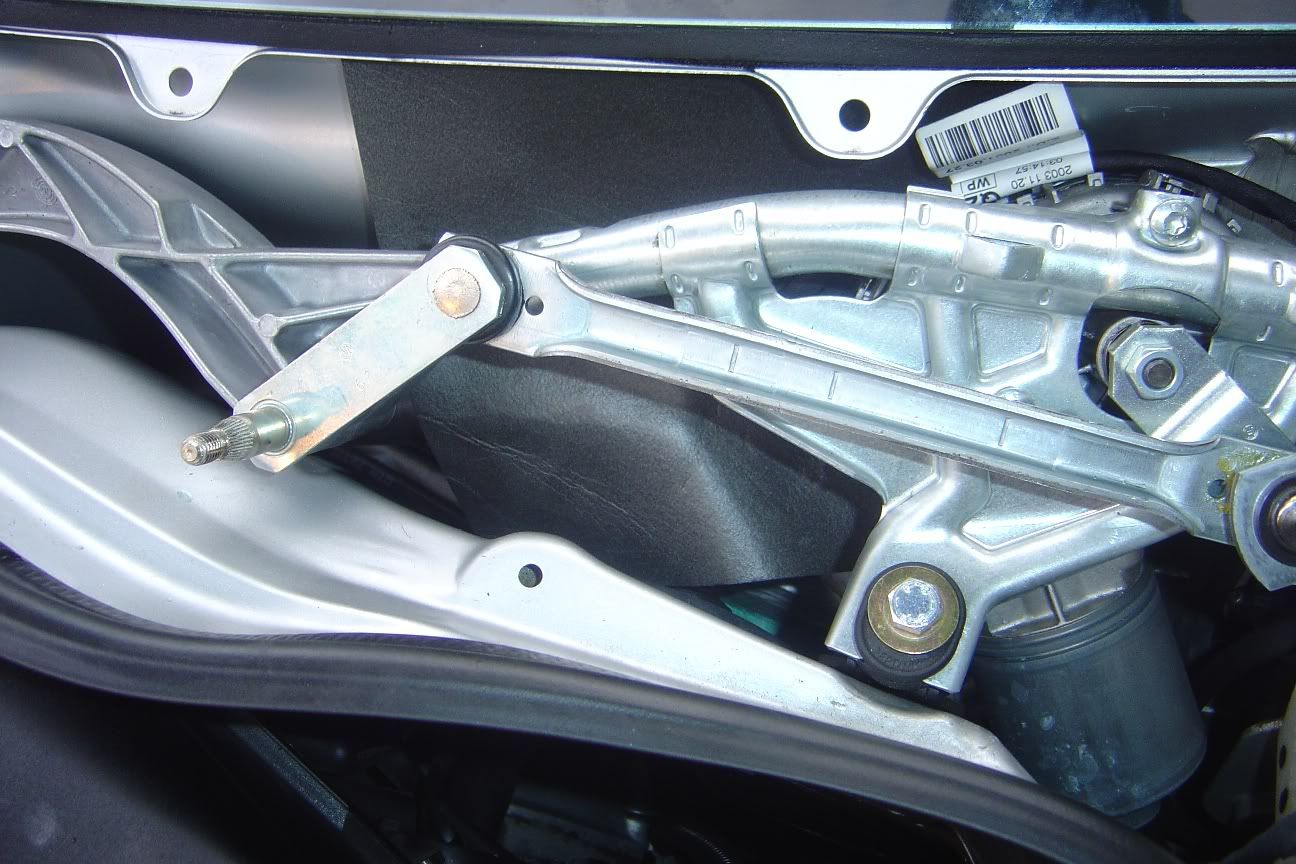
The changeover valve is covered with this thin foam padding. Just unfold it and tuck it under the wiper linkages. Next, you’ll need to reposition the linkages so you that you could access the valve. Gently push on the linkages until you have enough room. Now you’ll see the changover valve nested on the driver’s side firewall. If you have big hands like myself, you’ll be in a world of hate because it’s a tight squeeze!!
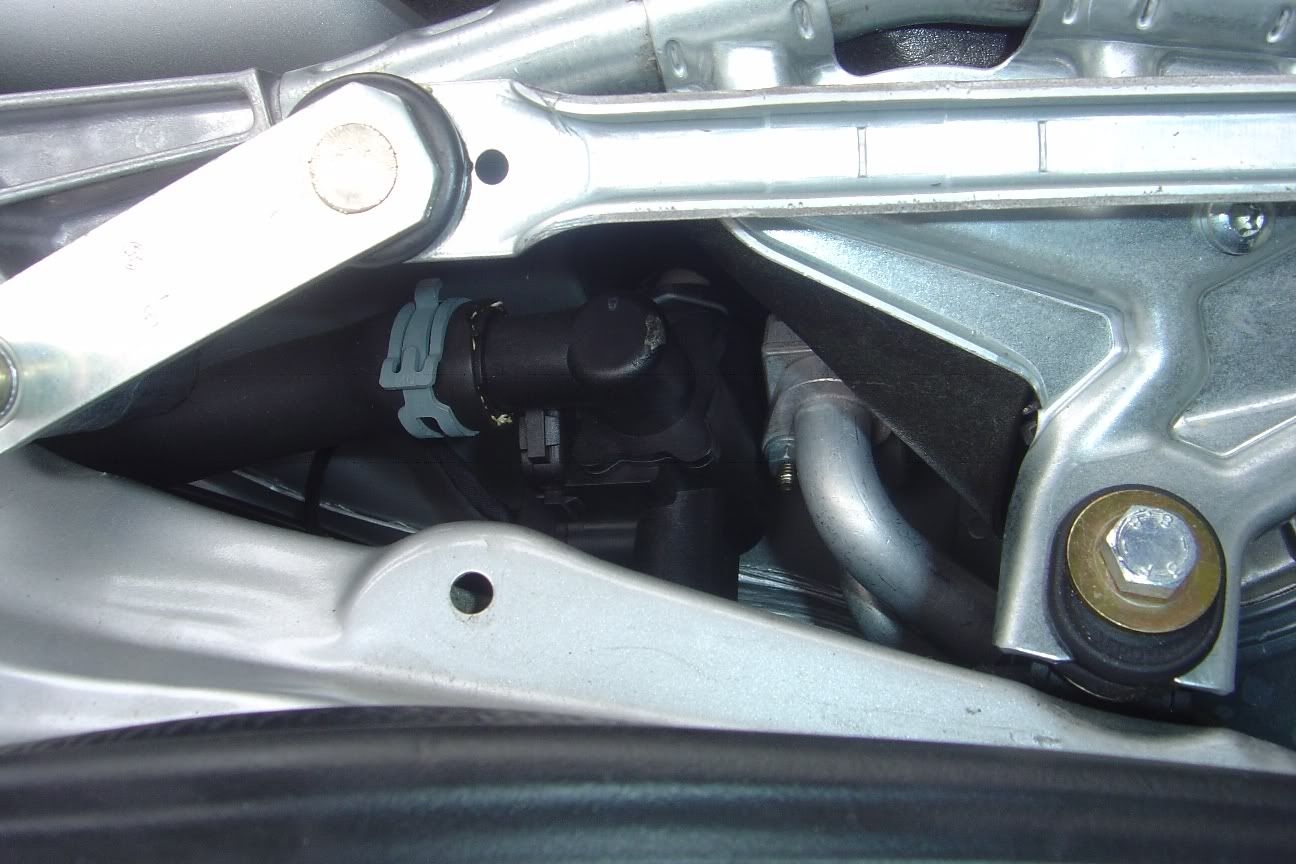
The valve has a total of 4 openings, 3 of which have a built in clip/lock and there is one socket for an electrical connector. In order to install or remove the tube/hose, you’ll need to unlock these locks by pulling on the clip outward.
Clips in locked position

Clips in unlocked position

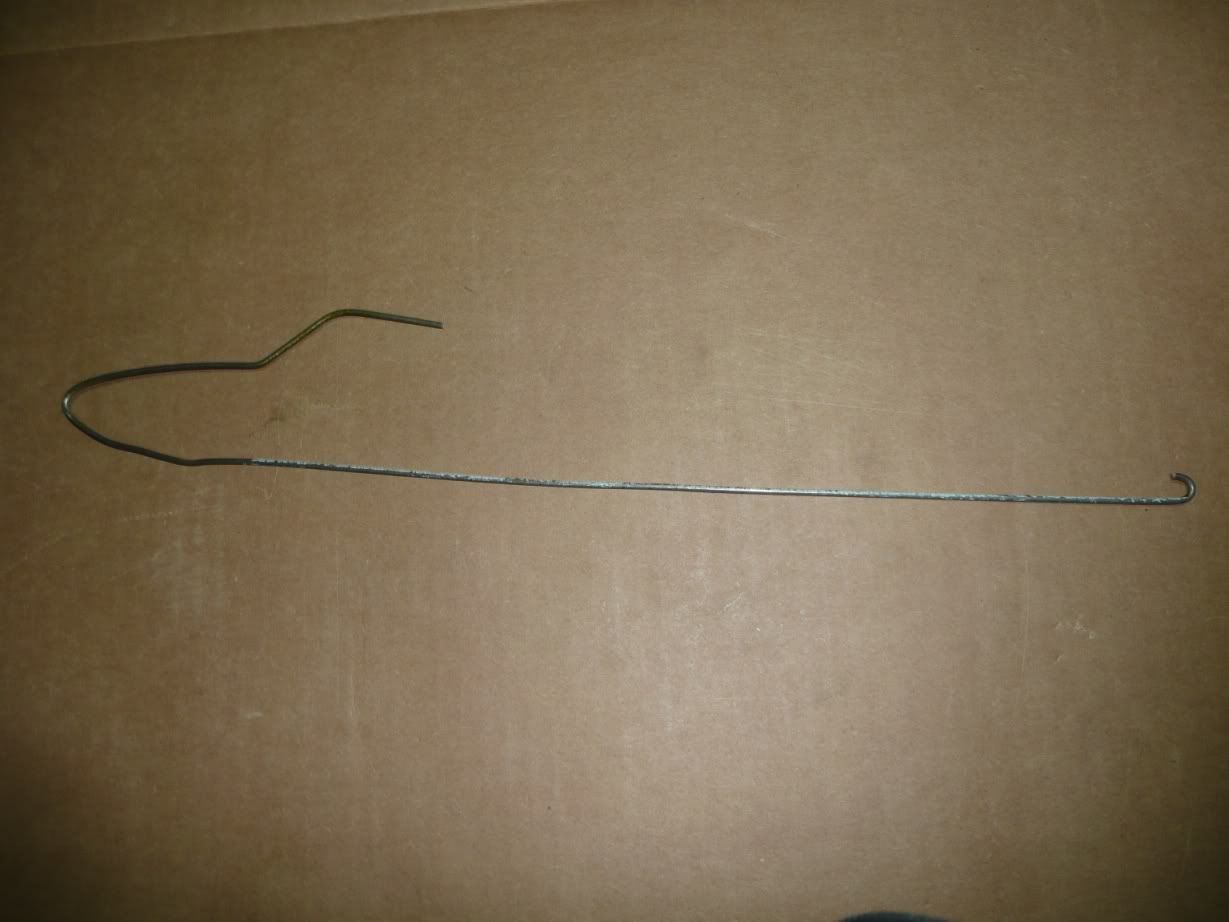
Since the valve is located in an extremely tight area, this is where a wire coat hanger will come in handy. Cut up a hanger then at the end, make a small hook. You’ll use this to unlock the clips. One of the locking clips is accessible between the engine and partition.
Coat hanger
Unlock clip with coat hanger
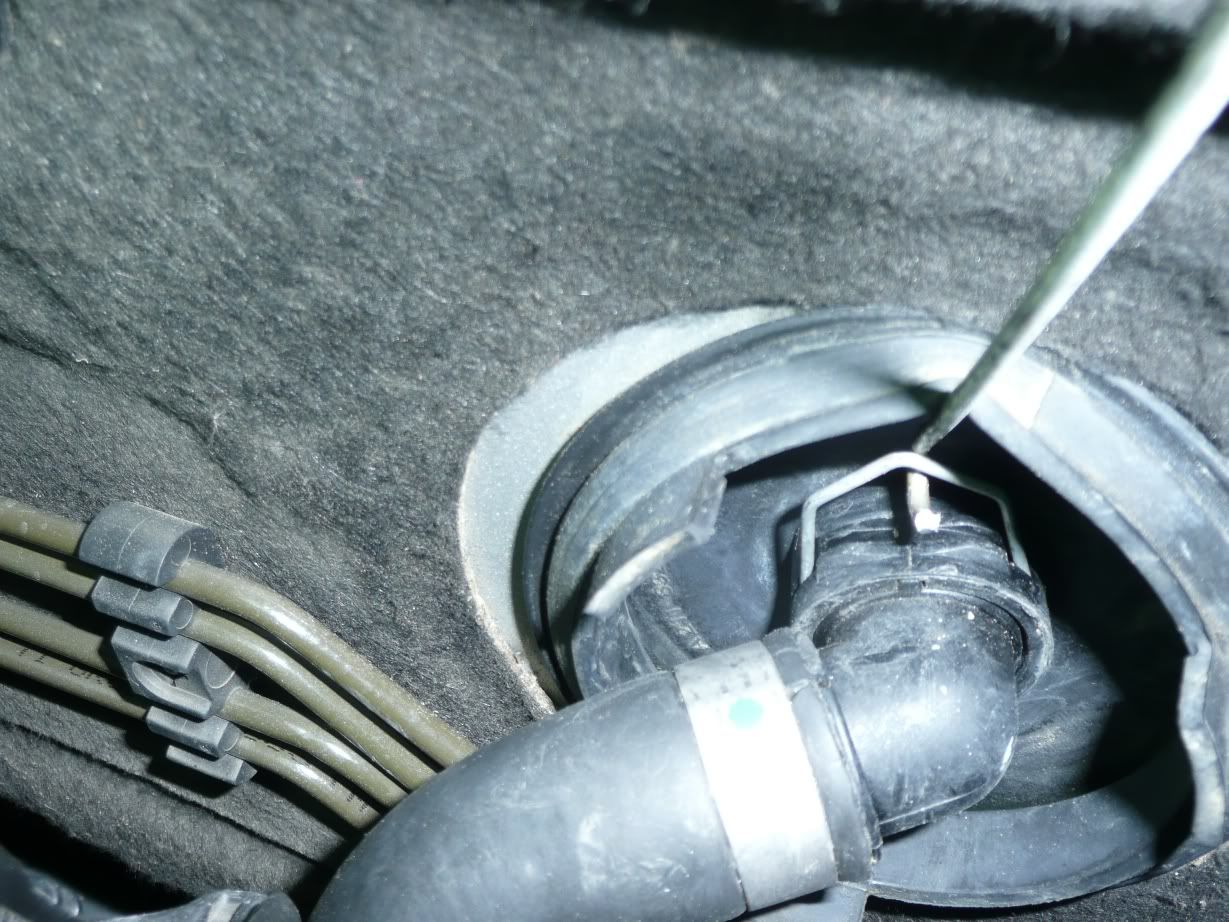
Hose removed: (small amount of coolant will leak out)

The 4th opening is connected to a hose that has a clamp. Use your angled needle nose pliers to remove this clamp and hose, then disconnect the electrical connector. The 2 locking clips are up against the firewall. From the driver’s side, use your coat hanger again to unlock the top clip. Now from the passenger’s side, use your coat hanger to unlock the bottom clip.

Now with everything disconnected, remove the valve body unit and install the new one in reverse order. Make sure you lock them clips! Reposition the wiper linkages back to their normal state and flip the foam padding back over the valve. Reinstall plastic trim, electronic module, weather-stripping and wiper arms. Now enjoy your a/c!
So here I go, on with another DIY.
Tools required:
Flatnose screwdriver
Needle nose pliers
An extended angle needle nose pliers
Ratchet
13MM socket
T25 Torx wrench or screwdriver
Wire coat hanger
Parts needed:
New changeover valve (part #A211 832 05 84). This is probably a revised valve w/ a new design since my faulty valve has the part #A211 832 00 84.
Here is what the changeover valve looks like. (old valve unit)
1st, remove the outer weather-stripping
2nd, you’ll need to remove both wiper arm assembly with a ratchet and a 13mm socket. Here are the 3 nuts you’ll need to remove.
Next remove this module on the driver’s side. I’m not sure what it exactly does, but you’ll need to unscrew it from the plastic trim panel. Using the T25 Torx screwdriver or wrench, remove the 3 screws and set the module aside. You don’t even need to disconnect it.
Now you’ll need to remove plastic trim panel that sits at the bottom of the windshield. It is secured down with 4 plastic clips. (they look like philip plastic screws). To remove these clips you gently slide a thin flathead screwdriver under the head of the clip and pry it up high enough so that you could use the needle nose pliers to pull on the shaft. Do not remove the shaft, just pull it out Ľ of an inch or less then remove the clip.
Location of plastic clips
Prying the shaft
Shaft extended out
Clip finally removed
At the bottom of the plastic trim panel is a big rubber hose that you’ll need to disconnect. On the passenger side, you’ll need to unhook the 2 electrical wires from the hanger. Now you could remove the plastic trim panel.
When you remove the plastic trim, you’ll see more wiper arm linkages as seen in the pic.
The changeover valve is covered with this thin foam padding. Just unfold it and tuck it under the wiper linkages. Next, you’ll need to reposition the linkages so you that you could access the valve. Gently push on the linkages until you have enough room. Now you’ll see the changover valve nested on the driver’s side firewall. If you have big hands like myself, you’ll be in a world of hate because it’s a tight squeeze!!
The valve has a total of 4 openings, 3 of which have a built in clip/lock and there is one socket for an electrical connector. In order to install or remove the tube/hose, you’ll need to unlock these locks by pulling on the clip outward.
Clips in locked position
Clips in unlocked position
Since the valve is located in an extremely tight area, this is where a wire coat hanger will come in handy. Cut up a hanger then at the end, make a small hook. You’ll use this to unlock the clips. One of the locking clips is accessible between the engine and partition.
Coat hanger
Unlock clip with coat hanger
Hose removed: (small amount of coolant will leak out)
The 4th opening is connected to a hose that has a clamp. Use your angled needle nose pliers to remove this clamp and hose, then disconnect the electrical connector. The 2 locking clips are up against the firewall. From the driver’s side, use your coat hanger again to unlock the top clip. Now from the passenger’s side, use your coat hanger to unlock the bottom clip.
Now with everything disconnected, remove the valve body unit and install the new one in reverse order. Make sure you lock them clips! Reposition the wiper linkages back to their normal state and flip the foam padding back over the valve. Reinstall plastic trim, electronic module, weather-stripping and wiper arms. Now enjoy your a/c!
while I'm sure this DIY is awesome...there are no pictures...cant really follow along especially if you are new, with no pictures...can some please help?
08-01-2014, 05:00 PM
#199
Super Moderator
You don't see the pictures? Your at work it looks like right? If so I assume you are using your work computer which could cause this try when you get home on your personal computer or try a different web browser. Side note don't worry I won't tell anyone lol but you should get me a job if you work for the company I think you do 
Last edited by samaritrey; 08-01-2014 at 05:02 PM.
08-04-2014, 05:10 PM
#200
Junior Member
Join Date: Jul 2012
Posts: 25
Likes: 0
Received 0 Likes
on
0 Posts
Mercedes E329 / 4 drs
Great information and especially the pictures. Great to be a member of MBW.
Thanks to all that responded. I can truly say that since I been a member of MBW I have rceived great info. and for that I have saved a lot $$. Hopefully I will be able to respond and offer info. that will assist other members. Thanks!
Manuel Ramirez
Thanks to all that responded. I can truly say that since I been a member of MBW I have rceived great info. and for that I have saved a lot $$. Hopefully I will be able to respond and offer info. that will assist other members. Thanks!
Manuel Ramirez


