When you click on links to various merchants on this site and make a purchase, this can result in this site earning a commission. Affiliate programs and affiliations include, but are not limited to, the eBay Partner Network.
Excellent post.
I have a W220 model and have seen many posts on this same subject. Most posts talk about the duo valve under the screen wipers and they replace that valve. I did the same, but the hot air in the rear AC continued the same. Then the Merc mechanic said the rear AC is controlled by a different duo valve located under the front right mudguard (I have a RHD car). Replacing that valve (much easier than the one under the wipers) resolved the problem permanently.
I thought that this should be mentioned here. I don't know if the W211 has the same system.
Thanks so much for taking the time to create this very helpful DIY. With your details and comments from others in the thread, I was able to tackle this job in about 1.5hrs start to finish! Excellent post! Thanks again!
first, thanks for all the info to-date ill add some tips
all my Cowl Grille Rivets (part# 123-990-05-92) broke so buy 4 for before starting the job
windshield wiper motor and assembly is a simple removal and gives you more room to work
reassembly sequence:
open metal clips on valve
attach big hose with the hard metal clip first (make sure clamp is facing up if you ever need to remove it again)
electric connector
two ports coming out of car interior
last the port inside the engine bay
i was not getting any heat in the rear (rather just engine baby temperature). in summer the A/C was not very cold, either.
here's a picture of mine (a2118320084):
as you can see, it *looks* to be in great shape, unlike the other poster's. i suspect the issue is unobservable and likely related to the solenoid's internals.
after having my friends swap it, heat was immediately restored and noticeable.
as the others said: it would be extremely beneficial to remove the wiper assembly. they seem easier to remove than the actual arms.
surprised 0084 lasted as long as it did: after sitting outside in two winters, i guess the inevitable happened.
The part was $42 with MB club discount. The dealer wanted $450 to do this job, so it's well worth the DIY.
Allow about 2-3 hours for this job. In another thread someone claims it only took 35 minutes, but I don't know how that's possible, even for a pro.
I have very small hands and it was very hard to reach things - if you have very large hands you may not be able to get this done by yourself.
--Open the hood to the fully open service position (push in the tab on the interior side of the hinge, one on each side of the car)
I had a very hard time prying the 4 black plastic rivets out, I ended up destroying them so I need to buy new ones (you can live without them for a few days).
The metal clips: pulling them with the coat hanger worked easily for one of them, but the other two I had to pry the end free with my finger to get it started which raised up one side a bit, them pull with the hanger.
The one facing towards the passenger side was not visible until I climbed up onto the car and stuck my face right down in the area.
After removing the first hose from the engine bay, fully remove the circle rubber grommet between the engine bay and the firewall area - this lets you reach in through the hole to maneuver the part.
The hose clamp is the hardest part - it takes a lot of force to fully open it, so needle nose pliers didn't work very well. Use a small locking pliers and grab it vertically from straight down. Do this after unclipping the 3 metal clips to the other hoses, as you can them move the part around to get it in position.
I moved the hose clamp back a few inches then removed the pliers - you need the space to reach in to pull the hose off. One technique is to hold the part in place by reaching through the circle hole.
I undid the electrical connector last as it was hard to get to otherwise.
When installing the new valve:
-electrical plug first
-large hose with hose clamp next (you need to be able to brace it against the driver's side of the car, against a tool handle etc).
-the two outlets towards the rear of the car next (leave the clips closed and just push them as mentioned about - it did take a lot of force to get them to click into place)
-reinstall rubber circular grommet
-engine bay hose
sometimes the changer don't come out too good sometimes you have to break them out if they've been in there for a while that's what I had to do with mine
just take a pair of vice grips and break it out
Last edited by Farell barner; 09-09-2022 at 05:02 PM.
QUOTE=W211 Ryda;2911552]Okay, last weekend was frickin hot in So-Cali reaching 90+ and that’s when I first started to experience extremely hot air blowing out from the rear vents (B-pillar and from center console). My front a/c vents were working fine, but the hot air being blown to the rear passenger area was unbearable. I remember seeing several threads of people experiencing the same problem and since my car is no longer under warranty, I decided to tackle the job myself. Thanks to Konigstiger, found the culprit to be with the changeover valve. https://mbworld.org/forums/showpost....49&postcount=2
So here I go, on with another DIY.
Tools required:
Flatnose screwdriver
Needle nose pliers
An extended angle needle nose pliers
Ratchet
13MM socket
T25 Torx wrench or screwdriver
Wire coat hanger
Parts needed:
New changeover valve (part #A211 832 05 84). This is probably a revised valve w/ a new design since my faulty valve has the part #A211 832 00 84.
2nd, you’ll need to remove both wiper arm assembly with a ratchet and a 13mm socket. Here are the 3 nuts you’ll need to remove. Attachment 385000 Attachment 385001
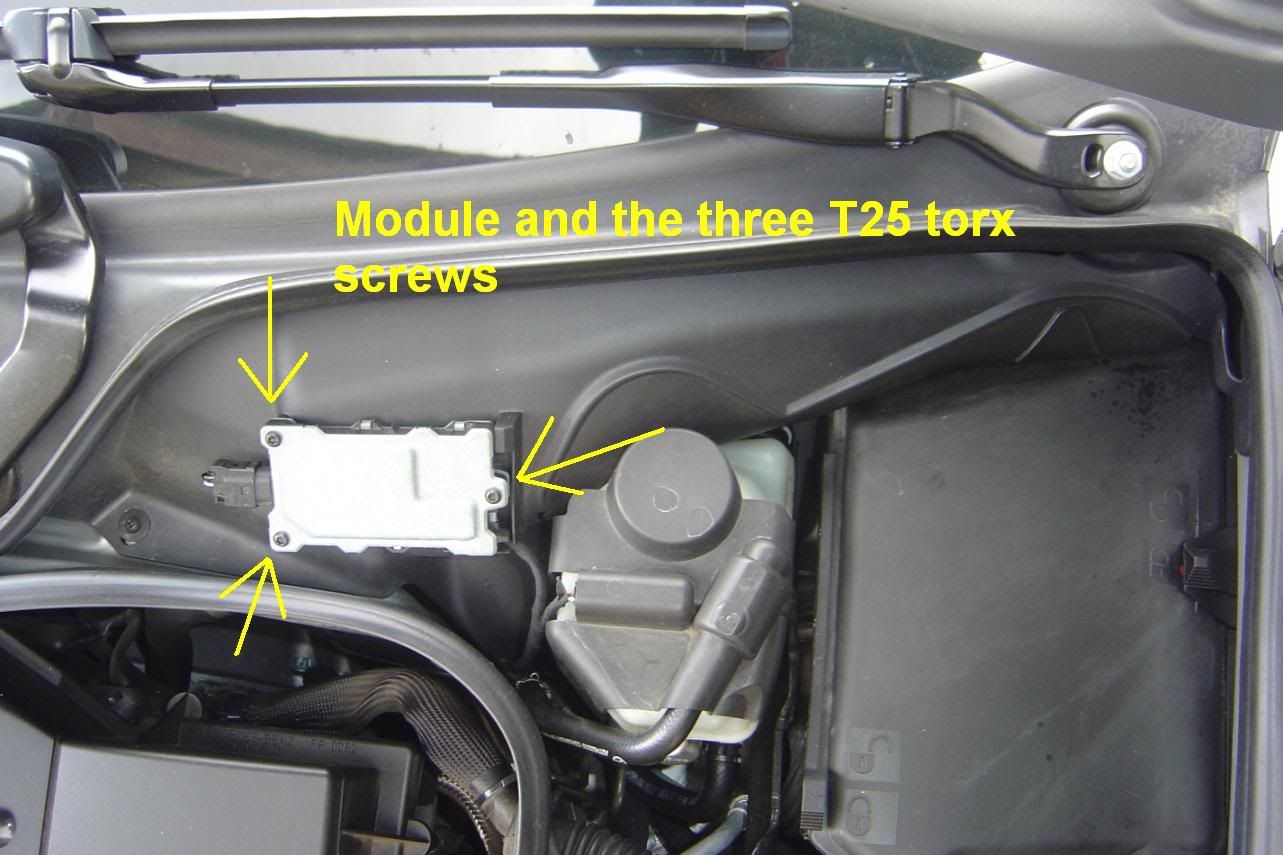
Next remove this module on the driver’s side. I’m not sure what it exactly does, but you’ll need to unscrew it from the plastic trim panel. Using the T25 Torx screwdriver or wrench, remove the 3 screws and set the module aside. You don’t even need to disconnect it.
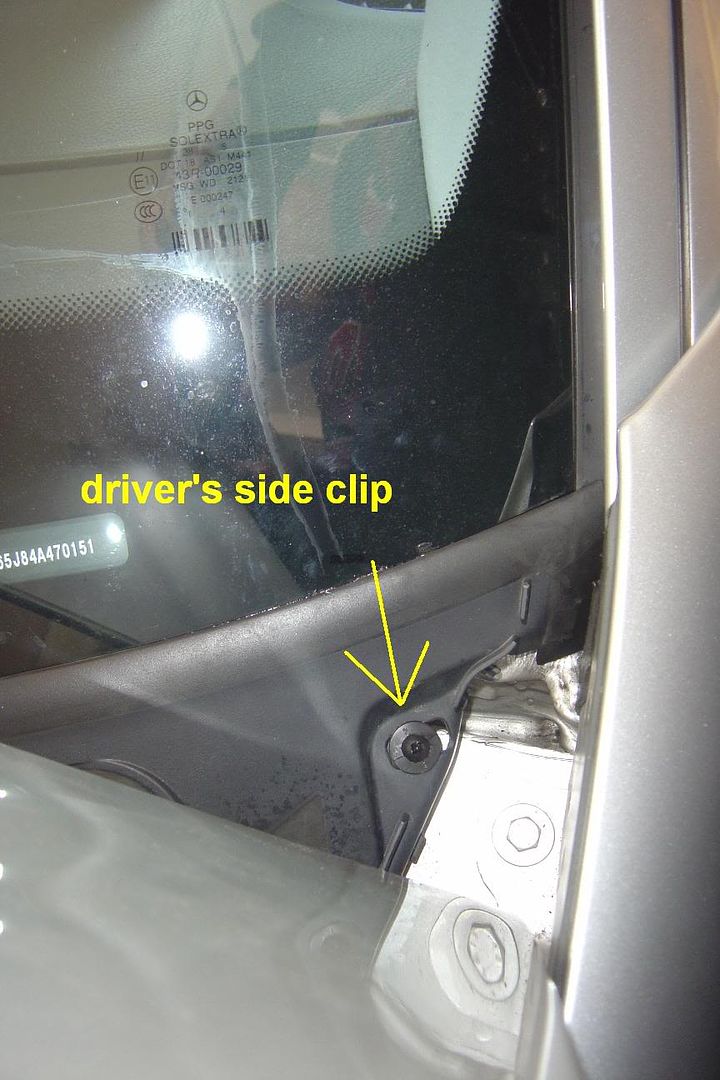
Now you’ll need to remove plastic trim panel that sits at the bottom of the windshield. It is secured down with 4 plastic clips. (they look like philip plastic screws). To remove these clips you gently slide a thin flathead screwdriver under the head of the clip and pry it up high enough so that you could use the needle nose pliers to pull on the shaft. Do not remove the shaft, just pull it out Ľ of an inch or less then remove the clip.
At the bottom of the plastic trim panel is a big rubber hose that you’ll need to disconnect. On the passenger side, you’ll need to unhook the 2 electrical wires from the hanger. Now you could remove the plastic trim panel.
When you remove the plastic trim, you’ll see more wiper arm linkages as seen in the pic. Attachment 385006
The changeover valve is covered with this thin foam padding. Just unfold it and tuck it under the wiper linkages. Next, you’ll need to reposition the linkages so you that you could access the valve. Gently push on the linkages until you have enough room. Now you’ll see the changover valve nested on the driver’s side firewall. If you have big hands like myself, you’ll be in a world of hate because it’s a tight squeeze!!
The valve has a total of 4 openings, 3 of which have a built in clip/lock and there is one socket for an electrical connector. In order to install or remove the tube/hose, you’ll need to unlock these locks by pulling on the clip outward.
Since the valve is located in an extremely tight area, this is where a wire coat hanger will come in handy. Cut up a hanger then at the end, make a small hook. You’ll use this to unlock the clips. One of the locking clips is accessible between the engine and partition.
Hose removed: (small amount of coolant will leak out) Attachment 385012
The 4th opening is connected to a hose that has a clamp. Use your angled needle nose pliers to remove this clamp and hose, then disconnect the electrical connector. The 2 locking clips are up against the firewall. From the driver’s side, use your coat hanger again to unlock the top clip. Now from the passenger’s side, use your coat hanger to unlock the bottom clip. Attachment 385013
Now with everything disconnected, remove the valve body unit and install the new one in reverse order. Make sure you lock them clips! Reposition the wiper linkages back to their normal state and flip the foam padding back over the valve. Reinstall plastic trim, electronic module, weather-stripping and wiper arms. Now enjoy your a/c![/QUOTE]
Thank you for this valuable resource I was able to bring my w211 to fully functional again!
all of the tips above are very helpful, especially the advice of buying those pesky plastic fasteners, they do break regardless of how much finesse you have in your skills.
a couple of feedback on the whole process.
1. when I remove those hoses connecting to the valve, a rather larger volume of coolant leaked out, it’s about 3-4 soaked rags worth (small towel fully soaked up). So it was rather messy but manageable.
2. the disconnection of the coolant line thru the engine shield (the one facing forward) was very tough. I would suggest to have the rubber seal rolled out towards the engine to increase the amount of room you have to work on that connection.
3. with #1, I had to top up my coolant so I suggest to have a bottle of spare coolant for fill up after the procedure. Also, I read that low coolant level can cause heat being switch off so it’s good to check levels before doubting whether the switch is functional.
thank you everyone for keeping my w211 on the road!
Okay, last weekend was frickin hot in So-Cali reaching 90+ and that’s when I first started to experience extremely hot air blowing out from the rear vents (B-pillar and from center console). My front a/c vents were working fine, but the hot air being blown to the rear passenger area was unbearable. I remember seeing several threads of people experiencing the same problem and since my car is no longer under warranty, I decided to tackle the job myself. Thanks to Konigstiger, found the culprit to be with the changeover valve. https://mbworld.org/forums/showpost....49&postcount=2
So here I go, on with another DIY.
Tools required:
Flatnose screwdriver
Needle nose pliers
An extended angle needle nose pliers
Ratchet
13MM socket
T25 Torx wrench or screwdriver
Wire coat hanger
Parts needed:
New changeover valve (part #A211 832 05 84). This is probably a revised valve w/ a new design since my faulty valve has the part #A211 832 00 84.
2nd, you’ll need to remove both wiper arm assembly with a ratchet and a 13mm socket. Here are the 3 nuts you’ll need to remove. Attachment 385000 Attachment 385001
Next remove this module on the driver’s side. I’m not sure what it exactly does, but you’ll need to unscrew it from the plastic trim panel. Using the T25 Torx screwdriver or wrench, remove the 3 screws and set the module aside. You don’t even need to disconnect it.
Now you’ll need to remove plastic trim panel that sits at the bottom of the windshield. It is secured down with 4 plastic clips. (they look like philip plastic screws). To remove these clips you gently slide a thin flathead screwdriver under the head of the clip and pry it up high enough so that you could use the needle nose pliers to pull on the shaft. Do not remove the shaft, just pull it out Ľ of an inch or less then remove the clip.
At the bottom of the plastic trim panel is a big rubber hose that you’ll need to disconnect. On the passenger side, you’ll need to unhook the 2 electrical wires from the hanger. Now you could remove the plastic trim panel.
When you remove the plastic trim, you’ll see more wiper arm linkages as seen in the pic. Attachment 385006
The changeover valve is covered with this thin foam padding. Just unfold it and tuck it under the wiper linkages. Next, you’ll need to reposition the linkages so you that you could access the valve. Gently push on the linkages until you have enough room. Now you’ll see the changover valve nested on the driver’s side firewall. If you have big hands like myself, you’ll be in a world of hate because it’s a tight squeeze!!
The valve has a total of 4 openings, 3 of which have a built in clip/lock and there is one socket for an electrical connector. In order to install or remove the tube/hose, you’ll need to unlock these locks by pulling on the clip outward.
Since the valve is located in an extremely tight area, this is where a wire coat hanger will come in handy. Cut up a hanger then at the end, make a small hook. You’ll use this to unlock the clips. One of the locking clips is accessible between the engine and partition.
Hose removed: (small amount of coolant will leak out) Attachment 385012
The 4th opening is connected to a hose that has a clamp. Use your angled needle nose pliers to remove this clamp and hose, then disconnect the electrical connector. The 2 locking clips are up against the firewall. From the driver’s side, use your coat hanger again to unlock the top clip. Now from the passenger’s side, use your coat hanger to unlock the bottom clip. Attachment 385013
Now with everything disconnected, remove the valve body unit and install the new one in reverse order. Make sure you lock them clips! Reposition the wiper linkages back to their normal state and flip the foam padding back over the valve. Reinstall plastic trim, electronic module, weather-stripping and wiper arms. Now enjoy your a/c!

 09-12-2019, 06:13 AM