


parking brake adjustment
Super Member


Joined: May 2004
Posts: 911
Likes: 1
From: Rhode Island
Debadged 6-Speed '05 C320 Sports Coupe
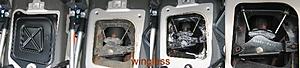
My parking brake would never fully retract when released. I would need to pull both the pedal and the release to extinguish the indicator.
The cover was removed, the cable lubed and cleaned. The system works fine now.
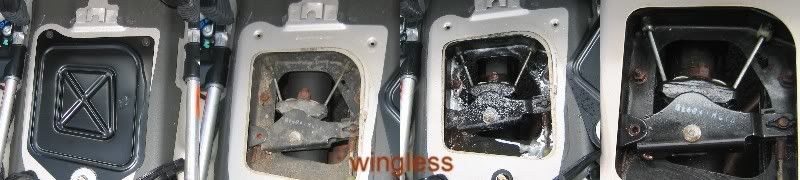
The merged image shows the progression of the service. Don't forget to clean the cover seal. I used WD-40 and towel paper to clean the gasket and all the internal surfaces.
No adjustment was required, just cleaning and lubing.
The cover was removed, the cable lubed and cleaned. The system works fine now.
The merged image shows the progression of the service. Don't forget to clean the cover seal. I used WD-40 and towel paper to clean the gasket and all the internal surfaces.
No adjustment was required, just cleaning and lubing.

MBWorld Fanatic!


Joined: Jun 2002
Posts: 7,273
Likes: 172
From: So. Oregon Coast
C230 Sport Coup + 2006 W164 ML350 + 99 Ford Escort RIP
I did this the other day, and now my parking brake works perfecto!
Didn't lube it though, just tightened till all the slack was out.
Now when I put the P brake on, it actually holds the car.
I'm trying to get in the habit of putting on the P brake, shifting to neutral,
letting off the brake, then putting in park, so I don't put pressure on the transmission.
Wow, you have some rust in there...
mine was fairly clean.
Took advantage of having that piece of felt out to clean the whole area.
Only tool needed was a crescent wrench.
My parking brake would never fully retract when released. I would need to pull both the pedal and the release to extinguish the indicator.
The cover was removed, the cable lubed and cleaned. The system works fine now.
The merged image shows the progression of the service. Don't forget to clean the cover seal. I used WD-40 and towel paper to clean the gasket and all the internal surfaces.
No adjustment was required, just cleaning and lubing.
Super Member
Joined: May 2004
Posts: 911
Likes: 1
From: Rhode Island
Debadged 6-Speed '05 C320 Sports Coupe
I did this the other day, and now my parking brake works perfecto!
Didn't lube it though, just tightened till all the slack was out.
Now when I put the P brake on, it actually holds the car.
I'm trying to get in the habit of putting on the P brake, shifting to neutral,
letting off the brake, then putting in park, so I don't put pressure on the transmission.
Didn't lube it though, just tightened till all the slack was out.
Now when I put the P brake on, it actually holds the car.
I'm trying to get in the habit of putting on the P brake, shifting to neutral,
letting off the brake, then putting in park, so I don't put pressure on the transmission.
The New England roadways undergo an annual ritual, designed to refresh memories of summers at the beach, even though snow is the order of the day. This is accomplished by covering the roadways with more sand and salt than snow. The downside is the corrosive effect this has on vehicles.
MBWorld Fanatic!
Joined: Jun 2002
Posts: 7,273
Likes: 172
From: So. Oregon Coast
C230 Sport Coup + 2006 W164 ML350 + 99 Ford Escort RIP
'another reason to live in california'.
I never want to see a snow shovel again as long as I live.

Tahoe included. Give me sun, sand, mountains, scantily clad women,
and fresh lime margies. Oh wait I had ALL those things, just today.

Oh yeh, and cars that don't rust in a year of ownership from salt and sand.
Last edited by C230 Sport Coup; Apr 16, 2007 at 01:02 AM.
MBWorld Fanatic!
Joined: Jun 2002
Posts: 7,273
Likes: 172
From: So. Oregon Coast
C230 Sport Coup + 2006 W164 ML350 + 99 Ford Escort RIP
MBWorld Fanatic!
Joined: May 2002
Posts: 2,916
Likes: 1
From: The blue white rock, third out.
2002 C230 Coupe(M111)
Sorry. Not been around much. Too much prep work for a business trip to Deutscheland.
Yeah, aint that parking brake a piece of crap? Mine made four trips to the dealer for that thing. Playing the what loaner will I get this time game was kinda fun, and since I have several vehicles I would usually let stuff sit until cooler weather, and drive the dealer's car in the sand and salt season.
Sounds like you got some great advice here! I never even knew about the underseat access panel. Cool.
Thread Starter
Senior Member
Joined: Mar 2006
Posts: 274
Likes: 0
From: rochester, MI
2002 C230 K, 6 speed
Sorry. Not been around much. Too much prep work for a business trip to Deutscheland.
Yeah, aint that parking brake a piece of crap? Mine made four trips to the dealer for that thing. Playing the what loaner will I get this time game was kinda fun, and since I have several vehicles I would usually let stuff sit until cooler weather, and drive the dealer's car in the sand and salt season.
Sounds like you got some great advice here! I never even knew about the underseat access panel. Cool.
Yeah, aint that parking brake a piece of crap? Mine made four trips to the dealer for that thing. Playing the what loaner will I get this time game was kinda fun, and since I have several vehicles I would usually let stuff sit until cooler weather, and drive the dealer's car in the sand and salt season.
Sounds like you got some great advice here! I never even knew about the underseat access panel. Cool.
MB World Stories
The Best of Mercedes & AMG

Dubai Tuner Gives the Mercedes G-Class An Entirely New Look
Verdad Gallardo
Six Gift Ideas Your AMG Loving Dad or Grad Will Cherish

7 Craziest Things AMG Gas Ever Built
Verdad Gallardo
New Electric Mercedes-AMG GT 4-Door Coupe Unveiled: 10 Things You Need to Know
Verdad Gallardo
6 Mercedes Models That Did NOT Age Well (But Are Somehow Still Cool)
Verdad Gallardo
Manual Mercedes? 6 Times Sindelfingen Let Drivers Have All The Fun
Verdad Gallardo
Mercedes SLR McLaren 722 S Is Extremely Rare Example Modified by McLaren
Verdad Gallardo
8 Classic Boxy Mercedes Designs That Have Aged Like Fine Wine
Verdad Gallardo
Flawlessly Restored Mercedes 190E Evo II Heads to Auction
Verdad Gallardo
Senior Member
Joined: Mar 2003
Posts: 350
Likes: 0
From: Stamford, CT
2003 C230
OK, I did the lube today. It took about 5 minutes
Once I fugured what size the bolts were .
Still, everything was clean inside. I used WD-40 to wipe it clean and then put some lithium grease in there. But, I couldn't figure out how to make the thing tighter. So, even though it's working good I have to push the pedal all the way to to fully engage the brake. How do I tighten it?
.Still, everything was clean inside. I used WD-40 to wipe it clean and then put some lithium grease in there. But, I couldn't figure out how to make the thing tighter. So, even though it's working good I have to push the pedal all the way to to fully engage the brake. How do I tighten it?
Thread Starter
Senior Member
Joined: Mar 2006
Posts: 274
Likes: 0
From: rochester, MI
2002 C230 K, 6 speed
Once I fugured what size the bolts were .
Still, everything was clean inside. I used WD-40 to wipe it clean and then put some lithium grease in there. But, I couldn't figure out how to make the thing tighter. So, even though it's working good I have to push the pedal all the way to to fully engage the brake. How do I tighten it?
.Still, everything was clean inside. I used WD-40 to wipe it clean and then put some lithium grease in there. But, I couldn't figure out how to make the thing tighter. So, even though it's working good I have to push the pedal all the way to to fully engage the brake. How do I tighten it?
Senior Member
Joined: May 2008
Posts: 363
Likes: 1
From: San Francisco
Sold - CLK500
i just performed this diy-fix on my clk. Was pretty straight forward, the only thing that took me a while was putting the rear leather piece that covers the seatbelts. The clips holding it in are a little tricky to get back into place.
Now my parking brake releases perfectly and i dont have to keep yanking on it to get the brake light to switch off!
After speaking with a friend of mine who is a mb tech he informed me that the parking brake automatically tightents itselft there i dont think its a good idea to start tighening up the slack from this end. Apparently the slack needs to be adjusted in the foot mechanism. so leave that one to the pro's
That being said if your parking brake it getting stuck! its an easy fix with some WD40!
Mike
Senior Member
Joined: May 2008
Posts: 363
Likes: 1
From: San Francisco
Sold - CLK500
My parking brake would never fully retract when released. I would need to pull both the pedal and the release to extinguish the indicator.
The cover was removed, the cable lubed and cleaned. The system works fine now.
The merged image shows the progression of the service. Don't forget to clean the cover seal. I used WD-40 and towel paper to clean the gasket and all the internal surfaces.
No adjustment was required, just cleaning and lubing.
The cover was removed, the cable lubed and cleaned. The system works fine now.
The merged image shows the progression of the service. Don't forget to clean the cover seal. I used WD-40 and towel paper to clean the gasket and all the internal surfaces.
No adjustment was required, just cleaning and lubing.
I didnt realease how little sound proofing there is between the seats and the access hole. Im going to throw down some dynamat to quieten down my exhaust.

Junior Member
Joined: Feb 2011
Posts: 68
Likes: 0
c240
front left wheel binds
Ok I thought I have a parking brake issue until I read the front wheels are not connected to the parking brake.
My problem is I noticed, with car raised on jack, while turning by han, the front left wheel does not turn as freely as the right front wheel.
Thr right wheel turns about 25 times before coming to a stop, while the left (driver side) only turns about 5 turns and stop.
Are my brake pads binding? Can I adjust the brakes so the wheel turns ok?
MBWorld Fanatic!
Joined: Dec 2006
Posts: 1,105
Likes: 11
From: Toronto, Canada
2019 C300 Wagon; '75 Triumph TR6; previous: 2004 C230 6spd sold after 17 years of driving
Some things are over-engineered and other are severely under-engineered. This is the latter and not sure why it is open to the elements from below and thrown up by the spinning drive shaft. This has caused me lots of problems especially in a winter environment with lots of salt causing corrosion of the of the arm and pivot points. I have had to free it, lube it and service every second year
This item should be sealed off or made with non rusting steel
A very stupid design, the engineer responsible should be shot
This item should be sealed off or made with non rusting steel
A very stupid design, the engineer responsible should be shot
Super Moderator

Joined: Jun 2008
Posts: 19,942
Likes: 192
From: Llandudno, Cape Town, South Africa
late 2009 CLK 350 Coupe Elegance, '65 Jaguar S Type wires
Ok I thought I have a parking brake issue until I read the front wheels are not connected to the parking brake.
My problem is I noticed, with car raised on jack, while turning by han, the front left wheel does not turn as freely as the right front wheel.
Thr right wheel turns about 25 times before coming to a stop, while the left (driver side) only turns about 5 turns and stop.
Are my brake pads binding? Can I adjust the brakes so the wheel turns ok?
My problem is I noticed, with car raised on jack, while turning by han, the front left wheel does not turn as freely as the right front wheel.
Thr right wheel turns about 25 times before coming to a stop, while the left (driver side) only turns about 5 turns and stop.
Are my brake pads binding? Can I adjust the brakes so the wheel turns ok?
Newbie
Joined: May 2011
Posts: 9
Likes: 0
C200K coupe 2003
Hi,
This is my first post here and its already a thank you for you guys!
I have been having the parking brake problem where I have to flick the pedal up with my foot as the light won't always go off, I sometimes have to use my hand to move it if I'm wearing the wrong shoes though!
Anyway, now I have discovered that the bit I am looking for is located under the rear seat, can anyone enlighten me as to how I get under there???
I don't actually get in the back of it very often and have no idea how to lift the rear seats (C200K coupe)

MBWorld Fanatic!
Joined: Mar 2004
Posts: 1,175
Likes: 24
From: Boston, MA
'14 ML350, '13 C220 CDI, '07 C280, '98 ML320
Look at the front face of the rear seat. You will see 4 bolts with plastic caps. Remove those caps, remove the bolts, and just lift up the seat.

Senior Member
Joined: Dec 2005
Posts: 258
Likes: 1
From: redondo beach, ca
2005 C230 SS
old thread but close to what im looking for! I found the adjustment behind the rear seat and was unsure how to adjust. i moved that nut either clockwise and counter and didnt feel a difference. but my biggest problem is the release lever near the steering wheel. it is just extremely loose. it doeskin 'pop' back like it once did. i tried seeing what made it hold etc by removing the fuse box near the steering wheel but there doesn't seem to be an adjustment. any assistance would be greatly appreciated!

Newbie
Joined: May 2011
Posts: 3
Likes: 0
380sl, 500sl euro, C240, 1952 Bentley
I bought a 2003 C240, 139K miles. The emergency foot brake could always be floored, so I knew somat was wrong. After a few months, I tackled it. I took off the passenger side rear wheel and brake disc, held in place with one star screw. SURPRISE, no emergency brake shoes. Completely devoid of any parking brake parts. Drivers side parking shoes were OK, parking shoes were hardly worn. (Brake pads were good).
Amazon had the emergency brake shoes, Rock Auto the springs. The adjusting star wheel assembly (at the top) and the spreader bracket that spread the shoes (at the bottom) and its stubby connecting pin to the cable clevis, was from MB dealership. (>$20). Lubed all parts with wheel grease.
Connected the cable to the spreader bracket. I assembled the smaller spring and the star wheel assembly first (3 parts)with the star wheel closer to the car front ( on both the left and right brakes), so the shoes can be expanded over the wheel flange hub. The smaller (upper) spring is assembled so that it is on the inside of the shoes with the spring hooks facing the car outer. Shoe retaining springs added next, using needle nose pliers to compress and give the spring a quarter turn. These springs hold the shoes in place against the back plate. So far so good. Connecting the larger and lower shoe spring was the most difficult PITA. Glad my mother was not listening. There is probably a trick or tool to make connecting that spring easier. It is assembled on the exterior of the shoes with its hooks facing inward. (Maybe I should have added the star wheel assembly last?). I replaced the brake disc and discovered NO improvement, foot brake pedal still floored. OH dear dear me!!
Removed the rear seat, held in place with 4 nuts below the rear seat front surface. Remove 4 plastic covers to access the nuts. Seat is then easily remove by pulling it forwards and exposing an insulation pad. Beneath the insulation pad there is a central metal cover about 8� x 8�. Remove it to expose brake cable connections. The passenger brake cable was disconnected. (In retrospect I think that made it easier to manipulate and attach the cable clevis to the spreader bracket).
The parking brake cables attach to a floating fulcrum lever via a keyhole shaped hole on the rear facing surface of the fulcrum lever.
How to adjust: Release the foot brake and place car in neutral.
First, the shoes can be adjusted with a flat bladed screw driver thru the holes in the wheel hub, or if just adjusting, thru a wheel bolt hole, to rotate the star wheel. Which way does the star wheel turn to expand the shoes??
Passenger side (US cars), the star adjusting wheel is at 11 o'clock and shoes are expanded by moving a flat bladed screw driver from a 12 o'clock to a 6 o'clock position to rotate the star wheel.
On the drivers side, the star wheel is at 1 o'clock and is expanded by moving the flat screw driver from a 6 o'clock to a 12 o'clock position.
Expand the shoes to where you cannot turn the disc, then back off until disc does not drag.
Secondly, adjust the central nut on the stud that protrudes thru the floating fulcrum lever in the brake mechanism beneath the rear seat, to remove slack in the cables. Next, apply the foot brake to check it out.
BINGO. Time for a beer.
NOTE!! I elected to forgo replacing the drivers side shoes as they were in good condition and I had had enough with that lower spring connection. Anyone want a new set of parking brake shoes and springs for one wheel??
Total cost less than $70.
Amazon had the emergency brake shoes, Rock Auto the springs. The adjusting star wheel assembly (at the top) and the spreader bracket that spread the shoes (at the bottom) and its stubby connecting pin to the cable clevis, was from MB dealership. (>$20). Lubed all parts with wheel grease.
Connected the cable to the spreader bracket. I assembled the smaller spring and the star wheel assembly first (3 parts)with the star wheel closer to the car front ( on both the left and right brakes), so the shoes can be expanded over the wheel flange hub. The smaller (upper) spring is assembled so that it is on the inside of the shoes with the spring hooks facing the car outer. Shoe retaining springs added next, using needle nose pliers to compress and give the spring a quarter turn. These springs hold the shoes in place against the back plate. So far so good. Connecting the larger and lower shoe spring was the most difficult PITA. Glad my mother was not listening. There is probably a trick or tool to make connecting that spring easier. It is assembled on the exterior of the shoes with its hooks facing inward. (Maybe I should have added the star wheel assembly last?). I replaced the brake disc and discovered NO improvement, foot brake pedal still floored. OH dear dear me!!
Removed the rear seat, held in place with 4 nuts below the rear seat front surface. Remove 4 plastic covers to access the nuts. Seat is then easily remove by pulling it forwards and exposing an insulation pad. Beneath the insulation pad there is a central metal cover about 8� x 8�. Remove it to expose brake cable connections. The passenger brake cable was disconnected. (In retrospect I think that made it easier to manipulate and attach the cable clevis to the spreader bracket).
The parking brake cables attach to a floating fulcrum lever via a keyhole shaped hole on the rear facing surface of the fulcrum lever.
How to adjust: Release the foot brake and place car in neutral.
First, the shoes can be adjusted with a flat bladed screw driver thru the holes in the wheel hub, or if just adjusting, thru a wheel bolt hole, to rotate the star wheel. Which way does the star wheel turn to expand the shoes??
Passenger side (US cars), the star adjusting wheel is at 11 o'clock and shoes are expanded by moving a flat bladed screw driver from a 12 o'clock to a 6 o'clock position to rotate the star wheel.
On the drivers side, the star wheel is at 1 o'clock and is expanded by moving the flat screw driver from a 6 o'clock to a 12 o'clock position.
Expand the shoes to where you cannot turn the disc, then back off until disc does not drag.
Secondly, adjust the central nut on the stud that protrudes thru the floating fulcrum lever in the brake mechanism beneath the rear seat, to remove slack in the cables. Next, apply the foot brake to check it out.
BINGO
. Time for a beer. NOTE!! I elected to forgo replacing the drivers side shoes as they were in good condition and I had had enough with that lower spring connection. Anyone want a new set of parking brake shoes and springs for one wheel??
Total cost less than $70.

Member
Joined: Aug 2014
Posts: 131
Likes: 1
From: Wichita, KS
2002 C230 Coupe
Again, thanks to the forum
Parking brake was inoperative on my recent purchase -- pedal goes straight to the floor with no resistance. Found the cable disconnected at the pedal. But no way could I pull the cable up enough to hook it back up again.
By backing off that adjustment under the rear seat I got enough slack to reconnect the pedal. Counted turns as I loosened the adjuster and tightened it the same. Pedal now meets resistance at half stroke and I can check another item off the list...


