


HOW TO: ** Wood steering wheel upgrade w/pics **
Thread Starter
MBWorld Fanatic!
Joined: Apr 2006
Posts: 8,137
Likes: 26
From: Maryland
Eurocharged 2004 E500, Eurocharged ECU/TCU 2005 SL600, 2010 Caddy SwaggerWagon
HOW TO: ** Wood steering wheel upgrade w/pics **
Since the original how to thread lost it pictures, I decided to do another one since I upgraded mine over the weekend. I did not disconnect the battery as the other thread stated. I just placed the key out of range and let the electronics discharge for 30 minutes before attempting.
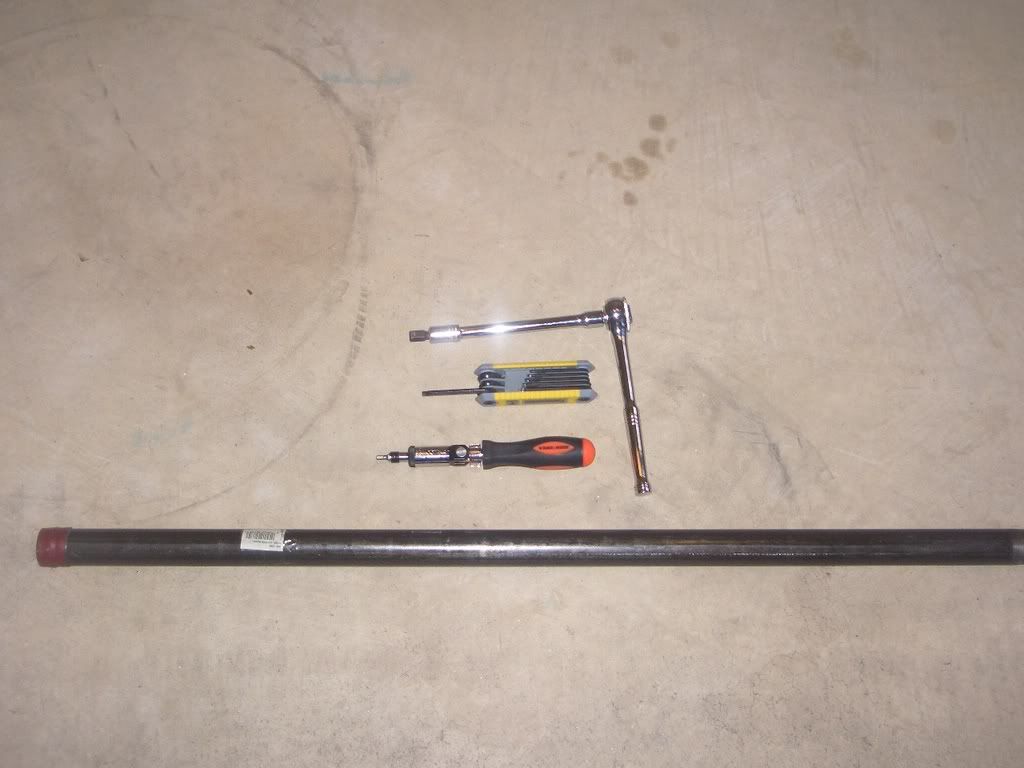
Here's what you need and how to do it in 15 minutes.
1. Switchblade style torx tool containing a #27 torx bit.
2. #10 hex socket
3. Ratchet
4. 3ft piece of pipe or breaker bar
5. 5/32 hex tool and driver
6. Small screwdriver
Use the 5/32 hex tool and driver to take apart the switchblade torx tool. You will then use only the naked #27 bit. You will see 2 holes in the rear of the steering wheel which hold the entire horn/airbag assembly in place.
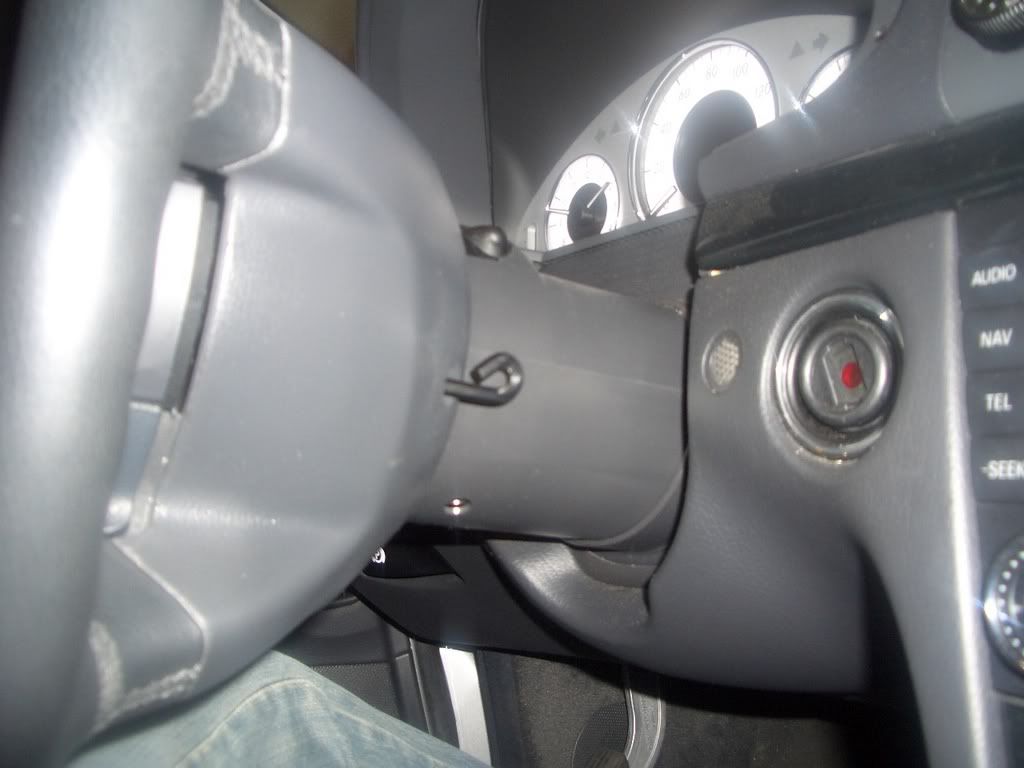
Use a small screwdriver, which I forgot to take a picture of, as a lever to turn the #27 torx bit. Remember counter clockwise will loosen it. It's reversed since the bolt is facing you.
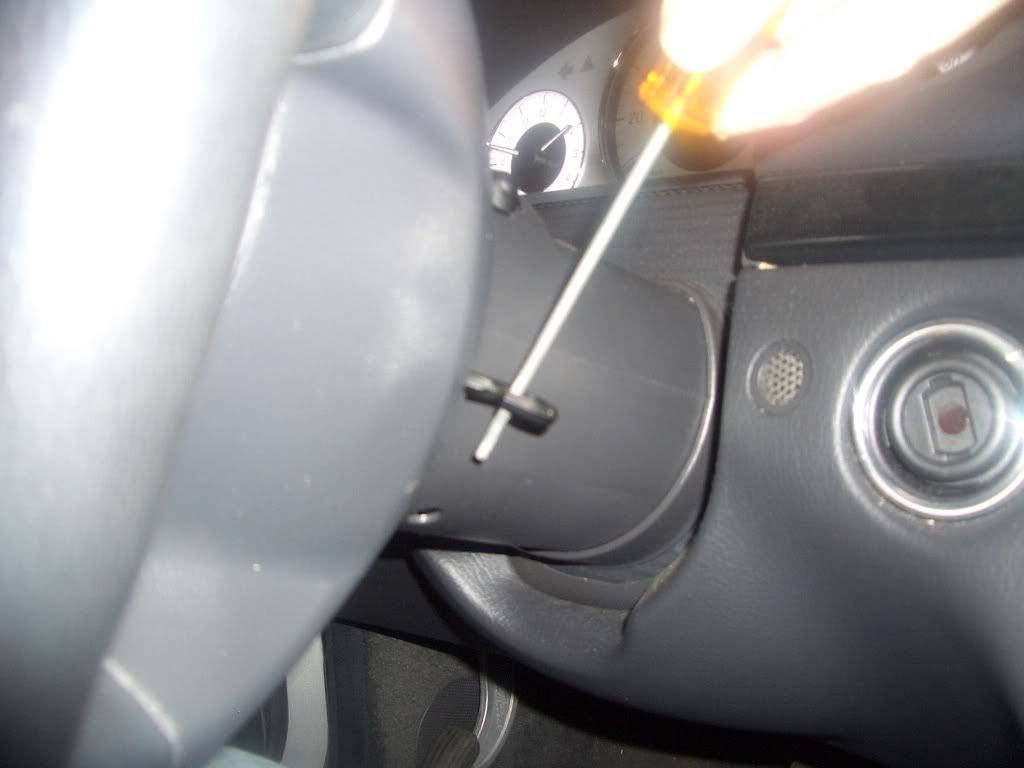
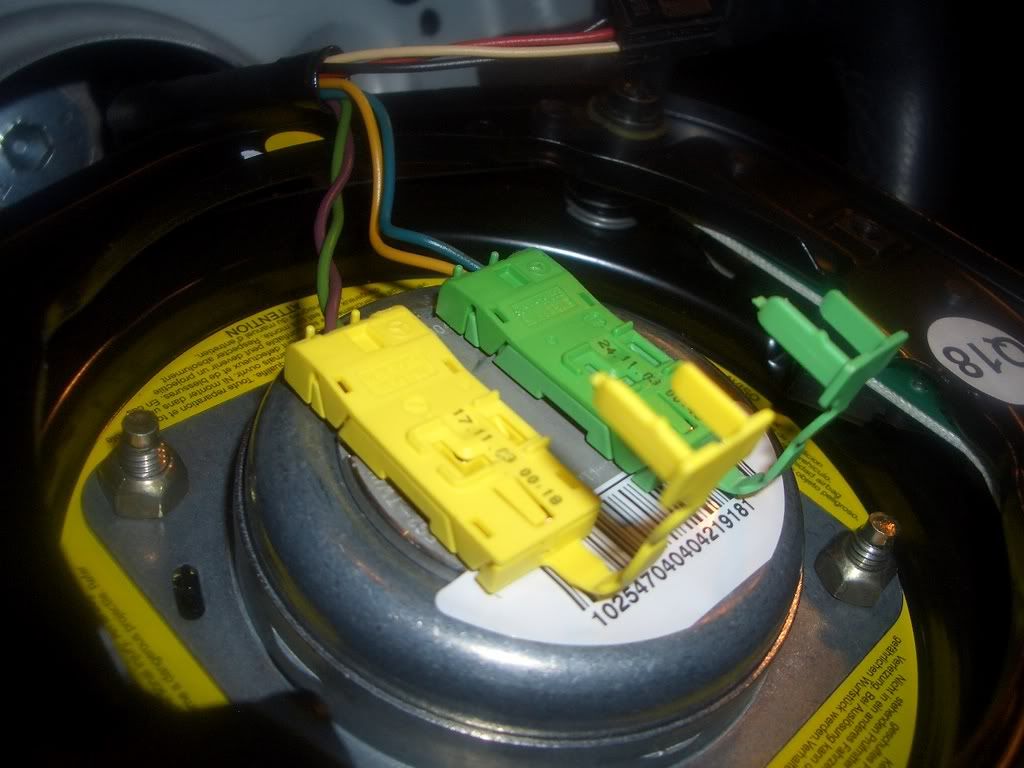
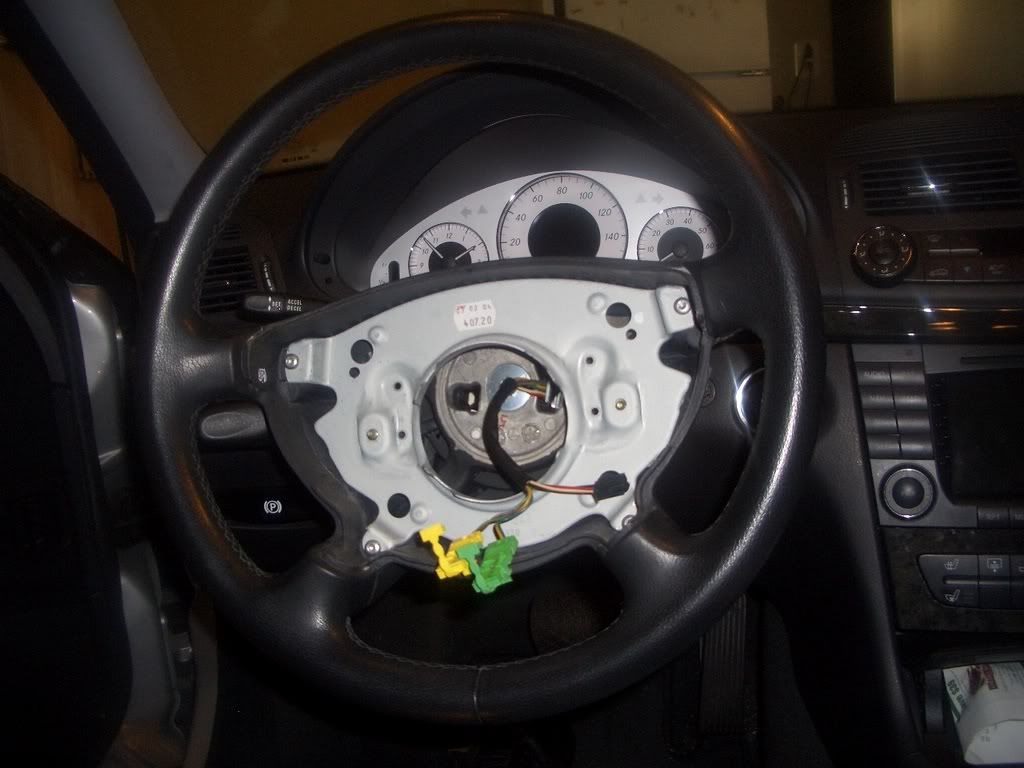
Remove both bolts and the airbag will come off easily. It will be held in place by 3 connectors.
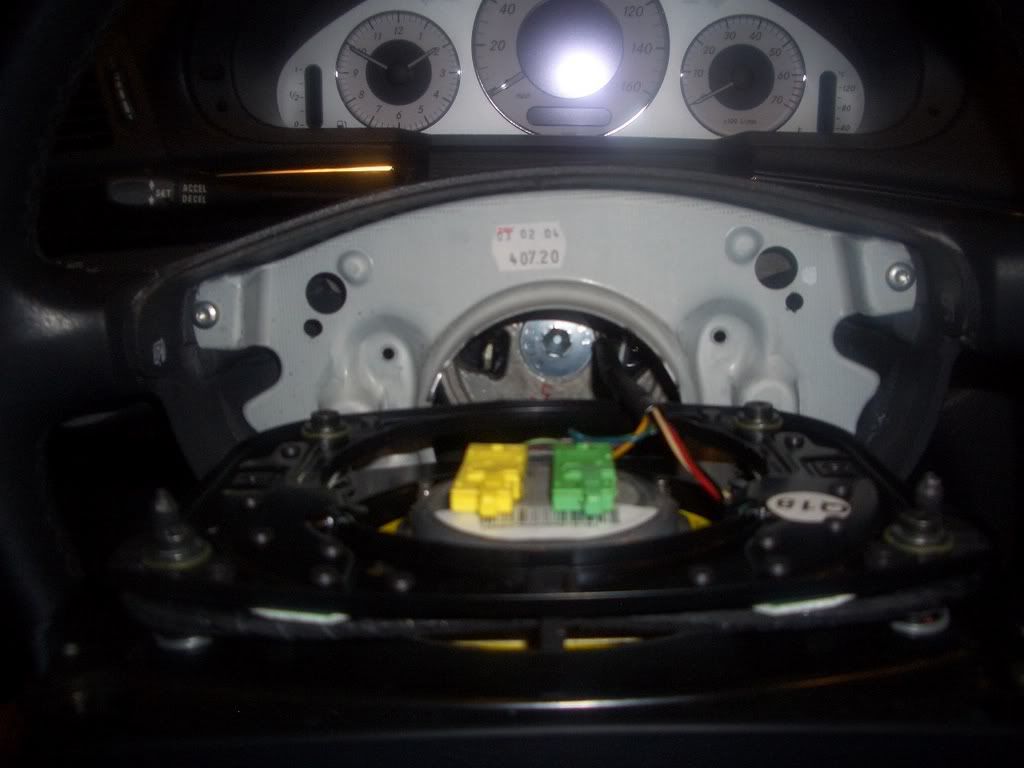
Remove the black connector first. Then pop-up the tabs on the green and yellow connectors. Pull the yellow and green connectors straight up and off of the airbag.
You will be left with this:
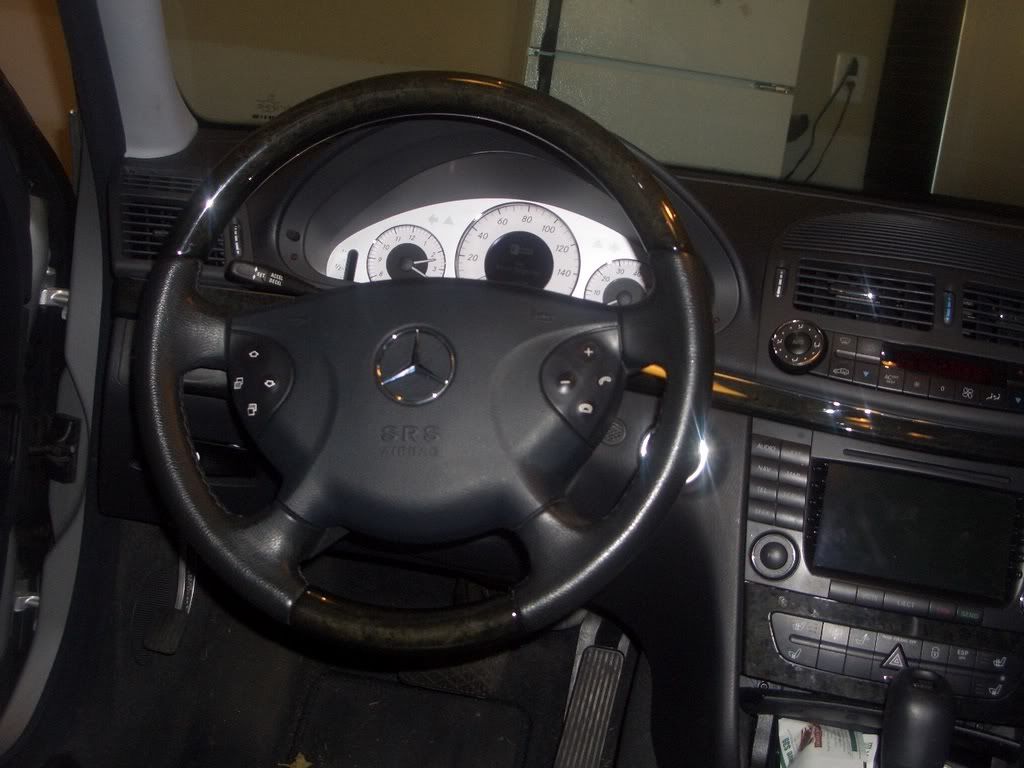
Using the #10 torx socket and ratchet, loosen the center bolt in the steering wheel. This should be done with two people as the bolt is on there super tight and the steering wheel lock doesn't feel sturdy enough to resist the amount of force needed to break loose the bolt. Have your helper sit in the driver seat and hold the wheel as if he were driving. You, standing to his left, place the pipe over the ratchet handle and loosen the bolt. After the bolt is out, the steering wheel pops straight off with little effort.
Replace with new wheel and install in reverse order.
Here's what you get:
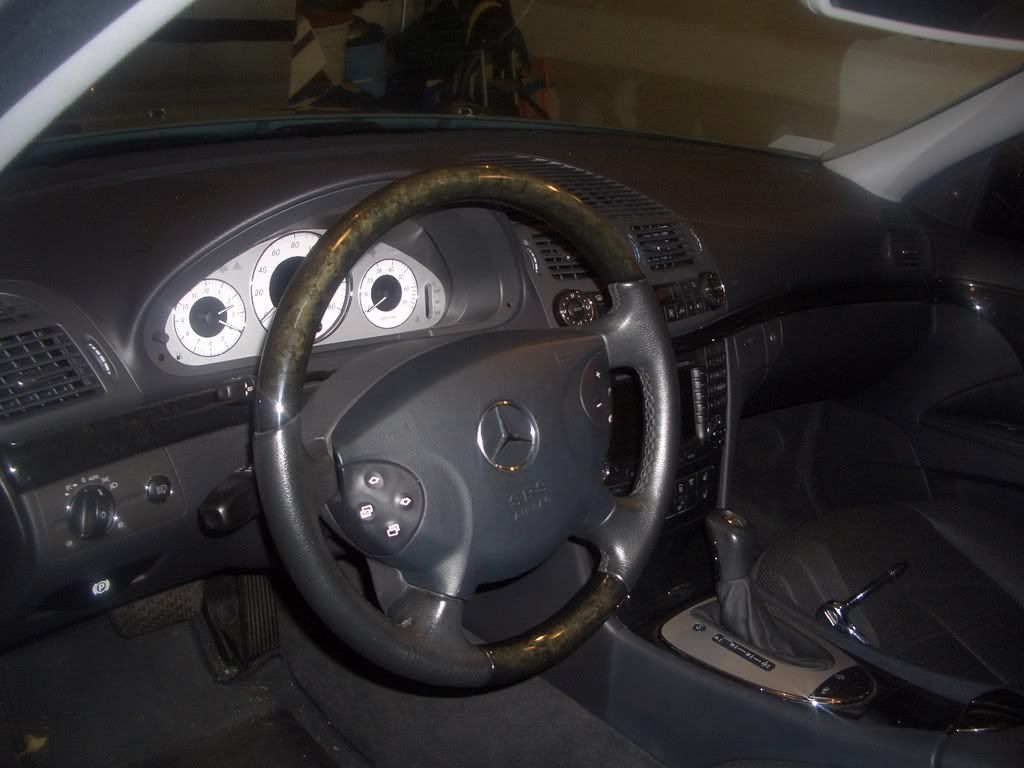
The new wheel feels great in your hands. The wooden part at the top feels thicker in the hand. It's great mod that can be done for relatively little money.
Good luck to those who attempt.
Here's what you need and how to do it in 15 minutes.
1. Switchblade style torx tool containing a #27 torx bit.
2. #10 hex socket
3. Ratchet
4. 3ft piece of pipe or breaker bar
5. 5/32 hex tool and driver
6. Small screwdriver
Use the 5/32 hex tool and driver to take apart the switchblade torx tool. You will then use only the naked #27 bit. You will see 2 holes in the rear of the steering wheel which hold the entire horn/airbag assembly in place.
Use a small screwdriver, which I forgot to take a picture of, as a lever to turn the #27 torx bit. Remember counter clockwise will loosen it. It's reversed since the bolt is facing you.
Remove both bolts and the airbag will come off easily. It will be held in place by 3 connectors.
Remove the black connector first. Then pop-up the tabs on the green and yellow connectors. Pull the yellow and green connectors straight up and off of the airbag.
You will be left with this:
Using the #10 torx socket and ratchet, loosen the center bolt in the steering wheel. This should be done with two people as the bolt is on there super tight and the steering wheel lock doesn't feel sturdy enough to resist the amount of force needed to break loose the bolt. Have your helper sit in the driver seat and hold the wheel as if he were driving. You, standing to his left, place the pipe over the ratchet handle and loosen the bolt. After the bolt is out, the steering wheel pops straight off with little effort.
Replace with new wheel and install in reverse order.
Here's what you get:
The new wheel feels great in your hands. The wooden part at the top feels thicker in the hand. It's great mod that can be done for relatively little money.
Good luck to those who attempt.
Last edited by Benz-O-Rama; Nov 24, 2007 at 09:43 AM.

Senior Member
Joined: Jan 2006
Posts: 490
Likes: 3
From: Dallas, TX
sold - w211 e320, f250, rx7 race car
Great job! I got to ask though, for a guy that mods his car a lot, what's up with those stock pedals still? Surely you know about the aluminum ones from MB http://img207.imageshack.us/img207/9...ict0272of1.jpg
Thread Starter
MBWorld Fanatic!
Joined: Apr 2006
Posts: 8,137
Likes: 26
From: Maryland
Eurocharged 2004 E500, Eurocharged ECU/TCU 2005 SL600, 2010 Caddy SwaggerWagon
Great job! I got to ask though, for a guy that mods his car a lot, what's up with those stock pedals still? Surely you know about the aluminum ones from MB http://img207.imageshack.us/img207/9...ict0272of1.jpg
What's next? I guess and ECU tune, maybe.
Out Of Control!!
Joined: Dec 2004
Posts: 14,212
Likes: 9
From: Boston, MA
00 MB ML55, 91 Toyota Supra Turbo(sold), 06 E500(gone), 03 BMW M3
Trending Topics
MB World Stories
The Best of Mercedes & AMG

6 Mercedes Models That Did NOT Age Well (But Are Somehow Still Cool)
Verdad Gallardo
Manual Mercedes? 6 Times Sindelfingen Let Drivers Have All The Fun
Verdad Gallardo
Mercedes SLR McLaren 722 S Is Extremely Rare Example Modified by McLaren
Verdad Gallardo
8 Classic Boxy Mercedes Designs That Have Aged Like Fine Wine
Verdad Gallardo
Flawlessly Restored Mercedes 190E Evo II Heads to Auction
Verdad Gallardo
Electric Mercedes C-Class Unveiled: 11 Things You Need to Know
Verdad Gallardo
Mercedes EQS Gets A Major Update: Everything You Need to Know
Verdad Gallardo
5 Underrated Mercedes-Benz Models That Don't Get the Love They Deserve
Verdad Gallardo
Mercedes 300D Has Pushed Well Past 1 Million Miles and It Ain't Stopping
Verdad Gallardo
Thread Starter
MBWorld Fanatic!
Joined: Apr 2006
Posts: 8,137
Likes: 26
From: Maryland
Eurocharged 2004 E500, Eurocharged ECU/TCU 2005 SL600, 2010 Caddy SwaggerWagon
Yep.
Purchased it from the same guy who selling the smoked tail lights for our cars.
https://mbworld.org/forums/classifieds/217841-211-tail-lights-wood-steering-wheel.html
Purchased it from the same guy who selling the smoked tail lights for our cars.
https://mbworld.org/forums/classifieds/217841-211-tail-lights-wood-steering-wheel.html

MBWorld Fanatic!


Joined: Sep 2009
Posts: 7,671
Likes: 60
From: NOMAD
EQS AMG, E53 AMG, GLE63s
I know this is old but is ther a way to straigten the wheel? When I swapped mine out originally, I think I had it over a bit so when I drive striaght, it isn't right......Is there maybe like an arrow or something that says its straight?

Junior Member
Joined: Jun 2011
Posts: 20
Likes: 0
From: Fort Lauderdale USA
E500 2003 sport package, Black on black, Heated seats, original rims...
I know this is an old post but i have a question, which is the VERY FIRST tool that i have to use? the 5/32 hex tool or, the #27 torx bit.
Thread Starter
MBWorld Fanatic!
Joined: Apr 2006
Posts: 8,137
Likes: 26
From: Maryland
Eurocharged 2004 E500, Eurocharged ECU/TCU 2005 SL600, 2010 Caddy SwaggerWagon
Yes, you should be able to adjust it, just a tooth or two, to get ti straight. Mine is....
#27 bit is what you need to remove the airbag.


Member
Joined: Jul 2002
Posts: 101
Likes: 0
GLE350
Since the original how to thread lost it pictures, I decided to do another one since I upgraded mine over the weekend. I did not disconnect the battery as the other thread stated. I just placed the key out of range and let the electronics discharge for 30 minutes before attempting.
Here's what you need and how to do it in 15 minutes.
1. Switchblade style torx tool containing a #27 torx bit.
2. #10 hex socket
3. Ratchet
4. 3ft piece of pipe or breaker bar
5. 5/32 hex tool and driver
6. Small screwdriver
Use the 5/32 hex tool and driver to take apart the switchblade torx tool. You will then use only the naked #27 bit. You will see 2 holes in the rear of the steering wheel which hold the entire horn/airbag assembly in place.
Use a small screwdriver, which I forgot to take a picture of, as a lever to turn the #27 torx bit. Remember counter clockwise will loosen it. It's reversed since the bolt is facing you.
Remove both bolts and the airbag will come off easily. It will be held in place by 3 connectors.
Remove the black connector first. Then pop-up the tabs on the green and yellow connectors. Pull the yellow and green connectors straight up and off of the airbag.
Good luck to those who attempt.
Remove the black connector first. Then pop-up the tabs on the green and yellow connectors. Pull the yellow and green connectors straight up and off of the airbag.
Hello, I've gotten this far but do not know how to disconnect the black connector. Could any one PLEASE help.....
.


