


How to remove glove box
MBWorld Fanatic!
Joined: Mar 2009
Posts: 3,135
Likes: 272
From: Sweden
S213
Its pretty easy, remove the plastic cover under the glovebox, three torx screws, remove the connector for the light and fold away a plastic latch in the middle as you pull it out.
Then remove the dash side panel to reveal another screw, Inside the box you must remove the aux connector, there is a small plastic washer covering the connector, pry this out and pull out the connector throgh the side cover opening,
then there is three or four (cant remember) screws inside the glovbox, in the upper part and in the leftmost part, one of them can be a bit tricky to see and remove.
Once this is done pull the box against you if your sitting in the seat, diconnect connectors to 12V socket and box illumination and the glovebox is out.
MBWorld Fanatic!


Joined: Apr 2007
Posts: 2,028
Likes: 7
From: Orlando, FL
2026 AMG GT63 Pro
Its pretty easy, remove the plastic cover under the glovebox, three torx screws, remove the connector for the light and fold away a plastic latch in the middle as you pull it out.
Then remove the dash side panel to reveal another screw, Inside the box you must remove the aux connector, there is a small plastic washer covering the connector, pry this out and pull out the connector throgh the side cover opening,
then there is three or four (cant remember) screws inside the glovbox, in the upper part and in the leftmost part, one of them can be a bit tricky to see and remove.
Once this is done pull the box against you if your sitting in the seat, diconnect connectors to 12V socket and box illumination and the glovebox is out.
Then remove the dash side panel to reveal another screw, Inside the box you must remove the aux connector, there is a small plastic washer covering the connector, pry this out and pull out the connector throgh the side cover opening,
then there is three or four (cant remember) screws inside the glovbox, in the upper part and in the leftmost part, one of them can be a bit tricky to see and remove.
Once this is done pull the box against you if your sitting in the seat, diconnect connectors to 12V socket and box illumination and the glovebox is out.
wish they had wagons here...350 i assume right?
MBWorld Fanatic!
Joined: Mar 2009
Posts: 3,135
Likes: 272
From: Sweden
S213
Thanks
 , yes a tint is planned, going for a light tint all the way around.
I wish it was a 350, but my car with an engine like that would cost as much as a C63 for you maybe even more ..
Its a Blue Efficiency 180 Kompressor, around 160PS with great gas mileage.
Junior Member
Joined: Apr 2009
Posts: 47
Likes: 0
ML350 W164
Its pretty easy, remove the plastic cover under the glovebox, three torx screws, remove the connector for the light and fold away a plastic latch in the middle as you pull it out.
Then remove the dash side panel to reveal another screw, Inside the box you must remove the aux connector, there is a small plastic washer covering the connector, pry this out and pull out the connector throgh the side cover opening,
then there is three or four (cant remember) screws inside the glovbox, in the upper part and in the leftmost part, one of them can be a bit tricky to see and remove.
Once this is done pull the box against you if your sitting in the seat, diconnect connectors to 12V socket and box illumination and the glovebox is out.
Then remove the dash side panel to reveal another screw, Inside the box you must remove the aux connector, there is a small plastic washer covering the connector, pry this out and pull out the connector throgh the side cover opening,
then there is three or four (cant remember) screws inside the glovbox, in the upper part and in the leftmost part, one of them can be a bit tricky to see and remove.
Once this is done pull the box against you if your sitting in the seat, diconnect connectors to 12V socket and box illumination and the glovebox is out.
Hope this helps, it is on a RHD model.
This is the plastic cover after removal. There are 3 screws. Note also the catch mentioned by Vic.
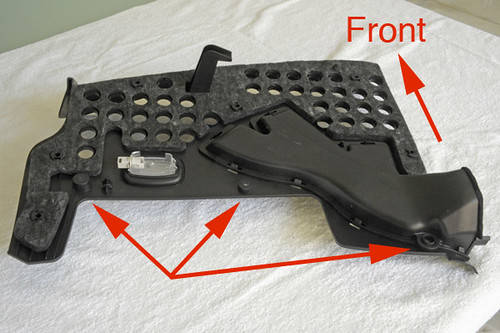
The location of the rest of the screws for the box.
Trending Topics
MB World Stories
The Best of Mercedes & AMG

6 Mercedes Models That Did NOT Age Well (But Are Somehow Still Cool)
Verdad Gallardo
Manual Mercedes? 6 Times Sindelfingen Let Drivers Have All The Fun
Verdad Gallardo
Mercedes SLR McLaren 722 S Is Extremely Rare Example Modified by McLaren
Verdad Gallardo
8 Classic Boxy Mercedes Designs That Have Aged Like Fine Wine
Verdad Gallardo
Flawlessly Restored Mercedes 190E Evo II Heads to Auction
Verdad Gallardo
Electric Mercedes C-Class Unveiled: 11 Things You Need to Know
Verdad Gallardo
Mercedes EQS Gets A Major Update: Everything You Need to Know
Verdad Gallardo
5 Underrated Mercedes-Benz Models That Don't Get the Love They Deserve
Verdad Gallardo
Mercedes 300D Has Pushed Well Past 1 Million Miles and It Ain't Stopping
Verdad Gallardo
Thread Starter
Member
Joined: Mar 2008
Posts: 95
Likes: 0
2008 C300
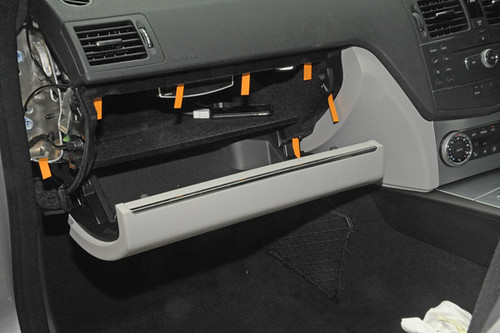
Does anyone know how to take off this piece? Looks like I wouldnt have to take the glove box out to replace the ipod interface cable.
If I took out this trim piece, I would have access to the ipod cable connector.
If I took out this trim piece, I would have access to the ipod cable connector.


Senior Member
Joined: Feb 2009
Posts: 361
Likes: 0
From: Los Angeles, CA
2009 C350
1. just start from pulling out the bottom and you should be able to make a gap quite easily.
2.then try to stretch open the gap by gradually running up along the edge near you.
3. when you reach the tip, carefully pull the panel towards the door. the side near you is held together by 3 clips and they're pretty tight. the other edge of the panel is held with a hinge sorta thing that comes off at an angle, if you know wt i mean...
and so as i've tried to say in the other post in the other thread.. that's the only panel you need to remove to access the ipod cable..
i know im a bad explainer. but i'm happy to answer questions =]
Thread Starter
Member
Joined: Mar 2008
Posts: 95
Likes: 0
2008 C300
1. just start from pulling out the bottom and you should be able to make a gap quite easily.
2.then try to stretch open the gap by gradually running up along the edge near you.
3. when you reach the tip, carefully pull the panel towards the door. the side near you is held together by 3 clips and they're pretty tight. the other edge of the panel is held with a hinge sorta thing that comes off at an angle, if you know wt i mean...
and so as i've tried to say in the other post in the other thread.. that's the only panel you need to remove to access the ipod cable..
i know im a bad explainer. but i'm happy to answer questions =]
2.then try to stretch open the gap by gradually running up along the edge near you.
3. when you reach the tip, carefully pull the panel towards the door. the side near you is held together by 3 clips and they're pretty tight. the other edge of the panel is held with a hinge sorta thing that comes off at an angle, if you know wt i mean...
and so as i've tried to say in the other post in the other thread.. that's the only panel you need to remove to access the ipod cable..
i know im a bad explainer. but i'm happy to answer questions =]


Super Member
Joined: Mar 2012
Posts: 591
Likes: 0
From: San Francisco
'08 Mercedes C300
https://mbworld.org/forums/c-class-w...in-filter.html
I'm not sure if it's the same as the facelift. Should be similar
I'm not sure if it's the same as the facelift. Should be similar


Member
Joined: Nov 2011
Posts: 217
Likes: 0
From: Kelowna, British Columbia
White 2009 C300 Sport
Senior Member

Joined: Nov 2002
Posts: 336
Likes: 11
From: Northern California
2016 GLE300d 4Matic
Hate to resurrect an old thread, but I'm trying to pull the glovebox to connect a DVR to the 12v lead on the glovebox lighter plug.
It's a 2010 GLK 4Matic with Premium 1 and Multimedia.
The bottom panel removed with the 3 Torx screws and the side panel wasn't too hard to pry off. The glovebox had only 1 screw on the top edge and none along the side panel near the cluster. The jack is an iPhone jack.
I can't find the rest of the screws (after careful examination with a flashlight) and I can't figure out how to loosen the iPhone jack - if I need to. The screw on the sidepanel edge was there and I removed it but taking it out and the one screw on the top edge still leaves me with a very secure glovebox. There was a little grey adjuster (for air to the glovebox?) I easily popped out. No screw under there. There is another small black square with a slot that seems secure too. I can't find another screw anywhere.
Anyone have some ideas? I'm stuck. Thanks for the intervention!

Member
Joined: Oct 2013
Posts: 107
Likes: 0
2008 Mercedes Benz C300 4matic Sport
Hate to resurrect an old thread, but I'm trying to pull the glovebox to connect a DVR to the 12v lead on the glovebox lighter plug.
It's a 2010 GLK 4Matic with Premium 1 and Multimedia.
The bottom panel removed with the 3 Torx screws and the side panel wasn't too hard to pry off. The glovebox had only 1 screw on the top edge and none along the side panel near the cluster. The jack is an iPhone jack.
I can't find the rest of the screws (after careful examination with a flashlight) and I can't figure out how to loosen the iPhone jack - if I need to. The screw on the sidepanel edge was there and I removed it but taking it out and the one screw on the top edge still leaves me with a very secure glovebox. There was a little grey adjuster (for air to the glovebox?) I easily popped out. No screw under there. There is another small black square with a slot that seems secure too. I can't find another screw anywhere.
Anyone have some ideas? I'm stuck. Thanks for the intervention!
It's a 2010 GLK 4Matic with Premium 1 and Multimedia.
The bottom panel removed with the 3 Torx screws and the side panel wasn't too hard to pry off. The glovebox had only 1 screw on the top edge and none along the side panel near the cluster. The jack is an iPhone jack.
I can't find the rest of the screws (after careful examination with a flashlight) and I can't figure out how to loosen the iPhone jack - if I need to. The screw on the sidepanel edge was there and I removed it but taking it out and the one screw on the top edge still leaves me with a very secure glovebox. There was a little grey adjuster (for air to the glovebox?) I easily popped out. No screw under there. There is another small black square with a slot that seems secure too. I can't find another screw anywhere.
Anyone have some ideas? I'm stuck. Thanks for the intervention!
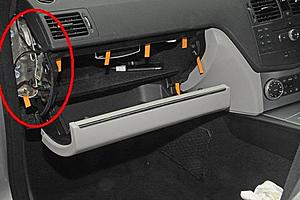
If the glovebox feels solidly connected you have probably missed a couple of screws. Look carefully at the picture in this thread with the orange tabs showing the location of the screws. As for the AUX jack, I remember pushing in and rotating the outer ring (in the glovebox) just a little, until the "teeth" of the ring lined up with the gaps between the teeth connected to the jack itself. The outer ring will then be freed into the glovebox and you can pull the jack through the hole. Basically, the "teeth" connected to the jack in a circle contract to fit in the hole and then expand once the jack is in the hole. The ring secures the expanded teeth of the jack. I don't know what this ring lock is called, but I hope this gives you an idea of how it works. It's very delicate. Don't force anything. Hope this helps.


