When you click on links to various merchants on this site and make a purchase, this can result in this site earning a commission. Affiliate programs and affiliations include, but are not limited to, the eBay Partner Network.
After removal and cleaning of my MAF by myself and my mechanic prior to me, I'm continuing to have issues and I wonder if the MAF can be the problem. I'm not replacing it until I'm sure. Can I ask for some thoughts?
The warning light now goes off after a while of driving, perhaps a few days of being easy on the gas. It comes on again and the car judders / loses power if I do any of the following:
Be NOT easy on the gas
Climb a long hill at HWY speeds.
I fail to see how the MAF can fail, please explain. There are no moving parts, so if it's clean, surely it should work?
thebaudelaires,.... hmmm,... you're the short cut guy from post# 43-50,... I would suggest you try removing the MAF like everyone else without any short cuts,... that way you can examine the hoses,.... you might have a broken hose somewhere,.... if not then replace MAF,.... get car on STAR or at least read OBD2 codes
Actually, - and I know this is an old thread but I'm still driving around with this problem - the reasoning behind the shortcut was that I simply didn't have the tools to take it apart the prescribed way and I wasn't sure I'd be able to get it back together, leaving me with a car that needed towing.
I wonder now if a pipe is indeed the problem. Hmm.
In any case, can anyone recommend a reliable source of MAF parts?
Guys I have E200 Kompressor, the genuine part number for MAF sensor is A2710940248; Siemens / VDO. The Genuine is very expensive around 600$ here in Jordan.
Do you recommend using another brand other than Mercedes like the one from Ultra Automotive (http://www.ebay.com/itm/MERCEDES-BENZ-CLK-200-CGI-2003-TO-2009-AIR-MASS-FLOW-SENSOR-WITH-HOUSING-MAF-124-/121181763440?pt=UK_CarsParts_Vehicles_CarParts_SM&hash=item1c36fef770)??
I would go OEM/OES only. Try to get quotes from a few different dealers as well as online. As you are in Jordan finding a company that will ship to you may be hard. My favorite parts site http://www.rmeuropean.com/Part-Numbe..._1E11B459.aspx has that PN listed. You can also try http://www.pelicanparts.com/cgi-bin/...ion=2710940248
But when you factor in shipping costs from the USA plus time it may not be that much of a savings.
Just to finish this thread. I ended up taking out and cleaning the MAF a few times. Got the removal down to a really short period. HOWEVER, last time I took it out I did two things:
I put some oil on the rear of it where it seals and I changed the plugs. I don't know which one did the trick but it's been about two years now and I've not had any further trouble. Could it have been the plugs all along? Worth considering before you go paying a shedload for the part, even if it is easy to get in.
I got P0171 three weeks back. Following this thread, I finally took out and cleaned the MAF sensor.
It was a pain in the neck to complete the job. it took me twice, and totaled over 6 hours of effort to finally able to take the intake hose clamp off, the second try was done after ordering a special flexible clamp tool.
I totally agree with the curses in the original post. it seems the design engineers never did any service work. The configuration was apparently designed for the total benefit of the Dealer Service departments, not for DIYers like you and I. A friend of mine has a 2000 C230, in that model, replacing the MAF sensor is a breeze that takes just 10 minutes and the sensor itself from Bosch costs just $25 instead of $300 in the 2004 model.
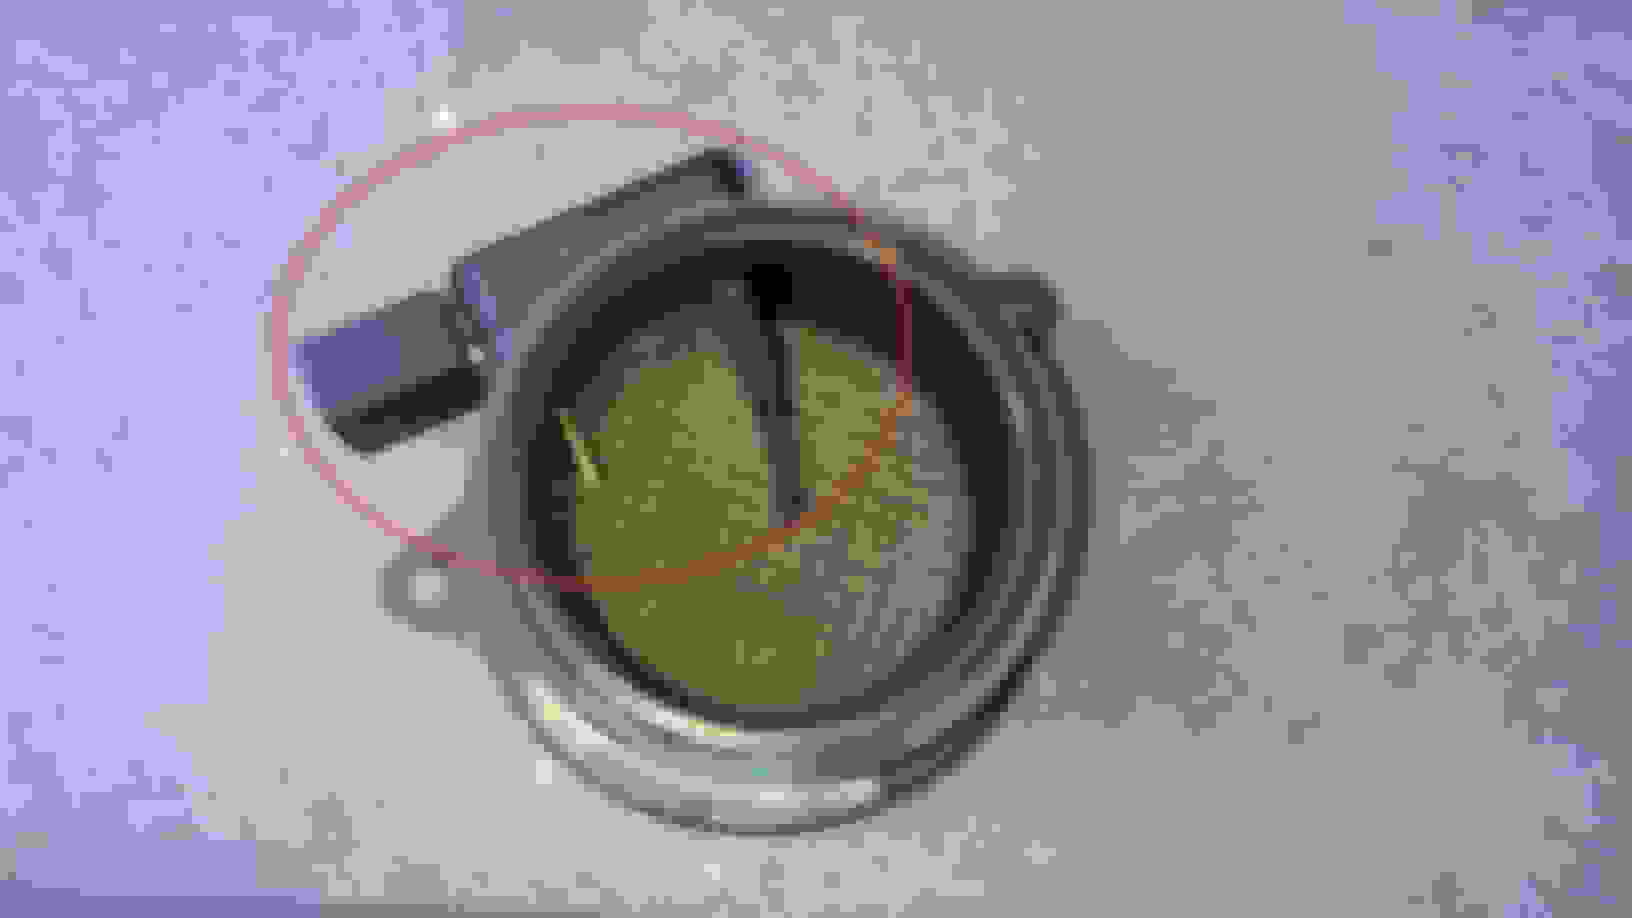
The same should actually hold true for the 2004 model as well, as what needs replacement is the sensor unit, not the housing, see the circled unit in the picture. The housing will never break, why replace that as well? Forcing the while-unit replacement is unreasonably wasteful to the owner and a burden to the environment as well. From the experience of my MAF project, I gained some insights, and would like to share with everyone here:
It is not necessary to remove the spring clamp to take out the airbox: There are three screws that mount the MAF sensor assembly to the airbox. While the bottom one seems impossible to reach without removing the spring clamp, the two top screws can be easily removed. After this, the extra degree of freedom gained will allow you to lift the airbox out of the front bushing. You can then lift the partially free airbox so much that you can feel the third screw by reaching your hand to the back. With this, using a flexible shaft hold firmly against the torx screw with one hand, it can be easily removed. So the airbox and the elbow are separated. The MAF sensor can then be easily pried off from the elbow piece.
Since there are plenty of space in the airbox, it becomes apparent that the bottom screw I painstakingly removed with a flexshaft in the last step should have been designed to be screwed on from inside the aixbox. So I did a little reengineering: A) I glued on a piece of plastic to the back of the elbow where the third screw comes through, with a small hole pre-drilled. B) I drilled the original hole on the airbox a little larger so a smaller screw can go through. Now the bottom screw will be from inside the aixbox. From now on, it is no longer necessary for me to remove the elbow and even the aixbox, to take out the MAF sensor.
If you still want to spare the ordeal of having to remove the spring clamp in the future, replace the it now with a screwed on plumbing hose clamp for $2.Hope this will help make your next project a little easier.
Cheers. Ben
Last edited by BenZ190D; Aug 25, 2015 at 09:39 AM.
I got P0171 three weeks back. Following this thread, I finally took out and cleaned the MAF sensor.
It was a pain in the neck to complete the job. it took me twice, and totaled over 6 hours of effort to finally able to take the intake hose clamp off, the second try was done after ordering a special flexible clamp tool.
I totally agree with the curses in the original post. it seems the design engineers never did any service work. The configuration was apparently designed for the total benefit of the Dealer Service departments, not for DIYers like you and I. A friend of mine has a 2000 C230, in that model, replacing the MAF sensor is a breeze that takes just 10 minutes and the sensor itself from Bosch costs just $25 instead of $300 in the 2004 model.
The same should actually hold true for the 2004 model as well, as what needs replacement is the sensor unit, not the housing, see the circled unit in the picture. The housing will never break, why replace that as well? Forcing the while-unit replacement is unreasonably wasteful to the owner and a burden to the environment as well. From the experience of my MAF project, I gained some insights, and would like to share with everyone here:
It is not necessary to remove the spring clamp to take out the airbox: There are three screws that mount the MAF sensor assembly to the airbox. While the bottom one seems impossible to reach without removing the spring clamp, the two top screws can be easily removed. After this, the extra degree of freedom gained will allow you to lift the airbox out of the front bushing. You can then lift the partially free airbox so much that you can feel the third screw by reaching your hand to the back. With this, using a flexible shaft hold firmly against the torx screw with one hand, it can be easily removed. So the airbox and the elbow are separated. The MAF sensor can then be easily pried off from the elbow piece.
Since there are plenty of space in the airbox, it becomes apparent that the bottom screw I painstakingly removed with a flexshaft in the last step should have been designed to be screwed on from inside the aixbox. So I did a little reengineering: A) I glued on a piece of plastic to the back of the elbow where the third screw comes through, with a small hole pre-drilled. B) I drilled the original hole on the airbox a little larger so a smaller screw can go through. Now the bottom screw will be from inside the aixbox. From now on, it is no longer necessary for me to remove the elbow and even the aixbox, to take out the MAF sensor.
If you still want to spare the ordeal of having to remove the spring clamp in the future, replace the it now with a screwed on plumbing hose clamp for $2.Hope this will help make your next project a little easier.
Cheers. Ben
So, did you end up getting the code cleared? I've been throwing a P0171 on & off since last Feb. and I'd like to get it taken care of.
You may want to do it soon as a prolonged bad MAF sensor may foul your downstream O2 Sensor. Yes, my P0171 went away after the replacement. But P0173 and a few others came on indicating a bad O2 sensor. Only after replacing the downstream sensor as well did the vehicle return to normal with good mpg.
A caution: don't use an aftermarket MAF sensor, they will cause more damage than fixing it. But a Bosch O2 sensor at $41 from Amazon works great:
You may want to do it soon as a prolonged bad MAF sensor may foul your downstream O2 Sensor. Yes, my P0171 went away after the replacement. But P0173 and a few others came on indicating a bad O2 sensor. Only after replacing the downstream sensor as well did the vehicle return to normal with good mpg.
Oh, I know all too well not to buy another other than OEM, especially for sensors, engine, and drive train components. So, did you end up have to replace entirely or just clean?
Hey All, I just wanted to share my experience removing my MAF for cleaning today. I actually found it to be a relatively quick job aside from that screw under the airbox outlet on the MAF . I didn't need to remove the airbox and in total only removed 5 screws and a hose clamp. There are 3 screws on the MAF one screw holding that weird vacuum pipe and one attached to a bracket that is zipptied to the ECM loom. In simplest terms here is what I did:
1. disconnect battery
2. disconnect 2x main harness connectors from ECM and any other connectors in my way.
3. disconnect stupid vacuum connector
4. attach my new hose clamp pliers thing and loosen clamp... OMG so good and only $12 on Amazon!
5. remove oil filter and cover hole (this gave me plenty of room to remove the 3rd screw)
6. remove 5 screws mentioned above and rubber hose attaching MAF pipe to Crankcase
7. pull out MAF and pipe turning in an anti-clockwise on its way up and out.
Clean and replace in reverse order.
For that 3rd screw.... it sucked and took me an extra 10mins than it should have done. I managed to get it out and back in with the below contraption. I wrapped a little tape around the screw when I was putting it back in (as pictured below also) and it prevented the screw falling and kept the contraption well mated to the screw head. As mentioned, removing the oil filter was completely awesome and necessary for getting a little more room to attack the 3rd screw.
My weapons
The perfect length/girth to get that screw...
More room when the oil filter was gone (and the hole covered)
(not the 3rd screw) how i didn't loose any screws
Seriously this ratcheting hose clamp tool is a god send! I have lost so much skin in the past!
Unfortunately however, this did not fix my idle problem. I cleaned the throttle body yesterday also to no avail. But at least I think the car is a little more punchy now. I have a rough shuddering when the AC is on and the car is in gear. It is not unbearable, just annoying.
Hello,
I'm really hoping someone is still watching this thread:
Does anybody have the part number or even just the part name for the hose that the PITA spring clamp is attached to? Got the ugly spring clamp off, but the hose is looking pretty chewed up now. Would like to order a new one, but can't seem to find a way to look it up. Intake Boot?
This is on a 2005 Mercedes C230K.
And yes, definitely tie a string or something onto your pliers when you try to get that clamp off.
Mercedes SLR McLaren 722 S Is Extremely Rare Example Modified by McLaren
Slideshow: A one-of-one U.S.-spec Mercedes-Benz SLR McLaren Roadster became even rarer after a factory-backed transformation at McLaren's headquarters.


 Jun 16, 2015, 01:28 PM