


Resealing the Recirculating Cover
Thread Starter
Moderator Alumni
Joined: Apr 2006
Posts: 3,255
Likes: 22
From: Seattle
w203 m112
Resealing the Recirculating Cover
The m112 motor has a cover that helps recirculate oil on top of each of the valve covers that often leaks and as a result the motor will lose oil and it will make your engine bay a mess.
Simple signs of this seal leaking are the smell of burning oil, the car losing excessive oil, and of course a very dirty set of valve covers and/or plugs and wires.
Unfortunately for the m112, there is no gasket that can simply be bought and replaced, but instead, we have to use a gasket maker to create a new seal.
Before I proceed with the basics of this process Id like to say that I am not a professional and that the process detailed is just my attempt to offer some insight for those who might have the problems I have found.
Tools Needed:
Permatex RVT Black Gasket Maker
E10 inverted star shaped bit
14mm star shaped bit. (i think)
Sensor Cleaner ( or something to help remove oil and engine grime)
A couple flat head screw drivers
Lots of cleaning rags/paper towels
Wire cutter (removing zip ties)
Zip ties
Time required - Two hours per cover
The steps are pretty simple:
Have the car parked in a garage/warm/dry place where you can work safely on the car after the engine has been parked for a while - to ensure very little oil is in these covers and that the headers are cool.
Remove the airbox + tubes that head to the air box + use something to cover the MAF.
Use paper towels and engine cleaning supplies to clean off the valve covers and headers. Be sure to clean and remove the coil packs because a lot of oil can be hiding under them. Also, be sure to wipe down the bottom side of the headers also. Unplug the coil packs from the wires leading to them from above the motor. Take and leave the coil packs off and clean under them too. Try not to get dirt/grime into the plugs of the coil pack. (might have to use a wire cutter to remove a zip tie or two)
(Be very thorough so you can be sure that once you do replace the seal and fire up the motor that there is not any extra dirt/oil that might be getting on the header and giving you false signs that you are further leaking oil that is burning on the headers )
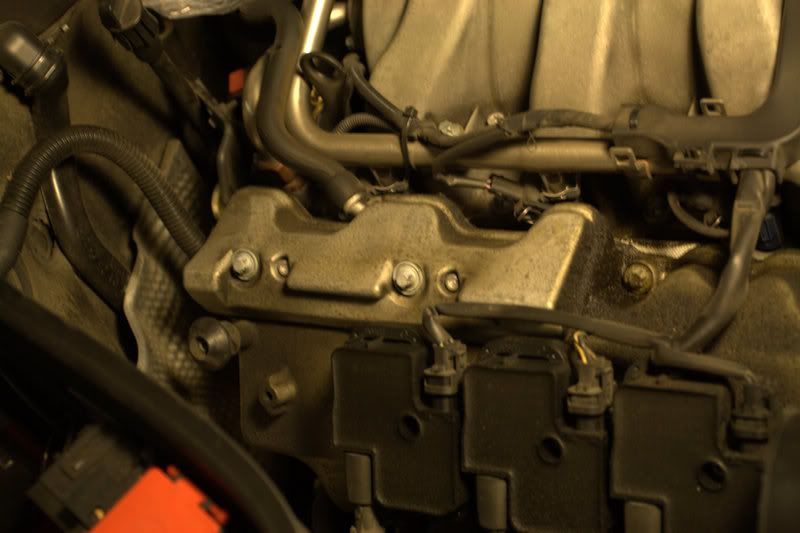
Once everything is cleaned up, go ahead and remove the bolts holding the recirculating valve covers down. There are two long bolts and two small bolts on the passenger side and there are three of each on the driver side.
Use flat head screw drivers to gently pry up the passenger side cover. The passenger side cover has one hose that runs into it that can be easily pulled off. Remove the cover and clean it.
Use flat head screw drivers to gently pry up the driver side cover. The driver side cover has two hoses that run into the cover, but I was unable to remove these. I just covered up the exposed side of the valve cover and cleaned the recirculating cover on top of the engine.
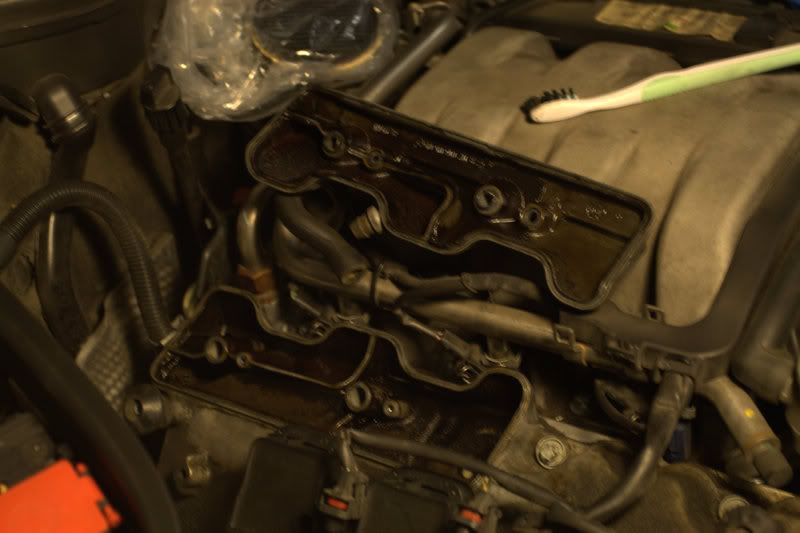
While the covers are removed, be sure to avoid dripping oil onto the motor and if you do, just clean it off. Additionally, when the recirculating covers are removed, one can see the holes that lead directly into the valve cover. We do not want anything to fall in there other than oil.
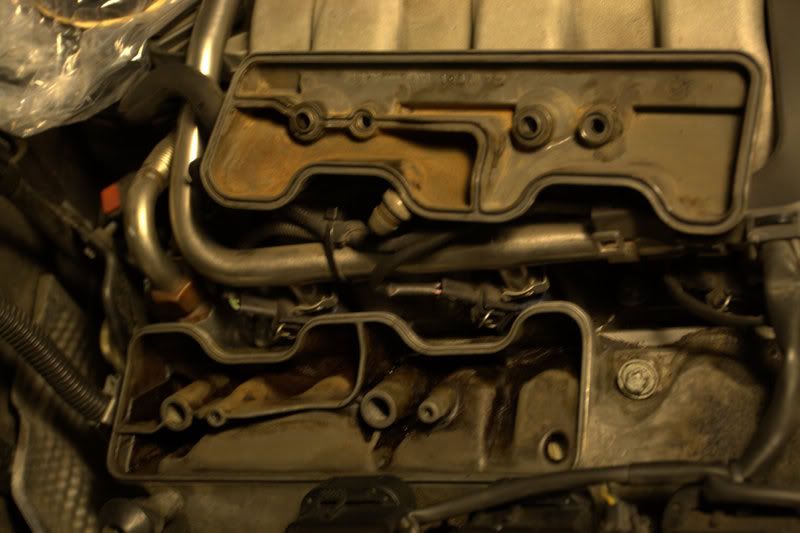
When cleaning play close attention to the areas that seal the oil in and make sure they are super clean. Each bolt that goes through the cover also had sealant around it w/in the cover.
When the covers are cleaned, apply the gasket maker appropriately and return the covers to their original position. Lightly tighten the bolts evenly and return an hour later, then fully tighten the bolts. The small bolts are prone to breaking - do not over torque them. (I could not find the torque specs for these bolts) Wait 24 hours for the sealant to fully cure, more if the weather is cold.
Reassemble the coil packs + the wires connecting them and the plugs + zip ties.
After the long wait... Fire up the car and make sure nothing is leaking out of there any more
PS - The pictures presented were arent quiet following the steps I provided. The steps provided are the steps I wish I would have taken now that I have done this once.
PSS - Many thanks to Erick Gunter, 1FASTC32, for replying quickly to emails and question and offering guidance throughout this process. Without his reassurances, this process would have been MUCH more difficult.
Simple signs of this seal leaking are the smell of burning oil, the car losing excessive oil, and of course a very dirty set of valve covers and/or plugs and wires.
Unfortunately for the m112, there is no gasket that can simply be bought and replaced, but instead, we have to use a gasket maker to create a new seal.
Before I proceed with the basics of this process Id like to say that I am not a professional and that the process detailed is just my attempt to offer some insight for those who might have the problems I have found.
Tools Needed:
Permatex RVT Black Gasket Maker
E10 inverted star shaped bit
14mm star shaped bit. (i think)
Sensor Cleaner ( or something to help remove oil and engine grime)
A couple flat head screw drivers
Lots of cleaning rags/paper towels
Wire cutter (removing zip ties)
Zip ties
Time required - Two hours per cover
The steps are pretty simple:
Have the car parked in a garage/warm/dry place where you can work safely on the car after the engine has been parked for a while - to ensure very little oil is in these covers and that the headers are cool.
Remove the airbox + tubes that head to the air box + use something to cover the MAF.
Use paper towels and engine cleaning supplies to clean off the valve covers and headers. Be sure to clean and remove the coil packs because a lot of oil can be hiding under them. Also, be sure to wipe down the bottom side of the headers also. Unplug the coil packs from the wires leading to them from above the motor. Take and leave the coil packs off and clean under them too. Try not to get dirt/grime into the plugs of the coil pack. (might have to use a wire cutter to remove a zip tie or two)
(Be very thorough so you can be sure that once you do replace the seal and fire up the motor that there is not any extra dirt/oil that might be getting on the header and giving you false signs that you are further leaking oil that is burning on the headers )
Once everything is cleaned up, go ahead and remove the bolts holding the recirculating valve covers down. There are two long bolts and two small bolts on the passenger side and there are three of each on the driver side.
Use flat head screw drivers to gently pry up the passenger side cover. The passenger side cover has one hose that runs into it that can be easily pulled off. Remove the cover and clean it.
Use flat head screw drivers to gently pry up the driver side cover. The driver side cover has two hoses that run into the cover, but I was unable to remove these. I just covered up the exposed side of the valve cover and cleaned the recirculating cover on top of the engine.
While the covers are removed, be sure to avoid dripping oil onto the motor and if you do, just clean it off. Additionally, when the recirculating covers are removed, one can see the holes that lead directly into the valve cover. We do not want anything to fall in there other than oil.
When cleaning play close attention to the areas that seal the oil in and make sure they are super clean. Each bolt that goes through the cover also had sealant around it w/in the cover.
When the covers are cleaned, apply the gasket maker appropriately and return the covers to their original position. Lightly tighten the bolts evenly and return an hour later, then fully tighten the bolts. The small bolts are prone to breaking - do not over torque them. (I could not find the torque specs for these bolts) Wait 24 hours for the sealant to fully cure, more if the weather is cold.
Reassemble the coil packs + the wires connecting them and the plugs + zip ties.
After the long wait... Fire up the car and make sure nothing is leaking out of there any more
PS - The pictures presented were arent quiet following the steps I provided. The steps provided are the steps I wish I would have taken now that I have done this once.
PSS - Many thanks to Erick Gunter, 1FASTC32, for replying quickly to emails and question and offering guidance throughout this process. Without his reassurances, this process would have been MUCH more difficult.
Last edited by TruTaing; Jan 14, 2008 at 05:31 AM.
Super Moderator
Joined: Jul 2006
Posts: 3,365
Likes: 12
From: Orange County, CA
GMC - Miata - Trek - P-Car
Excellent post, TruTaing.
It�s curious that MB chose to use RTV silicone, in lieu of a proper gasket, to seal the PCV baffles.
Form-a-gasket is a swell product that is utilized by all of the automobile manufacturers, but I have yet to see a M112 that didn�t leak from there. The oil separator's are not particularly efficient at removing the oil mist from the crankcase vapors either, as evidenced by your photographs. There is a lot of its slimy reside coating the downstream side of the intake tract, as well. Some of us have installed a catchcan to help collect the blowby particulates in order to minimize combustion chamber deposits and their deleterious effect on octane requirements. Off-highway use only, of course. Although we are running what is foisted as �premium� fuel, the DME�s spark-retard nanny is destined to intervene even sooner than it otherwise should.
Be thankful you don�t have an additional ~15 PSI pressurizing your intake manifold, lest the situation be even worse.
Trending Topics
Thread Starter
Moderator Alumni
Joined: Apr 2006
Posts: 3,255
Likes: 22
From: Seattle
w203 m112
E, I've managed to break mine open again and this time I'm absolutely certain my valve cover gaskets are leaking also. Only 110k miles too 
Either way, I've got MB gasket sealant, two valve cover gaskets, and a canon 5dmk2 to capture the whole process. I'm considering ordering the needswings teflon coated valve covers just for the simplicity of NOT having to clean my valve covers. haha. I will snap LOTS of pix just for you.
As for the m113: I believe the cover is exactly the same shape except on the m113 the valve cover is longer.
MB World Stories
The Best of Mercedes & AMG

Manual Mercedes? 6 Times Sindelfingen Let Drivers Have All The Fun
Verdad Gallardo
Mercedes SLR McLaren 722 S Is Extremely Rare Example Modified by McLaren
Verdad Gallardo
8 Classic Boxy Mercedes Designs That Have Aged Like Fine Wine
Verdad Gallardo
Flawlessly Restored Mercedes 190E Evo II Heads to Auction
Verdad Gallardo
Electric Mercedes C-Class Unveiled: 11 Things You Need to Know
Verdad Gallardo
Mercedes EQS Gets A Major Update: Everything You Need to Know
Verdad Gallardo
5 Underrated Mercedes-Benz Models That Don't Get the Love They Deserve
Verdad Gallardo
Mercedes 300D Has Pushed Well Past 1 Million Miles and It Ain't Stopping
Verdad Gallardo
10 Most Reliable Mercedes-Benz Models You Can Buy Used
Verdad GallardoMBWorld Fanatic!


Joined: Jun 2007
Posts: 1,022
Likes: 44
From: Los Angeles, CA
2015 C400 Tenorite Gray
E, I've managed to break mine open again and this time I'm absolutely certain my valve cover gaskets are leaking also. Only 110k miles too
Either way, I've got MB gasket sealant, two valve cover gaskets, and a canon 5dmk2 to capture the whole process. I'm considering ordering the needswings teflon coated valve covers just for the simplicity of NOT having to clean my valve covers. haha. I will snap LOTS of pix just for you.
As for the m113: I believe the cover is exactly the same shape except on the m113 the valve cover is longer.
Thread Starter
Moderator Alumni
Joined: Apr 2006
Posts: 3,255
Likes: 22
From: Seattle
w203 m112
I have a few other things in the works and I have actually NOT done this process yet, but I have gotten the supplies for it.
This time I tried to buy factory MB sealant in hopes that it would work better, but my tech sold me Toyota gasket sealant while saying that "the Toyota sealant is much better than the MB sealant." I personally think the seal broke again because my driving style has gotten more aggressive. haha. OR the sealant just isn't that great :x I have seen LOTS of m112s and m113 (in both NA and SC'd form) leaking from these gaskets.
Nicholi, I dont think its frowned upon at long as it stays on topic and helps future readers and forum members solve their problems! Post away!
MBWorld Fanatic!
Joined: Jun 2007
Posts: 1,022
Likes: 44
From: Los Angeles, CA
2015 C400 Tenorite Gray
I have a few other things in the works and I have actually NOT done this process yet, but I have gotten the supplies for it.
This time I tried to buy factory MB sealant in hopes that it would work better, but my tech sold me Toyota gasket sealant while saying that "the Toyota sealant is much better than the MB sealant." I personally think the seal broke again because my driving style has gotten more aggressive. haha. OR the sealant just isn't that great :x I have seen LOTS of m112s and m113 (in both NA and SC'd form) leaking from these gaskets.
Nicholi, I dont think its frowned upon at long as it stays on topic and helps future readers and forum members solve their problems! Post away!
This time I tried to buy factory MB sealant in hopes that it would work better, but my tech sold me Toyota gasket sealant while saying that "the Toyota sealant is much better than the MB sealant." I personally think the seal broke again because my driving style has gotten more aggressive. haha. OR the sealant just isn't that great :x I have seen LOTS of m112s and m113 (in both NA and SC'd form) leaking from these gaskets.
Nicholi, I dont think its frowned upon at long as it stays on topic and helps future readers and forum members solve their problems! Post away!
http://www.trevorezell.blogspot.com

Member
Joined: Dec 2010
Posts: 101
Likes: 6
Hers - 2003 C320. His - 2004 330i zhp 6 speed.
I have a few other things in the works and I have actually NOT done this process yet, but I have gotten the supplies for it.
This time I tried to buy factory MB sealant in hopes that it would work better, but my tech sold me Toyota gasket sealant while saying that "the Toyota sealant is much better than the MB sealant." I personally think the seal broke again because my driving style has gotten more aggressive. haha. OR the sealant just isn't that great :x I have seen LOTS of m112s and m113 (in both NA and SC'd form) leaking from these gaskets.
Nicholi, I dont think its frowned upon at long as it stays on topic and helps future readers and forum members solve their problems! Post away!
This time I tried to buy factory MB sealant in hopes that it would work better, but my tech sold me Toyota gasket sealant while saying that "the Toyota sealant is much better than the MB sealant." I personally think the seal broke again because my driving style has gotten more aggressive. haha. OR the sealant just isn't that great :x I have seen LOTS of m112s and m113 (in both NA and SC'd form) leaking from these gaskets.
Nicholi, I dont think its frowned upon at long as it stays on topic and helps future readers and forum members solve their problems! Post away!

MBWorld Fanatic!
Joined: Mar 2004
Posts: 1,175
Likes: 24
From: Boston, MA
'14 ML350, '13 C220 CDI, '07 C280, '98 ML320
In addition to using good quality sealant, you should apply thin and contiguous bead of sealant in the 'channel' of the covers around the perimeter and not to move the cover while putting the screws back on. Lastly, letting the sealant cure is also important. Failing to observe these suggestions may lead to leaks...
Last edited by pcy; Apr 8, 2011 at 07:43 PM.

Junior Member
Joined: Jul 2010
Posts: 59
Likes: 0
From: Austin, Texas
2003 Mercedes C240, 2009 Audi Q5
I used Permatex black and it worked fine. I really don't know how people do this with the valve covers on the car though. My valve cover gaskets were leaking anyway, so I cleaned everything off of the car. It took lots of elbow grease, time, and solvent to clean them up really well. My wife even helped out and was scrubbing the heck out of the channels. As pcy mentioned, I think cure time is really important. I also think the cleaner the better.
Good luck!
Good luck!
Member
Joined: Dec 2010
Posts: 101
Likes: 6
Hers - 2003 C320. His - 2004 330i zhp 6 speed.
In addition to using good quality sealant, you should apply thin and contiguous bead of sealant in the 'channel' of the covers around the perimeter and not to move the cover while putting the screws back on. Lastly, letting the sealant cure is also important. Failing to observe these suggestions may lead to leaks...
Another question actually... Do i apply the sealant to BOTH the channel in the cover that you take off AND the main cover into which it screws in? Or just apply to ONE? I am thinking just to the cover that you take off...
How much sealant should be applied as in "just a bit higher than the edge of the channel" or something else?
Last edited by vert; Apr 8, 2011 at 11:36 PM.
Member
Joined: Dec 2010
Posts: 101
Likes: 6
Hers - 2003 C320. His - 2004 330i zhp 6 speed.
I bought Permatex Black and will follow the steps in this DIY and your suggestion as well. Plan on doing plugs at the same time, as well as cleaning that whole area which is a total mess at the moment. Thanks!
Another question actually... Do i apply the sealant to BOTH the channel in the cover that you take off AND the main cover into which it screws in? Or just apply to ONE? I am thinking just to the cover that you take off...
How much sealant should be applied as in "just a bit higher than the edge of the channel" or something else?


