LCD Replacement - European Maker / Supplier

 07-31-2010, 09:48 PM
#27
Super Member
Thread Starter
Join Date: Jul 2010
Location: Cali
Posts: 605
Likes: 0
Received 0 Likes
on
0 Posts
2006 C230 Sedan
IT'S DONE!!!  All I have to say, it works!! In the process of posting up the details and pictures.
Wow.. didnt' realize I took 82 pictures
All I have to say, it works!! In the process of posting up the details and pictures.Wow.. didnt' realize I took 82 pictures
07-31-2010, 10:15 PM
#28
MBWorld Fanatic!
 07-31-2010, 11:10 PM
#29
Super Member
Thread Starter
Join Date: Jul 2010
Location: Cali
Posts: 605
Likes: 0
Received 0 Likes
on
0 Posts
2006 C230 Sedan
First and foremost, the DISCLAIMERS. I will not be liable for this instructional fix for you car. If you choose to use my information and attempt to install in what so ever ways, you take this with your OWN RISK. I am not liable for messing up your cluster or car of any kind. If you are not comfortable with anything, you should see a professional to fix this instead of using the following information posted here. Bottom line, you take it as amusment only and trying it out on your own is within your own decision. Anything breaks a cause of your decision to proceed is of your own descretion. WARNING!!!
Okay here it goes. Did the install, went nicely. Was tripping along the way since I am treading water on this fix since I never done this before. Well, I had taken clusters out on my Acura, but nothing with a Mercedes, don't want to find out that it ends up with an expensive fix instead.
First of all, want to thank fellow member VALEXV thread where he posted pictures and instructions of what to do step by step. Also to the other Members who gave pointers and their willingness to help to make this possible. I will post my install details. It should highlights his steps but I notice some other details that was not there that I notice might be important to know if a newbie were to do this the first time. Like myself.
Okay.. here goes
First off. Tools of the trade. This is what I need. Flat head screw driver (to assist with the 5 tabs that need to be dislodged in order to remove the cover), thick paper towel (cover the screw driver from scratching up the plastic cluster), homemade make shift hook to pull the cluster out. You can make your own hook by a clothes hanger. Just make sure you cut out the right size for the hook (very important) or else you would be like me trying to pull a stuck cluster or it seems like it. Or better yet, it's not gripping to anything.
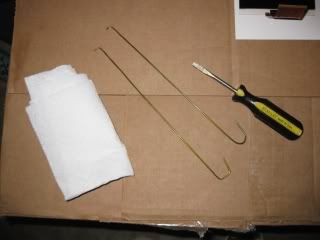
Notice the size of the hook is the same size of the hole. Make sure it's that size. I did a trail and error and found out the answer was right at my nose all along.

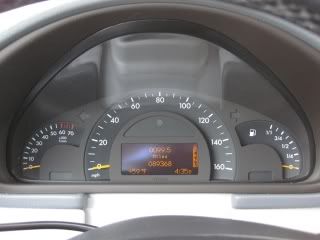
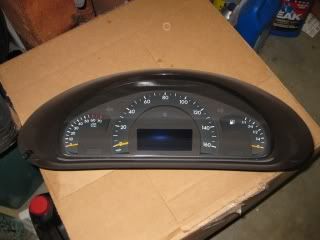
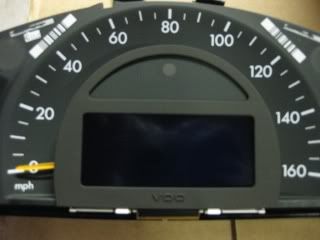
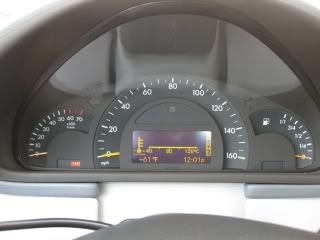
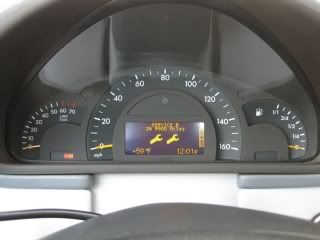
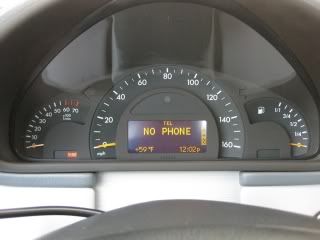
Before it goes under the knife. You can actually read the cluster right now, since it's cold outside and I have not start up the car. Notice it says 59 degrees. It doesn't acts up till 61+. So there is a slight blackout on the edges. But it isn't that bad now.
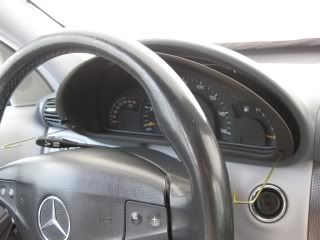
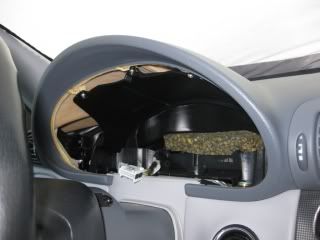
Before you operate, make sure you have the steering well at it's lowest and pull it to the max. This will ensure you have all the space you can to work with the cluster and removal of the cluster.
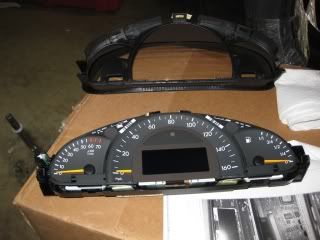
Poped out the cluster with a successful pull
Remove bracket behind cluster. It is in lock mode. You will see a gray bar in the center. Right next to gray bar on top, there is a tab you have to push in and while the tab being push in, you have to slide the gray tab all the way to the larger side of the white bracket. You will see that the bracket will loosen up and eventually comes right off. (If you do it correctly).
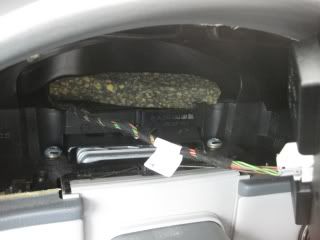
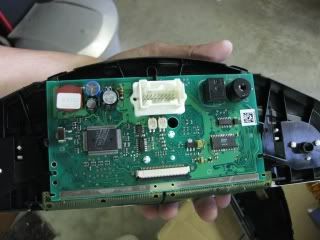
Empty cluster with information cord
At this point, you would want to bring your cluster in a work table to pull the lcd out. As for me, I had my car parked right on the street and working in frustration (the hook mishap), I had fogged up the windows and it was getting pretty hot. So before I had actually pulled the cluster out or figure out to. I had the windows open. I didn't think about how to close the windows when I had to walk in the garage to work on the cluster. So.. with haste, I just left the windows open and the car unlock. I didn't want to plug my keys in the car to turn it on to any setting knowing that it might trigger some components and wake the car up without it's cluster. So if you open the windows like I did, then you close it at your own risk, for me, i didn't want to take the risk.
Now... Back to the operation.
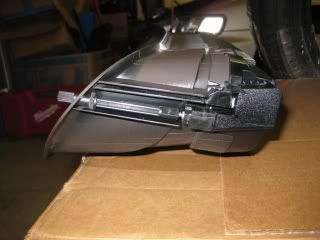
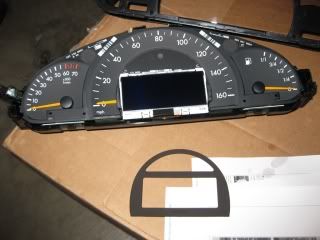
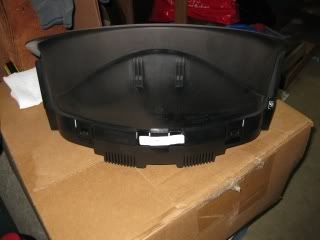
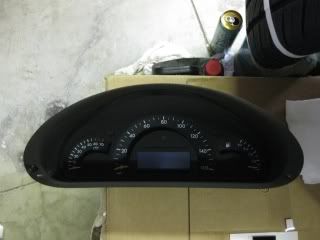
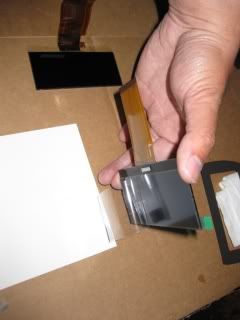
Cluster at a nice work area (Notice it's on top of a cardboard box. HAHAHA, yea that is my work area. DON'T ASK)
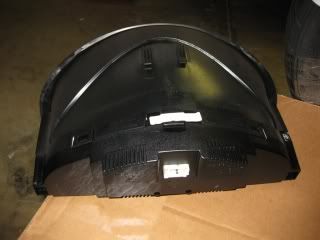
Some profiles. Notice there are 3 tabs on top and 2 on bottom.
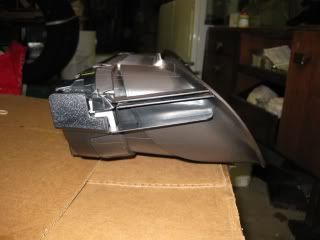
Use your fingers if you want or a screwdriver with thick paper towel (to prevent accident scratching).
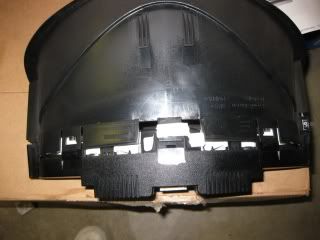
Remove top cover.
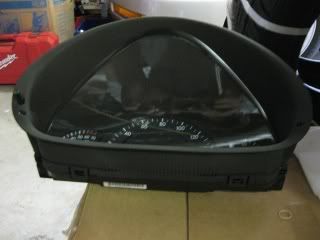
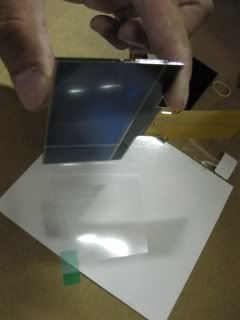
Remove plastic trim that is over lcd. It's held by 5 snaps on the arc. You might be worried. I am, so that is normal. Just take your time if you feel not too comfortable. I believe if you became a pro at this, you would just rip it right off and flex your biceps afterwards.
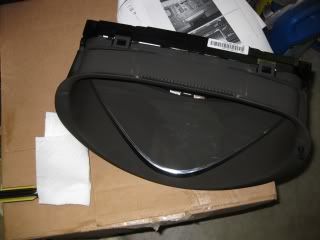
Take out the cluster. I don't know if you want to place it on any surface knowing that you don't want it sit on any of the needles. So I was a chicken and just held it to do the next few steps.
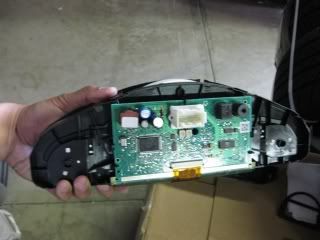
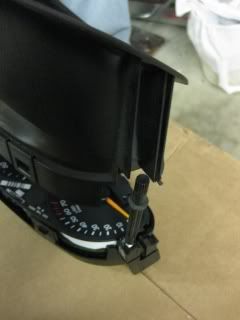
Look at the ribbon cable that it's attached to. There should be a black tab on each end. Push down (if you are looking from the top down) and the tab should snap down. Don't do it too hard. It is not suppose to be removed. Be gentle on this, since you are holding a sensitive piece of equipment. It should look like the below picture if down correctly.
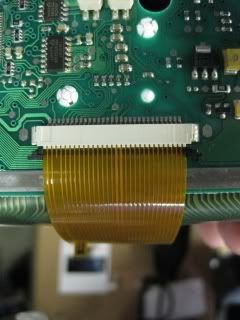
Then slide the ribbon out.
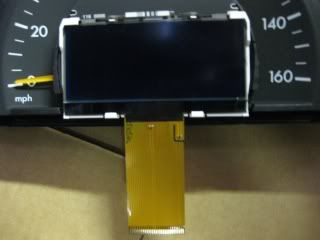
Turn around the cluster and look at the lcd screen side.
Okay here it goes. Did the install, went nicely. Was tripping along the way since I am treading water on this fix since I never done this before. Well, I had taken clusters out on my Acura, but nothing with a Mercedes, don't want to find out that it ends up with an expensive fix instead.
First of all, want to thank fellow member VALEXV thread where he posted pictures and instructions of what to do step by step. Also to the other Members who gave pointers and their willingness to help to make this possible. I will post my install details. It should highlights his steps but I notice some other details that was not there that I notice might be important to know if a newbie were to do this the first time. Like myself.
Okay.. here goes
First off. Tools of the trade. This is what I need. Flat head screw driver (to assist with the 5 tabs that need to be dislodged in order to remove the cover), thick paper towel (cover the screw driver from scratching up the plastic cluster), homemade make shift hook to pull the cluster out. You can make your own hook by a clothes hanger. Just make sure you cut out the right size for the hook (very important) or else you would be like me trying to pull a stuck cluster or it seems like it. Or better yet, it's not gripping to anything.
Notice the size of the hook is the same size of the hole. Make sure it's that size. I did a trail and error and found out the answer was right at my nose all along.
Before it goes under the knife. You can actually read the cluster right now, since it's cold outside and I have not start up the car. Notice it says 59 degrees. It doesn't acts up till 61+. So there is a slight blackout on the edges. But it isn't that bad now.
Before you operate, make sure you have the steering well at it's lowest and pull it to the max. This will ensure you have all the space you can to work with the cluster and removal of the cluster.
Poped out the cluster with a successful pull
Remove bracket behind cluster. It is in lock mode. You will see a gray bar in the center. Right next to gray bar on top, there is a tab you have to push in and while the tab being push in, you have to slide the gray tab all the way to the larger side of the white bracket. You will see that the bracket will loosen up and eventually comes right off. (If you do it correctly).
Empty cluster with information cord
At this point, you would want to bring your cluster in a work table to pull the lcd out. As for me, I had my car parked right on the street and working in frustration (the hook mishap), I had fogged up the windows and it was getting pretty hot. So before I had actually pulled the cluster out or figure out to. I had the windows open. I didn't think about how to close the windows when I had to walk in the garage to work on the cluster. So.. with haste, I just left the windows open and the car unlock. I didn't want to plug my keys in the car to turn it on to any setting knowing that it might trigger some components and wake the car up without it's cluster. So if you open the windows like I did, then you close it at your own risk, for me, i didn't want to take the risk.
Now... Back to the operation.
Cluster at a nice work area (Notice it's on top of a cardboard box. HAHAHA, yea that is my work area. DON'T ASK)
Some profiles. Notice there are 3 tabs on top and 2 on bottom.
Use your fingers if you want or a screwdriver with thick paper towel (to prevent accident scratching).
Remove top cover.
Remove plastic trim that is over lcd. It's held by 5 snaps on the arc. You might be worried. I am, so that is normal. Just take your time if you feel not too comfortable. I believe if you became a pro at this, you would just rip it right off and flex your biceps afterwards.
Take out the cluster. I don't know if you want to place it on any surface knowing that you don't want it sit on any of the needles. So I was a chicken and just held it to do the next few steps.
Look at the ribbon cable that it's attached to. There should be a black tab on each end. Push down (if you are looking from the top down) and the tab should snap down. Don't do it too hard. It is not suppose to be removed. Be gentle on this, since you are holding a sensitive piece of equipment. It should look like the below picture if down correctly.
Then slide the ribbon out.
Turn around the cluster and look at the lcd screen side.
Last edited by 04mbc230; 08-01-2010 at 12:04 AM.
07-31-2010, 11:12 PM
#30
Super Member
Thread Starter
Join Date: Jul 2010
Location: Cali
Posts: 605
Likes: 0
Received 0 Likes
on
0 Posts
2006 C230 Sedan
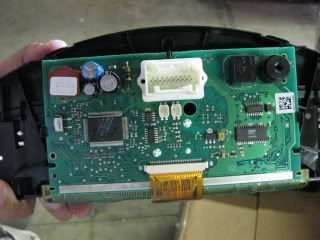
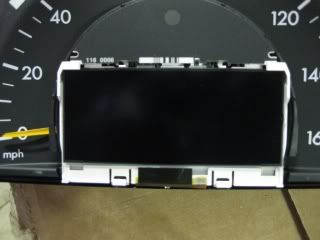
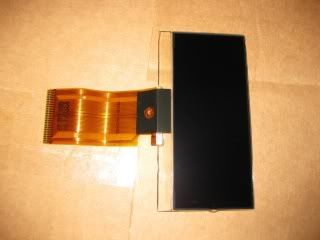
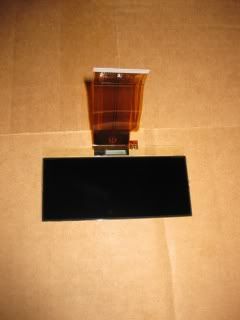
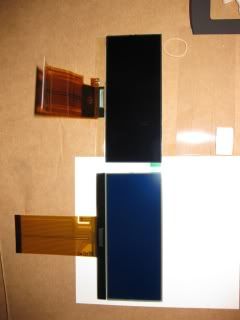
There is 2 tabs that is holding up the glass lcd screen. On either side of the bottom glass screen. Push it upwards and you will see that it slides right away from the tabs. Remove glass lcd screen.
Snap in the New LCD screen and start the reverse process.
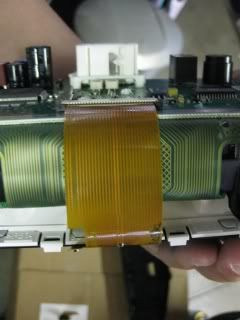
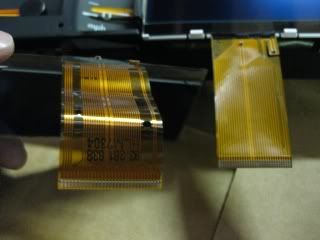
Since the new ribben will be straight. Assist to wrap it around the cluster to the back and fit in the ribbon to the white receiver.
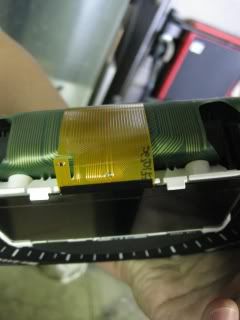
Notice the small tab on the new ribbon. Becareful not to crimp this while you install the back cover.
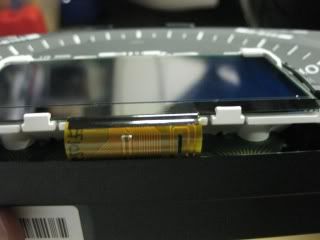
Install back cover. Make sure you push the small cable ribbon inside the cover. The OEM does not have this small ribbon and is only a notch. It seems that they remove it and had the resistor closer to the connector instead vs the resistor is on the end of this ribbon, hence why it need careful attention of not crimping it when installing the front cover.
Back in it's back cover
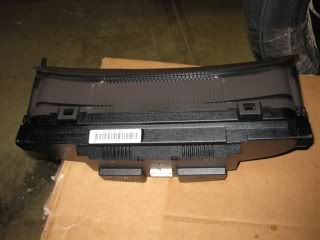
Be aware of the long pin that is part of the cluster. Make sure you have the cluster with it's back cover on and laying on the surface prior to installing back the front cover.
Finish profiles
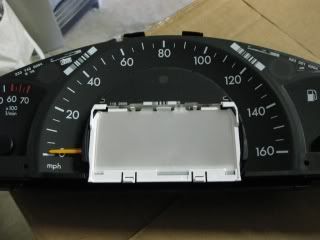
Connect the white wire bracket back on to the cluster and pop it back into it's home.
It's DONE!!
Snap in the New LCD screen and start the reverse process.
Since the new ribben will be straight. Assist to wrap it around the cluster to the back and fit in the ribbon to the white receiver.
Notice the small tab on the new ribbon. Becareful not to crimp this while you install the back cover.
Install back cover. Make sure you push the small cable ribbon inside the cover. The OEM does not have this small ribbon and is only a notch. It seems that they remove it and had the resistor closer to the connector instead vs the resistor is on the end of this ribbon, hence why it need careful attention of not crimping it when installing the front cover.
Back in it's back cover
Be aware of the long pin that is part of the cluster. Make sure you have the cluster with it's back cover on and laying on the surface prior to installing back the front cover.
Finish profiles
Connect the white wire bracket back on to the cluster and pop it back into it's home.
It's DONE!!
Last edited by 04mbc230; 07-31-2010 at 11:23 PM.
07-31-2010, 11:13 PM
#31
Super Member
Thread Starter
Join Date: Jul 2010
Location: Cali
Posts: 605
Likes: 0
Received 0 Likes
on
0 Posts
2006 C230 Sedan
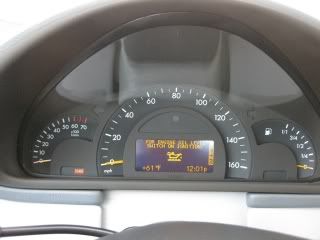
Finish and testing! It's much brighter and clearer. I can see every number and letter now.
Last edited by 04mbc230; 08-01-2010 at 12:10 AM.
 07-31-2010, 11:19 PM
#33
Super Member
Thread Starter
Join Date: Jul 2010
Location: Cali
Posts: 605
Likes: 0
Received 0 Likes
on
0 Posts
2006 C230 Sedan
Final thoughts.
Everything seems to be good. No issues. The warning screen came up red as regular. Didn't notice anything funny or heard anything blew up on start up. So I guess perhaps this is a fix once and for all. I am going to do a road test on it for 1 month and see how it holds up.
Since it's still summer here. There should be enough heat to test it's duration. Hope it will last and will keep you guys posted on this.
Last edited by 04mbc230; 08-01-2010 at 12:12 AM.
07-31-2010, 11:30 PM
#34
Super Member
Thread Starter
Join Date: Jul 2010
Location: Cali
Posts: 605
Likes: 0
Received 0 Likes
on
0 Posts
2006 C230 Sedan
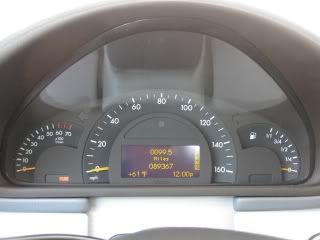
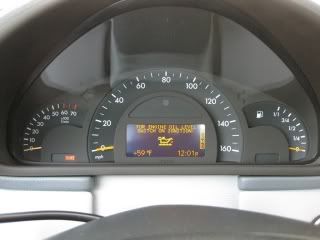
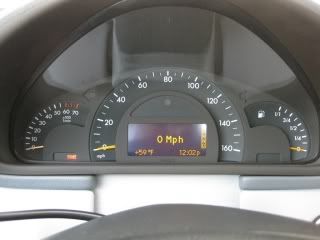
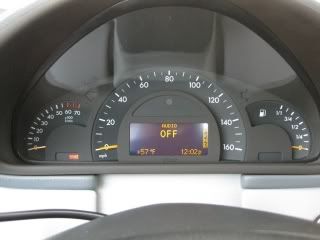
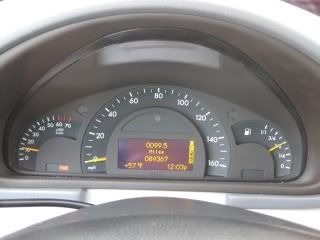
Notice something upon start up.
Before Operation
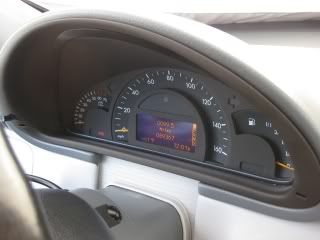
after operation
Notice anything different. Other than it's much brighter and the clock is reset.
The Mileage is off by 1 mile??? It went backwards by 1 mile than prior to Operation. Hmmz. I check all other settings, it is the same, other than the clock has to be reset. Also the trip counter is reset
Before Operation
after operation
Notice anything different. Other than it's much brighter and the clock is reset.
The Mileage is off by 1 mile???
It went backwards by 1 mile than prior to Operation. Hmmz. I check all other settings, it is the same, other than the clock has to be reset. Also the trip counter is reset
Last edited by 04mbc230; 08-01-2010 at 02:39 AM.
07-31-2010, 11:45 PM
#35
MBWorld Fanatic!
Yes, brighter overall. Clock always resets when cluster is disconnected. Was the darker/more contrast when it was cool?
Last edited by mleskovar; 07-31-2010 at 11:51 PM.
 08-01-2010, 02:20 AM
#37
Super Member
Thread Starter
Join Date: Jul 2010
Location: Cali
Posts: 605
Likes: 0
Received 0 Likes
on
0 Posts
2006 C230 Sedan
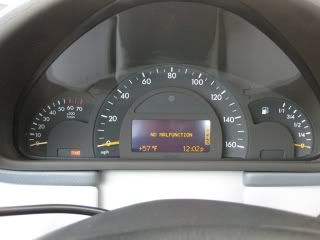
Notice the temp 59 degree oem and 61 degree new. So it did get warmer and hence more ambient light in the cabin.
I would say both lcd were in cool areas.
I'll check it out in the heat tomorrow afternoon and see how it goes.
08-01-2010, 02:36 AM
#38
Super Member
Thread Starter
Join Date: Jul 2010
Location: Cali
Posts: 605
Likes: 0
Received 0 Likes
on
0 Posts
2006 C230 Sedan
Can someone post some pictures of the China Supplier lcd issues. How does it look like? What errors?
Heard there is a voltage issue, does this makes it ring or buzz?
Heard there is a voltage issue, does this makes it ring or buzz?
08-01-2010, 02:49 PM
#39
Newbie

Join Date: Oct 2009
Posts: 2
Likes: 0
Received 0 Likes
on
0 Posts
looking for a c230
Hey since I think all of us here have this issue- would it be possible to get a large group order to save some money? How much was this LCD and where did you end up getting it?
08-01-2010, 05:44 PM
#40
Super Member
Thread Starter
Join Date: Jul 2010
Location: Cali
Posts: 605
Likes: 0
Received 0 Likes
on
0 Posts
2006 C230 Sedan

Now yeah. I got it for $144 bucks, but they charged by EURO, which is 110 shipped. It took 3 days after payment to arrive at my door. I think that is pretty fast since they are on the other side of the world (Europe) from where I live. I live in Califorina. So that depends how much the exchage rate for that day. They did state that if we purchase enough, shipping could be free and discounts can be given as well. Discounts are base on how big the order is.
There is a 1 year warranty on the product.
So, yeah, to summarize, max would be $144 USD if purchasd individually.
I don't know if we should do this now or wait till my road test on this product. I don't want this end up like the other few attempts from an earlier fix with sources from the China supplier.
So, perhaps you guys/gals tell me when is an appropriate time for testing. I will continue to post pictures/snap shots updates of this every other day.
Last edited by 04mbc230; 08-01-2010 at 08:39 PM.
08-01-2010, 05:47 PM
#41
Super Member
Thread Starter
Join Date: Jul 2010
Location: Cali
Posts: 605
Likes: 0
Received 0 Likes
on
0 Posts
2006 C230 Sedan
Okay.. Here's an update. Day 2 after installation.
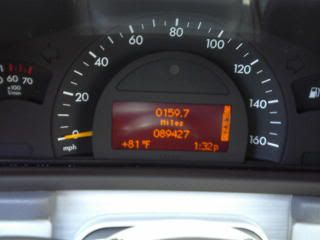
Sorry about the picture, it's a little blurry because I was driving and also didn't have a camera other than my LG phone.
It's at 81 degrees today with clear skys and slight breeze. Taken at 1:32pm in the afternoon. 60 miles of useage. Right after picking up some car wash materials and bug/tar product. There is some nasty tar that won't wash off. This was here when I bought the car. 1 month ago. Didn't notice it at the time on the test drive. Probably I do, but thought it was just dirt.
Usually at this temp, I can't read anything other than the mileage. So it's holding up for now. I expect it to, since it's still new though.
Sorry about the picture, it's a little blurry because I was driving and also didn't have a camera other than my LG phone.
It's at 81 degrees today with clear skys and slight breeze. Taken at 1:32pm in the afternoon. 60 miles of useage. Right after picking up some car wash materials and bug/tar product. There is some nasty tar that won't wash off. This was here when I bought the car. 1 month ago.
Didn't notice it at the time on the test drive. Probably I do, but thought it was just dirt. Usually at this temp, I can't read anything other than the mileage. So it's holding up for now. I expect it to, since it's still new though.
Last edited by 04mbc230; 08-01-2010 at 08:07 PM.
08-01-2010, 08:32 PM
#42
Super Member
Thread Starter
Join Date: Jul 2010
Location: Cali
Posts: 605
Likes: 0
Received 0 Likes
on
0 Posts
2006 C230 Sedan
Anybody changed the leds that is behind the white clear screen. I heard they are surface mount leds. Perhaps someone can give me some info about these leds or a picture of how it looks like.
I can do a search and see if we change it out. Perhaps WHITE with RED. Instead the OEM ORANGE with RED.
Just wondering.
I can do a search and see if we change it out. Perhaps WHITE with RED. Instead the OEM ORANGE with RED.
Just wondering.
Last edited by 04mbc230; 08-01-2010 at 08:48 PM.
08-01-2010, 09:29 PM
#43
Super Member

Join Date: Mar 2007
Location: centennial, CO
Posts: 812
Likes: 0
Received 0 Likes
on
0 Posts
2003 c240
I am working on those now. Cant find whte and red smt's. also when the white is used. it doesnt shine through white. it turns the lcd blue. This might be due to the brightness of the led's or the lcd being bad. I'll post some pics. I did one row in white so far.
08-01-2010, 09:51 PM
#44
Super Member
Thread Starter
Join Date: Jul 2010
Location: Cali
Posts: 605
Likes: 0
Received 0 Likes
on
0 Posts
2006 C230 Sedan
Oh cool. Thanks. I am going to ask the supplier to see if they deal with these as well. Perhaps it could be an easy fix.
08-01-2010, 10:03 PM
#45
Super Member
Join Date: Mar 2007
Location: centennial, CO
Posts: 812
Likes: 0
Received 0 Likes
on
0 Posts
2003 c240
yea if you can get smd led in size 3528 bi-color with white and red that be awesome. Right now i'm doubling up the LED so that i can still maintain the dual color function.
08-01-2010, 10:53 PM
#46
Super Member
Join Date: Mar 2007
Location: centennial, CO
Posts: 812
Likes: 0
Received 0 Likes
on
0 Posts
2003 c240
I think I am about ready to give up on changing the colors on the cluster. Just too many problems keep arising. It's a good thing i have a spare cluster to do tests on. But heres a couple pics. I only did one column in white but You can see when putting a white led behind the lcd that it just makes the entire lcd screen light up blue. I also changed the led's in the gas gauge which turned out nice.
08-01-2010, 11:31 PM
#47
Super Member
Thread Starter
Join Date: Jul 2010
Location: Cali
Posts: 605
Likes: 0
Received 0 Likes
on
0 Posts
2006 C230 Sedan
I think I am about ready to give up on changing the colors on the cluster. Just too many problems keep arising. It's a good thing i have a spare cluster to do tests on. But heres a couple pics. I only did one column in white but You can see when putting a white led behind the lcd that it just makes the entire lcd screen light up blue. I also changed the led's in the gas gauge which turned out nice.
How do you put thos LEDs on? Do you have to solder?
08-02-2010, 12:58 AM
#48
Super Member
Join Date: Mar 2007
Location: centennial, CO
Posts: 812
Likes: 0
Received 0 Likes
on
0 Posts
2003 c240
well the led's for the speed, fuel, and tach are fairly easy swaps if you can solder. But, the problem is if you mess one of the printed lines up then none of the lights will work for that particular portion. I think i accidentally melted one of the lines on the speed numbers and now those lights wont turn on.
With the lcd portion i was able to use two different led's to still maintain the red warning but its still a pain.
Since i couldnt get the numbers to light up on the speed and now the lcd stopped working, i think i am giving up on this project. Too high of a risk for such a small reward. And it would also be pretty annoying that the stereo and HVAC controls wouldnt match the cluster if i made it white.
If i can get my hands on a better camera i'll show you how i doubled up the led's for the lcd portion.
08-02-2010, 01:19 AM
#49
Super Member
Thread Starter
Join Date: Jul 2010
Location: Cali
Posts: 605
Likes: 0
Received 0 Likes
on
0 Posts
2006 C230 Sedan
Sounds like a tough fix for a small reward as you stated. But the other LEDs look nice with white instead of orange.
Yes, if it soldering work, I will pass. Just too big of risk to take, especially on a cluster.
Yes, if it soldering work, I will pass. Just too big of risk to take, especially on a cluster.
08-02-2010, 08:12 AM
#50
Out Of Control!!
To answer your question, I think a month would be a reasonable timeframe to see if some problems arise before a big group buy.
I replaced mine in July with a much newer lcd from a used cluster, but I can see already that it's not perfect, so I would be interested in the group buy, assuming that yours ends up working out fine.
Thanks for looking into this, btw.
I replaced mine in July with a much newer lcd from a used cluster, but I can see already that it's not perfect, so I would be interested in the group buy, assuming that yours ends up working out fine.
Thanks for looking into this, btw.


