

Carbon Fiber interior trim


Thread Starter
Junior Member
Joined: Dec 2010
Posts: 22
Likes: 0
From: Knoxville, TN
2005 C55
Carbon Fiber interior trim
Well my Carbon Fiber interior trim is in the car! I researched a bit before undertaking this project. There are quite a few instructional sites for reference. I wanted to write my own DIY to basically show the parts of this project that were not generic to the carbon fiber wrap process itself and were specific to my trim pieces, and then also add a few observations.
I am not sure whether it is permissible to reference the vendors where I purchased the materials for this project so I am leaving them out for now. If someone can tell me it is OK to post, then I will add the vendor for the interior parts and the carbon fiber and resin. All highly recommended.
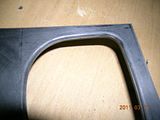
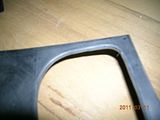
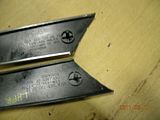
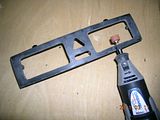
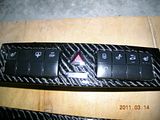
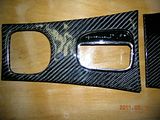
This phase of my project involved the center console, ashtray cover, bezel for climate control and upper button panel. I removed all sheet metal from the parts to leave only the ABS part itself.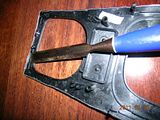 Afterward, this involved a little decision process about how to successfully wrap these parts. Around the perimeter of each part, the metal wraps around to the back of the part so that was simple�just wrap the carbon fiber around in the same manner. But on the interior cut outs (and on some edges), the metal trim only wraps partially and rests on a plastic lip. I knew I would not be able to successfully cut the carbon fiber short enough to rest on that lip without it fraying, pulling, and/or loosing the weave pattern. I chose to grind the lip away with a dremel and I have a few before and after pictures below. This turned out to work very well and I had very minimal adjustments to make in order to get the trim to fit over the corresponding parts.
I roughed the surface of all parts using 150 grit dry sandpaper.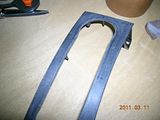 I used a mix of resin and solvent (without hardener) to base coat the face of the parts to be wrapped and allowed several hours for this base to become tacky. I carefully spread the carbon fiber fabric onto a flat surface instead of cutting the pieces out individually, then laid the piece on the carbon fiber at the correct angle. The resin is tacky enough to cause the carbon fiber to adhere so I cut it with a roller fabric cutter. I then used a foam paint roller to apply slight pressure to conform the carbon fiber to the face of the part. Laying the part back down on its face, I sprayed 3M adhesive strictly along the edges of the part and just slightly onto the back side and also along the interior openings of the part. I carefully wrapped the fabric around the perimeter and cut out the interior openings, with slices at the corners to allow the fabric to meet the contour. One thing I did differently than all the instructions I reviewed was to leave the wrap intact and not to trim at this point. I only trimmed the excess after applying the first coat of epoxy, being careful to stop the epoxy along the bottom edge of each part. After it dried, I came back with several different cutters to trim the wrap flush along the backside. I also used the dremel to trim the fabric flush along the backside as needed. Breathing protection is absolutely a must at this point, as this will cause lots of tiny particles to go airborne.
The epoxy coating process is fairly well documented. I don�t have much to add to that except to say the first two times I mixed more than I needed. Afterward, I began mixing in a cough syrup cup where I could mix about 3 ozs. at a time. I did NOT sand between epoxy coats and used three coats on each part. In retrospect, I should have used four coats of epoxy and will in the future. I had some pitting in my finish so I mixed more epoxy and dabbed epoxy into the low spots. Once the final coat was dry, I sanded using 150, 220, 320, and then wet sanded using 400 and 600. My wet sanding was done at a running faucet with frequent rinsing. I finished the pieces off with a spray enamel clear coat with 400 and 600 wet sanding between spray coats. I ended up with some slight pitting in this finish as well, so I sprayed clear coat into the lid and dabbed the clear coat into the pits using a wooden skewer. I think I ended up using about 8 coats of clear finish.
I test fit the trim to each respective component and used the dremel to make small grinding passes to get a better fit.
Removal of these pieces are easy. The Center console just lifts out in the front and then with the cup holder in the up position, you slide the piece forward to remove. You can disconnect the plugs from the shifter and then depress the tabs that hold the gearshift trim and gear indicator in place. Then turn the lock ring and pull upward on the shifter to remove if from the shift rod.
The ashtray has two tabs the hold it in place. Once out, you can locate the two slide tabs at the top of the ashtray lid and pry in a twisting manner with a small screwdrive to release the trim lid from the ashtray. VERY little force is required here so if it isn�t coming off easy, you are probably doing the wrong thing. I can post pictures of this if necessary.
The climate control cluster has two torx screws at the bottom. Once unscrewed, that piece simply slides out, as it has guides at the top.
I used a link on another site to figure out how to remove the upper vents so I could get to the button panel screws. Like the climate control, it has two torx screws at the top and guides at the bottom.
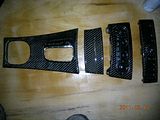
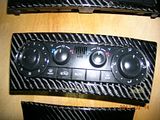
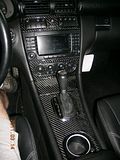
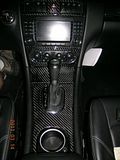
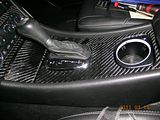
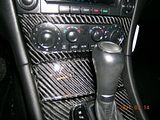
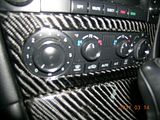
I consider it a success, however, my job was far from flawless. My second phase (all door trim) will go much easier. Below are finished pictures.
I am not sure whether it is permissible to reference the vendors where I purchased the materials for this project so I am leaving them out for now. If someone can tell me it is OK to post, then I will add the vendor for the interior parts and the carbon fiber and resin. All highly recommended.
This phase of my project involved the center console, ashtray cover, bezel for climate control and upper button panel. I removed all sheet metal from the parts to leave only the ABS part itself.
 Afterward, this involved a little decision process about how to successfully wrap these parts. Around the perimeter of each part, the metal wraps around to the back of the part so that was simple�just wrap the carbon fiber around in the same manner. But on the interior cut outs (and on some edges), the metal trim only wraps partially and rests on a plastic lip. I knew I would not be able to successfully cut the carbon fiber short enough to rest on that lip without it fraying, pulling, and/or loosing the weave pattern. I chose to grind the lip away with a dremel and I have a few before and after pictures below. This turned out to work very well and I had very minimal adjustments to make in order to get the trim to fit over the corresponding parts.


I roughed the surface of all parts using 150 grit dry sandpaper.
 I used a mix of resin and solvent (without hardener) to base coat the face of the parts to be wrapped and allowed several hours for this base to become tacky. I carefully spread the carbon fiber fabric onto a flat surface instead of cutting the pieces out individually, then laid the piece on the carbon fiber at the correct angle. The resin is tacky enough to cause the carbon fiber to adhere so I cut it with a roller fabric cutter. I then used a foam paint roller to apply slight pressure to conform the carbon fiber to the face of the part. Laying the part back down on its face, I sprayed 3M adhesive strictly along the edges of the part and just slightly onto the back side and also along the interior openings of the part. I carefully wrapped the fabric around the perimeter and cut out the interior openings, with slices at the corners to allow the fabric to meet the contour. One thing I did differently than all the instructions I reviewed was to leave the wrap intact and not to trim at this point. I only trimmed the excess after applying the first coat of epoxy, being careful to stop the epoxy along the bottom edge of each part. After it dried, I came back with several different cutters to trim the wrap flush along the backside. I also used the dremel to trim the fabric flush along the backside as needed. Breathing protection is absolutely a must at this point, as this will cause lots of tiny particles to go airborne.
The epoxy coating process is fairly well documented. I don�t have much to add to that except to say the first two times I mixed more than I needed. Afterward, I began mixing in a cough syrup cup where I could mix about 3 ozs. at a time. I did NOT sand between epoxy coats and used three coats on each part. In retrospect, I should have used four coats of epoxy and will in the future. I had some pitting in my finish so I mixed more epoxy and dabbed epoxy into the low spots. Once the final coat was dry, I sanded using 150, 220, 320, and then wet sanded using 400 and 600. My wet sanding was done at a running faucet with frequent rinsing. I finished the pieces off with a spray enamel clear coat with 400 and 600 wet sanding between spray coats. I ended up with some slight pitting in this finish as well, so I sprayed clear coat into the lid and dabbed the clear coat into the pits using a wooden skewer. I think I ended up using about 8 coats of clear finish.
I test fit the trim to each respective component and used the dremel to make small grinding passes to get a better fit.
Removal of these pieces are easy. The Center console just lifts out in the front and then with the cup holder in the up position, you slide the piece forward to remove. You can disconnect the plugs from the shifter and then depress the tabs that hold the gearshift trim and gear indicator in place. Then turn the lock ring and pull upward on the shifter to remove if from the shift rod.
The ashtray has two tabs the hold it in place. Once out, you can locate the two slide tabs at the top of the ashtray lid and pry in a twisting manner with a small screwdrive to release the trim lid from the ashtray. VERY little force is required here so if it isn�t coming off easy, you are probably doing the wrong thing. I can post pictures of this if necessary.
The climate control cluster has two torx screws at the bottom. Once unscrewed, that piece simply slides out, as it has guides at the top.
I used a link on another site to figure out how to remove the upper vents so I could get to the button panel screws. Like the climate control, it has two torx screws at the top and guides at the bottom.
I consider it a success, however, my job was far from flawless. My second phase (all door trim) will go much easier. Below are finished pictures.


Trending Topics

Newbie
Joined: Jan 2012
Posts: 3
Likes: 0
From: Norway
2004 C180K
I like it, seems like you�ve made a real effort. Myself, having the family wagon, went with satin black, sprayed and sanded with 400 grade paper in between coats. I might get around to post some images.
mvh Aril
mvh Aril

Member
Joined: Apr 2010
Posts: 135
Likes: 0
From: Vegas
07 c230
Very nice, the only thing i have to say is that when i did my interior trim, the cigarette lighter cover thats right in front of the boot, i made the pattern go against the grain. it adds a nice visual effect to it. pics if you want, but regardless. great job


